Mopar vs Chevy practice build
Illinois, United States
Joined: August 30, 2005
KitMaker: 3,289 posts
Auto Modeler: 1,620 posts
Posted: Friday, June 04, 2010 - 12:09 PM UTC
I guess I spent waaaaay too much time thinking about the up coming build, so much so that I simply had to fire up a kit and try it...so here we go.
For your viewing pleasure we have one '55 chevy kit that is being reworked into an alterted wheelbase gasser...just because!
The frame has been cut at the rear and had 1 scale foot removed so the assmebly could be remounted forward...the rear wheelwells were also cut out and moved 1 scale foot forward{still sorta blending things there}. The front control arm suspension has been removed completely and replaced with 2"x3" square framework, spares high rise front springs have been added as well as a straight axle up front. I cut out all the inner fenderwells and am prepping a natural choice for the motor...a 409cu.in. motor with the 348/409 dual quad high rise manifold. I'll have to see what I can scrounge or scratch up for dump headers...no pesky fednerwells to get in the way now!
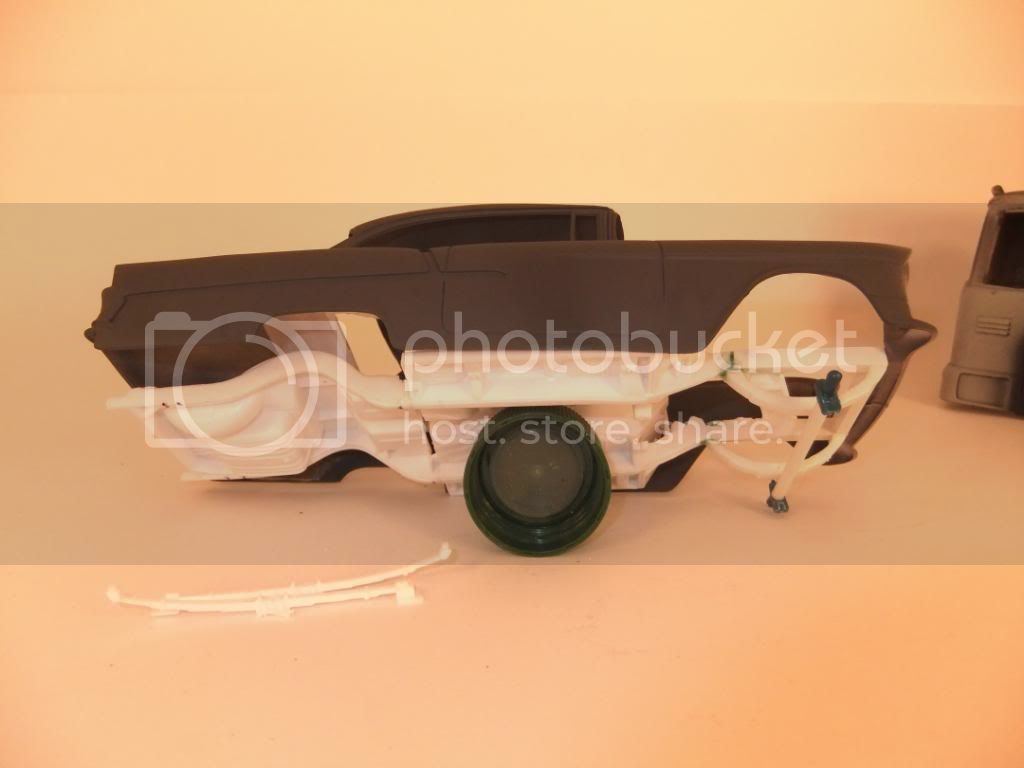
This will be an "econo-racer theme" build.
-comments, critiques and questions are always welcome....
-I say I have two kids- one son & one daughter...my wife says she has three- one son ,one daughter and one husband.
...and don't tell yourself you can't do it....it'll just take longer then
AussieReg
 Associate Editor
#007
Victoria, Australia
Joined: June 09, 2009
KitMaker: 8,156 posts
Auto Modeler: 2,953 posts
Posted: Friday, June 04, 2010 - 12:14 PM UTC
ON the bench
Revell 1/24 '53 Corvette (building as '54)
Revell 1/24 BMW 507 Coupe and Cabrio
Italeri 1/48 Me262 B-1a/U1 Nightfighter
Monogram 1/24 '57 Chevy Nomad
Dragon 1/350 USS Frank Knox DD-742
North Carolina, United States
Joined: November 28, 2005
KitMaker: 2,216 posts
Auto Modeler: 522 posts
Posted: Friday, June 04, 2010 - 02:18 PM UTC
Looking good Bob.......you traitor.

Hermon

"Those who would give up Essential Liberty
to purchase a little Temporary Safety,
deserve neither Liberty nor Safety."
Benjamin Franklin
#439
Washington, United States
Joined: November 05, 2005
KitMaker: 4,950 posts
Auto Modeler: 555 posts
Posted: Friday, June 04, 2010 - 02:31 PM UTC
Nothing to be ashamed of, I did the same thing over a P-40 build, that starts about a year from now.

Hanger Queens in Waiting:
Monogram 1/72 F8F-1
Corsair the Sky Pirate - 1/72 Ace A-7D
Century Series - Airfix 1/72 F-105G
Anti Shipping - Academy 1/72 PBJ-1D
Academy 1/72 F-84E
Illinois, United States
Joined: August 30, 2005
KitMaker: 3,289 posts
Auto Modeler: 1,620 posts
Posted: Friday, June 04, 2010 - 02:54 PM UTC
-I say I have two kids- one son & one daughter...my wife says she has three- one son ,one daughter and one husband.
...and don't tell yourself you can't do it....it'll just take longer then
Illinois, United States
Joined: August 30, 2005
KitMaker: 3,289 posts
Auto Modeler: 1,620 posts
Posted: Friday, June 04, 2010 - 03:02 PM UTC
Thank you folks for the kind words and emoticons...while I like the build so far, I can see that in the future I'd like the front wheels farther out front...so maybe an aquisition of a miss deal kit for the model T type front spring and axle might be needed to set it out farther next time.
This is why I'm getting the kinks out now...and the only real way to see it is to build it.
I just pilfered the rear axle from my crummy chromed red baron kit so she'll be sporting a quick change axle out back...I'm dechroming it now as we speak. I need to gut the innards of the rear chassis{spare tire well/gas tank/ anything else in there} since the car will be wearing a small moon gas tank up front...just enough for a run is all ya need{gas = 7 pounds a gallon?!}
-I say I have two kids- one son & one daughter...my wife says she has three- one son ,one daughter and one husband.
...and don't tell yourself you can't do it....it'll just take longer then
Washington, United States
Joined: September 20, 2007
KitMaker: 861 posts
Auto Modeler: 339 posts
Posted: Saturday, June 05, 2010 - 07:50 AM UTC
Nice one, Bob. A little warmup never hurt anyone.
And that gives me an idea...
-YL
Kobenhavn, Denmark
Joined: June 29, 2004
KitMaker: 6,760 posts
Auto Modeler: 2,182 posts
Posted: Sunday, June 13, 2010 - 11:06 PM UTC
Pretty cool subject, even though it's not a Mopar

On the workbench:
MPC: 1972 Pontiac GTO
Revell: 1965 Mustang
Verlinden 120mm guard of the marine.
Revell: 2010 Camaro
Monogram: 1931 Rolls Royce
Italeri: LVT2 Amtrac
Illinois, United States
Joined: August 30, 2005
KitMaker: 3,289 posts
Auto Modeler: 1,620 posts
Posted: Monday, June 14, 2010 - 02:55 AM UTC
Jesper...just wait for the "Mopar" version!
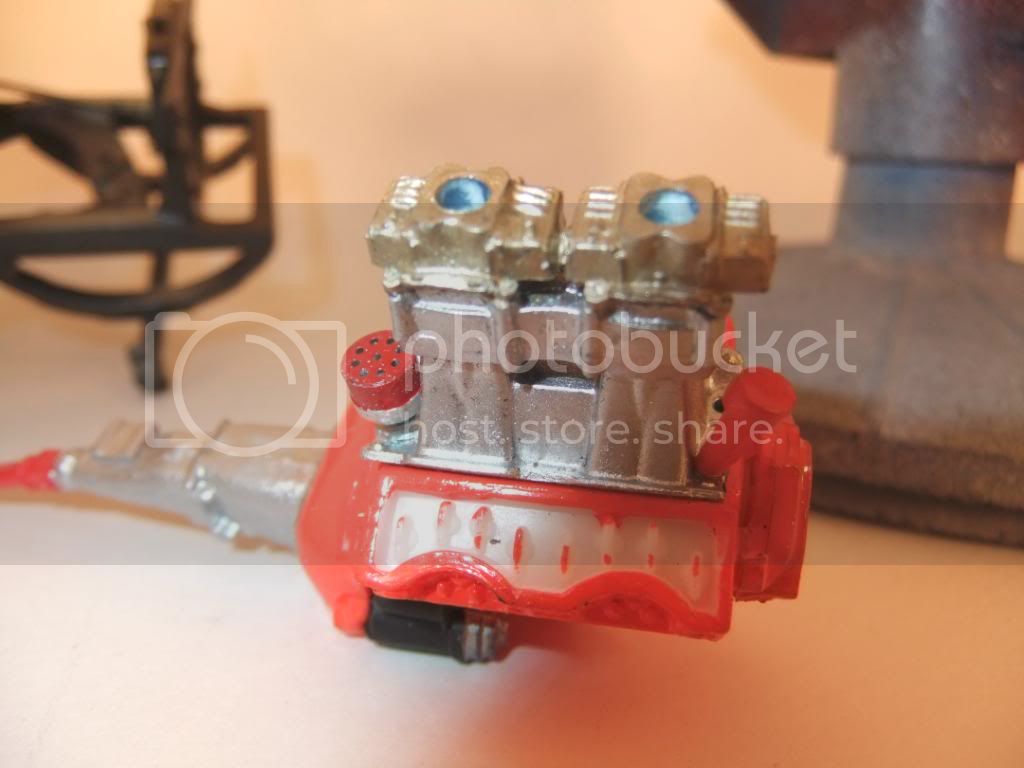
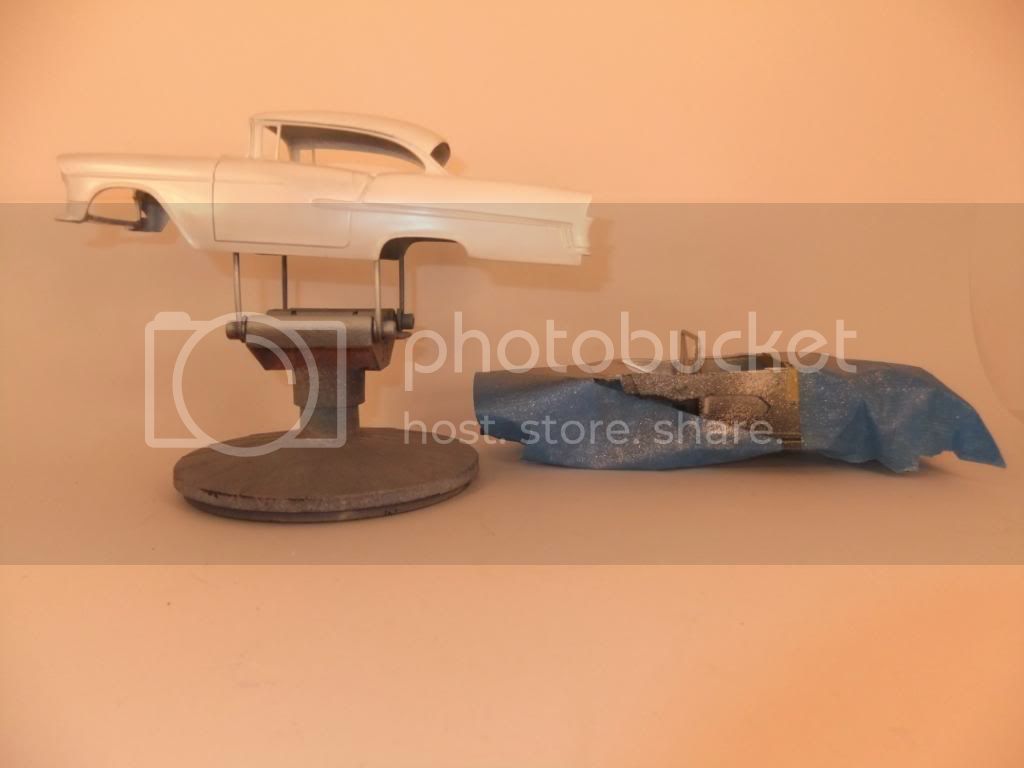
Anyway, here's where I'm at this moment-
The motor is closer to being done...have to wire the distributor and make headers since niether of the ones I have for this are good.
I've got the body in a base white coat for now and the frame is nearly done as well.}got other things on my plate happening as well which is slowing me down alittle}
More to come...main color coats start going on today!
-I say I have two kids- one son & one daughter...my wife says she has three- one son ,one daughter and one husband.
...and don't tell yourself you can't do it....it'll just take longer then
#439
Washington, United States
Joined: November 05, 2005
KitMaker: 4,950 posts
Auto Modeler: 555 posts
Posted: Monday, June 14, 2010 - 03:47 AM UTC
Bob, be carefull, they say spraying that much paint does two things to ya.
The first one is that you start to forget stuff and
the second one is..........
.........ah scrap, it can't remember what it was.


Hanger Queens in Waiting:
Monogram 1/72 F8F-1
Corsair the Sky Pirate - 1/72 Ace A-7D
Century Series - Airfix 1/72 F-105G
Anti Shipping - Academy 1/72 PBJ-1D
Academy 1/72 F-84E
Illinois, United States
Joined: August 30, 2005
KitMaker: 3,289 posts
Auto Modeler: 1,620 posts
Posted: Monday, June 14, 2010 - 05:48 AM UTC
That's what I heard...but I forget who I heard it from!

-I say I have two kids- one son & one daughter...my wife says she has three- one son ,one daughter and one husband.
...and don't tell yourself you can't do it....it'll just take longer then
Illinois, United States
Joined: August 30, 2005
KitMaker: 3,289 posts
Auto Modeler: 1,620 posts
Posted: Thursday, June 17, 2010 - 01:23 PM UTC
Ok...more progress!
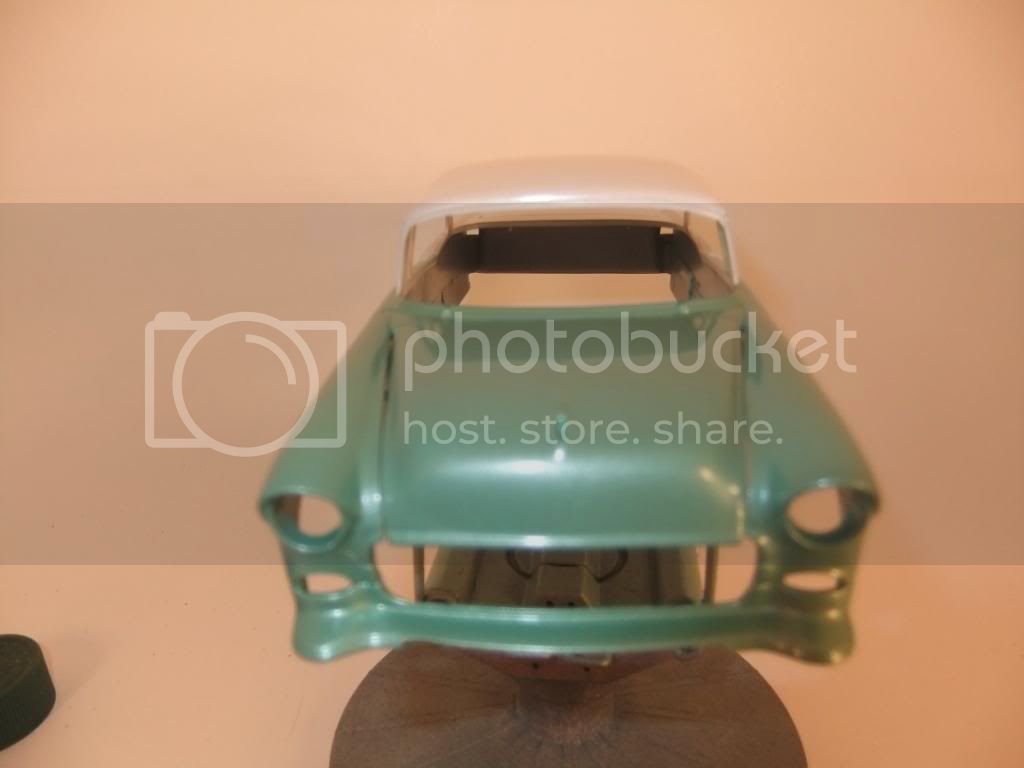
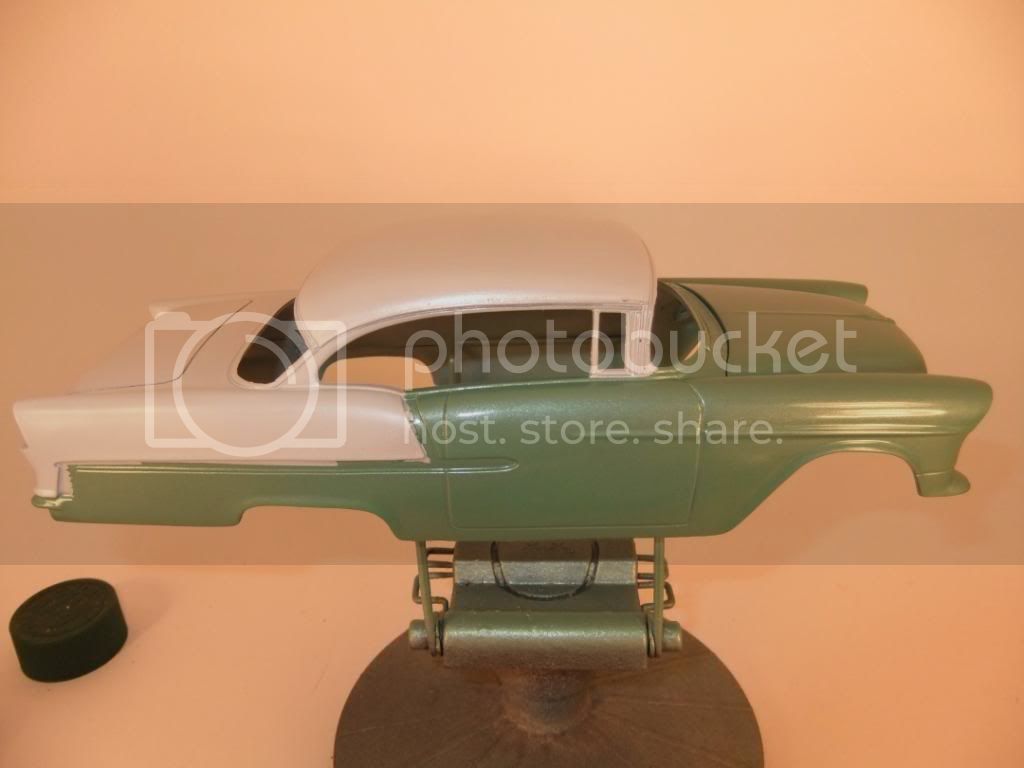
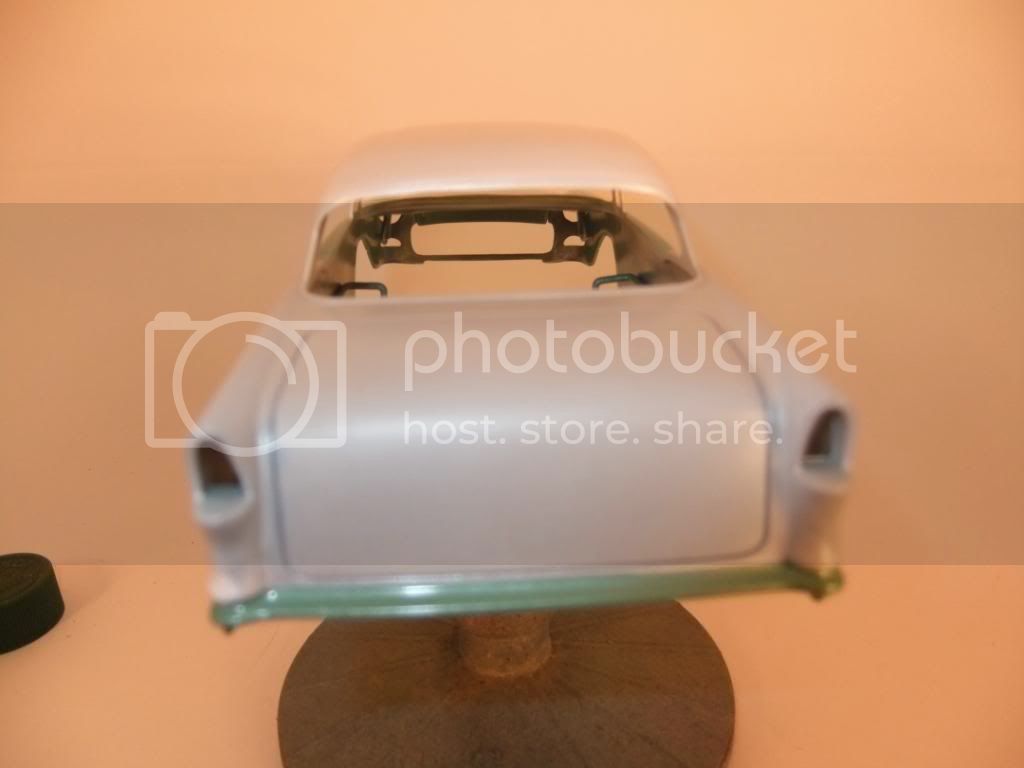
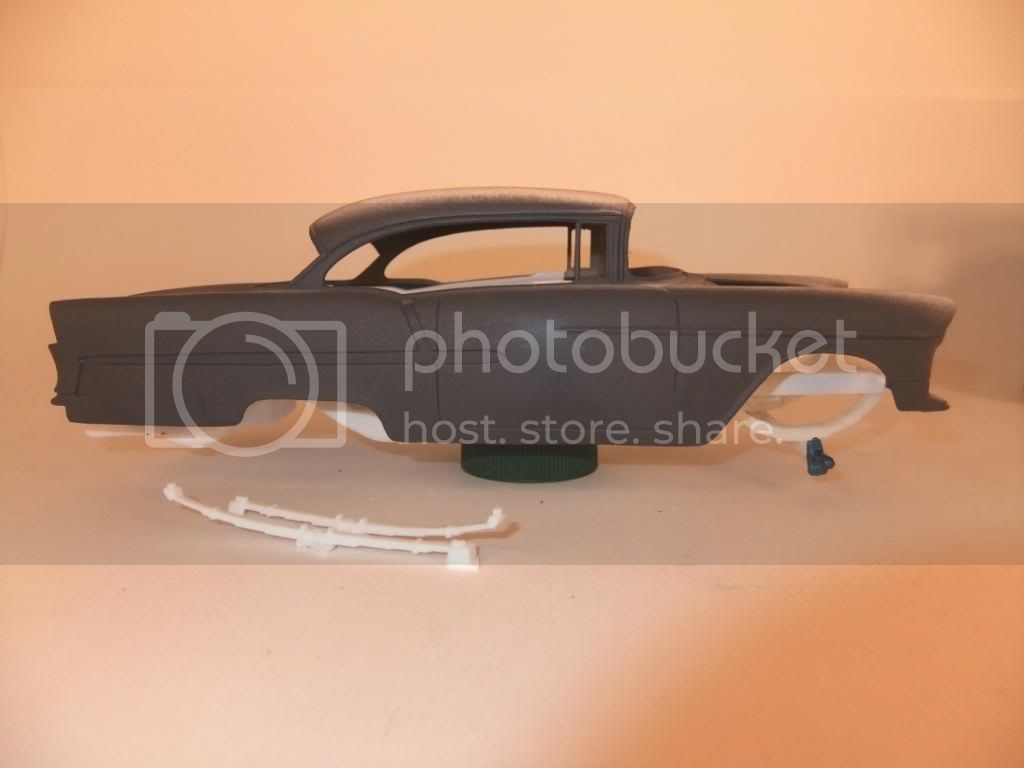
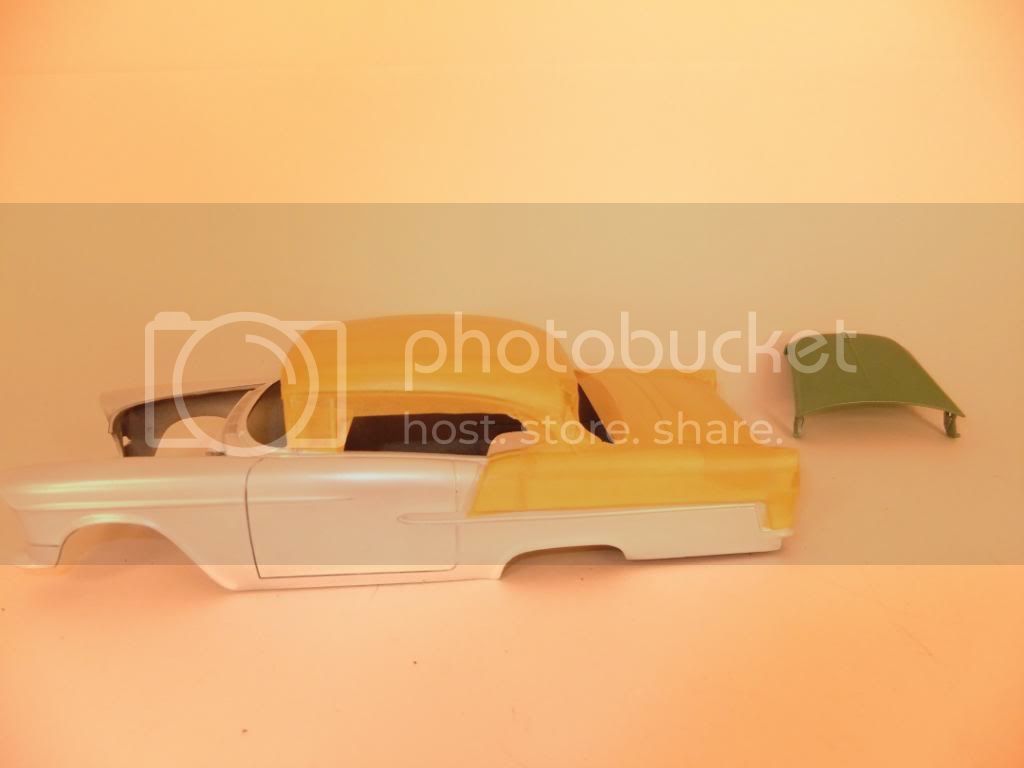
Here I've painted the whole body in tamiya's "pearl white" seeing as the back half is going to be that color and there wasn't that much of the front to do...
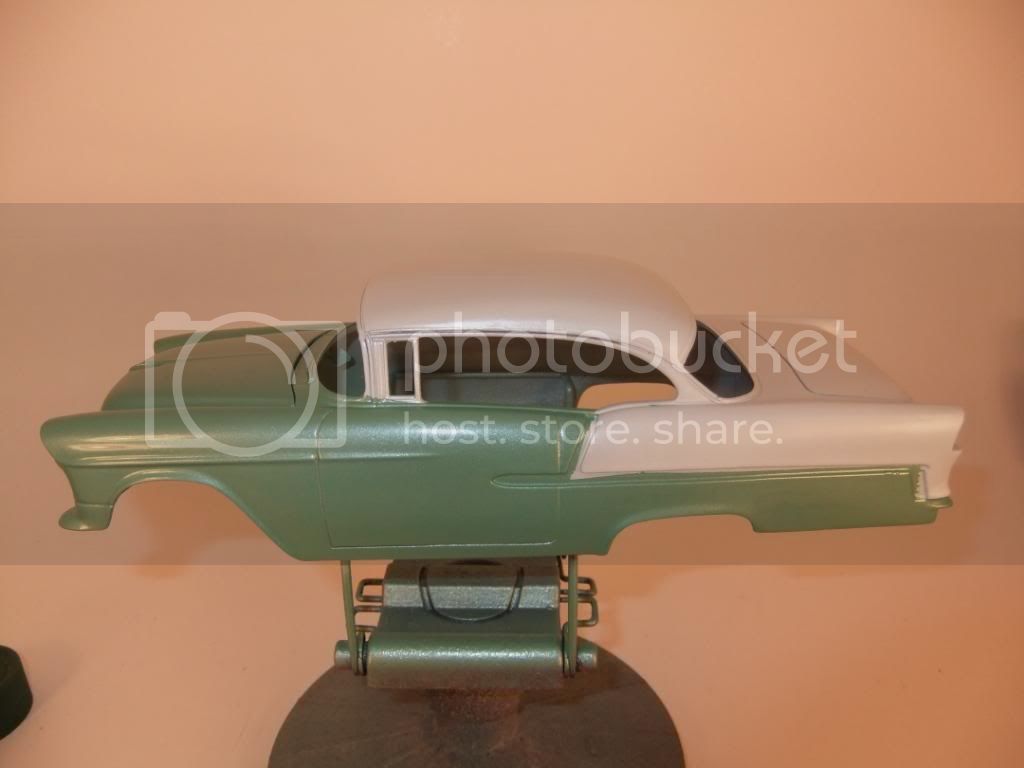
You'll get the benefit of time lapsed photography here to catch you up...here the body is masked off for the front paint color which is tamiya's "pearl green"-{'50's colors theme going on here!}
The interior is nearly done and I picked red for the seat to really offset it as a quicky drop in...thoughts on the seat color choice?
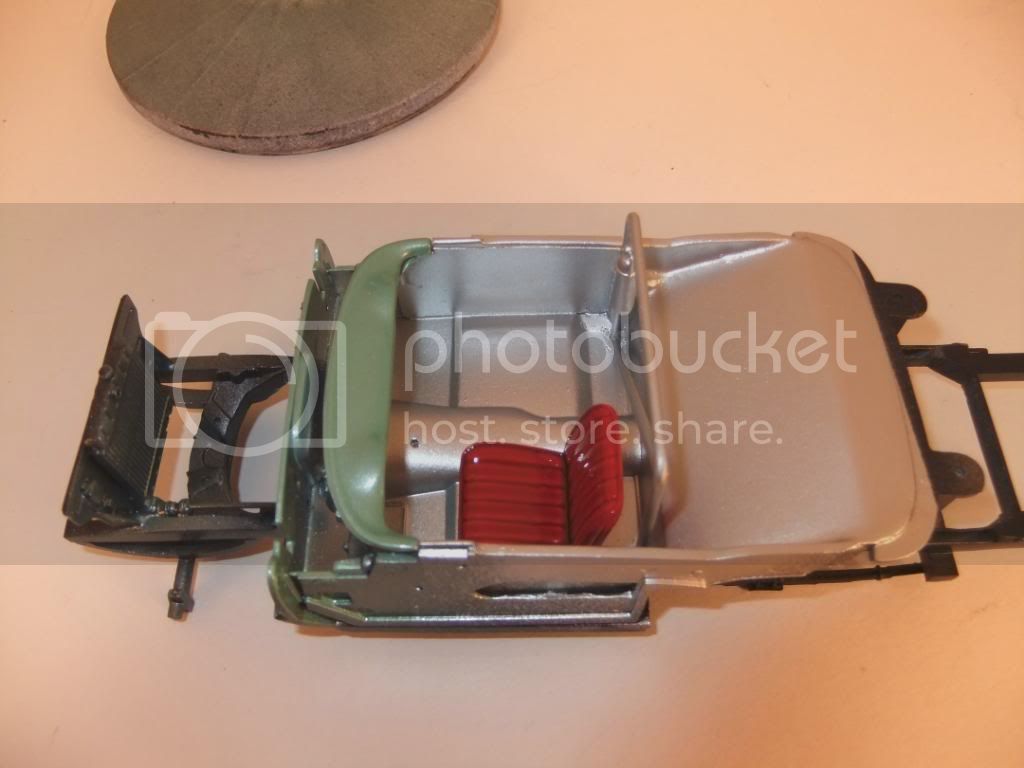
As you can see by the interior I chopped the rear seat out to accomodate the newly rest rear suspension{had to-hehehe} and sanded down the inner door panels and filled with flat sheet stock to give the interior that "paneled racer look". The dash will be stock as well as the steering wheel. The hole on the hump is for the shifter.
-I say I have two kids- one son & one daughter...my wife says she has three- one son ,one daughter and one husband.
...and don't tell yourself you can't do it....it'll just take longer then
Illinois, United States
Joined: August 30, 2005
KitMaker: 3,289 posts
Auto Modeler: 1,620 posts
Posted: Thursday, June 17, 2010 - 01:30 PM UTC
-I say I have two kids- one son & one daughter...my wife says she has three- one son ,one daughter and one husband.
...and don't tell yourself you can't do it....it'll just take longer then
Washington, United States
Joined: September 20, 2007
KitMaker: 861 posts
Auto Modeler: 339 posts
Posted: Thursday, June 17, 2010 - 02:06 PM UTC
The green and white looks great, Bob. Are those colors Tamiya's acrylics from the bottle, or are you using their rattle cans?
I think the red seat is perfect. Nice touch.
-YL
Kobenhavn, Denmark
Joined: June 29, 2004
KitMaker: 6,760 posts
Auto Modeler: 2,182 posts
Posted: Thursday, June 17, 2010 - 10:56 PM UTC
Love your choice of colors. Looks great.
On the workbench:
MPC: 1972 Pontiac GTO
Revell: 1965 Mustang
Verlinden 120mm guard of the marine.
Revell: 2010 Camaro
Monogram: 1931 Rolls Royce
Italeri: LVT2 Amtrac
Illinois, United States
Joined: August 30, 2005
KitMaker: 3,289 posts
Auto Modeler: 1,620 posts
Posted: Thursday, June 17, 2010 - 11:20 PM UTC
Thanks guys....
Yoni, they are both tamiya rattle can colors.
-I say I have two kids- one son & one daughter...my wife says she has three- one son ,one daughter and one husband.
...and don't tell yourself you can't do it....it'll just take longer then
Washington, United States
Joined: September 20, 2007
KitMaker: 861 posts
Auto Modeler: 339 posts
Posted: Friday, June 18, 2010 - 04:51 AM UTC
Quoted Text
Thanks guys....
Yoni, they are both tamiya rattle can colors.
I have a question for you, then. Do you have any problems with masking over this paint?
Every time I mask over Tamiya sprays, there is an issue with the color I mask over. When I remove the tape, there is a "ghost pattern" left on the paint. It isn't adhesive residue, and you can't wipe it off. It does go away, however, with either a gentle rubbing out with polishing compound or a coat of clear.
This has happened to me with blue 3-M painter's tape (both the regular and delicate surfaces versions), regular 3-M masking tape, good old Scotch tape, and Testors' ModelMaster tape. I haven't used Tamiya tape because my LHS doesn't carry it (and 3-M blue has been my standard for years).
I haven't experienced this with regular hobby enamels or automotive lacquers. It has only happened when masking over Tamiya rattlecan paint (that has dried for at least 72 hours - sometimes longer).
-YL
Illinois, United States
Joined: August 30, 2005
KitMaker: 3,289 posts
Auto Modeler: 1,620 posts
Posted: Friday, June 18, 2010 - 10:50 AM UTC
Quoted Text
Quoted Text
Thanks guys....
Yoni, they are both tamiya rattle can colors.
I have a question for you, then. Do you have any problems with masking over this paint?
Every time I mask over Tamiya sprays, there is an issue with the color I mask over. When I remove the tape, there is a "ghost pattern" left on the paint. It isn't adhesive residue, and you can't wipe it off. It does go away, however, with either a gentle rubbing out with polishing compound or a coat of clear.
This has happened to me with blue 3-M painter's tape (both the regular and delicate surfaces versions), regular 3-M masking tape, good old Scotch tape, and Testors' ModelMaster tape. I haven't used Tamiya tape because my LHS doesn't carry it (and 3-M blue has been my standard for years).
I haven't experienced this with regular hobby enamels or automotive lacquers. It has only happened when masking over Tamiya rattlecan paint (that has dried for at least 72 hours - sometimes longer).
-YL
Funny you'd mention that "ghost pattern" thing since I got it too! Now, for the record...I used tamiya spray paint, tamiya masking tape{10mm - not that it would matter} and did it on dry paint{2 days drying time}and I pulled the tape off the usual way by pulling back over itself to keep it from pulling paint. I've used the 3M blue tape too but I have a twist to it - I take the tape and apply it to my pants or shorts 1st {pends on the time of year} to slightly detack it...never had a bleed thru problem but I do use it as main filler or blocker and use the tamiya slim tape for the edges. I have had slight issues with the parma tape{used it when they were out of the tamiya tape} but that was only once...I'd need another shot at it, to make sure I guess, before I could pass final judgement on the 1st occurance.
-I say I have two kids- one son & one daughter...my wife says she has three- one son ,one daughter and one husband.
...and don't tell yourself you can't do it....it'll just take longer then
Illinois, United States
Joined: August 30, 2005
KitMaker: 3,289 posts
Auto Modeler: 1,620 posts
Posted: Friday, June 18, 2010 - 10:55 AM UTC
Oh, I don't use the 3M blue anymore for actual edge masking since I've had bleed problems even with burning the edges. I don't redily recommend the 3M purple 1" tape since it has very low tack right off the roll!
-I say I have two kids- one son & one daughter...my wife says she has three- one son ,one daughter and one husband.
...and don't tell yourself you can't do it....it'll just take longer then
North Carolina, United States
Joined: November 28, 2005
KitMaker: 2,216 posts
Auto Modeler: 522 posts
Posted: Friday, June 18, 2010 - 12:58 PM UTC
"Those who would give up Essential Liberty
to purchase a little Temporary Safety,
deserve neither Liberty nor Safety."
Benjamin Franklin
Illinois, United States
Joined: August 30, 2005
KitMaker: 3,289 posts
Auto Modeler: 1,620 posts
Posted: Friday, June 18, 2010 - 02:25 PM UTC
....I'll leave that endevor to those better suited to the cause...but don't rule me out entirely!
..and thanks for the kind words on the paint...nice to know I'm doing it right.
-I say I have two kids- one son & one daughter...my wife says she has three- one son ,one daughter and one husband.
...and don't tell yourself you can't do it....it'll just take longer then
AussieReg
Associate Editor #007
Victoria, Australia
Joined: June 09, 2009
KitMaker: 8,156 posts
Auto Modeler: 2,953 posts
Posted: Friday, June 18, 2010 - 02:51 PM UTC
AAAAAAAAHAhahahahaha
Maybe so, but it would still run better on 7 than, well, you know !!
Lookin super-cool so far Bob, I love the color combo !!
Cheers, D
ON the bench
Revell 1/24 '53 Corvette (building as '54)
Revell 1/24 BMW 507 Coupe and Cabrio
Italeri 1/48 Me262 B-1a/U1 Nightfighter
Monogram 1/24 '57 Chevy Nomad
Dragon 1/350 USS Frank Knox DD-742
Joined: December 15, 2002
KitMaker: 4,503 posts
Auto Modeler: 217 posts
Posted: Saturday, June 19, 2010 - 03:10 AM UTC
Dave
"Don't be afraid to think outside the box"
"Animal wants Trucks!!"
Illinois, United States
Joined: August 30, 2005
KitMaker: 3,289 posts
Auto Modeler: 1,620 posts
Posted: Saturday, June 19, 2010 - 06:33 AM UTC
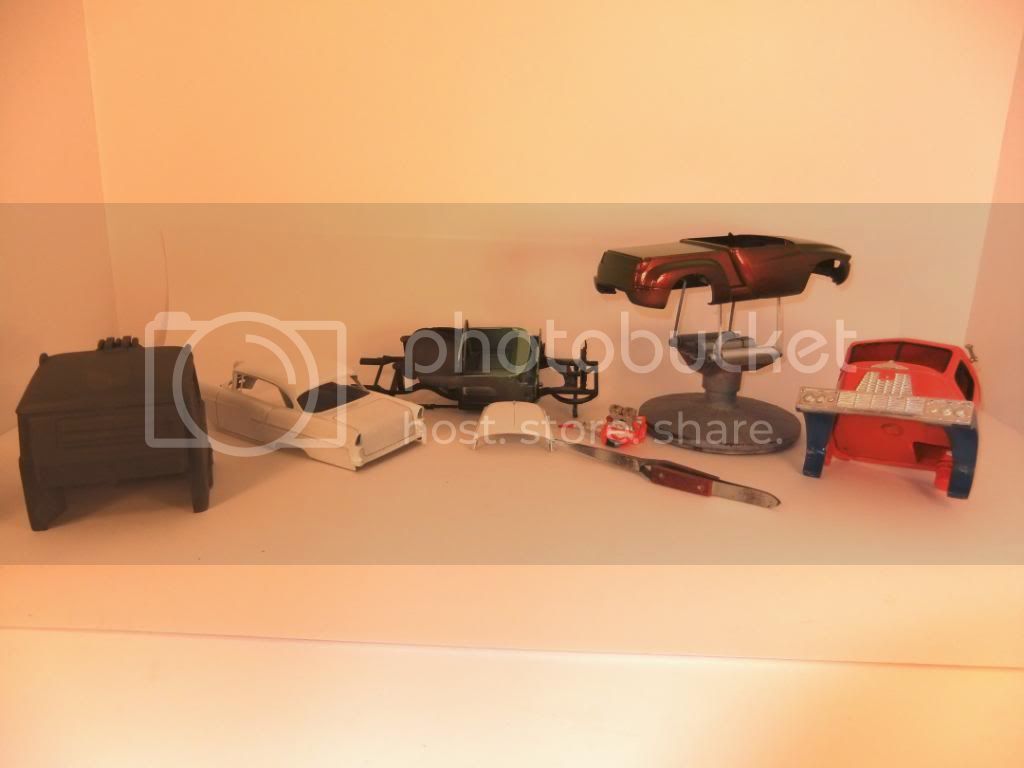
Thank you folks...here's the quicky mock up of the car's stance....I like it...
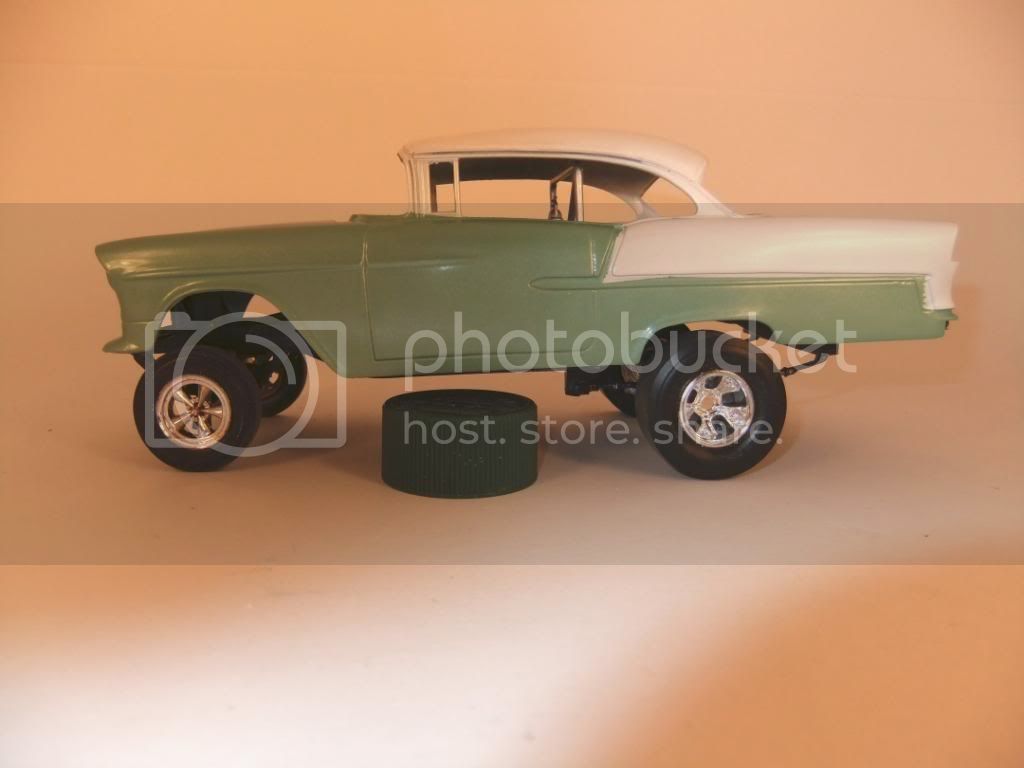
...the "other" mile high club!
-I say I have two kids- one son & one daughter...my wife says she has three- one son ,one daughter and one husband.
...and don't tell yourself you can't do it....it'll just take longer then
Washington, United States
Joined: September 20, 2007
KitMaker: 861 posts
Auto Modeler: 339 posts
Posted: Saturday, June 19, 2010 - 09:12 AM UTC
Quoted Text
Funny you'd mention that "ghost pattern" thing since I got it too!
It's good to know that I'm not seeing things. Well, at least not in my paint.
I love Tamiya sprays for their ease of use and quick dry times - especially when compared to loading up the airbrush with standard hobby enamels - but the ghost imprint masking thing
really bugs me. At least it goes away with a coat of clear.
BTW, the stance on your Chev is killer.
-YL