

My buddy told me to try my hand at revamping the new Challenger kit into some other old style/retro new coupe...so...after some really cool research I'm down to these 5 ideas{hermon...feel free to chime in!}
-2011 '70 cuda concept
-2011 '71 cuda concept
-2011 '71 charger concept
-2011 '71 superbird...rear wing or no rear wing?
-2011 '71 roadrunner
All these will be based off of the AMT 2009 Challenger kit as a base ... I may need to get more kits!
Your thoughts folks on the top 1-3 to be done?!


Go to automodeler.com for the current dynamic site!
Hosted by Jim Starkweather
Concept mopars that I want to build

old-dragon

Joined: August 30, 2005
KitMaker: 3,289 posts
Auto Modeler: 1,620 posts

Posted: Wednesday, December 29, 2010 - 09:51 AM UTC
old-dragon
Joined: August 30, 2005
KitMaker: 3,289 posts
Auto Modeler: 1,620 posts
Posted: Wednesday, December 29, 2010 - 09:52 AM UTC
Oh, and no saying "all of them"{hermon}....let's get 1-3 figured out 1st...after I get a few other irons{builds} out of the current fire! 

old-dragon
Joined: August 30, 2005
KitMaker: 3,289 posts
Auto Modeler: 1,620 posts
Posted: Wednesday, December 29, 2010 - 03:17 PM UTC
I can't post his work here due to copyright, but do a search of "Michael Leonhard" and you'll see what has inspired me...google "concept cuda" for any show shots of the 09 concept cuda.
...man that Roadrunner calls to me, there's even a guy who's taking a real Roadrunner and making his own concept car out of it!
...man that Roadrunner calls to me, there's even a guy who's taking a real Roadrunner and making his own concept car out of it!
old-dragon
Joined: August 30, 2005
KitMaker: 3,289 posts
Auto Modeler: 1,620 posts
Posted: Friday, December 31, 2010 - 02:27 PM UTC
Nobody yet? At least our WII system is now up and running.., it's weird posting from the TV!

HunterCottage

#116

Joined: December 19, 2001
KitMaker: 1,717 posts
Auto Modeler: 244 posts

Posted: Saturday, January 01, 2011 - 01:54 AM UTC
Quoted Text
Your thoughts folks on the top 1-3 to be done?!
1. '71 Superbird without wing
2. '71 Charger
3. '71 Cuda
Gotta love them 70's colors...
Looking forward to this...
old-dragon
Joined: August 30, 2005
KitMaker: 3,289 posts
Auto Modeler: 1,620 posts
Posted: Saturday, January 01, 2011 - 02:14 AM UTC
Thanks for the input Brian. Yes, that wing is alittle off with the way it juts out from the mounts- if you saw the concept pics. I could see it done better by mounting it like the origonal on the tops of the rear quarter panels.
I already have a plan for the needed fender extentions for both the Superbird and the Roadrunner...it's the front and rear ends that will take some thought...and the charger doors would be easy enough with just cutting out the "reversed scoops", pushing them in and adding side filler pieces.
Interesting how Michael Leonhard didn't do a Cuda concept drawing....
HunterCottage
#116
Joined: December 19, 2001
KitMaker: 1,717 posts
Auto Modeler: 244 posts
Posted: Saturday, January 01, 2011 - 03:49 AM UTC
Yeah, I saw the concept pics, but didn't really notice the details you mentioned but they do about sum up why I don't like the wing. It just seems to be off.
It was cool though that he did a Volvo S60 concept, it looks good, but I would really like to see his take on a C70...
Happy New Year!!
It was cool though that he did a Volvo S60 concept, it looks good, but I would really like to see his take on a C70...
Happy New Year!!
old-dragon
Joined: August 30, 2005
KitMaker: 3,289 posts
Auto Modeler: 1,620 posts
Posted: Saturday, January 01, 2011 - 04:09 AM UTC
Happy New Year to you too sir!....Michael does alot of neat stuff but I noticed his hotrods aren't that wild...not compared to what he came up with for those concept cars at least. I'm waiting to see what happens to the 1:1 Roadrunner shown on his site! Looks cool so far.......
As per the wing, the whole problem is that a Superbird without a wing just isn't really a Superbird...the nose and the wing really make the car...so some kind of redesign will have to be in order I guess to do that car.
I do like how Michael picked the 70/71 Satellite/Sebring body to make his concept out of instead of the older big square bodied cars of earlier years...eons ago I used to own a 1:1 '72 Satellite Sebring Plus with the sadeyes grill, so I have an affection for those cars in any trim.
old-dragon
Joined: August 30, 2005
KitMaker: 3,289 posts
Auto Modeler: 1,620 posts
Posted: Saturday, January 01, 2011 - 04:24 AM UTC
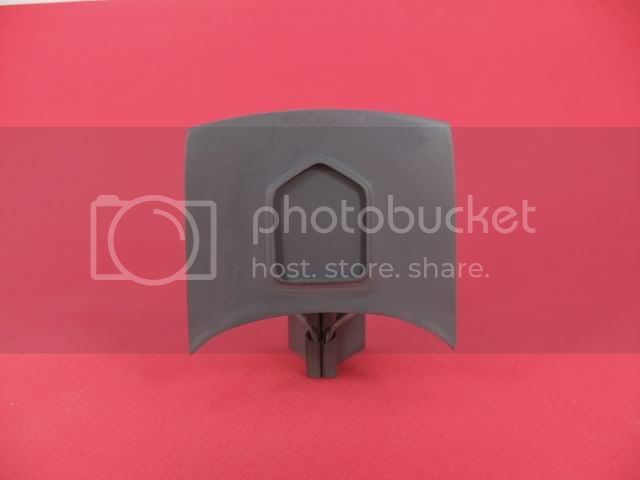
Update, just for laughs I pulled out an AMT '09 Challenger kit{1/25} and one of my Revell '71 Hemi Cuda convertible kits{1/24} and the '71 Cuda grill nearly is too big for the Challenger grill hole...the '71 Cuda grill mics up at 1.503 wide while the Challenger grill opening comes in at 1.476. so about .030ish will have to either be shaved from the cuda grill width. Not much left to remove from the challenger opening so maybe about .015 from the middle of the cuda grill and equal .0075 from the outsides..a shaker hood will be in order too instead of the challenger's hemi hood.
Just mic'd the '71 "fender gills"...they come in at .225 high and there's .277{let's call it .225} of challenger fender section for them - Cool.
More digi caliper measuring to do yet.....
Just mic'd the '71 "fender gills"...they come in at .225 high and there's .277{let's call it .225} of challenger fender section for them - Cool.
More digi caliper measuring to do yet.....

Hwa-Rang

Joined: June 29, 2004
KitMaker: 6,760 posts
Auto Modeler: 2,182 posts

Posted: Sunday, January 02, 2011 - 11:20 PM UTC
Happy new year Bob.
Sounds like some amazing projects.
1. ´71 Cuda
2. '71 Superbird(No wing, or perhaps a much smaller wing)
3. ´71 Charger
Sounds like some amazing projects.
1. ´71 Cuda
2. '71 Superbird(No wing, or perhaps a much smaller wing)
3. ´71 Charger
old-dragon
Joined: August 30, 2005
KitMaker: 3,289 posts
Auto Modeler: 1,620 posts
Posted: Sunday, January 09, 2011 - 02:58 PM UTC
Let's start with an easy one.....the '71 style-
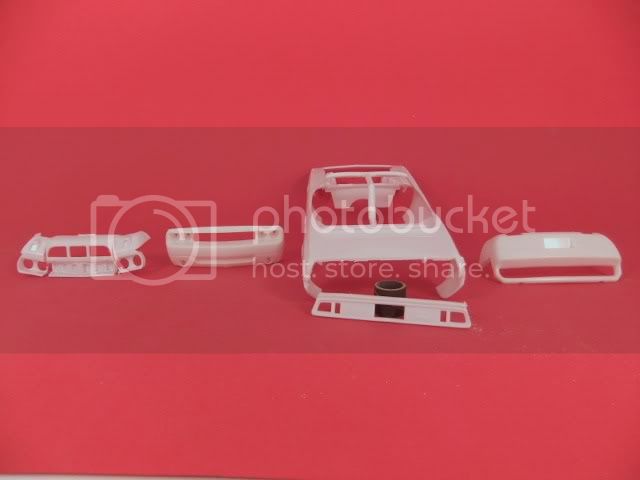
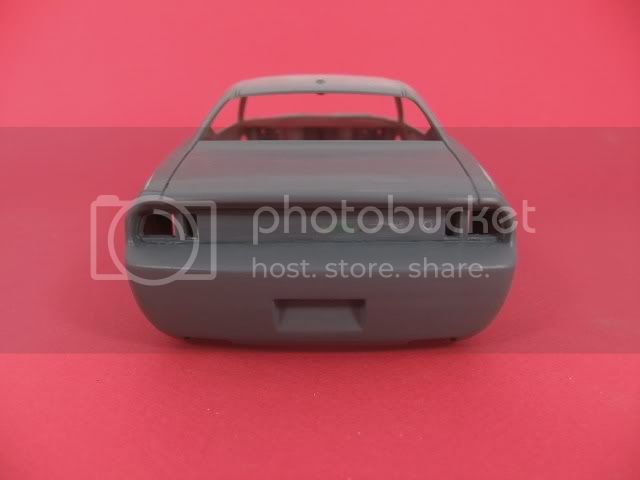
Here's the 1/25 AMT '09 Challenger base kit's front and reart ends opened up{from the left- 2nd and 4th pics}. Carve them out any way you like. Any of the "new" Challenger kits will work cause they're really the same except for extra rims or an engine{most are curbside}. I'm using the 1/24 Revell '71 Hemi Cuda convertible kit as my parts donar since I have two of them to play with and they're still easy to find. Cut out the rear panel and the inner grill carefully.
Here we have the new front end...sand and fit...sand and refit...repete till it fits - and it will!
I'm still fitting the new rear inner panel...Where the '71's license plate was will now be filled in and smoothed since the Challenger body has the plate in the bumper, and I'll keep it that way.
-pics to follow when it's dry, sanded and fitted.
After this I'll remove the '71's front fender louvers and graft those into the Challengers fenders....then figure out how to swap in the '71's shaker hood.
For the '70 type I went and ebayed my way to an easy fix{cheat where you can!} and got the reliable resin '70 cuda type front end...
Oh, I'll be making the '71/'72 roadrunner type in the Chevy vs Mopar campaign.
old-dragon
Joined: August 30, 2005
KitMaker: 3,289 posts
Auto Modeler: 1,620 posts
Posted: Saturday, January 15, 2011 - 05:00 AM UTC
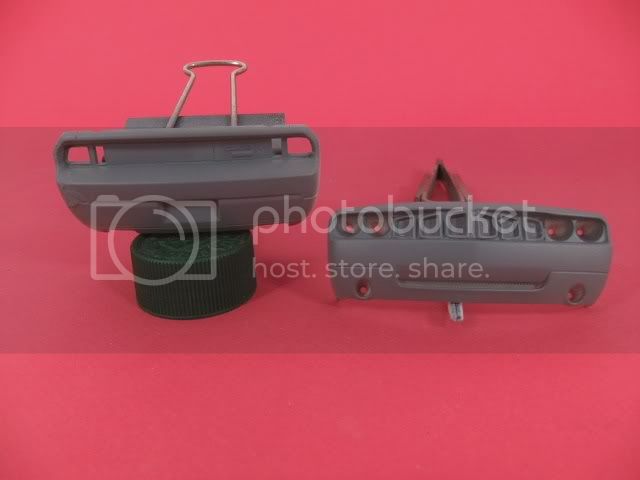
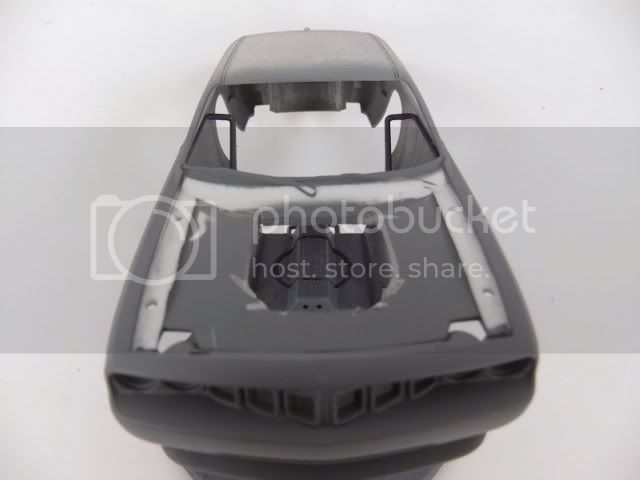
Been rather busy the last few days but I did get some work done here finally. Here's the '71 type front and rear ends..got a little "oops" on the rear bumper...will have to fix that!
Next up today will be the fender gills-
Next up today will be the fender gills-
Hwa-Rang
Joined: June 29, 2004
KitMaker: 6,760 posts
Auto Modeler: 2,182 posts
Posted: Saturday, January 15, 2011 - 08:50 AM UTC
Your custom building skills are superior Bob.
old-dragon
Joined: August 30, 2005
KitMaker: 3,289 posts
Auto Modeler: 1,620 posts
Posted: Monday, January 17, 2011 - 03:11 PM UTC
Nah, I just can't leave well enough alone{sometimes box stock blows...lol} - but thank you anyway for the comment.......care to try one yourself my friend? Forget the shaker hood and it's pretty easy...hey, if I can do it, so can you!
I went and bought some Don Schumacher decals this weekend for his '71 race Cuda...I have absolutely no idea where I could use those though...
Tell yah what...making the new front and rear ends was easy compared to fitting and then flattening the powerbulge hood out for that shaker version. This is gonna take some work........and time........
old-dragon
Joined: August 30, 2005
KitMaker: 3,289 posts
Auto Modeler: 1,620 posts
Posted: Saturday, January 22, 2011 - 03:34 PM UTC
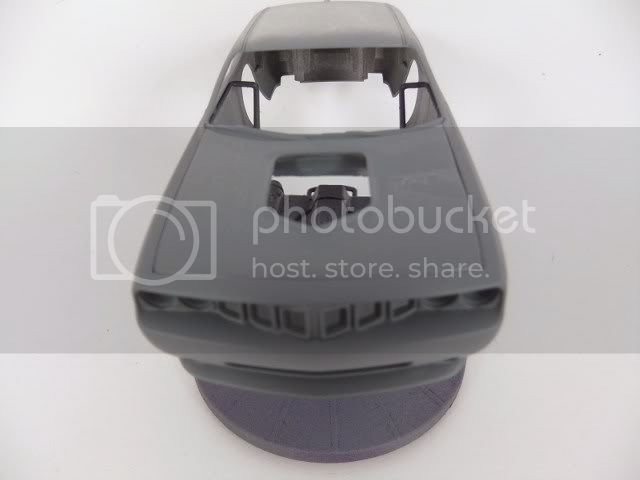
More progress on the '71 type-
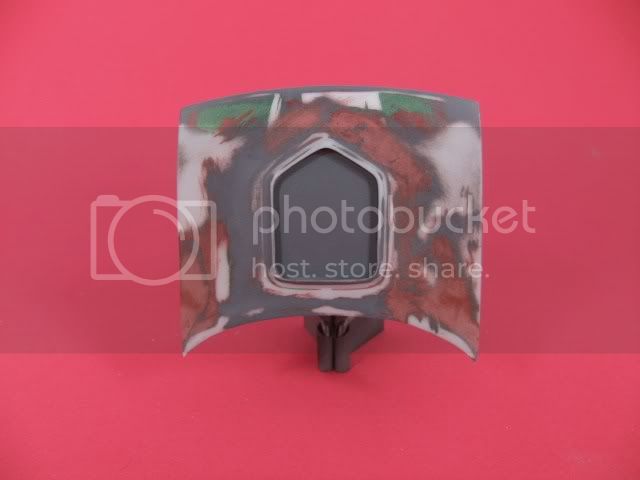
Here's the hood alittle better after 1st and 2nd filler applied-
Another coat of primer today, it's closer and yes I will remove that inner plate when it's all done-
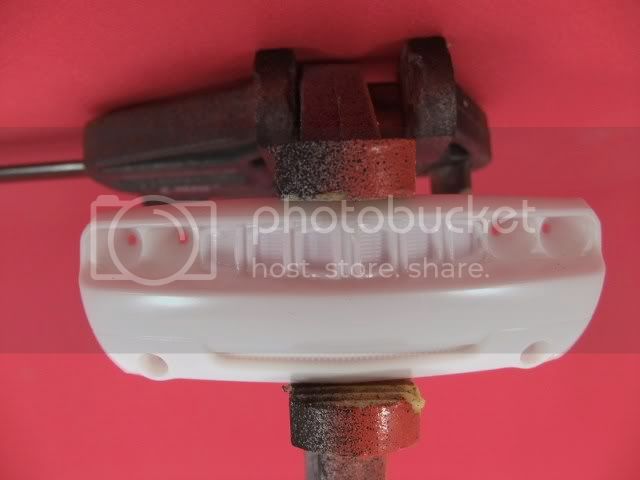
The backend is nearly done...another wet sanding a another coat of primer should do it. Rather than keep the cast lettering I'm using the decal lettering-
The front end, though wet still, is nearly done{see the drip on the lower LH side}..one more coat of primer yet still-

I just started the interior today.
Here's the hood alittle better after 1st and 2nd filler applied-
Another coat of primer today, it's closer and yes I will remove that inner plate when it's all done-
The backend is nearly done...another wet sanding a another coat of primer should do it. Rather than keep the cast lettering I'm using the decal lettering-
The front end, though wet still, is nearly done{see the drip on the lower LH side}..one more coat of primer yet still-
I just started the interior today.

VonCuda
Joined: November 28, 2005
KitMaker: 2,216 posts
Auto Modeler: 522 posts

Posted: Tuesday, January 25, 2011 - 11:54 AM UTC
Daaaaang.........this is cool Bob. Oh yeah, I vote you build them all.
What grit you wet sanding with? And, what grit will you finish with?
Hermon
What grit you wet sanding with? And, what grit will you finish with?
Hermon

old-dragon
Joined: August 30, 2005
KitMaker: 3,289 posts
Auto Modeler: 1,620 posts
Posted: Tuesday, January 25, 2011 - 03:05 PM UTC
Hey, welcome back bud...hope things are ok by you!
I used 600 as a rough blending grit...light swirling motions. Then I used 3000 grit for smothing to get a semi gloss finish to see any distortions in the surface{hood especially}...clean up and then recoat with primer and repete with 3000 till right.
The hood, like alot of filled areas on any piece, was wavy. Using the 3000 grit glosses it up to more easily see this and I use a decent light source to look for anything not right. I like using a pencil to mark areas that need work since it doesn't run or bleed thru paint...dont' use a marker or a pen! I'm using the my Stevens Int sanding pads{3k/6k/8k/10k/12k}. The problem with those foam covered pads is they give too much on the wavy areas, so I break out a sanding stick{400-600} to straighten those areas...then back to the high grit stuff for the sheen.
VonCuda
Joined: November 28, 2005
KitMaker: 2,216 posts
Auto Modeler: 522 posts
Posted: Wednesday, January 26, 2011 - 12:20 PM UTC
Thanks for those tips Bob. I'm really starting to sweat this whole "shiny black Cuda' " I'm building. Up till now my idea of a shiny smooth finish was shooting the whole thing with Future when it's all done.
Hermon
Hermon
old-dragon
Joined: August 30, 2005
KitMaker: 3,289 posts
Auto Modeler: 1,620 posts
Posted: Wednesday, January 26, 2011 - 02:49 PM UTC
Don't sweat it, just prep it! Remove all the mold lines and primer....wet sand till she's smooth and reprime if needed. Lay 2 coats of paint and wet sand smooth....lay another coat or two, apply any decals and BMF trim then lay on 2 coats of clear and wet sand lightly....hit her with 1-2 more of clear and polish - nice deep color!
Wet sand with high grit...like 3000 or better. If you don't have one of those $8 Revell polishing pad kits, go get one....you'll love it.
I suggest black lacquer, clear lacquer and use of a sealing primer.
Wet sand with high grit...like 3000 or better. If you don't have one of those $8 Revell polishing pad kits, go get one....you'll love it.
I suggest black lacquer, clear lacquer and use of a sealing primer.

AussieReg

#007

Joined: June 09, 2009
KitMaker: 8,156 posts
Auto Modeler: 2,953 posts

Posted: Wednesday, January 26, 2011 - 03:51 PM UTC
Quoted Text
Your thoughts folks on the top 1-3 to be done?!
1. '57 Chev
2. '67 'Vette Roadster
3. '68 Camaro


old-dragon
Joined: August 30, 2005
KitMaker: 3,289 posts
Auto Modeler: 1,620 posts
Posted: Friday, January 28, 2011 - 03:03 AM UTC
Quoted Text
Quoted TextYour thoughts folks on the top 1-3 to be done?!
1. '57 Chev
2. '67 'Vette Roadster
3. '68 Camaro
..."concept MOPARS that I want to build"... your welcome to start a build thread on those "other" types elsewhere if ya like, but that ain't happening here buddy!{blah!....hehehe}.
...your list was because I asked about the W-29, wasn't it?!

AussieReg
#007
Joined: June 09, 2009
KitMaker: 8,156 posts
Auto Modeler: 2,953 posts
Posted: Friday, January 28, 2011 - 10:37 AM UTC
Quoted Text
...your list was because I asked about the W-29, wasn't it?!
Who, me, never, I wouldn't do that . . . . . . . would I ?
Seriously good work you're doing here Bob, except maybe the subject matter. I'm gunna try to use your methods to improve my work for the Group Build in March.
Cheers, D
old-dragon
Joined: August 30, 2005
KitMaker: 3,289 posts
Auto Modeler: 1,620 posts
Posted: Friday, January 28, 2011 - 06:00 PM UTC
That's Ok D, I sorta just got even with ya in the Zerstorer thread-
Gills are next for the fender sides.....I'm considering 2 ways of doing this;
1) resin cast the '71 gills and lay them "on" the newer body
2) cut out and fit the '71 gill sections "in" the newer body
...got some depth measurements to make to see #1 idea is possible.
Gills are next for the fender sides.....I'm considering 2 ways of doing this;
1) resin cast the '71 gills and lay them "on" the newer body
2) cut out and fit the '71 gill sections "in" the newer body
...got some depth measurements to make to see #1 idea is possible.
old-dragon
Joined: August 30, 2005
KitMaker: 3,289 posts
Auto Modeler: 1,620 posts
Posted: Saturday, January 29, 2011 - 07:35 AM UTC
OK, I'm still playing with the shaker hood....
I cut out where the inner shaker will go so I can slip it in after painting since the shaker will be another color from the body{silver or black}. I noticed along the way that the hood sat about .030 higher than the fender tops so I had to shave off from the area where the hood sits to drop it back down where it needs to be so it's flush....check your kits when/if you do this so yours sits flush. I don't know why it sat too tall since I never touched the bottom of the hood nor the top area where it sits?
I'm finding there's still some blending to do on the hood where I added the shaker section...this mod will set you back some time to get it right - but do take your time to make it look good. I'd bet there will be an aftermarket piece available sometime in the future to make this easier....in the meantime consider it sweat equity.
It does look pretty darn good this way...ma Mopar needs to make this real!!!
AussieReg
#007
Joined: June 09, 2009
KitMaker: 8,156 posts
Auto Modeler: 2,953 posts
Posted: Saturday, January 29, 2011 - 10:34 AM UTC
Beautiful work Bob, lookin really good. Are you going to play with the stance as well ?
Keep the progress pics coming mate, I'm loving this stuff.
Cheers, D
Keep the progress pics coming mate, I'm loving this stuff.
Cheers, D
 |

WEB HOSTING BY


Copyright ©2021 Auto Modeler and Kitmaker Network, a subsidiary of Silver Star Enterprises
All Rights Reserved. Please read our Conditions of Use and Privacy Policy.
All Rights Reserved. Please read our Conditions of Use and Privacy Policy.