

Joel,
Thanks for the tip about ordering Gravity Paints from Spain. I checked the US site and they were not taking orders. Any tips about using the 2K gloss? I'm not too sure about getting the proportions correct. Can you premix a batch and store it or do you need to use it as soon as you have mixed it??
Thanks
Russ


Go to automodeler.com for the current dynamic site!
Hosted by Jim Starkweather
Ebbro 1/20 scale Brabham BT18 F2

slobuilder

Joined: September 06, 2013
KitMaker: 70 posts
Auto Modeler: 35 posts

Posted: Tuesday, March 19, 2019 - 02:07 AM UTC

Joel_W
Joined: December 04, 2010
KitMaker: 11,666 posts
Auto Modeler: 2,974 posts

Posted: Tuesday, March 19, 2019 - 05:50 AM UTC
Quoted Text
Joel,
Thanks for the tip about ordering Gravity Paints from Spain. I checked the US site and they were not taking orders. Any tips about using the 2K gloss? I'm not too sure about getting the proportions correct. Can you premix a batch and store it or do you need to use it as soon as you have mixed it??
Thanks
Russ
Russ,
Google Gravity Paints USA, and read the threads. The 1st few go for pages and pages. Matte~ is the worst businessman going. His help quit and he's trying to run a full time business solo PT. He's orders takes months to fill if ever. I had to go through Pay Pal to get my money back. Gravity of Spain has a full time staff, answers your emails in 24 hrs or less, and has even picked up the phone when I called. The online chat never gets a response for me. The shipping is by DHL so it goes by Air not boat. From the time I order which we'll call day 1, the paint is at my front door in 4 days total including the order day. Shipping is like $8.
As for the 2K clear gloss, sorry, but I don't use it as yet. I'm still using lacquers. It's really not that hard to mix correctly. There's a ton of videos on You Tube, and Gabriel is your man here.
Joel

Joel_W
Joined: December 04, 2010
KitMaker: 11,666 posts
Auto Modeler: 2,974 posts
Posted: Monday, March 25, 2019 - 02:33 AM UTC
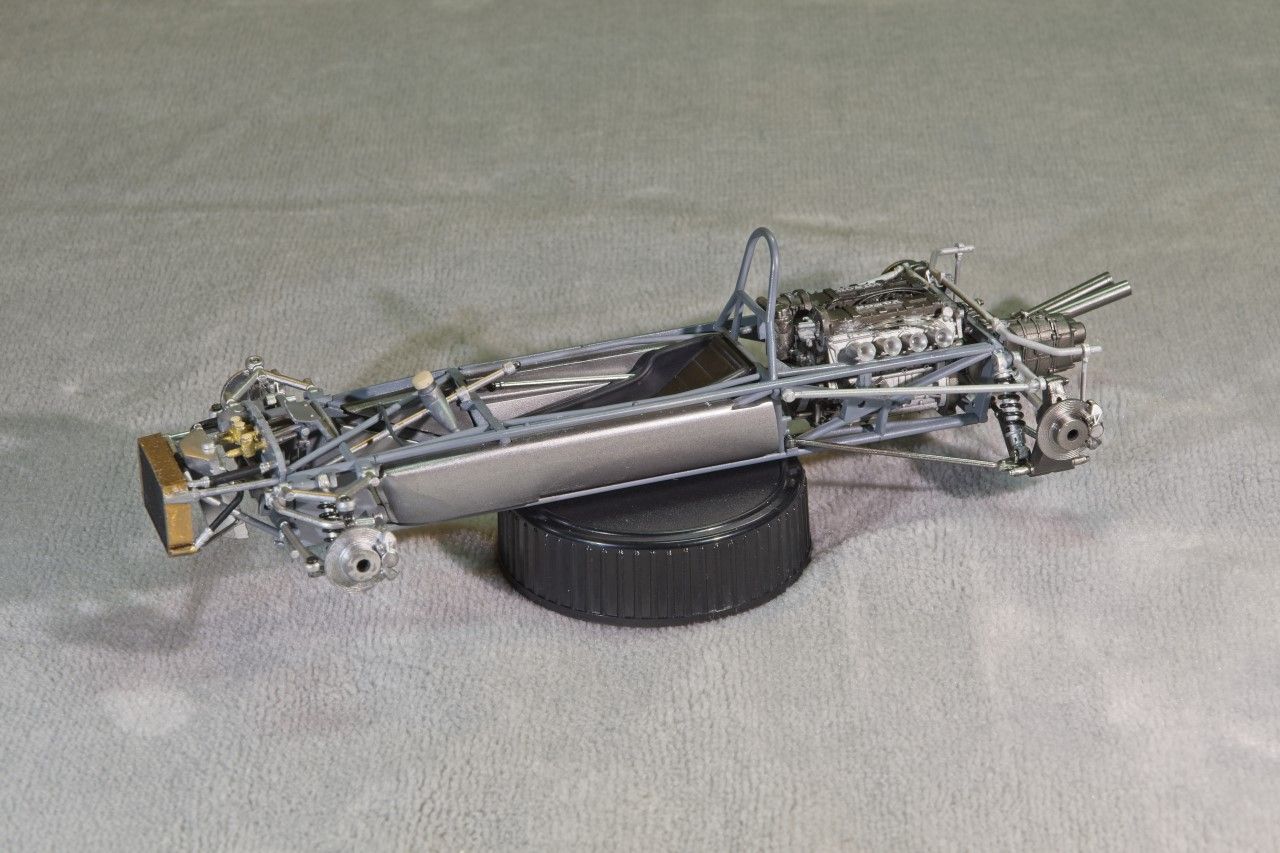
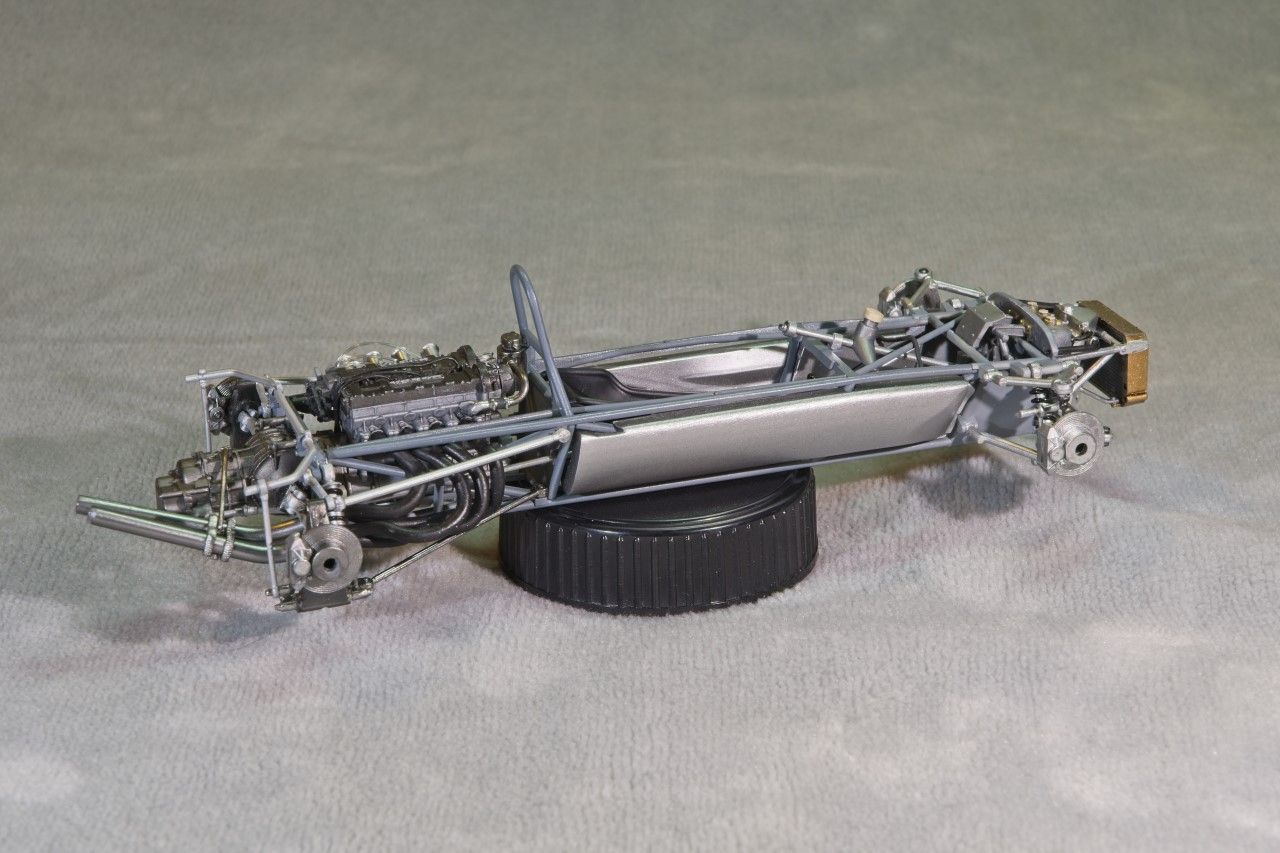
Finally, time for the next update.
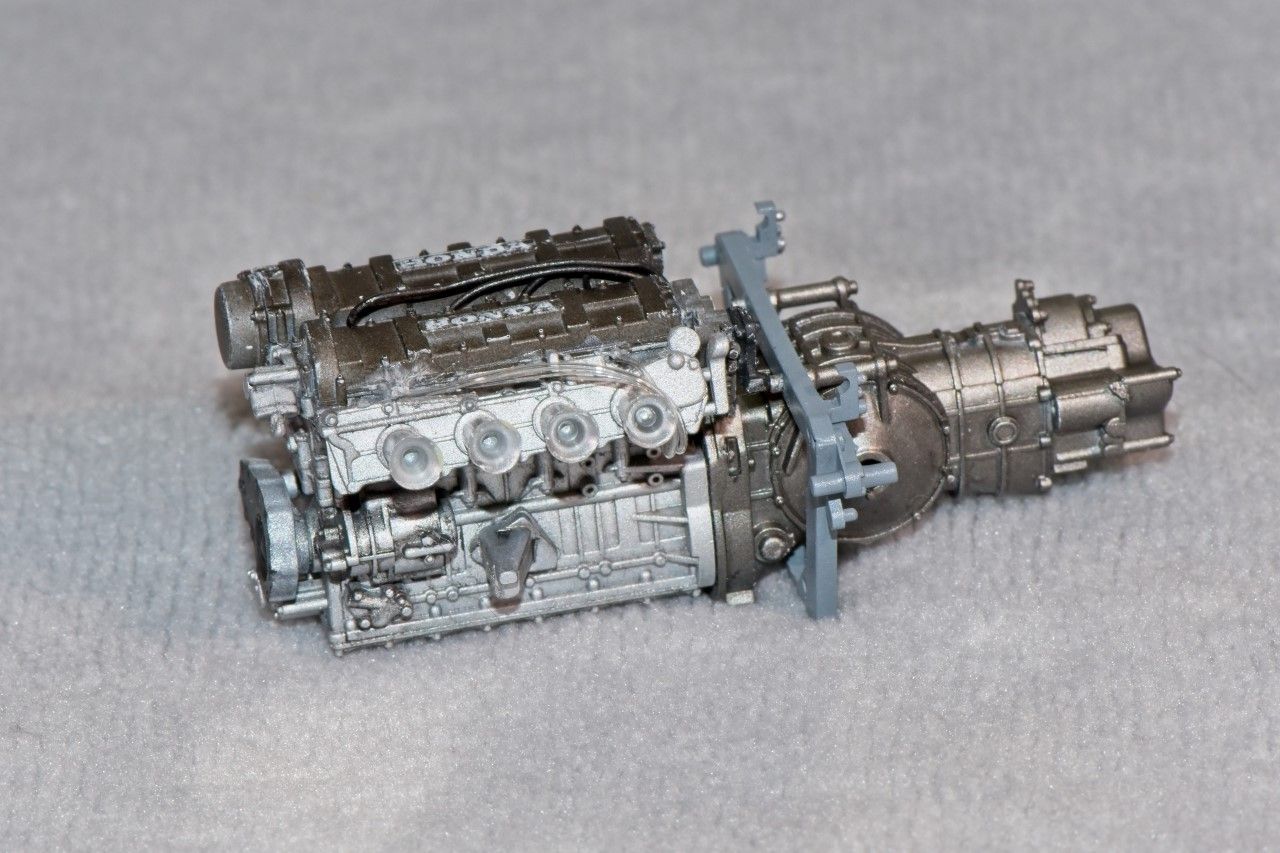
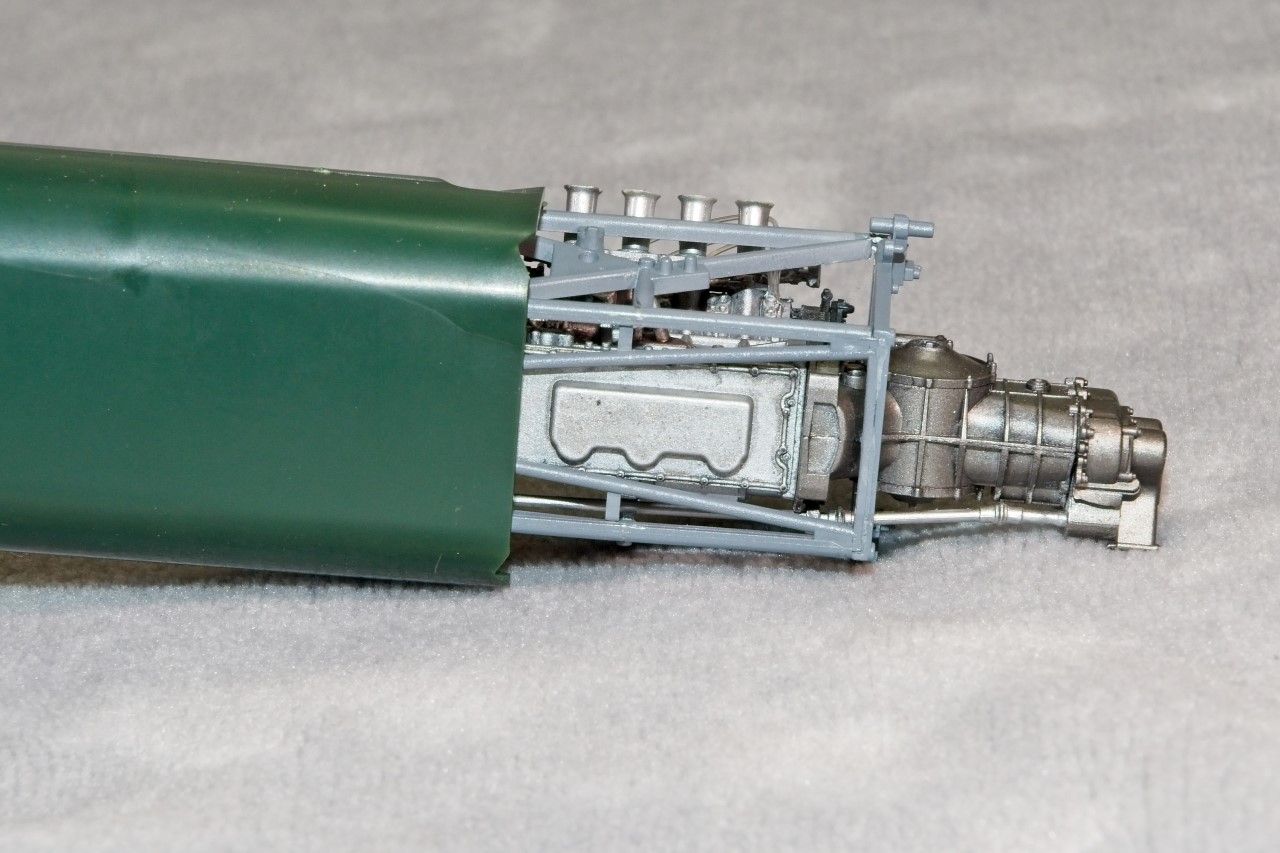
Now that the front end is finished, my efforts turned to the Honda F2 1 liter works engine. Once again Ebbro has designed and produced a simply exquisite replica. The Aluminum block was molded in a pretty nice looking Aluminum shade as well as the cam cover and the appropriate parts in Black, but I decided to go ahead and paint the entire engine.
Everything was primed with Tamiya Gray Primer/Sealer thinned 1:1 with Mr. Hobby #400 thinner.
Then the block was air brushed with Alcad2 #101 Flat Aluminum, while the transmission was painted with a 50/50 mixture of Alcad # 103 Dark Aluminum and #111 Magnesium. If I had the opportunity to redo the Transmission, I'd go with just the #103 Dark Aluminum and just a few drops of the Magnesium.
I've stripped all the nicely done chrome parts with Oven Cleaner, and it's just way to caustic to use in the house, so I did the stripping in the garage. But cleaning the parts was a real issue. I'm going to go back to either Bleach or Simple Green and just let them do their thing.
I air brushed the 4 intake tubes, which are really molded quite well with Tamiya Gray primer and then Alcad Steel for a slightly shinier look. I opted not for the more traditional gloss black as I wanted to cut back on the super shine effect.
Next up was the very simple ignition wiring from the plugs on top of the cam cover to a channel in the back of the block that goes to a opening in the front of the block by the crankshaft magneto. Then the fuel injection fuel lines were run from the injectors right to the metering unit with no ties or clamps. So I did it that way as well.
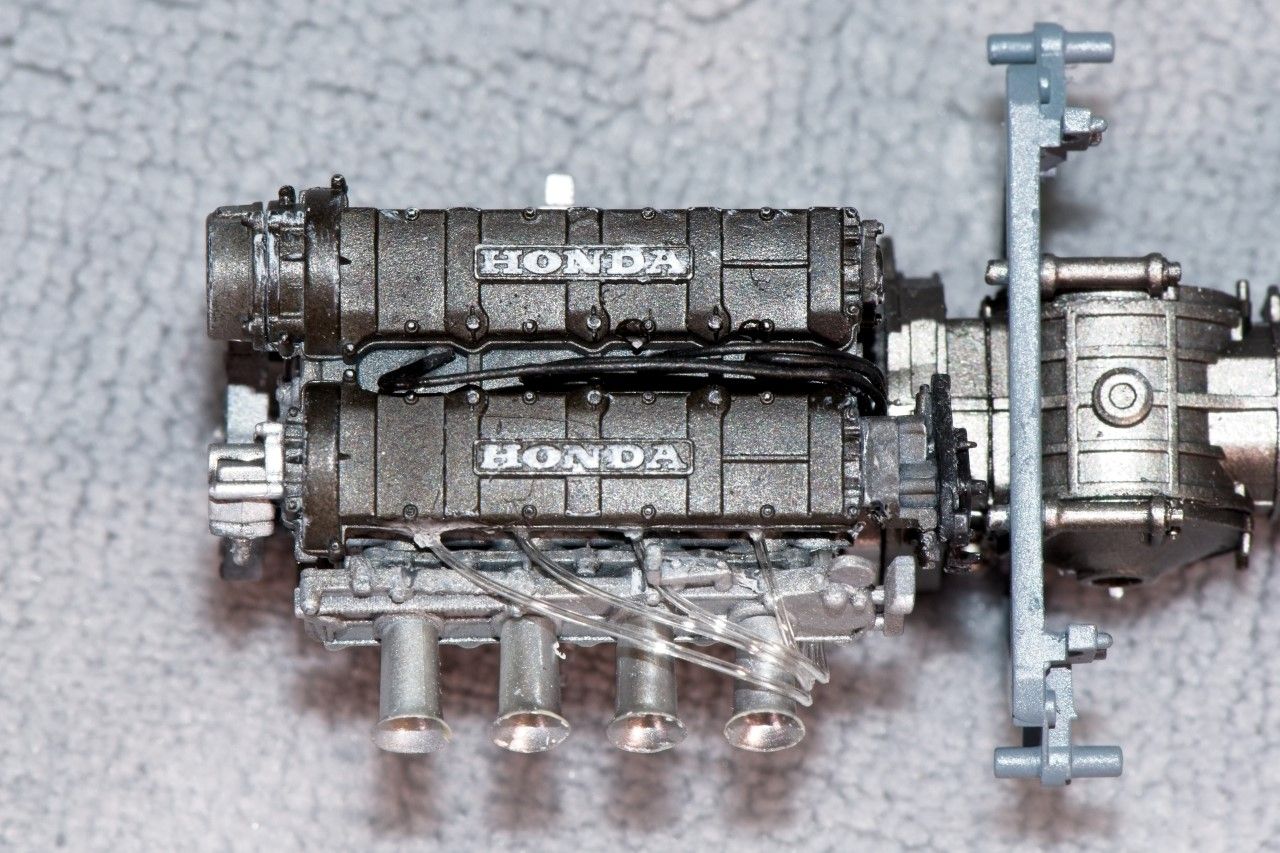
Painting the Honda logos was done by brush, and yes it took forever with several attempts. this should have been two decals for old, half blind guys like me.
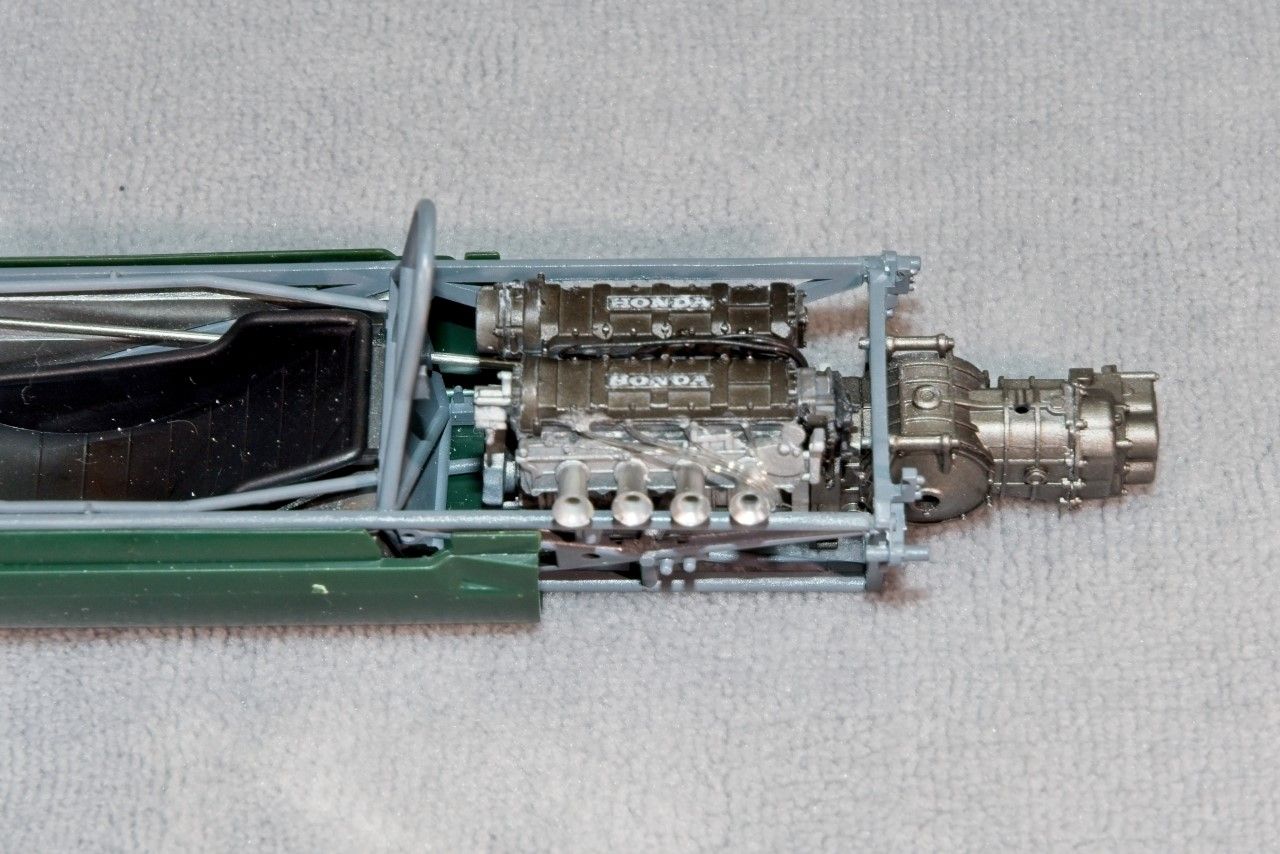
Next up was the issue of installing the engine/transmission unit into the chassis. I did forget to mention that you had to install both motor mounts on the block just right so that everything aligns perfectly. I got it pretty close. I also had to install the stainless steel shift linkage from the final gear housing to a hole in the back of the cockpit bulkhead, that the other end of the shift linkage runs to the front of the cockpit with the shifter. I opted to just do a press fit for now and leave the final adjustment and gluing at the pivot point for last.
I'm sure that two mechanics with 4 hands working on the real engine assembly would have little issues with getting it into place, but I have full size hands & fingers, while the engine housing is 1/20 scale. And I could have used a 3rd really small hand, but that wasn't to be. It took a considerable amount of time to jockey everything into place all at the same time, but everything does align and fit perfectly. Some Tamiya Extra Thin glue keeps everything in place.
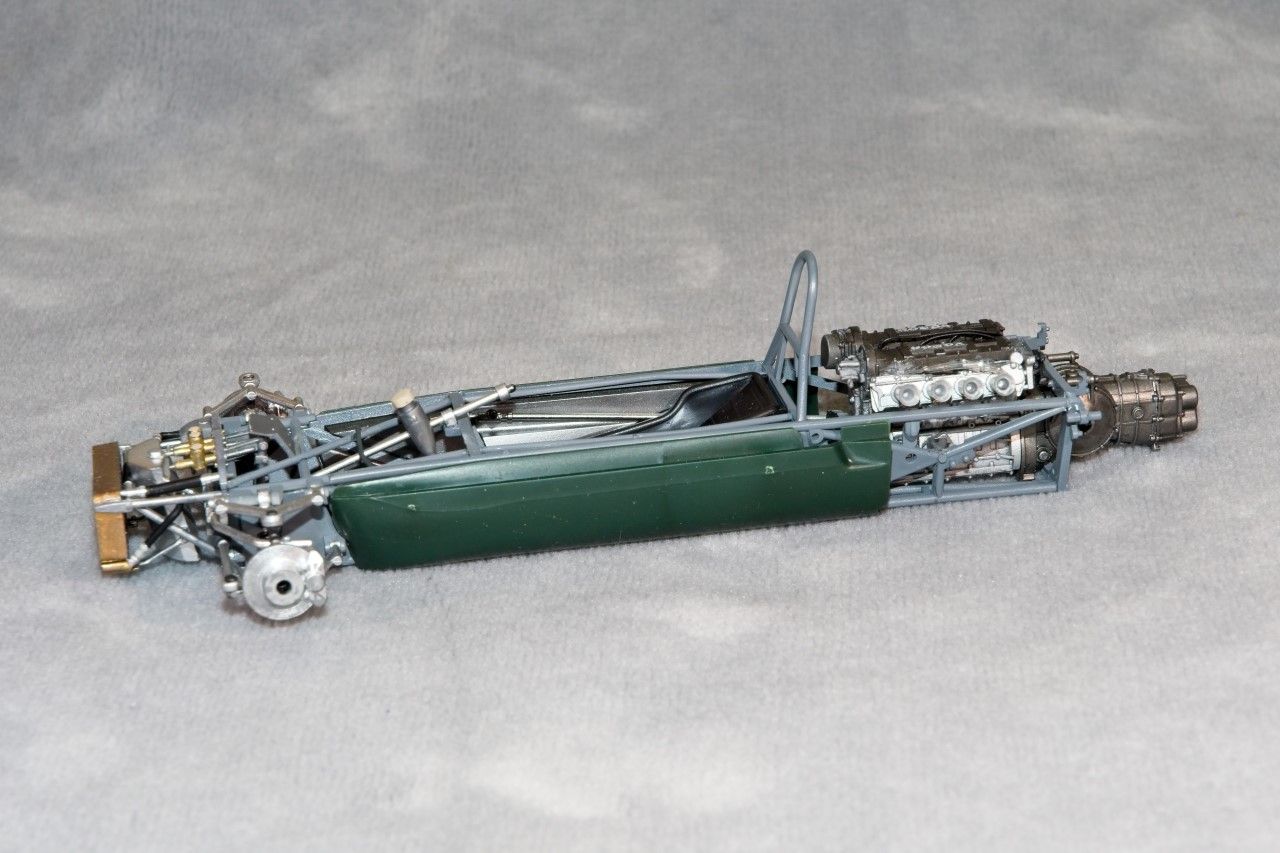

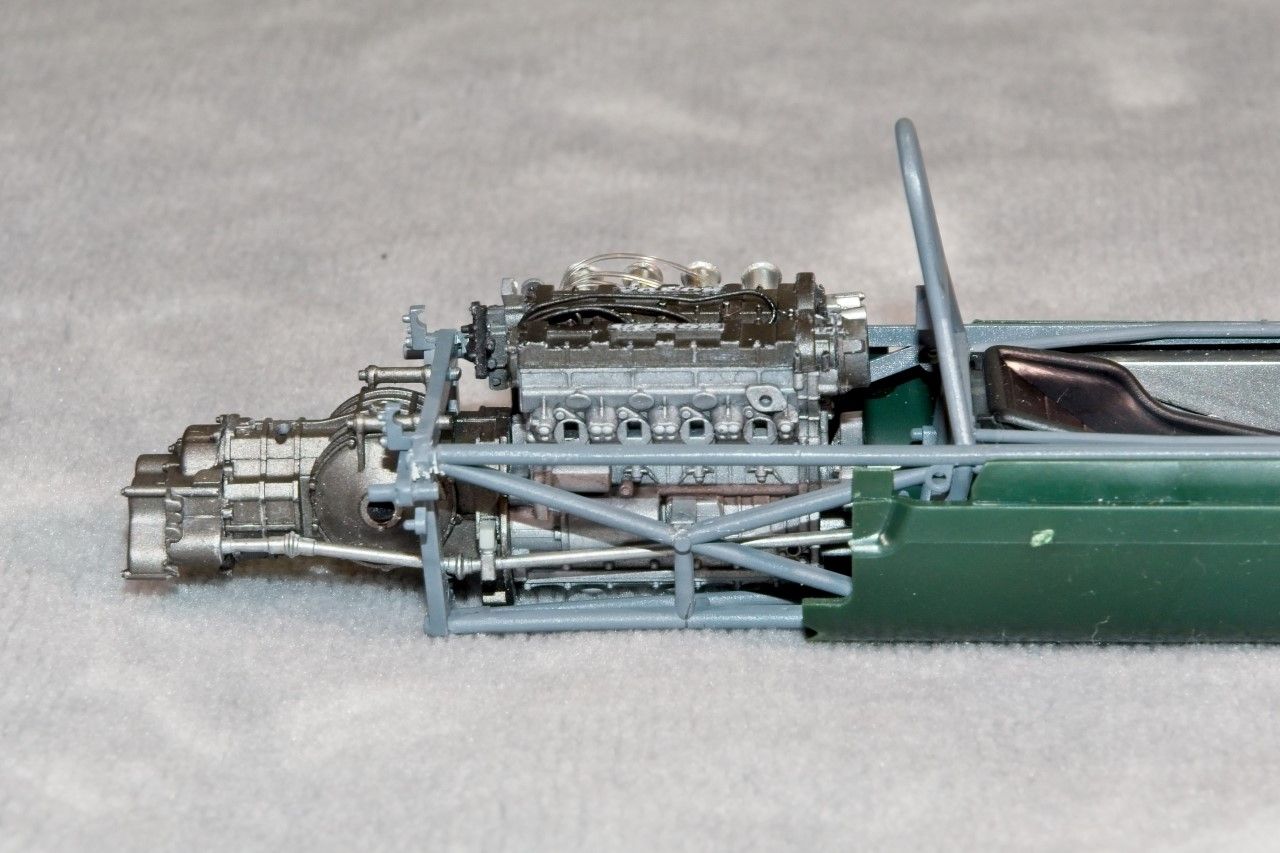
I just noticed on the bottom square rail at the back of the chassis where the other half is the rear support for the engine/transmission that under magnification the glue joint shows. I'll have to fill the small gap, then repaint.
Thanks to all for checking out my BT18 to date. As always it's greatly appreciated.
Joel
Now that the front end is finished, my efforts turned to the Honda F2 1 liter works engine. Once again Ebbro has designed and produced a simply exquisite replica. The Aluminum block was molded in a pretty nice looking Aluminum shade as well as the cam cover and the appropriate parts in Black, but I decided to go ahead and paint the entire engine.
Everything was primed with Tamiya Gray Primer/Sealer thinned 1:1 with Mr. Hobby #400 thinner.
Then the block was air brushed with Alcad2 #101 Flat Aluminum, while the transmission was painted with a 50/50 mixture of Alcad # 103 Dark Aluminum and #111 Magnesium. If I had the opportunity to redo the Transmission, I'd go with just the #103 Dark Aluminum and just a few drops of the Magnesium.
I've stripped all the nicely done chrome parts with Oven Cleaner, and it's just way to caustic to use in the house, so I did the stripping in the garage. But cleaning the parts was a real issue. I'm going to go back to either Bleach or Simple Green and just let them do their thing.
I air brushed the 4 intake tubes, which are really molded quite well with Tamiya Gray primer and then Alcad Steel for a slightly shinier look. I opted not for the more traditional gloss black as I wanted to cut back on the super shine effect.
Next up was the very simple ignition wiring from the plugs on top of the cam cover to a channel in the back of the block that goes to a opening in the front of the block by the crankshaft magneto. Then the fuel injection fuel lines were run from the injectors right to the metering unit with no ties or clamps. So I did it that way as well.
Painting the Honda logos was done by brush, and yes it took forever with several attempts. this should have been two decals for old, half blind guys like me.
Next up was the issue of installing the engine/transmission unit into the chassis. I did forget to mention that you had to install both motor mounts on the block just right so that everything aligns perfectly. I got it pretty close. I also had to install the stainless steel shift linkage from the final gear housing to a hole in the back of the cockpit bulkhead, that the other end of the shift linkage runs to the front of the cockpit with the shifter. I opted to just do a press fit for now and leave the final adjustment and gluing at the pivot point for last.
I'm sure that two mechanics with 4 hands working on the real engine assembly would have little issues with getting it into place, but I have full size hands & fingers, while the engine housing is 1/20 scale. And I could have used a 3rd really small hand, but that wasn't to be. It took a considerable amount of time to jockey everything into place all at the same time, but everything does align and fit perfectly. Some Tamiya Extra Thin glue keeps everything in place.
I just noticed on the bottom square rail at the back of the chassis where the other half is the rear support for the engine/transmission that under magnification the glue joint shows. I'll have to fill the small gap, then repaint.
Thanks to all for checking out my BT18 to date. As always it's greatly appreciated.
Joel

goodn8

Joined: October 12, 2008
KitMaker: 709 posts
Auto Modeler: 21 posts

Posted: Monday, March 25, 2019 - 03:53 AM UTC
Hi Joel!
Just greetings to assure you that I follow since the start.
Once more: "What a great build!"
Sorry for missing the last Porsche-deadline, it turned out just awesome. No matter what subject you work on, its always a pleasure to follow the progress. The "metal" work on the engine is just incredible, really fantastic skills!
btw; Mr. Hobby's #400 thinner is my favourite too. Also I plan to use my Mr. Hobby #1500 surfacer the next time, I need a smooth surface.
Thomas


Joel_W
Joined: December 04, 2010
KitMaker: 11,666 posts
Auto Modeler: 2,974 posts
Posted: Monday, March 25, 2019 - 04:36 AM UTC
Quoted Text
Hi Joel!
Just greetings to assure you that I follow since the start.
Once more: "What a great build!"
Sorry for missing the last Porsche-deadline, it turned out just awesome. No matter what subject you work on, its always a pleasure to follow the progress. The "metal" work on the engine is just incredible, really fantastic skills!
btw; Mr. Hobby's #400 thinner is my favourite too. Also I plan to use my Mr. Hobby #1500 surfacer the next time, I need a smooth surface.
Thomas
Thomas,
Thanks so much my friend for those really kind words. Believe me, nothing I do is earth shaking, or cutting edge. Like most modelers, I've kind of borrowed what I know and use from others before me.
You're going to love #1500 surfacer. Just keep in mind that it's too hin right out of the bottle to be used as filler like 1200 or 1000. I still do thin but not nearly as much as I do for 1200.
Joel

Merlin

#017

Joined: June 11, 2003
KitMaker: 17,582 posts
Auto Modeler: 388 posts

Posted: Monday, March 25, 2019 - 08:05 AM UTC
Hi Joel
It's really looking excellent! It's fascinating to see the tubular chassis at a time when monocoque construction was just beginning to take over.
All the best
Rowan
It's really looking excellent!
It's fascinating to see the tubular chassis at a time when monocoque construction was just beginning to take over.All the best
Rowan

Joel_W
Joined: December 04, 2010
KitMaker: 11,666 posts
Auto Modeler: 2,974 posts
Posted: Monday, March 25, 2019 - 08:20 AM UTC
Quoted Text
Hi Joel
It's really looking excellent!
All the best
Rowan
Rowan,
Thanks for stopping by and checking my Brabham out. Glad it meets your high standards.
Agreed about the how a tube chassis now looks so weird. But I do remember working on tube chassis all the time at Rascal Racing. It took me a long time to actually believe that the stressed monocoque car was as strong, while so much lighter then a tube chassis car. But all I had to do was look no further then my MGB. It didn't have a chassis!
Joel

AussieReg
#007

Joined: June 09, 2009
KitMaker: 8,156 posts
Auto Modeler: 2,953 posts
Posted: Monday, March 25, 2019 - 08:34 AM UTC
Hi Joel.
Moving along beautifully with this build. The engine finish and details look great and you overcame the alignment troubles very nicely.
Once again your comprehensive posts will provide great reference material for other builders to follow.
Looking forward to more progress.
Cheers, D
Moving along beautifully with this build. The engine finish and details look great and you overcame the alignment troubles very nicely.
Once again your comprehensive posts will provide great reference material for other builders to follow.
Looking forward to more progress.
Cheers, D

Joel_W
Joined: December 04, 2010
KitMaker: 11,666 posts
Auto Modeler: 2,974 posts
Posted: Monday, March 25, 2019 - 08:55 AM UTC
Quoted Text
Hi Joel.
Moving along beautifully with this build. The engine finish and details look great and you overcame the alignment troubles very nicely.
Once again your comprehensive posts will provide great reference material for other builders to follow.
Looking forward to more progress.
Cheers, D
D,
Thanks my friend for you most kind words. I'm loving this build more then I should. It's truly turning out to be a true labor of love.
Joel

RussellE

#306
Joined: June 27, 2010
KitMaker: 3,959 posts
Auto Modeler: 495 posts
Posted: Monday, March 25, 2019 - 08:49 PM UTC
amazing details Joel 

Joel_W
Joined: December 04, 2010
KitMaker: 11,666 posts
Auto Modeler: 2,974 posts
Posted: Tuesday, March 26, 2019 - 12:36 AM UTC
Quoted Text
amazing details Joel
Russell,
Thanks so my friend for stopping by and checking out my BT 18 build to date. I'm really appreciative that you like what I've accomplished so far.
Joel
Joel_W
Joined: December 04, 2010
KitMaker: 11,666 posts
Auto Modeler: 2,974 posts
Posted: Wednesday, March 27, 2019 - 02:35 AM UTC
I've continued to spend some time on research as several of the pictures I've posted show the BT18 chassis with 1 liter engines for F2 that have other makes besides Honda: Coventry Climax, BMW, Lotus, and a few more. Plus the basically same chassis was also used in their F3 cars with different engines for that series.
The official Brabham F2 team had just 6 BT18 cars, and those were powered by Honda. The Honda engines as I have said, belonged to Honda, and thus the engines were taken back when the contract was over. In several pictures you can see Honda mechanics working on the engines only, not the car.
Brabham also built about 40 customer BT18s for various series, and it is those cars that got the various other engine packages. It sure seems that back in those days, swapping out engine types was pretty easy by just moving motor mounts and sundries.
I hope that this information clears up some of the confusion I caused.
Joel

Hwa-Rang

Joined: June 29, 2004
KitMaker: 6,760 posts
Auto Modeler: 2,182 posts

Posted: Wednesday, March 27, 2019 - 04:29 AM UTC
Looks amazing Joel. Love the color variation of the various metalic engine components.

Cosimodo
#335

Joined: September 03, 2013
KitMaker: 1,808 posts
Auto Modeler: 701 posts

Posted: Saturday, March 30, 2019 - 07:43 AM UTC
The engine looks superb. As Jesper said, the metallic variations make the details stand out.
cheers
Michael
cheers
Michael
Joel_W
Joined: December 04, 2010
KitMaker: 11,666 posts
Auto Modeler: 2,974 posts
Posted: Sunday, March 31, 2019 - 12:57 AM UTC
Quoted Text
The engine looks superb. As Jesper said, the metallic variations make the details stand out.
cheers
Michael
Michael,
Thanks so much for stopping by, it's always appreciated.
Metallic color variations are so easy with Alcad 2 (as that's what I'm still using these days). I also mixed my own shade of burnt exhaust steel as I just couldn't find a shade that I was happy with.
Joel
Joel_W
Joined: December 04, 2010
KitMaker: 11,666 posts
Auto Modeler: 2,974 posts
Posted: Saturday, April 06, 2019 - 12:03 PM UTC
I finally finished up the exhaust system, & the rear suspension including the drive train, So I've completed enough work for another update.
I started with the exhaust headers which are all separate parts, and the two exhaust pipes, plus the bracket that kind of holds those pipes in place, which attaches to the top and bottom of the transmission at an angle just to make it a little more interesting. While the headers were molded in Black, it wasn't the shade I was looking for, so I mixed Mig Ammo Mat Black with a few drops of their Mig Ammo Gray primer to both lighten and Dull the color.
The problem that I encountered is that with each exhaust header being a separate piece; #1 & 4 get mated together that attaches to the inner exhaust pipe, and #2 & 3 mated together for the outer pipe. Sounds simple enough, but not only did I have to align all 4 headers, but the exhaust pipes rest on that bracket with the two piece molded springs. In other words, once again I needed 3 hands, and very small fingers. I made sure that each header mounted flush to the block, but they still needed some tender loving care. I've seen pictures where the pipes are perfectly aligned, and just as many where they angle in towards the back of the gearbox, and that's how mine came out. Pretty close, but no cigar.

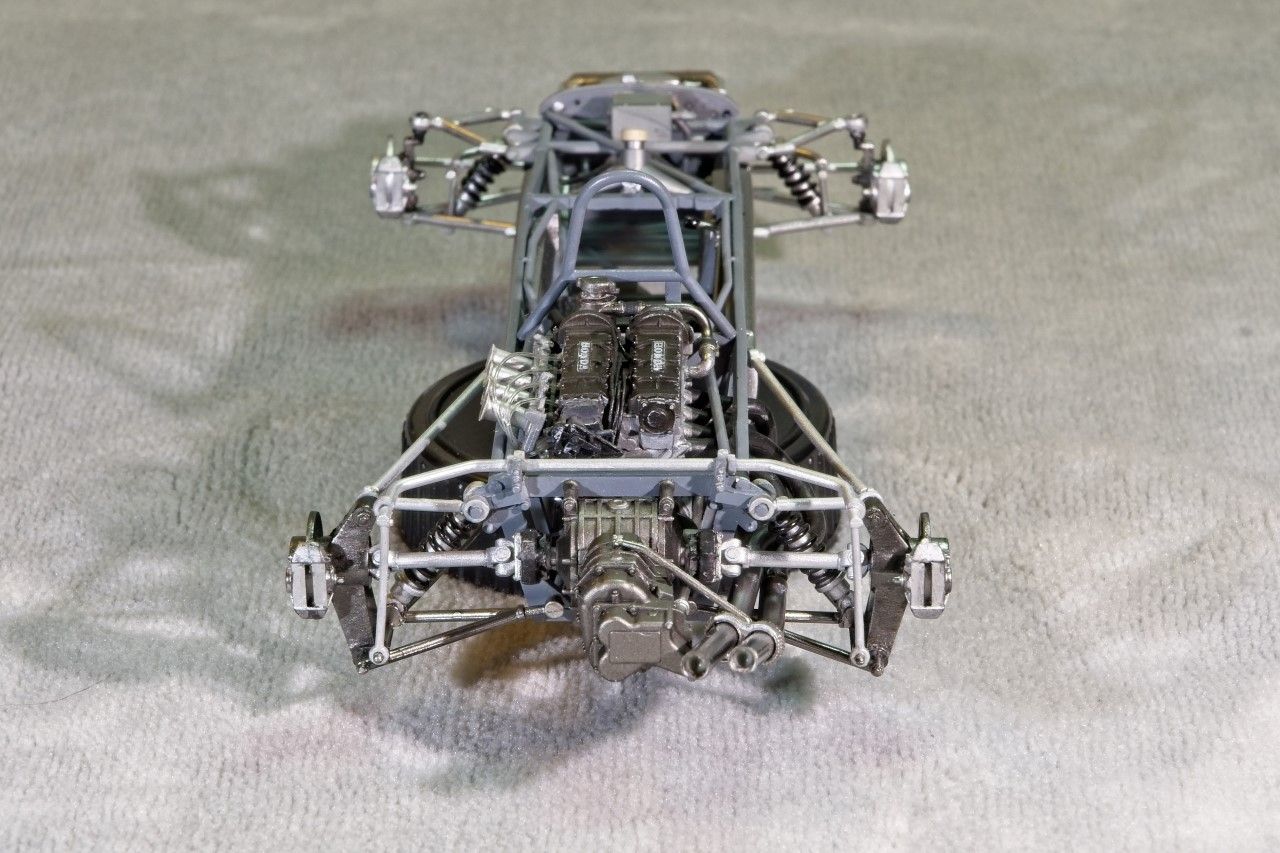
Now that was just a warmup for the dozens of parts that comprise both the rear suspension, and the drive train.
All the parts were primed with Mr. Hobby 1500 Gray primer, not their Black primer, nor did I opt for a coat of Gloss Black to give the Alcad Metalizers a deep shine. Most of the parts are stainless steel. Polished when new, but they just didn't stay that way very long. Grease, grime, and plain old dirt from Jack's hands and work rags took care of that in short order. My compromise was as I said, the Gray undercoat only.
I started with the suspension lower arms that the disc brakes are attached to. Those were painted straight Alcad Stainless Steel. The Discs were a combination of Stainless steel and Steel, while the Hub Carriers (? as I just can't remember the correct name), were painted Alcad Magnesium which looks close enough to a dark cast metal color.
The rest of the suspension was painted Alcad2 Chrome, but over Gray primer doesn't have that super shine.
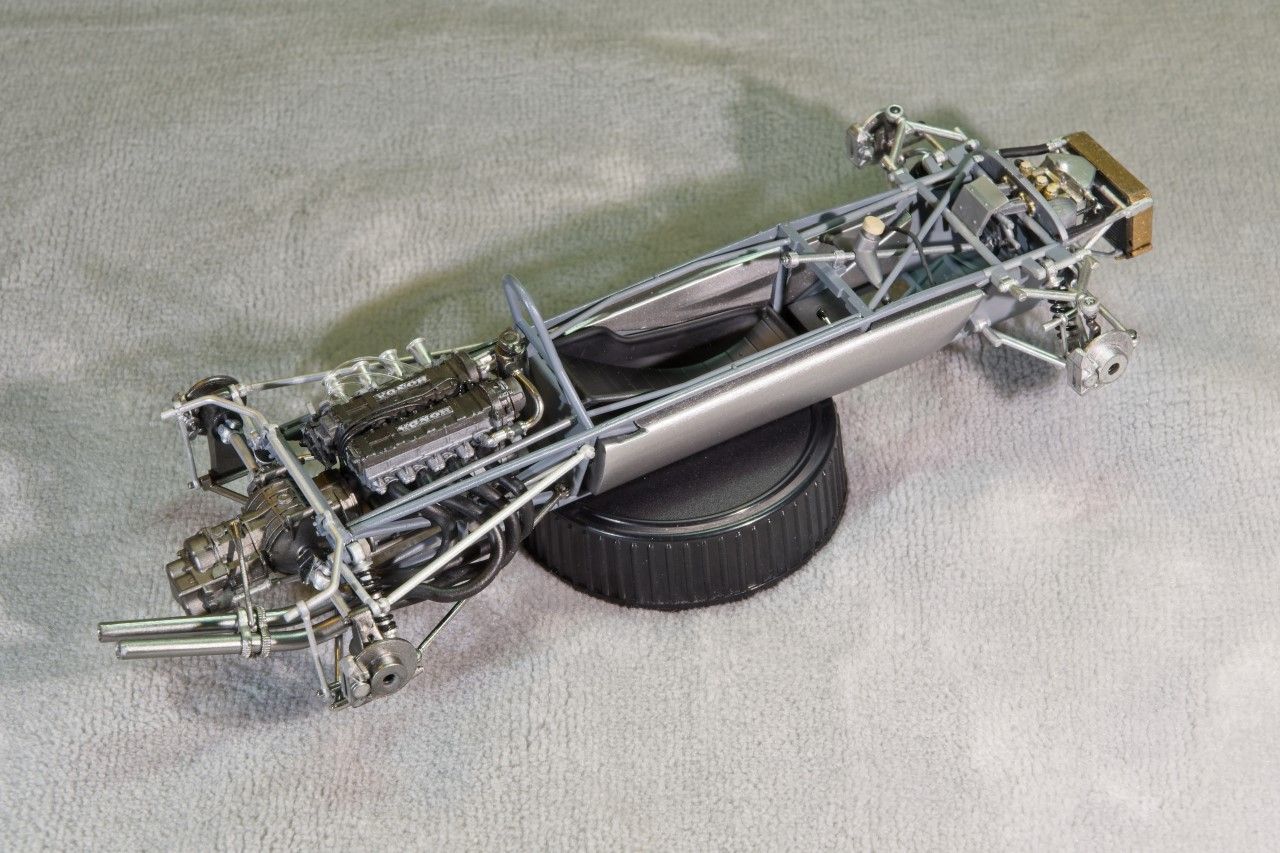
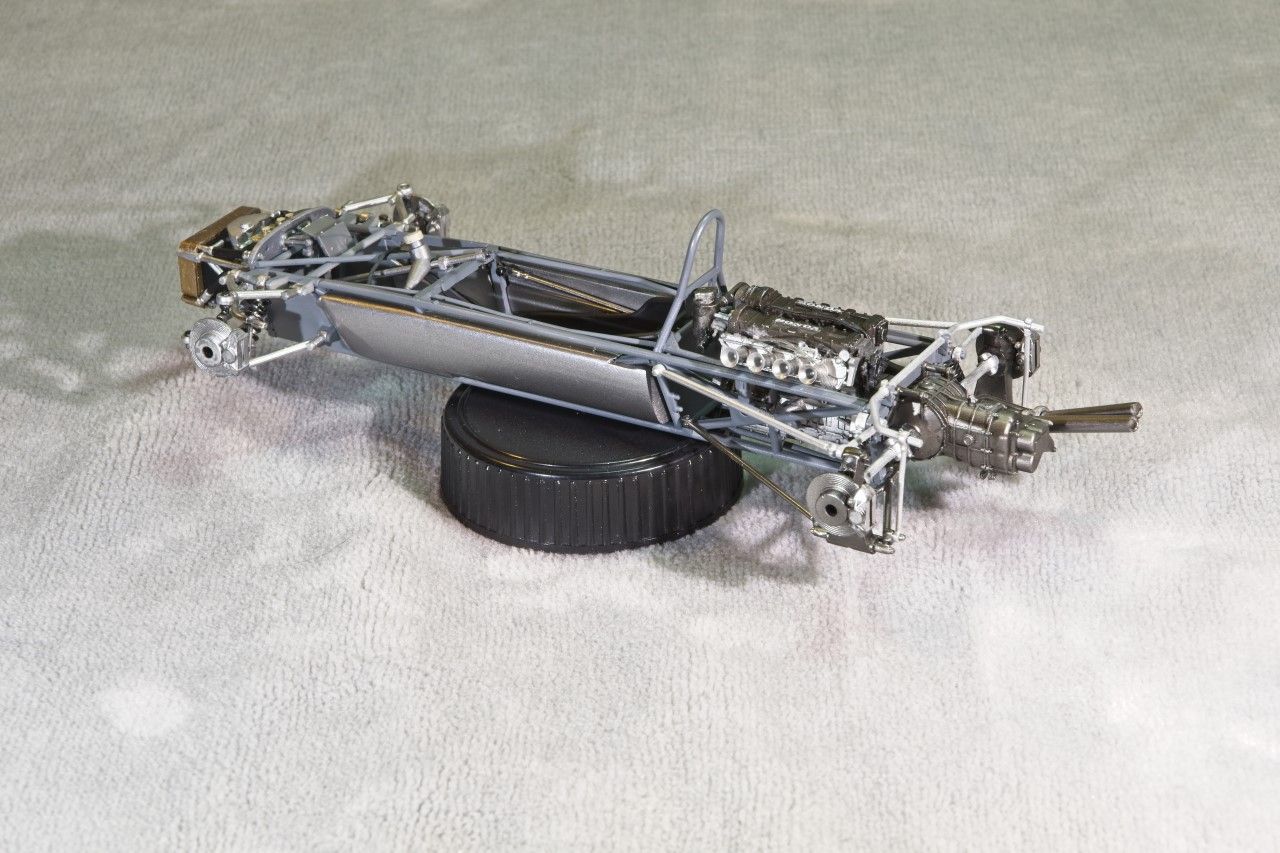
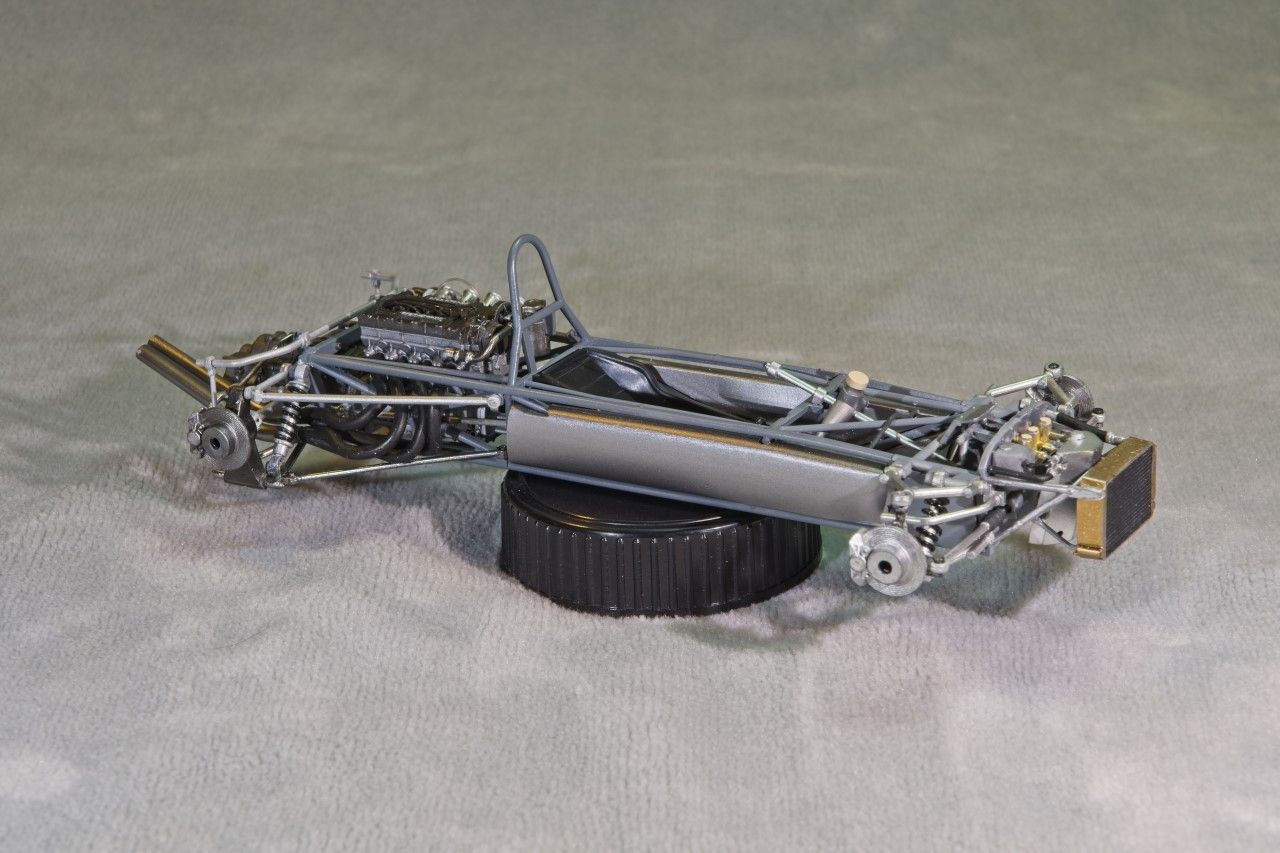
One thing I did notice was that whomever decided on colors, has no idea that Black can be Matt, Semi Gloss, or Gloss. Every single call out is for Semi gloss.
Thanks for stopping by and checking out my BT build to date. It's greatly appreciated.
Joel
I started with the exhaust headers which are all separate parts, and the two exhaust pipes, plus the bracket that kind of holds those pipes in place, which attaches to the top and bottom of the transmission at an angle just to make it a little more interesting. While the headers were molded in Black, it wasn't the shade I was looking for, so I mixed Mig Ammo Mat Black with a few drops of their Mig Ammo Gray primer to both lighten and Dull the color.
The problem that I encountered is that with each exhaust header being a separate piece; #1 & 4 get mated together that attaches to the inner exhaust pipe, and #2 & 3 mated together for the outer pipe. Sounds simple enough, but not only did I have to align all 4 headers, but the exhaust pipes rest on that bracket with the two piece molded springs. In other words, once again I needed 3 hands, and very small fingers. I made sure that each header mounted flush to the block, but they still needed some tender loving care. I've seen pictures where the pipes are perfectly aligned, and just as many where they angle in towards the back of the gearbox, and that's how mine came out. Pretty close, but no cigar.
Now that was just a warmup for the dozens of parts that comprise both the rear suspension, and the drive train.
All the parts were primed with Mr. Hobby 1500 Gray primer, not their Black primer, nor did I opt for a coat of Gloss Black to give the Alcad Metalizers a deep shine. Most of the parts are stainless steel. Polished when new, but they just didn't stay that way very long. Grease, grime, and plain old dirt from Jack's hands and work rags took care of that in short order. My compromise was as I said, the Gray undercoat only.
I started with the suspension lower arms that the disc brakes are attached to. Those were painted straight Alcad Stainless Steel. The Discs were a combination of Stainless steel and Steel, while the Hub Carriers (? as I just can't remember the correct name), were painted Alcad Magnesium which looks close enough to a dark cast metal color.
The rest of the suspension was painted Alcad2 Chrome, but over Gray primer doesn't have that super shine.
One thing I did notice was that whomever decided on colors, has no idea that Black can be Matt, Semi Gloss, or Gloss. Every single call out is for Semi gloss.
Thanks for stopping by and checking out my BT build to date. It's greatly appreciated.
Joel
AussieReg
#007
Joined: June 09, 2009
KitMaker: 8,156 posts
Auto Modeler: 2,953 posts
Posted: Saturday, April 06, 2019 - 03:20 PM UTC
This build is looking excellent Joel. Your attention to detail down to the type of metal that each 1:1 component was made from makes a really eye-catching display.
I can understand the difficulty in getting those headers and exhausts aligned, it is a tight little spot with lots of intrusions to work though.
Keep up the great work, I'm looking forward to more updates.
Cheers, D
I can understand the difficulty in getting those headers and exhausts aligned, it is a tight little spot with lots of intrusions to work though.
Keep up the great work, I'm looking forward to more updates.
Cheers, D
Cosimodo
#335
Joined: September 03, 2013
KitMaker: 1,808 posts
Auto Modeler: 701 posts
Posted: Saturday, April 06, 2019 - 07:42 PM UTC
Great work Joel! I can remember from way back when on how fiddly it is to assemble those exhaust pipes from engine to pipe. Be thankful it was only a four cylinder  .
.
The shot from the rear of the car shows the work and detail that you have put into the Brabham. It's looking stunning.
cheers
Michael
.The shot from the rear of the car shows the work and detail that you have put into the Brabham. It's looking stunning.
cheers
Michael
Joel_W
Joined: December 04, 2010
KitMaker: 11,666 posts
Auto Modeler: 2,974 posts
Posted: Sunday, April 07, 2019 - 02:30 AM UTC
Quoted Text
This build is looking excellent Joel. Your attention to detail down to the type of metal that each 1:1 component was made from makes a really eye-catching display.
I can understand the difficulty in getting those headers and exhausts aligned, it is a tight little spot with lots of intrusions to work though.
Keep up the great work, I'm looking forward to more updates.
Cheers, D
D,
Thanks my friend for stopping by. it's much appreciated. I did try to work with various shades of Alcad2 plus a few I mixed myself, to help define each different type of metal used.
I'm going to have to be more careful how I set up my lighting as the direct front lighting was way to strong and the result is that much of the Chrome looks like bare plastic. Since I use a tripod, I can use more indirect lighting, and longer exposures to correct that issue.
Those headers were indeed a headache, but I got close enough. Just can't wait to see what's in store for me when I tackle a Tamiya F1 kit with a Ford Cosworth V8. I've read that a lot of the kits have all 8 header pipes as separate pieces.
Joel
Joel_W
Joined: December 04, 2010
KitMaker: 11,666 posts
Auto Modeler: 2,974 posts
Posted: Sunday, April 07, 2019 - 02:36 AM UTC
Quoted Text
Great work Joel! I can remember from way back when on how fiddly it is to assemble those exhaust pipes from engine to pipe. Be thankful it was only a four cylinder
The shot from the rear of the car shows the work and detail that you have put into the Brabham. It's looking stunning.
cheers
Michael
Michael,
Thanks so much for your most kind words. They're greatly appreciated.
As I mentioned to D, Tamiya F1 kits with Ford Cosworth V8's are known for their separate exhaust headers. Should really be fun.
The detail is all Ebbro's. The work to get it correctly, or closely painted to the real deal with Alcad's2 was mine, as the color callouts varied all over the place.
The fit is nearly perfect, but it does require a lot of effort to get everything to fit without forcing the issue due to paint build up, and alignment as one part can interfere with the fit of other parts. I found that in many cases, the easiest method for me to follow was to partially attach several parts then slowly work them into their final position.
Joel
Hwa-Rang
Joined: June 29, 2004
KitMaker: 6,760 posts
Auto Modeler: 2,182 posts
Posted: Sunday, April 07, 2019 - 10:26 PM UTC
Awesome metal work Joel. Very inspiring build, will have to get started on an F1 kit 
Joel_W
Joined: December 04, 2010
KitMaker: 11,666 posts
Auto Modeler: 2,974 posts
Posted: Monday, April 08, 2019 - 12:35 AM UTC
Quoted Text
Awesome metal work Joel. Very inspiring build, will have to get started on an F1 kit
Jesper my Friend,
Thanks so much for those really inspiring words. Believe me, the hardest part of the metal work was having to clean out my Grex Genesis AB over and over again during those painting sessions. The rest of the credit goes to Alcad2. All I really did was decide to keep the base/primer a Mat Gray to duplicate castings, and a smoother (slightly polished) surface for the Stainless Steel rods and such that needed a slight shine.
Love to see you do a proper F1 sooner then later.
Joel
Merlin
#017
Joined: June 11, 2003
KitMaker: 17,582 posts
Auto Modeler: 388 posts
Posted: Monday, April 08, 2019 - 07:33 AM UTC
Hi Joel
Lovely work! You've precisely touched on exactly one of things that's been on my mind for when I start my Lotus (sorry - I'm running a week or so behind the start I promised you.  ) - and it ties in with our weathering thread...
How dirty should a racer be?
I'm not thinking in terms of the end of the race where every unfortunate insect that got in the way is smeared across the windscreen etc. - but how far do racing teams go preparing their cars for each race?
Maybe it's changed over the years? It'd be great to get some feedback from anyone who's checked out F1 and Indy cars close up before a race - how pristine are they? - and, from that, how much (if any) weathering is realistic on a model?
And going back a step, Joel... I do want to start my Lotus 49 this week. I'll be learning a lot from you at every stage - so I hope I don't disappoint you.
All the best
Rowan
Lovely work!
You've precisely touched on exactly one of things that's been on my mind for when I start my Lotus (sorry - I'm running a week or so behind the start I promised you. ) - and it ties in with our weathering thread...How dirty should a racer be?
I'm not thinking in terms of the end of the race where every unfortunate insect that got in the way is smeared across the windscreen etc. - but how far do racing teams go preparing their cars for each race?
Maybe it's changed over the years? It'd be great to get some feedback from anyone who's checked out F1 and Indy cars close up before a race - how pristine are they? - and, from that, how much (if any) weathering is realistic on a model?
And going back a step, Joel... I do want to start my Lotus 49 this week. I'll be learning a lot from you at every stage - so I hope I don't disappoint you.
All the best
Rowan
Joel_W
Joined: December 04, 2010
KitMaker: 11,666 posts
Auto Modeler: 2,974 posts
Posted: Monday, April 08, 2019 - 09:27 AM UTC
Rowan,
Talk about a loaded question. I wish that there was one simple answer, but there isn't. Generally, the lower the class of racing, the more of a one man garage effort it is. But we're talking top shelf, F1 & Indy cars.
Even though I'm An American, I was fortunate to have seen Chapman's 49A, and 49B Lotus's race at Watkins Glen in 1967 & 1968. Those cars were absolutely pristine. Every nut, bolt, part, tire, and wheel were spotless when the arrived at the track. Honestly all the cars were. But it didn't take long for leaking oil, grease, dirt, and who knows what else to find homes on the cars. Generally, they were cleaned at night and ready to go the next day. today, clean isn't clean enough, spotless is just mandatory, as dirt slows down the cars.
Generally speaking, the same holds true for Indy Cars.
The further you go back into the annals of racing, the dirty the cars seemed to be nearly all the time.
I'm in the camp of having my builds look like how the car would look rolling out of the 40 ft trailers.
You could always do some mild weathering with dark washes, which I do for the engine and gearbox. But you'd be hard pressed to find pictures of anything much more unless it's after the race or a practice session.
Looking forward to your epic build.
Ismael Gonzales, whose one of my friends on another auto list, is a world class auto modeler, whose work is simply amazing. He also likes to weather his models as the real deal would have looked after the race.
Here's two pictures of his 2016 Ford GT class winning LeMans car. The diorama is simply amazing. You'd have a real hard time telling the difference from the real car from his model.
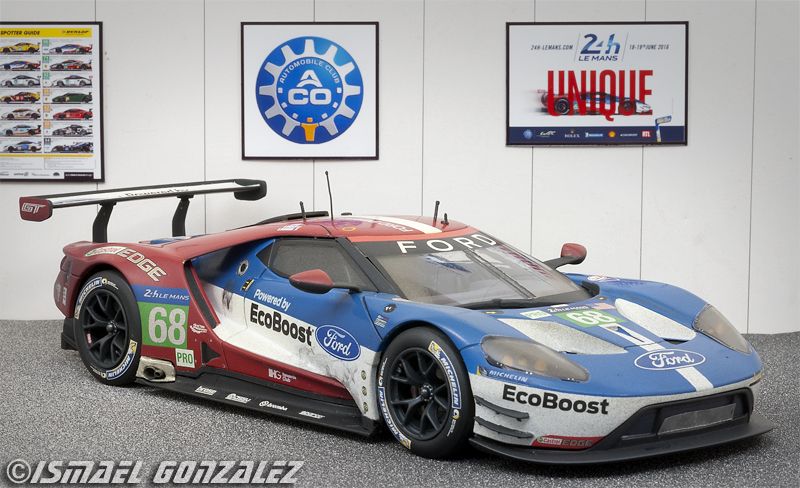
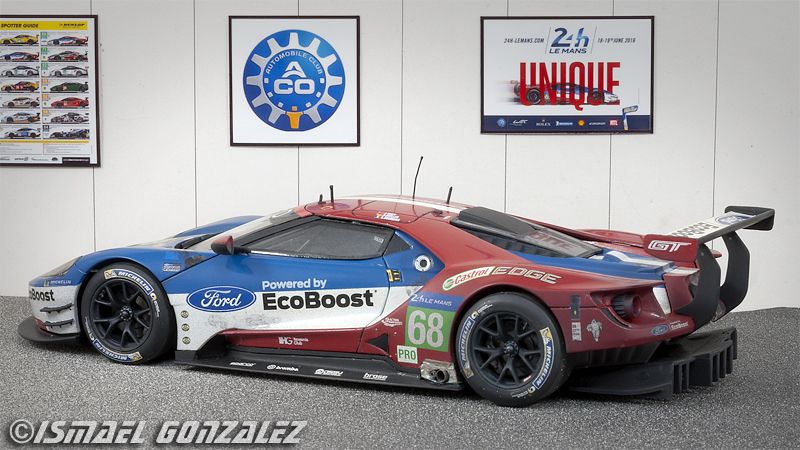
Joel
Talk about a loaded question. I wish that there was one simple answer, but there isn't. Generally, the lower the class of racing, the more of a one man garage effort it is. But we're talking top shelf, F1 & Indy cars.
Even though I'm An American, I was fortunate to have seen Chapman's 49A, and 49B Lotus's race at Watkins Glen in 1967 & 1968. Those cars were absolutely pristine. Every nut, bolt, part, tire, and wheel were spotless when the arrived at the track. Honestly all the cars were. But it didn't take long for leaking oil, grease, dirt, and who knows what else to find homes on the cars. Generally, they were cleaned at night and ready to go the next day. today, clean isn't clean enough, spotless is just mandatory, as dirt slows down the cars.
Generally speaking, the same holds true for Indy Cars.
The further you go back into the annals of racing, the dirty the cars seemed to be nearly all the time.
I'm in the camp of having my builds look like how the car would look rolling out of the 40 ft trailers.
You could always do some mild weathering with dark washes, which I do for the engine and gearbox. But you'd be hard pressed to find pictures of anything much more unless it's after the race or a practice session.
Looking forward to your epic build.
Ismael Gonzales, whose one of my friends on another auto list, is a world class auto modeler, whose work is simply amazing. He also likes to weather his models as the real deal would have looked after the race.
Here's two pictures of his 2016 Ford GT class winning LeMans car. The diorama is simply amazing. You'd have a real hard time telling the difference from the real car from his model.
Joel
Stickframe
#362
Joined: December 01, 2013
KitMaker: 1,661 posts
Auto Modeler: 431 posts

Posted: Monday, April 08, 2019 - 05:52 PM UTC
Hi Joel,
You have clearly mastered the full spectrum of silvers and greys - wow - the rolling chassis looks great!
Thanks for posting the GT - nice build. The weathered effect is very convincing - looks very realistic
Cheers
Nick
You have clearly mastered the full spectrum of silvers and greys - wow - the rolling chassis looks great!
Thanks for posting the GT - nice build. The weathered effect is very convincing - looks very realistic
Cheers
Nick
 |

WEB HOSTING BY


Copyright ©2021 Auto Modeler and Kitmaker Network, a subsidiary of Silver Star Enterprises
All Rights Reserved. Please read our Conditions of Use and Privacy Policy.
All Rights Reserved. Please read our Conditions of Use and Privacy Policy.