_GOTOBOTTOM
Cars
Discuss all types of automotive modeling here.
A Bridge too far GT40 MKIV
Stickframe
#362
_VISITCOMMUNITY
California, United States
Joined: December 01, 2013
KitMaker: 1,661 posts
Auto Modeler: 431 posts
Posted: Tuesday, April 02, 2019 - 09:18 AM UTC
Hello gents,

As I've spent the last few months building off-road racers, I wanted something new and challenging - and I think I found it.

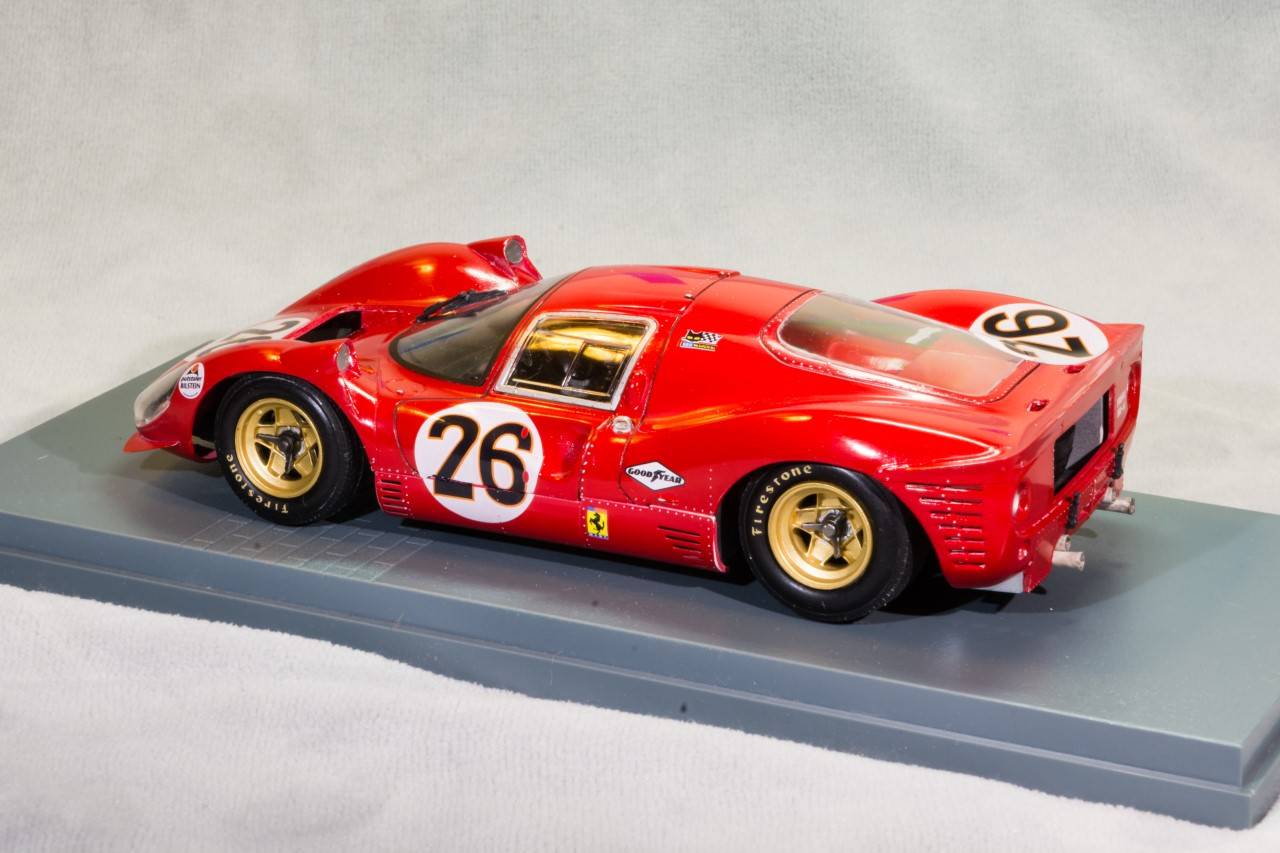
Sadly, this build doesn't qualify for the blue oval group build - as about all that can be traced to Ford is the concept of the big block engine and, as it's a racer, it's hard for me to say (as I don't know) exactly how much of the block and it's internal workings actually come from Ford - much less the heads etc - nonetheless, it's widely recognized as a Ford - the GT40 Mk IV, and that's what I call it too - a Ford.

I decided on this version for a variety of what might, upon retrospect, have been not great ideas. I thought - I could buy one of the really nice, Renaissance resin kits - and cut it up, and modify it to something more than a curbside kit - how hard could that be? Clearly I realized it wouldn't be easy - but also, really didn't know how hard it might be.

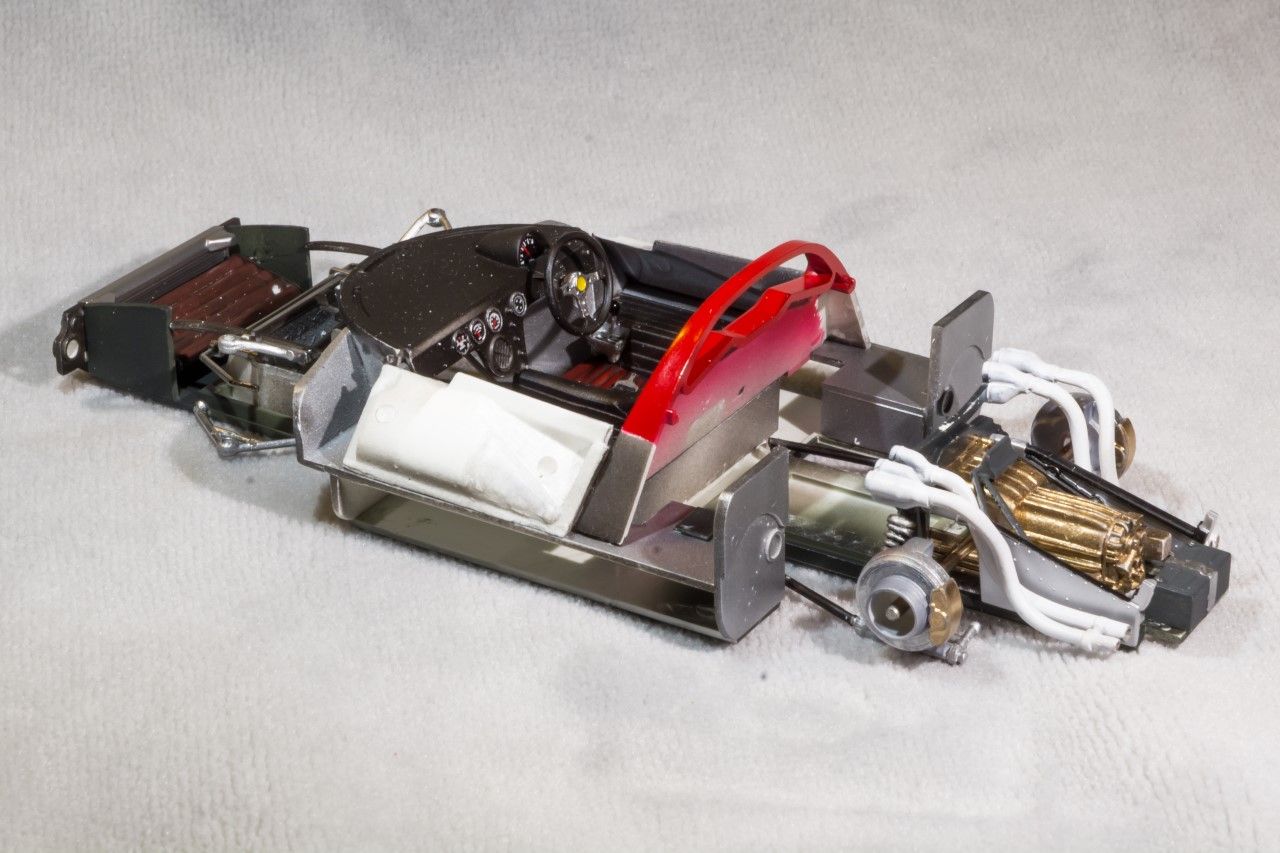
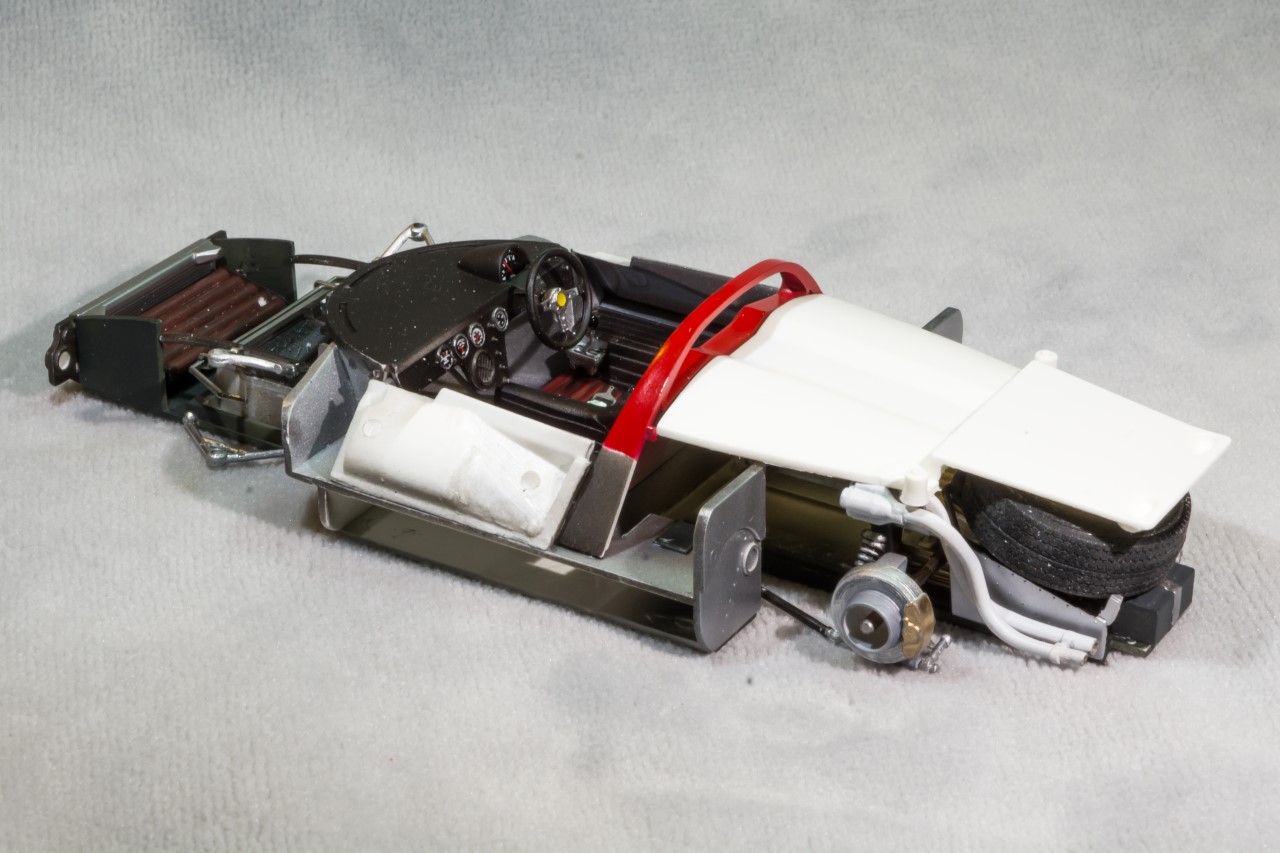
The kit is really nice, and it includes an interesting mix of PE, machined parts, resin parts, visible portion of the engine etc - but - with a very simple "axle" assembly - not to my liking one bit. The body shell and chassis each come as separate, one piece parts you glue/screw together, with various add on elements.

Job number one - start cutting and carving:


As you can see above, the resin here is thick. Fortunately, it's pretty nice on the outside, but hidden away, on the underside -chunky! Fairly forgiving though - I cut apart: the doors, hood, trunk, and cabin - with only a couple of big cracks - which were easy to fix. Some cuts/carved/etched out sections went smoothly - others - ugh - quite ugly!! At more than one point, I almost just gave up - but, didn't.

Take a look, mostly buttoned up:


Mostly not:


This has been quite a head scratcher!!!

And, a few more:


I include the image above so you can see how the "trunk" is hinged-the brass/aluminum frame pinned to the resin frame below the exhaust - this was not easy to figure out - at - all!! but, so far so good. You'll see plenty of materials here - this is involving the use of any parts I can find.

Next up some progress on the cabin and front end:


Same, idea, but different solution for the operable hood.


The cabin roof etc is only dry fit - to keep it in place, I drilled pins into the chassis and roof/etc - so, it will stay in place as I bumble around with it -but, can remove it - to address the inevitable problems.

I haven't figured out how to hinge the doors - I seem to be out of luck there - but, haven't given up altogether.

So gents - I've decided that this is a fun challenge - and accept it for it's various shortcomings - at best, it might build up to a nice display car - at worst, into a barnyard find diorama - who knows? still a long way to go -

Cheers and happy model building

Nick


Cosimodo
#335
_VISITCOMMUNITY
Auckland, New Zealand
Joined: September 03, 2013
KitMaker: 1,808 posts
Auto Modeler: 701 posts
Posted: Tuesday, April 02, 2019 - 12:43 PM UTC
That's great work Nick, especially the engine sub-frame and suspension which I guess you scratch built.
I am surprised that a GT40 Mk IV does not qualify as a "Ford" since it was all about Ford vs. Ferrari and Porsche at LeMans in the late 60's.

cheers
Michael
Stickframe
#362
_VISITCOMMUNITY
California, United States
Joined: December 01, 2013
KitMaker: 1,661 posts
Auto Modeler: 431 posts
Posted: Tuesday, April 02, 2019 - 01:29 PM UTC
Hi Michael -

Thanks! Yes, the suspension and other parts are kitbashed and scratchbuilt. The kit didn’t have a suspension per se - instead a pretty simple chassis with metal rod axles - but the kit body is sure nice!

I was joking about not being a “Ford” - tho, in the context of the blue oval build, I think it makes sense - that is, a 1967 GT40 Mk IV, wasn’t similar to an off the line car of most manufacturers of the time. The GT40 was a remarkable accomplishment, bringing with it all sorts of bragging rights - just not the same as most production cars - that said, you might know the saying “win on Sunday sell on Monday” Seems to still ring true!

Cheers,
Nick
Hwa-Rang
_VISITCOMMUNITY
Kobenhavn, Denmark
Joined: June 29, 2004
KitMaker: 6,760 posts
Auto Modeler: 2,182 posts
Posted: Tuesday, April 02, 2019 - 05:21 PM UTC
Great subject Nick. Super job on the mod's/scratch building.
AussieReg
Staff MemberAssociate Editor
AUTOMODELER
#007
_VISITCOMMUNITY
Victoria, Australia
Joined: June 09, 2009
KitMaker: 8,156 posts
Auto Modeler: 2,953 posts
Posted: Tuesday, April 02, 2019 - 10:41 PM UTC
Excellent work so far Nick. Once again your innovation and adaptation skills are bringing results! That is one chunky piece of resin, you must be getting arms like Arny moving that around. It is probably almost the same weight as the original 1:1

Following with much interest, a unique project once again from "The House of Haskell".

Cheers, D
Joel_W
Staff MemberAssociate Editor
AUTOMODELER
_VISITCOMMUNITY
New York, United States
Joined: December 04, 2010
KitMaker: 11,666 posts
Auto Modeler: 2,974 posts
Posted: Wednesday, April 03, 2019 - 06:41 AM UTC
Nick,
What a great start with your engineering of the hinges and suspension. I'm really looking forward to your updates till your GT40 MK IV crosses your finish line.

For the Ford GB, it just has to be a vehicle built by Ford. The GT40 MKIV was certainly designed and built in Deerborn Michigan by Ford. The engine is their 427 ci block with a single massive 4 barrel carb that was also used in Nascar Fords. Sadly it was the end of the Ford journey as Ford.

Joel
Merlin
Staff MemberSenior Editor
AEROSCALE
#017
_VISITCOMMUNITY
United Kingdom
Joined: June 11, 2003
KitMaker: 17,582 posts
Auto Modeler: 388 posts
Posted: Thursday, April 04, 2019 - 06:42 AM UTC
Hi Nick

Great work! I've never seen a build like this, so it's going to be fascinating to follow. There are clearly going to be a lot of useful tips to learn for future projects.

All the best

Rowan
Stickframe
#362
_VISITCOMMUNITY
California, United States
Joined: December 01, 2013
KitMaker: 1,661 posts
Auto Modeler: 431 posts
Posted: Thursday, April 11, 2019 - 12:04 PM UTC
Hi guys, thanks for dropping by, having a look, and leaving some thoughts.

Hi Jesper, thanks - I appreciate the sentiment - I have fun with scratch building, but - this has been a real challenge!!

Hi Damian, yes....adaptation, adaptation...and more adaptation - and, thick, sort of petroleum smelling resin- lol - just like a real car - haha...thanks - -

Hi Joel, you hit this one on the head, making it to the finish line is a real goal. I hope this car gets finished and looks at least respectable. I gave up on operable doors - too late for that, so I reattached and closed the passenger side door and left the driver's side open - with what I think look like convincing hinges...we'll see, but for now, I'm staying optimistic.

Hi Rowan, thanks for taking a look. Yes, the approach here is a bit out of the ordinary, but I do enjoy the challenge. Somewhere along the way I concluded that I don't do what I want to at work - as this isn't work why not? So far I've been fairly lucky with relatively few disasters.

OK - please take a look. A few updates being made. Considering how unlikely it is that you will even notice what I've done (subtle but really tedious advances), I can say, it's taken a long time, and a lot of work!


I'm waiting for two, four barrel carbs, and a manifold from BNL resins.....when I get them will clean up the engine.

Thanks for having a look

cheers

Nick


Joel_W
Staff MemberAssociate Editor
AUTOMODELER
_VISITCOMMUNITY
New York, United States
Joined: December 04, 2010
KitMaker: 11,666 posts
Auto Modeler: 2,974 posts
Posted: Friday, April 12, 2019 - 12:45 AM UTC
Nick,
Great progress so far.

From what I can see, you mounted the wheels and tires. The side gas tanks are now painted Aluminum or skinned, with rivets, a great touch by the way, and the start of the filler cap assembly.

Also the rear mesh grill has been added, as well as the rear brake ducking.

I'm sure that you've done a lot more. That I missed.

I do like your idea of not having moving doors. For a static model, one open on the drivers side, and the other door closed works just fine for me.

Joel
Stickframe
#362
_VISITCOMMUNITY
California, United States
Joined: December 01, 2013
KitMaker: 1,661 posts
Auto Modeler: 431 posts
Posted: Friday, April 12, 2019 - 03:11 PM UTC
Hi Joel,

Good eye! I’m particularly glad that you noticed the various “aluminum” treatment attempts! So far no paint, but I’ve used some etch material from other kits that look the part, and really good eye on the “rivets” in the evergreen!

What you see that might look like paint already next to the driver’s seat is lead foil - formed over various pieces of cut, carved, filed then glued evergreen. The real car has a metal transition between the seat and the deck of the modular chassis. As I’ll model the door open (glad to have your thumbs up on that!) I need some interior detail - ie not just the seat - resulting in the opportunity in doing some “aluminum forming” haha -

Thanks for checking it out -

Nick
Joel_W
Staff MemberAssociate Editor
AUTOMODELER
_VISITCOMMUNITY
New York, United States
Joined: December 04, 2010
KitMaker: 11,666 posts
Auto Modeler: 2,974 posts
Posted: Saturday, April 13, 2019 - 12:53 AM UTC

Quoted Text

Hi Joel,

Good eye! I’m particularly glad that you noticed the various “aluminum” treatment attempts! So far no paint, but I’ve used some etch material from other kits that look the part, and really good eye on the “rivets” in the evergreen!

What you see that might look like paint already next to the driver’s seat is lead foil - formed over various pieces of cut, carved, filed then glued evergreen. The real car has a metal transition between the seat and the deck of the modular chassis. As I’ll model the door open (glad to have your thumbs up on that!) I need some interior detail - ie not just the seat - resulting in the opportunity in doing some “aluminum forming” haha -

Thanks for checking it out -

Nick


Nick,

It's hard from looking at pictures from the site to figure out if it's Metal foil, paint, aluminum sheet, or what not. The important thing is that you modeled it, rather then just painting the interior one or two shades of paint.

Joel
Stickframe
#362
_VISITCOMMUNITY
California, United States
Joined: December 01, 2013
KitMaker: 1,661 posts
Auto Modeler: 431 posts
Posted: Wednesday, April 17, 2019 - 07:57 AM UTC
Hello gents -

I'm making real headway on the MK IV. My carbs and manifold arrived on Monday, and they worked out OK. The detail is frankly a bit soft, but, one shouldn't forget context. This project is not exactly my most well planned adventure in modeling - so, in that spirit, the carbs are fine. That said, I am now interested in finding really crisp resin carbs...? I have a friend who does 3d printing...maybe for another project.

You'll see I added a fuel line for the double pumpers, and a throttle linkage representation using very thin, strong wire and remnants of a Aber T-55 etch - very fine parts, which are ideal for this.

Please take a look:


It's certainly a colorful combination of scrap box spares! I want the carb/car to look used - so, I gave them a light weathering. the flat pan between the carbs and manifold served as the base for an airbox, fed by ports on the rear body shell on the original car. For this, I'm not adding the sidewalls - I want to see the carbs:


You can also see I added a distributor - the little sleeves sticking out above are preset for my plug wires. It occurred to me that it would be really hard to add these later - so, I over drilled the under side of each and glued them directly to the distributor. While likely still an unpleasant task, I'm hopeful this will make installing the wires a bit easier.

And placed on the primer coated car:


The valve covers are not included in the pics above - so you can see where the spark plugs will go.

So far so good - Yes - I know - the anodized els on the fuel line are likely not period correct - I can live with that, and I'll add a few more, including on the trans cooler - to give this powerhouse some flare - haha - they will look nice against the many layers of silver to come, and the yellow spark plug wires.

thanks for having a look!

Cheers
Nick


Cosimodo
#335
_VISITCOMMUNITY
Auckland, New Zealand
Joined: September 03, 2013
KitMaker: 1,808 posts
Auto Modeler: 701 posts
Posted: Wednesday, April 17, 2019 - 12:17 PM UTC
I love your detail work Nick. The carbs look amazing with the small fuel lines highlighted.

cheers
Michael
Joel_W
Staff MemberAssociate Editor
AUTOMODELER
_VISITCOMMUNITY
New York, United States
Joined: December 04, 2010
KitMaker: 11,666 posts
Auto Modeler: 2,974 posts
Posted: Thursday, April 18, 2019 - 01:25 AM UTC
Nick,
Simply outstanding detailing. I'm truly impressed. So impressed, that my 3 Fujimi kits might never get built as none contain any engines or facsimiles of just the top half, and the only AM engines I know of are now out of production.

Joel

Stickframe
#362
_VISITCOMMUNITY
California, United States
Joined: December 01, 2013
KitMaker: 1,661 posts
Auto Modeler: 431 posts
Posted: Friday, April 19, 2019 - 12:15 PM UTC
Hi gents -

Michael, thanks very much - I’m glad the (tedious!!) detailing paid off! Glad you like it and thanks for the note, I appreciate it -

Hi Joel,

Thanks for the positive words! As you know, these projects take some effort, so positive feedback from peers is great to hear!

Yes - the dilemma of doing this sort of work on a Fujimi kit....I used some Fujimi parts for this - and a few Fujimi AM parts - unfortunately there are a variety of differences between the Fujimi MK I and II and this, a Renaissance MKIV, including the use of a big block - happily for me, the headers are similar!

But to your thoughts on doing more to the MKII without a specific AM kit - that’s really interesting. I thought a lot about that, and how I might handle it. As you can’t see much of the engine block once installed (notice above) I’ll bet you could either scratch a block like form, or use a BNL small block and go from there. You might need to scratch build the intake manifold (can’t remember if multiple carbs or injection?) - velocity stacks, valve covers etc are avail. The headers can be scratch built. I have a post on off road racing Chevy trucks - lucky me, each received custom built headers - tedious but achievable. If you’re interested in this let me know - there’s a website that sells resin header flanges and collectors that make this easier to do - using solder for the pipes - nice...

The Fujimi suspension looks good - and you don’t need to rebuild any of it, unless you want - and the more obvious parts (sway bar, control arms etc) can be enhanced with brass rods and aluminum tubing,

Yes - I really thought about this - I have a Fujimi body and some parts - not a full kit though - an interesting project might be to see if I can build it with what I have and scratch the rest.....

Sure is an interesting idea you’ve sparked.....Or, you can give it a go! Aren’t you doing a GT on the blue oval build? Haha - it seems you’re already cranking through several complex builds -.

Happy model building!

Cheers
Nick
Joel_W
Staff MemberAssociate Editor
AUTOMODELER
_VISITCOMMUNITY
New York, United States
Joined: December 04, 2010
KitMaker: 11,666 posts
Auto Modeler: 2,974 posts
Posted: Saturday, April 20, 2019 - 01:58 AM UTC
Nick,
At this point I'm looking at doing the Revell Ford GT with AM decals covering 2016-18, but who knows what else will catch my eye by the time the GB starts!! Only time will tell.

I've looked at all 3 of my Fujimi Ford GT kits from 1966-1968 (John Wyler Gulf team), and each one follows the same Fujimi kit design for those era cars. No engine, just a transaxle to hang the rear suspension on, and the needed exhaust pipes. Then to add insult to injury, they came up with that engine cover plate. Here's my Ferrari P330-P4 from that Fujimi series:


You can clearly see the plate in the final build pictures. To me the overall look and feel of the car is there, but once you get a look into the business end window, the replica presentation just changes to something else.

I want my Ford GTs to be better then that. So I'll try to find those AM engines. If not, I'll jury rig the proper engine from another kit. The GT MK11s from 1966-1967 had those massive 427s, but the Wyler cars were powered by 289ci small blocks as per the change in rules, which was one of the major factors of Ford packing it in.

Joel
Stickframe
#362
_VISITCOMMUNITY
California, United States
Joined: December 01, 2013
KitMaker: 1,661 posts
Auto Modeler: 431 posts
Posted: Wednesday, April 24, 2019 - 12:30 PM UTC
Hi Joel,

You raise many good points and thanks for sharing a great build - It is too bad that some effort isn’t made by the manufacturer to provide opening assemblies, warranting the inclusion of even modestly detailed engines - if nothing else, i think they are a fun challenge to build!

As for today - first, sharing some sort of mediocre pics - I took them just before running out the door this AM - and, am short on time today - so, some pics and not many words:


And there you have it - I'll try and assemble it in a few days then get some respectable pics! The paint looks good in real life. I left some areas unpainted for gluing.

Cheers
Nick


AussieReg
Staff MemberAssociate Editor
AUTOMODELER
#007
_VISITCOMMUNITY
Victoria, Australia
Joined: June 09, 2009
KitMaker: 8,156 posts
Auto Modeler: 2,953 posts
Posted: Thursday, April 25, 2019 - 02:57 AM UTC
Talk about making a silk purse from a sow's ear! Lovely work Nick, looking forward to the glamour shots.

Cheers, D
Joel_W
Staff MemberAssociate Editor
AUTOMODELER
_VISITCOMMUNITY
New York, United States
Joined: December 04, 2010
KitMaker: 11,666 posts
Auto Modeler: 2,974 posts
Posted: Friday, April 26, 2019 - 01:07 AM UTC
Nick,
An absolutely impressive presentation as those pictures really show off all the work you've done on this most difficult build.

I'm really looking forward to your final set of pictures.

Joel
Stickframe
#362
_VISITCOMMUNITY
California, United States
Joined: December 01, 2013
KitMaker: 1,661 posts
Auto Modeler: 431 posts
Posted: Tuesday, May 07, 2019 - 08:58 AM UTC
Hi Damian and Joel - glad you guys like the outcome of this conversion, I appreciate your words!

I'm more or less pleased with end result - my reticence comes from my own decisions two or three times along the way, when I concluded - that "nope, no way this will work...."

I shouldn't have taken that point of view - because I lost focus and got sloppy a few times - when it wouldn't have been that difficult to stay on point!! Particularly with the painting, which is "this" close to being a great paint job - but, as I was doubtful of myself and the end result....it's about 85% a great paint job (the dead center of the hood looks like a flawless, yellow mirror, as do big parts of the long rear fenders - wow!!), 15%....less so - oh well - live and learn!

OK - enough rambling about "what could have been..." haha - here is, what is:


And now, the REALLY snappy pics...:


And there you have it! This was a tough build - but certainly a fun one - thanks for having a look

cheers
Nick


Joel_W
Staff MemberAssociate Editor
AUTOMODELER
_VISITCOMMUNITY
New York, United States
Joined: December 04, 2010
KitMaker: 11,666 posts
Auto Modeler: 2,974 posts
Posted: Wednesday, May 08, 2019 - 02:36 AM UTC
Nick,
Congrats on crossing the finish line

Henry Ford and the entire team behind the GT40 program would have been proud of your build. It's just exceptional.

Working with resin isn't easy, and requires a whole new set of skills. You certainly have that needed skill set.

The finished model looks and has the feel of the real thing, and that's the most important goal.

As for the paint, it really looks quite good in your pictures.

So what's your next auto build going to be?

Joel
Stickframe
#362
_VISITCOMMUNITY
California, United States
Joined: December 01, 2013
KitMaker: 1,661 posts
Auto Modeler: 431 posts
Posted: Wednesday, May 08, 2019 - 06:05 PM UTC
Hi Joel,

Thanks for taking the time to leave some thoughts - I appreciate your support.

Yes....resin models, they are a bit more challenging than plastic - I do enjoy working on them! This was a fun, if not difficult build - you’re point though about achieving “the look” of the real thing - that’s the tough part - I’m glad it passed your “eye” test.

I’m currently working on what is essentially the opposite of this - take a look at the “Old 4x4” project - rust and grime at its height! Past that, I’m thinking about a GT of some type - Nissan, Toyota, McLaren? Not sure just yet....but something high tech with clean lines and bright shine! In the mean time, I’m watching your Lola! Nice!

Cheers

Nick
ayovtshev
#490
_VISITCOMMUNITY
Sofiya, Bulgaria
Joined: September 22, 2016
KitMaker: 1,432 posts
Auto Modeler: 1 posts
Posted: Tuesday, May 14, 2019 - 07:37 PM UTC

Quoted Text

..."The House of Haskell"...


Spot on designation, Damian!

Nick's builds are pure treasures- the deeper you go, the more you find. Always!

Hat off to your scratchbuilding skills,Nick!

Hwa-Rang
_VISITCOMMUNITY
Kobenhavn, Denmark
Joined: June 29, 2004
KitMaker: 6,760 posts
Auto Modeler: 2,182 posts
Posted: Tuesday, May 14, 2019 - 09:06 PM UTC
Beautiful job Nick. Spectacular engine details.
 _GOTOTOP