Cars: Formula1
For Formula 1 racing modelers.
Tamiya 1/20 scale Lotus 25 Coventry Climax
Joel_W
Staff MemberAssociate Editor
AUTOMODELER
_VISITCOMMUNITY
New York, United States
Joined: December 04, 2010
KitMaker: 11,666 posts
Auto Modeler: 2,974 posts
Posted: Wednesday, August 28, 2019 - 12:32 AM UTC

Quoted Text


Quoted Text


Quoted Text

always good to drop by and see what's happening in your workshop Joel!

Never disappointed.

Q: what did you make the spark plug leads from?


Russell,
Glad you liked what you saw. I've actually fixed all the paint issues on the shocks, then I realized that once the tires/wheels go on, you'll never see them.

The spark plug wires are from a 4 color set of 1/24 scale ignition wires from HLJ. As I run out of various wires and cables my new resource is Detail Masters and my local big box Arts & Crafts store: AC Moore.

Joel


always the risk with any build Joel: we could spend hours, days even, on fine details only for them to hidden in the final result. Seen many an aircraft build suffering that

Thank you for the tip about the spark plug wires: ordered from my LHS


Russell,
Tell me about it. When I was into military aircraft, detailing cockpits and wheel wells was basically just for the posting of build updates, as none of that work would ever be seen on my display shelves especially as all the aircraft models are kept in plastic cases.

Cars are really different in some cases, but similar in others. The time I spent detailing the interior of the Ferrari P330 P415 will be never seen again, but I'm finding that some cars I display with the engine cover off like the 956 Porsche, and the bottoms do show in the gloss black display bases, or even a small mirror placed under the car. Still a ton of satisfying fun for this old timer.

Joel
Joel_W
Staff MemberAssociate Editor
AUTOMODELER
_VISITCOMMUNITY
New York, United States
Joined: December 04, 2010
KitMaker: 11,666 posts
Auto Modeler: 2,974 posts
Posted: Wednesday, August 28, 2019 - 12:34 AM UTC

Quoted Text

Hi Joel - nice work on the engine and rear end! Looks great!

There’s a website, Ted’s Modeling Marketplace that sells all sorts of scale details - parts to wires - and they deliver on time - for pre tinted fuel lines, I found some at SpotModel - though far away, the parts get here pretty fast

Ok, keep up the good work!

Cheers
Nick


Nick,
Thanks for liking what I've accomplished to date. Coming from you, it means a lot.

And thanks for the info on Ted’s Modeling Marketplace, going to go Google it now.

RussellE
#306
_VISITCOMMUNITY
Victoria, Australia
Joined: June 27, 2010
KitMaker: 3,959 posts
Auto Modeler: 495 posts
Posted: Wednesday, August 28, 2019 - 09:37 AM UTC

Quoted Text

Russell,
Tell me about it. When I was into military aircraft, detailing cockpits and wheel wells was basically just for the posting of build updates, as none of that work would ever be seen on my display shelves especially as all the aircraft models are kept in plastic cases.

Cars are really different in some cases, but similar in others. The time I spent detailing the interior of the Ferrari P330 P415 will be never seen again, but I'm finding that some cars I display with the engine cover off like the 956 Porsche, and the bottoms do show in the gloss black display bases, or even a small mirror placed under the car. Still a ton of satisfying fun for this old timer.

Joel


I think you've hit the nail on the head, Joel: as long as we're having fun, that's the first and only thing that matters
Joel_W
Staff MemberAssociate Editor
AUTOMODELER
_VISITCOMMUNITY
New York, United States
Joined: December 04, 2010
KitMaker: 11,666 posts
Auto Modeler: 2,974 posts
Posted: Wednesday, August 28, 2019 - 09:58 AM UTC
Russell,
Just ask my wife about my mood this morning trying to do suspension work on the Lotus 25, as most of the parts are Matt or Semi Matt Black. I just can see the alignment holes to the pins even with a light, and what would take you guys 10 min, took me well over 1 hr with a ton of frustration. The left eye is totally useless, and the right one is starting to fail with the Retina disease.

Joel
Cosimodo
#335
_VISITCOMMUNITY
Auckland, New Zealand
Joined: September 03, 2013
KitMaker: 1,808 posts
Auto Modeler: 701 posts
Posted: Wednesday, August 28, 2019 - 06:34 PM UTC
I have missed this for a couple of weeks! Great update Joel and the little Lotus is looking a treat. As always you have great attention to detail and whether it is visible or not we always know we made the effort and sometimes the hidden parts are the most satisfying part of builds.

cheers
Michael
Hwa-Rang
_VISITCOMMUNITY
Kobenhavn, Denmark
Joined: June 29, 2004
KitMaker: 6,760 posts
Auto Modeler: 2,182 posts
Posted: Wednesday, August 28, 2019 - 08:59 PM UTC
Looks amazing Joel.

There might be details, that you can't see, once completely assembled, but you know they are there and we know that they are there.

Joel_W
Staff MemberAssociate Editor
AUTOMODELER
_VISITCOMMUNITY
New York, United States
Joined: December 04, 2010
KitMaker: 11,666 posts
Auto Modeler: 2,974 posts
Posted: Thursday, August 29, 2019 - 12:47 AM UTC
Michael,
So glad that you liked what you saw in my Lotus 25 build. I do try my best, but yesterday rear suspension was really difficult with the black colors of the donuts to the dark colors of the Transmission axle carriers making seeing and depth of field issues a major issue. What most of you can do in 10 min took me a hour to accomplish after many failed attempts. But I did get both sides of the rear suspension done. Now on to the top of the engine and the pit.

Joel
Joel_W
Staff MemberAssociate Editor
AUTOMODELER
_VISITCOMMUNITY
New York, United States
Joined: December 04, 2010
KitMaker: 11,666 posts
Auto Modeler: 2,974 posts
Posted: Thursday, August 29, 2019 - 12:50 AM UTC
Jesper,
How very true. I guess part of it is that I understand what most of those details are and what they're used for. So that their importance to the build is just that to me. With my aircraft days, I literally knew next to nothing technical, so if it wasn't going t be visible when the build was finished, I just left it off.

Joel
RussellE
#306
_VISITCOMMUNITY
Victoria, Australia
Joined: June 27, 2010
KitMaker: 3,959 posts
Auto Modeler: 495 posts
Posted: Thursday, August 29, 2019 - 09:21 AM UTC

Quoted Text

Russell,
Just ask my wife about my mood this morning trying to do suspension work on the Lotus 25, as most of the parts are Matt or Semi Matt Black. I just can see the alignment holes to the pins even with a light, and what would take you guys 10 min, took me well over 1 hr with a ton of frustration. The left eye is totally useless, and the right one is starting to fail with the Retina disease.

Joel


I'm really sorry to hear that Joel The doctors can nothing?
Joel_W
Staff MemberAssociate Editor
AUTOMODELER
_VISITCOMMUNITY
New York, United States
Joined: December 04, 2010
KitMaker: 11,666 posts
Auto Modeler: 2,974 posts
Posted: Thursday, August 29, 2019 - 10:38 AM UTC

Quoted Text


Quoted Text

Russell,
Just ask my wife about my mood this morning trying to do suspension work on the Lotus 25, as most of the parts are Matt or Semi Matt Black. I just can see the alignment holes to the pins even with a light, and what would take you guys 10 min, took me well over 1 hr with a ton of frustration. The left eye is totally useless, and the right one is starting to fail with the Retina disease.

Joel


I'm really sorry to hear that Joel The doctors can nothing?


Russell,
Not really. I've had 4 laser surgeries in the left eye and 2 in the right eye. Plus a series of injections into both Retinas. They didn't do a thing, so I opted not to continue with them. Each shot costs $3,000, and after the insurance and grant money I still owed $1,000 per round. Made no sense.

The disease in my good eye, the right one, doesn't effect my vision as it's just off of the spot where the pupil focuses the light on the Retina. In the left eye it's dead center, so everything is just plain gray. As long as the disease doesn't spread in the right eye, I'm ok with vision, but what I see is always darker then what you see, and I have poor depth of field which makes modeling a rear challenge.

Joel
RussellE
#306
_VISITCOMMUNITY
Victoria, Australia
Joined: June 27, 2010
KitMaker: 3,959 posts
Auto Modeler: 495 posts
Posted: Thursday, August 29, 2019 - 10:23 PM UTC
All things considered then Joel, you're doing amazingly good work!
Joel_W
Staff MemberAssociate Editor
AUTOMODELER
_VISITCOMMUNITY
New York, United States
Joined: December 04, 2010
KitMaker: 11,666 posts
Auto Modeler: 2,974 posts
Posted: Friday, August 30, 2019 - 12:42 AM UTC

Quoted Text

All things considered then Joel, you're doing amazingly good work!


Russell,
Thanks for the support, it's much appreciated. Like I said, I have my good days, and my bad days.

Joel
Joel_W
Staff MemberAssociate Editor
AUTOMODELER
_VISITCOMMUNITY
New York, United States
Joined: December 04, 2010
KitMaker: 11,666 posts
Auto Modeler: 2,974 posts
Posted: Sunday, September 01, 2019 - 05:10 AM UTC
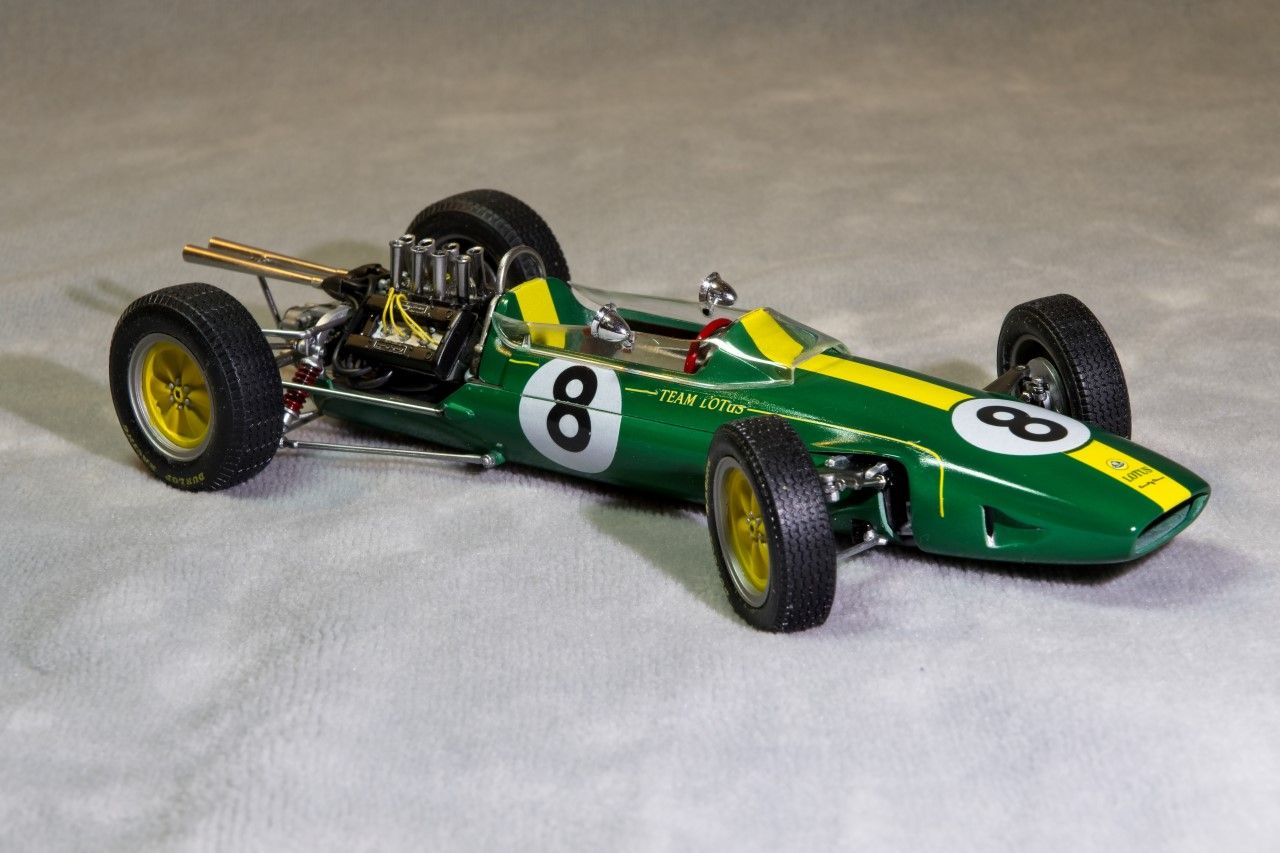
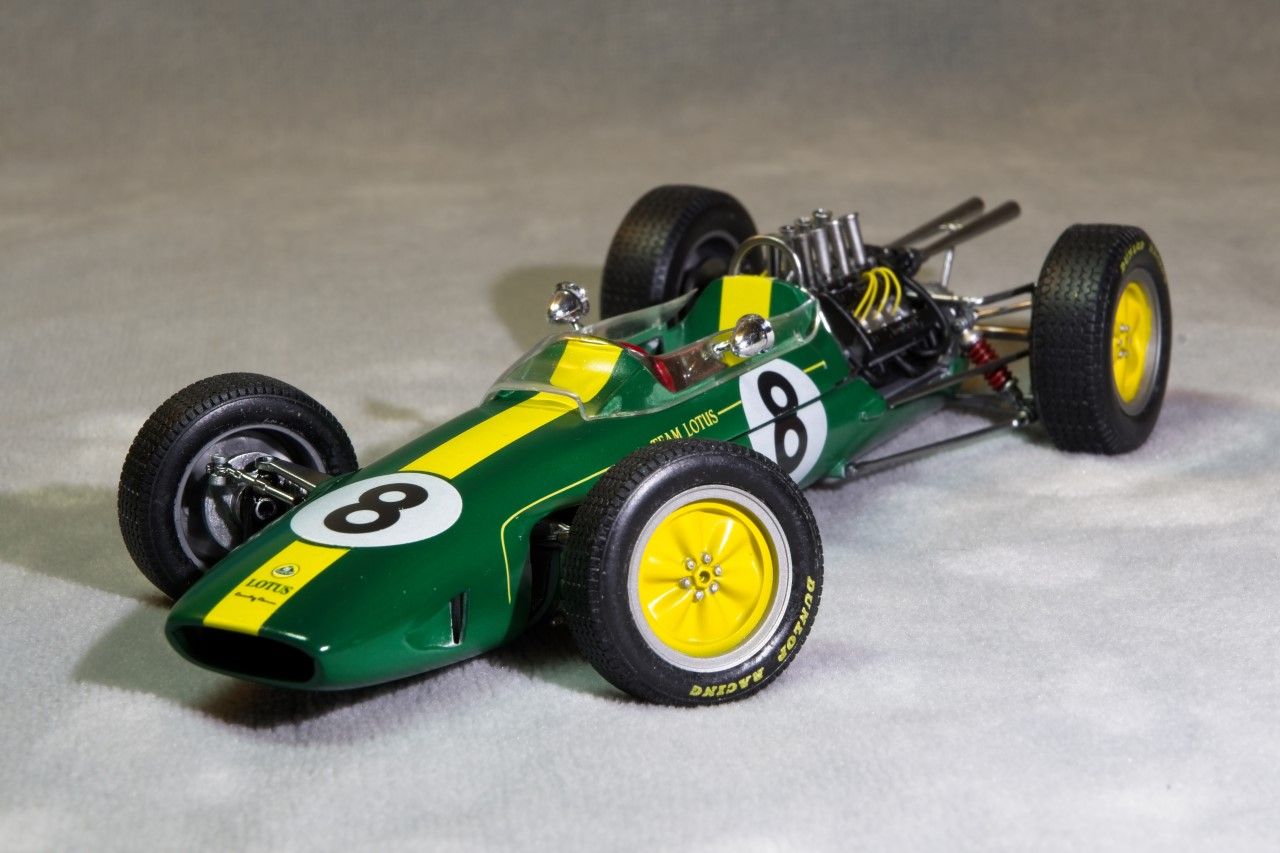
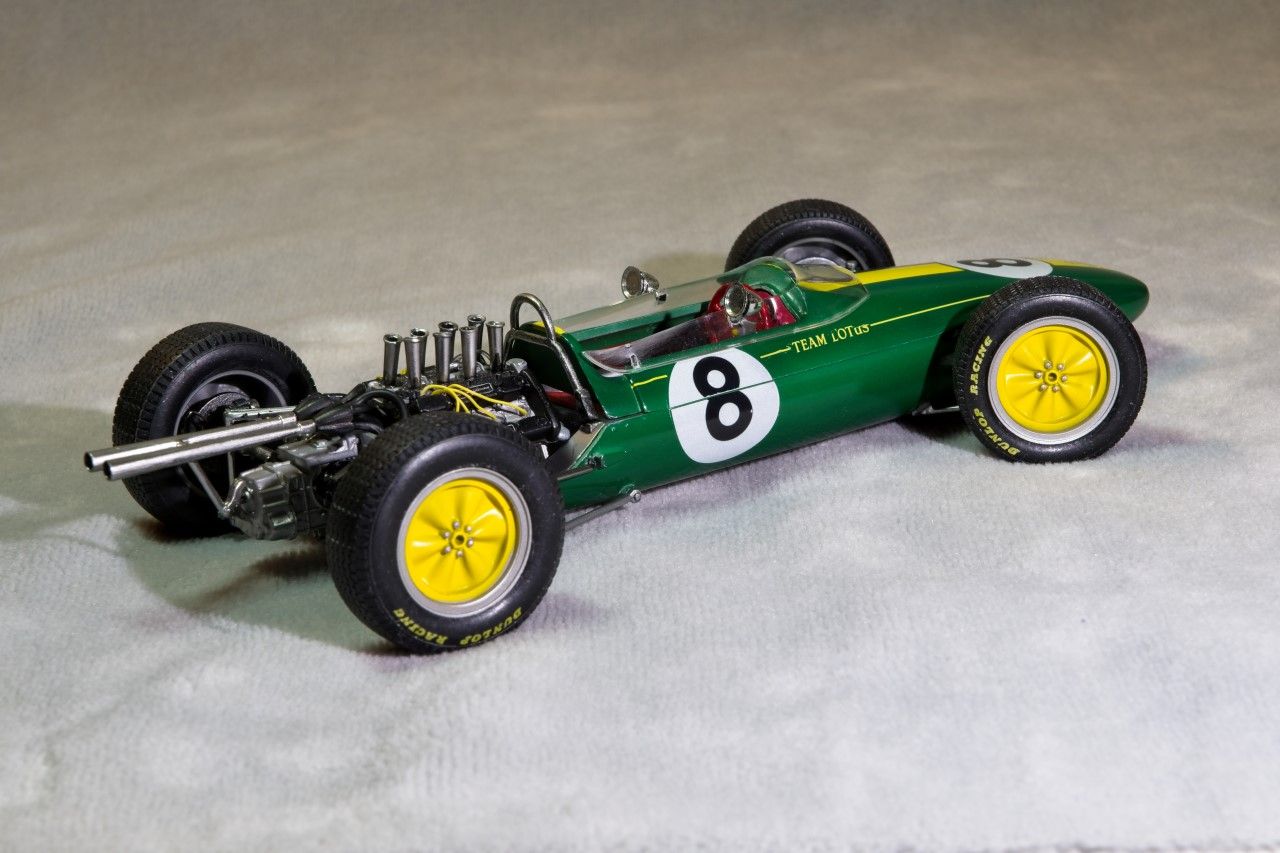
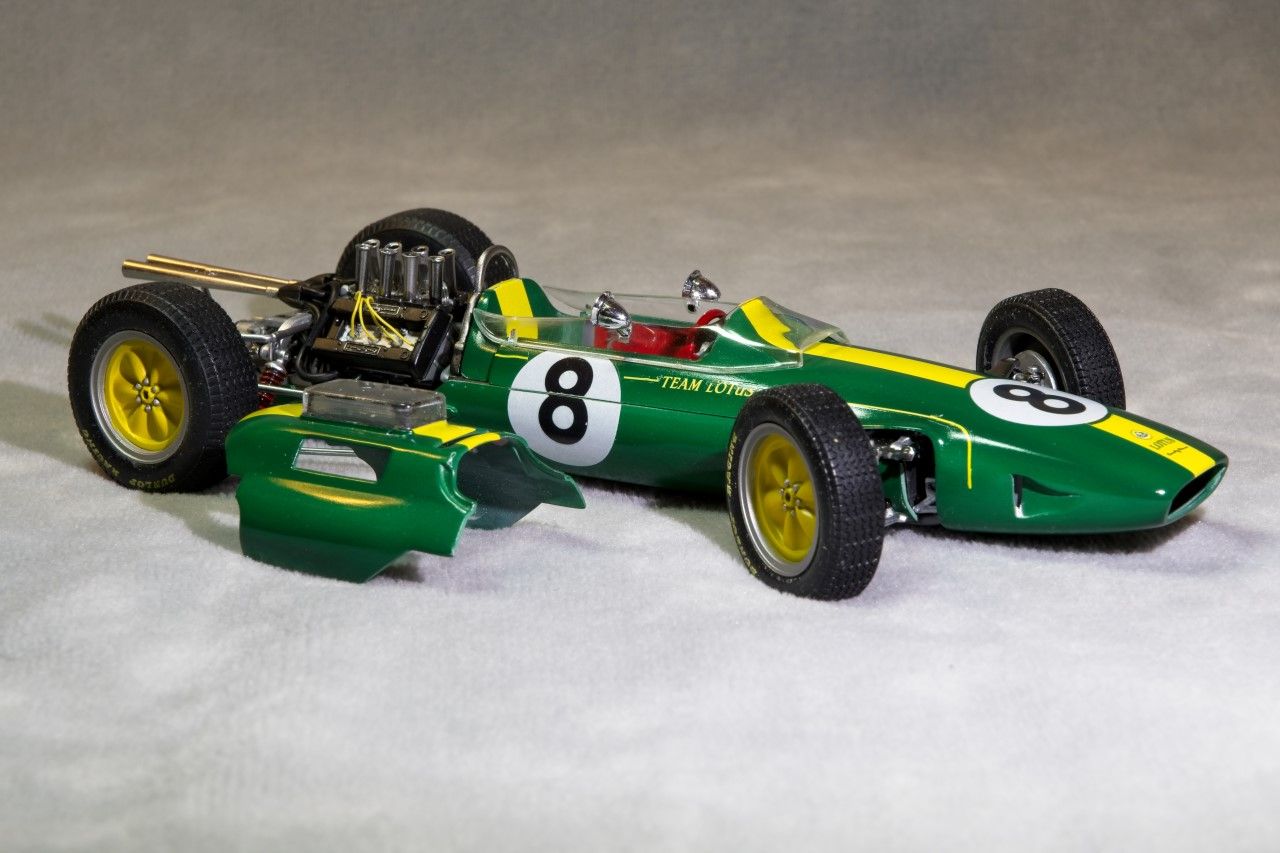
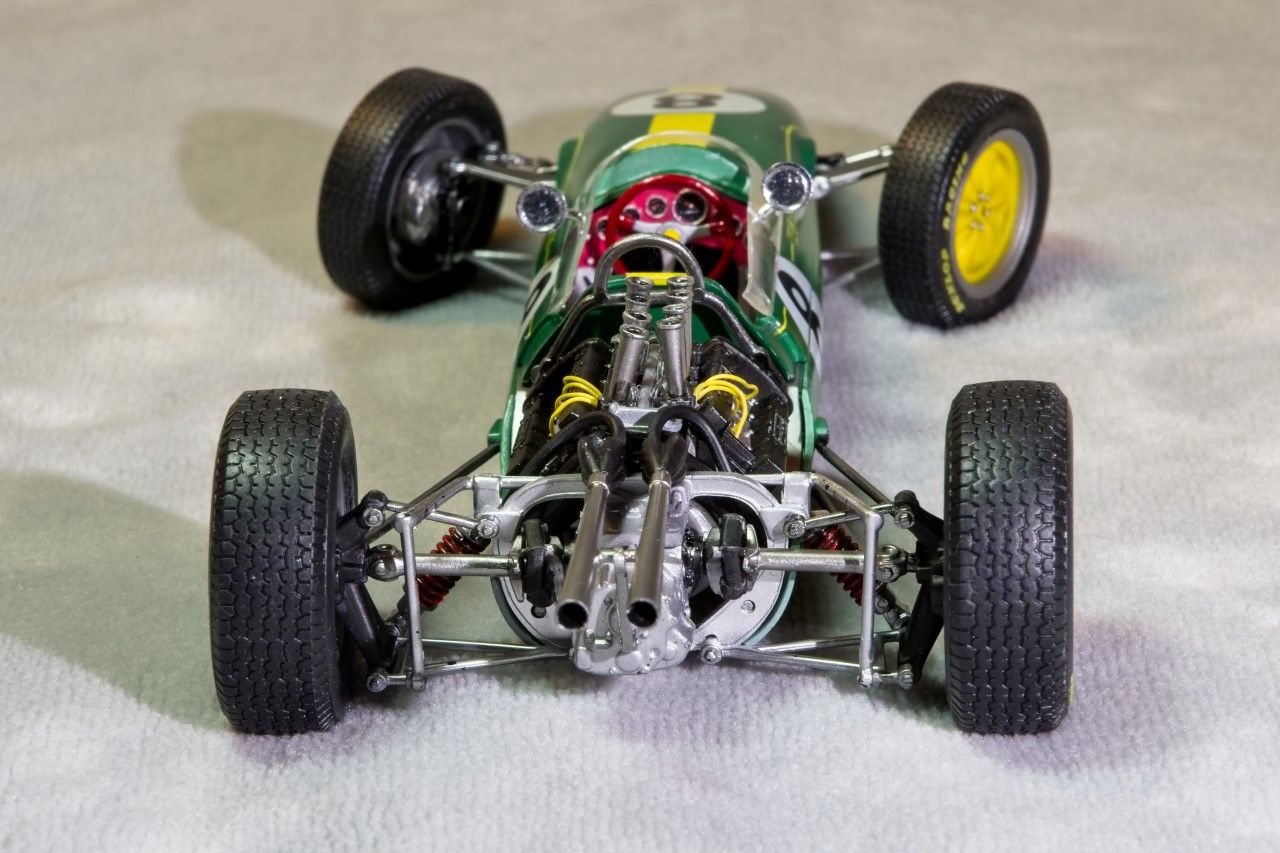
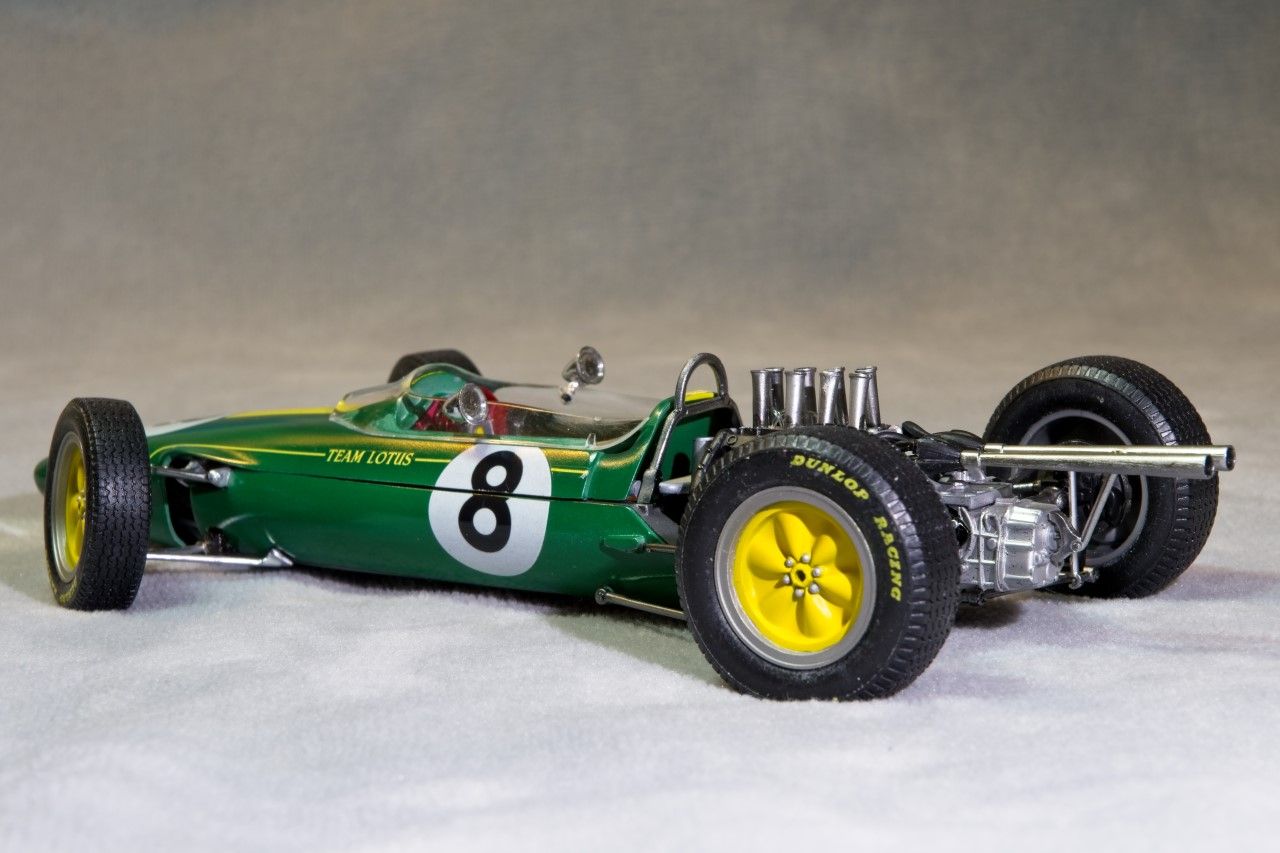
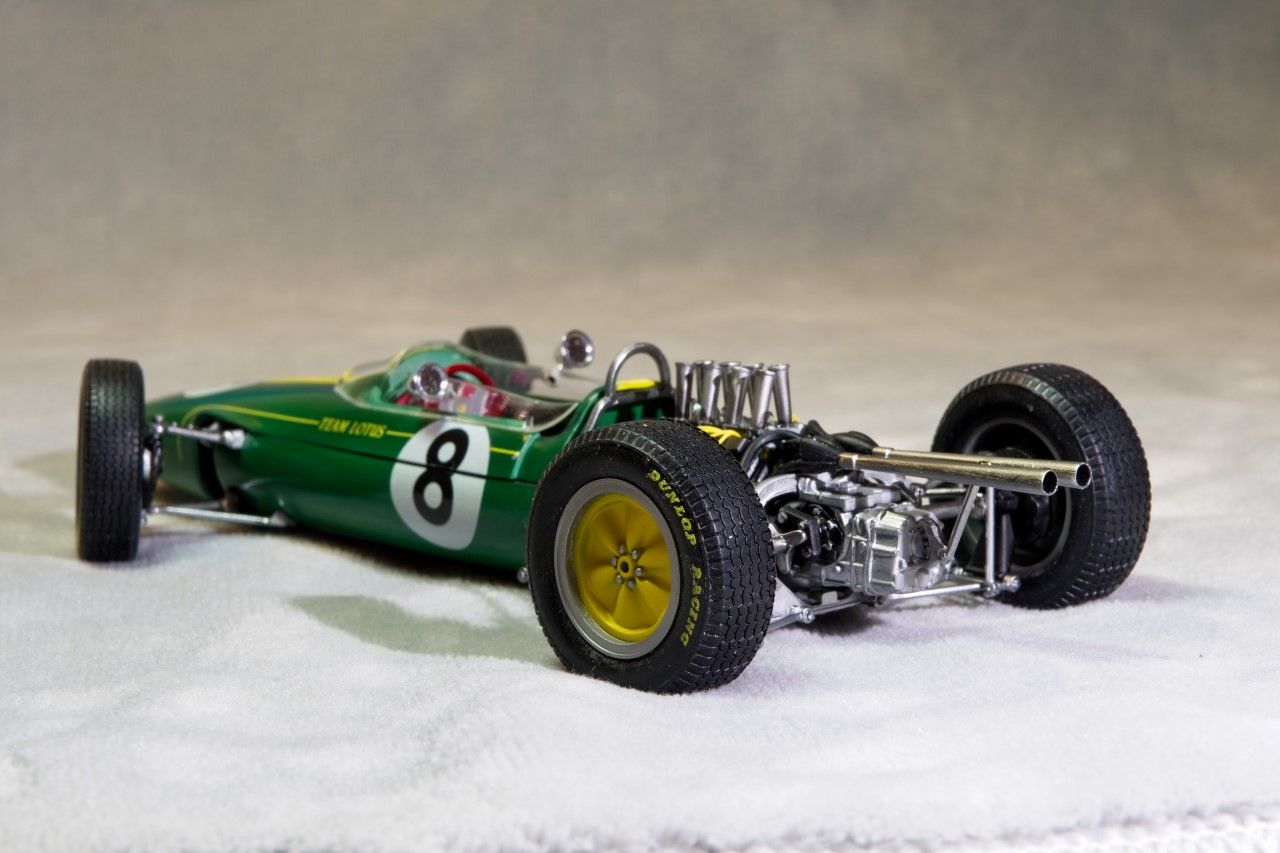
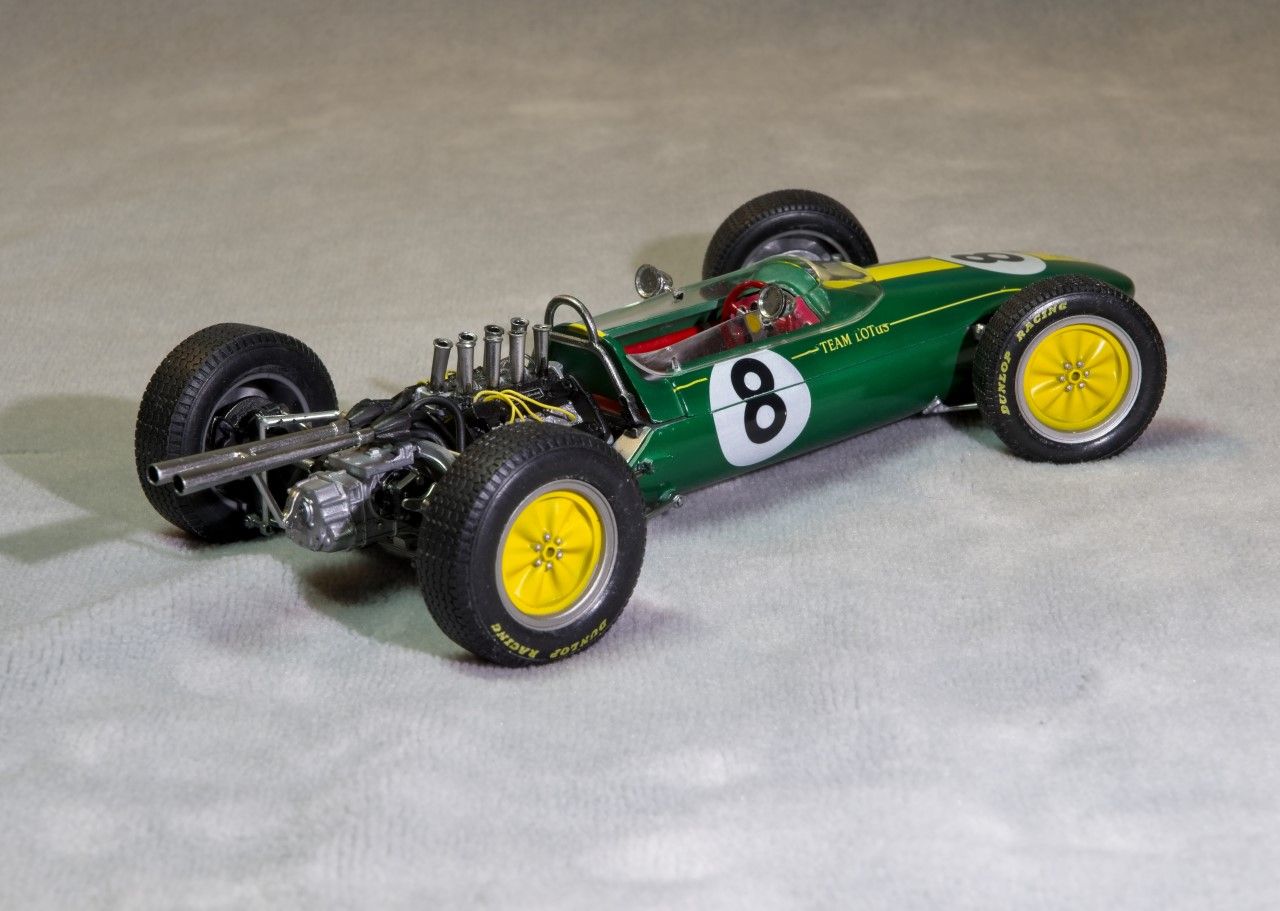
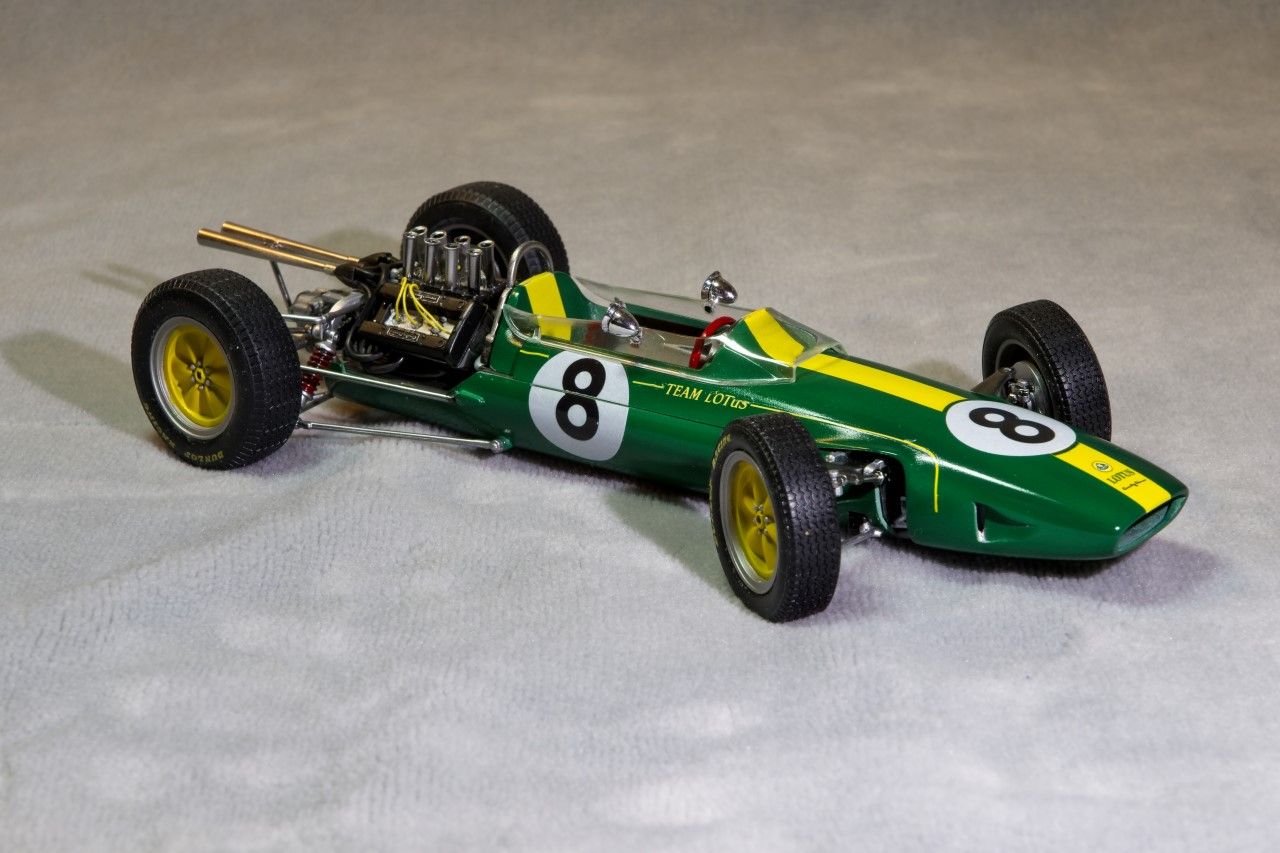
Well, Yesterday my Coventry Climax Lotus 25 crossed the finish line, so this is my final update before she's placed in her individual display case, and then on my F1 shelf. But 1st I did have several final touches to complete.

1-1st was the installation of the roll bar/rear bulkhead. After the usual gloss Black basecoat, the bulkhead was painted Alcad2 Aluminum. Once dry I masked it off, and painted the rull bar Alcad2 Chrome. The bulkhead fits right between the pipe to the water pump and the pipe to the radiator. Hense, that gap you saw in previous pictures.

2-The Redish Brown leather seat and steering wheel as well as the Stainless Steel steering shaft were installed. I started off with the custom mix that Tamiya listed, but the color was way to Brown. So I kept on adding Tamiya Gloss Red till I got closer to the set of reference pictures I was using. The Redish color does vary all over the place depending on whose restoration you're looking at. Some are pure Red which I believe for this car was wrong. The Redish color would have quickly turned darker and somewhat Brownish from dirt, grease, oils, etc. So I went with my own mix.

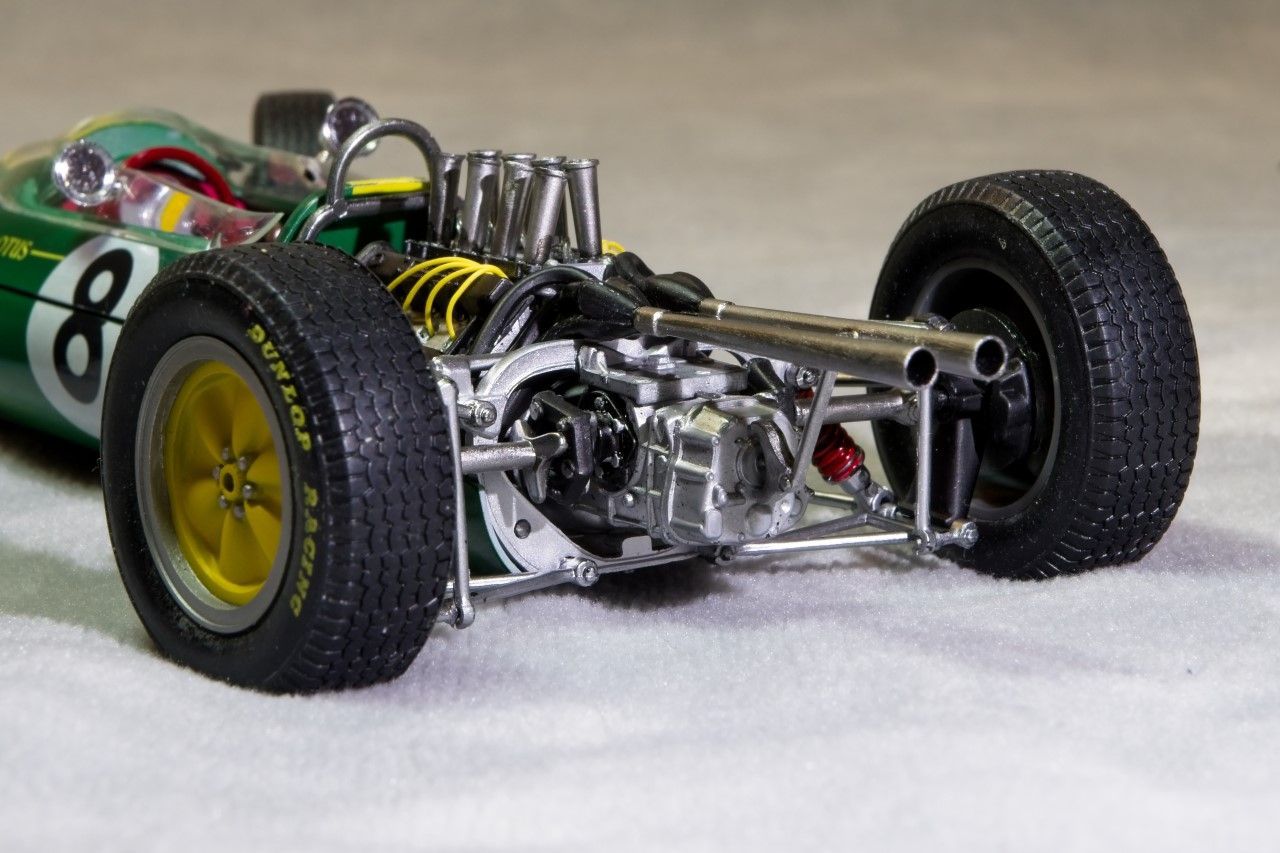
3-The Fuel injection intakes had preveiously been stripped, recieved a basecoat of Tamiya Gloss Black, then Alcad2 Chrome. Now they were glued into position.

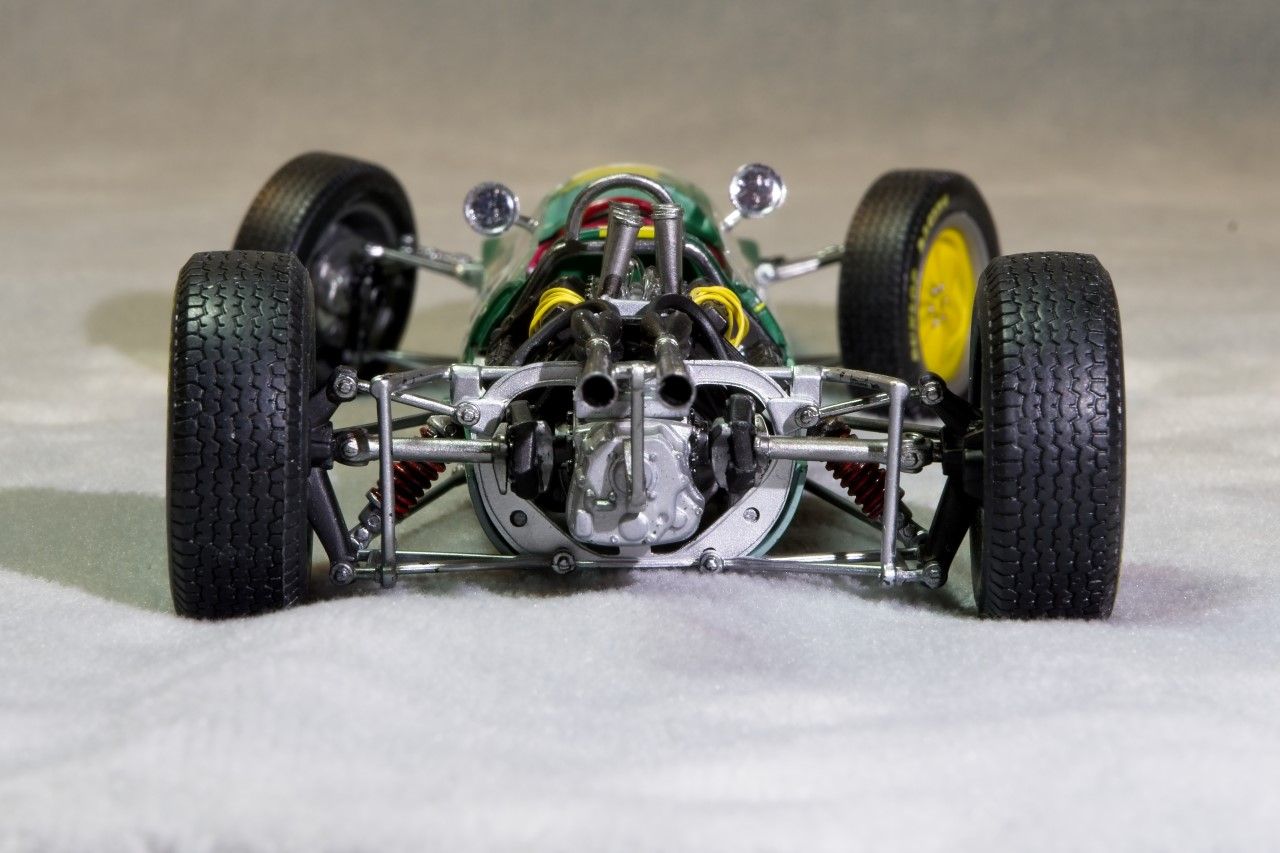
4-Next was finishing the rear suspension. All the various rods were painted various shades of Alcad2. The hub carrier was painted Semi Gloss Black, the Disc brake assemblies also recieved various shades of Alcad2, and Mr. Hobby Metallics. The rubber donuts were painted Tamiya Natio black mixed with some Flat Black, then the bolts were picked out with Testors Silver. The drive shafts were also painted with Alcad2 Chrome. Honestly, the suspension assembly required a min. of 3 hands and the eyesight of an Eagle, neither of which I have. So boy did I struggle, and did I have a ton of colorful words and expressions that my wife just loved so much that she closed the computer/modeling room door, and turned up the TV in the Den. Finally, when I thought all was lost, I got one side done. The other side took considerable less time, the colorful oration wasn't necessary.

5-Now for the moment of truth, time to attach the top main body shell to the lower half. I had decided to glue them together rather then have the ability to remove it to display the front end details, which honestly were just OOB and therefore nothing special. One could always look into the front of the nose to see the radiator, or turn over the model and look through the lower front suspension to see some more detail. That does look a whole lot better then the complete insight overview.

6-The Exhaust collectors and attachment brace to the rear of the gearbox were chromed with Alcad2 and installed. To my surprise the fit was perfect! And I'd worried about this since day 1 of the build, as I've always had issues with exhaust and collectors.

7-The cockpit plexiglass fits perfectly. Once glued into place I glued the two Talbot mirrors into position. The glass parts are separate. I used Pledge over the chrome to represent the mirror faces, and then glued them to their bases.

8-And finally the wheels and tires were press fitted into place. I've read review after review that knocked how they look. But honestly, they looked just fine to me. Sure glad that I didn't spring for #25 for the resin replacement set.

And so ends one special build of the Lotus that helped formulate my love of road racing and Formula 1 way back in the summer of 1963 when I bought my 1st Road & Track magazine.

Thanks to all that have been along for journey, and to those who have stopped by from time to time. It's always much appreciated.

And here's some pictures of the finished Lotus 25.

Joel


RussellE
#306
_VISITCOMMUNITY
Victoria, Australia
Joined: June 27, 2010
KitMaker: 3,959 posts
Auto Modeler: 495 posts
Posted: Sunday, September 01, 2019 - 11:03 AM UTC
any Formula 1 fan would be proud to have this model grace their display shelves, Joel!

Another fine addition to what I reckon is quickly becoming quite an impressive automotive collection!

"Roll on" I say!

Thanks always for sharing and I look forward to seeing what is next!
Cosimodo
#335
_VISITCOMMUNITY
Auckland, New Zealand
Joined: September 03, 2013
KitMaker: 1,808 posts
Auto Modeler: 701 posts
Posted: Sunday, September 01, 2019 - 09:35 PM UTC
That is just stunning Joel. Another amazing Lotus for your collection and this certainly looks your best. I wasn't sure about the BRG color in the beginning but seeing it on the finished kit it looks spot on.

What's next? A Ford for Blue Oval or do you have something else lined up?

Cheers
Michael
Hwa-Rang
_VISITCOMMUNITY
Kobenhavn, Denmark
Joined: June 29, 2004
KitMaker: 6,760 posts
Auto Modeler: 2,182 posts
Posted: Sunday, September 01, 2019 - 10:37 PM UTC
Another superb build Joel. Having your eye problems, in mind, just makes the build even more impressive.
rdt1953
_VISITCOMMUNITY
New Jersey, United States
Joined: February 06, 2015
KitMaker: 1,098 posts
Auto Modeler: 52 posts
Posted: Monday, September 02, 2019 - 12:19 AM UTC
Joel -
The Lotus 25 - designed and put together by a small group of men in what amounted to not much more than a shed and powered by an engine that had it’s roots in a pump motor !
Another beautiful job - no surprise considering it came from you & Tamiya .
An excellent miniature of my favorite race car. I agree that the Dunlop wobble web wheels and tires look fine.
Can’t wait to see what’s next !
Joel_W
Staff MemberAssociate Editor
AUTOMODELER
_VISITCOMMUNITY
New York, United States
Joined: December 04, 2010
KitMaker: 11,666 posts
Auto Modeler: 2,974 posts
Posted: Monday, September 02, 2019 - 12:35 AM UTC

Quoted Text

any Formula 1 fan would be proud to have this model grace their display shelves, Joel!

Another fine addition to what I reckon is quickly becoming quite an impressive automotive collection!

"Roll on" I say!

Thanks always for sharing and I look forward to seeing what is next!


Russell,
Thanks so much my friend for those most kind words. You've been along for the ride since day 1, and I truly appreciate that.

My auto collection is all of 8 models with the Lotus 25 being number 8, and half of them are Formula cars.

Joel
Joel_W
Staff MemberAssociate Editor
AUTOMODELER
_VISITCOMMUNITY
New York, United States
Joined: December 04, 2010
KitMaker: 11,666 posts
Auto Modeler: 2,974 posts
Posted: Monday, September 02, 2019 - 12:58 AM UTC

Quoted Text

That is just stunning Joel. Another amazing Lotus for your collection and this certainly looks your best. I wasn't sure about the BRG color in the beginning but seeing it on the finished kit it looks spot on.

What's next? A Ford for Blue Oval or do you have something else lined up?

Cheers
Michael


Michael,
So glad that you appreciated my efforts, but most of the credit goes to Tamiya for producing such an outstanding kit. Outside of some engine wiring, it's pure box stock.

Honestly, you did have me a little concerned about the BRG color, but Gravity and Zero paints are dead on as I've never read a single post questioning the color. True, the primer has a lot to do with it, but I use Mr. Hobby's 1500 which is a very light gray. Even the Yellow on the wheels are primed with it. Just took a lot of coats to look the part. That should have been Tamiya White primer. Just to lazy to switch colors in my AB.

As for what's up next. Good question. The Ford Blue Oval GB is still a full month away. Officially I'm building a Revell 1/25th scale Roush Trans Am Mustang in Folger's sponsorship. But I have a 2nd kit with a Resin body and goodies that a friend sent me. Not even sure that all the parts are there as everything came loose in a Lotus 72E box! All the resin was in baggies, so I'm assuming it's complete. I've also got several AM decal sheets for it including one that he sent. So I might start that kit, or do the Revell Hot Wheels Camaro but not those markings. Once the GB starts, the current kit gets stopped, and the GB build starts.

That's plans 1 & 2. But there's a 3rd plan. I like to alternate builds: Closed wheel then open wheel, etc. So I might just start an open wheel car. But as a tease it's not a Formula car. It will be from the American Cart series, but which one, I'm not sure of.

Joel
Joel_W
Staff MemberAssociate Editor
AUTOMODELER
_VISITCOMMUNITY
New York, United States
Joined: December 04, 2010
KitMaker: 11,666 posts
Auto Modeler: 2,974 posts
Posted: Monday, September 02, 2019 - 01:06 AM UTC

Quoted Text

Another superb build Joel. Having your eye problems, in mind, just makes the build even more impressive.


Jesper,
Thanks my friend for your most positive words, they're always greatly appreciated. The Lotus 25 actually turned out way better then I thought. As for my eye issues, just think how hard it would have been to build it with being nearly blind in both eyes

Joel
Joel_W
Staff MemberAssociate Editor
AUTOMODELER
_VISITCOMMUNITY
New York, United States
Joined: December 04, 2010
KitMaker: 11,666 posts
Auto Modeler: 2,974 posts
Posted: Monday, September 02, 2019 - 01:24 AM UTC

Quoted Text

Joel -
The Lotus 25 - designed and put together by a small group of men in what amounted to not much more than a shed and powered by an engine that had it’s roots in a pump motor !
Another beautiful job - no surprise considering it came from you & Tamiya .
An excellent miniature of my favorite race car. I agree that the Dunlop wobble web wheels and tires look fine.
Can’t wait to see what’s next !


Richard,
What a thrill to hear from you. I know that you followed my comings and goings behind closed doors, but a post is a treat.

Agreed about Tamiya producing a kit of such complexity and accuracy way back in 1998, but every kit I've built from that period of theirs has been cutting edge even by today's standards. I really think that the Old man was still around making sure that every car kit was the best it could be no matter what the Bean Counters had to say.

the story of the car is rather amazing as back then the British racing cottage Industry was just that. Chapman from what I heard built his early cars in his garage, but they were just oversized sheds as the cars were so small by our standards. Can you imagine trying that today with even a simple car?

I do remember Jack Brabham's story of when he arrived at the Copper Car Company from New Zealand, and when he asked where his car was, they took him out to a shed and showed him a stack of tubing and a wielding torch.

In many ways I much preferred those days to what it takes to build a race car today. Even I tinkered with my MGB to do some racing. Today I can't even figure out the basics of my Hyundai Sports Coupe.

As for what's up next, it's the Blue Oval GB with Revell's 1/25 scale Roush Trans AM Folger's Mustang. But I have a full month to tinker, and I'm really not sure. As I said I like to alternate, so maybe another open wheeler that I'll finish after my Ford build(s), or start the non GB Mustang now?

So how's the bike coming along? By now you've gotta be in the home stretch? Then you'll finally start your 1/12 bike build which I've been waiting for what seems like forever.

Joel
Merlin
Staff MemberSenior Editor
AEROSCALE
#017
_VISITCOMMUNITY
United Kingdom
Joined: June 11, 2003
KitMaker: 17,582 posts
Auto Modeler: 388 posts
Posted: Monday, September 02, 2019 - 06:13 AM UTC
Hi Joel

Wow! That really does look spectacular! The finish is immaculate!

All the best

Rowan
Joel_W
Staff MemberAssociate Editor
AUTOMODELER
_VISITCOMMUNITY
New York, United States
Joined: December 04, 2010
KitMaker: 11,666 posts
Auto Modeler: 2,974 posts
Posted: Monday, September 02, 2019 - 06:25 AM UTC

Quoted Text

Hi Joel

Wow! That really does look spectacular! The finish is immaculate!

All the best

Rowan


Rowan,
Thanks so much for your double thumbs up, coming from you it really means a lot.

For once I didn't screw up anywhere on the body shell. You can't even see where I had to combine two different decal makers yellow stripes for my one decaling screw up.

Joel
Dixon66
_VISITCOMMUNITY
New Hampshire, United States
Joined: December 12, 2002
KitMaker: 1,500 posts
Auto Modeler: 645 posts
Posted: Monday, September 02, 2019 - 10:11 AM UTC
Joel,
Your fit and finish came out way better than mine. I didn't use that clear plastic screen though, I formed some stainless steel mesh to make it.

Well done.
Joel_W
Staff MemberAssociate Editor
AUTOMODELER
_VISITCOMMUNITY
New York, United States
Joined: December 04, 2010
KitMaker: 11,666 posts
Auto Modeler: 2,974 posts
Posted: Monday, September 02, 2019 - 11:22 AM UTC

Quoted Text

Joel,
Your fit and finish came out way better than mine. I didn't use that clear plastic screen though, I formed some stainless steel mesh to make it.

Well done.


David,
Thanks so much for checking out my Lotus 25, and liking my efforts.

Agreed 100% about the intake screening. The only screening I had on hand was a fabric that just wouldn't hold it's shape as intended, so I went with the kit part till I can find some screening that would work.

The engine cover has never been on car, and I've got it displayed behind it for now. When I do the replacement, then I'll move it so it's easy to see it.

Joel