_GOTOBOTTOM
Cars: Muscle Cars
60's & 70's Classics
AMT 1/25 '66 Mustang build
Szmann
_VISITCOMMUNITY
Netherlands Antilles
Joined: September 02, 2014
KitMaker: 1,977 posts
Auto Modeler: 1,371 posts
Posted: Thursday, August 15, 2019 - 10:30 AM UTC
Hi, guys!

Finally I put myself and my equipment together after the prolonged vacation and there I am, with a new thread.

Disclaimer: the copyright of the pictures presented in this blog belongs to Right on Replicas, LLC., and are published under written agreement from the trademark owner. At the end of this build, a link to the video production based on these pictures will be posted.

I have received this kit for review from RoR, but it was commissioned by a Canadian collector, and here I am, with a double-commission build, double the trouble that is. And the truth to be said, I was the one looking for trouble.
However, let's get started:

Here is the box art, with a fiery red Mustang slightly customized. The kit is of older vintage and very rare nowadays. I have heard for some time rumors about a re-release by AMT, but none was confirmed:
.

Here are the kit's contents. Although offers three versions (stock, custom and drag), the box it's only half full and the instructions are shrunk to 4 pages only (!). The only exciting parts in the kit are the tires. The instructions, the mold quality and detailing, as well as the clear plastic parts are rather "meh!", but I was expecting it!


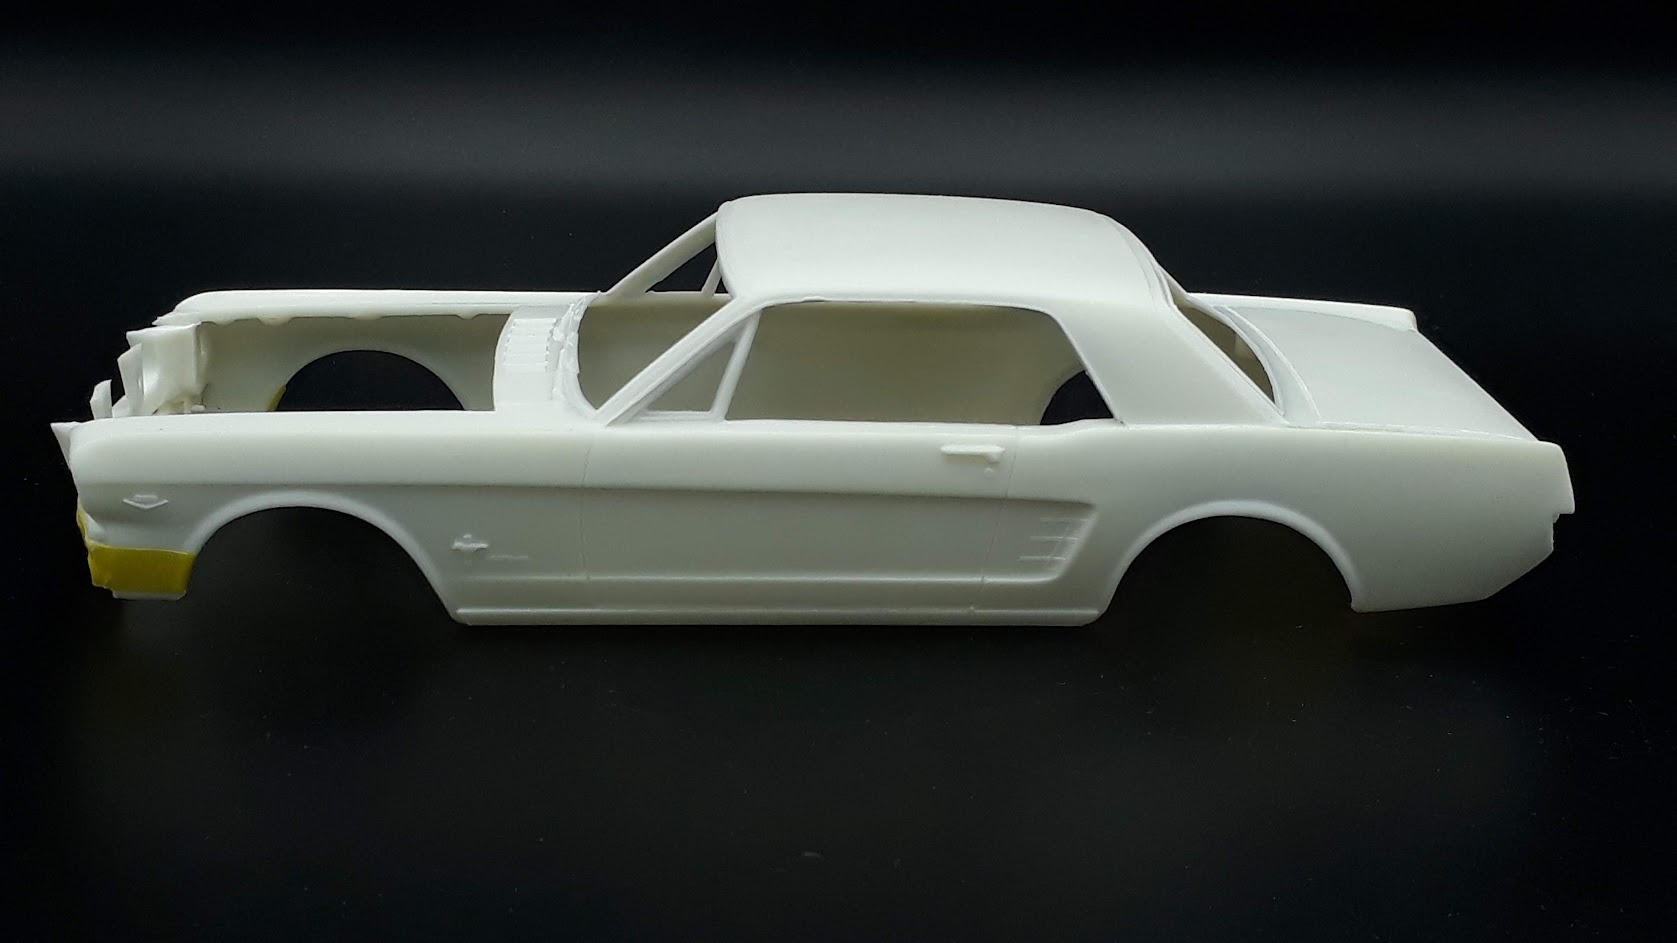
The main piece, the body, is molded solidly and with just a few minor imperfections as too shallow panel lines and a little flash. The main issue was though the chip on the left side drip line.


The reinforcing piece of styrene here needed to be removed. It seems easy but isn't entirely so because the way was molded.


The stock bumper was added to the car as the first step in this build. The alignment isn't golden, and it needed dressing up after assembly:


The panel lines were deepened with Tamiya scriber:


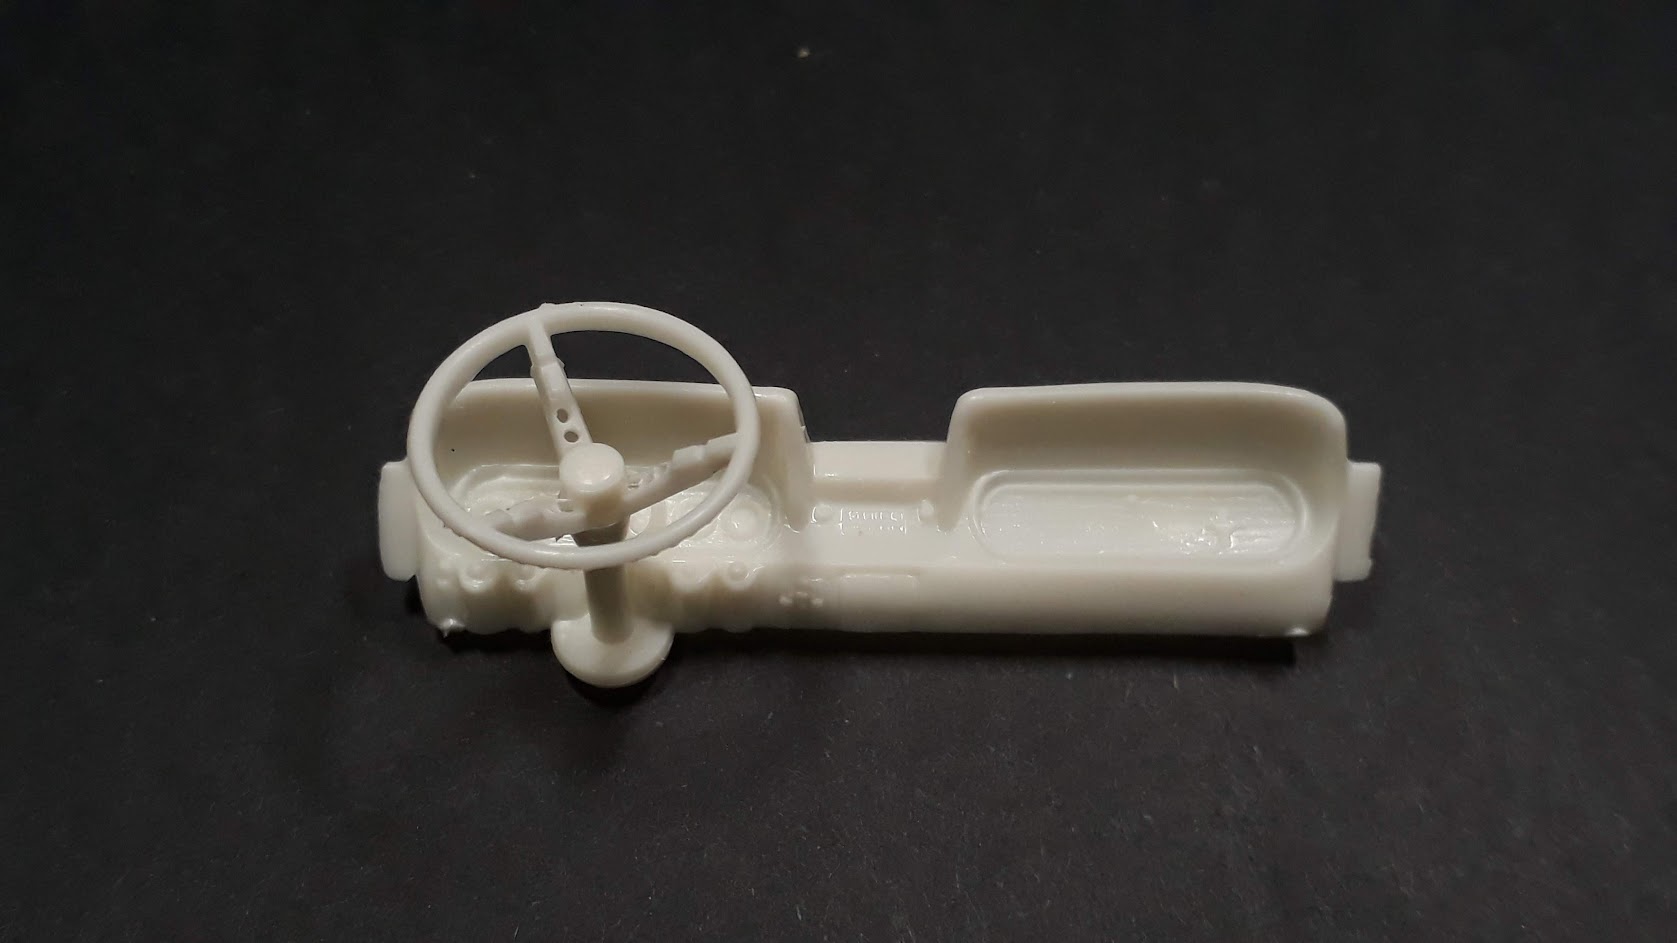
And these three pieces are almost the entire build: easy to assemble but with sacrificed detail and hard to paint molded-in features:


The body primed with Mr. Surfacer 1500, diluted with Mr. Levelling Thinner


For airbrushing I have used my H&S Evolution 0.4mm @ 20psi:


The same products and airbrush were used to prime the bottom pan:


The bottom pan painted with Tamiya XF 69 NATO Black, diluted with MLT:


The final color of the body will be chrome yellow. Here, the body base-coated with gold:


I have used Tamiya X-31 Titanium Gold, diluted with MLT and sprayed thru H&S Evolution 0.4mm @ 20psi:


The bottom pan received a MicroSatin gloss coat, after being spayed with Tamiya X-69 NATO Black.


These 15 parts are dedicated to the engine. They are poorly molded and with lots of useless chrome:


The engine assembled. Lots of gaps and poor detailing:


The other side of the engine is every bit as bad as the first one:


I have identified and repaired the areas with finishing problems:


Painting redone over the afflicted areas:


A very thin coat of primer was applied over the engine, just to cover the chrome and as witness for the gaps in the assembly:


The body sprayed with Chrome Yellow Rust-oleum enamel, after the previous gold under-base was slightly polished with 3000 grit sanding sponge. Apparently the "trick" works. The yellow resulted very bright and didn't required more than one application:


The most difficult part so far it was the engine. At first, I noted I have installed the cylinder heads wrongly (left for right) because of the vague instructions. As a matter of fact, the instructions not even call for the stock ones, which I found hiding on a sprue. However, these last ones have no details, and some scratch was required:


Since I had already trouble with the engine assembly, I took my time to scratch a few details, including the distributor:


The engine block and transmission assembly painted with Tru-Color Paints 750 Viking Blue. The accessories I have painted initially with TCP-1231 Glossy Deep Blue Black but I didn't like the contrast and decided to re-do them in black:


The detailing of the engine almost complete now. At this stage it was still in need for a gloss acrylic coat before the oil wash:


The engine glued in its place, after it had received an oil wash:


The bottom pan it is probably the worst part in this kit with respect to detail quality. Detailed with a painting brush, Using Vallejo acrylics:


The interior parts cleaned from flash and dry-fitted:


The interior has received a coat od TCP-010 Black over the primer. Unfortunately, the rear bench is molded with the interior and needs masking before matting the interior:


The seats painted with the same TCP-010 Black:


The firewall has some petite details painted in, but too fine to be picked up by brush. Again, some scratch required:


The body panels which will end up eventually in yellow were primed and under-coated with Titanium Gold:


The bench masked with Tamiya masking tape, before the application of matte paint:


The interior sprayed with Tamiya XF-69 NATO Black after masking. The seats were also installed. The contrast between the two black shades seems good enough to my eye. The central console was picked up with Vallejo Air Silver:


The dashboard dry-fitted. I have drilled thru the steering wheel spokes to accentuate the sporty looks; however, the spokes are too thick and harmful for the scale effect:


The dashboard sprayed with TCP-010 Black. The kit doesn't have any dash decals, so I picked the dials with a white acrylic wash, while the rims were picked with a silver felt tip pen:


One of the toughest decisions in this built it was which wheels. Eventually I have chosen the "street burner" version:


The firewall painted with the base color. I have added "cables" from stretched sprue:


The wheels are attached thru metal axles. It is my least favourite solution, but I am content with the solidity of the assembly:


Side-view of the assembly to estimate the vehicle's stance. I'm almost happy with it:


The interior dry-fitted on the chassis. Well, it is just for the picture, because the interior's position cannot be precisely established before the firewall falls into place:


The body sprayed with Splash 2K urethane thru H&S Evolution 0.4mm @ 20psi:


The gloss is impeccable, but I have here and there the dreaded dry grains, so difficult to deal with because of the urethane's hardness:


The dash completed and added to the interior, as well as the gear shift:


The firewall installed in place. It needed some masking tape aid, because the alignment is lacking and the curvature of the wall doesn't match the body's curvature:


The "standard" features being installed. To be honest, I was expecting more trouble:


The rear bumper in its place: the fitment has its issues, but it could have been worst:


The radiator mask washed with Tamiya Panel Liner Black. The preliminary dry-fit test suggests that there were be no problems:


And now I am up to date with the Mustang build, the one that progressed the fastest during my "silence".
I'm looking now to gain ground with my Dacia dual build, and to regain synchronicity with the other ongoing builds - I've seen already couple of very interesting "new" blogs and articles.

Cheers!
Gabriel
AussieReg
Staff MemberAssociate Editor
AUTOMODELER
#007
_VISITCOMMUNITY
Victoria, Australia
Joined: June 09, 2009
KitMaker: 8,156 posts
Auto Modeler: 2,953 posts
Posted: Thursday, August 15, 2019 - 10:48 AM UTC
Excellent comprehensive starting post Gabriel, and it's always good to see another muscle car on the boards here (even if it's "only" a Ford ) !

The gold undercoat is a very good idea to get the yellow top coat to really glow, I must remember that one.

The firewall detailing really looks good once it is installed and will definitely give the engine bay a busy feel once everything is put together. What did you use for the wiring off the distributor? It looks to have a nice natural flexibility and still holds the radius of the curves well.

The soft details on the parts here is very obvious and a bit disappointing, but you are dealing with it easily and bringing a very nice result so far.

Cheers, D
RussellE
#306
_VISITCOMMUNITY
Victoria, Australia
Joined: June 27, 2010
KitMaker: 3,959 posts
Auto Modeler: 495 posts
Posted: Thursday, August 15, 2019 - 10:58 AM UTC
well, I'm buckled up and along for the ride, Gabriel!
jimb
_VISITCOMMUNITY
New York, United States
Joined: August 25, 2006
KitMaker: 2,539 posts
Auto Modeler: 1,405 posts
Posted: Thursday, August 15, 2019 - 11:18 AM UTC
Your Mustang is coming long just great. Love the added details & the way you are dealing with the shortcomings in the kit. This will be helpful with my future build.

Jim
Szmann
_VISITCOMMUNITY
Netherlands Antilles
Joined: September 02, 2014
KitMaker: 1,977 posts
Auto Modeler: 1,371 posts
Posted: Thursday, August 15, 2019 - 11:24 AM UTC

Quoted Text

Excellent comprehensive starting post Gabriel, and it's always good to see another muscle car on the boards here (even if it's "only" a Ford ) !


Haha! I agree with you. It's "just" a Ford and "only" a Mustang! The first pony car. "The car that started it all". Thanks for the warm welcome!


Quoted Text


The gold undercoat is a very good idea to get the yellow top coat to really glow, I must remember that one.


Yes, the method yields good results and I've heard the silver base works as good for white. I need to try that one too, since I am "obsessed" with "the perfect" white finish!


Quoted Text


The firewall detailing really looks good once it is installed and will definitely give the engine bay a busy feel once everything is put together. What did you use for the wiring off the distributor? It looks to have a nice natural flexibility and still holds the radius of the curves well.


The distributor was entirely scratch-built. First: find a round piece of sprue that is thick enough to take a hole to accommodate the number of wires you need. Cut a cylindrical section of the sprue and make in the top a progressively large hole from the middle. Make sure you stay centered and don't damage the "wall" of the hole. Stretch some wire from "regular" sprue. Cut as many lengths as you need (5,7,9,13...), line up the ends and glue them into the hole in the cylindrical section. Tamiya extra thin works just fine, since it's all styrene. In the bottom of the cylindrical section (distributor by now), drill another small hole for the connecting pin. Drill a hole for that pin into the engine block (if doesn't have already one). Glue the distributor with the long wires to the block. Only now the fun starts! The styrene "cables" are pretty stiff. Bend them carefully not to snap them into the desired direction / angle, progressively "greasing" them with Tamiya extra thin. The cement will affect the styrene and will relieve the tension. Repeat until you achieve the desired bending angle. Trim the wires to desired length and insert the free ends into the "cylinders" recipient. Once the cement evaporates, the wire will retain its shape, it will stay strong and it is very easy to paint it with a #0 brush.
Tip: I prefer to trim the "distributor" to its final height after drilling the main hole and adding the wires. I have better grip like that for drilling / fiddling with the wires.
Downside: excess glue can melt the wire. If you watch closely, one of my wires is noticeably thinner than the others; that is because my lack of patience in bending the wire and excess glue.


Quoted Text


The soft details on the parts here is very obvious and a bit disappointing, but you are dealing with it easily and bringing a very nice result so far.


I hope I will manage a half decent build; this is one of my best commissioners and I have no intention to treat him superficially!

Cheers!
Gabriel
Cosimodo
#335
_VISITCOMMUNITY
Auckland, New Zealand
Joined: September 03, 2013
KitMaker: 1,808 posts
Auto Modeler: 701 posts
Posted: Thursday, August 15, 2019 - 02:29 PM UTC
Fascinating build Gabriel. It's great to see so much progress in a single blog and some excellent tips that I must try and remember for the future. You should detail a list of base colours for top colours i.e. gold for yellow, silver for red. I would be interested to know what others you have in mind since so far I have just gone over the primer colour.

cheers
Michael
Hwa-Rang
_VISITCOMMUNITY
Kobenhavn, Denmark
Joined: June 29, 2004
KitMaker: 6,760 posts
Auto Modeler: 2,182 posts
Posted: Thursday, August 15, 2019 - 10:31 PM UTC
Looks great so far Gabriel. Super paintjob and the added details really make a difference.
Szmann
_VISITCOMMUNITY
Netherlands Antilles
Joined: September 02, 2014
KitMaker: 1,977 posts
Auto Modeler: 1,371 posts
Posted: Thursday, August 15, 2019 - 10:58 PM UTC

Quoted Text

well, I'm buckled up and along for the ride, Gabriel!


Thanks, Russel. You're welcome to take the gunner's seat!

Gabriel
Szmann
_VISITCOMMUNITY
Netherlands Antilles
Joined: September 02, 2014
KitMaker: 1,977 posts
Auto Modeler: 1,371 posts
Posted: Thursday, August 15, 2019 - 11:15 PM UTC

Quoted Text

Your Mustang is coming long just great. Love the added details & the way you are dealing with the shortcomings in the kit. This will be helpful with my future build.

Jim


Thanks, Jim!
I think I'm suffering of AMS, as many modelers. When I see these shortcomings, and I know it can be done better, I just cannot help myself and try and fix them. I owe much of what I know to the other "veterans" here. I'm very glad to share my techniques and if you find them helpful, it means the objective of blog is accomplished.

Gabriel
Szmann
_VISITCOMMUNITY
Netherlands Antilles
Joined: September 02, 2014
KitMaker: 1,977 posts
Auto Modeler: 1,371 posts
Posted: Thursday, August 15, 2019 - 11:31 PM UTC

Quoted Text

Fascinating build Gabriel. It's great to see so much progress in a single blog and some excellent tips that I must try and remember for the future. You should detail a list of base colours for top colours i.e. gold for yellow, silver for red. I would be interested to know what others you have in mind since so far I have just gone over the primer colour.

cheers
Michael


Thank you, Michael!
Well, this undercoating technique is rather new to me as well, and not thoroughly tested. It is based on my previous experiences and on the current auto manufacturers's practices.
However, it is very important the final effect you're after. Let's take the example of the red, one of the weakest pigments.
- If I want a dark, cherry red, with deep shadows, I would use a black glossy base, doubled by a rather thick gloss overcoat;
- If I want a popping red, fiery red, I would use a tan or yellow, even gold base;
- If I want a desaturated red (Marlboro red), I would use a silver or glossy white base;
- If I want a faded red, a "chalky" red, I would use a yellow satin base and a less glossy finish.
The color theory it is also useful, because the transparency of the paint layer; some optical mix it's also in the play.

I'm going to experiment more and I'll keep you all posted.

Gabriel
Szmann
_VISITCOMMUNITY
Netherlands Antilles
Joined: September 02, 2014
KitMaker: 1,977 posts
Auto Modeler: 1,371 posts
Posted: Thursday, August 15, 2019 - 11:44 PM UTC

Quoted Text

Looks great so far Gabriel. Super paintjob and the added details really make a difference.


Thank you, Jesper! I think you may recognize the paternity of adding electric lines to the firewall, among the other detailing.

Gabriel
Szmann
_VISITCOMMUNITY
Netherlands Antilles
Joined: September 02, 2014
KitMaker: 1,977 posts
Auto Modeler: 1,371 posts
Posted: Friday, August 16, 2019 - 12:01 AM UTC
UPDATE

The front grille added to the body. As expected, not a issue here:


The hood dry-fitted. The cable of the ignition coil is pushing upwards - but that's an easy fix. However, the main issue is with the gloss finish which needed a rough sanding to get rid of the over-spray and now it's expecting a new coat of 2K.


The interior and chassis dry-fitted just to check the clearance of the wheels - OK, I shall say. The runner boards are in obvious need of a retouch.


Three-quarter view with the partially assembled model. I guess this is the most advantageous viewing angle.


Cheers!
Gabriel
jimb
_VISITCOMMUNITY
New York, United States
Joined: August 25, 2006
KitMaker: 2,539 posts
Auto Modeler: 1,405 posts
Posted: Friday, August 16, 2019 - 03:15 AM UTC
It's really looking nice.

Jim
Joel_W
Staff MemberAssociate Editor
AUTOMODELER
_VISITCOMMUNITY
New York, United States
Joined: December 04, 2010
KitMaker: 11,666 posts
Auto Modeler: 2,974 posts
Posted: Friday, August 16, 2019 - 07:27 AM UTC
Gabriel,
I'm truly impressed with how quickly you got through most of the 'Stang build.

The engine came out pretty darn good considering what you started with, and the scratched out distributor and ignition wires really adds a lot to the engine compartment. Nice decision to get rid of all that chrome as there wasn't any back in those days. I had a 1970 Boss 302 and it didn't have any chrome under the hood, just a ton of HP & torque.

You did a bang up job on the interior, especially the dash as the instruments do really pop.

The chassis for what AMT gave you to work with, really looks the part. Nicely done with all that hand detail painting.

I'm most impressed with your paint job. It's just stunning and really grabs your eye. Looking forward to your redo of the 2K finish, as I'm still to nervous to even attempt it.

Just one thing: don't forget to chrome all the body emblems.

Joel
Szmann
_VISITCOMMUNITY
Netherlands Antilles
Joined: September 02, 2014
KitMaker: 1,977 posts
Auto Modeler: 1,371 posts
Posted: Friday, August 16, 2019 - 10:22 PM UTC

Quoted Text

It's really looking nice.

Jim


Jim, thank you! Yes, she's as classic and as sporty as it gets (for Pony class).

Gabriel
Szmann
_VISITCOMMUNITY
Netherlands Antilles
Joined: September 02, 2014
KitMaker: 1,977 posts
Auto Modeler: 1,371 posts
Posted: Friday, August 16, 2019 - 11:00 PM UTC

Quoted Text

Gabriel,
I'm truly impressed with how quickly you got through most of the 'Stang build.


Thanks, Joel! Not much of a performance since everything is molded together!


Quoted Text


The engine came out pretty darn good considering what you started with, and the scratched out distributor and ignition wires really adds a lot to the engine compartment. Nice decision to get rid of all that chrome as there wasn't any back in those days. I had a 1970 Boss 302 and it didn't have any chrome under the hood, just a ton of HP & torque.


Well, the engine compartment in this kit is pretty basic and it needed some pimping up. As for the chrome on the engine, as any European, I just find it senseless. But true to the original, the original V8 on the 'Stang it had no bling whatsoever.


Quoted Text


You did a bang up job on the interior, especially the dash as the instruments do really pop.


The dashboard is the only place on this kit (bar for the wheels), where AMT isn't disappointing. There are no decals, but the molding is decent and the raised detail helps a lot with the painting.


Quoted Text


The chassis for what AMT gave you to work with, really looks the part. Nicely done with all that hand detail painting.


The chassis lay-out isn't all that bad per se; but all being molded together is a pain to paint without making a mess.


Quoted Text


I'm most impressed with your paint job. It's just stunning and really grabs your eye. Looking forward to your redo of the 2K finish, as I'm still to nervous to even attempt it.


Yes, I'm pretty pleased with the way the yellow pops. As for clear coats, they are the quirkiest "paints". If you're safe with your current one and with the Gravity three-step system, then stick with it! 2K is unbeatable as gloss, but is troublesome and basically you have one chance. It is so hard after it cures, that it cannot be polished with virtually anything I've tried, other than rough sandpaper. The micro-scratches are after that impossible to deal with. Honestly, I don't know what to recommend here!


Quoted Text


Just one thing: don't forget to chrome all the body emblems.


Thanks for the reminder. I left them for last on purpose - this time I'm going to use Molotow pen and I don't want to fiddle with the body too much after I apply it.

Yet my biggest concern on this build isn't cleared yet: the front lights are the dreaded chrome "blobs". I've tried something on my Mack DM 600 build and I wasn't happy with the result.

Any suggestion on how to solve that?

Gabriel
md72
#439
_VISITCOMMUNITY
Washington, United States
Joined: November 05, 2005
KitMaker: 4,950 posts
Auto Modeler: 555 posts
Posted: Saturday, August 17, 2019 - 03:55 AM UTC
Gabriel, Great work. I was going to ask about the distributor, but I see where you laid it out in plenty of detail for Damien. That's some pretty brave modeling. I might get brave enough to try it someday.

On an airplane model, I tried the Alclad gloss Black primer under the Alclad aluminum. The result was fantastic. I don't know why they spent all those years telling us to prime before final paint but forgot to mention the importance of a coloring to supplement or improve the top color.
Szmann
_VISITCOMMUNITY
Netherlands Antilles
Joined: September 02, 2014
KitMaker: 1,977 posts
Auto Modeler: 1,371 posts
Posted: Saturday, August 17, 2019 - 08:23 AM UTC

Quoted Text

Gabriel, Great work. I was going to ask about the distributor, but I see where you laid it out in plenty of detail for Damien. That's some pretty brave modeling. I might get brave enough to try it someday.


Mark, thank you for taking the time and letting a comment. It may be looking difficult from afar, but once you grab your pine vice drill and some sprue left-overs, you'll see isn't as much of a "bravery".


Quoted Text


On an airplane model, I tried the Alclad gloss Black primer under the Alclad aluminum. The result was fantastic. I don't know why they spent all those years telling us to prime before final paint but forgot to mention the importance of a coloring to supplement or improve the top color.


I'm glad for you that you have achieved a good metallic finish. Perhaps it is the most difficult paint, except the final gloss clear.
About the other colors, it is just too much theory. The problem is that quite often what works for one modeler doesn't work for another. The airbrushing is as personal as the handwriting: the principles are the same, but the results will never be identical. The practice and endless testing is the key.

Gabriel
RussellE
#306
_VISITCOMMUNITY
Victoria, Australia
Joined: June 27, 2010
KitMaker: 3,959 posts
Auto Modeler: 495 posts
Posted: Monday, August 19, 2019 - 10:04 AM UTC
Super quick progress Gabriel, but super nice work too
Szmann
_VISITCOMMUNITY
Netherlands Antilles
Joined: September 02, 2014
KitMaker: 1,977 posts
Auto Modeler: 1,371 posts
Posted: Friday, September 06, 2019 - 01:33 PM UTC

Quoted Text

Super quick progress Gabriel, but super nice work too


Thanks, Russ! Well, my progress staled for a little while for being overloaded at work and pledged with my 1:1 car problems, but here I am with another update:

UPDATE - BMF, again!

After I've been trying Molotow and silver pens and Alclads and I don't know what else, I'm back to Bare Metal Foil for chrome trim on my models. And, I don't really know why, it seems nw so much easier than before...

Rear window's frame trimmed with a single piece of BMF for seamless looks and the rear lights / chrome bevels added. Unfortunately, the alignment pin is visible on the chromed parts due poor molding, and it is way too late in the build to do any modification. I have to live with this one!


Dripline and vent chromed as well, again, using a single piece of BMF. The door handle and the door lock were picked with Molotow Liquid Chrome Pen 1mm:


The front window frame and the wipers done as well. Now, analyzing this picture, I realized the passenger side wiper needs a little trimming:


Fast conclusion to this episode: never fix it if isn't broken! I'll stop fooling around with "simpler" solutions while the "old" ones are working and working good. I cannot explain to myself the resentment I once had for BMF!

Cheers!
Gabriel
Cosimodo
#335
_VISITCOMMUNITY
Auckland, New Zealand
Joined: September 03, 2013
KitMaker: 1,808 posts
Auto Modeler: 701 posts
Posted: Friday, September 06, 2019 - 03:43 PM UTC
If that's foiling then that's very good. Looking great Gabriel!

cheers
Michael
AussieReg
Staff MemberAssociate Editor
AUTOMODELER
#007
_VISITCOMMUNITY
Victoria, Australia
Joined: June 09, 2009
KitMaker: 8,156 posts
Auto Modeler: 2,953 posts
Posted: Friday, September 06, 2019 - 06:08 PM UTC
Beautiful work Gabriel! I've only used BMF a couple of times but I can already see that it has some great qualities and advantages over a masked and painted chrome finish.

Cheers, D
Szmann
_VISITCOMMUNITY
Netherlands Antilles
Joined: September 02, 2014
KitMaker: 1,977 posts
Auto Modeler: 1,371 posts
Posted: Saturday, September 07, 2019 - 10:55 AM UTC

Quoted Text

If that's foiling then that's very good. Looking great Gabriel!

cheers
Michael


Thanks, Michael! It is foil indeed and looks pretty much like the real counterpart.


Quoted Text


Beautiful work Gabriel! I've only used BMF a couple of times but I can already see that it has some great qualities and advantages over a masked and painted chrome finish.

Cheers, D


I agree, it has a few advantages. First off, it looks "realistic". Then you can re-do it as many times as needed if something goes wrong or you can remove it at your pleasure. Unlike Molotow or other paints, once applied doesn't need time to dry, doesn't smudge and doesn't need a protective coat. As for the time and patience, eh, well, when you get used with it, it is actually time-saving in report to masking and painting.

Gabriel
Dixon66
_VISITCOMMUNITY
New Hampshire, United States
Joined: December 12, 2002
KitMaker: 1,500 posts
Auto Modeler: 645 posts
Posted: Saturday, September 07, 2019 - 02:08 PM UTC
Not sure how I missed this thread, that is a fine looking Stang. I love the work on the firewall, I'll be stealing that.

Wish I had heard about the gold below Chrome Yellow trick when I was spraying my now shelf queen slab sided Cobra. It just doesn't pop the way my test spoon looked.
Szmann
_VISITCOMMUNITY
Netherlands Antilles
Joined: September 02, 2014
KitMaker: 1,977 posts
Auto Modeler: 1,371 posts
Posted: Sunday, September 08, 2019 - 09:59 AM UTC

Quoted Text

Not sure how I missed this thread, that is a fine looking Stang. I love the work on the firewall, I'll be stealing that.

Wish I had heard about the gold below Chrome Yellow trick when I was spraying my now shelf queen slab sided Cobra. It just doesn't pop the way my test spoon looked.


You are welcome at any time, David! At my turn, I've stole the idea from Jesper so, yeah, I think you can call it "common knowledge" now

Yes, yellow, orange and red are very weak pigments and need "help". This is how I actually evaluate a color range: if the red is good, then anything else is good!

Gabriel
 _GOTOTOP