The Garage
For general automotive modeling or non-modeling topics.
Blue Oval - Ford Motor Co. GB Build Thread
Merlin
Staff MemberSenior Editor
AEROSCALE
#017
_VISITCOMMUNITY
United Kingdom
Joined: June 11, 2003
KitMaker: 17,582 posts
Auto Modeler: 388 posts
Posted: Wednesday, October 02, 2019 - 05:38 AM UTC
Hi Damian

Wow! It looks like you've got some work on your hands!

If you haven't already attacked it with the Dremel, I wonder if it might help reduce the amount of surgery needed if you cement the side that's fitting OK, let it cure thoroughly, and then use a combination of clamps and spacers to try to get the joints on the other side to line up at least reasonable well before cementing them. And then, again, letting it all cure thoroughly before releasing the pressure on the parts.

Here's to it turning out well, however you tackle it.

All the best

Rowan
AussieReg
Staff MemberAssociate Editor
AUTOMODELER
#007
_VISITCOMMUNITY
Victoria, Australia
Joined: June 09, 2009
KitMaker: 8,156 posts
Auto Modeler: 2,953 posts
Posted: Wednesday, October 02, 2019 - 05:56 AM UTC
Hi Rowan.

Unfortunately this isn’t a case of 2 parts not lining up. This is a mould issue on one part with the contours of the upper and lower body lines on the RHS being way out of alignment.

I’m afraid it’s definitely a case for the angry grind-em-up Dremel drum sander

Cheers, D
Joel_W
Staff MemberAssociate Editor
AUTOMODELER
_VISITCOMMUNITY
New York, United States
Joined: December 04, 2010
KitMaker: 11,666 posts
Auto Modeler: 2,974 posts
Posted: Wednesday, October 02, 2019 - 06:22 AM UTC
Well guys, sure looks like I've got egg on my face, and it's only day #2.

I've been listing the 1986 Roush Folger's Mustang as one of his SCCA Trans Am cars, but from additional research it seems that Mr. Roush ran the Folger's car as modeled by Revell as Tommy Kendall's 1986 IMSA GTO car. Same exact specs for either series, but the two different USA road racing associations. it does get somewhat confusing for this old timer.

Joel
Joel_W
Staff MemberAssociate Editor
AUTOMODELER
_VISITCOMMUNITY
New York, United States
Joined: December 04, 2010
KitMaker: 11,666 posts
Auto Modeler: 2,974 posts
Posted: Wednesday, October 02, 2019 - 06:50 AM UTC
already time for my 1st update, although I haven't done much. Just previously sanded, rubbed out, and then polished the surface to get rid of a ton of scratches as I purchased this kit 2nd hand online. So yesterday afternoon I was able to prime the inside and outside of the two piece shell with my favorite primer: Mr. Hobby's Mr. Finisher's Primer/Sealer #1500 thinned with their #400 leveling thinner 3 parts primer to 2 parts thinner. Dried for about a day, then very lightly sanded with Tamiya #3000 sponge wet. End result is smooth as silk.


My build plan is to have the front clip removable. The issue is that I have pictures of various Roush Mustangs where the front clip comes completely off as in the kit, the clip comes off but the bumper assembly stays on the chassis, and the clip stays in place but the engine hood lifts ups but not off.

I do see the reasons why there are 3 options.
Clip off/bumper on, is for major engine, front end work during the race.
Clip and bumper off is for full access to the suspension either during the race or in the shop
Engine hood lifts up for quick check and or work during the race.

I'm going with the kit option of the full clip off at this point as alignment of bumper to the rest of the clip would most likely be an issue.

Joel
Merlin
Staff MemberSenior Editor
AEROSCALE
#017
_VISITCOMMUNITY
United Kingdom
Joined: June 11, 2003
KitMaker: 17,582 posts
Auto Modeler: 388 posts
Posted: Wednesday, October 02, 2019 - 08:45 AM UTC

Quoted Text

Hi Rowan.

Unfortunately this isn’t a case of 2 parts not lining up. This is a mould issue on one part with the contours of the upper and lower body lines on the RHS being way out of alignment.

I’m afraid it’s definitely a case for the angry grind-em-up Dremel drum sander

Cheers, D


Hi Damian

Perhaps there'll be a half-way stage at which a bit of serious "convincing" might save further "butchery" (here's hoping for you...).

Looking at your photos, the only plus-point I can see is that the kit is moulded in grey styrene - which I always think is easier to work with than the white that I've encountered in my Revell kits. The plastic looks as though it's pretty soft - which can be both a blessing and a curse...

By comparison, I can tell already that I did well in choosing my 1940 Coupe. I've been messing around with the beginnings of the engine and chassis. There's a tad more clean-up needed than my first inspection for the review highlighted, but nothing to worry about.

It'll be a few days yet before I can really get "stuck in", so I may have some progress to show come Sunday...

All the best

Rowan
Stickframe
#362
_VISITCOMMUNITY
California, United States
Joined: December 01, 2013
KitMaker: 1,661 posts
Auto Modeler: 431 posts
Posted: Wednesday, October 02, 2019 - 08:53 AM UTC
Damian and Joel, you two are sure moving right along!

D, you’ll be a master body man by the end of 2019! Seems you’ve had your share of misaligned, warped and otherwise ungreat body parts to resolve.

Joel - your approach on the mustang is interesting. I’ve just gotten into mine. I’ve made some simple body mods like cutting out vents etc but have focused on trying to add some interest to the suspension. Some cutting, some scratch mods and so on. So far so good - I’ll post a pic of the kit in the box and early steps tomorrow

Keep up the great work guys, and yes, I’m looking forward to seeing what everyone else is up to too!

Cheers
Nick
Merlin
Staff MemberSenior Editor
AEROSCALE
#017
_VISITCOMMUNITY
United Kingdom
Joined: June 11, 2003
KitMaker: 17,582 posts
Auto Modeler: 388 posts
Posted: Wednesday, October 02, 2019 - 08:57 AM UTC
Hi Joel

I think there's a classic modelling adage along the lines of "The more refs you have, the more you regret it!" If there isn't - I guess I just started it, because I've certainly been there, so I totally sympathise with you.

Sometimes you run down so many reference "rabbit-holes" that lead different ways, you need to make an "educated choice" and live with it. Blogs are great for this, because readers will follow your reasoning.

All the best

Rowan
Joel_W
Staff MemberAssociate Editor
AUTOMODELER
_VISITCOMMUNITY
New York, United States
Joined: December 04, 2010
KitMaker: 11,666 posts
Auto Modeler: 2,974 posts
Posted: Wednesday, October 02, 2019 - 09:12 AM UTC
Rowan,
Agreed for sure on the reference issues because rather then using one or two sources like a Book, I specialize in Google searchers, so I'm all over the place. just gotta focus and stay focused or I'll never make any real progress.

Nick,
My goal is to just add a little detailing to enhance the look of the model. And I'll still end up finishing (hopefully) weeks or even months after you do.

I'm not worried about doing any cutting or drilling after the primer stage if I deem it necessary. I'll double check the body sections, and see what needs to be done, then do it. Re-prime if necessary, and then the color coat. I actually ordered the color from MCW paints, so hopefully they'll be no surprises. The decals should really keep me busy for a good week or more.

Joel

Joel
Spruslayer
_VISITCOMMUNITY
Indiana, United States
Joined: May 26, 2017
KitMaker: 57 posts
Auto Modeler: 16 posts
Posted: Wednesday, October 02, 2019 - 10:31 AM UTC
Managed to dive into this a little today.One of my modeling peeves is a vehicle that dose not sit square or level,which i have made plenty of.This is my atempt to avoid that
Joel_W
Staff MemberAssociate Editor
AUTOMODELER
_VISITCOMMUNITY
New York, United States
Joined: December 04, 2010
KitMaker: 11,666 posts
Auto Modeler: 2,974 posts
Posted: Wednesday, October 02, 2019 - 10:40 AM UTC
Mike,
Nicely done on that jig. it surely will solve any squaring up issues.

Joel
Spruslayer
_VISITCOMMUNITY
Indiana, United States
Joined: May 26, 2017
KitMaker: 57 posts
Auto Modeler: 16 posts
Posted: Wednesday, October 02, 2019 - 11:04 AM UTC
Thank you Joel,I hope it works 🤔
AussieReg
Staff MemberAssociate Editor
AUTOMODELER
#007
_VISITCOMMUNITY
Victoria, Australia
Joined: June 09, 2009
KitMaker: 8,156 posts
Auto Modeler: 2,953 posts
Posted: Wednesday, October 02, 2019 - 11:30 AM UTC
2 days in, 35 replies and 350-plus views, it is so good to see the level of interest increasing here.

Joel, awesome job on the primer, a perfect base for that shiny black finish.

Mike, I'm sure your jig will whip that chassis into shape, nice work!

In between extreme panel-work sessions I'm going to start putting these guys together and have a go at proper figure painting for the first time.


Cheers, D
Joel_W
Staff MemberAssociate Editor
AUTOMODELER
_VISITCOMMUNITY
New York, United States
Joined: December 04, 2010
KitMaker: 11,666 posts
Auto Modeler: 2,974 posts
Posted: Wednesday, October 02, 2019 - 11:40 AM UTC
D,
I'm betting that we just smash all the previous Campaigns/GBs on AutoModeler.

The planned scheme for the Mustang is going to be (hopefully) Tommy Kendall's 1986 IMSA Folger's GTO Mustang. Down the road will be the 1997 All Sport SCCA Trans Am Mustang of Kendall's as well, and it's Black and Green. The shell is Resin which was I really struggling with.


And good luck with those figures. Painting them is a lot harder then it looks.

Joel
AussieReg
Staff MemberAssociate Editor
AUTOMODELER
#007
_VISITCOMMUNITY
Victoria, Australia
Joined: June 09, 2009
KitMaker: 8,156 posts
Auto Modeler: 2,953 posts
Posted: Wednesday, October 02, 2019 - 11:46 AM UTC

Quoted Text

And good luck with those figures. Painting them is a lot harder then it looks.


I totally agree. I have some good friends on a local Facebook page who are top figure painters, so I will be leaning on them a lot for advice.

The contingency plan is that if I completely stuff them up, they won't go in the display. Being so small it will be easy to strip them off and start again (likelihood=extreme )

Cheers, D
Stickframe
#362
_VISITCOMMUNITY
California, United States
Joined: December 01, 2013
KitMaker: 1,661 posts
Auto Modeler: 431 posts
Posted: Wednesday, October 02, 2019 - 12:06 PM UTC
Damian,

Another source for very detailed coverage on the highest quality figure work is Jerry Rutman, on armorama. He periodically posts tutorials, but he’s great with WIP photos in general so you can pick up a lot of great info - and, he’s a really good guy who seems pleased to address questions you might have. He’s been a big help to me over the years.

1stJaeger, Romain Baulesch, who sadly passed, was an outstanding figure painter and all around modeler (and a great guy), also on Armorama who had some great posts - you might know both of them, but each have posted a lot, so great for reference.

Happy figure work!
Nick
AussieReg
Staff MemberAssociate Editor
AUTOMODELER
#007
_VISITCOMMUNITY
Victoria, Australia
Joined: June 09, 2009
KitMaker: 8,156 posts
Auto Modeler: 2,953 posts
Posted: Wednesday, October 02, 2019 - 12:11 PM UTC
Hi Nick. Yes, I am familiar with Jerry's work and follow a few of his threads, amazing stuff he does!

I'm looking forward to tinkering with these figures, and I have a couple of modern figure sets that I might be able to use to put beside the other 2 builds in my display.

Cheers, D
Szmann
_VISITCOMMUNITY
Netherlands Antilles
Joined: September 02, 2014
KitMaker: 1,977 posts
Auto Modeler: 1,371 posts
Posted: Wednesday, October 02, 2019 - 12:18 PM UTC
Guys, this topic is so hot, I cannot follow it. Excellent organizing work from Joel and Damian pays off handsomely. I feel proud to be myself in the mix.

Damian, that body problem on your car it's a stinker, but we all know you're going to win the fight!

Joel, You're flying off the start line faster than ever. Glad to see you with such appetite for construction

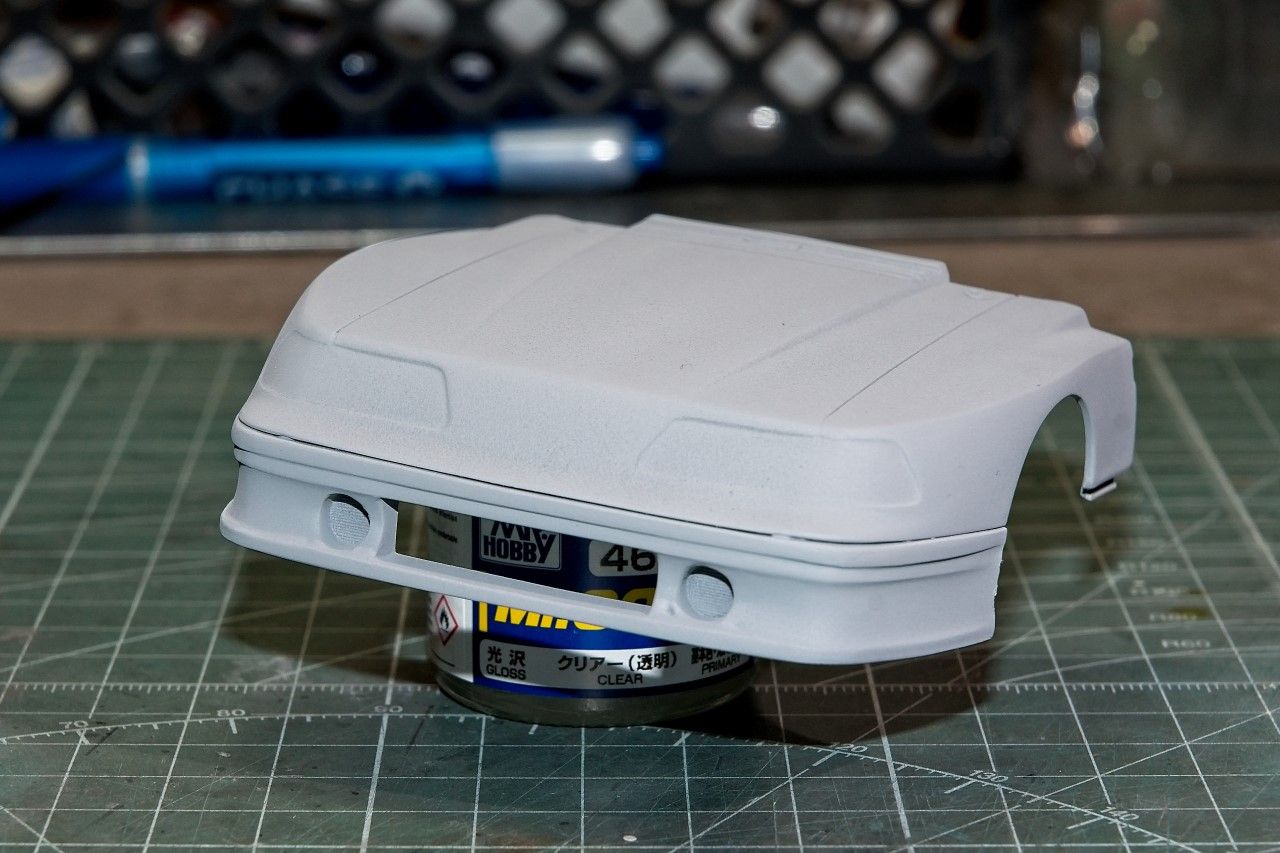
Mike, you've run into a rather common problem, but you found a good enough solution. I'm quite confident it is the good one.
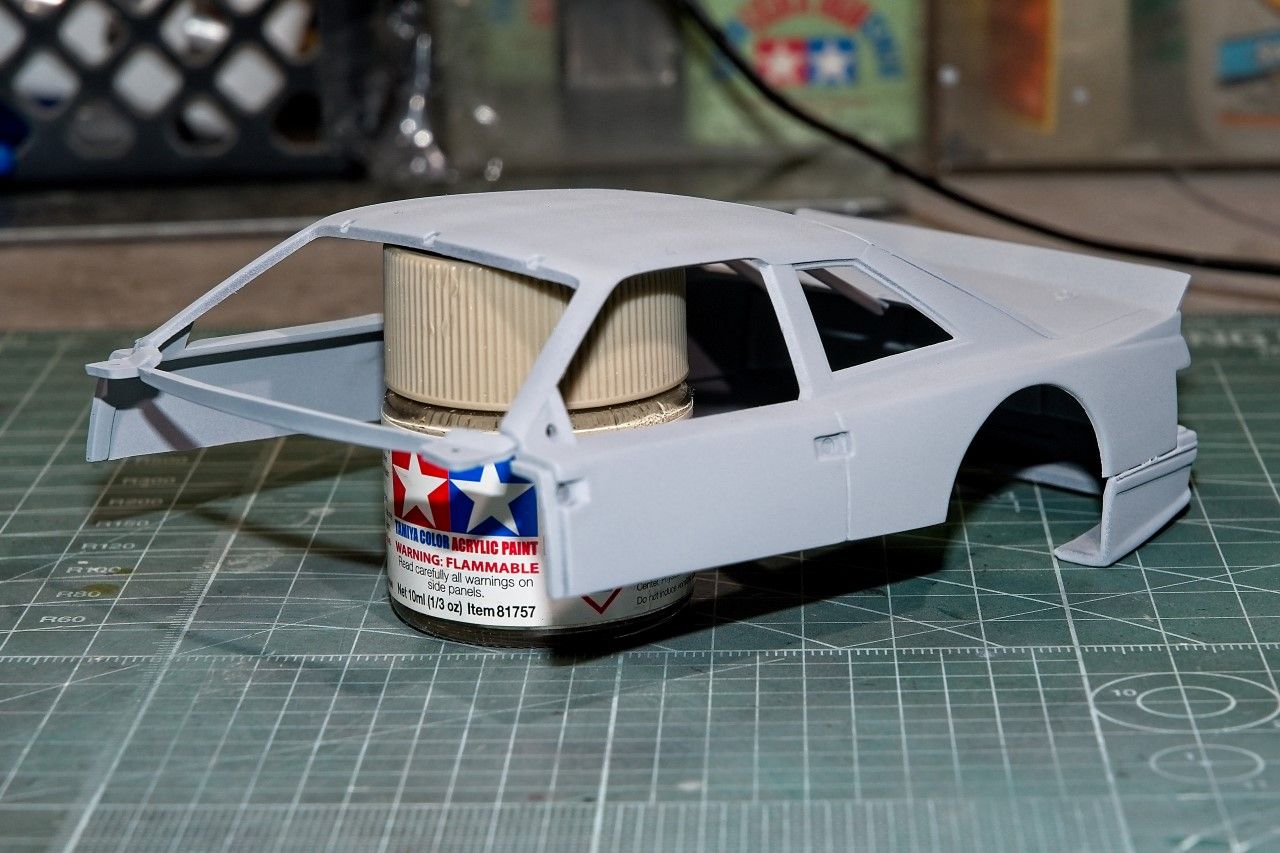
UPDATE - First Moebius

Well, time has cometh for me to open the box as well. My first Moebius kit. Despite the good reviews, despite of the fact that I own a few of their kits and despite my sheer curiosity, I never had the chance to work on a Moebius before now.

First impressions
Since I lifted the box's lid, I kept wondering how they managed to cram that much plastic in a tiny box like that. I mean the box isn't that small - it is the same size as the AMT boxes, but the amount of plastic makes it look so.
The kit is abundant in details. The plastic is very light gray in color somewhat soapy and feels heavy, pretty soft and reacts wonderfully to Tamiya extra thin. The seam lines and ejector marks (there are a few of both) are easy to remove. On the negative, a sharp blade can easily gouge the soft styrene...

Instructions look beautiful in color, but they are somewhat lacking. The kit is very well engineered though, and the parts are keyed (sometimes double keyed) and the errors are easily avoidable by a mediocre modeler.

Here are all the parts in this kit. I know I said at some point they are some 300 parts, but I guess Moebius had skipped some numbers. They are more likely around 200 parts - still a good number for a highly detailed model:


Here is an example of the instructions. They look well organized and easy to follow, but if you follow the painting logic you may need to jump up and down in the manual, as I already did


The first step comprises the assembly of 7 parts


Here an example of skipping steps for easiness of painting. This assembly will follow normally much later in the manual, but I've done it as step 2:


The result of about 1 1/2 hour work: Frame, cross-members, arms, front suspension, steering pump assembled; the exhaust system prepared for priming and the rear differential assembled and cleaned:


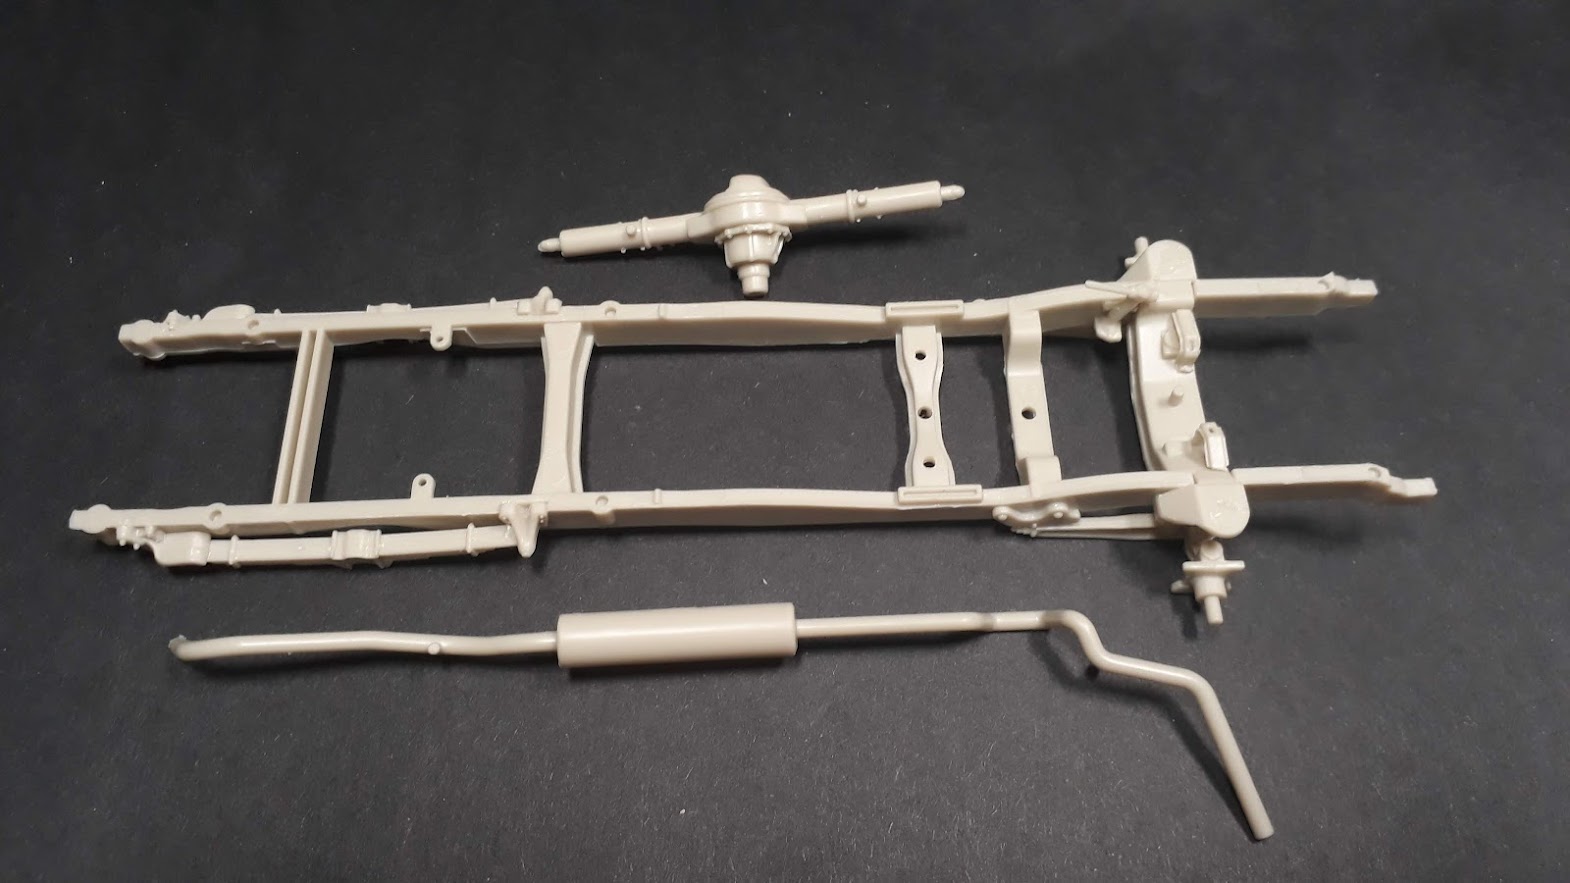
I cannot complain about the level of detail. I'm quite a bit blown away by it actually. There is some more cleaning to do to the whole assembly before priming, but WHOW!


Cheers!
Gabriel
AussieReg
Staff MemberAssociate Editor
AUTOMODELER
#007
_VISITCOMMUNITY
Victoria, Australia
Joined: June 09, 2009
KitMaker: 8,156 posts
Auto Modeler: 2,953 posts
Posted: Wednesday, October 02, 2019 - 12:26 PM UTC

Quoted Text

Here are all the parts in this kit. I know I said at some point they are some 300 parts, but I guess Moebius had skipped some numbers. They are more likely around 200 parts - still a good number for a highly detailed model:


Perhaps they counted the sprues, instructions, individual decals and box as well ???

Excellent start Gabriel, looks like a very nice kit so far!

Cheers, D
Joel_W
Staff MemberAssociate Editor
AUTOMODELER
_VISITCOMMUNITY
New York, United States
Joined: December 04, 2010
KitMaker: 11,666 posts
Auto Modeler: 2,974 posts
Posted: Thursday, October 03, 2019 - 12:00 AM UTC
Gabriel,
Thank you Sir for those most kind words as to the effort that Damian and I have put into the Ford GB. Believe me, it's more then well worth it. As you've noticed, the level of excitement by all is just simply amazing, as is the number of members who have signed up.

I'm trying really hard to move away from the terms Campaign and Enlistee simply because they have a military connotation, and we're as civilian as a modeling site can get.

I'm really looking forward to your Moebius kit build, as I've never actually seen one before. So far, it looks like you've picked an excellent kit as the detail of the front suspension is crisp and certainly looks the part.

And as for a flying start, you've passed me by a mile. All I've really done is prime the two shells. The prep was done when I 1st got the kit. You've actually spent a good deal of time in the building phase.

Joel
Dixon66
_VISITCOMMUNITY
New Hampshire, United States
Joined: December 12, 2002
KitMaker: 1,500 posts
Auto Modeler: 645 posts
Posted: Thursday, October 03, 2019 - 12:11 AM UTC
Just as a side note, immediately after the start picture it was boxed back up and the sacrificial/test Raptor was pulled out and soaked in dish detergent.

Will be trying Gravity Grabber Blue on it, obviously that wouldn't have been a factory color.
Joel_W
Staff MemberAssociate Editor
AUTOMODELER
_VISITCOMMUNITY
New York, United States
Joined: December 04, 2010
KitMaker: 11,666 posts
Auto Modeler: 2,974 posts
Posted: Thursday, October 03, 2019 - 01:03 AM UTC

Quoted Text

Just as a side note, immediately after the start picture it was boxed back up and the sacrificial/test Raptor was pulled out and soaked in dish detergent.

Will be trying Gravity Grabber Blue on it, obviously that wouldn't have been a factory color.


David,
I'm not familiar with that shade of Gravity paint, so I just googled it. It's a Medium Blue Ford Motorcraft color. So the reason for it not being an authorized color is when it was 1st offered by Ford?

Joel
AussieReg
Staff MemberAssociate Editor
AUTOMODELER
#007
_VISITCOMMUNITY
Victoria, Australia
Joined: June 09, 2009
KitMaker: 8,156 posts
Auto Modeler: 2,953 posts
Posted: Thursday, October 03, 2019 - 02:08 AM UTC
I decided to get stuck right in tonight, no sense in delaying the inevitable. About an hour of carefully grinding and carving and sanding and I think I've got it to a point where I can fit the top and blend the joins. The main trouble spot (circled) lines up nicely now and I have managed to keep the contour to match the RHS.


I need to get this right, I've got Henry himself looking over my shoulder !


Cheers, D
bluebell914
_VISITCOMMUNITY
Pennsylvania, United States
Joined: September 26, 2018
KitMaker: 61 posts
Auto Modeler: 49 posts
Posted: Thursday, October 03, 2019 - 03:19 AM UTC
This will be my build for Blue Oval
https://gallery3.kitmaker.net/showphoto.php/photo/473615/ppuser/75354
Joel_W
Staff MemberAssociate Editor
AUTOMODELER
_VISITCOMMUNITY
New York, United States
Joined: December 04, 2010
KitMaker: 11,666 posts
Auto Modeler: 2,974 posts
Posted: Thursday, October 03, 2019 - 04:26 AM UTC

Quoted Text


Patrick,
Just a great choice. Are you going to be using the Fujimi kit?
Joel
Joel_W
Staff MemberAssociate Editor
AUTOMODELER
_VISITCOMMUNITY
New York, United States
Joined: December 04, 2010
KitMaker: 11,666 posts
Auto Modeler: 2,974 posts
Posted: Thursday, October 03, 2019 - 04:27 AM UTC
D,
I'm sure that the Old Man approves of how you've got that complex joint to align.

Joel