_GOTOBOTTOM
Cars
Discuss all types of automotive modeling here.
Building some MFH projects
AussieReg
Staff MemberAssociate Editor
AUTOMODELER
#007
_VISITCOMMUNITY
Victoria, Australia
Joined: June 09, 2009
KitMaker: 8,156 posts
Auto Modeler: 2,953 posts
Posted: Tuesday, December 10, 2019 - 08:05 AM UTC
Yeah, I'm having enough trouble with 50-odd bits of old AMT styrene. I'm truly unsure if I would survive one of these kits

Looks amazing mate, super work.

Cheers, D
Joel_W
Staff MemberAssociate Editor
AUTOMODELER
_VISITCOMMUNITY
New York, United States
Joined: December 04, 2010
KitMaker: 11,666 posts
Auto Modeler: 2,974 posts
Posted: Tuesday, December 10, 2019 - 09:17 AM UTC
Nick,
I have complete faith in you. I'm 101% positive that you'll get the body parts to fit like a glove. Now if was me, it would be a whole different story.

Joel
Stickframe
#362
_VISITCOMMUNITY
California, United States
Joined: December 01, 2013
KitMaker: 1,661 posts
Auto Modeler: 431 posts
Posted: Wednesday, December 11, 2019 - 08:46 AM UTC
Hi gents,

Thanks for having a look -

D, I'm sure you'd power right through one of these! it seems that one of the biggest factors in getting these done is positive mind set, followed closely by patience!

Hi Joel, again, I appreciate your optimism! I'm still not willing to speak the words, "yes, it will work fine" hahha thanks -

In the meantime, some pics of about half of what I'm doing so far.

This is the rear canopy - don't be fooled by the top two pics:


Famous last words, "sure looks good!" - - I'm not convinced at all just yet. First, it took a long time to get this to even sit flat. The tube chassis was a bit warped horizontally, at the top, meaning the wheels sit flat on the bottom, but the canopy on top, didn't. Let the terror begin - apply steady, gradually increasing force on the chassis in an effort to bend the top of the frame, while not destroying it. It worked.

Next, on the underside of the canopy - there are four key locating and connecting points:


As you can see, there are two pins in the rear, and two arms for hinges in the front. These are to be glued into subtle indentations in the resin canopy. This works fine, but having been around my own builds long enough, I am fully confident that these points would snap off during fitting, and then during use. So, I used scrap brass photoetch material to make retainers, as shown below:


Above, you can see a connection for the hinge arm - glued flush on the canopy, and curved to match the curve on either side of the arm, ideally holding it in place.

Next:


In the rear are these locating pins that lift in and out of the chassis receiving points - what could go wrong here?? I'd knock them off, that's what! so, more brass retainers. For these, I made little two prong forks, that wrap the base of the pin, covering a base that is wider than the pin itself.

Challenges for this bold move: Cut an opening in the retainer that is the right size....then, make a "Z" fold in the sheet brass, that steps off the base of the pin that lands flush to the resin canopy....CA prefers to work on flush surface to surface connections - cheating doesn't work, I've tried.

In the meantime, I painted up the rocker panels and some other parts - these are sitting in my laundry room, near the hot water heater right now - why you ask? It's raining here - and the acrylic finish wouldn't dry with all the humidity! lol - so, as I'm at work now, I'm hoping these will be baked/finished when I get home, so that I can apply my water based, acrylic clear coat! what could go wrong??

Cheers and happy model building -

Nick


Joel_W
Staff MemberAssociate Editor
AUTOMODELER
_VISITCOMMUNITY
New York, United States
Joined: December 04, 2010
KitMaker: 11,666 posts
Auto Modeler: 2,974 posts
Posted: Friday, December 13, 2019 - 02:32 AM UTC
Nick,
You're selling your abilities way short. Honestly, those retainers for the hinges and pins are way beyond my skill level. The fit perfectly, look perfect, and if you didn't tell us that you made them, I'd bet that they came with the kit. What's more they should really help to secure those parts to the rear deck.

Joel
Stickframe
#362
_VISITCOMMUNITY
California, United States
Joined: December 01, 2013
KitMaker: 1,661 posts
Auto Modeler: 431 posts
Posted: Monday, December 16, 2019 - 08:50 AM UTC
HI Joel,

Thanks, yes, the little bits that keep the whole thing together! I don't know about you, but if given enough time, I'll knock parts like that clean off the kit. In fact, I probably still will!! it drives me nuts.

OK, on to some progress - the rear canopy:


Try as I might, I couldn't get the upper and lower fender archs to match - so, I opted for some cutting. The actual difference is less dramatic than this cut line suggests, in fact it's about half of the distance shown. Except, these fenders have a flare projecting outward, so I needed to cut deep enough to allow me to add the flare, to match with its counterpart on the lower section. The cut and fill worked out fine on both sides - in fact, I went so far as to add two fine wire (.015") pins in each to keep them from getting knocked off.

And, below you'll see some progress, including the rocker panels below the cabin - painted, clear coated, and installed:


These need to be installed before the front or rear body parts can be fitted/installed. As this will take lots of handling, forcing, and cajoling parts together, I made sure the decals were on and all was clear coated!! I don't want to screw up the finish. These panels by the way, are screwed onto the drivers area with four, self tapping 1.4 mm screws - yes, as the fit of course takes some finessing, this is a bit nerve wracking.

And, while at it, I kept going with painting of odds and ends - added some more materials, and so on:


I like the mix of colors and materials on this kit - and I don't look forward to, or really want to, install the removable body parts, covering all of this up! They pack an awful lot into a 1/24 kit!

My next steps include getting the body painted and on without destroying the build.

Fingers crossed -

Happy model building -

Cheers
Nick


Joel_W
Staff MemberAssociate Editor
AUTOMODELER
_VISITCOMMUNITY
New York, United States
Joined: December 04, 2010
KitMaker: 11,666 posts
Auto Modeler: 2,974 posts
Posted: Monday, December 16, 2019 - 09:47 AM UTC
Nick,
I'm truly speechless, the build is that good

I just can't believe my eyes how super detailed this kit is, and how well you've executed the build to get this far. All I want to know is when do you add some gas and test fire the engine up?

Joel

Dixon66
_VISITCOMMUNITY
New Hampshire, United States
Joined: December 12, 2002
KitMaker: 1,500 posts
Auto Modeler: 645 posts
Posted: Monday, December 16, 2019 - 01:38 PM UTC
What Joel said is enough for me too. Wow!
Hwa-Rang
_VISITCOMMUNITY
Kobenhavn, Denmark
Joined: June 29, 2004
KitMaker: 6,760 posts
Auto Modeler: 2,182 posts
Posted: Monday, December 16, 2019 - 09:58 PM UTC
The amount of details are just mind blowing. Will you paint or drill out the holes, in the spokes, of the steering wheel?
Stickframe
#362
_VISITCOMMUNITY
California, United States
Joined: December 01, 2013
KitMaker: 1,661 posts
Auto Modeler: 431 posts
Posted: Thursday, December 19, 2019 - 10:05 AM UTC
HI Joel and David,

Thanks - yes, I've got to say, while this build process requires a fair amount of commitment by the model builder, the results are pretty nice. I should not have started my adventures with MFH with this kit - I think I dove into the proverbial deep end of the pool a bit too soon. Live and learn I guess. No, that doesn't mean that I'll buy another of the 908s and try again. I have a few MFH kits - as I mentioned at the start of this, I've been buying a kit or two a year for a while - so I have others that are more or less complex. I'll wait a while to start the 917!

Jesper - good eye - I spaced on the steering wheel - so, I pulled it out, steering column and all, which of course is funny because when I put it together, the wheel would not stay on - well, now it does, and it has a few lightening holes drilled through it:


and you can see other body parts making their way onto the chassis, but that assembly isn't done yet - instead, more and more bits and paint detailing - tail lights, and more shades of silver (50??? lol):


There you have it to date. I like the exhaust tips - those are resin parts and painted up nicely. The tail lights are a foggy resin and look pretty good too.

OK - I suspect I'll finish this in the next few days, but probably won't post again until after the first of the year -

Cheers and looking forward to a better 2020!!!
Happy model building and best wishes to all -

Nick
Cosimodo
#335
_VISITCOMMUNITY
Auckland, New Zealand
Joined: September 03, 2013
KitMaker: 1,808 posts
Auto Modeler: 701 posts
Posted: Thursday, December 19, 2019 - 12:21 PM UTC
Just looks amazing Nick! The level of detail is what attracts me to MFH, not sure about the complexity of it. Looking forward to the final pictures in 2020. Have a good break.

cheers
Michael
AussieReg
Staff MemberAssociate Editor
AUTOMODELER
#007
_VISITCOMMUNITY
Victoria, Australia
Joined: June 09, 2009
KitMaker: 8,156 posts
Auto Modeler: 2,953 posts
Posted: Thursday, December 19, 2019 - 12:41 PM UTC
Nick, every progress update on this build has been awesome. The level of detail and complexity along with the mixture of media in the parts takes thus type of kit to another level. I’m really looking forward to seeing the final update.

Have a happy and safe break and we will see you on the other side.

Cheers, D
Joel_W
Staff MemberAssociate Editor
AUTOMODELER
_VISITCOMMUNITY
New York, United States
Joined: December 04, 2010
KitMaker: 11,666 posts
Auto Modeler: 2,974 posts
Posted: Friday, December 20, 2019 - 09:51 AM UTC
Nick,
Just an amazing build to date. I'm just super impressed. I'll be waiting for your final post as I can't wait to see those Gulf colors on the body shell.

I should hang my head in shame as my progress on the Mustang is so slow these days, but I'm getting there. Update hopefully this weekend.

Joel
Stickframe
#362
_VISITCOMMUNITY
California, United States
Joined: December 01, 2013
KitMaker: 1,661 posts
Auto Modeler: 431 posts
Posted: Wednesday, January 08, 2020 - 11:20 AM UTC
Hello gents,

I finished the 908 a few days before Christmas, but haven't had any time to post an update - so, here we go:


A nice attribute of MFH kits is that effort is made to make sure that the kit correctly reflects a particular car, in this case the 908/3, number 8, that raced in 1971. As you can see above this car was raced, looked good on the curvy hill climb course, but ultimately DNF - apparently hit a rock and damaged the right front suspension. Too bad! It sure looked good, started with a good position on the grid, and Vic Elford is pretty highly regarded as a driver - as they say, just another day at the races.

Now, on to mine. Funny twist of fate here - I was just about satisfied with my nearly OK body work - when alas, a big, PITA distraction emerged - decals that fractured and wouldn't set. Perfect. And, yes, it has a correct finish on the body/paint, and not one but two types of setting solution were tried: No luck. Yes, this irked me - but, I wish I was taller and wealthy too....take a look:


And, yes - there was a clear coat over these! Weird eh? the word "Porsche" was complete at one time...I'm guessing the clear coat must have been all that was holding this decal on and it just flicked off while polishing...nice.


The picture above is particularly galling. If you go back to the build you'll see I went of my way to carefully adapt/adjust the rear fender well and the flare - upper and lower - to match. I did, and miraculously it worked and looks great. Uh, except for the number 8 which magically became unaligned while handling, and had part of the top flick off. I did't notice the misalignment until after it was clear coated....again, nice.

Ok - enough whining - back to the car:


Problems with decals or not as whole this was a very challenging build which might even look better without the body (and obviously decals) on!

As the real car was a DNF, because it apparently hit a rock or something, I decided I could add some dust and wear to distract from the glaring mess that is the decals:


And for some scale, with some similar vintage Porsche's:


OK, for now I'm taking a breather from the MFH - I built a 911 GT1 immediately after, with lots of complicated decals, which worked fine, and am starting a new scratch project. I'll restart this post in a month or two or whenever I'm ready to try again.

Cheers

Nick


Cosimodo
#335
_VISITCOMMUNITY
Auckland, New Zealand
Joined: September 03, 2013
KitMaker: 1,808 posts
Auto Modeler: 701 posts
Posted: Wednesday, January 08, 2020 - 11:36 AM UTC
Hi Nick, I am sorry to read, and see, the troubles with the decals. I know how gutting that can be but the car itself looks great and from the normal viewing distance viewers would probably never notice the issues.
The Martini colour scheme looks quite restrained against their later depictions and looks good against the silver, and a great contrast to your other racing Porsches.

cheers
Michael
Joel_W
Staff MemberAssociate Editor
AUTOMODELER
_VISITCOMMUNITY
New York, United States
Joined: December 04, 2010
KitMaker: 11,666 posts
Auto Modeler: 2,974 posts
Posted: Wednesday, January 08, 2020 - 03:09 PM UTC
Nick,
The decal issue really sucks. Been there, had the same results, and believe me I know exactly how you feel. And yes, I took off a little time to regroup. Then back to my disaster.

What I did was to find some AM decals, and I'm positive for such a popular car as the 908/3 they're out there. Both times I had to strip the body. In this case it's not attached except for the lower sills. I'm sure that you can strip them, and with careful masking repaint.

As for your build, you know exactly how I feel about the job you did. Impressive doesn't do it justice.

I haven't a clue as to why the fit got out of wack, but again, I've been there. My 956 has the tail engine cover off for that exact reason. I'd display it with the engine deck up and the front deck off to show of the chassis and details.

I'm right here for you if I can help in any way.

Joel
Hwa-Rang
_VISITCOMMUNITY
Kobenhavn, Denmark
Joined: June 29, 2004
KitMaker: 6,760 posts
Auto Modeler: 2,182 posts
Posted: Thursday, January 09, 2020 - 12:18 AM UTC
Bummer about those decals. Did the clear coat split as well, or "just" the decals? did you paint, the body, with acrylics?
AussieReg
Staff MemberAssociate Editor
AUTOMODELER
#007
_VISITCOMMUNITY
Victoria, Australia
Joined: June 09, 2009
KitMaker: 8,156 posts
Auto Modeler: 2,953 posts
Posted: Friday, January 10, 2020 - 12:08 PM UTC
Hi Nick.

I'm loving this build, the little niggles just give it more character! As you said, take a break, a little diversion can only do you good.

With regard to the DNF - (Accident), it's the MARTINI Racing Team, what do you expect? At least they crashed smiling

Cheers, D
Joel_W
Staff MemberAssociate Editor
AUTOMODELER
_VISITCOMMUNITY
New York, United States
Joined: December 04, 2010
KitMaker: 11,666 posts
Auto Modeler: 2,974 posts
Posted: Saturday, January 11, 2020 - 02:29 AM UTC
Nick,
Looking at your picture of the 3 Porsches, I believe that the top one is a open cockpit 908/2 from the late 1960s. She really looks fantastic as you nailed the paint job. Is that the old Union kit, or a limited run multi media kit?

When ever I've seen pictures of those endurance cars, I often wondered just how much air turbulence the drivers had to deal with at high speeds. I'm sure that the nose pushed most of the killer air flow over the driver's head, but surely some buffeting had to happen. I remember my 1st time trial at Bridgehampton in my MGB (no windshield, just a small plexi homemade deflector), and I was wearing the traditional open face helmet, Goggles, bandana over my mouth to keep crap and bugs out, and a sun visor brim. Down the back straight it felt like my head was being ripped off. Tore that brim right off the helmet and tossed it right there.

Joel


Joel
Stickframe
#362
_VISITCOMMUNITY
California, United States
Joined: December 01, 2013
KitMaker: 1,661 posts
Auto Modeler: 431 posts
Posted: Tuesday, July 14, 2020 - 09:46 AM UTC
Hi fellow model building enthusiasts,

I have been following Michael's beautiful work on the MFH 917 - wow -

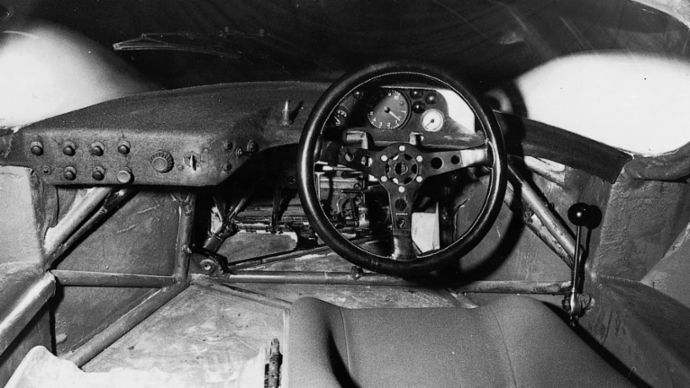
A recent subject on that build has been a question about the alignment of the steering column relative to the position of the driver's seat. I didn't want to get too far afield on this subject on his build log, so I decided to address it on my own.

The MFH 908 also has the steering column off center, which made me wonder - for such an obvious element, how could it be so far off?

It turns out, the kit is right - the steering columns on both cars are not centered on the seat, and line drawings of each appear to confirm that they were not supposed to be.

Please see the following:


This was tougher to prove in photos, but who knows? these images seem to illustrate the off-set, but I can't tell how much or little it is or isn't from the angle:


I haven't built the MFH 917, but did build the 1/24 Fujimi and from below, I can't tell what they did, as the steering column is part of the dash, and am not sure of exactly what is going on from these pics:


And, on the MFH 1/24 908, the off-set is apparent:


So, I think the off-set is intentional, and reflects the actual car. In looking this up, it turns out that several cars, racing and otherwise have the off-set, for all sorts of reasons.

OK, now, back to work at the real job. I'll eventually start another MFH, but for now, finishing the Cat D7R

Happy model building, and stay well

Nick
Joel_W
Staff MemberAssociate Editor
AUTOMODELER
_VISITCOMMUNITY
New York, United States
Joined: December 04, 2010
KitMaker: 11,666 posts
Auto Modeler: 2,974 posts
Posted: Tuesday, July 14, 2020 - 11:10 AM UTC
Nick,
Very interesting information. Perhaps the confusion is in the reduction due to scale. But I've never seen a steering wheel that far off set in any race car. The drivers leg would seem to rest right below the wheel which isn't the best place for it as it would be hitting the wheel constantly.

Here's a picture of a 917 that I think solves both sides of our equation. the wheel is indeed slightly angled to the right, but so is the seat at the same exact angle, and the wheel is dead center to the seat. I'm willing to bet that the pedals are also at the same angle.


Joel


Stickframe
#362
_VISITCOMMUNITY
California, United States
Joined: December 01, 2013
KitMaker: 1,661 posts
Auto Modeler: 431 posts
Posted: Tuesday, July 14, 2020 - 12:04 PM UTC
Hi Joel,

It is certainly an interesting question. I added the color lines on the last version for clarity - if you look below, you'll see the originals, with different annotations:


Above is the 917 shown at a larger scale - you can see the seat centerline and the steering wheel - and what looks like the steering column centerline.

The 908 drawing is less useful, but you can see the offset between the seat and wheel:


Neither of which I understand - other than the spaces are very tight - the result would be this:


I'm not sure if the figure above is exaggerated to make the point, but it seems to reflect the situation. It also looks like some uncomfortable driving, to add to essentially laying on your back, in a very high powered, low slung machine!

It turns out, this is not that uncommon, but for who knows what reasons:


I think it's the same in my FX 35....why? I don't know. Thinking about it, the car can be uncomfortable to drive long distances - but it is fun! has plenty of power to spare.

I would guess that MFH does their homework, and has the offset intentionally. Alas, all speculation from me - while I have spent my adult life designing things, I can't say why others draw or design what they do - just sort of fun to think about.

Stay well and happy model building -

Nick

Cosimodo
#335
_VISITCOMMUNITY
Auckland, New Zealand
Joined: September 03, 2013
KitMaker: 1,808 posts
Auto Modeler: 701 posts
Posted: Tuesday, July 14, 2020 - 01:24 PM UTC
Great info Nick! I must admit I didn't realise that the steering wheel was offset until I put the seat in place. I first did wonder if the column was bent (which is a real possibility with these kits!) but it is clear from the attachment points to the framing that the offset is meant to be. As for the seat, in the kit at least, there is no potential to have it turned in towards the wheel.

The other point that surprised me that Porsche built these cars as right hand drive but the gear change also on the right hand.

I think this is a case of an engineering exercise first, driver usability second.

cheers
Michael
 _GOTOTOP