_GOTOBOTTOM
Motorcycles
Scale motorcycle modeling topics.
My chopper project
old-dragon
_VISITCOMMUNITY
Illinois, United States
Joined: August 30, 2005
KitMaker: 3,289 posts
Auto Modeler: 1,620 posts
Posted: Saturday, November 01, 2008 - 03:15 PM UTC
Here's where I'm at so far.....


and here's the real work..the hack-

...this is what ya get when you take a 57' nomad and try to turn it into a hack...a 57' gnome.
Sadly, the camera doesn't quite pick up on the "Green to blue to purple" color change that the HOC color change paint has to offer. And yes, the sidecar will be the same color but with the usual chrome and white trim on the fins{I fought myself for awhile on painting the 57' that color, but with the cycle it seems ok}.
mother
_VISITCOMMUNITY
New York, United States
Joined: January 29, 2004
KitMaker: 3,836 posts
Auto Modeler: 256 posts
Posted: Saturday, November 01, 2008 - 04:26 PM UTC
Great looking chopper Bob, the sidecar is a nice touch. I can see the difference in the colors. Where did you get the paint from and was it expensive. Back to the sidecar…looks like a great hack job, where did you cut it up and piece it together. If you don’t want to paint it as the bike you could always go with flat black.

I just finished my Revell chopper tonight and I’m pretty pleased with it. I have a second one that I had plans on doing a coffin sidecar, I’d have to scratchbuild it as there are no 1/12 coffins.

Looking forward to your next progress posting.

Joe
old-dragon
_VISITCOMMUNITY
Illinois, United States
Joined: August 30, 2005
KitMaker: 3,289 posts
Auto Modeler: 1,620 posts
Posted: Saturday, November 01, 2008 - 04:28 PM UTC
A few more shots-

-kick starter...the arm "was" the origonal side stand.

-belt guards and you can see what a black wash does for the fins...nice depth.

...does this kick starter make me look fat...{oh god - I sound like my wife!}
-widened stock long tank can be seen...no gas cap nor speedo yet

-cut the indexing pins and aligned the spokes on the outer rim....looks nicer I think.
old-dragon
_VISITCOMMUNITY
Illinois, United States
Joined: August 30, 2005
KitMaker: 3,289 posts
Auto Modeler: 1,620 posts
Posted: Saturday, November 01, 2008 - 04:55 PM UTC

Quoted Text

Great looking chopper Bob, the sidecar is a nice touch. I can see the difference in the colors. Where did you get the paint from and was it expensive. Back to the sidecar…looks like a great hack job, where did you cut it up and piece it together. If you don’t want to paint it as the bike you could always go with flat black.

I just finished my Revell chopper tonight and I’m pretty pleased with it. I have a second one that I had plans on doing a coffin sidecar, I’d have to scratchbuild it as there are no 1/12 coffins.

Looking forward to your next progress posting.

Joe


Thank you!...high praise coming from you sir.
- "Paint" - rattle can "house of color" 3 stage{base/color/clear} laquer...yeah, not exactly cheap, but the result is worth it{for one or two models - hahaha}.
- I like the suede idea...I just have a hard time seeing any 57' chevy in flip/flop paint...old seveties big metallic or new fine metallic, candy..yeah, just not easily with that color{works fine for the cycle though}.
- The 1/25 scale{looks like a large peddle car, which is what I was after}...she was chopped at the bottom of the pillars to remove the roof, then cut the bulkhead, firewall and rear door{nomad} and sectioned the needed amount out and glued back together. The fender holes were filled and smoothed with the exception of the pass rear which just has an inner plate for the sidecar frame axle to pass thru. I have a color matched fender for the sidecar wheel. I didn't do a windshield...actually, truth be told, I did, but it looked weird by the time it was narrowed{hahaha}. Alot of time was spent in smoothing the old wheelwells and blending it all....hood top too.
- A coffin would be cool! You got your choice of old western 6 sided or modern{grandpa's coffin rod} fiberglass. Do a silvery white interior for the silk...or old school tuck and roll...your cycle - your call...but that would look cool and be easy to build. FWIW - I'm using the rectangled fender sprue for the hack frame! I'd say a 7' long by 4' wide{ish} size for a standard coffin...modify as needed for intended use of course!{like my chevy}

...hey...I'm sending you a PM with a link to a site you gotta check out...too cool!!!!!{I wanna do a slammed peterbuilt with "that" on it!

old-dragon
_VISITCOMMUNITY
Illinois, United States
Joined: August 30, 2005
KitMaker: 3,289 posts
Auto Modeler: 1,620 posts
Posted: Saturday, November 01, 2008 - 07:19 PM UTC
Last reply for the night...uhm, er..morning-
3 times I've tried to bend custom exhaust for this build and I've failed 3 times so far tonight...I give - for now!
-thick wall K&S aluminum tubing snaps on mild bends{I don't recommend using it - but I had to try}#1
- thin wall K&S aluminum tubing likes to kink #2, so I tried again with plastic rod in it...got the front pipe done{half way there!} but the reverse back bend that mimics the oem rear plastic pipe's lower bend snaps even with the plastic rod in it{really darn annoying!!!!!!!!}. #3
...that's 3 tries....tomorrow I'll break out the brass tubing and anneal it 1st, then stick in plastic rod and try again. I know - "brass" - but I'll alcladd II chrome it when done. I want longer exhaust...actual tubing...and something close to "fish tails" on the ends......and I'll get it yet{but not tonight}.....I'm hittin the kid's holloween candy and going to bed!
old-dragon
_VISITCOMMUNITY
Illinois, United States
Joined: August 30, 2005
KitMaker: 3,289 posts
Auto Modeler: 1,620 posts
Posted: Monday, November 03, 2008 - 08:00 AM UTC
Alright...I got it! I have to suggest to anyone that if your going to do really harsh back bends and the like, to use brass tubing. Once you anneal it, it bends really easy. I used my mapp gas tank on the brass tube and got it a nice orange across the work area of the tube, then shoved a piece of plastic rod inside to keep kinks away and viola, I have my rear pipe bent the way I needed. You'll see the old aluminum pipe that's split open{hate when that happens!}. For easy bends, sure, use aluminum tube and you can polish it. Me, I'll prime, base coat and alclad II the chrome on these. Nice part with brass is if you have any lil nicks or dings you can fill them in with filler and smooth{I have one - oops}, then paint...you can't do that with aluminum tubing if your going to polish it and put it on directly. Food for thought........
Now, to figure out if I can do fishtails......and how.....

..now, go make your own size/length and curve custom pipes for your chopper!
mother
_VISITCOMMUNITY
New York, United States
Joined: January 29, 2004
KitMaker: 3,836 posts
Auto Modeler: 256 posts
Posted: Monday, November 03, 2008 - 07:08 PM UTC
Thanks for the PM & links Bob. The bike is coming along well. The pipe look super. Here's a thought on bending aluminum tubing. Fill the tubes with water and find something that will seal the ends. Then freeze them overnight and bend, this ice will/should act as a solid tubing and bend without kinks and such. No I’m not guaranteeing this will work but it’s worth a shot.

For the fishtails...cut/grind pipe using a dremel or sandpaper and then flaten tips.

Will you be simulating the color of the pipes burnt where that attach to the engine. If you need help there I’ll show you how. I did mine and they look pretty darn close.

Happy Modeling,
Joe
Hisham
_VISITCOMMUNITY
Al Qahirah, Egypt / لعربية
Joined: July 23, 2004
KitMaker: 6,856 posts
Auto Modeler: 50 posts
Posted: Tuesday, November 04, 2008 - 01:21 AM UTC
Regarding bending aluminum.. I was having some work done to my bathroom and installing some aluminum pipes and the guy that was doing the job was filling the pipes with sand before bending them. I wonder if that would work with the small scale stuff?

Hisham
Yoni_Lev
_VISITCOMMUNITY
Washington, United States
Joined: September 20, 2007
KitMaker: 861 posts
Auto Modeler: 339 posts
Posted: Tuesday, November 04, 2008 - 03:55 AM UTC
Ahhh, the old sand trick. My dad used it while bending up a rollcage for his full-scale '56 Ford, back when he was still running bracket races and spending all his free time in the garage. Personally, I've tried the same thing with aluminum tubing and haven't had any luck. The sand needs to be held in place and compacted, and I haven't found anything that works well, especially with small diameter tubing.

I like Joe's ice idea, but I think you would have to work rather quickly, before things melted.

The brass tubing seems the way to go. I would imagine you could get some pretty nice bends using it.

-YL
rv1963
_VISITCOMMUNITY
New York, United States
Joined: December 07, 2004
KitMaker: 1,888 posts
Auto Modeler: 806 posts
Posted: Thursday, November 06, 2008 - 03:17 AM UTC
Bending any small tube is very difficult with out getting a kink, you can try solid rod and drill a hole about a 1/4 to a 1/2 inch deep and than make your bends that will not kink and the drilled ends look realistic.
viper29_ca
_VISITCOMMUNITY
New Brunswick, Canada
Joined: October 18, 2002
KitMaker: 2,247 posts
Auto Modeler: 95 posts
Posted: Thursday, November 06, 2008 - 03:59 AM UTC
Another option for bending pipes, if you aren't 100% set on using aluminum, get some Evergreen tubing and a heat gun. Friend of mine scratchbuilds 1950s and 60s stock cars from regular street cars and custom builds all his roll cages that way. Would do for exhaust pipes as well!
old-dragon
_VISITCOMMUNITY
Illinois, United States
Joined: August 30, 2005
KitMaker: 3,289 posts
Auto Modeler: 1,620 posts
Posted: Sunday, December 28, 2008 - 08:41 PM UTC
I didn't like the plain tank, so I went a new route...speedo with filler cover. This is the very beginnings...
rv1963
_VISITCOMMUNITY
New York, United States
Joined: December 07, 2004
KitMaker: 1,888 posts
Auto Modeler: 806 posts
Posted: Monday, December 29, 2008 - 04:27 PM UTC
Great work on the gas tank Bob i really like the way that looks.
mother
_VISITCOMMUNITY
New York, United States
Joined: January 29, 2004
KitMaker: 3,836 posts
Auto Modeler: 256 posts
Posted: Monday, December 29, 2008 - 06:20 PM UTC
Bob that’s an excellent idea cooperating the speedometer into the tank. The work is nice and tight. I have to remember this the next time I do another chopper. What are using for the speedometer…aftermarket? For all my gages I often go through old racing catalogs and magazines, there you’ll find pics of techs and gages, then I cut the ones that’ll fit, glue and clear coat lightly using future floor wax. Looking forward to the next progress posting.

Joe
old-dragon
_VISITCOMMUNITY
Illinois, United States
Joined: August 30, 2005
KitMaker: 3,289 posts
Auto Modeler: 1,620 posts
Posted: Tuesday, December 30, 2008 - 02:15 PM UTC

Quoted Text

Bob that’s an excellent idea cooperating the speedometer into the tank. The work is nice and tight. I have to remember this the next time I do another chopper. What are using for the speedometer…aftermarket? For all my gages I often go through old racing catalogs and magazines, there you’ll find pics of techs and gages, then I cut the ones that’ll fit, glue and clear coat lightly using future floor wax. Looking forward to the next progress posting.

Joe


The flat section is a laminate of plain evergreen .010 on the bottom and evergreen wood siding for the "milled" top look piece. Glue the pieces together...give it 5min to set up alittle, then rubber band them onto the section of the tank it needs to go to get the contours nice...it gets pretty close. As for the speedo, yeah, I was going to use a pic inserted on a flat disc with an .010 clear sheet over it{disc}. I'll be alclading this whole thing....still need two fillers yet. Oh, that's a 1/2" tube for the main housing with a spares tank ring type idler wheel{small tankette} for the inner section....spokes removed after the glued dried.
Yoni_Lev
_VISITCOMMUNITY
Washington, United States
Joined: September 20, 2007
KitMaker: 861 posts
Auto Modeler: 339 posts
Posted: Wednesday, December 31, 2008 - 10:17 AM UTC

Good call on the tank speedo and associated pieces, as they look great. I have to give you a lot of credit for having the guts to add this stuff over a completed paint job!

-YL
old-dragon
_VISITCOMMUNITY
Illinois, United States
Joined: August 30, 2005
KitMaker: 3,289 posts
Auto Modeler: 1,620 posts
Posted: Wednesday, December 31, 2008 - 11:33 PM UTC

Quoted Text


Good call on the tank speedo and associated pieces, as they look great. I have to give you a lot of credit for having the guts to add this stuff over a completed paint job!

-YL


...try not to think of it as being so major, try thinking of it being like adding mirrors or roof marker lights on a semi truck or badges/script on a car. I much prefer adding a sepparate piece than trying to paint in on because it's molded in.
thegirl
_VISITCOMMUNITY
Alberta, Canada
Joined: January 19, 2008
KitMaker: 6,743 posts
Auto Modeler: 64 posts
Posted: Wednesday, March 25, 2009 - 05:01 AM UTC
Dis you every finish this project Bob ?
old-dragon
_VISITCOMMUNITY
Illinois, United States
Joined: August 30, 2005
KitMaker: 3,289 posts
Auto Modeler: 1,620 posts
Posted: Wednesday, March 25, 2009 - 01:37 PM UTC

Quoted Text

Dis you every finish this project Bob ?


..funny you should ask...the tank speedo assy is drying as I type{primer}...there's a model show in 4 weeks at the LHS and I'd like to toss a couple of my builds in there for laughs...that and the daughter is going to do a "make and take" that day...will bring my nephew too if my sister will let him go{he and my daughter are the same age - 7}.
The side car is a distant project at this point since there's sooooo much to configure{hack frame/suspension and redo the paint}.
I can nail the bike before the show.......
thegirl
_VISITCOMMUNITY
Alberta, Canada
Joined: January 19, 2008
KitMaker: 6,743 posts
Auto Modeler: 64 posts
Posted: Wednesday, March 25, 2009 - 02:28 PM UTC
Yes I just had to ask ! Please post some pics of it before you head down to the show . I would really like to see the pics . I'm starting to have an interest in these .
old-dragon
_VISITCOMMUNITY
Illinois, United States
Joined: August 30, 2005
KitMaker: 3,289 posts
Auto Modeler: 1,620 posts
Posted: Monday, April 20, 2009 - 05:28 AM UTC
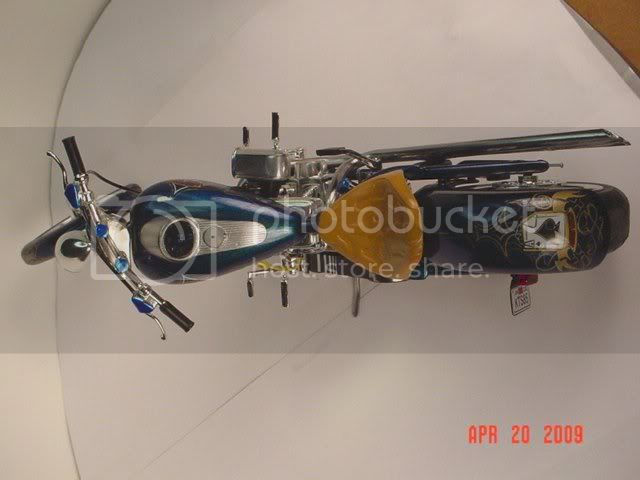
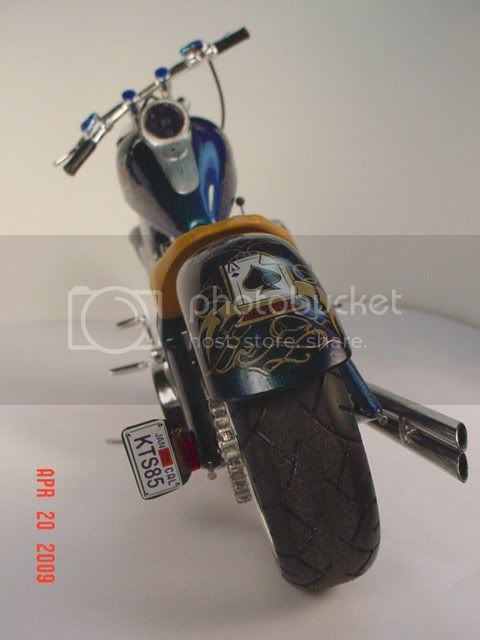
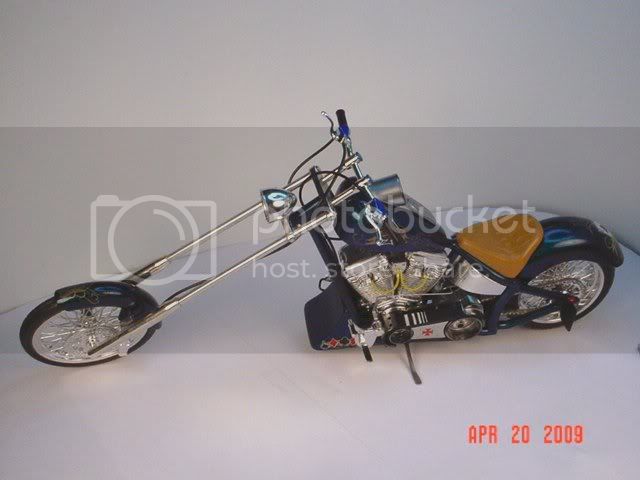
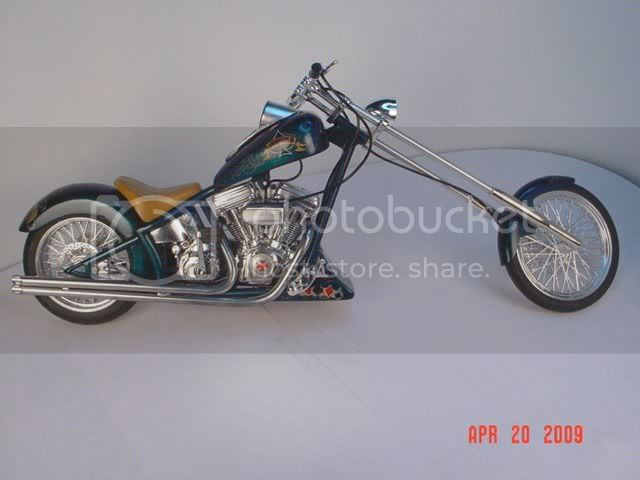
Alright, I'm callin her done-


...I tried to get a good shot of just the speedo{digital readout} but it always came up fuzzy. Too close I guess even in "close up" mode.
She took "Best cycle and 2nd best model of show"...got beat out by an Albatros IV in 1/72 scale...it was nice though.
old-dragon
_VISITCOMMUNITY
Illinois, United States
Joined: August 30, 2005
KitMaker: 3,289 posts
Auto Modeler: 1,620 posts
Posted: Monday, April 20, 2009 - 05:33 AM UTC
Oh, forgot to add that the lack of shine on the speedo was intentional; aclad II chrome on a flat black base= brushed aluminum, which is what I wanted. Add the tombstone tailight came out ok, but I'll do a better one next time.
thegirl
_VISITCOMMUNITY
Alberta, Canada
Joined: January 19, 2008
KitMaker: 6,743 posts
Auto Modeler: 64 posts
Posted: Monday, April 20, 2009 - 06:32 PM UTC
Awesome job done on the bike Dave ! turned out really well . The custom pipes are great , what did you paint them with ? or are the polished ?

How did the show go as well ?
old-dragon
_VISITCOMMUNITY
Illinois, United States
Joined: August 30, 2005
KitMaker: 3,289 posts
Auto Modeler: 1,620 posts
Posted: Tuesday, April 21, 2009 - 02:43 PM UTC

Quoted Text

Awesome job done on the bike Dave ! turned out really well . The custom pipes are great , what did you paint them with ? or are the polished ?

How did the show go as well ?


The pipes are brass with alclad II chrome and buffed out.
The show went well, the daughter got to build her make and take{I had to help alittle since she's only 7} and of the 4 models I brought, they all went home with ribbons...1st place/best truck & 1st place/best sci fi, a 2nd place/best model{chopper} and a 3rd place/best paint.
The chopper and the car I brought got the most attention from people.

-Bob
krow113
_VISITCOMMUNITY
British Columbia, Canada
Joined: March 16, 2010
KitMaker: 473 posts
Auto Modeler: 257 posts
Posted: Monday, March 22, 2010 - 02:02 PM UTC
Get some solid aluminum welding rod ,easy to bend and wont kink.
 _GOTOTOP