

I was just going to say that you would need to stretch the sharkmouth around the wheel opening, but looks like you're already thinking about it. She's looking great, and I dig those swisschease bomber-style seats.
It may look cool to add some "exhaust" effect on the rear quarters above the pipes, kinda like on the old piston engine powered fighters and bombers.
Where did you get the cheesecake decal in that size?


Go to automodeler.com for the current dynamic site!
Hosted by Jim Starkweather
59 Caddy "bomber"

vonHengest

Joined: June 29, 2010
KitMaker: 5,854 posts
Auto Modeler: 40 posts

Posted: Tuesday, July 12, 2011 - 02:35 PM UTC

old-dragon
Joined: August 30, 2005
KitMaker: 3,289 posts
Auto Modeler: 1,620 posts

Posted: Tuesday, July 12, 2011 - 03:30 PM UTC
Quoted Text
I was just going to say that you would need to stretch the sharkmouth around the wheel opening, but looks like you're already thinking about it. She's looking great, and I dig those swisschease bomber-style seats.
It may look cool to add some "exhaust" effect on the rear quarters above the pipes, kinda like on the old piston engine powered fighters and bombers.
-Where did you get the cheesecake decal in that size?
I angles the exhaust pipes downward so that would'nt really work here...however, if one ran them thru a side panel like the real aircraft then oh yeah it would work{a suggestion for your build?!}.
-The seats are just the nerc marauder spares that I sand blocked at an angle to add the side bolster plates to....then drill{alot}. Replica and miniatures has a bomber seat set but it just didn't call to me - do a search on bomber seats and you'll see alot of different styles including those intended for cars/rat rods.
-Starship modeler {.com} has these JT Graphics decals onsite for the old Babylon 5 Starfury kit. They have quite a few different ones and there's other places online that sell them too. I bought one long ago for my Starfury kit and got two by mistake...sorta since I found out I actually paid for two even though the invoice said one decal- turned out for the best in the long run.
old-dragon
Joined: August 30, 2005
KitMaker: 3,289 posts
Auto Modeler: 1,620 posts
Posted: Tuesday, July 12, 2011 - 03:38 PM UTC
Quoted Text
I'm with Jesper, the new mouth looks great, like it's open ready to eat some rusty old MOPAR. Before it was just smiling as a beautiful Corvette passed by !!
Keep up the great work Bob, very inspiring indeed.
Wow, how'd I miss you...there's an allison under the hood and the driver smiled as he passed the vette alright....well, there was supposed to be an allison in there but it's slated for another project...anybody got a Dodge Omni model...the lil 4 door one?!

old-dragon
Joined: August 30, 2005
KitMaker: 3,289 posts
Auto Modeler: 1,620 posts
Posted: Tuesday, July 12, 2011 - 03:52 PM UTC
Quoted Text
...Where did you get the cheesecake decal in that size?
Here-
cheesecake decals
...I think "bad penny" needs to get done...{says this as I tap my finger on the mouse and look sheepishly around the room and laugh}...they didn't have that one back when or I'd have it now!

AussieReg

#007

Joined: June 09, 2009
KitMaker: 8,156 posts
Auto Modeler: 2,953 posts

Posted: Wednesday, July 13, 2011 - 01:16 AM UTC
Quoted Text
Wow, how'd I miss you...
I'm only little, and I don't say much !


old-dragon
Joined: August 30, 2005
KitMaker: 3,289 posts
Auto Modeler: 1,620 posts
Posted: Wednesday, July 13, 2011 - 11:36 AM UTC
Quoted Text
...and I don't say much !
Awh sheesh...where's my boots, it's getting deep!!!!!!!!!!!!!!!
...speaking of where's stuff - where's Hermon! Hope things are fairing well for them.

KoSprueOne

Joined: March 05, 2004
KitMaker: 4,011 posts
Auto Modeler: 851 posts

Posted: Wednesday, July 13, 2011 - 01:00 PM UTC
Quoted Text
I'm with Jesper, the new mouth looks great, like it's open ready to eat some rusty old MOPAR. Before it was just smiling as a beautiful Corvette passed by !!
Keep up the great work Bob, very inspiring indeed.
that's right...
old-dragon
Joined: August 30, 2005
KitMaker: 3,289 posts
Auto Modeler: 1,620 posts
Posted: Sunday, July 24, 2011 - 02:59 PM UTC
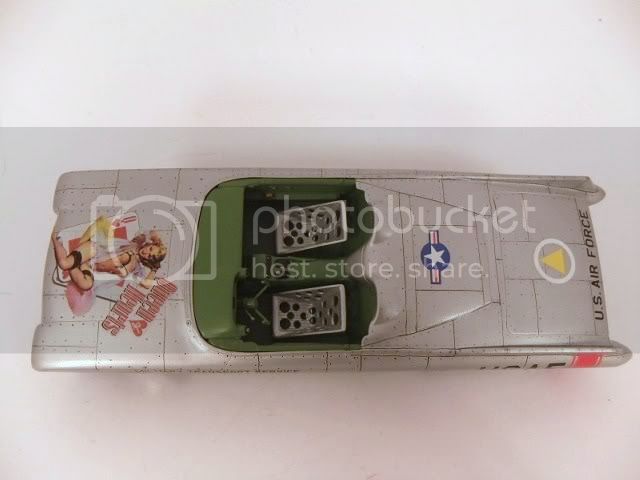
Got the seats in today...maybe some sort of leather looking pads might be in order for the poor driver and passenger...hmmm...I have some leather colored miliput clay around here somewhere.......
Next up is figuring out how to remove the old shark mouth decals so I can paint in the new stuff....and yes, of course, I had already clear coated the car.
Next up is figuring out how to remove the old shark mouth decals so I can paint in the new stuff....and yes, of course, I had already clear coated the car.
KoSprueOne
Joined: March 05, 2004
KitMaker: 4,011 posts
Auto Modeler: 851 posts
Posted: Sunday, July 24, 2011 - 05:02 PM UTC
the original shark mouth is fine. My eyes are mostly on the modifications of the car anyway
old-dragon
Joined: August 30, 2005
KitMaker: 3,289 posts
Auto Modeler: 1,620 posts
Posted: Monday, July 25, 2011 - 01:28 PM UTC
Quoted Text
the original shark mouth is fine. My eyes are mostly on the modifications of the car anyway
Actually I really like what you did with the revamped front end..like anything in this hobby, it'll take some work!
I'll try and snap a pic of the installed seats later and upload it...
old-dragon
Joined: August 30, 2005
KitMaker: 3,289 posts
Auto Modeler: 1,620 posts
Posted: Sunday, July 31, 2011 - 06:31 AM UTC
Sometimes you just gotta listen to your kids, even the 6yr olds....I was talking to the wife about how I was going to easily remove the shark nose decals from the caddy when my 6yr old son pipes up, "hey daddy, just don't do like you did with the space ship - ok!" Then it hit me like a pallet of bricks, when I built my Romulan space ship long ago {like 6 months or so} I finished spraying the last coat of sealer over the decals and it was dry but we were getting ready to head out for dinner and he wanted to see it done so I showed him. When I set it down on the table to go I didn't notice there was white tape there {I thought it was paper strips} so when we came home I grabbed the space ship and up came the tape with it...and of course when I tried to remove said tape it took some of the decals with it. I fixed that with some sprayed on battle damage but that basic idea should work here - right?!
It did!
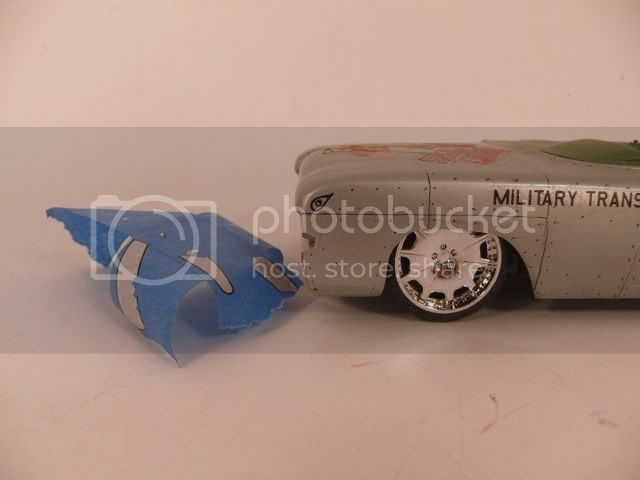
On the tape you'll see the old shark mouths from both sides but everything else is intact...you gotta love your kids somedays!!!!!!!!
The "now" lovely part about this is that even when seal coated the decal won't adhere well enough to stay put when tape is applied and pulled off...the clear coat around the decal will stay because the underlying paint is secure, but that decal doesn't stand a ghost of a chance of sticking.
So, next time you wish to remove a bad decal try this...just don't let any tape hit any other decals that you want to stay! Trust me on that!
It did!
On the tape you'll see the old shark mouths from both sides but everything else is intact...you gotta love your kids somedays!!!!!!!!
The "now" lovely part about this is that even when seal coated the decal won't adhere well enough to stay put when tape is applied and pulled off...the clear coat around the decal will stay because the underlying paint is secure, but that decal doesn't stand a ghost of a chance of sticking.
So, next time you wish to remove a bad decal try this...just don't let any tape hit any other decals that you want to stay! Trust me on that!
KoSprueOne
Joined: March 05, 2004
KitMaker: 4,011 posts
Auto Modeler: 851 posts
Posted: Sunday, July 31, 2011 - 03:49 PM UTC
haha, well done 


Hwa-Rang

Joined: June 29, 2004
KitMaker: 6,760 posts
Auto Modeler: 2,182 posts

Posted: Sunday, July 31, 2011 - 11:13 PM UTC
Excellent idea. Kudos to your son
old-dragon
Joined: August 30, 2005
KitMaker: 3,289 posts
Auto Modeler: 1,620 posts
Posted: Monday, August 01, 2011 - 11:05 AM UTC
Quoted Text
Excellent idea. Kudos to your son
Yup, he's mine...smart, good looking, and has a small pack of girls that hit him on a regular basis....you know what that means. Me, I need some good looks and to get my wife to quit hitting me!

EnviXR8
Joined: June 18, 2011
KitMaker: 7 posts
Auto Modeler: 5 posts

Posted: Monday, August 01, 2011 - 10:49 PM UTC
oh I like this! that is bloody awesome!
what a great concept.. pure genius and executed so very well!
Awesome...
what a great concept.. pure genius and executed so very well!
Awesome...
old-dragon
Joined: August 30, 2005
KitMaker: 3,289 posts
Auto Modeler: 1,620 posts
Posted: Tuesday, August 02, 2011 - 11:34 AM UTC
Thanks Chris...now, as promised I'll show you the seats installed....how low can we go!
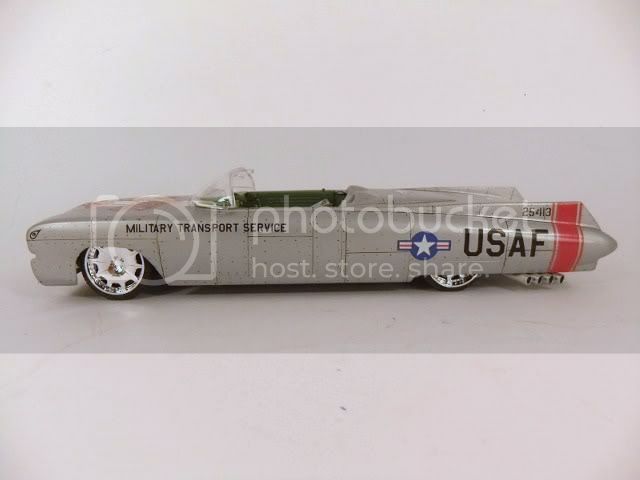
...about "that" low, and that's with a raise in height from the origonal seat base!
Please note the "new" windshield...I, uhm, had to since alittle over zealous buffing cracked and split the origonal in two{ouch}...good thing I had another to use. That new one is actually the '57 caddy rear window...hey, it's nice and low to begin with and has no marks like the other one did.
I'll start the white base for the new mouth tonight.....
KoSprueOne
Joined: March 05, 2004
KitMaker: 4,011 posts
Auto Modeler: 851 posts
Posted: Tuesday, August 02, 2011 - 12:50 PM UTC
Sahweeet! lookin good man, really coming together. That scraping stance is outrageous! love it
the interior is is really WWII aero looking too
the interior is is really WWII aero looking too
AussieReg
#007
Joined: June 09, 2009
KitMaker: 8,156 posts
Auto Modeler: 2,953 posts
Posted: Tuesday, August 02, 2011 - 01:55 PM UTC
Super job O-D, I'm loving it !
Cheers, D
Cheers, D
Hwa-Rang
Joined: June 29, 2004
KitMaker: 6,760 posts
Auto Modeler: 2,182 posts
Posted: Tuesday, August 02, 2011 - 11:23 PM UTC
Way cool Bob, way cool.

sroth88
Joined: August 13, 2007
KitMaker: 109 posts
Auto Modeler: 39 posts

Posted: Wednesday, August 03, 2011 - 02:16 AM UTC
Very cool I love it.
randyd
Joined: July 04, 2009
KitMaker: 241 posts
Auto Modeler: 12 posts

Posted: Monday, August 15, 2011 - 03:44 PM UTC
Hi Bob,
I love this car or plane or....?????
Some of the best thinking 'outside the box' that I've seen in a long time!!!
Randy
vonHengest
Joined: June 29, 2010
KitMaker: 5,854 posts
Auto Modeler: 40 posts
Posted: Saturday, February 04, 2012 - 07:18 PM UTC
I don't know if you've seen the 55 Merlin, but I was thinking of your build when I saw it go across the Barrett Jackson auction block.

grimmo
Joined: January 17, 2006
KitMaker: 752 posts
Auto Modeler: 16 posts
Posted: Saturday, February 04, 2012 - 08:06 PM UTC
Bob, that is one awesome build!
Jeremy, that 55 was built in australia too. So it was sold in america?
Jeremy, that 55 was built in australia too. So it was sold in america?
vonHengest
Joined: June 29, 2010
KitMaker: 5,854 posts
Auto Modeler: 40 posts
Posted: Sunday, February 05, 2012 - 07:09 PM UTC
It would appear so. It started appearing in promotional booklets shortly before it went across the auction block. I believe it sold for $200,000 even, but I'm not certain. They were having trouble trying to start it when it was on the block.
 |

WEB HOSTING BY


Copyright ©2021 Auto Modeler and Kitmaker Network, a subsidiary of Silver Star Enterprises
All Rights Reserved. Please read our Conditions of Use and Privacy Policy.
All Rights Reserved. Please read our Conditions of Use and Privacy Policy.