

Great update Joel, you've moved along quite a lot during the week. Its is great to see that the complex roll cage went together so well, and that it just drops into place on the floor pan. As you said, finding flash on a new mould is a bit disappointing, but it looks like it was and easy fix, and with the clean fit of the fenders the body looks really good.
The harness decals look good, and being tucked away into such a deep seat profile it would be difficult to pick whether they were decal or PE.
The extra wiring and braid, and the nice bright extinguisher, set it all off beautifully.
Cheers, D


Go to automodeler.com for the current dynamic site!
Hosted by Jim Starkweather
Beemax 1/24 scale Porsche 935 K2 DRM ver

AussieReg

#007

Joined: June 09, 2009
KitMaker: 8,156 posts
Auto Modeler: 2,953 posts

Posted: Sunday, June 16, 2019 - 12:37 AM UTC


Joel_W

Joined: December 04, 2010
KitMaker: 11,666 posts
Auto Modeler: 2,974 posts

Posted: Sunday, June 16, 2019 - 01:06 AM UTC
D,
Glad that you like my efforts to date. One dumb thing I forgot to do was to Dullcoat the seat. That will really knock down the shine on the harnesses so that they don't jump out at you.
I'm going to order a 1/2 dozen sets of Eduard 1/25-1/24 scale buckles and clasps, and make my own belts from surgical tape. Hopefully that will solve my problem.
The rear fenders do have a small seam that I have to deal with, but like everything else in the kit, the fit is near on perfect.
Joel

Joel_W
Joined: December 04, 2010
KitMaker: 11,666 posts
Auto Modeler: 2,974 posts
Posted: Friday, June 21, 2019 - 07:26 AM UTC
Another really satisfying week working on the 935 K2 Porsche.
Last update ended with the body shell just resting on the chassis pegs to get a feel for how she'll look. So it's time to finish up the interior.
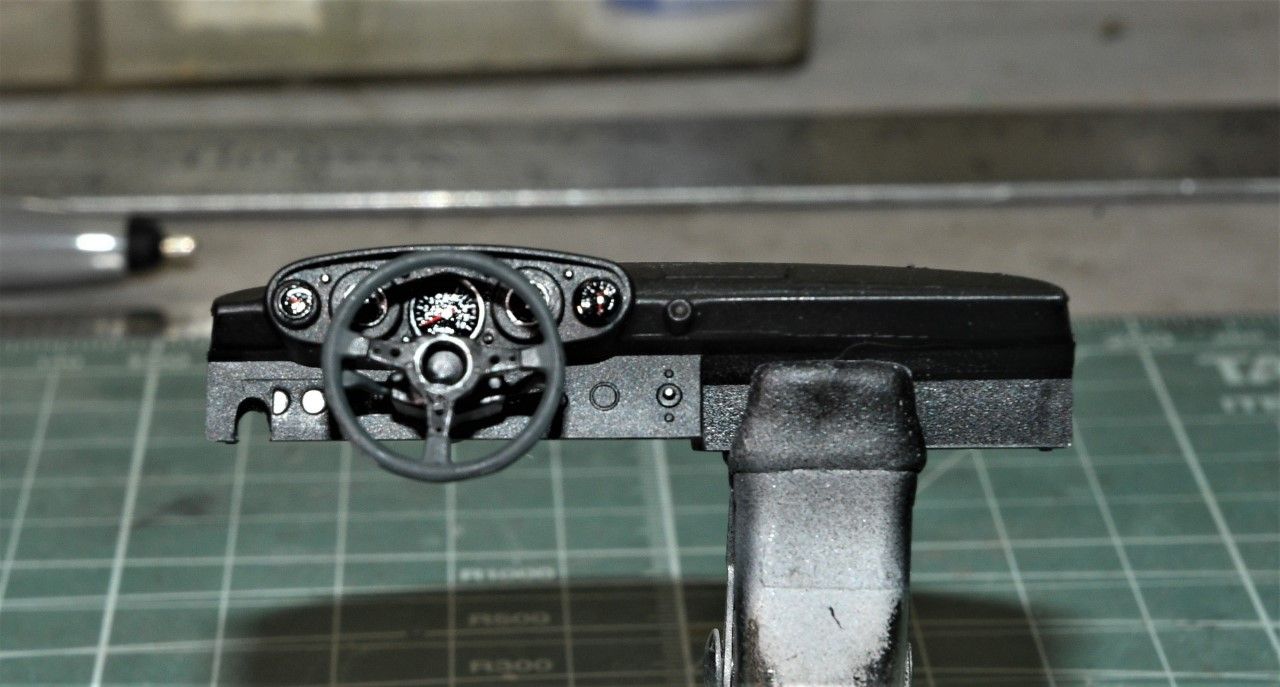
1st up was the dash and steering wheel assembly. I primed all three parts Mr. Hobby Gray Finishing Surfacer #1500, then air brushed the front of the dash and instrument cluster Mig Ammo Flat Black. The Top of the dash was air brushed with Tamiya Semi Gloss Black with a few drops of Dullcoat. The steering wheel was painted Flat Black with the grip hand brushed Tamiya Nato black so it had a more of a foam/rubber look to it. The instrument bezels were hand painted with good old Testors Enamel Silver using a # 5/0 Sable Brush. All the instruments are decals, so I gave each recess a drop of Pledge and let it dry. A hour or so later I applied the decals using my decaling system of Micro Set, Micro Sol, & Sovaset. 24 hrs later another drop or two of Pledge to replicate the lens.
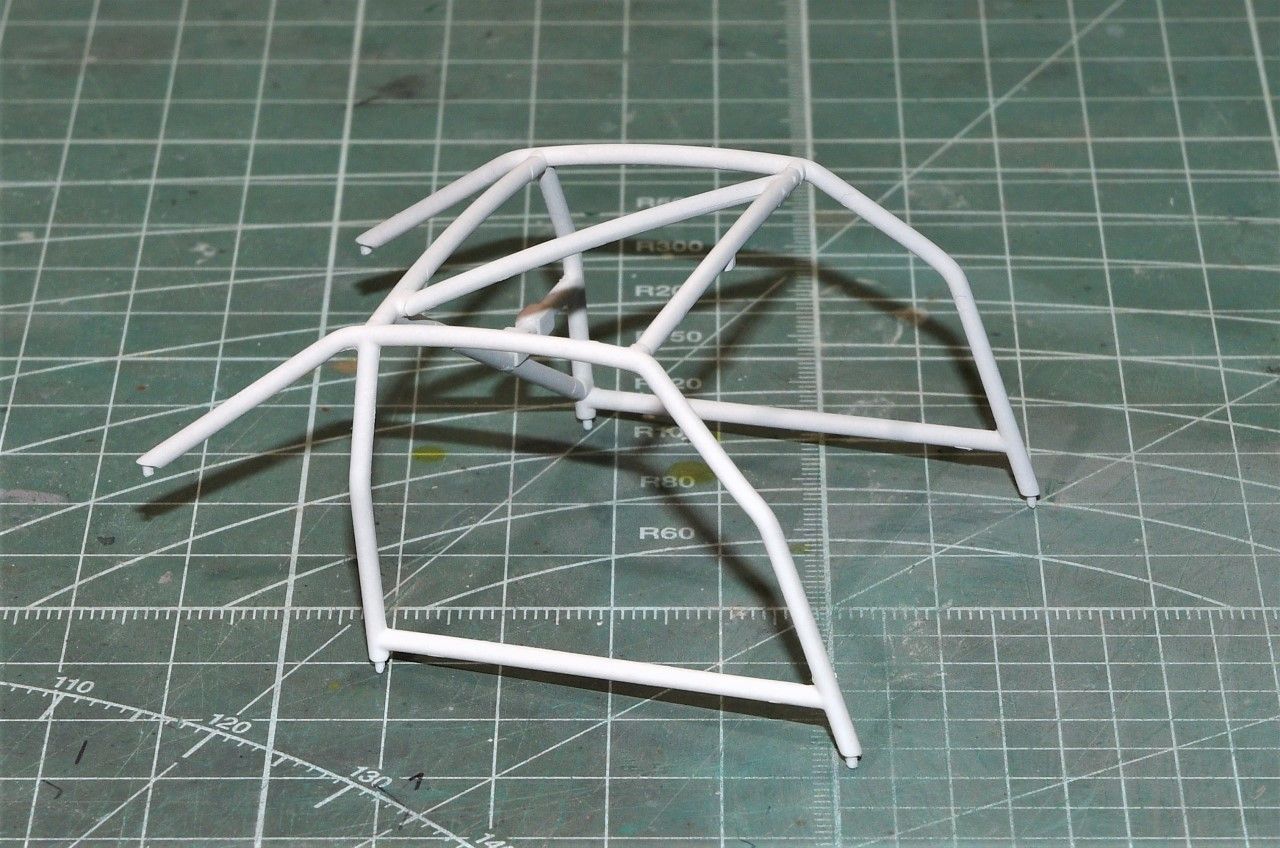
I then primed the roll cage with Tamiya Light Gray Primer Sealer in a Rattle can as I was just to lazy to get out the air brush. The Tamiya primer laid down perfectly. I know that in the picture it looks white, but it's light Gray for sure.
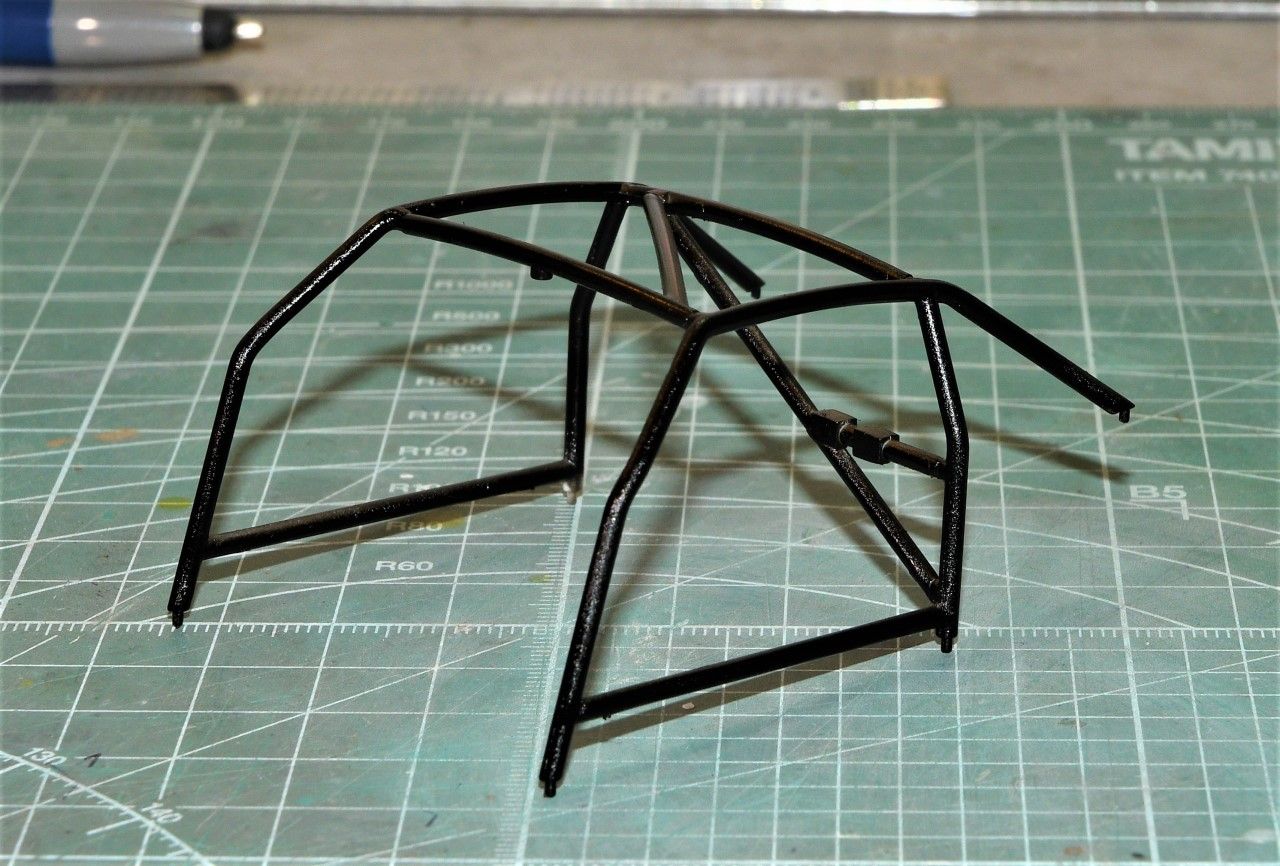
I gave it a hour or so to dry, then I air brushed it Tamiya Semi gloss Black. I let it dry overnight, then it recieved a coat of ModelMaster Glosscoat which isn't as glossy as Mr. Color's C46 Gloss Lacquer clearcoat.
Next up was gluing the roll cage into it's proper position, which like everything else in the kit to date just dropped right into place. This was followed with both inner door panels that were also previously primed and painted Mig Ammo Flat Black and then a coat of Dullcoat. Finally the Dash assembly which also just dropped right into place.
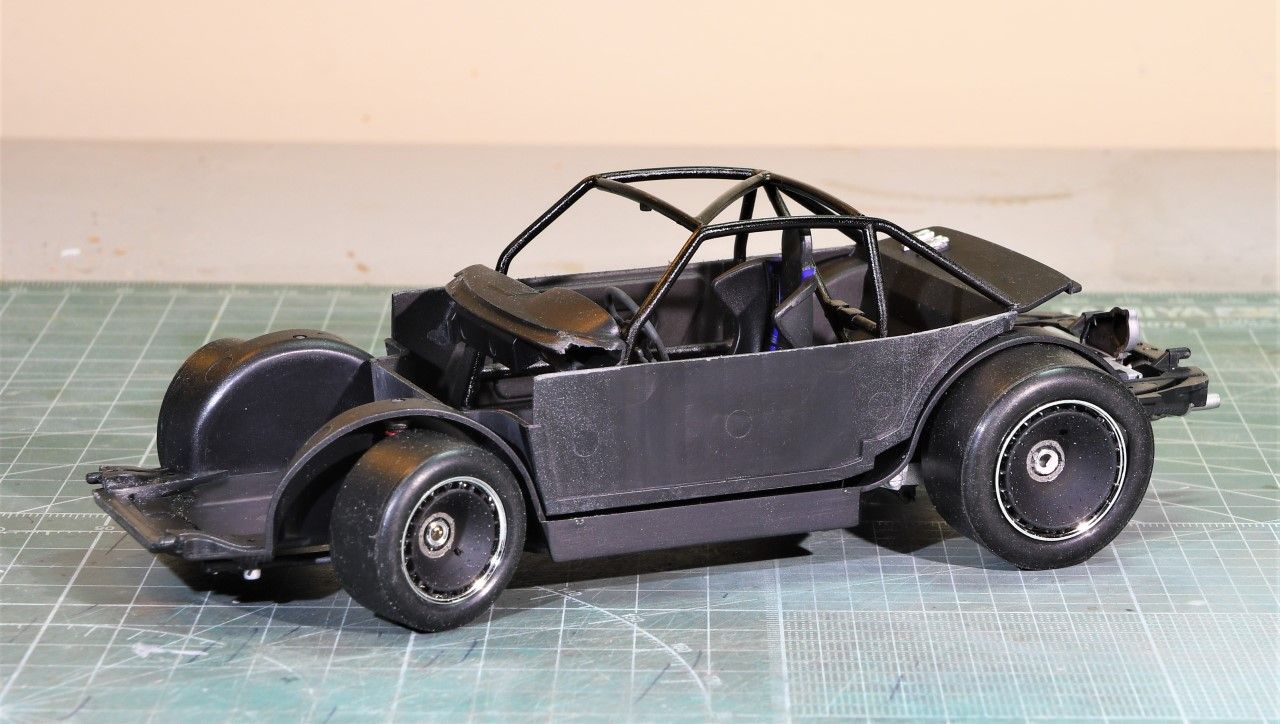
I've previously installed the brake venting discs into each wheel using CA for the front and 5 min epoxy for the rears, as the CA just didn't keep them glued into place for some unknown reason.
Now came the moment of truth for the test fit with everything basically in place. Usually I have a few issues that would need to be addressed, but not this time, as the body just snapped right into place on the 4 pegs. The dash fit perfectly, as did the tires, and the engine turbo exhausts. The body does have a little movement that's necessary to be able to get it over and then onto the pegs. Still, it has the proper stance and look of a Kremer 935 K2.
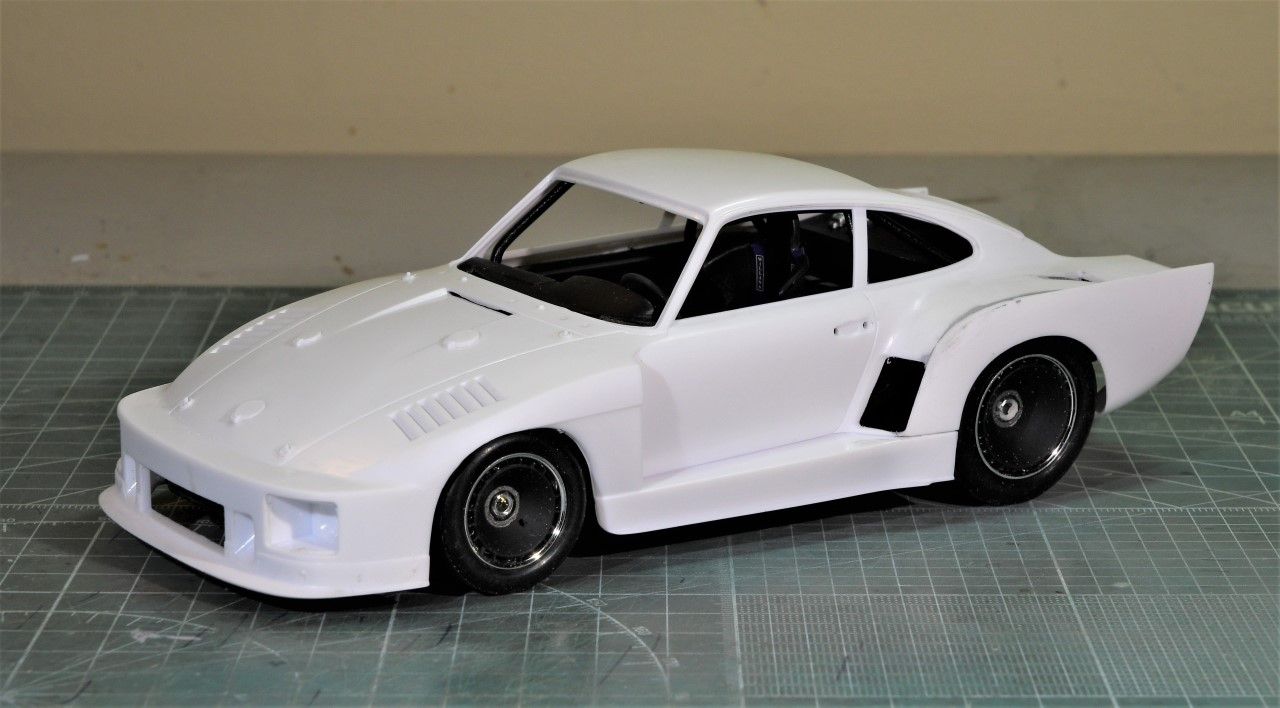
Joel
Last update ended with the body shell just resting on the chassis pegs to get a feel for how she'll look. So it's time to finish up the interior.
1st up was the dash and steering wheel assembly. I primed all three parts Mr. Hobby Gray Finishing Surfacer #1500, then air brushed the front of the dash and instrument cluster Mig Ammo Flat Black. The Top of the dash was air brushed with Tamiya Semi Gloss Black with a few drops of Dullcoat. The steering wheel was painted Flat Black with the grip hand brushed Tamiya Nato black so it had a more of a foam/rubber look to it. The instrument bezels were hand painted with good old Testors Enamel Silver using a # 5/0 Sable Brush. All the instruments are decals, so I gave each recess a drop of Pledge and let it dry. A hour or so later I applied the decals using my decaling system of Micro Set, Micro Sol, & Sovaset. 24 hrs later another drop or two of Pledge to replicate the lens.
I then primed the roll cage with Tamiya Light Gray Primer Sealer in a Rattle can as I was just to lazy to get out the air brush. The Tamiya primer laid down perfectly. I know that in the picture it looks white, but it's light Gray for sure.
I gave it a hour or so to dry, then I air brushed it Tamiya Semi gloss Black. I let it dry overnight, then it recieved a coat of ModelMaster Glosscoat which isn't as glossy as Mr. Color's C46 Gloss Lacquer clearcoat.
Next up was gluing the roll cage into it's proper position, which like everything else in the kit to date just dropped right into place. This was followed with both inner door panels that were also previously primed and painted Mig Ammo Flat Black and then a coat of Dullcoat. Finally the Dash assembly which also just dropped right into place.
I've previously installed the brake venting discs into each wheel using CA for the front and 5 min epoxy for the rears, as the CA just didn't keep them glued into place for some unknown reason.
Now came the moment of truth for the test fit with everything basically in place. Usually I have a few issues that would need to be addressed, but not this time, as the body just snapped right into place on the 4 pegs. The dash fit perfectly, as did the tires, and the engine turbo exhausts. The body does have a little movement that's necessary to be able to get it over and then onto the pegs. Still, it has the proper stance and look of a Kremer 935 K2.
Joel

Cosimodo

#335

Joined: September 03, 2013
KitMaker: 1,808 posts
Auto Modeler: 701 posts

Posted: Friday, June 21, 2019 - 01:03 PM UTC
Excellent work Joel! The dash looks very Porsche. Interesting how they kept the binnacle and steering wheel out of the road cars, not bothering to enhance them for the race cars. The body looks good to in its stance, very ready to race down the track.
cheers
Michael
cheers
Michael
Joel_W
Joined: December 04, 2010
KitMaker: 11,666 posts
Auto Modeler: 2,974 posts
Posted: Saturday, June 22, 2019 - 12:50 AM UTC
Michael,
Thanks so much for stopping by and checking out my build to date, it's always greatly appreciated to get feedback to where I'm at.
Might have to shut down the build for a few days as I managed a catch a really bad summer head cold visiting my Mother-n-Law the other day at the Rehab center. Hard to work with one's head down when your nose is acting more like a sink faucet then anything else right now.

Joel
Thanks so much for stopping by and checking out my build to date, it's always greatly appreciated to get feedback to where I'm at.
Might have to shut down the build for a few days as I managed a catch a really bad summer head cold visiting my Mother-n-Law the other day at the Rehab center. Hard to work with one's head down when your nose is acting more like a sink faucet then anything else right now.
Joel

Dixon66
Joined: December 12, 2002
KitMaker: 1,500 posts
Auto Modeler: 645 posts

Posted: Saturday, June 22, 2019 - 12:37 PM UTC
Coming along nicely. The wheels look spectacular. Hope you feel better soon and can get back to work on this beast.

RussellE
#306
Joined: June 27, 2010
KitMaker: 3,959 posts
Auto Modeler: 495 posts
Posted: Sunday, June 23, 2019 - 12:04 AM UTC
"moving"along nicely Joel 

Joel_W
Joined: December 04, 2010
KitMaker: 11,666 posts
Auto Modeler: 2,974 posts
Posted: Sunday, June 23, 2019 - 01:08 AM UTC
Quoted Text
Coming along nicely. The wheels look spectacular. Hope you feel better soon and can get back to work on this beast.
David,
Thanks so much for your Thumbs up. I really appreciate it.
I've been trying to work a little on my 935 and battle my annual summer head cold, but so far the cold is winning hands down. just ask my wife as the night time is by far the worst.
Joel
Joel_W
Joined: December 04, 2010
KitMaker: 11,666 posts
Auto Modeler: 2,974 posts
Posted: Sunday, June 23, 2019 - 01:09 AM UTC
Quoted Text
"moving"along nicely Joel
Russell,
Thanks for stopping by and checking out my progress to date. It's always much appreciated.
Joel
AussieReg
#007
Joined: June 09, 2009
KitMaker: 8,156 posts
Auto Modeler: 2,953 posts
Posted: Sunday, June 23, 2019 - 02:05 AM UTC
This build is coming together beautifully Joel, great to see that the complex assemblies all work together harmoniously.
Looking at the base without the shell you can see a serious amount of rubber on the rear end, you can imagine it would handle like a train on tracks around the corners!
BTW this little gem turned up in my Facebook feed a couple of days back, some people have too much time on their hands, but this little Isetta has been nicely built!

Cheers, D
Looking at the base without the shell you can see a serious amount of rubber on the rear end, you can imagine it would handle like a train on tracks around the corners!
BTW this little gem turned up in my Facebook feed a couple of days back, some people have too much time on their hands, but this little Isetta has been nicely built!
Cheers, D
Joel_W
Joined: December 04, 2010
KitMaker: 11,666 posts
Auto Modeler: 2,974 posts
Posted: Sunday, June 23, 2019 - 08:17 AM UTC
Quoted Text
This build is coming together beautifully Joel, great to see that the complex assemblies all work together harmoniously.
Looking at the base without the shell you can see a serious amount of rubber on the rear end, you can imagine it would handle like a train on tracks around the corners!
BTW this little gem turned up in my Facebook feed a couple of days back, some people have too much time on their hands, but this little Isetta has been nicely built!
Cheers, D
D,
Thanks for stopping by. One thing that these cars have is plenty of rubber where the tires hit the road.
Just love that little BNW Kremer Valiant that showed up in your Facebook page. The colors are certainly dead on.
Joel
Joel_W
Joined: December 04, 2010
KitMaker: 11,666 posts
Auto Modeler: 2,974 posts
Posted: Tuesday, July 02, 2019 - 04:52 AM UTC
Not much bench time of late due to family issues with my Mother-n-law, but I did squeeze in enough time to prime the shell and rear wing with Mr. Finishing Surfacer 1500 thinned 3 parts Surfacer to 2 parts Mr. Leveling #400 Thinner.
Just air brushed on light/even coats @ 16 psi, and the results were nearly perfect.
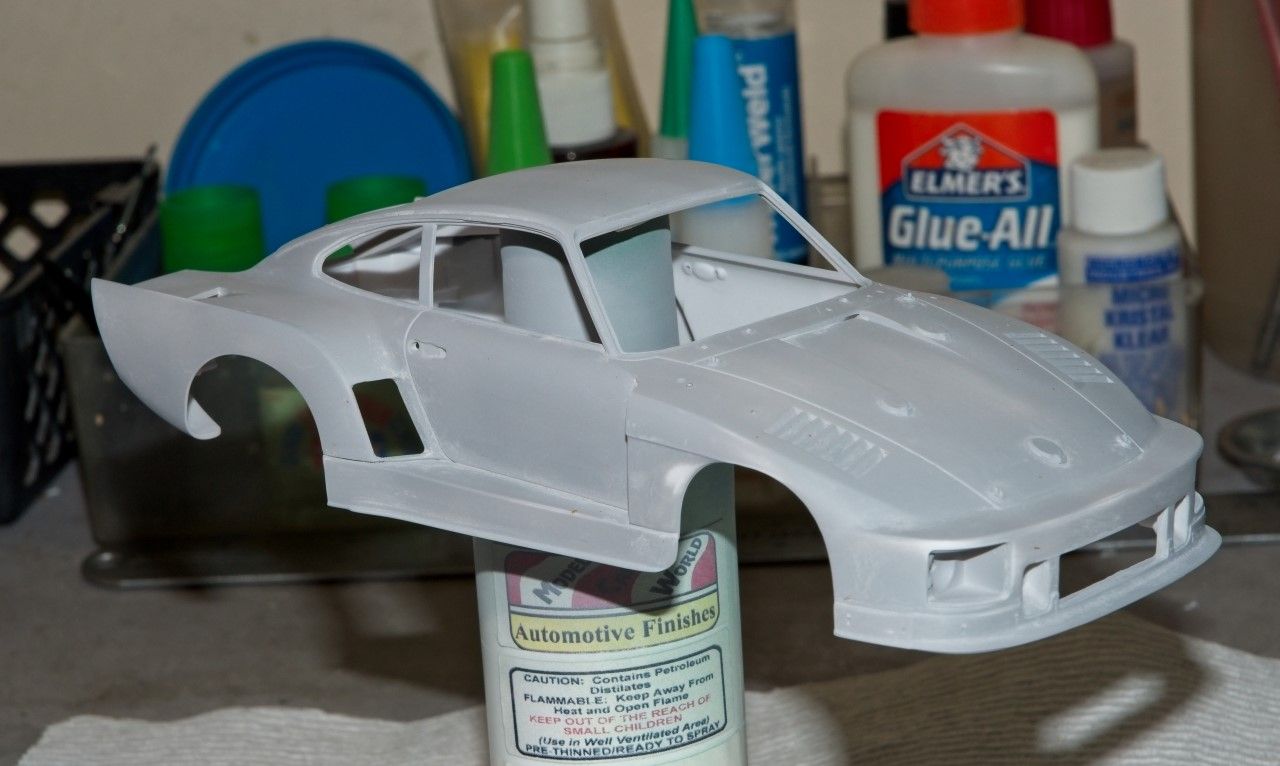
Gave the primer overnight to fully cure, then a light sanding with water & Tamiya #3,000 sponge. Then a quick wipe with a tack cloth.
Air brushed the shell & rear wing with Gravity's #GC-138 Porsche Carrara White @ 16 psi. 4 light/even coats and it was back into the drying bin.
Another light wet rub with Tamiya #3,000 sponge and I can start the complex decal scheme. This one isn't for the faint of heart.
Joel
Just air brushed on light/even coats @ 16 psi, and the results were nearly perfect.
Gave the primer overnight to fully cure, then a light sanding with water & Tamiya #3,000 sponge. Then a quick wipe with a tack cloth.
Air brushed the shell & rear wing with Gravity's #GC-138 Porsche Carrara White @ 16 psi. 4 light/even coats and it was back into the drying bin.
Another light wet rub with Tamiya #3,000 sponge and I can start the complex decal scheme. This one isn't for the faint of heart.
Joel
Cosimodo
#335
Joined: September 03, 2013
KitMaker: 1,808 posts
Auto Modeler: 701 posts
Posted: Tuesday, July 02, 2019 - 07:04 PM UTC
That is looking superb Joel! Always difficult to get a nice white coat. I was going to say the decals are pretty good for this car since I used the same scheme for the 934 but then remembered this Porsche is Beemax not Tamiya so good luck with them
cheers
Michael
cheers
Michael
Joel_W
Joined: December 04, 2010
KitMaker: 11,666 posts
Auto Modeler: 2,974 posts
Posted: Wednesday, July 03, 2019 - 01:37 AM UTC
Quoted Text
That is looking superb Joel! Always difficult to get a nice white coat. I was going to say the decals are pretty good for this car since I used the same scheme for the 934 but then remembered this Porsche is Beemax not Tamiya so good luck with them
cheers
Michael
Michael,
Thanks so much for stopping by and checking out my build to date. It's always greatly appreciated.
I actually find all bright colors to be much harder to get a smooth consistent finish then darker colors. Yet I don't have a clue why that is.
What I've been concentrating on is how I apply the color coats. Over the last few car builds I've completely changed how I do that. Using Gravity paints which are already pre-thinned. I've reduced the flow rate to 16 psi rather then the 20 psi even though my air brush hose is 6 ft not the usual 3 ft. Then I really have to concentrate on keeping each pass consistent and not doubling up or stopping causing paint to build up in the corners, and creating Orange Peel. For the wet coats I just slow down but I don't move in any closer as I try to maintain staying about 5-6 inches from the surface rather then the 3-4 inches I was using.
The result is a much more consistent and smoother color coat, that only takes a very light rub with a wet #3,000 sponge to get the surface smooth enough to decal without needing a Glosscoat. Yeah I know it sounds strange, but I learned this technique from Paul Budzik, and it works perfectly. Not a drop of Silvering.
Joel
AussieReg
#007
Joined: June 09, 2009
KitMaker: 8,156 posts
Auto Modeler: 2,953 posts
Posted: Wednesday, July 03, 2019 - 01:48 AM UTC
Nice work Joel, the white finish is always troublesome but you've got it under control there for sure!
Looking forward to the epic decal application.
Cheers, D
Looking forward to the epic decal application.
Cheers, D
Joel_W
Joined: December 04, 2010
KitMaker: 11,666 posts
Auto Modeler: 2,974 posts
Posted: Wednesday, July 03, 2019 - 02:21 AM UTC
D,
Thanks for checking the 935 out. I always appreciate your stopping by.
So far I've put 4+ hours into decaling, and I've got a good two more sessions to go. The Cartgraf decals are truly amazing. I was worried that I'd need some touch up green paint as many of the decals are multi pcs, but so far everything fits and aligns perfectly. That almost never happens.
the brake air vents on top of the front fenders required letting the decal dry after several applications of Solvaset, then cutting and more Solvaset. When I checked this morning they look like they were painted on.
Sure hope I'm not jinxing myself.
Joel
Joel_W
Joined: December 04, 2010
KitMaker: 11,666 posts
Auto Modeler: 2,974 posts
Posted: Friday, July 05, 2019 - 05:22 AM UTC
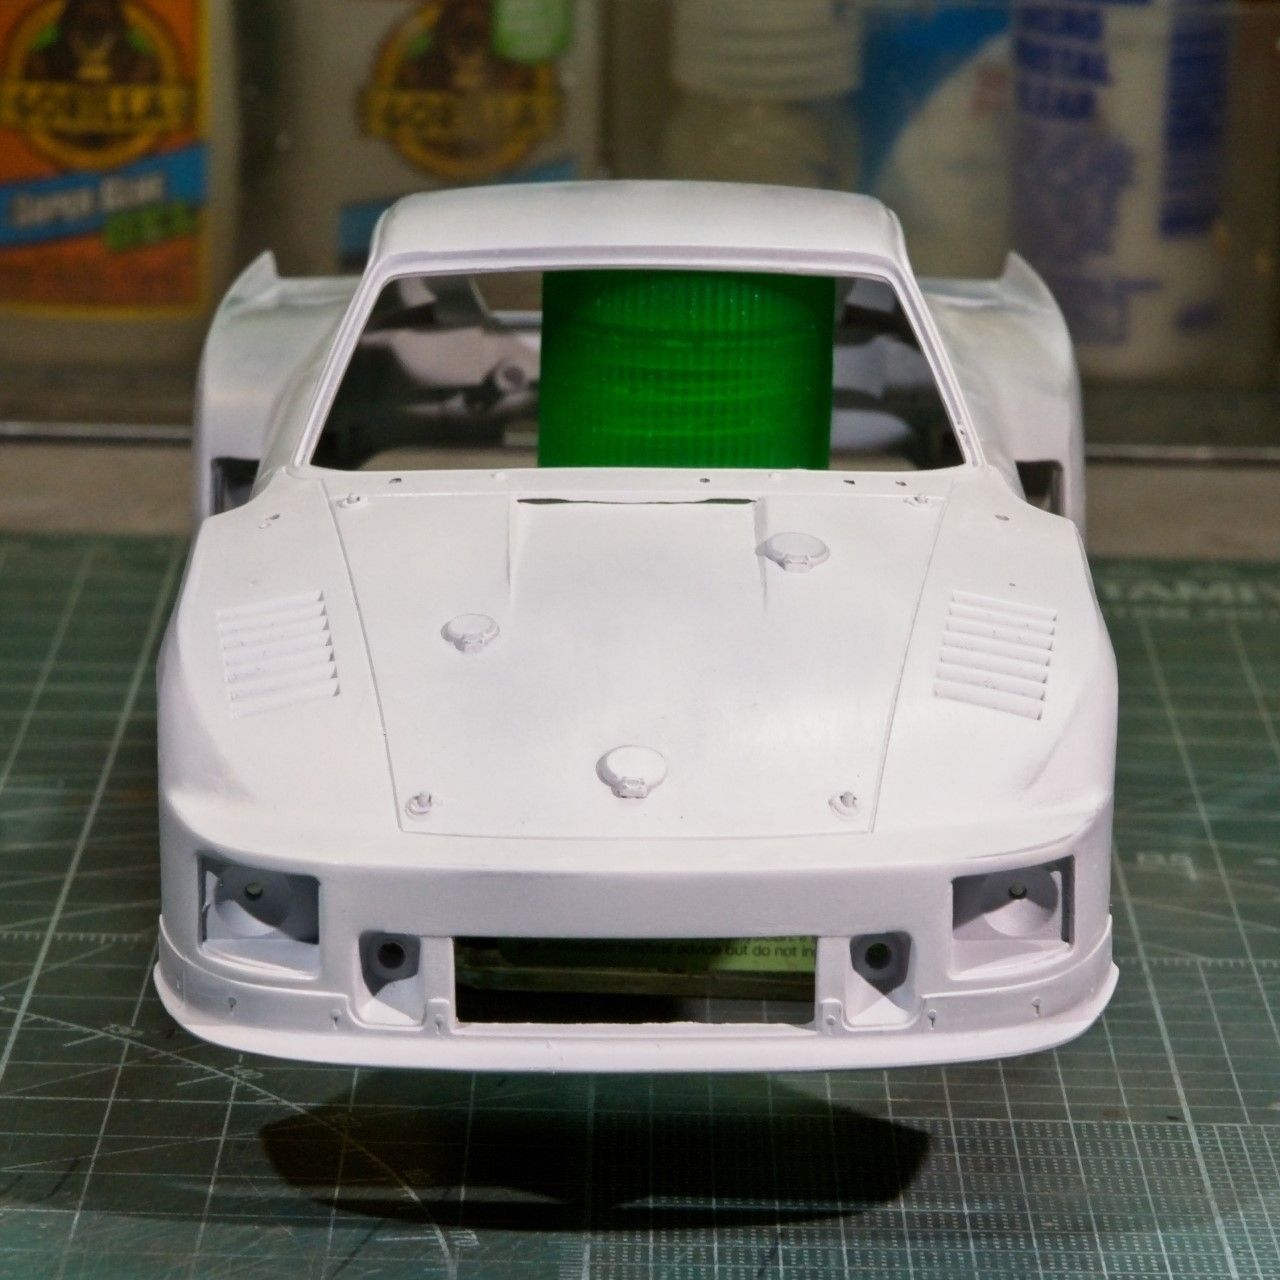
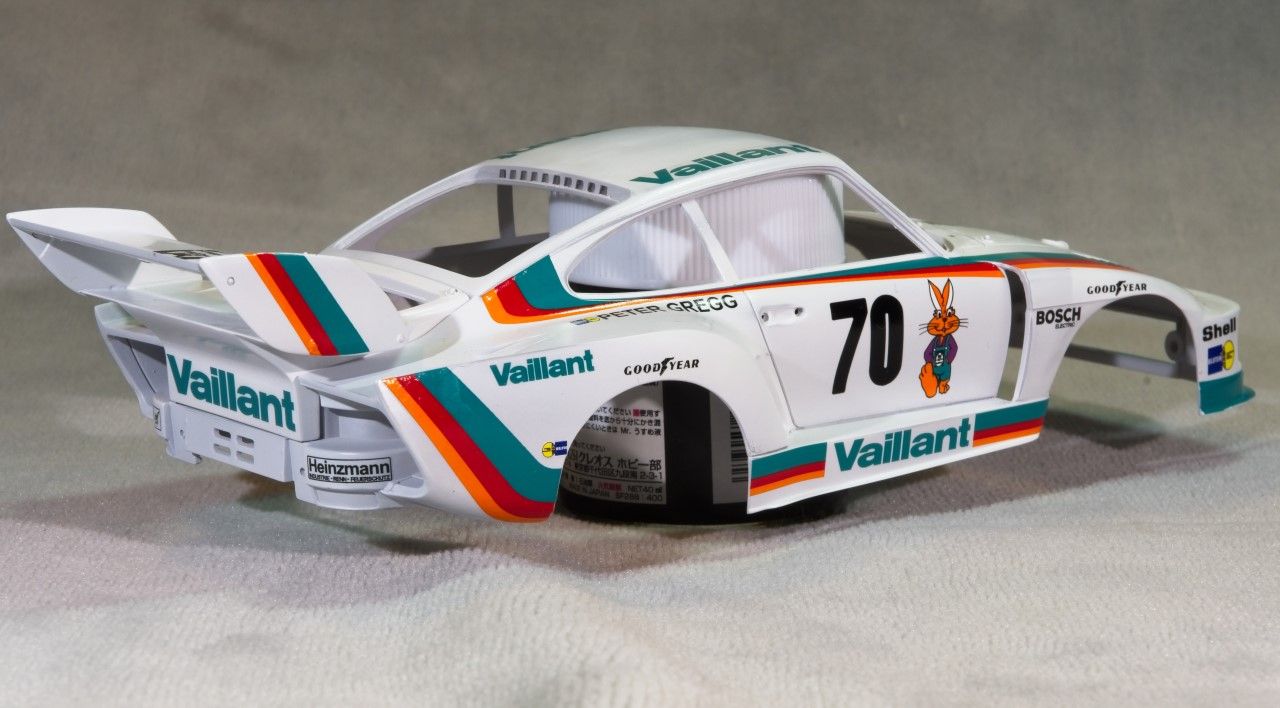
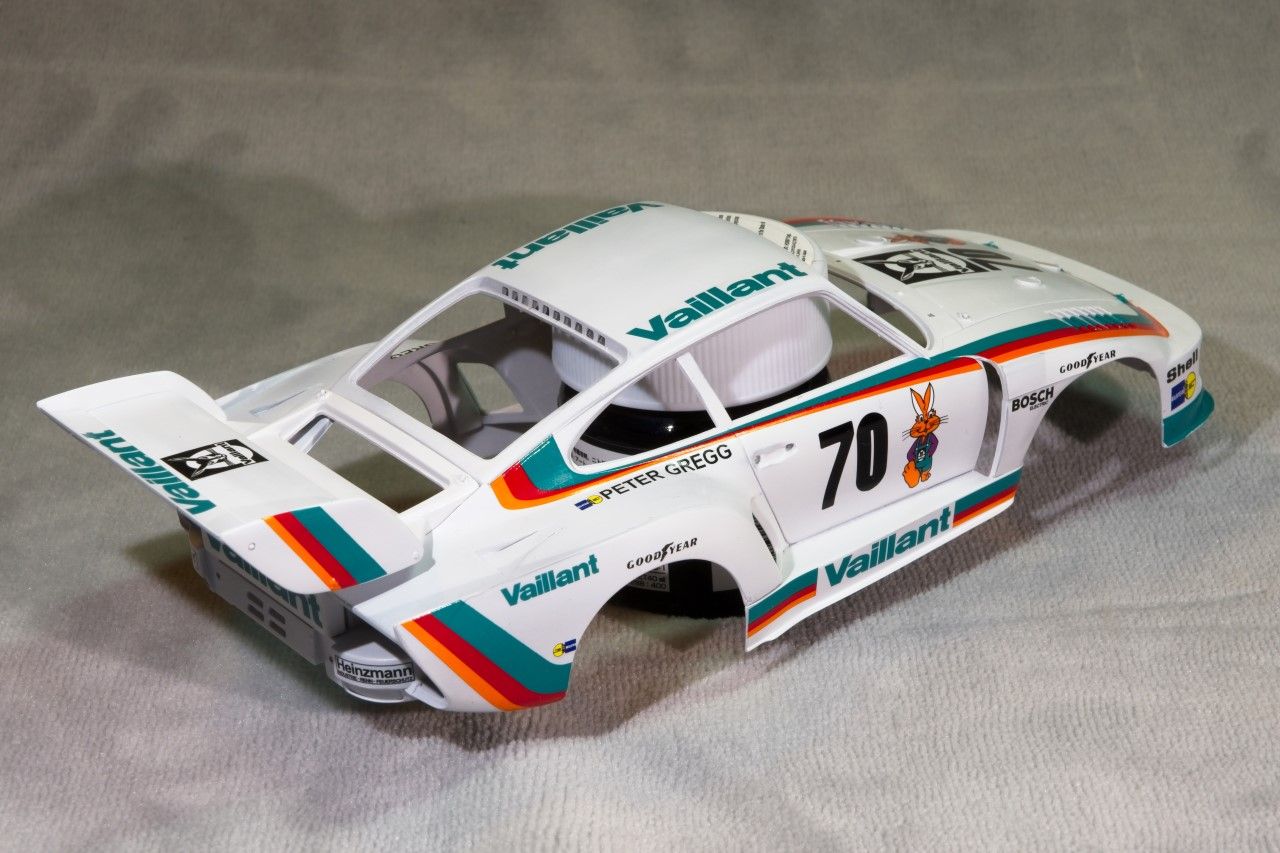
last update took forever to get ready and post, as it dealt with the priming and painting of the body. This update deals with the extensive decaling that took 18 hours to complete.
Somehow I thought that Beemax designed the decals and then had Cartograf print them. Well, I was really surprised when I closely examined the two pages of decals that no where did is say printed by Cartograf, just Beemax Models Porsche 935 K2. So now I'm going to be dealing with Asian decals which have a reputation as being on the thick side, and not the easiest to get to conform to compound curves.
Ok, I'm ready for the challenge as I had purchased Mr. Mark Setter & Sol just for Asian decals. They would be my backup plan if my usual decal procedures didn't work. I still use a 3 part decaling process: Microset, Microsol, & Sovaset, giving each solution ample to to work their magic, and repeating with numerous applications of Solvaset as needed.
To prepare the painted shell and rear wing, I gently rubbed out the paint with warm water & Tamiya's #3,000 sponge. The goal was just to get the paint smooth when I ran my finger across the surface. Contrary to the old decaling standard, I no longer bother applying a heavy clear gloss coat for a few reasons. 1st it will just mimic the texture of the paint, so you still have to rub it out, and it starts to fill in all the recessed panel lines, so that any panel line wash becomes all that much harder to do correctly.
Decals don't need a glossy surface, they need a smooth surface without any nooks & crankies. It's that texture that will cause the decals to Silver as they dry, because there is air trapped under the decal in those nooks & Crannies. Rubbing out the paint solves that issue. For the record I paint with Gravity lacquer paints, as Lacquer responds quite well to rubbing and polishing. Of course I always manage to rub a few spots to hard or to much, and burn right through the paint and sometimes the primer as well. Luckily with an All White paint scheme, touch up work was easy, and took no time.
I decal the same way I paint: hood, left side, rear deck, right side, & finally the roof. I also don't apply one decal right next to the previous one so it gets soaked in the solutions all over again. I'll give it a good half hour to dry, then go back and apply the missing decals.
The trim decals from the top of the front fender to just past the rear side window are two pieces, making placement and adjustment easy. I didn't bother trying to cut the openings in the upper brake venting till the decals completely dried over night. Then I cut them along the back of each vent slot, and used a small brush with Solvaset to get them to lay and tuck down. The end result is nearly purfect. I do have a little touch up work to do where the decal had a mind of it's own.
Below is a set of pictures as the body looks after the decals have dried. There is no Clear Gloss coat on top of the decals at this stage. Just decals directly on top of the Matt lacquer paint.
Joel
Cosimodo
#335
Joined: September 03, 2013
KitMaker: 1,808 posts
Auto Modeler: 701 posts
Posted: Friday, July 05, 2019 - 08:59 AM UTC
Excellent! I see you even managed to get the decals to settle around the front splitter. How many pieces were involved with that? And getting them down over the front brake vents like that is also a great achievement.
Cheers
Michael
Cheers
Michael
AussieReg
#007
Joined: June 09, 2009
KitMaker: 8,156 posts
Auto Modeler: 2,953 posts
Posted: Friday, July 05, 2019 - 09:59 AM UTC
Looks amazing Joel, lovely work!
You are spot on about the clear gloss for decalling as well, if you have a rough paint job and throw clear down on it, you will have rough clear, just as much chance of slivering, more work to flatten it down, and more obscured surface details. The best results for me come from a nice smooth paint job, slow and steady with the decals, then a clear coat to protect them from further weathering.
Cheers, D
Edit: another thing to consider is that some clear costs react badly to some decals treatments so there is a risk of cloudy tide marks around the decals.
Joel_W
Joined: December 04, 2010
KitMaker: 11,666 posts
Auto Modeler: 2,974 posts
Posted: Saturday, July 06, 2019 - 12:29 AM UTC
Quoted Text
Excellent! I see you even managed to get the decals to settle around the front splitter. How many pieces were involved with that? And getting them down over the front brake vents like that is also a great achievement.
Cheers
Michael
Michael,
Thanks for checking out my 935 K2 to date, it's much appreciated.
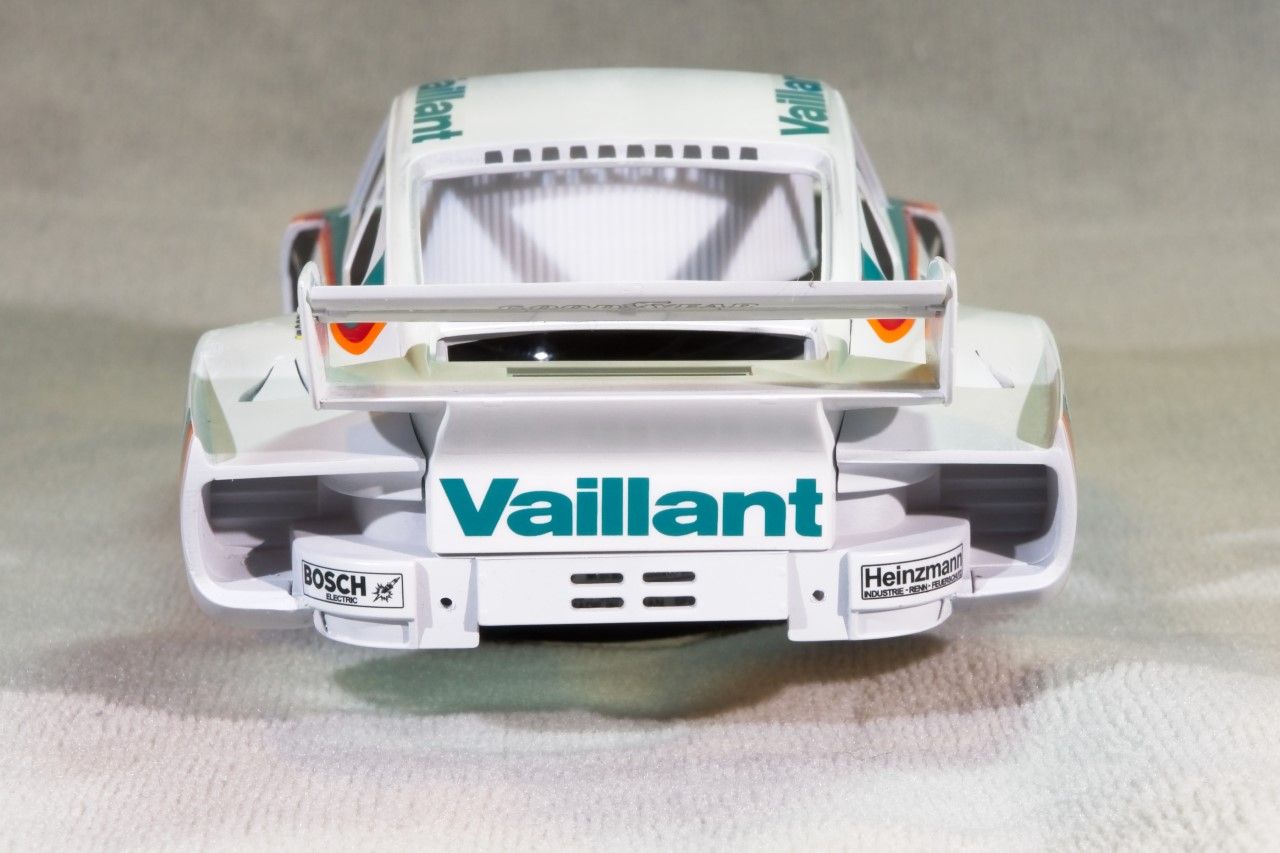
As for the decals covering the front splitter plate, it was one of two decaling areas that really concerned me. Compound curves everywhere both on the vertical and horizontal surfaces. I really thought that it would be a disaster. But to my surprise Beemax divided the decal into 3 pieces: the main plate fender to fender, then both vertical sides from the wheel well to the radiator intake. The main plate decal is curved so that it literally just fell into place. I did work it up a tad to help hide the seam for the other decals if there was any issues. I let the decal dry a full 24 hrs, then applied each side decal using the overlap as needed. Like I said, to my amazement, it turned out perfectly.
The front brake vents were a lot harder to do. My plan as I said was to lay down the decal and just forget about the vents for now. As the decal dried, I kept on soaking the area around and over the vents with Solvaset, then pushing down on the decal with a Q-tip so that it shrunk into the vents. When I thought I'd gone as far with that as I safely could, I let it dry for a full 24 hrs. I figured that the decal glue was still on the back of the decal where it wasn't touching the vents but just hanging there. I used a brand new #11 blade and cut the openings on two adjourning sides so that the decal can now lay down on the recessed part of each vent. I did pre-wet the area with Microset, then the top with Solvaset. Just a little nudge with a Q-tip and they laid down perfectly. Honestly, there were a few ripped spots that I touched up with paint, but it's nearly impossible to see them.
Joel
Joel_W
Joined: December 04, 2010
KitMaker: 11,666 posts
Auto Modeler: 2,974 posts
Posted: Saturday, July 06, 2019 - 12:49 AM UTC
Quoted Text
Looks amazing Joel, lovely work!
You are spot on about the clear gloss for decalling as well, if you have a rough paint job and throw clear down on it, you will have rough clear, just as much chance of slivering, more work to flatten it down, and more obscured surface details. The best results for me come from a nice smooth paint job, slow and steady with the decals, then a clear coat to protect them from further weathering.
Cheers, D
Edit: another thing to consider is that some clear costs react badly to some decals treatments so there is a risk of cloudy tide marks around the decals.
D,
Thanks for the Thumbs up, it's always greatly appreciated.
I always managed to have some decaling issues in my aircraft days. Rough paint followed by coats of Gloss, just created another rough surface that I didn't always deal correctly with. Then one day I saw a decaling presentation on You Tube by Master Modeler Paul Budzik who was scratch building 1/48 scale aircraft to IPMS National winning standards, when I was just trying to get my models finished to a neophyte acceptable level. The guy really knows his stuff.
Paul's always goes through whatever he's discussing to the nth degree, which I do appreciate as he answers just about all my questions and concerns. When he claimed that he didn't gloss for decaling, I just laughed. Well, I wasn't laughing by the end of the video. I was a true believer. Not only did I learn how to smooth a color coat, but I adopted his decaling method with a slight modification here and there. Instantly, my decaling improved 101%. Gone was the dreaded Silvering. Honestly, I was constantly blaming the decals for my problems, when I was the problem
 . Since then, I've worked into my modeling several of Paul's procedures and methods.
 Like you, I've heard and seen, again via You Tube issues with Lacquer Clear Glosses destroying decals. So I cheated, and just settled on Mr. Hobby/ Mr. Color's #46 Clear Gloss (which unfortunately only comes in small, expensive 10ml bottles) when a few of the online modelers that I follow use it as well as Super Clear III, which also isn't available in the USA for some reason.
The key for me is how I apply the clear lacquer gloss. Two light tack coats that safely seal the decals, then two wet coats.
Joel

Hwa-Rang

Joined: June 29, 2004
KitMaker: 6,760 posts
Auto Modeler: 2,182 posts

Posted: Sunday, July 07, 2019 - 05:12 PM UTC
18 hours of decaling! hat off to you sir, pretty amazing.
Joel_W
Joined: December 04, 2010
KitMaker: 11,666 posts
Auto Modeler: 2,974 posts
Posted: Monday, July 08, 2019 - 12:56 AM UTC
Quoted Text
18 hours of decaling! hat off to you sir, pretty amazing.
Jesper,
Actually it was only 6 hrs/day for 3 days. And that includes breaks.
There are two pages of decals to deal with, and alignment of those trim decals took quite a while for me to get right.
Joel
RussellE
#306
Joined: June 27, 2010
KitMaker: 3,959 posts
Auto Modeler: 495 posts
Posted: Monday, July 08, 2019 - 11:40 AM UTC
Have been off the boards for a few weeks Joel and just catching up now.
Really great progress here and making light of those decals!
Hope the M.I.L. challenges are in hand too...
Really great progress here and making light of those decals!
Hope the M.I.L. challenges are in hand too...

Szmann

Joined: September 02, 2014
KitMaker: 1,977 posts
Auto Modeler: 1,371 posts

Posted: Monday, July 08, 2019 - 07:57 PM UTC
Hi, Joel!
Just catching up with the build.
Again, you didn't disappoint with the level of documentation, attention to detail and - most important - with the carefully recorded technical part of the "business". I find your builds always very instructive.
Following closely this one from now on!
Gabriel
Just catching up with the build.
Again, you didn't disappoint with the level of documentation, attention to detail and - most important - with the carefully recorded technical part of the "business". I find your builds always very instructive.
Following closely this one from now on!
Gabriel
 |

WEB HOSTING BY


Copyright ©2021 Auto Modeler and Kitmaker Network, a subsidiary of Silver Star Enterprises
All Rights Reserved. Please read our Conditions of Use and Privacy Policy.
All Rights Reserved. Please read our Conditions of Use and Privacy Policy.