_GOTOBOTTOM
Cars: Custom
For customized car kits and projects.
70 GTO Pro Street...By Cuhail
Cuhail
_VISITCOMMUNITY
Illinois, United States
Joined: February 10, 2004
KitMaker: 2,058 posts
Auto Modeler: 310 posts
Posted: Thursday, March 23, 2006 - 07:12 AM UTC

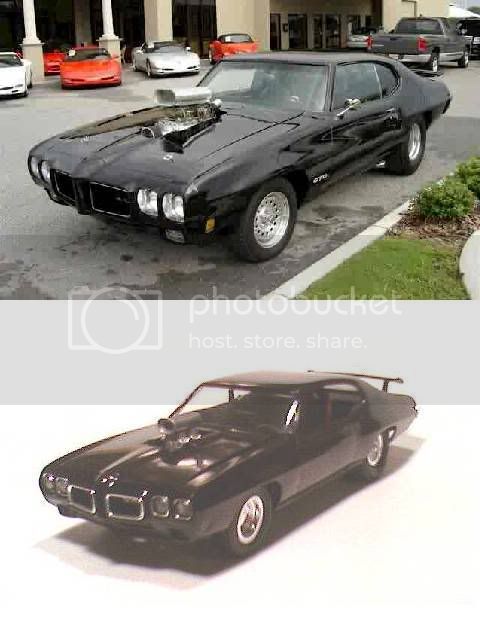
Hey guys, another bone-head project by me. This time I let THIS inspire me to start carving plastic:


I worked my ass off bidding and losing and bidding and losing and then I won this:


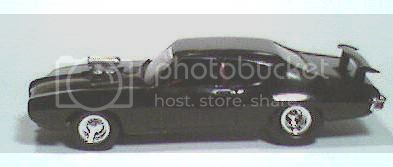
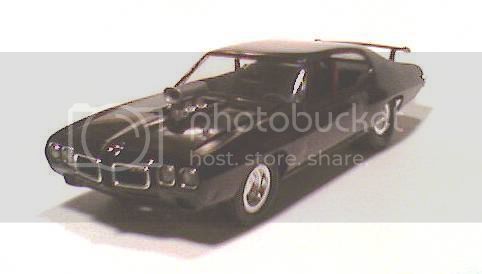
So, now it was time to start cutting and gluing and cutting (Today is redundancy day in my home) and gluing and so forth, because I wanted the lo-slung look instead of the ass-in-the-air look the 72 GTO has:


The first thing I had to do was cut up junkyard 67 Chevelle I had bought for the engine, salvage it's narrow rear end and wheelwel section and attach it to the GTO frame. (I used parts from the original MPC 72 GTO kit for refs again, they're red)


Not too bad, I threw a coat of Testor's Stainless Steel on it today and buffed it up. Sorry, no pix, but, lemme tell ya it came out pretty good.

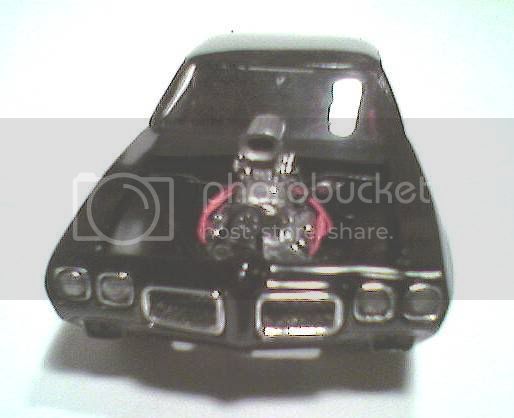
I then threw my attention to the interior. I didn't want a stock interior, I wanted more of the race-ready look with flat, sheetmetal panels and a rollbar. So, I did just that. And I gave the dashboard a good working-over too:


AAAAAaaand....that's where I am as far as pictures go. My great new buddy rv1963 is gonna set me up with a Revell supercharger from his 68 Firechicken (Sorry, old joke) and this baby should be rolling soon!
I also get to apply some new painting techniques that I've picked up recently. Dammit, I want a GREAT finish on this one. SMOOTH AS GLASS.

So, that's it till more pix can be taken.

Yes, another GTO,
Cuhail
rv1963
_VISITCOMMUNITY
New York, United States
Joined: December 07, 2004
KitMaker: 1,888 posts
Auto Modeler: 806 posts
Posted: Thursday, March 23, 2006 - 08:26 AM UTC
Looks like an interesting project Murph, your parts have been sent today, i sent the main blower the front and rear covers , intake manifold all in chrome, scoop pully and belt setup white plastic. My next project has already been started its a kit i don't often see an original first run Revell 1961 Jaguar XK-E Roadster i think i will paint it a bright red with a tan interior i will post picks when i get more work done.
Cuhail
_VISITCOMMUNITY
Illinois, United States
Joined: February 10, 2004
KitMaker: 2,058 posts
Auto Modeler: 310 posts
Posted: Thursday, March 23, 2006 - 07:28 PM UTC
Great! Every man needs a Jag in the collection to WOW the ladies with! :-)

Thanks for the blower, I'm looking forward to slapping it on the engine I have assembled (minus the intake up.) I'm gonna order some new carbs and a scoop today.

Yea!
Cuhail
Pedro
_VISITCOMMUNITY
Wojewodztwo Pomorskie, Poland
Joined: May 26, 2003
KitMaker: 1,208 posts
Auto Modeler: 51 posts
Posted: Friday, March 24, 2006 - 04:27 AM UTC
Coming together nicely Murphy!
I once wanted to do every model year impalas, (one of my favourite cars of all time) but living in Poland I had limited acces to american car kits (sort of like with allied kits in Asia- no market for them here :-) )

Rv, I also have a revell's Jag waiting in line but mine is XK SS model, also to be painted in bright red

Cheers
Pedro
Hwa-Rang
_VISITCOMMUNITY
Kobenhavn, Denmark
Joined: June 29, 2004
KitMaker: 6,760 posts
Auto Modeler: 2,182 posts
Posted: Saturday, March 25, 2006 - 06:56 PM UTC
Very interesting project Murphy.
Metalic Purple would be a cool color for this one

Looking forward to more progress shot's.

Cuhail
_VISITCOMMUNITY
Illinois, United States
Joined: February 10, 2004
KitMaker: 2,058 posts
Auto Modeler: 310 posts
Posted: Sunday, March 26, 2006 - 12:53 AM UTC
I think I'm going with a super-deep black. I'm gonna try and make the model look just like the above picture.

Besides, the '66 GGGTO is the purple one.

Thanks for looking though,
Cuhail
Cuhail
_VISITCOMMUNITY
Illinois, United States
Joined: February 10, 2004
KitMaker: 2,058 posts
Auto Modeler: 310 posts
Posted: Tuesday, April 04, 2006 - 06:05 AM UTC
Hi guys!

Well, after a week of my kid being home for spring break AND having NO access to the camera, I didn't get a lot done on this scoot. But, today the SWMBO brought home the camera from work, so I took the shots!
The model is just dry-fitted.
How the rear end turned out:


The engine is coming along nice with a donated supercharger ( From rv1963 ):


Now, I mentioned before on why I was tubbing out the rear wheelwells. It was because I didn't want the rear end sticking up so much like on my 72 GTO. I took a shot of the two cars next to each other so ya'll can see the height difference.


That's the update!

Cuhail
rv1963
_VISITCOMMUNITY
New York, United States
Joined: December 07, 2004
KitMaker: 1,888 posts
Auto Modeler: 806 posts
Posted: Tuesday, April 04, 2006 - 06:35 AM UTC
Murph the GTO is coming along nicely and the rear suspension looks great it has a very clean look i like it.
Cuhail
_VISITCOMMUNITY
Illinois, United States
Joined: February 10, 2004
KitMaker: 2,058 posts
Auto Modeler: 310 posts
Posted: Tuesday, April 04, 2006 - 07:27 AM UTC

I should of thrown these in too.

One: A good 3/4 front left:


And, a slightly pulled back engine picture:


Ahhrrgg, my gallery is screwy. Gotta fix,

Enjoy,
Cuhail
Hwa-Rang
_VISITCOMMUNITY
Kobenhavn, Denmark
Joined: June 29, 2004
KitMaker: 6,760 posts
Auto Modeler: 2,182 posts
Posted: Tuesday, April 04, 2006 - 11:11 AM UTC
That rear end looks awesome. How did you achieve that worn look on the wheels?
Cuhail
_VISITCOMMUNITY
Illinois, United States
Joined: February 10, 2004
KitMaker: 2,058 posts
Auto Modeler: 310 posts
Posted: Tuesday, April 04, 2006 - 06:24 PM UTC

Oh, the usual way. With a little sandpaper. I just make sure I go WITH the tread and not against it.
I read a good article in Scale Auto Mag. on engine detailing and making fan belts, so, I'm gonna put those tips to work today.

Cuhail
Cuhail
_VISITCOMMUNITY
Illinois, United States
Joined: February 10, 2004
KitMaker: 2,058 posts
Auto Modeler: 310 posts
Posted: Sunday, October 08, 2006 - 08:39 PM UTC

Just an update. I started this build in March and here it is October now. I have a camera coming home tonight so I thought I'd refresh everyones memory.
I finished the Blown, carbed 400 cid engine and set the radiator up with a scratchbuilt electric fan.
The interior has been painted.
The body has been painted (I could start a whole new thread on THAT process! Paint, sand, paint, sand, paint, sand!) and all it needs now is a good gloss clear and a bit of chrome trim (just a little by the picture I'm trying to match, though).

I do love 70 GTO's though, this IS my favorite car in the world!

Keep an eye out!
Cuhail
slodder
_VISITCOMMUNITY
North Carolina, United States
Joined: February 22, 2002
KitMaker: 11,718 posts
Auto Modeler: 408 posts
Posted: Sunday, October 08, 2006 - 10:13 PM UTC
I can't wait to see it - I just got on board the GTO train and must say it's been quite a ride down this thread.

Good job on the rework of the back end. I do like the low look better than the butt high look.
Hwa-Rang
_VISITCOMMUNITY
Kobenhavn, Denmark
Joined: June 29, 2004
KitMaker: 6,760 posts
Auto Modeler: 2,182 posts
Posted: Monday, October 09, 2006 - 12:48 PM UTC
Cuhail, good to have you back behind the wheel, of your '70 pro street goat. Looking forward to seeing the engine and paintjob.
Cuhail
_VISITCOMMUNITY
Illinois, United States
Joined: February 10, 2004
KitMaker: 2,058 posts
Auto Modeler: 310 posts
Posted: Wednesday, October 11, 2006 - 01:11 AM UTC
Took some cruddy phone pics. Comparing this to the very top photo in the thread, I think it's coming pretty darn close.


Again, can't wait for the Canon!

Damn, what an awesome car! I love GTOs!

Cuhail
Cuhail
_VISITCOMMUNITY
Illinois, United States
Joined: February 10, 2004
KitMaker: 2,058 posts
Auto Modeler: 310 posts
Posted: Wednesday, October 11, 2006 - 01:21 AM UTC

Comparison shot. Scrolling up and down sucks!


Cheers! Thanks for looking!
Cuhail
Hwa-Rang
_VISITCOMMUNITY
Kobenhavn, Denmark
Joined: June 29, 2004
KitMaker: 6,760 posts
Auto Modeler: 2,182 posts
Posted: Wednesday, October 11, 2006 - 11:12 AM UTC
You really need that Canon
Seriously, from what I can see, it looks COOOOOL. You're right, it is d... close to the 1/1 car.
Cuhail
_VISITCOMMUNITY
Illinois, United States
Joined: February 10, 2004
KitMaker: 2,058 posts
Auto Modeler: 310 posts
Posted: Tuesday, October 17, 2006 - 01:46 AM UTC

CANON SHOTS!!!


99% done. Just a bit of trim missing when I had the good camera.

Lemme know guys. I have never put this much work into a model before and I'm looking for redemption.

Thanks for looking,
Cuhail
rv1963
_VISITCOMMUNITY
New York, United States
Joined: December 07, 2004
KitMaker: 1,888 posts
Auto Modeler: 806 posts
Posted: Tuesday, October 17, 2006 - 04:59 AM UTC
The pics look a lot better on both GTO's Murph, the paint looks good so does the engine, are you going for the chrome foil tape for the trim or will you use paint, you should be proud you have done some nice work on this car.
Hwa-Rang
_VISITCOMMUNITY
Kobenhavn, Denmark
Joined: June 29, 2004
KitMaker: 6,760 posts
Auto Modeler: 2,182 posts
Posted: Tuesday, October 17, 2006 - 11:23 AM UTC
You should definitely be proud of your pro street Goat. Over all very nice work, very nice indeed. Love those engine details.
Could we see some close ups of the rear end?
slodder
_VISITCOMMUNITY
North Carolina, United States
Joined: February 22, 2002
KitMaker: 11,718 posts
Auto Modeler: 408 posts
Posted: Tuesday, October 17, 2006 - 03:31 PM UTC
The effort was well worth it. This came out very nicely.
Keep up the good work. When all the little details are done and it's 100% take another couple of 'done' shots.

Well done.
Cuhail
_VISITCOMMUNITY
Illinois, United States
Joined: February 10, 2004
KitMaker: 2,058 posts
Auto Modeler: 310 posts
Posted: Wednesday, October 18, 2006 - 01:19 AM UTC

Thank you, all of you.

RV-
That's the blower assembly you donated. It wouldn't look as good without your help and I'm so glad ya dig it.
I WAS going to use BMF "Black Chrome", but, after purchasing it and testing it out on some parts box crappulence, I'm not so happy with it. It seems (to me) that it's quite a bit thicker than regular BMF and the adhesive really sucks. Any suggestions? If I can't get the foil to work, I'll just paint of course.

Jesper-
Thank you and yes, I'll get some "underneath" shots this weekend. I should show off that first "cut and paste" that led to the rest.

You guys rock! Waiting to hear from mother. He's got some parts into this one too including the distributor.
I will take some more pics this weekend including the completely scrachbuilt firewall, battery and rearend.

Toodles,
Cuhail
Cuhail
_VISITCOMMUNITY
Illinois, United States
Joined: February 10, 2004
KitMaker: 2,058 posts
Auto Modeler: 310 posts
Posted: Saturday, October 21, 2006 - 05:58 AM UTC

The undercarriage:


rv1963
_VISITCOMMUNITY
New York, United States
Joined: December 07, 2004
KitMaker: 1,888 posts
Auto Modeler: 806 posts
Posted: Saturday, October 21, 2006 - 08:06 AM UTC
Murph if you can't get the foil to work you will have to paint it, you can try using flat black or semi gloss acrylic paint instead of enamel this way if you make a mistake it will be easier to remove.
mother
_VISITCOMMUNITY
New York, United States
Joined: January 29, 2004
KitMaker: 3,836 posts
Auto Modeler: 256 posts
Posted: Saturday, October 21, 2006 - 09:21 AM UTC
Hello Murphy,
This sure turned well, yes sir. Great job on the engine detail, body paint looks top notch. Great choice on the color of the roll bars. The red really stands out well. So what do you think it’ll run on the quarter, I’m guessing mid-10’s. Looking forward to seeing what's on the trailer next.

Joe
 _GOTOTOP