Kobenhavn, Denmark
Joined: June 29, 2004
KitMaker: 6,760 posts
Auto Modeler: 2,182 posts
Posted: Wednesday, January 10, 2018 - 04:04 PM UTC

" BORDER="0">
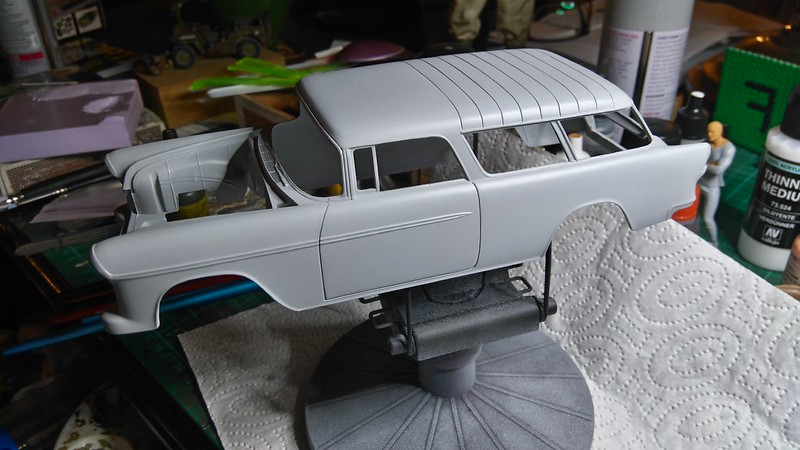
Not quite there with the images, but this have to do for now.
Shaved the door handles and removed the gas filler door.
Primer is Tamiya.
On the workbench:
MPC: 1972 Pontiac GTO
Revell: 1965 Mustang
Verlinden 120mm guard of the marine.
Revell: 2010 Camaro
Monogram: 1931 Rolls Royce
Italeri: LVT2 Amtrac
Kobenhavn, Denmark
Joined: June 29, 2004
KitMaker: 6,760 posts
Auto Modeler: 2,182 posts
Posted: Wednesday, January 10, 2018 - 04:12 PM UTC
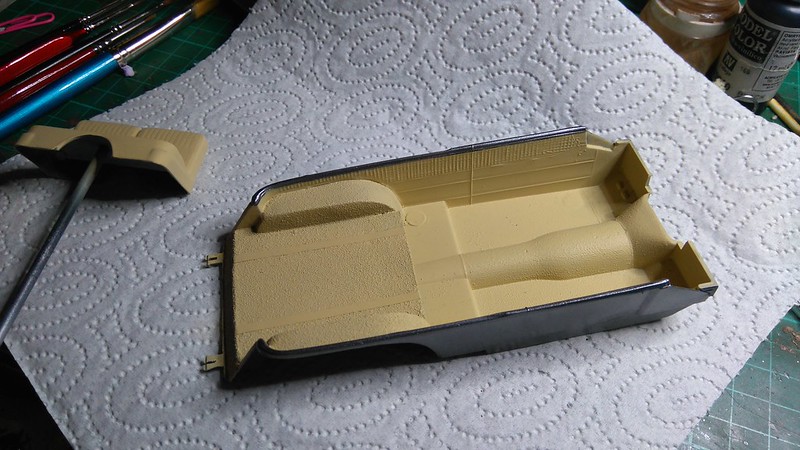
Removed the rather large door hinges, for the trunk door.

" BORDER="0">
My original plan was to do the interior in red and black, but I have changes my mind and now do it in a two tone brown. More or less identical to the interior I did on the Hudson.
" BORDER="0">
On the workbench:
MPC: 1972 Pontiac GTO
Revell: 1965 Mustang
Verlinden 120mm guard of the marine.
Revell: 2010 Camaro
Monogram: 1931 Rolls Royce
Italeri: LVT2 Amtrac
Myanmar
Joined: March 05, 2004
KitMaker: 4,011 posts
Auto Modeler: 851 posts
Posted: Thursday, January 11, 2018 - 07:08 AM UTC
That body is looking clean!

i watched a scale plastic figure crawl along the edge . . . of an exacto blade . . . that's my dream , it's my nightmare . . . . . . . crawling , slithering . . . . . along the edge . . . . . . of an exacto . . . . . blade . . . . and surviving
Canada
Joined: December 30, 2011
KitMaker: 902 posts
Auto Modeler: 2 posts
Posted: Monday, January 15, 2018 - 05:17 AM UTC
Kobenhavn, Denmark
Joined: June 29, 2004
KitMaker: 6,760 posts
Auto Modeler: 2,182 posts
Posted: Tuesday, May 22, 2018 - 12:53 PM UTC
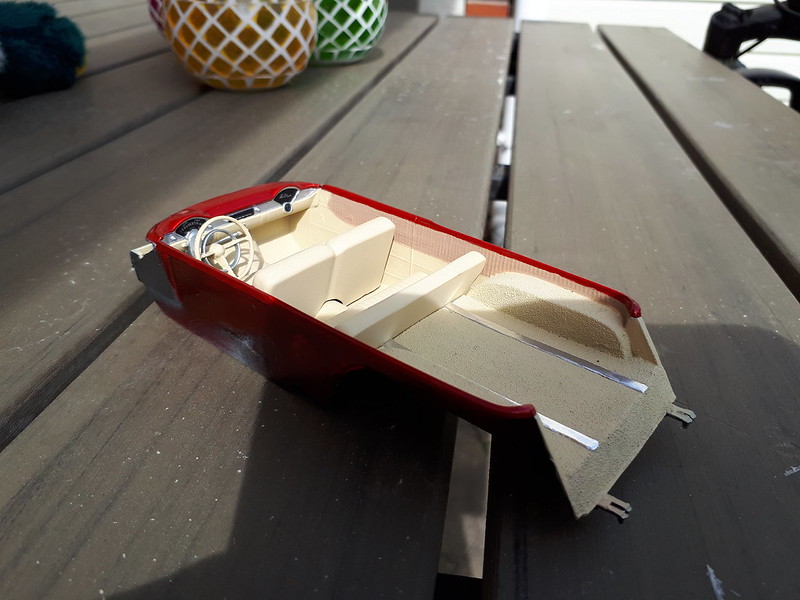
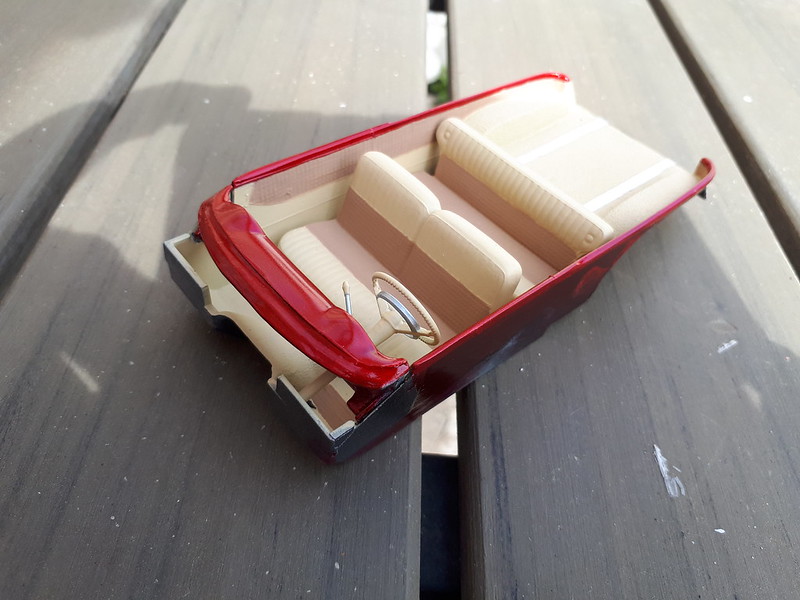
A small update. Finished the interior.
" BORDER="0">
" BORDER="0">
On the workbench:
MPC: 1972 Pontiac GTO
Revell: 1965 Mustang
Verlinden 120mm guard of the marine.
Revell: 2010 Camaro
Monogram: 1931 Rolls Royce
Italeri: LVT2 Amtrac
AussieReg
 Associate Editor
#007
Victoria, Australia
Joined: June 09, 2009
KitMaker: 8,156 posts
Auto Modeler: 2,953 posts
Posted: Tuesday, May 29, 2018 - 03:51 PM UTC
Super smooth finish on the bodywork Jesper, and I like the interior scheme. Very retro.
Looking forward to more.
Cheers, D
ON the bench
Revell 1/24 '53 Corvette (building as '54)
Revell 1/24 BMW 507 Coupe and Cabrio
Italeri 1/48 Me262 B-1a/U1 Nightfighter
Monogram 1/24 '57 Chevy Nomad
Dragon 1/350 USS Frank Knox DD-742
Joel_W
Associate Editor New York, United States
Joined: December 04, 2010
KitMaker: 11,666 posts
Auto Modeler: 2,974 posts
Posted: Saturday, June 23, 2018 - 05:35 AM UTC
Jasper,
Just caught up on your Nomad build. Boy does that bring back some memories from my college days in the late 60's early 70's. Nomads and Dune Buggies were popular even here on LI NY once the surfing crazy took hold.
Outstanding job on the custom work without making it look like a custom. Excellent choice of colors for the interior.
Joel
On my Workbench:
Monogram 1/24 scale 427 Shelby Cobra
Just Completed:
Beemax 1/24 scale BMW M3 E30 1992 Evolution II
Kobenhavn, Denmark
Joined: June 29, 2004
KitMaker: 6,760 posts
Auto Modeler: 2,182 posts
Posted: Thursday, September 06, 2018 - 09:57 PM UTC
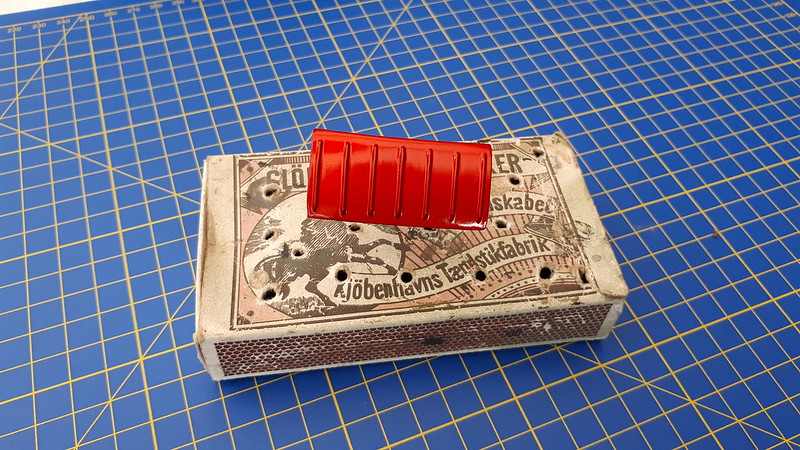
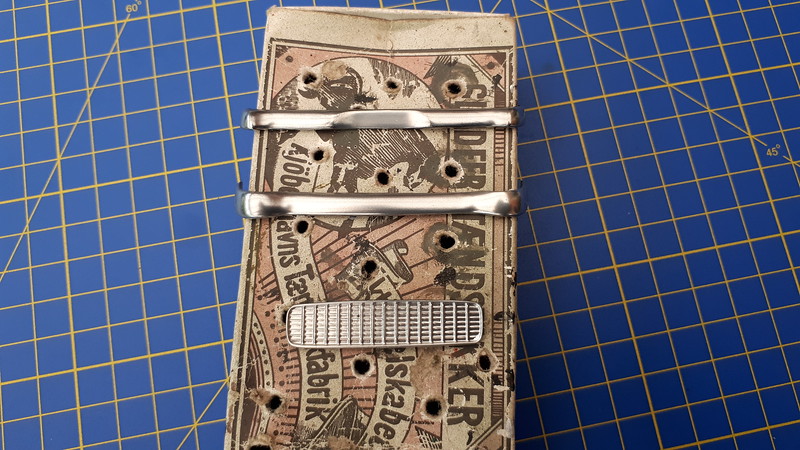
Have given the body the first 2 coats of Tamiya clear red, over siler acrylics base.
" BORDER="0">
Since I have shaved the door handles, no point in keeping the rather large door handle, on the trunk door, so that was shaved as well.
" BORDER="0">
Did some chrome work as well. Removed the original chrome, with oven cleaner and repainted with AK-interactive chrome. Not as shiny as I would have wanted. Next time I will use Tamiya gloss black, as base coat, not Ak's black base for chrome, which looks more semi-gloss, than gloss.
" BORDER="0">
On the workbench:
MPC: 1972 Pontiac GTO
Revell: 1965 Mustang
Verlinden 120mm guard of the marine.
Revell: 2010 Camaro
Monogram: 1931 Rolls Royce
Italeri: LVT2 Amtrac
Netherlands Antilles
Joined: September 02, 2014
KitMaker: 1,977 posts
Auto Modeler: 1,371 posts
Posted: Monday, September 10, 2018 - 08:52 AM UTC
Jesper, looking good! I'm on the verge of trying this method you used it for painting the body on my next Porsche build. Any
caveat?
Cheers!
Gabriel

Gabriel
Many of my builds can be seen on YT in video format. Please check 'Panzergrau Models' Channel.
Kobenhavn, Denmark
Joined: June 29, 2004
KitMaker: 6,760 posts
Auto Modeler: 2,182 posts
Posted: Monday, September 10, 2018 - 06:35 PM UTC
Hi Gabriel. Thanks for looking in.
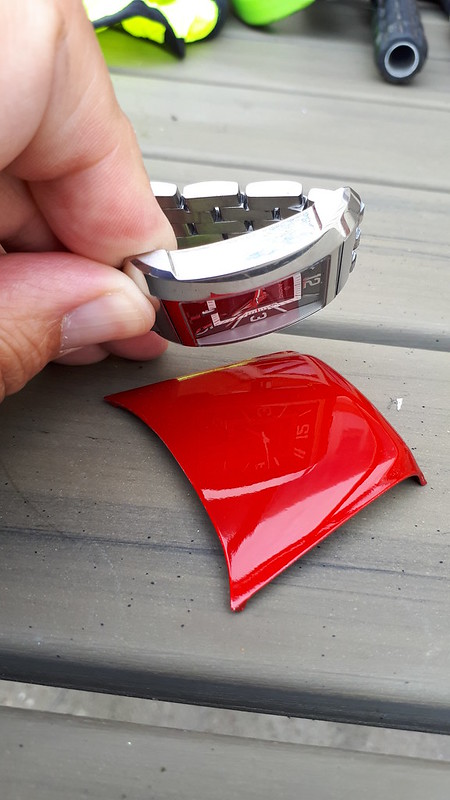
Choose a base coat that will not react ,to the clear red. My first attempt, years ago, the Tamiya clear red, desolved the Tamiya silver base coat. Not a lot, but enough to slightly contaminate the red top coat.
Even coats are vital. The clear color will darken with every coat and if, the paint, in som eareas, are thicker than other, it can look darker in those areas.
On the workbench:
MPC: 1972 Pontiac GTO
Revell: 1965 Mustang
Verlinden 120mm guard of the marine.
Revell: 2010 Camaro
Monogram: 1931 Rolls Royce
Italeri: LVT2 Amtrac
Joel_W
Associate Editor New York, United States
Joined: December 04, 2010
KitMaker: 11,666 posts
Auto Modeler: 2,974 posts
Posted: Wednesday, September 12, 2018 - 01:55 AM UTC
Jesper,
the Tamiya Clear Red really looks fantastic on the body. Those small details like removing door handles since the hinges were already removed, are touches that most of us would have just plain missed.
Joel
On my Workbench:
Monogram 1/24 scale 427 Shelby Cobra
Just Completed:
Beemax 1/24 scale BMW M3 E30 1992 Evolution II
Kobenhavn, Denmark
Joined: June 29, 2004
KitMaker: 6,760 posts
Auto Modeler: 2,182 posts
Posted: Wednesday, September 12, 2018 - 06:55 PM UTC
Hi Joel
Glad you like it.
Gave the body another shot, of clear red. Will start polishing next week.
On the workbench:
MPC: 1972 Pontiac GTO
Revell: 1965 Mustang
Verlinden 120mm guard of the marine.
Revell: 2010 Camaro
Monogram: 1931 Rolls Royce
Italeri: LVT2 Amtrac
#306
Victoria, Australia
Joined: June 27, 2010
KitMaker: 3,959 posts
Auto Modeler: 495 posts
Posted: Wednesday, September 12, 2018 - 10:34 PM UTC
Jesper, this looks very cool. Watching with interest!

Stay home and build models!
In 1/72
Gloster Gladiator MkII for the Bi-planes Campaign
In 1/350
Airfix 1:350 Type 45 Destroyer
Kobenhavn, Denmark
Joined: June 29, 2004
KitMaker: 6,760 posts
Auto Modeler: 2,182 posts
Posted: Sunday, September 16, 2018 - 06:00 PM UTC
On the workbench:
MPC: 1972 Pontiac GTO
Revell: 1965 Mustang
Verlinden 120mm guard of the marine.
Revell: 2010 Camaro
Monogram: 1931 Rolls Royce
Italeri: LVT2 Amtrac
Kobenhavn, Denmark
Joined: June 29, 2004
KitMaker: 6,760 posts
Auto Modeler: 2,182 posts
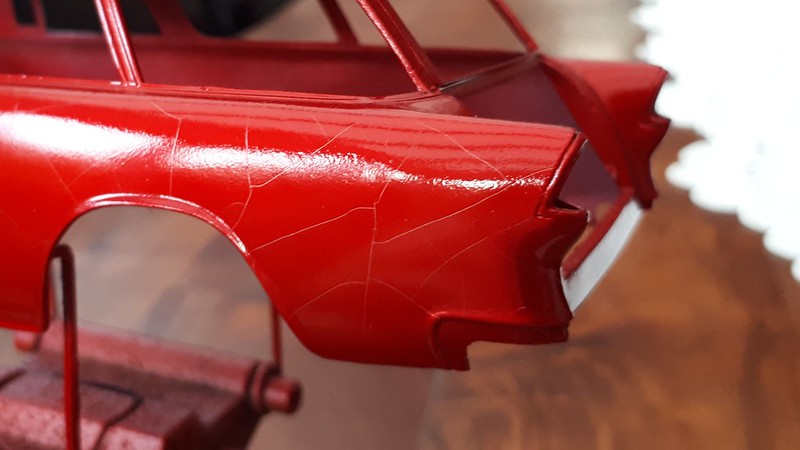
Posted: Wednesday, October 17, 2018 - 05:21 PM UTC
A major set-back have hit this build. The paint have started to crack. I think the problem is the retarder/flow agent I used, with the acryllics silver base coat. The trunk door was painted separately, with no retarder added and shows no signs of cracking. Perhaps I added to much retarder. Well, not much else to do but strip the paint and start all over.
On the workbench:
MPC: 1972 Pontiac GTO
Revell: 1965 Mustang
Verlinden 120mm guard of the marine.
Revell: 2010 Camaro
Monogram: 1931 Rolls Royce
Italeri: LVT2 Amtrac
New York, United States
Joined: August 25, 2006
KitMaker: 2,539 posts
Auto Modeler: 1,405 posts
Posted: Thursday, October 18, 2018 - 12:41 AM UTC
Well that's a real bummer.
Jim
"Socialism is a philosophy of failure, the creed of ignorance, and the gospel of envy, its inherent virtue is the equal sharing of misery." ---- Winston Churchill
Joel_W
Associate Editor New York, United States
Joined: December 04, 2010
KitMaker: 11,666 posts
Auto Modeler: 2,974 posts
Posted: Thursday, October 18, 2018 - 06:48 AM UTC
Jesper,
That really sucks.
Once, years ago I had cracking in my color coat start after I sealed it with clear gloss. Started a few days after the gloss was applied. From what I was told the cracking is due to the color coat not fulling drying and the clear trapped the moisture in.
that's one lessen I never forgot, and why I only paint bodies with lacquer Primer, lacquer color, and lacquer Clearcoat.
Joel
On my Workbench:
Monogram 1/24 scale 427 Shelby Cobra
Just Completed:
Beemax 1/24 scale BMW M3 E30 1992 Evolution II
Netherlands Antilles
Joined: September 02, 2014
KitMaker: 1,977 posts
Auto Modeler: 1,371 posts
Posted: Friday, October 19, 2018 - 04:25 PM UTC
Really sorry to see that happening,
Jesper!
I found meanwhile some pearlescent paints and I lost my appetite for
Tamiya transparent acrylics.
Well, I'm sure you have the skill to get out from that corner!
Cheers!
Gabriel
Gabriel
Many of my builds can be seen on YT in video format. Please check 'Panzergrau Models' Channel.
#306
Victoria, Australia
Joined: June 27, 2010
KitMaker: 3,959 posts
Auto Modeler: 495 posts
Posted: Monday, October 22, 2018 - 08:37 AM UTC
Hi Jesper!
rotten luck with the paint! Hope you can sort it out!

Stay home and build models!
In 1/72
Gloster Gladiator MkII for the Bi-planes Campaign
In 1/350
Airfix 1:350 Type 45 Destroyer
England - South East, United Kingdom
Joined: August 26, 2015
KitMaker: 92 posts
Auto Modeler: 57 posts
Posted: Friday, February 01, 2019 - 09:39 PM UTC
DUDE!
You are rocking this build - damn shame about the paint, though!
Onwards and upwards!
G¬)
We come in peace, so shoot to kill...
AussieReg
Associate Editor #007
Victoria, Australia
Joined: June 09, 2009
KitMaker: 8,156 posts
Auto Modeler: 2,953 posts
Posted: Saturday, February 02, 2019 - 10:00 AM UTC
Quoted Text
Super smooth finish on the bodywork Jesper, and I like the interior scheme. Very retro.
Looking forward to more.
Cheers, D
10 months later I realise that I liked it so much that I inadvertently used almost the same colours on my 51 Chev!
Hope to see some progress on this one soon, the same kit is next up in my build list for the Tri-5 project (once I finish the 3 on the bench).
Cheers, D
ON the bench
Revell 1/24 '53 Corvette (building as '54)
Revell 1/24 BMW 507 Coupe and Cabrio
Italeri 1/48 Me262 B-1a/U1 Nightfighter
Monogram 1/24 '57 Chevy Nomad
Dragon 1/350 USS Frank Knox DD-742
Kobenhavn, Denmark
Joined: June 29, 2004
KitMaker: 6,760 posts
Auto Modeler: 2,182 posts
Posted: Sunday, February 03, 2019 - 06:21 PM UTC
Hope to have some progress soon. Striping the paint, have been quite a pain

4 layers of candy red, 2 layers of base color and primer. 24 hours in ovencleaner did nothing, so I'm using something a lot hotter, being carefull not to ruin the styrene.
On the workbench:
MPC: 1972 Pontiac GTO
Revell: 1965 Mustang
Verlinden 120mm guard of the marine.
Revell: 2010 Camaro
Monogram: 1931 Rolls Royce
Italeri: LVT2 Amtrac
Kobenhavn, Denmark
Joined: June 29, 2004
KitMaker: 6,760 posts
Auto Modeler: 2,182 posts
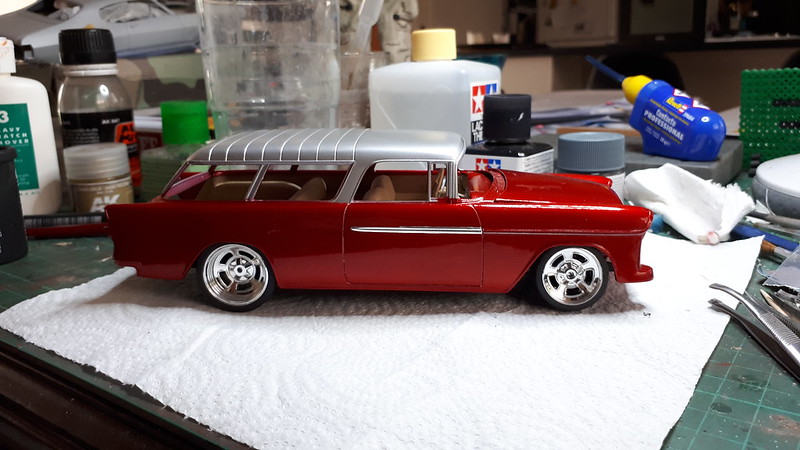
Posted: Sunday, August 18, 2019 - 06:44 AM UTC
I finally got this one going again. The removal of the paint really took it's toll, but now the Chevy and I are back in the saddle.
Grey primer, two coats of Tamiya silver leaf and four coats of Tamiya clear red.
I have started polishing. First a run with a 4000 grid sanding pad, moving along with Novus heavy scratch remover and finally Meguiars scratch X2.0.
" BORDER="0">
Getting there.
" BORDER="0">
On the workbench:
MPC: 1972 Pontiac GTO
Revell: 1965 Mustang
Verlinden 120mm guard of the marine.
Revell: 2010 Camaro
Monogram: 1931 Rolls Royce
Italeri: LVT2 Amtrac
#306
Victoria, Australia
Joined: June 27, 2010
KitMaker: 3,959 posts
Auto Modeler: 495 posts
Posted: Monday, August 19, 2019 - 10:06 AM UTC
Good to see this one on the go again Jesper
that finish is so good, it could be used as a mirror to shave with

Stay home and build models!
In 1/72
Gloster Gladiator MkII for the Bi-planes Campaign
In 1/350
Airfix 1:350 Type 45 Destroyer
Kobenhavn, Denmark
Joined: June 29, 2004
KitMaker: 6,760 posts
Auto Modeler: 2,182 posts
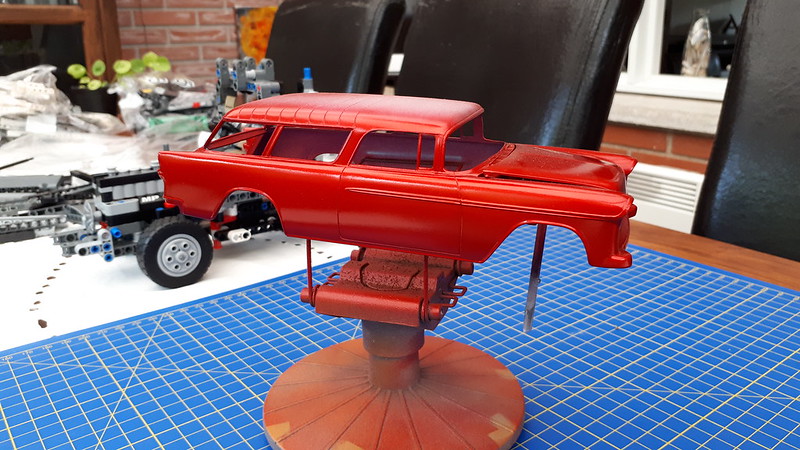
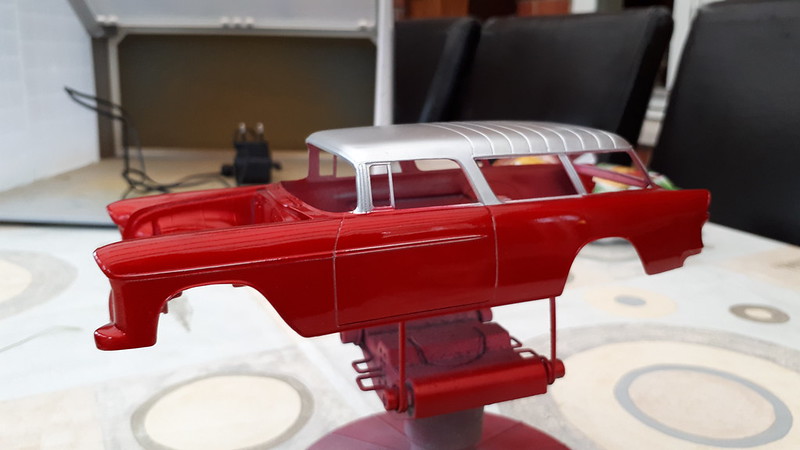
Posted: Thursday, August 22, 2019 - 02:03 AM UTC
Thanks for looking in gentlemen.
A dry fit, to give you an idea, of the finished product.
" BORDER="0">
On the workbench:
MPC: 1972 Pontiac GTO
Revell: 1965 Mustang
Verlinden 120mm guard of the marine.
Revell: 2010 Camaro
Monogram: 1931 Rolls Royce
Italeri: LVT2 Amtrac


