_GOTOBOTTOM
Cars: Custom
For customized car kits and projects.
Testors 1/24 "Hot Metal" trailer
Szmann
_VISITCOMMUNITY
Netherlands Antilles
Joined: September 02, 2014
KitMaker: 1,977 posts
Auto Modeler: 1,371 posts
Posted: Monday, July 23, 2018 - 11:53 PM UTC
Hi, guys!

Sill fiddling with my Mack DM600 and not daring yet to enter the MTO campaign with my Stuka, I started a week-end project.

I bought this Testors 1/24 trailer to display my auto models for photo sessions. As you might guess, the die cast body it's not a marvel of engineering and the plastic parts let much to be desired. On the positives, the build is sturdy and heavy - not too much of a chance to tip it over accidentally.

The paint job is very sloppy with over-spray and runs everywhere and I decided to customize it. I use also the chance to try out my new line of paints from Tru-color, of which I received an ample sample package for review (in parallel with this build blog I'm doing my video review on the paints as well)

The box art:

You can see for yourself on the picture that the wheels are misaligned and the paint is poorly applied (not the best recommendation for a company that makes a living from selling paints!)

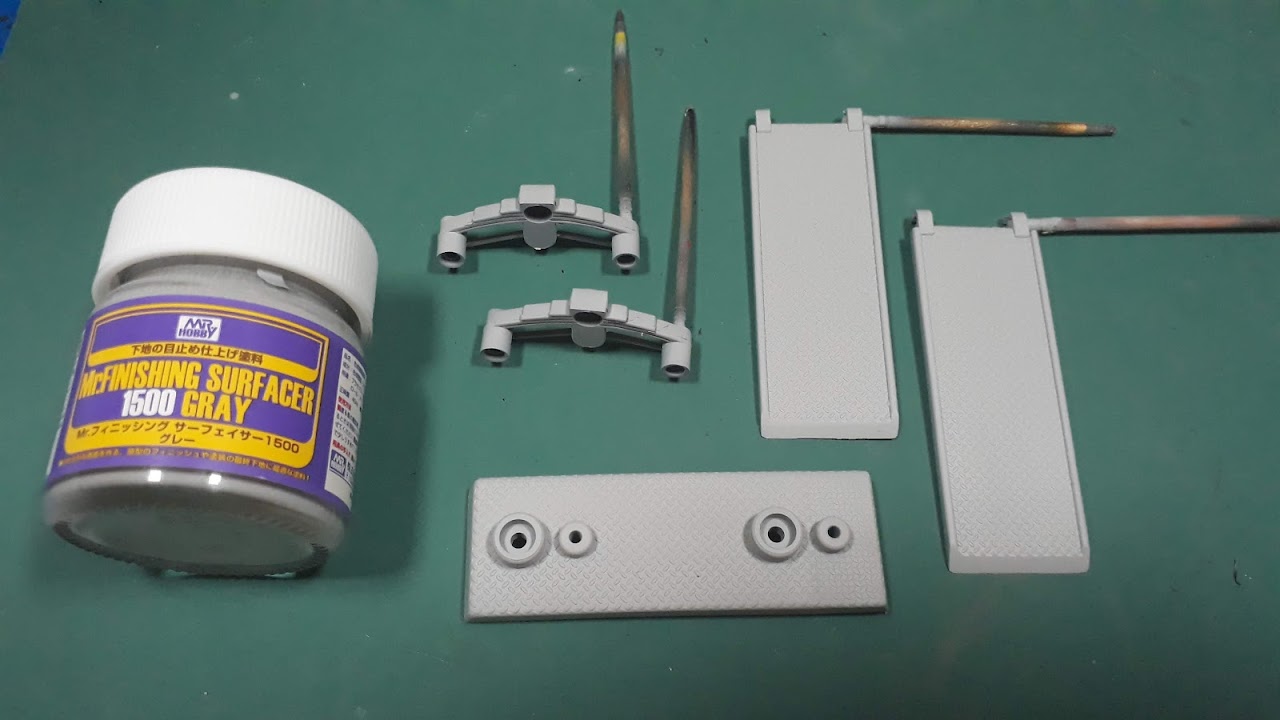
I sanded down as much as I could from old paint and I scuffed well the surfaces with fine grit sandpaper, the applied a solid coat of MR. Finishing Surfacer 1500. This primer managed to dislocate my old Testors enamel primer from the top of the preferences


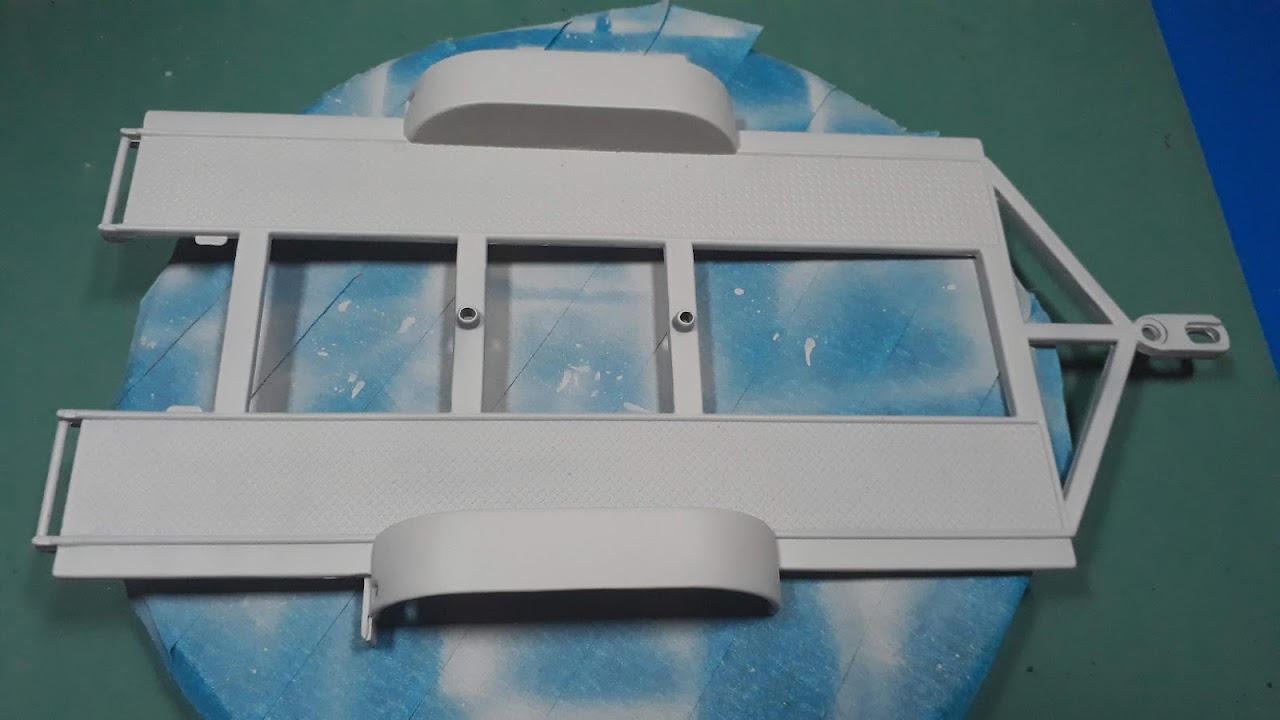
The application went smooth but exposed some areas that still need some work (most obvious the seam line on the interior of the neck triangle).

The plastic parts needed a lot of refinement before priming, but now trey're almost OK and the diamond plate rendition not bad at all... The springs still need couple of touches.


The next step: selective application of TCP 010 Black from Tru-Color range. I'm still working out the final color scheme, but I think I'm going to use TCP 534 High gloss school bus yellow in conjunction with TCP 520 High gloss torch red

I am really curious to see how these paints look like!

Cheers!
Gabriel
Szmann
_VISITCOMMUNITY
Netherlands Antilles
Joined: September 02, 2014
KitMaker: 1,977 posts
Auto Modeler: 1,371 posts
Posted: Wednesday, July 25, 2018 - 03:18 AM UTC
Hi, guys!

UPDATE

I pre-sprayed the rolling areas and the springs with black TCP-010, then masked off and applied some TCP-534 High gloss school bus yellow. Although the manufacturer recommends that the paints to be sprayed straight out of the bottle, I used 40% MLT because I chose to use a fine setting: H&S .2mm @ 20psi


I know it's never a good idea to spray yellow over black, but in my case I chose to do so for easy masking. A second coat and some wet sanding will be needed.


I fiddled with different ideas but eventually I decided for TCP-520 High gloss torch red as main color. The yellow you have seen earlier it's just pre-coating for positive masks and accents; most of it it's going to be covered in red. Mindful to my first experience with yellow, I used this time a 50% MLT mix and it went much easier. The result is fairly glossy, although no special preparation was made, I just sprayed over the primer.


I'm looking forward now to design and cut my masks, then to apply them and to spray the main color. It might take couple of days - I want to give the first coat a chance to dry properly before sanding

Cheers!
Gabriel
Hwa-Rang
_VISITCOMMUNITY
Kobenhavn, Denmark
Joined: June 29, 2004
KitMaker: 6,760 posts
Auto Modeler: 2,182 posts
Posted: Wednesday, July 25, 2018 - 08:07 PM UTC
Nice little Pieces. Excellent idea for photos.
Will you keep it nice and shiny or weathered?
Szmann
_VISITCOMMUNITY
Netherlands Antilles
Joined: September 02, 2014
KitMaker: 1,977 posts
Auto Modeler: 1,371 posts
Posted: Wednesday, July 25, 2018 - 11:00 PM UTC
Hi, Jesper!

Thank you for stopping by! The weathering question was also the first question that popped into my mind, especially because the trailer's wheels are far from perfect. But casting a look at my future builds, I realized that all three - four incoming auto builds are going to be "show" builds - even my Mack DM600 truck and I think the trailer it's not going to see any weathering except maybe some slight coat of pigments on the wheels to take away from the shine.

Gabriel
Szmann
_VISITCOMMUNITY
Netherlands Antilles
Joined: September 02, 2014
KitMaker: 1,977 posts
Auto Modeler: 1,371 posts
Posted: Thursday, July 26, 2018 - 11:22 AM UTC
Hi, guys!

UPDATE

I needed a second coat of yellow over the pre-sprayed black and I took the opportunity to refine some spots where my airbrush misbehaved:


Although the TCP is an acrylic based paint, it feels pretty much like enamels, very easy to sand:


And waiting for yellow to dry, I sprayed and un-masked the central piece (which name and purpose I don't know) and I assembled the suspension to the wheels:


Thus far I could go for now... I need the main body of the trailer to dry after wet sanding and before spraying the second coat of yellow.

Cheers!
Gabriel
LonCray
_VISITCOMMUNITY
Virginia, United States
Joined: August 24, 2005
KitMaker: 348 posts
Auto Modeler: 19 posts
Posted: Friday, July 27, 2018 - 12:42 AM UTC
I'm not positive, but I think that central piece is for the purpose of screwing to the model that is to sit on the trailer.
Szmann
_VISITCOMMUNITY
Netherlands Antilles
Joined: September 02, 2014
KitMaker: 1,977 posts
Auto Modeler: 1,371 posts
Posted: Friday, July 27, 2018 - 09:39 AM UTC
Hi, Lee! Thank you! Yes, it makes sense. I'm grateful for your help.

UPDATE
Positive masks applied over the previous sprayed yellow. TCP-520 high gloss torch red applied on top. I used a Ginza .3mm airbrush @ 25psi. The good news is that the edges came out very clean, much better than if I would have used my traditional Krylons. The bad news is that the "high gloss" isn't all that bright. In my books that finish is a semi-gloss finish. It is true, TCP provides as well gloss medium but I didn't bother - a polyurethane clear coat follows!


To be honest, I am pleased with the way a have achieved the masking - there is minimal fuss in a couple of places where my masking tape edges weren't properly secured.

The following step to aply the clear coat on the upper surface only and some matte / satin wash on the black surfaces, to simulate rubberized coating of a sort.

Cheers!
Gabriel
Joel_W
Staff MemberAssociate Editor
AUTOMODELER
_VISITCOMMUNITY
New York, United States
Joined: December 04, 2010
KitMaker: 11,666 posts
Auto Modeler: 2,974 posts
Posted: Saturday, July 28, 2018 - 06:35 AM UTC
Gabriel,
My apologies for missing your build thread. I must say it's a novel idea for displaying cars. Excellent body prep work that paid nice dividends with the color coats. As for your positive masks, as they came out great.


I've never gotten a really good high gloss on any gloss color with the exception of Tamiya's Gloss Black which I still need to rub out prior to Shooting Alcads. The Urethane coating should make it super shiny.

Joel
Szmann
_VISITCOMMUNITY
Netherlands Antilles
Joined: September 02, 2014
KitMaker: 1,977 posts
Auto Modeler: 1,371 posts
Posted: Saturday, July 28, 2018 - 07:40 AM UTC
Thanks for tuning in, Joel!

No worries, that was a "collateral" build - just a painting exercise which I made to try out new paints / thinners.

I did achieve much better gloss with Rust-oleums and Krylons - for non-metallic that is.

Here is an example of one coat no special preparation with Rust-oleum sand color:


Anyhow, TCP finish takes very well the clear - I had no run or other fault whatsoever


I'm waiting for the clear coat to fully cure (48 hrs) before I decide if I'm going to apply a second coat or else. I guess it's "overdone" already for an utilitarian vehicle (?)

... and I'm thinking to paint the the inside of the wheels wells with semi-matte black, as some anti-rust compound (?)

Cheers!
Gabriel
Lakota
#123
_VISITCOMMUNITY
New Mexico, United States
Joined: November 17, 2008
KitMaker: 1,202 posts
Auto Modeler: 15 posts
Posted: Saturday, July 28, 2018 - 07:48 AM UTC
Gabriel,
Are you using regular Krylon spray point from the hardware store? I'm watching your build with interest as I have the same kit. My original plan was to hook it to the back of a pickup and place my die cast cars on it for a display similar to what you are doing. That was a few years ago, I could never find a die cast pickup truck kit.
Take care,
Don "Lakota"
Szmann
_VISITCOMMUNITY
Netherlands Antilles
Joined: September 02, 2014
KitMaker: 1,977 posts
Auto Modeler: 1,371 posts
Posted: Saturday, July 28, 2018 - 08:14 AM UTC
Hi, Don

No, I'm not decanting from the spray cans. Krylon has a range called Short Cuts like the ones below:


Unfortunately there are only a few colors in the range, and not all of them equal in quality. The Pepper Red and Gloss Black are superb. The gloss white is average and the high visibility orange it's a complete disaster. I can confirm that the spray paint are as good though, because I have used them at my work and they turned out to be very glossy and with good adherence on rusty surfaces.

As for Rust-oleum i use buy the small cans as seen here:

Again, not all are the same. In fact, the only one that I don't like so far is the gloss black because contains too much oil and dries slowly. In contrast, the yellow shown here it's one of the best in their range I've tried thus far.

However, for this particular build I'm using Tru Color paints and for what I can say based in the first experiences, they are much more suitable to be applied with masks than the enamels listed above because they give a much "cleaner" edge.

For all of the above I use household lacquer thinner (and more recently MLT) for airbrushig and household paint thinner for brushing. Recently I have discovered that the result it's much smoother for hand brushing when diluted with turpentine. The last information has to be taken with a grain of salt, because I tried it only couple of times and only with Krylon gloss black. I still need to experiment on that one.

Gabriel
Hwa-Rang
_VISITCOMMUNITY
Kobenhavn, Denmark
Joined: June 29, 2004
KitMaker: 6,760 posts
Auto Modeler: 2,182 posts
Posted: Sunday, July 29, 2018 - 07:29 PM UTC
Looks good Gabriel. Great job on the masking.
Szmann
_VISITCOMMUNITY
Netherlands Antilles
Joined: September 02, 2014
KitMaker: 1,977 posts
Auto Modeler: 1,371 posts
Posted: Thursday, August 02, 2018 - 01:08 PM UTC
Thanks, Jesper!

And more masking yet! Initially I neglected the underside of the loading ramps - I just sprayed them casually. Then I figured out that in travelling position the underside is the main visible surface I stripped the paint and re-did the job, integrating the graphic scheme to it. Here they are, pictured in approximate travelling position:


The trailer itself received a second coat of clear and I think it looks about good:


I have decided to paint the wheel wells with matte black eventually, to disguise some molding issues, difficult to fix on cast metal, and that is what comes next.

Cheers!
Gabriel
Joel_W
Staff MemberAssociate Editor
AUTOMODELER
_VISITCOMMUNITY
New York, United States
Joined: December 04, 2010
KitMaker: 11,666 posts
Auto Modeler: 2,974 posts
Posted: Friday, August 03, 2018 - 05:38 AM UTC
Gabriel,
The bottom of the ramps look tremendous. Well done. Th picture of how the trailer looks now isn't there. Just the dreaded small box with an X in it.

Joel
Szmann
_VISITCOMMUNITY
Netherlands Antilles
Joined: September 02, 2014
KitMaker: 1,977 posts
Auto Modeler: 1,371 posts
Posted: Saturday, August 04, 2018 - 02:01 AM UTC

Quoted Text

Gabriel,
The bottom of the ramps look tremendous. Well done. Th picture of how the trailer looks now isn't there. Just the dreaded small box with an X in it.

Joel


Thanks for the head-up, Joel. That is one of the Google photo quirks. I will never understand why refuses to share some pictures. I've tried about everything: make sure the picture has the right permissions, re-loaded, re-linked, everything. It shows just fine on my screen... Anyhow, today's update will show it again.

UPDATE
Clear polyurethane applied over the back of the loading ramps. It is very glossy but it has a few grits that I need to polish off. I will wait another day just to make sure the clear is well hardened:


Over the superior parts, the areas sprayed previously black, I applied a "moonshine wash" to replicate some sort of rubberized coating. I could go even further by wiping out some of it but I'll let it to the "natural course", because this display trailer it's going to see some action and for sure wear and tear will appear sooner than I bet for


Same treatment applied to the main body of the trailer - hopefully now you'll be able to see the picture


I masked and painted the wheel wells just to disguise some molding issues. And Again I've got more than I paid for when removing the masks, a portion of clear peeled off - probably because inadequate surface preparation. Anyhow, this time I didn't dwell into it - the trailer stance it's very low and nothing of that it's going to be seen. I applied the clear there just for added protection and not for aesthetic reasons. I beveled the edges of the tear and sprayed another patch of clear.


Now I'm waiting for everything to be nicely cured and to begin the final assembly.

Cheers!
Gabriel
KoSprueOne
_VISITCOMMUNITY
Myanmar
Joined: March 05, 2004
KitMaker: 4,011 posts
Auto Modeler: 851 posts
Posted: Saturday, August 04, 2018 - 02:26 AM UTC
Paint job is looking slick!


Szmann
_VISITCOMMUNITY
Netherlands Antilles
Joined: September 02, 2014
KitMaker: 1,977 posts
Auto Modeler: 1,371 posts
Posted: Saturday, August 04, 2018 - 02:42 AM UTC
Thank you, KSO!

Testing now the load capacity with my DM600 nearly completed chassis It looks interesting

Gabriel
Joel_W
Staff MemberAssociate Editor
AUTOMODELER
_VISITCOMMUNITY
New York, United States
Joined: December 04, 2010
KitMaker: 11,666 posts
Auto Modeler: 2,974 posts
Posted: Saturday, August 04, 2018 - 02:47 AM UTC
Gabriel,
Outstanding for sure. And the finish is super gloss and a mile deep.
Joel
Szmann
_VISITCOMMUNITY
Netherlands Antilles
Joined: September 02, 2014
KitMaker: 1,977 posts
Auto Modeler: 1,371 posts
Posted: Monday, August 06, 2018 - 01:01 AM UTC
Joel, thank you! The gloss was achieved with solvent based polyurethane (yellowish tinge):

Final UPDATE

I declare this build finished, although are still couple of things to work out. The neck crank is ill fitting, over scale and poorly molded - I will replace it with a metallic screw when I'm going to find a suitable one. One of the ramp hinges broke during the photo shooting. I'm still looking for a permanent solution there - the plastic is very soft type. Here are the final pics:


Conclusions to the build

The Testors model is of '60s inheritance and has clunky detail and poor molds, both in plastic and metal. On the positives, it offers a sturdy, well weighted and well balanced display base for auto models in 1/24th and 1/25th scale so basically it's serving well its scope.

The secondary objective of this build was to test Tru-Color paints which I have for review. They are pre-thinned solvent based acrylics. Because have used mostly fine settings (H&S .2mm @ 20psi) I added up to 40% MLT. The paints have fine pigment and good pigment load and high coverage capabilities. Once dry are easy to sand but one needs to use caution - they are softer than lacquers and enamels. They answer very well to wet sanding with fine grit sponges (1000 grit and up). After curing the paints are taking very well "hot" clear coats - for testing purposes I used both solvent based polyurethane and Alclad Klear Kote On the negatives, the "high gloss" paints are not all that glossy.- they dry to a semi-gloss or satin finish but the finish is very even and needs minimal preparation before the clear. Very important for me - because I use quite often masking - its the fact that those paints can be applied neatly in a single coat and give a very clean edge - much better than regular enamels.

Signing out,
Gabriel
Joel_W
Staff MemberAssociate Editor
AUTOMODELER
_VISITCOMMUNITY
New York, United States
Joined: December 04, 2010
KitMaker: 11,666 posts
Auto Modeler: 2,974 posts
Posted: Monday, August 06, 2018 - 03:27 AM UTC

Quoted Text

Joel, thank you! The gloss was achieved with solvent based polyurethane (yellowish tinge):

Final UPDATE

I declare this build finished, although are still couple of things to work out. The neck crank is ill fitting, over scale and poorly molded - I will replace it with a metallic screw when I'm going to find a suitable one. One of the ramp hinges broke during the photo shooting. I'm still looking for a permanent solution there - the plastic is very soft type. Here are the final pics:


Conclusions to the build

The Testors model is of '60s inheritance and has clunky detail and poor molds, both in plastic and metal. On the positives, it offers a sturdy, well weighted and well balanced display base for auto models in 1/24th and 1/25th scale so basically it's serving well its scope.

The secondary objective of this build was to test Tru-Color paints which I have for review. They are pre-thinned solvent based acrylics. Because have used mostly fine settings (H&S .2mm @ 20psi) I added up to 40% MLT. The paints have fine pigment and good pigment load and high coverage capabilities. Once dry are easy to sand but one needs to use caution - they are softer than lacquers and enamels. They answer very well to wet sanding with fine grit sponges (1000 grit and up). After curing the paints are taking very well "hot" clear coats - for testing purposes I used both solvent based polyurethane and Alclad Klear Kote On the negatives, the "high gloss" paints are not all that glossy.- they dry to a semi-gloss or satin finish but the finish is very even and needs minimal preparation before the clear. Very important for me - because I use quite often masking - its the fact that those paints can be applied neatly in a single coat and give a very clean edge - much better than regular enamels.

Signing out,
Gabriel


Gabriel,
Just a great build that will serve you well for its intended purpose.

Paint and finish looks perfect to me.


Joel
Hwa-Rang
_VISITCOMMUNITY
Kobenhavn, Denmark
Joined: June 29, 2004
KitMaker: 6,760 posts
Auto Modeler: 2,182 posts
Posted: Monday, August 06, 2018 - 05:10 PM UTC
Who would have thought a trailer could look this good
Well done my friend.
Joel_W
Staff MemberAssociate Editor
AUTOMODELER
_VISITCOMMUNITY
New York, United States
Joined: December 04, 2010
KitMaker: 11,666 posts
Auto Modeler: 2,974 posts
Posted: Tuesday, August 07, 2018 - 02:10 AM UTC

Quoted Text

Who would have thought a trailer could look this good
Well done my friend.


Jesper,
Your comment brought back some really fond memories of my years Enduro Karting. We trailered my Kart in a painted Silver with just a tie down tarp. And the only way it was ever washed was when it rained. The complete opposite of how the Kart was maintained.

Joel
Szmann
_VISITCOMMUNITY
Netherlands Antilles
Joined: September 02, 2014
KitMaker: 1,977 posts
Auto Modeler: 1,371 posts
Posted: Tuesday, August 07, 2018 - 03:15 AM UTC
Jesper, that's a legitimate question Honestly, I didn't expected myself! I just "followed my nose" Here I took a picture for the YT video cover. The original trailer on the background...


Related to Joel's story, I have one of my own
I was for couple of years co-owner of a boat repair shop. We have this guy bringing in a 11 feet boat open deck - Yellow Fin. The boat still functional, but the electrics were completely messed up, all the lights gone, compass trashed, fuel tanks gauges not functional, the paint on the cockpit wall chipped to the fiberglass and so on. We finished that boat two days in advance. I inspected it, i gave the OK but it was Friday afternoon and I was idling in my office. To keep myself busy, I unscrewed the wood inserts (cheap teak wood imitations) which were grayed by elements. I sanded them and applied in quick succession a zinc primer followed by gloss Caterpillar yellow from the can. As soon the paint was dry to touch I installed the inserts back. All that was under one hour
Saturday the owner came to pick up his boat and to pay the check. He never mind the compass worked again, same the navigation lights and the fuel tank gauges! He insisted again and again that the way his boat looked now was the way he always wanted! LOL. We parted very good friends and every time we meet coincidentally on the street he's expressing his regrets my company went out of business and is stressing out that I am the only one that knows about the boats LOL! And he's very proud about his Yellow Fin!

Gabriel
Joel_W
Staff MemberAssociate Editor
AUTOMODELER
_VISITCOMMUNITY
New York, United States
Joined: December 04, 2010
KitMaker: 11,666 posts
Auto Modeler: 2,974 posts
Posted: Tuesday, August 07, 2018 - 04:20 AM UTC
Gabriel,
Great story. It also explains how and why you work so well with your hands, and how you can see modeling in small, organized, steps towards a completed goal.

I on the other hand, am more likely to just dive in and pray for the best.

Joel
RussellE
#306
_VISITCOMMUNITY
Victoria, Australia
Joined: June 27, 2010
KitMaker: 3,959 posts
Auto Modeler: 495 posts
Posted: Tuesday, August 07, 2018 - 09:52 AM UTC
a most interesting topic Gabriel!

You are a master of paints!

Who'd have thought Rust-Oleum could be shot through an airbrush?!

 _GOTOTOP