Cars: Other Racing
For automotive racing topics not already covered.
Fujimi 1/24 scale Ferrari 330 P4
Joel_W
Staff MemberAssociate Editor
AUTOMODELER
_VISITCOMMUNITY
New York, United States
Joined: December 04, 2010
KitMaker: 11,666 posts
Auto Modeler: 2,974 posts
Posted: Wednesday, October 31, 2018 - 09:01 AM UTC

Quoted Text


Quoted Text

I'm more then impressed that you're moving into the custom decal printing realm of the hobby. I believe that Michael from IndyCal doesn't always make his own drawings, but scans in the kit decals, then makes size, color corrections, and corrects any registration issues. A lot of work, but the results are far superior to the kit decals. Will be closely following your progress as you report your efforts. How about starting a thread so that we can follow your progress?

Joel


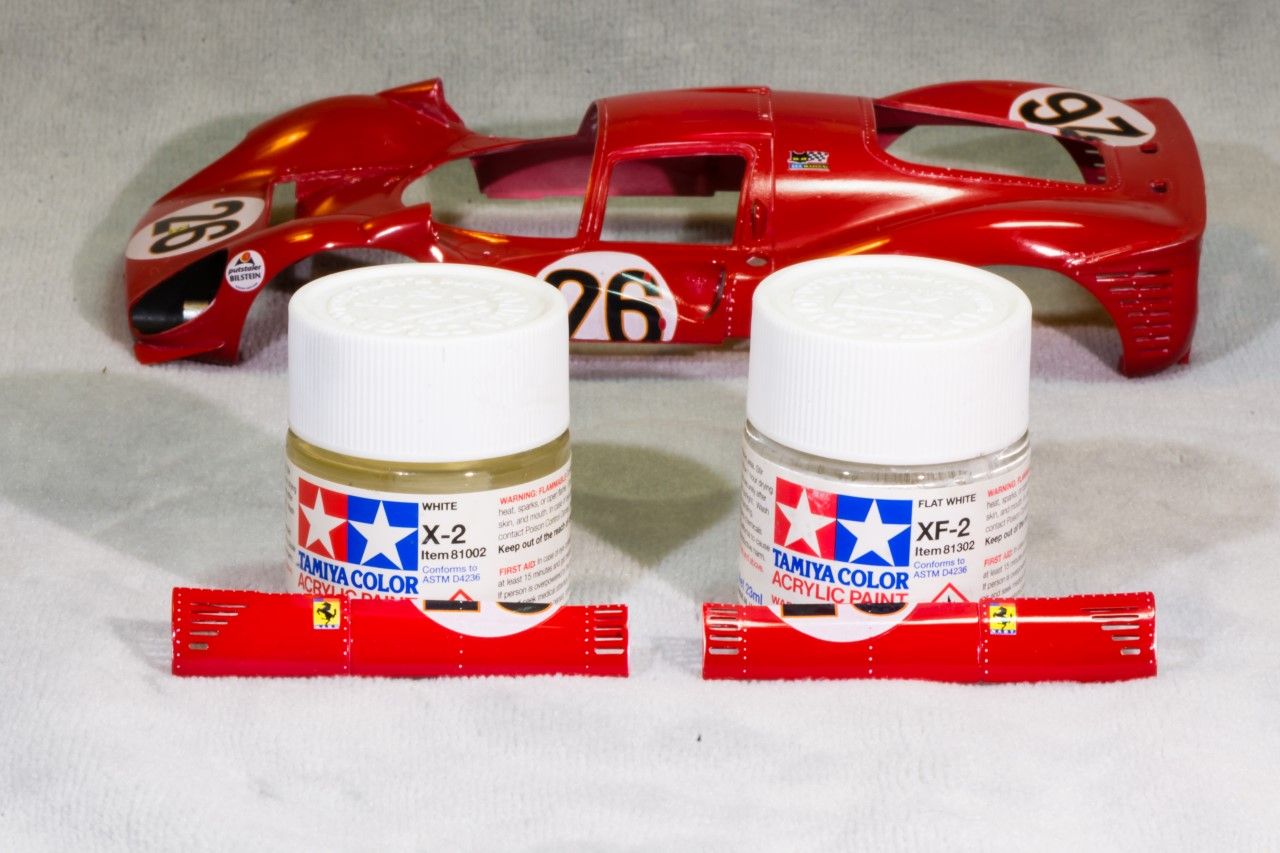
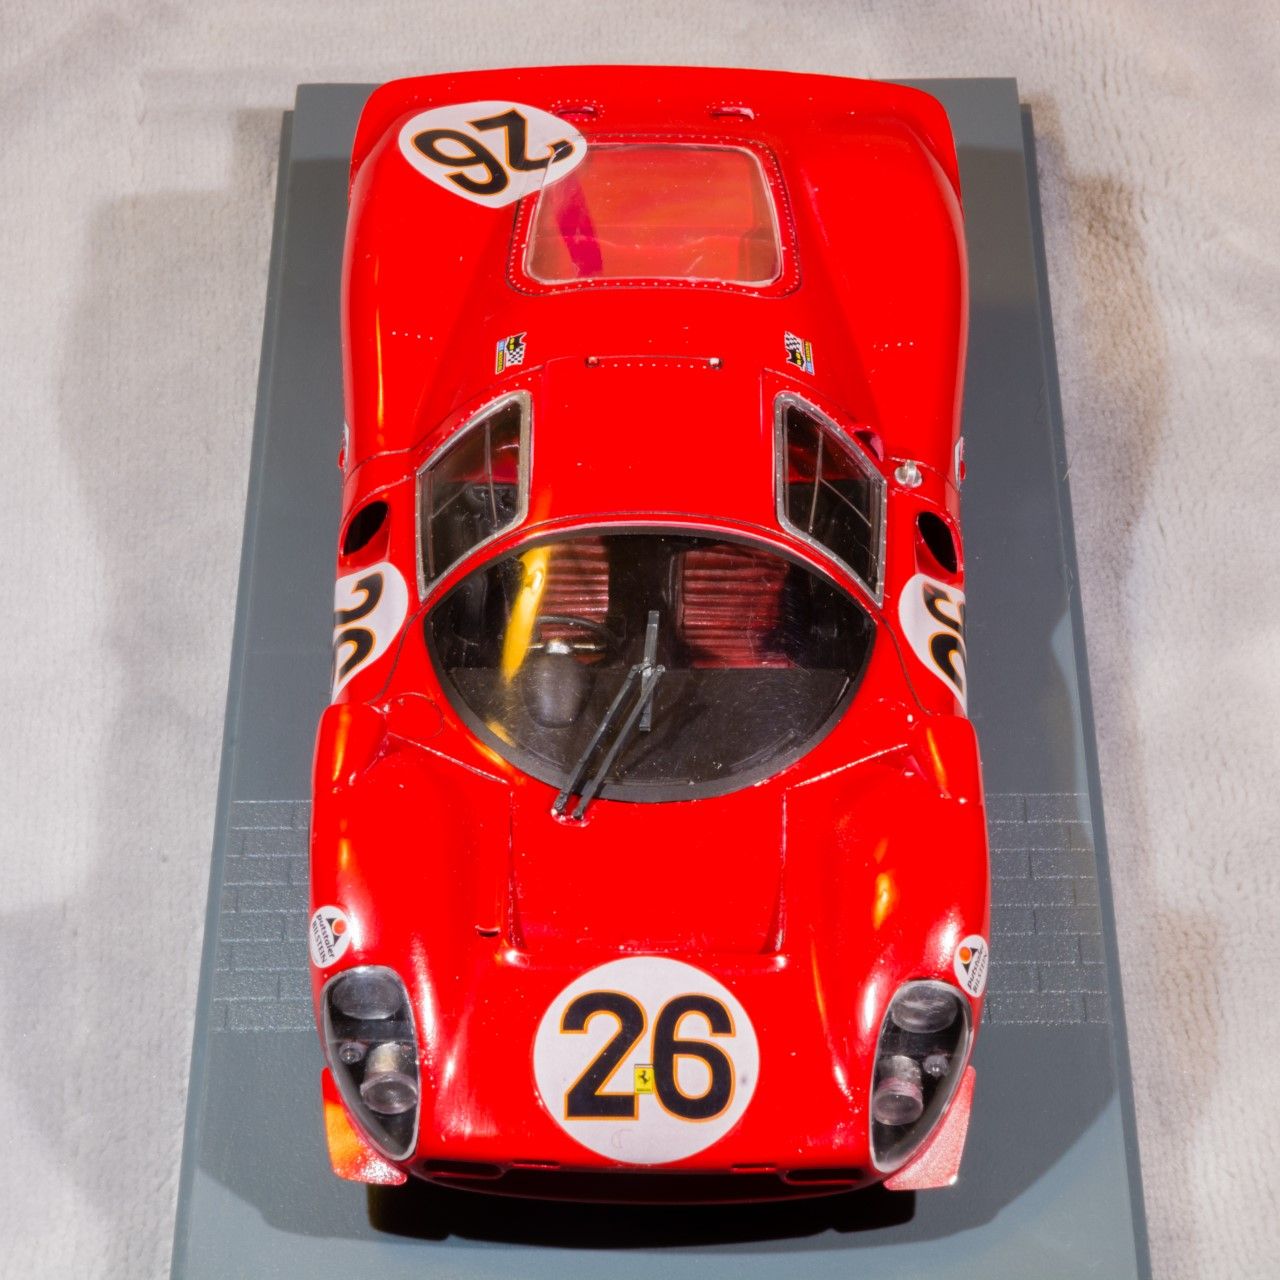
The sand / tan color background test I can make it when I catch some extra bench time - hopefully this week-end - on plastic spoons. Probably I'll be staring my Porche 959 for Porsche Campaign by then and the setup will come in handy.

I didn't meant I open a decal printing business - I just expanded my work bench. But, of course, I will let you know with examples if the effort pays off. Yes, I might open a separate thread but before anything else I need to pick up my shipment which is still in the shipper's warehouse, set up the printer and figure out how it works. It will be fantastic if I can synchronize it with my plotter to pre-cut the decal's contour (which I doubt).

Gabriel


Gabriel,
I wasn't thinking that course, but rather being able to create all those decals that you can't get, or have to buy sheets for just a few decals. I've been down that path, and it gets expensive, and often times pretty frustrating in.

No rush on the primer test, so you can concentrate on the decals for now.

Joel
Szmann
_VISITCOMMUNITY
Netherlands Antilles
Joined: September 02, 2014
KitMaker: 1,977 posts
Auto Modeler: 1,371 posts
Posted: Wednesday, October 31, 2018 - 12:10 PM UTC

Quoted Text

No rush on the primer test, so you can concentrate on the decals for now.


Like I could wait! The result of the first "shot". Don't mind the jagged exterior edges - I don't have a circular cutter and I cut with a #11 blade - nor the nick in the middle of the color one - it's a plastic imperfection that poked thru.


What do you think?

Gabriel
rdt1953
_VISITCOMMUNITY
New Jersey, United States
Joined: February 06, 2015
KitMaker: 1,098 posts
Auto Modeler: 52 posts
Posted: Thursday, November 01, 2018 - 08:54 AM UTC
[quote]
Quoted Text


Richard,
It's the closest I could come to a Japanese camo paint scheme.

Right now my mojo level is at absolute max, and loving every min of it.

Any chance that you'll be starting your bike build sooner then later?


Joel


Joel - It is taking all my willpower to keep from tearing into the RC 166 - I am waiting for the MFH reference book which I purchased on EBay from BNA in Australia. I am working away on my 1/1 scale bike right now getting some chassis components ready for powder coat . Once I take them to the Powder coat shop It may take up to six weeks so I may get some modeling in then .
Cheers - Richard
Joel_W
Staff MemberAssociate Editor
AUTOMODELER
_VISITCOMMUNITY
New York, United States
Joined: December 04, 2010
KitMaker: 11,666 posts
Auto Modeler: 2,974 posts
Posted: Thursday, November 01, 2018 - 09:18 AM UTC
[quote]
Quoted Text


Quoted Text


Richard,
It's the closest I could come to a Japanese camo paint scheme.

Right now my mojo level is at absolute max, and loving every min of it.

Any chance that you'll be starting your bike build sooner then later?


Joel


Joel - It is taking all my willpower to keep from tearing into the RC 166 - I am waiting for the MFH reference book which I purchased on EBay from BNA in Australia. I am working away on my 1/1 scale bike right now getting some chassis components ready for powder coat . Once I take them to the Powder coat shop It may take up to six weeks so I may get some modeling in then .
Cheers - Richard


Richard,
Sounds like you've made a ton of progress this past summer. You could always post some pictures of your 1:1 project here. I'd love to see them

Hopefully, you find some time during that 6 wks to get some modeling in, and there there is the winter months right around the corner.

Joel
Joel_W
Staff MemberAssociate Editor
AUTOMODELER
_VISITCOMMUNITY
New York, United States
Joined: December 04, 2010
KitMaker: 11,666 posts
Auto Modeler: 2,974 posts
Posted: Monday, November 05, 2018 - 05:38 AM UTC
Well, another week and time for my next update on the 330 P4.

Since my last update where decaling was finally finished, and the Mr. Hobby/Mr. Color Clear Lacquer applied. I was really happy with how the clearcoat self leveled as I used their proprietary leveling thinner. As expected there is some slight Orange peel, and the shine wasn't as deep as I had wanted. So the final phase of the paint process was about to commence.

I very carefully with a lite touch, started to polish out the clearcoat with Tamiya 3,000 sponge wet, and washed off the residue as I went along. When I was finished with the wet sanding the decals looked more like they were painted on, but in all honesty, the IndyCal decals looked darn good before I wet sanded them.

Next up was the 3 part Gravity polishing system. When I was finally done, I just stared at the shell. I've never achieved a finish like this before.

But there's a lot of dried residue in the recessed panel lines, so I used a wet (with water only) Q-tip, but most of it still remained. So I got out my Iwata M1 AB, and simply air brushed close up those panel lines with plain old water. Cleaned all the recessed lines in two min. flat. the shell dried by the time I had cleaned the AB and put it ,as these days I use a pair of Grex ABs.

The Final step was the 1st of two coats of Gravity's synthetic wax. The end result was a shine even deeper then before.

The last coat & water rinse will be after the shell is installed on the chassis, but before the glass is glued into place.

I do have some raise areas and edges that will need touch up with Red or aluminum paint. Those spots will be dealt with by using an artist's extra fine tip magic marker.

Here's a few pictures of where I'm at now.

Thanks for stopping by,

Joel


RussellE
#306
_VISITCOMMUNITY
Victoria, Australia
Joined: June 27, 2010
KitMaker: 3,959 posts
Auto Modeler: 495 posts
Posted: Monday, November 05, 2018 - 09:01 PM UTC
Looks great Joel!

Very nice progress for this week
Hwa-Rang
_VISITCOMMUNITY
Kobenhavn, Denmark
Joined: June 29, 2004
KitMaker: 6,760 posts
Auto Modeler: 2,182 posts
Posted: Monday, November 05, 2018 - 11:27 PM UTC
Where's my sunglasses? Looks great Joel.
Joel_W
Staff MemberAssociate Editor
AUTOMODELER
_VISITCOMMUNITY
New York, United States
Joined: December 04, 2010
KitMaker: 11,666 posts
Auto Modeler: 2,974 posts
Posted: Tuesday, November 06, 2018 - 01:29 AM UTC

Quoted Text

Where's my sunglasses? Looks great Joel.


Jesper,
Thanks so much my friend for checking out my build to date. It's always much appreciated. I'll send you a pair of my special online model viewing glasses asap.

Joel
Joel_W
Staff MemberAssociate Editor
AUTOMODELER
_VISITCOMMUNITY
New York, United States
Joined: December 04, 2010
KitMaker: 11,666 posts
Auto Modeler: 2,974 posts
Posted: Tuesday, November 06, 2018 - 01:59 AM UTC

Quoted Text

Looks great Joel!

Very nice progress for this week


Russell,
Thanks for the thumbs up. I'm really making progress now. I can finally see the finish line.

Joel
goodn8
_VISITCOMMUNITY
Berlin, Germany
Joined: October 12, 2008
KitMaker: 709 posts
Auto Modeler: 21 posts
Posted: Tuesday, November 06, 2018 - 03:21 AM UTC

Joel, that is soooo beautiful!!

About the the "3 part Gravity polishing system" - I aleady received my 3 part system from "Novus" and am curious how it will work whenever I plan to build a "shiny" subject.

Maybe I missede it somewhere but let me ask about the so often discussed "paint-scale effect". Does anyone care about that on automotive or motorbike builds with a fresh look?

Th mas
Joel_W
Staff MemberAssociate Editor
AUTOMODELER
_VISITCOMMUNITY
New York, United States
Joined: December 04, 2010
KitMaker: 11,666 posts
Auto Modeler: 2,974 posts
Posted: Tuesday, November 06, 2018 - 04:40 AM UTC

Quoted Text


Joel, that is soooo beautiful!!

About the the "3 part Gravity polishing system" - I aleady received my 3 part system from "Novus" and am curious how it will work whenever I plan to build a "shiny" subject.

Maybe I missede it somewhere but let me ask about the so often discussed "paint-scale effect". Does anyone care about that on automotive or motorbike builds with a fresh look?

Th mas


Thomas,
Thanks my friend for your most positive post. It's always greatly appreciated.

As far as the Novus system, I've never used it. Outside of the Gravity system I've used the 2 part MCW system which is good, but the results aren't as good IMHO. Many of the top builders who have video Vlogs, use a combination to all commercial products. I'm pretty sure that these systems are all from various auto finishing companies, especially since the paints from Gravity, Zero, & MCW are in fact formulated from the original formulas, and they use pigments and Thinners from those companies as well. I'd bet that the thinners have really been toned down, but they still work just fine.

The issue of scale effect has been around since the 70s as that's when I 1st heard the phrase. Basically, the idea is to lighten the colors by a few shades as a 1/48 scale model viewed at 1 ft would be like viewing the real model at 48 ft. But effect should decrease as the scale decreases, and increase as the scale increases. 48th scale is only 16 yds, and it just doesn't work for the larger scales. About the only color I actually modulate is flat black with Nato black for interior applications.

This issue of the amount of shine, and the depth of the shine really stays the same. it's the scale of the subject that fools one eye that it's less, but really the physics says it's the same.

Joel


magnusf
_VISITCOMMUNITY
Stockholm, Sweden
Joined: May 02, 2006
KitMaker: 1,953 posts
Auto Modeler: 8 posts
Posted: Tuesday, November 06, 2018 - 07:17 AM UTC
Joel! No doubt that's a Ferrari after you got that red paint on ! That rear end design with the louvres behind the rear wheels looks really modern, don't they look like this even today more or less?

Back to the rivet wheel now ...


Magnus
Merlin
Staff MemberSenior Editor
AEROSCALE
#017
_VISITCOMMUNITY
United Kingdom
Joined: June 11, 2003
KitMaker: 17,582 posts
Auto Modeler: 388 posts
Posted: Tuesday, November 06, 2018 - 10:02 AM UTC
Hi Joel

That's beautiful, the way it's polishing up! The depth to the shine is superb.

That's a great tip about using an airbrush with water to clean out polishing residue! I've hit a similar problem when polishing a clear coat ahead of applying decals on an aircraft kit - particularly when wet-polishing (the result can be really stubborn to shift!) - but I've never thought of trying a "power wash". I now know what to try next time.

All the best

Rowan
Joel_W
Staff MemberAssociate Editor
AUTOMODELER
_VISITCOMMUNITY
New York, United States
Joined: December 04, 2010
KitMaker: 11,666 posts
Auto Modeler: 2,974 posts
Posted: Tuesday, November 06, 2018 - 10:34 AM UTC

Quoted Text

Joel! No doubt that's a Ferrari after you got that red paint on ! That rear end design with the louvres behind the rear wheels looks really modern, don't they look like this even today more or less?

Back to the rivet wheel now ...


Magnus


Magnus,
Thanks so much for checking out my 330 P4 build and like what you see.

Those rear air vents really haven't been used for a while especially with Ferraris current endurance racing, which was mostly heavily modified productions cars. Here's their 488


But they now have a current prototype car for endurance racing aimed at LeMans. Unfortunately, nearly all of today's race cars starting with F1 while aerodynamic wonders, they're really quite ugly to purists like me. Good thing I model mostly the 1960s-1980s.


Joel
Joel_W
Staff MemberAssociate Editor
AUTOMODELER
_VISITCOMMUNITY
New York, United States
Joined: December 04, 2010
KitMaker: 11,666 posts
Auto Modeler: 2,974 posts
Posted: Tuesday, November 06, 2018 - 10:38 AM UTC

Quoted Text

Hi Joel

That's beautiful, the way it's polishing up! The depth to the shine is superb.

That's a great tip about using an airbrush with water to clean out polishing residue! I've hit a similar problem when polishing a clear coat ahead of applying decals on an aircraft kit - particularly when wet-polishing (the result can be really stubborn to shift!) - but I've never thought of trying a "power wash". I now know what to try next time.

All the best

Rowan


Rowan,
It's great to see and hear from you again, as I know just how busy you are with the models for the book.

the power washing works great, just make sure it's not a true water based paint you're power washing.

This is the 2nd model that I haven't used any gloss clear coat as a base for decaling. I just rubbed out the color coats till they were smooth. The results were perfect. BTW, the Gravity paints are Matt based. The gloss is strictly from the top clearcoats.

Joel
Cosimodo
#335
_VISITCOMMUNITY
Auckland, New Zealand
Joined: September 03, 2013
KitMaker: 1,808 posts
Auto Modeler: 701 posts
Posted: Tuesday, November 06, 2018 - 06:47 PM UTC
Wow Joel!
If that's effect of the Gravity system that is fantastic, though I am more sure it was down to your skills.

cheers
Michael
Joel_W
Staff MemberAssociate Editor
AUTOMODELER
_VISITCOMMUNITY
New York, United States
Joined: December 04, 2010
KitMaker: 11,666 posts
Auto Modeler: 2,974 posts
Posted: Wednesday, November 07, 2018 - 08:30 AM UTC

Quoted Text

Wow Joel!
If that's effect of the Gravity system that is fantastic, though I am more sure it was down to your skills.

cheers
Michael


Michael,
I only wish it was, but it's the Gravity system. My skills are average at best, so if I can achieve a finish like this, anyone can.

Joel
Szmann
_VISITCOMMUNITY
Netherlands Antilles
Joined: September 02, 2014
KitMaker: 1,977 posts
Auto Modeler: 1,371 posts
Posted: Wednesday, November 07, 2018 - 09:29 AM UTC
Great job, Joel! Very red and very glossy ! Well done!

Cheers!
Gabriel
Joel_W
Staff MemberAssociate Editor
AUTOMODELER
_VISITCOMMUNITY
New York, United States
Joined: December 04, 2010
KitMaker: 11,666 posts
Auto Modeler: 2,974 posts
Posted: Thursday, November 08, 2018 - 02:08 AM UTC

Quoted Text

Great job, Joel! Very red and very glossy ! Well done!

Cheers!
Gabriel


Gabriel,
Thanks so much for your praise. I really appreciate it, especially when I've seen the finish on your bike build.

Joel
Joel_W
Staff MemberAssociate Editor
AUTOMODELER
_VISITCOMMUNITY
New York, United States
Joined: December 04, 2010
KitMaker: 11,666 posts
Auto Modeler: 2,974 posts
Posted: Sunday, November 11, 2018 - 09:50 AM UTC
Well, it's with mixed feeling that I make my final update post on the Fujimi 1/24 scale Ferrari 330 P4 as she crossed the finish line a few days ago. I still want to give her another coat of wax, but that's a few days off.

It this a perfect build? Hell no. But it's my best paint job and finish to date, and that means I'm trending in the right direction. Kind of unusual for me.

So here's the final set of pictures for all to enjoy.

Joel


rdt1953
_VISITCOMMUNITY
New Jersey, United States
Joined: February 06, 2015
KitMaker: 1,098 posts
Auto Modeler: 52 posts
Posted: Sunday, November 11, 2018 - 11:08 AM UTC
Joel -

Beautiful ! I am very envious of your painting skills . I am going to pester you a bit when it comes time to paint the tank and fairing on the RC 166.

What's next on your build list ?

Keep at it ! Richard
Cosimodo
#335
_VISITCOMMUNITY
Auckland, New Zealand
Joined: September 03, 2013
KitMaker: 1,808 posts
Auto Modeler: 701 posts
Posted: Sunday, November 11, 2018 - 11:43 AM UTC
Not enough superlatives available for this one

Fantastic work Joel.

cheers
Michael
Joel_W
Staff MemberAssociate Editor
AUTOMODELER
_VISITCOMMUNITY
New York, United States
Joined: December 04, 2010
KitMaker: 11,666 posts
Auto Modeler: 2,974 posts
Posted: Sunday, November 11, 2018 - 11:47 AM UTC

Quoted Text

Joel -

Beautiful ! I am very envious of your painting skills . I am going to pester you a bit when it comes time to paint the tank and fairing on the RC 166.

What's next on your build list ?

Keep at it ! Richard


Richard,
Thanks so much for your really most kind words. Coming from someone at your skill level is truly humbling. I'm more then willing to help with the gloss painting on the bike, but somehow I don't think you'll need my help.

My original plans were basically one closed wheel, then one open wheel car, but I signed up for the Porsche GB, so I'm going to focus on that now. For the build it's the very old 1986 or so Tamiya 1/24 scale Porsche 956 as it does actually have an engine and gear box. I plan on doing some detailing in the bay, and a ton of corrections in the pit which is 100% wrong. I'm going with the Rothmans car, and IndyCal decals, but I opted not the set with the blue areas. Those I'll try to paint as I have zero confidence in huge decals.


Joel
Joel_W
Staff MemberAssociate Editor
AUTOMODELER
_VISITCOMMUNITY
New York, United States
Joined: December 04, 2010
KitMaker: 11,666 posts
Auto Modeler: 2,974 posts
Posted: Sunday, November 11, 2018 - 11:48 AM UTC

Quoted Text

Not enough superlatives available for this one

Fantastic work Joel.

cheers
Michael


Michael my friend.
Thank you so much for not only your most positive praise, but being here throughout the build.

Joel
Szmann
_VISITCOMMUNITY
Netherlands Antilles
Joined: September 02, 2014
KitMaker: 1,977 posts
Auto Modeler: 1,371 posts
Posted: Sunday, November 11, 2018 - 01:47 PM UTC
Beautiful display, Joel! You have crossed the finishing line in style - I really like the overall looks of the build. Just great. I'll see you next in the Porsche campaign I guess?

Keep inspiring us!

Gabriel