

Charlie, great to see some progress bring made, even if its doing the same thing for the third time! No point leaving things that youre not happy with, you will regret it later in the build.
Cheers, D


Go to automodeler.com for the current dynamic site!
The Garage
For general automotive modeling or non-modeling topics.
For general automotive modeling or non-modeling topics.
Hosted by Jim Starkweather
Garage Queens 2019 Group Build

AussieReg

#007

Joined: June 09, 2009
KitMaker: 8,156 posts
Auto Modeler: 2,953 posts

Posted: Friday, February 08, 2019 - 11:44 AM UTC


md72

#439

Joined: November 05, 2005
KitMaker: 4,950 posts
Auto Modeler: 555 posts

Posted: Friday, February 08, 2019 - 12:00 PM UTC
OK, I guess I'm in for a lot of work. Heck I still don't have all of the old paint off of the body. 


Szmann

Joined: September 02, 2014
KitMaker: 1,977 posts
Auto Modeler: 1,371 posts

Posted: Friday, February 08, 2019 - 03:06 PM UTC
Quoted Text
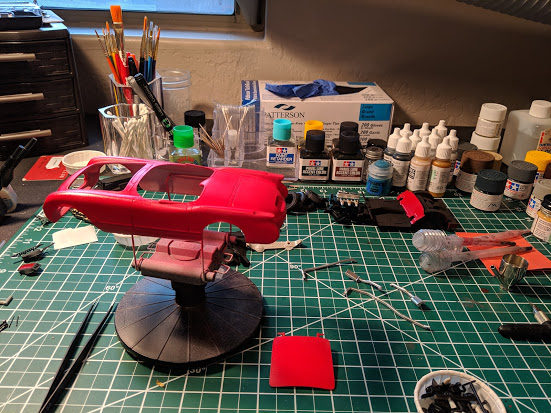
Did some filling, sanding, some more sanding and finished it off with a little sanding.
Way to go, Charlie! I never got away with less than two coats of primer and two coats of base coat, with sanding and curses in between
 Now I sort of like sanding, but I use to hate it!
Quoted Text
Gonna post some experiment pictures on painting the exhaust this weekend. I got inspired by the 300C thread.
I'm watching you!
 Good luck with the experiment. It shouldn't be too difficult.
Looking forward to the next update!
Cheers!
Gabriel


md72
#439
Joined: November 05, 2005
KitMaker: 4,950 posts
Auto Modeler: 555 posts
Posted: Sunday, February 10, 2019 - 12:42 PM UTC
OK, if I'm going to get serious about this car building thing, I'm going to need a bit of help. Like this whole paint thing. Dull finishes to FS, ANA, BS and RLM standards I get. But what color is "Thanks Vermillion", "Bring 'em Back Olive", "Burnt Amber", or " Dark Moss Green"?
It took me two tries to get an OK color for my Camaro. The first try was Model Master "Bright Blue", turned out to be a flat color. Next try was a Mr. Color paint it looks good, but it has a much steeper learning curve than any of the Model Master paint's I've used. So what pants do you folks use?
It took me two tries to get an OK color for my Camaro. The first try was Model Master "Bright Blue", turned out to be a flat color. Next try was a Mr. Color paint it looks good, but it has a much steeper learning curve than any of the Model Master paint's I've used. So what pants do you folks use?
Szmann
Joined: September 02, 2014
KitMaker: 1,977 posts
Auto Modeler: 1,371 posts
Posted: Sunday, February 10, 2019 - 02:09 PM UTC
Quoted Text
OK, if I'm going to get serious about this car building thing, I'm going to need a bit of help. Like this whole paint thing. Dull finishes to FS, ANA, BS and RLM standards I get. But what color is "Thanks Vermillion", "Bring 'em Back Olive", "Burnt Amber", or " Dark Moss Green"?
It took me two tries to get an OK color for my Camaro. The first try was Model Master "Bright Blue", turned out to be a flat color. Next try was a Mr. Color paint it looks good, but it has a much steeper learning curve than any of the Model Master paint's I've used. So what pants do you folks use?
Mark, there you go!
You've got a chunk of auto modelling pie! These names for auto paints suppose to be "attractive" or to have a "meaning". In fact, there is about the inconsistency of manufacturers to repeat a color based on a scribbled "recipe", and therefore each car series comes with a slightly different color.If you really want to go deep into it, you can find on the net cross-references between the auto paints and FS or even you can buy automotive paint in small quantities (touch-up paint).
Now, back to the bench! Probably you don't want to go ballistic about the "perfect match" and a close-enough match will suffice, at least for now. You can mix your own paints or - if you don't have a grip on the color theory, you can grab a can of oil based enamel from any hardware store that matches your taste. Just make sure is says "gloss". My favorite brand is "Rust-oleum", but when I am in need I use "ACE Hardware" as well. Those two have a very similar formula to MM (Testors). Testors can be a little confusing, because they have both military (matte) and auto (glossy) colors.
Krylon is again a brand to consider - all their paints are glossy, safe for "signal orange" which is almost like liquid sand.
Moving to the "specialist paints", there are dedicated producers as Gravity, TruColor, Zero paints that guarantee the correct match brand / year. Usually they are lacquers or acrylic lacquers. The lacquers are usually glossy, the acrylic lacquers are usually semi-gloss to semi-matte and are also known as "two stage" paints, because they really need a glossy clear coat to achieve the shine.
As I discovered myself couple of years ago, much more important is the final clear - that is the one that give you the shine and "delivers" the cat to the watcher. So: better the clear, better the finish. There are here plenty choices as well: acrylics (x-22, Aqua gloss), enamels (Humbrol), lacquers (Gunze, Alclad), urethanes (2K) - I have arranged them pretty much in hardness crescent order. I cannot recommend enough 2K, that for me at least superseded any other one by a mile and a half.
Each paint has its perks and quirks: finally is more important what you get the result with.
Yeah, I know: It sounds like I've talked a lot and I said nothing. Here's a list of products that work best for me in this moment:
Primer: Mr. Surfacer 1500 diluted with MLT;
Base coat, solid: Rust-oleum enamel;
Base coat, pearlescent: Tru-Color paints;
Base coat, metallic: Krylon enamels;
Clear coat: 2K Diamond.
Note: I have very little to no experience with Gravity Paints and Zero Paints but I've heard only good things about them.
I hope this helps.
Cheers!
Gabriel
md72
#439
Joined: November 05, 2005
KitMaker: 4,950 posts
Auto Modeler: 555 posts
Posted: Sunday, February 10, 2019 - 04:10 PM UTC
Thanks!
Well it looks like it's going to be easier and harder than I expected. It looks like a few colors may have named matches in the model paint world (Bullitt Mustang?). The rest are going to depend on my eyeball matches to internet color chips and spray can lids.
Well it looks like it's going to be easier and harder than I expected. It looks like a few colors may have named matches in the model paint world (Bullitt Mustang?). The rest are going to depend on my eyeball matches to internet color chips and spray can lids.
AussieReg
#007
Joined: June 09, 2009
KitMaker: 8,156 posts
Auto Modeler: 2,953 posts
Posted: Monday, February 11, 2019 - 01:15 AM UTC
Hi Mark.
Great to see the Auto bug has bitten you! My approach is different to Gabriel's. I have never tried the hardware or auto-store paints, I stick to the hobby brands. Traditionally I have used Tamiya and Gunze acrylics but as you said, the colour range is quite bland and very military-oriented. Even the bright colours are more pastels and primary colours. Adventuring into the auto world opens up a whole other spectrum in both colours, metallic flecks, chameleon or flips paints, and the whole super high gloss thing. Scary stuff indeed.
I have started to try out the pre-thinned lacquer paints such as MRP (Mr Paint) and the local Aussie SMS (Scale Modellers Supply). They have quite a large range of colours and effects paints, they are pre-thinned ready to airbrush out of the bottle, and they lay down beautifully with 2 or 3 light coats. A bit of fine sanding and you can go to the gloss clear of choice, generally a single-pack lacquer gloss or a two-pack (2K).
If you want to stick to the traditional model paints, the Tamiya or Model Master enamels will give you a good gloss finish with little trouble, ready to fine sand and clear coat. It is just the colour range that might hold you back.
The best advice I can give is to go out and grab some different types of paint and play around until you find something that clicks for you.
I'm looking forward to seeing your progress, and just keep firing out those questions here, there's plenty of experience and no shortage of goodwill.
Cheers, D

ChurchSTSV
Joined: September 20, 2017
KitMaker: 350 posts
Auto Modeler: 64 posts

Posted: Monday, February 11, 2019 - 03:53 AM UTC
Quoted Text
Quoted Text
Did some filling, sanding, some more sanding and finished it off with a little sanding.
Way to go, Charlie! I never got away with less than two coats of primer and two coats of base coat, with sanding and curses in betweenQuoted Text
Gonna post some experiment pictures on painting the exhaust this weekend. I got inspired by the 300C thread.
I'm watching you!
Looking forward to the next update!
Cheers!
Gabriel
Got the materials and paints I need to see what I can make up. Have to wait for the pregnant wife to be out of the house before I start throwing this kind of paint around. Even in the back yard, the smell carries into the house.
But I got the supplies I need and we shall see!!

ChurchSTSV
Joined: September 20, 2017
KitMaker: 350 posts
Auto Modeler: 64 posts
Posted: Monday, February 11, 2019 - 03:56 AM UTC
Quoted Text
Charlie, great to see some progress bring made, even if its doing the same thing for the third time! No point leaving things that youre not happy with, you will regret it later in the build.
Cheers, D
Double edged sword. Looking at this site showed me I could do better. So I got back to square one and try more tricks, make it better.
Turn around is it makes other people more inspired to see so much time and effort being put into something.
Let me remind you, Gentlemen; This is the first model car I have built since I was around 13. I am making it up as I go thanks to this website, my imagination, and a very kind wife.

165thspc

#521
Joined: April 13, 2011
KitMaker: 9,465 posts
Auto Modeler: 106 posts

Posted: Monday, February 11, 2019 - 04:57 AM UTC
No progress on the military command car since last post. Just checking in to keep current with Armorama.

md72
#439
Joined: November 05, 2005
KitMaker: 4,950 posts
Auto Modeler: 555 posts
Posted: Tuesday, February 12, 2019 - 07:07 PM UTC
Well, I accidently made progress on the Camaro tonight.
The long assembled cockpit has been placed into the body shell.
I managed to get the grille looking pretty good.
I Went back and painted the front of the cockpit, rather than leave it screaming white.
The long assembled cockpit has been placed into the body shell.
I managed to get the grille looking pretty good.
I Went back and painted the front of the cockpit, rather than leave it screaming white.
AussieReg
#007
Joined: June 09, 2009
KitMaker: 8,156 posts
Auto Modeler: 2,953 posts
Posted: Tuesday, February 12, 2019 - 07:13 PM UTC
Looks pretty good Mark, you need to try to have a few more accidents like that mate! 🙃
md72
#439
Joined: November 05, 2005
KitMaker: 4,950 posts
Auto Modeler: 555 posts
Posted: Wednesday, February 13, 2019 - 07:14 AM UTC
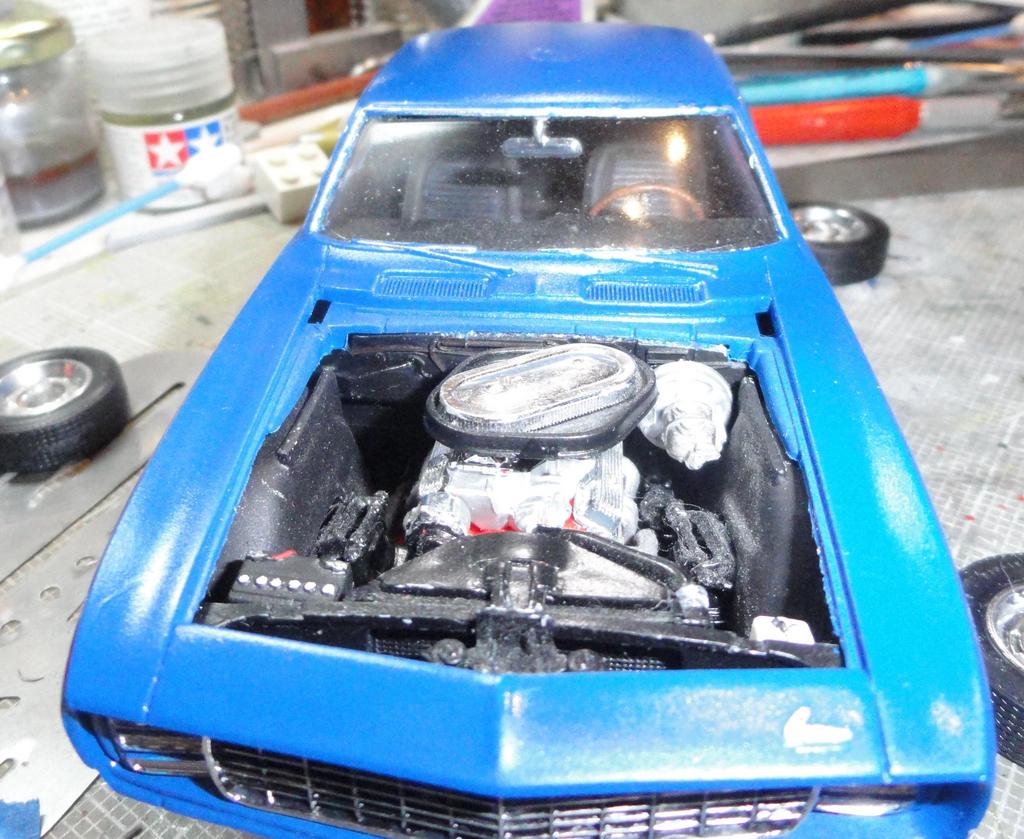
Well, it was a happy accident, the three airplanes in front of it were all in paint or glue drying delays. So I pulled the car out of the bottom drawer and did a little work. Micro-photography isn't my friend, but that front face of the cabin shell looks pretty good, considering that it was Vallejo black brushed on not more than 10 minutes before I took the picture. 
md72
#439
Joined: November 05, 2005
KitMaker: 4,950 posts
Auto Modeler: 555 posts
Posted: Thursday, February 14, 2019 - 08:43 AM UTC
And the accidental progress is undone, by accident.  I got the Firewall installed and then tried to place the Chassis into the body shell. the front and both sides of the body have to be streched out quite a bit to let the chaissis pass. In reaching for leverage, I popped the rear window out. So no I've removed the firewall, un attached the cabin (only glued at one point) and re glued the window.
I think an all of my previous test fits, I was able to slide the front of the chaiisis into the freont of the body with no problem. I think that option disappeared when I glued the cabin in.
I got the Firewall installed and then tried to place the Chassis into the body shell. the front and both sides of the body have to be streched out quite a bit to let the chaissis pass. In reaching for leverage, I popped the rear window out. So no I've removed the firewall, un attached the cabin (only glued at one point) and re glued the window. I think an all of my previous test fits, I was able to slide the front of the chaiisis into the freont of the body with no problem. I think that option disappeared when I glued the cabin in.
AussieReg
#007
Joined: June 09, 2009
KitMaker: 8,156 posts
Auto Modeler: 2,953 posts
Posted: Thursday, February 14, 2019 - 09:32 AM UTC
Quoted Text
And the accidental progress is undone, by accident.
Mark, I'm sorry to hear that mate. I hope it all comes together more easily second time around. This is the story of our art though isn't it. Three steps forward, two steps back, a sideways leap, sit and have a beverage (hot or cold), then back marching forward again.
Looking forward to the next instalment.
Cheers, D
Szmann
Joined: September 02, 2014
KitMaker: 1,977 posts
Auto Modeler: 1,371 posts
Posted: Thursday, February 14, 2019 - 11:00 AM UTC
Quoted Text
Quoted TextAnd the accidental progress is undone, by accident.
Mark, I'm sorry to hear that mate. I hope it all comes together more easily second time around. This is the story of our art though isn't it. Three steps forward, two steps back, a sideways leap, sit and have a beverage (hot or cold), then back marching forward again.
Looking forward to the next instalment.
Cheers, D
D., I couldn't have said it any better! Sorry, Mark, to hear it. The drink proposed by Damian it's on me, OK?
Cheers!
md72
#439
Joined: November 05, 2005
KitMaker: 4,950 posts
Auto Modeler: 555 posts
Posted: Thursday, February 14, 2019 - 06:30 PM UTC
Yes, I'm gonna need that drink or 5 or 6. I think in the process of putting it all together, I broke off about 6 or 7 other pieces. But here's the result, a Comaro up on blocks.
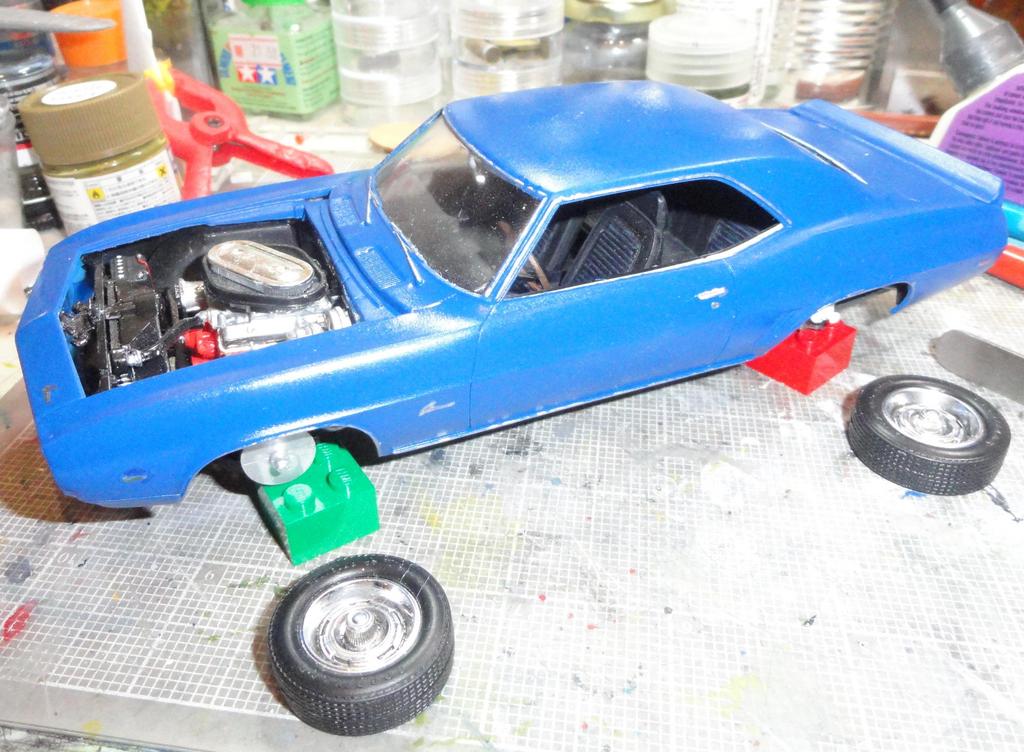
I think I've now completed 32 of 36 steps, could be the home stretch, oh but there are decals too.

I think I've now completed 32 of 36 steps, could be the home stretch, oh but there are decals too.
Removed by original poster on 03/02/19 - 07:09:52 (GMT).

accessdenied

Joined: December 07, 2016
KitMaker: 64 posts
Auto Modeler: 16 posts

Posted: Sunday, March 03, 2019 - 09:30 PM UTC
,just been dusting off some half-started/half-finished projects that I've had tucked away.
So thought I'd see if I can make some progress on my 25th scale Tracked Tractor .
I'll dispense with the blah blah blah and just throw some photo's here
.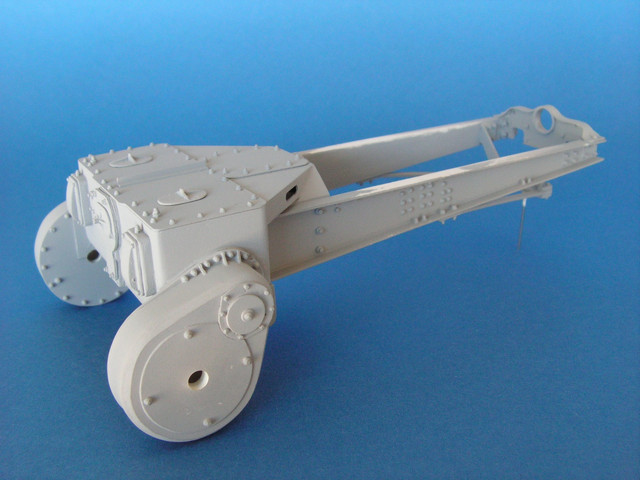
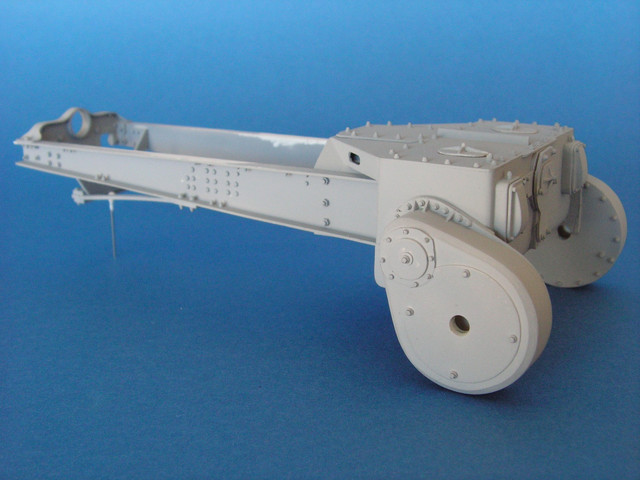
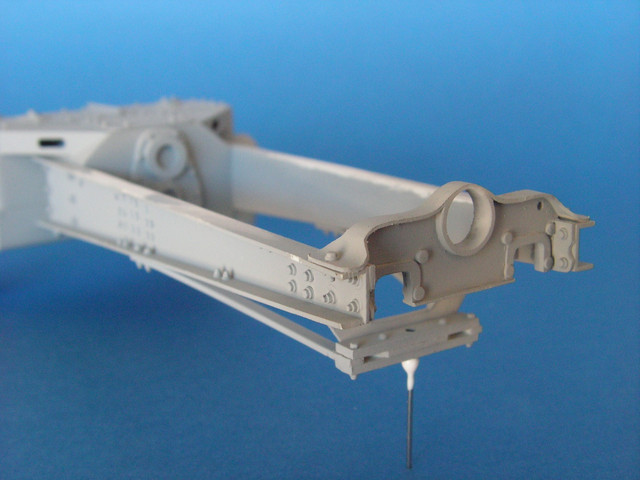
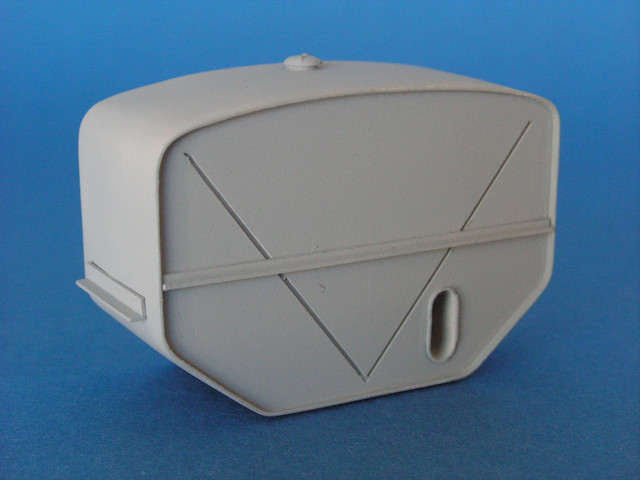
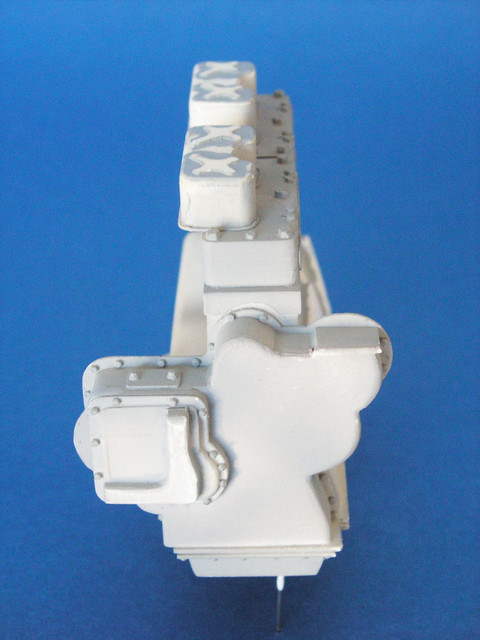
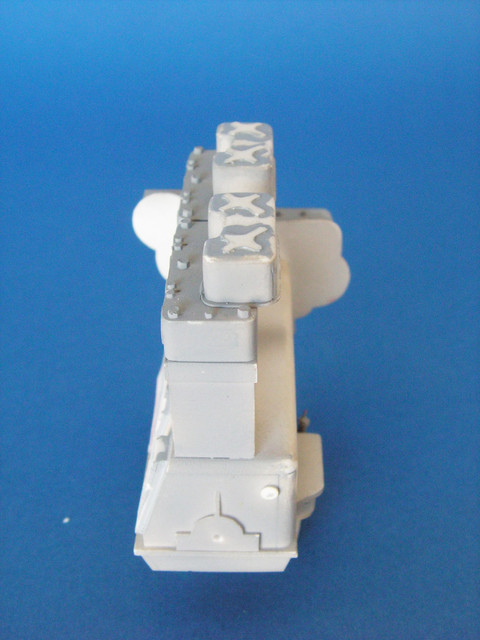
 time to continue with the engine build
Click on the photo if you want to see some really rough scratch building
AussieReg
#007
Joined: June 09, 2009
KitMaker: 8,156 posts
Auto Modeler: 2,953 posts
Posted: Tuesday, March 05, 2019 - 07:15 PM UTC
Some tight and neat work there Roger, great detail and a very unique subject. Im looking forward to further updates.
Any images of the real thing you could share? Im scratching my head a bit at this one.
Cheers, D
Any images of the real thing you could share? Im scratching my head a bit at this one.
Cheers, D
ChurchSTSV
Joined: September 20, 2017
KitMaker: 350 posts
Auto Modeler: 64 posts
Posted: Monday, March 11, 2019 - 03:53 AM UTC
Sorry about e lack of updates lately. I had a surprise relative show up and sleep in my office/model room over the weekend.
Hopefully, get some updates going this week!!
Hopefully, get some updates going this week!!
accessdenied
Joined: December 07, 2016
KitMaker: 64 posts
Auto Modeler: 16 posts
Posted: Monday, March 11, 2019 - 08:06 PM UTC
Quoted Text
Any images of the real thing you could share? Im scratching my head a bit at this one.
Cheers, D
Most folk associate this tractor as a piece of Soviet military hardware, although it's initial purpose was for work on the collective farms - Tractor S-65 Stalinets, трактор С-65 СТАЛИНЕЦ.Haven't gotten around to posting any 1:1 photos yet, it's on my to-do-list
.AussieReg
#007
Joined: June 09, 2009
KitMaker: 8,156 posts
Auto Modeler: 2,953 posts
Posted: Monday, March 11, 2019 - 08:59 PM UTC
Ok, I know the one. Trumpeter released it in 1/35 I think. Very interesting machine!
ChurchSTSV
Joined: September 20, 2017
KitMaker: 350 posts
Auto Modeler: 64 posts
Posted: Wednesday, March 27, 2019 - 03:02 AM UTC
I got some work done!!
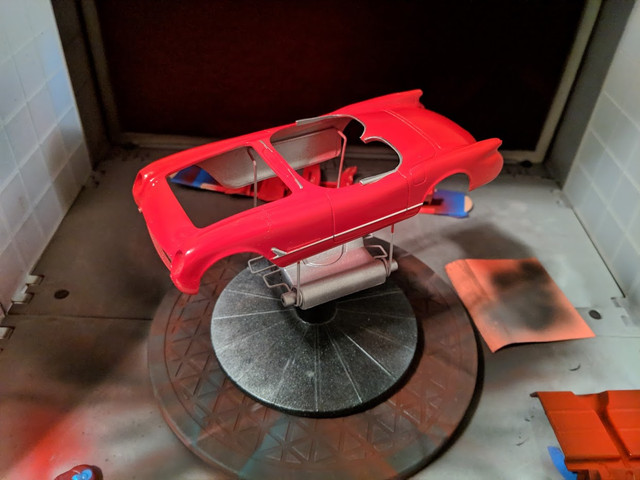
The great tape-off
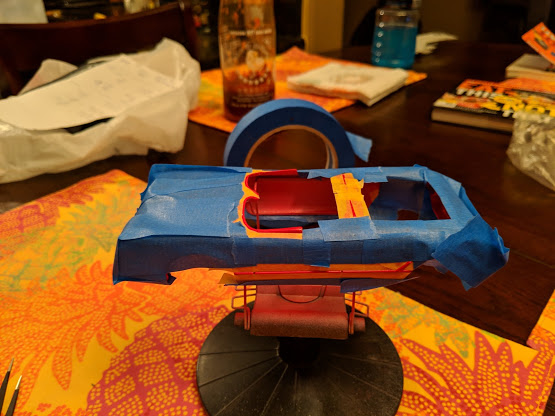
My first attempt at body trim ever.
host image for free
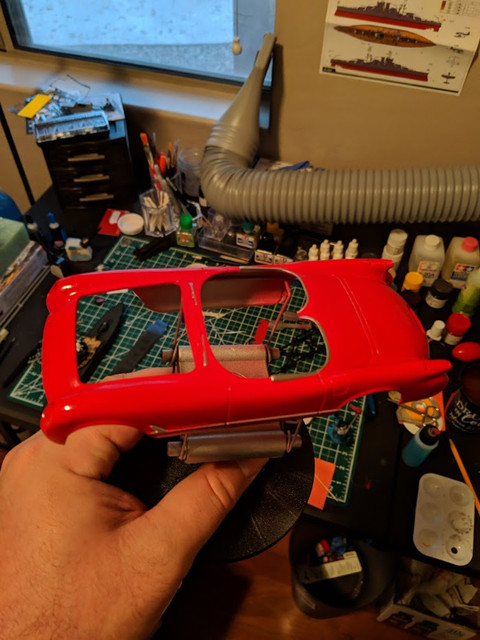
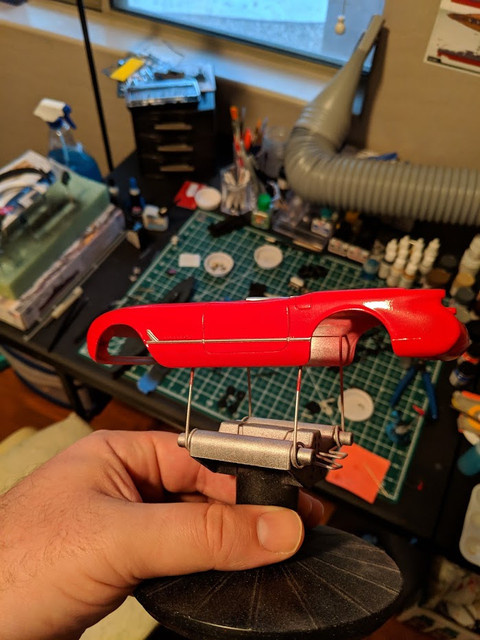
Some cleanup to do but overall I am very proud of myself. Comments please!! I need criticism!
The great tape-off
My first attempt at body trim ever.
host image for free
Some cleanup to do but overall I am very proud of myself. Comments please!! I need criticism!
AussieReg
#007
Joined: June 09, 2009
KitMaker: 8,156 posts
Auto Modeler: 2,953 posts
Posted: Thursday, March 28, 2019 - 07:22 PM UTC
Looks like a neat masking job Charlie, what paint did you use for the chrome trim? Nice gloss on the red body work as well.
Great to see the Corvette back on the bench.
Cheers, D
Great to see the Corvette back on the bench.
Cheers, D
 |

WEB HOSTING BY


Copyright ©2021 Auto Modeler and Kitmaker Network, a subsidiary of Silver Star Enterprises
All Rights Reserved. Please read our Conditions of Use and Privacy Policy.
All Rights Reserved. Please read our Conditions of Use and Privacy Policy.