_GOTOBOTTOM
Cars: Formula1
For Formula 1 racing modelers.
Tamiya 1/20 scale Lotus 25 Coventry Climax
Joel_W
Staff MemberAssociate Editor
AUTOMODELER
_VISITCOMMUNITY
New York, United States
Joined: December 04, 2010
KitMaker: 11,666 posts
Auto Modeler: 2,974 posts
Posted: Thursday, July 25, 2019 - 09:32 AM UTC
As I mentioned in my final update on the Porsche 935 K2 build, my next build will be the out of production Tamiya 1/20 Lotus 25 Coventry Climax F1 car.

Tamiya orignally released this kit back in 1998, and for some reason has never re-issued it, even though it's still a much sort after kit. Beleive me I know, as I spent several months checking ebay a few times per week for a new posted kit. And for a change I actually found one, an opened box but sealed sprues and decals from right here on the East coast of the good old USA.


This build actually is about to some degree, not, 1, not 2, but 3 F1 icons: Colin Chapman,the designer of the Lotus cars, Jim Clark one of the greatest all time drivers, and the car itself.

All the existing Formula 1 Grand Prix car designs up to the early 1960's time frame were built around some form of a tube chassis, which then every part of the car was bolted to, and then covered with a open wheel cigar shaped fiberglass body shell.

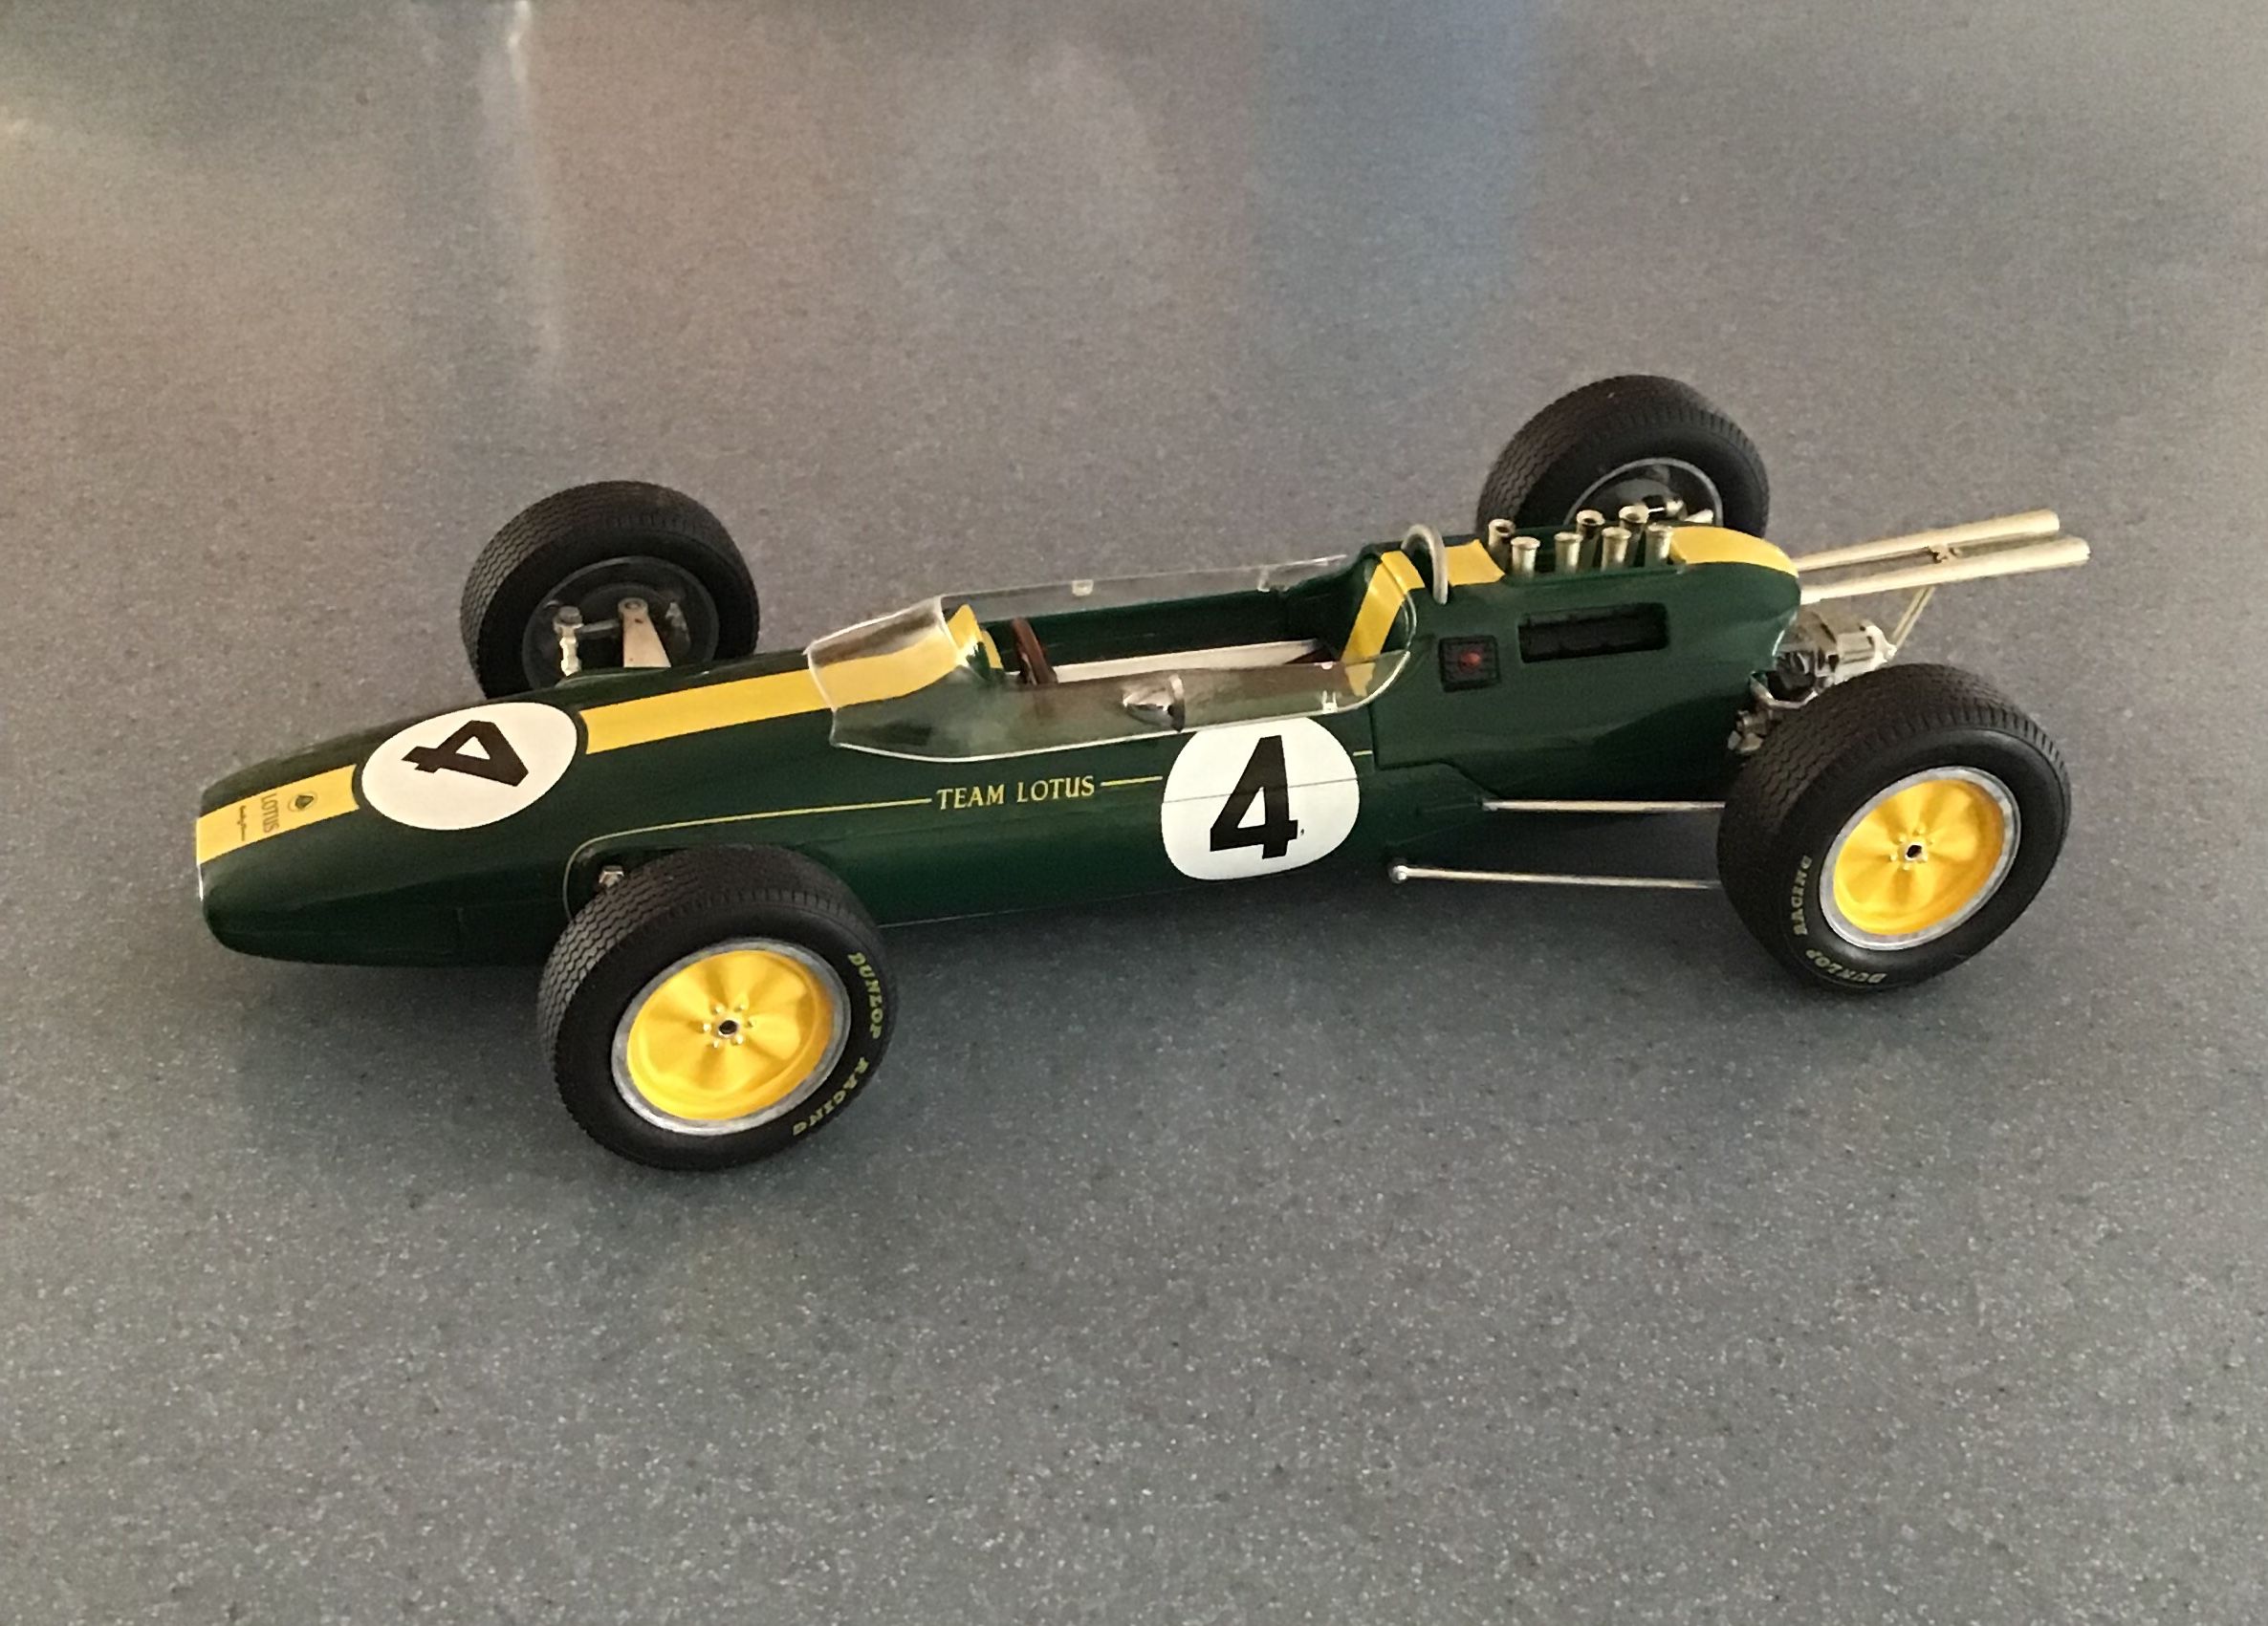
For the 1092 season, the governing body decreased the engine displacement to just 1.5 liters. Colin Chapman's 1962 Lotus 25 was designed around a 1.5 Liter Coventry Climax normally aspirated engine, and the car was a brand new design: A monocoque. The engine became the stressed member that supported the rear suspension and drive train. The whole assembly was then bolted to the the rear cockpit bulkhead. The front cockpit bulkhead supported the front suspension. There was no tube chassis what so ever. The resulting car was almost half the weight of a typical F1 car of the period, while being stiffer then a typical tube chassis. The result was a car that could out brake, out accelerate, and just plain out handle any other F1 car for the 1962 season.

The car was so successful that Jim Clark, his driver, won the 1st time out at Spa in 1962, and almost won the Championship as well. The following season Clark in the Lotus 25 won 7 Grand Prix on his way to winning the 1963 F1 World Championship, as well as Lotus winning the F1 Constructor's Championship.

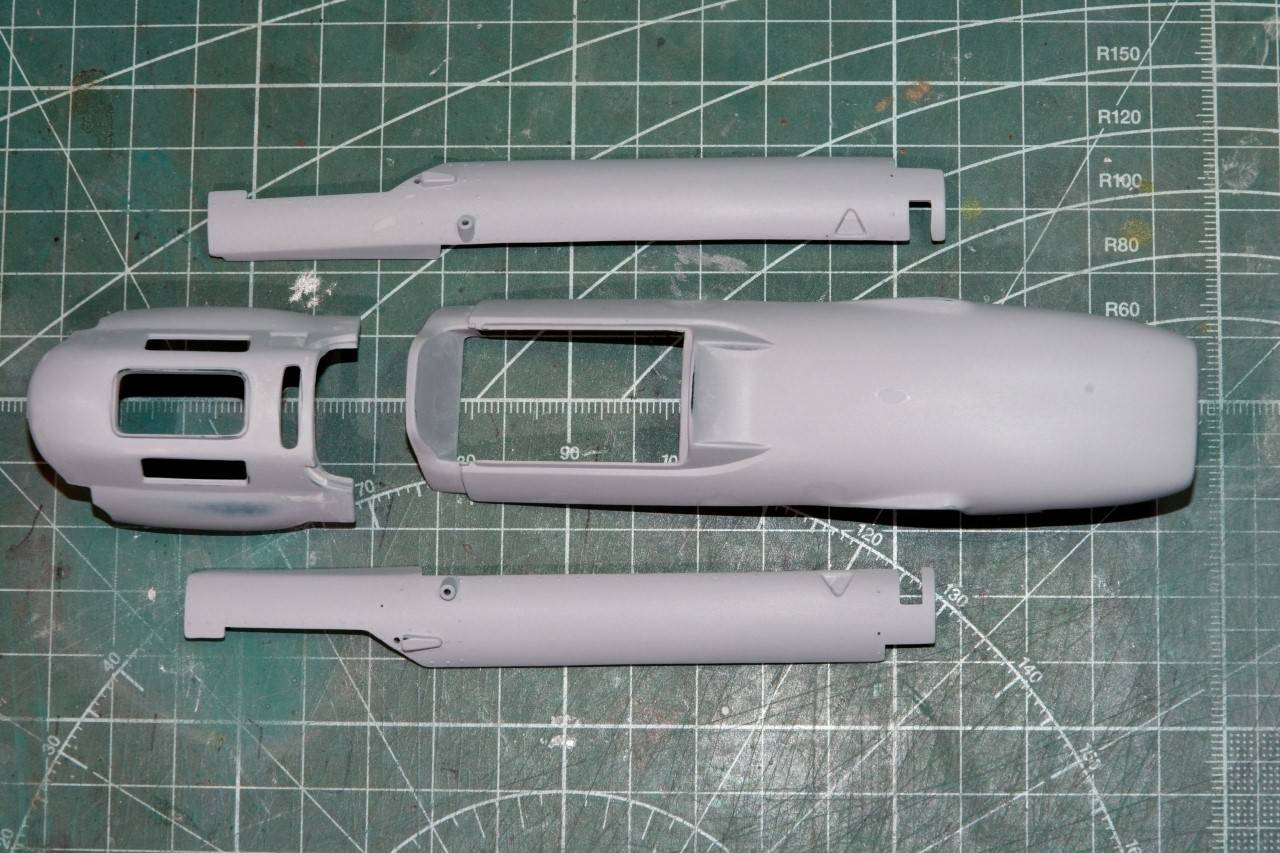
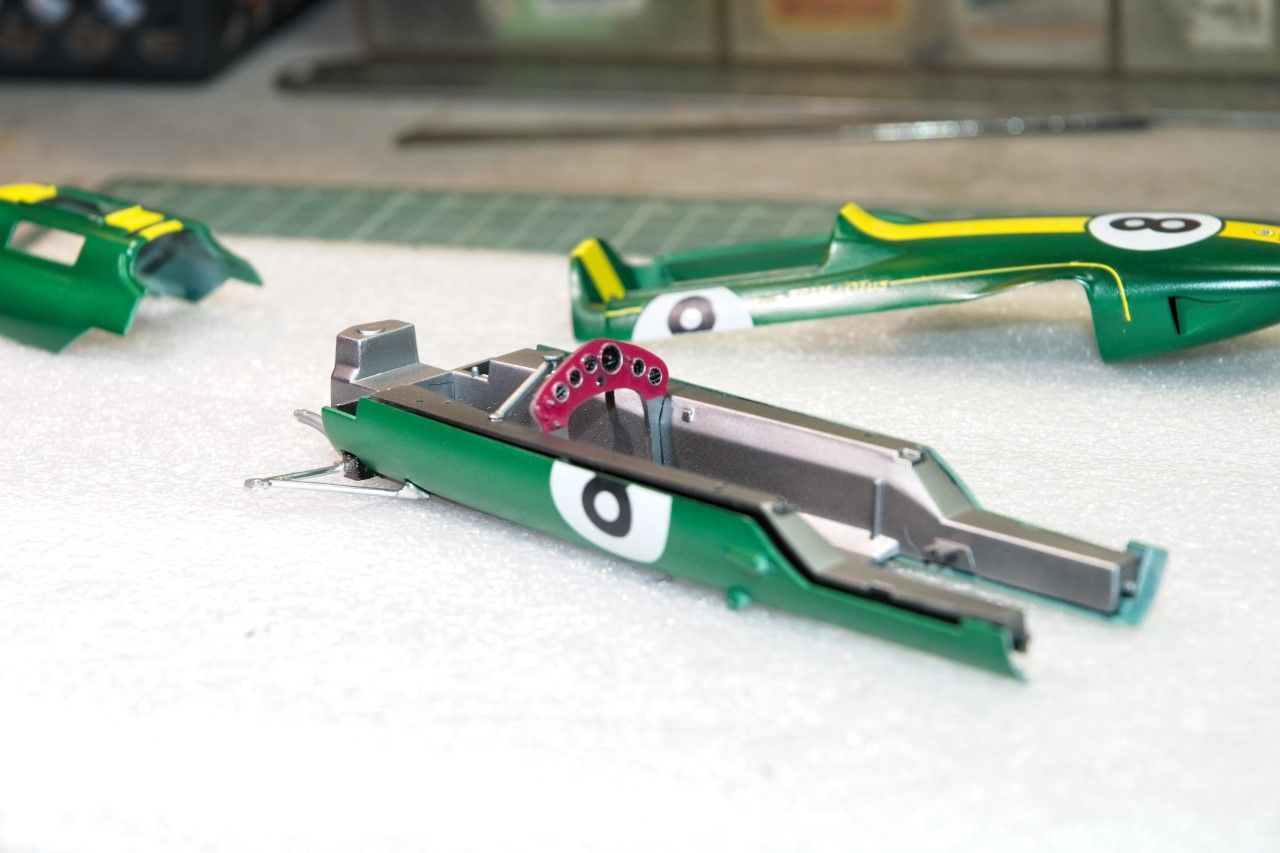
The tub is basically the floor pan with the lower end of the front suspension. What's unique about it is that the front lower arms slot into a opening in the side of the shell, while the back of the arm glues directly to the same body panel. That should really create a strong bond rather then the usual pinning of the suspension arms.


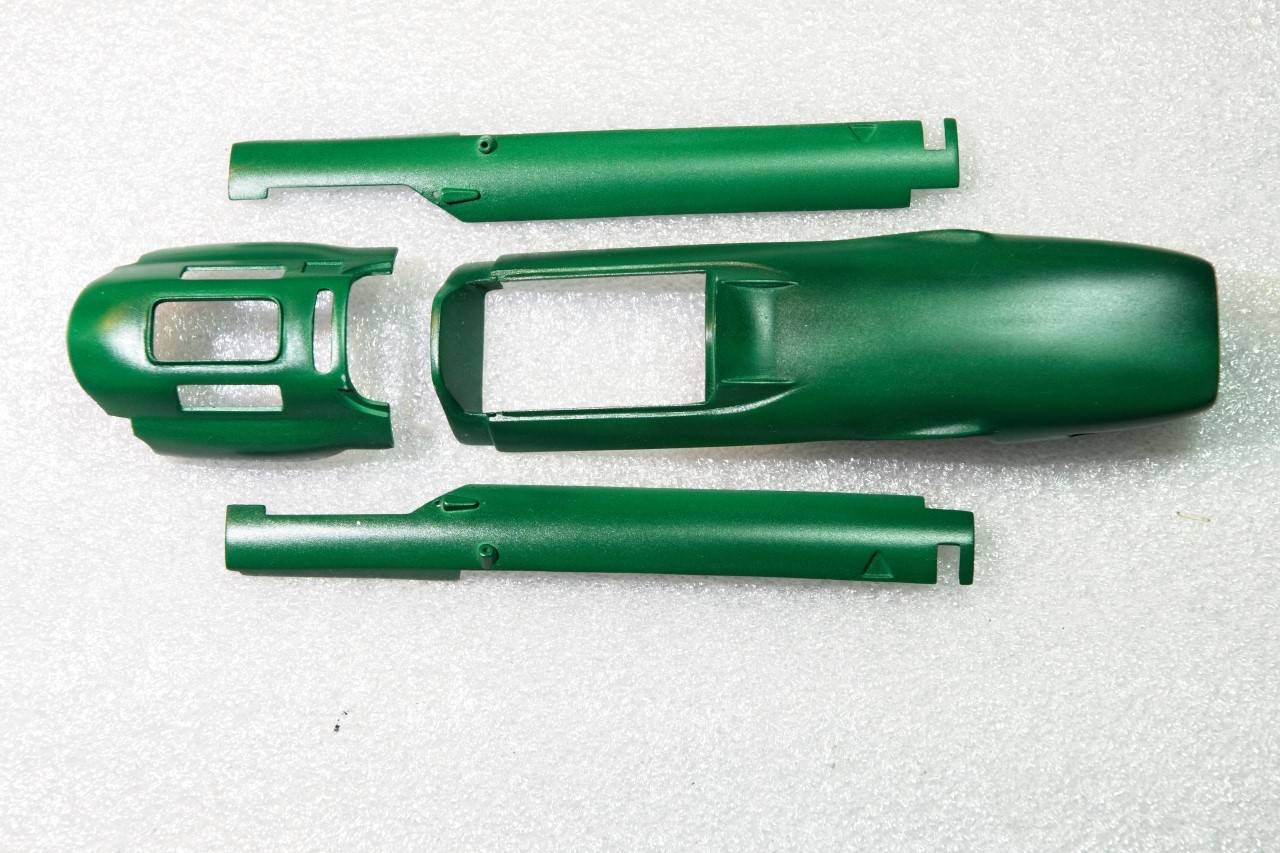
The pan had rather large swirl marks, so I sanded and polished it, then masked it out for a basecoat of Mr. Hobby 1500 Black Primer.


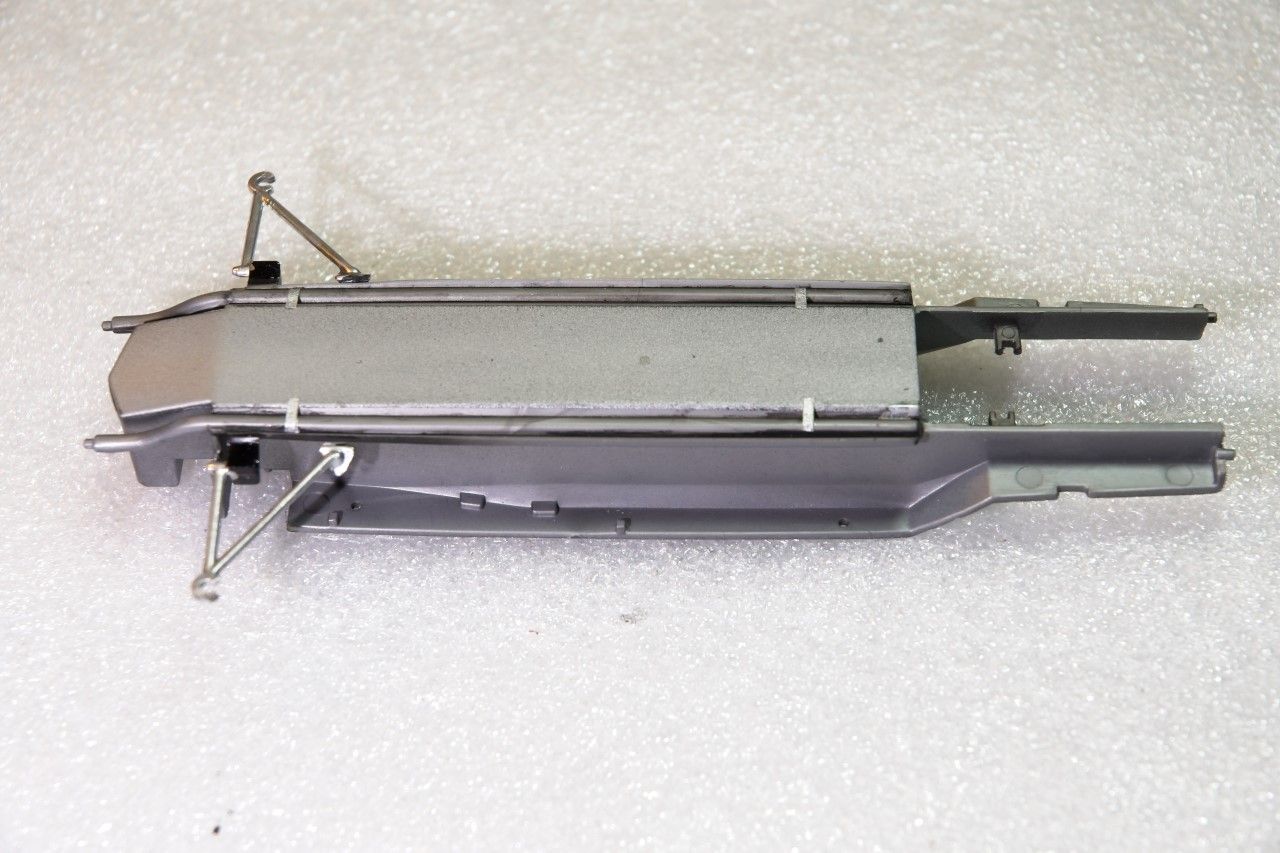
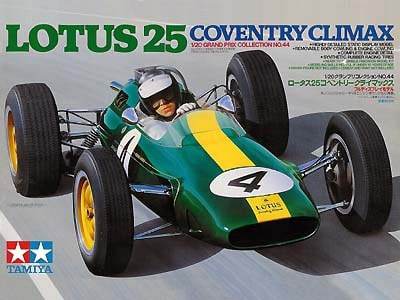
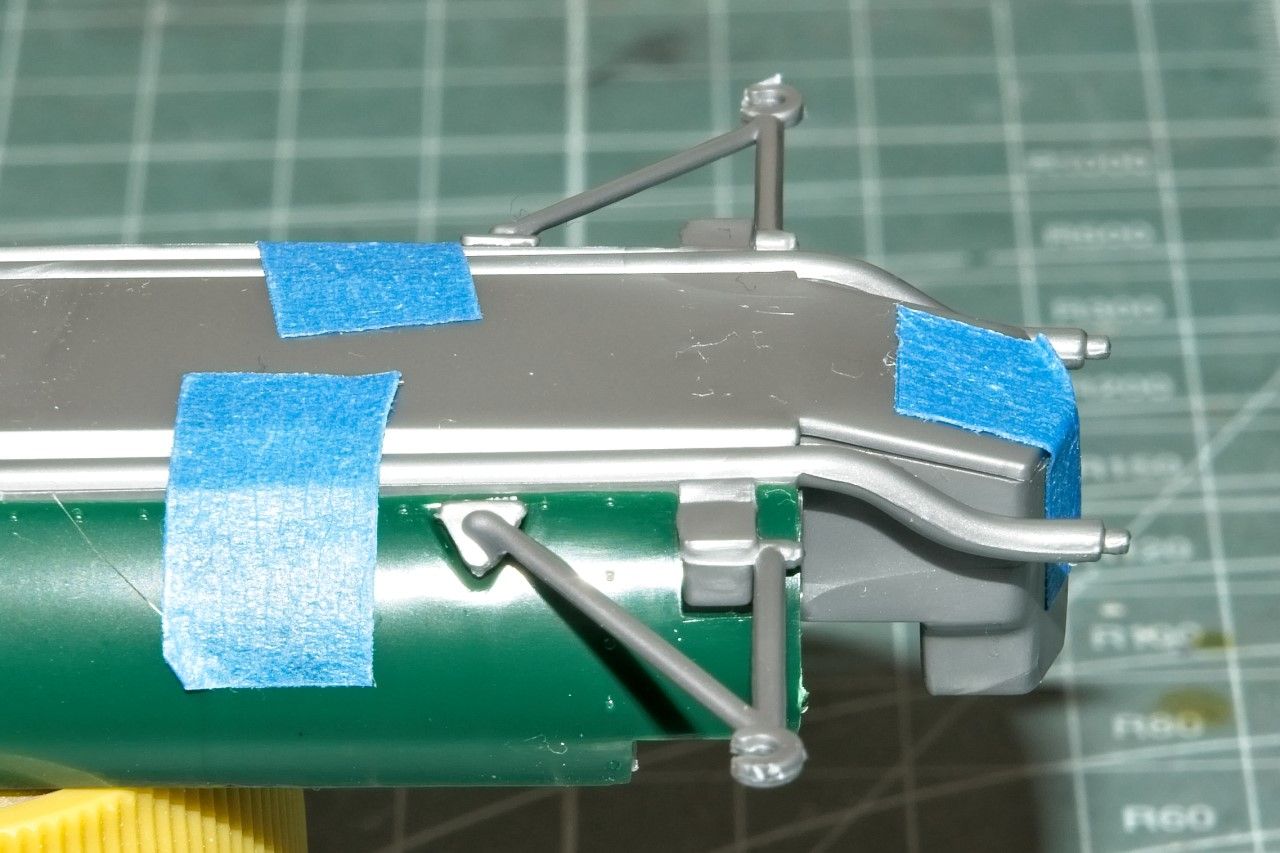
I opted not to go with a gloss Black undercoat as I wanted the Aluminum pan to have a more oxidized look to it. So I air brushed on Alcad II Aluminum ALC 101. Then I painted the suspension arms Tamiya X-11 Chrome Silver over a base coat of Tamiya X-1 Gloss Black. I let that dry for a full day, then lightly wet buffed the Alumimum pan with 6000,8000, and 12,000 just to smooth it out a tad. I followed that up with Tamiya Black Panel line wash on both sides of both radiator pipes. Then I sealed everything with Alcad II ALC 312Semi-Matt Kleer.

Looking at the pan I noticed that there are no brackets to hold those pipes in place. So they're actually just hanging from the radiator and the engine. Every bump, blimp of the engine, or what not must cause those pipes to move. That just didn't seem right to me. I looked and looked but couldn't find any pictures of the bottom of the pan, so I just made 4 simple brackets out of tape, then painted Aluminum. I basically got the two back brackets aligned, but somehow I just plain old screwed up the front ones. So I'll move one later tonight.


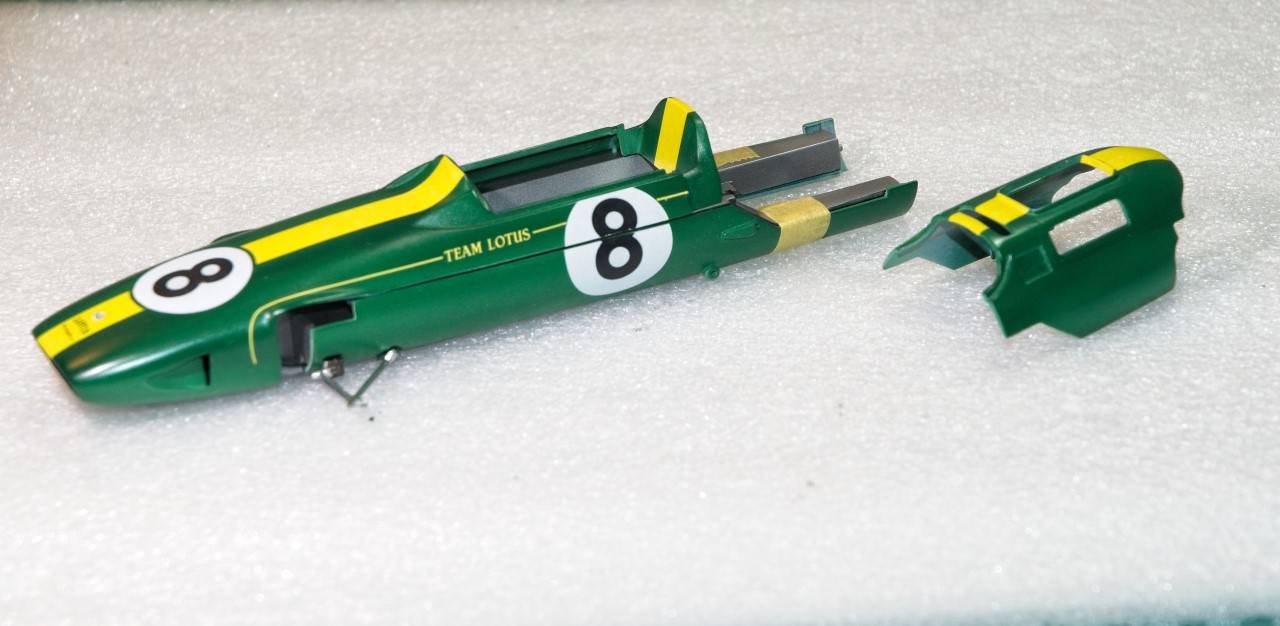
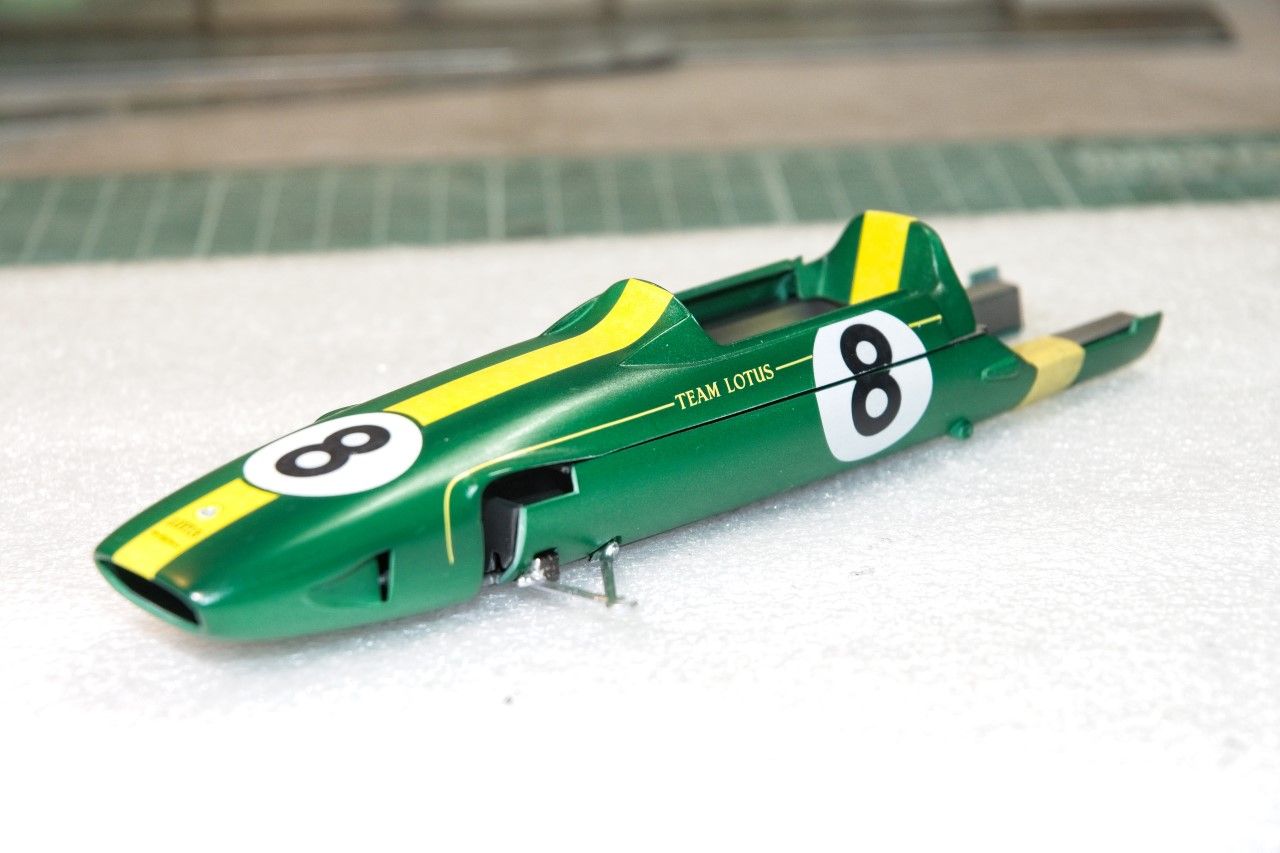
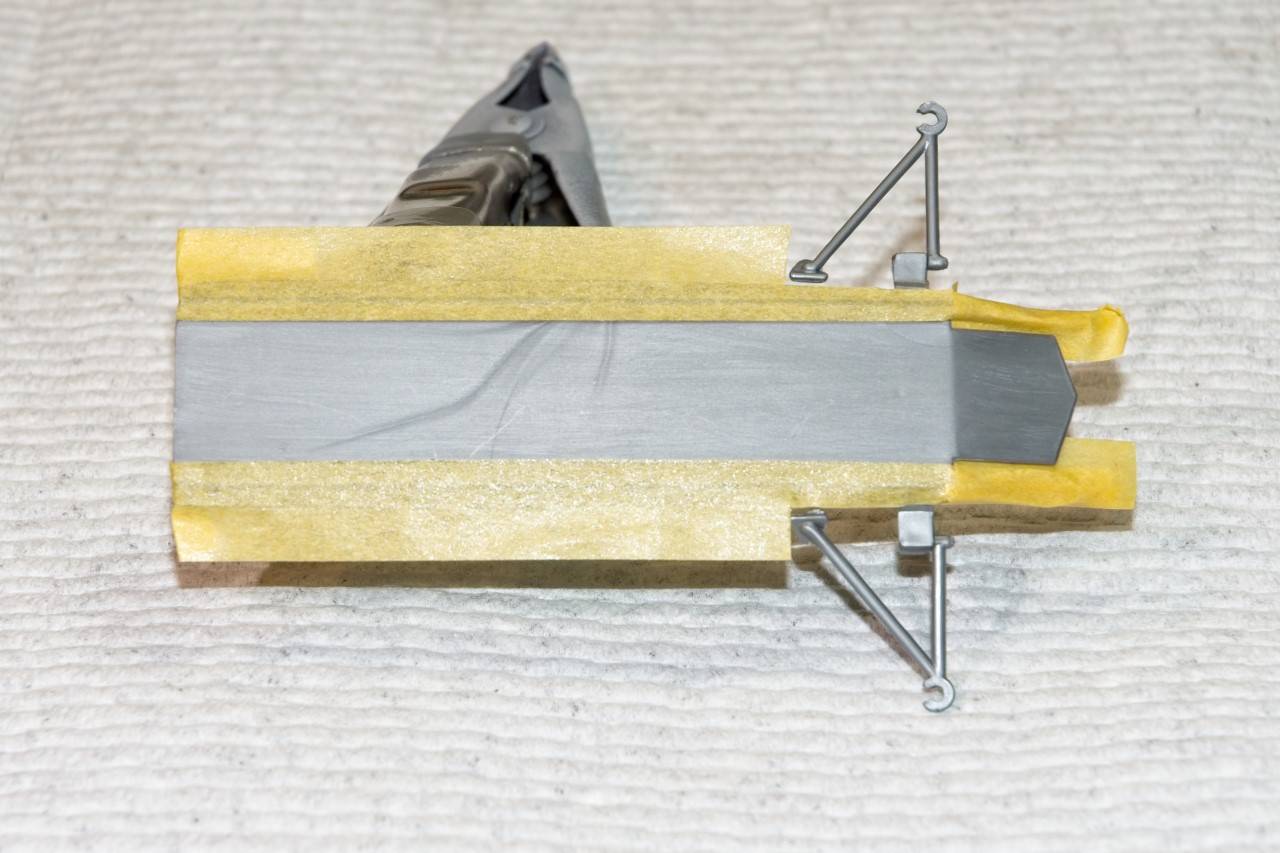
And finally I dry fitted the various body panels and engine cover just to see how good the fit is, and it's pretty good.


Thanks for stopping by and checking out my progress to date. As always, it's most appreciated.

Joel
RussellE
#306
_VISITCOMMUNITY
Victoria, Australia
Joined: June 27, 2010
KitMaker: 3,959 posts
Auto Modeler: 495 posts
Posted: Thursday, July 25, 2019 - 09:42 AM UTC
strapped in and ready for the ride Joel
Joel_W
Staff MemberAssociate Editor
AUTOMODELER
_VISITCOMMUNITY
New York, United States
Joined: December 04, 2010
KitMaker: 11,666 posts
Auto Modeler: 2,974 posts
Posted: Thursday, July 25, 2019 - 09:48 AM UTC

Quoted Text

strapped in and ready for the ride Joel


Russell,
Thanks buddy for being the 1st to join me for the ride. should be a lot of fun.

Joel
AussieReg
Staff MemberAssociate Editor
AUTOMODELER
#007
_VISITCOMMUNITY
Victoria, Australia
Joined: June 09, 2009
KitMaker: 8,156 posts
Auto Modeler: 2,953 posts
Posted: Thursday, July 25, 2019 - 10:02 AM UTC
Moving along nicely on this one already Joel, great to see another open wheeler in the mix!

As always, I'm following with much interest.

Cheers, D
Joel_W
Staff MemberAssociate Editor
AUTOMODELER
_VISITCOMMUNITY
New York, United States
Joined: December 04, 2010
KitMaker: 11,666 posts
Auto Modeler: 2,974 posts
Posted: Friday, July 26, 2019 - 01:10 AM UTC
D,
I try to stick to my plan of one open wheeler, then one closed wheel car, which unfortunately I haven't always followed.

Haven't really done all that much, but the build really will be all about my usual enhanced basic OOB build. Just engine wiring, fuel injection lines, a few engine lines here and there, brake lines, and wiring the IP as the back is clearly visible.

My focus as usual is the best paint, decal, and finish I can do. My open wheel kit stash has more Lotuses then any other make. Gee, I wonder why.

Joel
Cosimodo
#335
_VISITCOMMUNITY
Auckland, New Zealand
Joined: September 03, 2013
KitMaker: 1,808 posts
Auto Modeler: 701 posts
Posted: Friday, July 26, 2019 - 11:12 AM UTC
Great start to this Joel. My next build will be a F1 car so always following for the tips.

cheers
Michael
Joel_W
Staff MemberAssociate Editor
AUTOMODELER
_VISITCOMMUNITY
New York, United States
Joined: December 04, 2010
KitMaker: 11,666 posts
Auto Modeler: 2,974 posts
Posted: Saturday, July 27, 2019 - 12:51 AM UTC
Michael,
Great to have you alone for the ride. Sure hope it won't get to bumpy as many of my builds seem to end up doing.

What F1 car/kit are you planning on doing? it's going to be great to actually have someone else building a race car here besides me. As it does get a little lonely at times.

Joel
rdt1953
_VISITCOMMUNITY
New Jersey, United States
Joined: February 06, 2015
KitMaker: 1,098 posts
Auto Modeler: 52 posts
Posted: Saturday, July 27, 2019 - 01:08 AM UTC
Hi Joel -

Glad to see you doing this kit . As you may recall from past discussions this is certainly my all time favorite race car and one of my favorite automobiles period. This car changed the way Formula cars were arranged and built to this day and likely forever.

Colin Chapman was a genious ( and we can't discount the significant contributions of his team members ) who recognized the importance of saving weight - all other things being equal , two cars with equal horsepower/weight ratios , the lighter car will impose less stress on all of it's components. If any one wants to see some very graphic proof of this concept , search Youtube for videos of Caterham Sevens at Nurburgring . ( Caterham is the current producer of Mr. Chapman's Lotus Seven )
In the hands of some very skilled people you can watch this simple and very old design eating modern Porsches and BMWs alive.

Colin Chapman ranks with the best - Kelly Johnson , Leroy Grumman , Jiro Horikoshi , Reginald Mitchell - the list goes on .

Here is a shot of my attempt at this kit done many years ago . This was an experiment at finishing bare plastic - just a brushed on coat of Future , decals , and another brush coat of Future . I am still pleased with the result but sadly missing one of it's Talbots and velocity tubes and a little worse for wear , the result
of sitting uncased on top of my dresser for years.


Modeling urge is still strong but I dare not start a new kit as it will call me away from the Commando build. Chassis, gearbox and cylinder head are now done and I have the bottom end all torn down where much to my dismay I discovered that the oil pump had developed an appetite for munching on bits of piston rings that found their way into the sump in the dark past.

As always, a pleasure to watch your builds my friend.

Cheers - Richard
Joel_W
Staff MemberAssociate Editor
AUTOMODELER
_VISITCOMMUNITY
New York, United States
Joined: December 04, 2010
KitMaker: 11,666 posts
Auto Modeler: 2,974 posts
Posted: Saturday, July 27, 2019 - 01:30 AM UTC
Richard,
It's great to hear from you, and I'm thrilled that you took the time to post in my Lotus 25 build. Your build really looks darn good to me, not even considering it age. the BRG paint and Tamiya Yellow Stripe decals looks nearly perfect in your picture.

As for the missing velocity stack, You are an exceptional model machinist from what I've seen, so it shouldn't be all that hard for you to duplicate another stack. As for the missing Talbot, I'll check my very small parts bin and see what I can come up with.

One issue that I can't seem to resolve as yet is the tire markings. You've painted your White, while I was thinking about leaving them as is. The reason is that I have several pictures of the car out on various tracks with Clark at the wheel. Some have the tire logos painted, and some don't.

Not all F1 drivers loved Chapman's light weight approach above all else. Jackie Ickx told Chapman that he couldn't push his Lotus to the limit as he just never felt safe in it, as it was literally falling apart from his lightweight short cuts. But he did manage to win that F1 race, then left the team.

Sure sounds that you've made excellent progress on the bike, and yet it still holds all sorts of issues. Can you purchase another oil pump or at worst parts to fix this one?

Joel
Hohenstaufen
_VISITCOMMUNITY
England - South East, United Kingdom
Joined: December 13, 2004
KitMaker: 2,192 posts
Auto Modeler: 29 posts
Posted: Saturday, July 27, 2019 - 03:28 AM UTC
Sorry to pitch in out of the blue and I know it's off topic, but being a fellow Commando owner (sufferer?) I had to put in my two penn'orth for Richard. If piston ring bits have gone through the pump, it's going to be scrap. Even if the gears aren't wrecked, the pump body will be scored so you will lose pressure. Only real option is new pump. I had one fitted when the bottom end was rebuilt on mine a few years ago. It cost about £200 for the whole pump then, not sure what it will be now. This was from Norvil (formerly Fair Spares) in Rugeley, Staffs. Other dealers may be available to you in the US, I think there's a Norvil branch out there? Despite having a nearly new pump, mine still wet sumps like anything BTW!
Joel_W
Staff MemberAssociate Editor
AUTOMODELER
_VISITCOMMUNITY
New York, United States
Joined: December 04, 2010
KitMaker: 11,666 posts
Auto Modeler: 2,974 posts
Posted: Saturday, July 27, 2019 - 03:44 AM UTC
Steve,
No problem. But Richard hasn't been stopping by all that often, sometimes months pass between his visits. You might want to send him a pm about the oil pump.
Joel
Stickframe
#362
_VISITCOMMUNITY
California, United States
Joined: December 01, 2013
KitMaker: 1,661 posts
Auto Modeler: 431 posts
Posted: Saturday, July 27, 2019 - 09:36 AM UTC
Hi Joel,

Wow! You don’t waste time! You’re having a strong model building year - another project looking good!

Cheers
Nick
Joel_W
Staff MemberAssociate Editor
AUTOMODELER
_VISITCOMMUNITY
New York, United States
Joined: December 04, 2010
KitMaker: 11,666 posts
Auto Modeler: 2,974 posts
Posted: Sunday, July 28, 2019 - 01:03 AM UTC

Quoted Text

Hi Joel,

Wow! You don’t waste time! You’re having a strong model building year - another project looking good!

Cheers
Nick


Nick,
I've always started a new build within a few days (sometimes just hours) of completing a build. But that's just me. I've already done the basic and necessary research, bought needed paints, AM decals, Seatbelts (depends on the year of the car), and the rare AM parts, so I'm ready to go.

I retired more then 1 1/2 years ago, so I've also got a lot more free time. My Honey to do list never shrinks, and most major home projects like completing the re-finishing of the basement is a winter project for me. So like I said, I've got more free time then ever before.

With that being said, my other hobby has always been Photography,and a member in the local PFLI chapter. But I only actively go out on a shoot once per week most of the time, and rarely once the cold weather arrives since I'm mostly a Nature and Bird Photographer, plus I truly hate the cold weather.

I was never much good at the needed hand/eye coordination for 1st person gaming, although I really like gaming, so I keep on trying. Now I'm looking at the Civilization series as it's a turn based game that's gotten fantastic reviews over the years.

I did give on & off line auto racing some serious thought, but good equipment starts around the $600 mark, and doesn't last forever, plus I'm not so sure I'd even be just ok at it.


Joel


Cosimodo
#335
_VISITCOMMUNITY
Auckland, New Zealand
Joined: September 03, 2013
KitMaker: 1,808 posts
Auto Modeler: 701 posts
Posted: Monday, July 29, 2019 - 07:35 PM UTC

Quoted Text

Michael,
Great to have you alone for the ride. Sure hope it won't get to bumpy as many of my builds seem to end up doing.

What F1 car/kit are you planning on doing? it's going to be great to actually have someone else building a race car here besides me. As it does get a little lonely at times.

Joel


Hi Joel, I have in mind something with a New Zealand connection. I am keen to build some cars that the Kiwi drivers used in the 60's and 70's. The first one up will be something for Denny.

cheers
Michael
Joel_W
Staff MemberAssociate Editor
AUTOMODELER
_VISITCOMMUNITY
New York, United States
Joined: December 04, 2010
KitMaker: 11,666 posts
Auto Modeler: 2,974 posts
Posted: Tuesday, July 30, 2019 - 06:11 AM UTC
Michael,
Great decision on going with a Kiwi driver. Now Denny was one of my favorites as he was the equal to Bruce in the Bruce & Denny show. They did alternate who would win the Can Am as they were that dominant.

Denny drove F1 cars for Brabham going way back to 1964 or so, and for McLaren through 1974ish.

Not sure how many of the Brabham F1 cars were actually kitted, but there's several McLaren cars that you can choose from including the M23 in two scales. Care to give me a hint?

Joel
Cosimodo
#335
_VISITCOMMUNITY
Auckland, New Zealand
Joined: September 03, 2013
KitMaker: 1,808 posts
Auto Modeler: 701 posts
Posted: Tuesday, July 30, 2019 - 12:31 PM UTC
It will be his last year in F1, 1974, a Texaco McLaren.

cheers
Michael
Joel_W
Staff MemberAssociate Editor
AUTOMODELER
_VISITCOMMUNITY
New York, United States
Joined: December 04, 2010
KitMaker: 11,666 posts
Auto Modeler: 2,974 posts
Posted: Tuesday, July 30, 2019 - 11:50 PM UTC

Quoted Text

It will be his last year in F1, 1974, a Texaco McLaren.

cheers
Michael


Michael,
Great choice. What scale as Tamiya made it in both 1/20 & 1/12 scale?

Joel
Joel_W
Staff MemberAssociate Editor
AUTOMODELER
_VISITCOMMUNITY
New York, United States
Joined: December 04, 2010
KitMaker: 11,666 posts
Auto Modeler: 2,974 posts
Posted: Friday, August 02, 2019 - 04:15 AM UTC
or a fully retired guy I sure didn't get much done on the Lotus 25 this week. Unfortunately, family issues had been taking much of our time of late, and this past week has seen the same. But I did manage some quality time at the bench.

With the bottom chassis pan painted a dull Aluminum, I wanted to paint the interior tub a brighter shade of Aluminum. So I 1st primed it with Tamiya X-1 Gloss black thinned with Mr. Color's #400 leveling thinner 2:3. I gave that a full day to dry, then without any buffing needed I air brushed on Alcad #119 Airframe Aluminum. The shade is much shinier then #101 Aluminum, but no where near the shine from their Chrome, so that there would be a big difference between the Aluminum shades, and the polished steel of the front suspension.


Next up my attention turned to the Instrument panel & bulkhead. I primed the bulkhead with Tamiya Semi Gloss Black, then air brushed on Alcad #119 Aluminum. That gave the finish a slightly different look as it's cut from much thicker aluminum stock. I needed to mask the painted portion for the IP but Alcad doesn't recommend masking any of the really shiny shades, so i detacked a piece of Tamiya tape till it barely stuck to anything and hoped it wouldn't pull any of the Alcad up.

The Red on the IP literally looks different in just about every picture I have both pre & post restorations. Of course who knows what film was used for each picture, how it was processed, and then how it was stored for the last 50 or so years. Tamiya recommends 3 parts Red to 1 part White which is really a pinkish color. But over the Black would have a darker hue, so I went with that route. The color really doesn't look Pinkish, but not that Red either. I very gently pulled the tape off even before I cleaned my AB. I gave the paint a hour to dry, then using Testors Silver from those little bottles and a #0/5 brush, I very carefully painted the bezels so they looked liked they were Chromed. Next day I used the Indy Cal instrument decals that I punched out of the decal sheet, then finally after a day to really dry, I used my life time supply of Pledge to replicate the clear lenses.


I had previously glued the bottom half of the nose to the top, then gave it several days to really cure as the Extra Thin has a nasty habit of creating a slight channel alone the glue joint. Which naturally it did. I filled it with Tamiya putty, then sanded to shape, and sealed with CCA glue. Once dry enough after about 15 min, I sanded the CCA and surrounding area on both sides from #400 Emerycloth to #800, then finished up with wet pieces of 1,200 & finally 3,000 Tamiya sponges. I also had taken care of any issues I had created when I cut off the parts from their respective trees with the same procedures.

Ok, time to prime. I do prefer a light Gray primer most of the time, but will use white for light, bright colors. I'm working down my supply of Mr. Hobby 1,500 Finisher Primer so I went with it. I thinned it 3 parts primer to 2 parts #400 leveling Thinner as it's really quite thin as is. I air brushed it on with my Grex AB with a #5 set up.


And now you're up to date.

Thanks to all for stopping by, it's always greatly appreciated.

Joel
Hwa-Rang
_VISITCOMMUNITY
Kobenhavn, Denmark
Joined: June 29, 2004
KitMaker: 6,760 posts
Auto Modeler: 2,182 posts
Posted: Tuesday, August 06, 2019 - 10:14 PM UTC
Looks great so far Joel. Nice sharp dash.

Got to get started on my own open wheeler
Joel_W
Staff MemberAssociate Editor
AUTOMODELER
_VISITCOMMUNITY
New York, United States
Joined: December 04, 2010
KitMaker: 11,666 posts
Auto Modeler: 2,974 posts
Posted: Wednesday, August 07, 2019 - 01:39 AM UTC
Jesper,
I'm looking forward to your build blog. I'd sure love to see a few other race car builds from any type/era of racing.

Joel
Joel_W
Staff MemberAssociate Editor
AUTOMODELER
_VISITCOMMUNITY
New York, United States
Joined: December 04, 2010
KitMaker: 11,666 posts
Auto Modeler: 2,974 posts
Posted: Thursday, August 08, 2019 - 08:38 AM UTC
Well, it's time for my weekly update give or take a few days. Once again, not enough quality time at the bench as life just keeps on interfering. But some time is way better then no time.

I reached the point of the build where I needed to prime, paint, decal, and gloss finish all four of the body panels, as the lower two side panels need to be installed prior to the completion of the both the front and rear suspensions. I've already primed the panels so the next step was the color coats.


I'm once again opting for Gravity's pre-thinned lacquer paints: color GC-113 Lotus British Racing Green. Air Brushed @ a flow rate of 16 psi. I always apply one really light tack coat, then just add light, even coats till I get a consistant color coat. For some strange reason the coat looked grainier then usual which took me by surprise. I gave the color coat 24 hrs to dry and cure, then instead of my usual wet rub with #3,000 sponge, I opted to go with #8,000 as I've had a nasty tendency of rubbing through some of the high spots. The use of #8,000 cured that issue, but the finish turned out not as smooth as I'm use to. Still it was more then smooth enough for decaling without a base gloss coat.


I had decided to use Indy Cal's decals rather then the Tamiya decals, as the Tamiya's Yellow stripe was much to bright compared to some of my research pictures, while the Indy Cal decals had a much paler Yellow. The Tamiya decals are indidually printed so that it's easy to cut them off the sheet, or as a group like the front stripe, space, white number circle, space, & stripe. I really don't mind the extra work in preparing the decals as the Indy Cal sheet is just one big decal. The issue was that I just assumed that the same sequence applied to their decals. Unfortunately it didn't work out that way.

I started at the cockpit with the big Yellow stripe using my usual decal procedures. Then I decided that the next decal should be the Yellow stripe that ends at the nose. I came to this conclusion because I had no idea of how much space actually would be allocated for the number circle, which also has a small BRG separation ubove and below the White number circle. As it turned out the Yellow stripes didn't leave any separation and were infact to long so the number circle overlapped them!! Now I'm really screwed as even my wife could see this error.

I then noticed on the decal sheet that there was two small BRG decals that were as wide as the stripes and as long as the needed spaces!! Of course cutting them out was a real nightmare, but I managed to get both done without cutting the decals to pieces. Then came the problem of trying to apply them as I'm not the most danty of guys. Some how I managed to get them applied, and to my utter amazement, they looked perfect!! Ok, enough patting myself on my back, now back to the engine cowl.


As You can see, the cowl has 3 separate sections that need to be decaled. No big deal as the decals laid down perfectly including those lips.

Next up I applied the upper halves of the side number circles on both sides, then came those L-O-N-G T-HI-N Yellow lines that wrap around the lip of the front suspension just to make it a little more interesting. Somehow I also managed to get both sides on, and then just as I thought I beat the Reaper, the curved section on the 2nd decal just disolved from the Walthers decal Solution I was using! I cut a piece of the Tamiya decal which is a little brighter yellow, and aligned it the best I could. Came out pretty good if you ask me.


The following day I finished up the decals starting with the 2 split 8's that were on the Lotus for the 1963 USGP. Hardest part was deciding where to cut them. I couldn't find a picture of the car, but I managed to get it close enough to fool one's eye.


Next up is removing both side panels and glossing all 4 body panels. Hopefully, it will have a good enough smooth and glossy finish.

Joel

Cosimodo
#335
_VISITCOMMUNITY
Auckland, New Zealand
Joined: September 03, 2013
KitMaker: 1,808 posts
Auto Modeler: 701 posts
Posted: Thursday, August 08, 2019 - 07:49 PM UTC
I know you think that you don't get much bench time but I wish I had the time you do!
Great job on the paint and maybe it's the lighting but i would have thought BRG was darker. I have that gravit colour so i would be interested in your impression.
The decaling, for something that did seem to go to plam it certainly appears to be pretty amazing. I'm impressed with the 8's and the striping. Together the little lotus looks very sharp.

cheers
Michael
Joel_W
Staff MemberAssociate Editor
AUTOMODELER
_VISITCOMMUNITY
New York, United States
Joined: December 04, 2010
KitMaker: 11,666 posts
Auto Modeler: 2,974 posts
Posted: Friday, August 09, 2019 - 12:48 AM UTC

Quoted Text

I know you think that you don't get much bench time but I wish I had the time you do!
Great job on the paint and maybe it's the lighting but i would have thought BRG was darker. I have that gravit colour so i would be interested in your impression.
The decaling, for something that did seem to go to plam it certainly appears to be pretty amazing. I'm impressed with the 8's and the striping. Together the little lotus looks very sharp.

cheers
Michael


Michael,
Easiest path to more bench time should be retirement and a moderated "Honey to do List", just hasn't been working out for me this spring and summer. But sooner or later I'll get caught up with the list, and we'll get my Wife's Mother's Medicaid issues resolved.

As far as the color for the Gravity BRG paint, it's straight out of their bottle untouched with. I've got 3 bottles, and to the eye, they all look the same. It's the same bottle that I painted the Brabham BT-18 with.

For a base coat I even used darker gray primer. The BT-18 had Mr. Hobby 1500 Light Gray primer, while the Lotus 25 had Tamiya Gray primer/Sealer which is a good few shades darker.

Most likely it's the intensity of the Photo lights. and how close I have them set to the model. I would assume that the overall color would slightly darken up after fully glossing it as the layer of Clear would deflect a tad amount of light. Well, that's my theory anyway.

The decaling certainly had it's lucky moments. Usually I'm on the wrong end of those for sure.

Joel
AussieReg
Staff MemberAssociate Editor
AUTOMODELER
#007
_VISITCOMMUNITY
Victoria, Australia
Joined: June 09, 2009
KitMaker: 8,156 posts
Auto Modeler: 2,953 posts
Posted: Monday, August 12, 2019 - 01:30 AM UTC
Very good progress report here Joel, the paint came up really well and you dealt with the complex decal set nicely. The join in the yellow pinstripe on the RHS is barely visible and should blend well under your clear coat finish.

Cheers, D
Joel_W
Staff MemberAssociate Editor
AUTOMODELER
_VISITCOMMUNITY
New York, United States
Joined: December 04, 2010
KitMaker: 11,666 posts
Auto Modeler: 2,974 posts
Posted: Monday, August 12, 2019 - 04:03 AM UTC

Quoted Text

Very good progress report here Joel, the paint came up really well and you dealt with the complex decal set nicely. The join in the yellow pinstripe on the RHS is barely visible and should blend well under your clear coat finish.

Cheers, D


D,
Thanks for the positive feedback, it's always most welcome.

Since I posted my last update, I've applied the clear Glosscoat, rubbed it out, polished it, and then waxed it. Looks much, much better, but doesn't have that mile deep shine do to the poor finish that I let slide for the color coat.

Joel
 _GOTOTOP