


Go to automodeler.com for the current dynamic site!
Hosted by Jim Starkweather
Tamiya 1/20 scale Lotus 25 Coventry Climax

RussellE

#306

Joined: June 27, 2010
KitMaker: 3,959 posts
Auto Modeler: 495 posts

Posted: Monday, August 12, 2019 - 11:11 AM UTC
Looking very good Joel


Joel_W

Joined: December 04, 2010
KitMaker: 11,666 posts
Auto Modeler: 2,974 posts

Posted: Tuesday, August 13, 2019 - 12:39 AM UTC
Quoted Text
Looking very good Joel
Russell,
Thanks for checking out my progress to date, it's always much appreciated.
Joel

RussellE
#306
Joined: June 27, 2010
KitMaker: 3,959 posts
Auto Modeler: 495 posts
Posted: Tuesday, August 13, 2019 - 09:16 AM UTC
Quoted Text
Quoted TextLooking very good Joel
Russell,
Thanks for checking out my progress to date, it's always much appreciated.
Joel
My pleasure Joel
I'm always here on Kitmaker, lurking around somewhere, even though I don't always have time to comment

Joel_W
Joined: December 04, 2010
KitMaker: 11,666 posts
Auto Modeler: 2,974 posts
Posted: Friday, August 16, 2019 - 07:01 AM UTC
Well, it's been another week and I've managed to get enough done for my weekly update, so lets get right to it.
While I wasn't thrilled with how the base color BRG came out, I had applied all the decals, then a clear gloss coat of Mr. Color C-46 Acrylic lacquer thinned 1:1 with Mr Hobby's Mr. Color #400 leveling Thinner. I applied light, even coats with my air brush @ a flow rate of 16 psi, then gave all the panels 3 full days to dry and cure. Next up was rubbing the gloss out with Alpha Emery Cloth sheets soaked in warm water: 6,000, 8,000, & 12,000. A quick wipe, and then air dried in my drying booth.
When dry I used Gravity's 3 part polishing system followed by their excellent GC-311 synthetic wax, then glued on the lower side body panels very carefully with Tamiya Extra Thin. By a pure stroke of luck I didn't get any on the body.
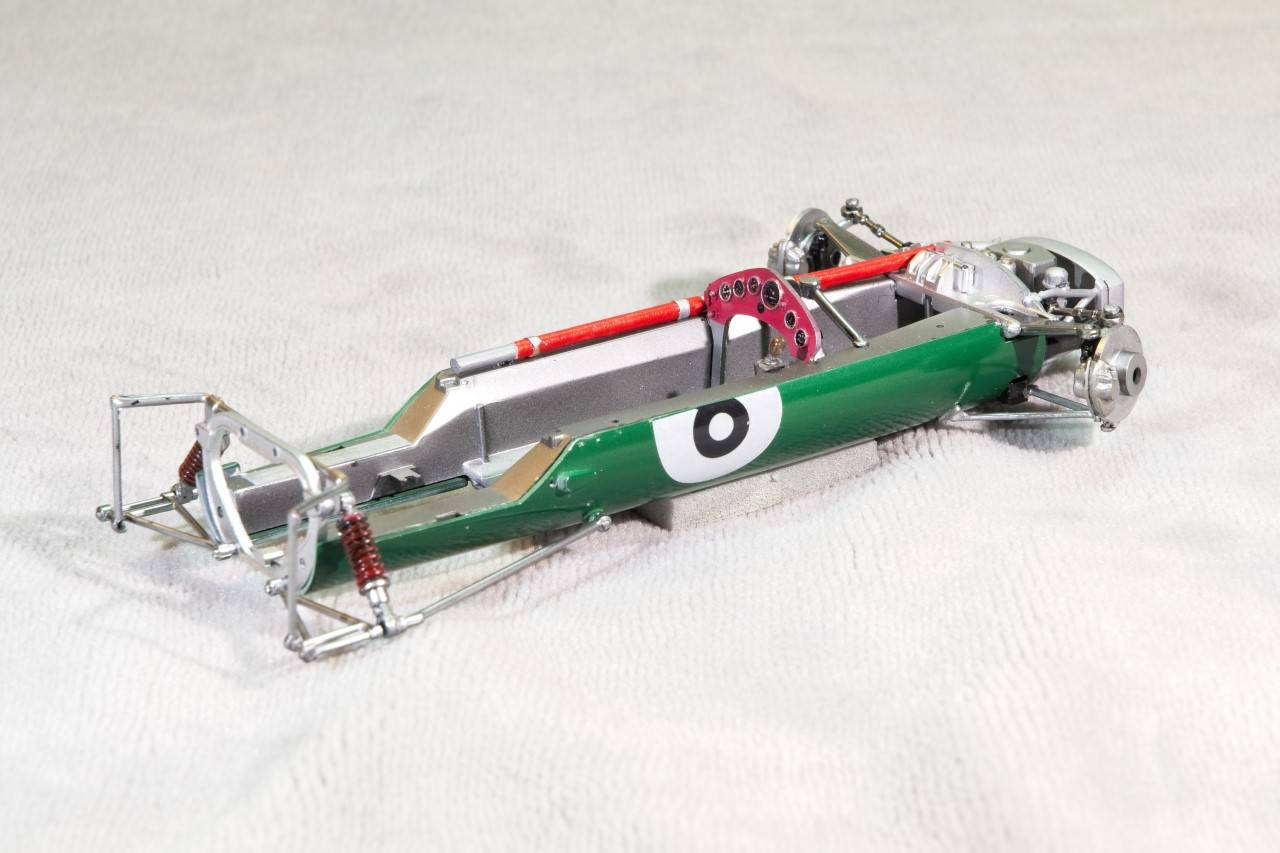
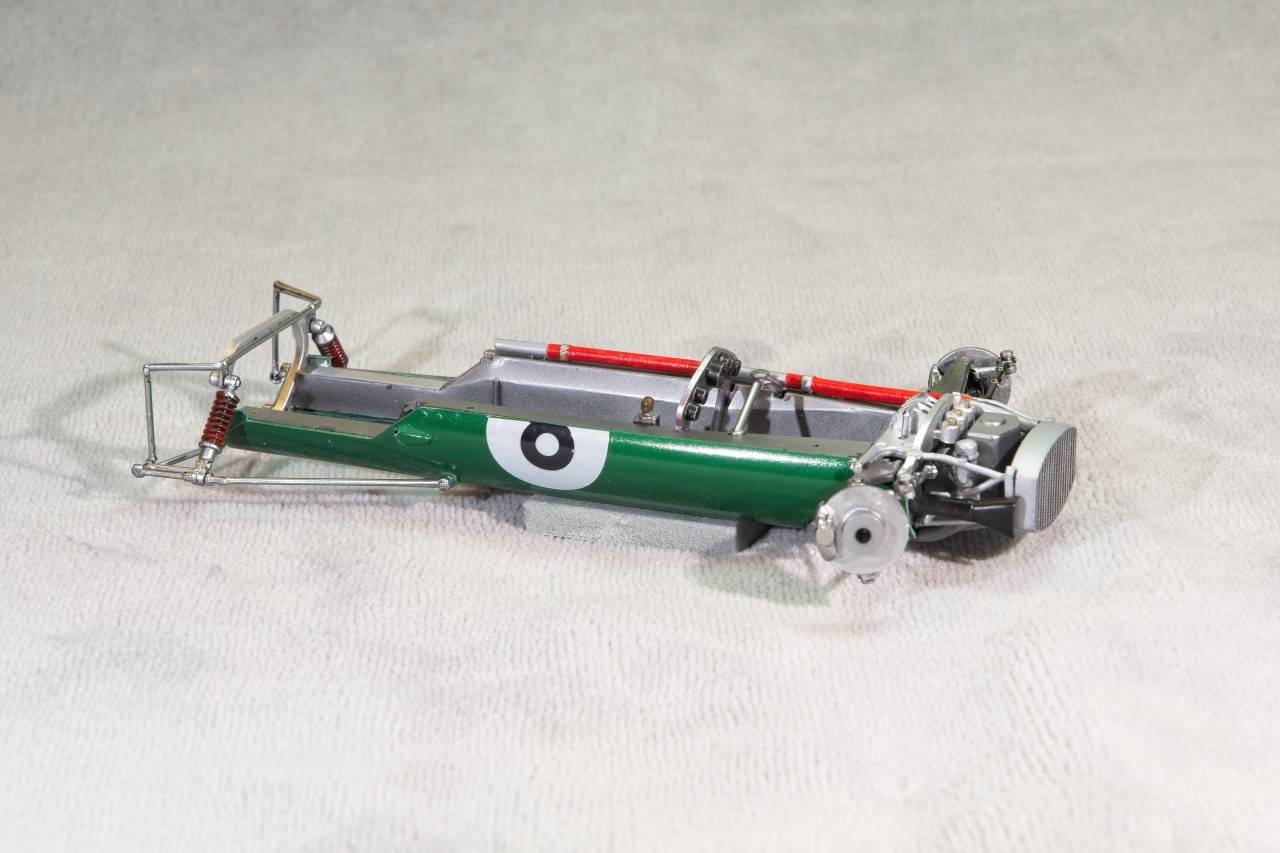
Next up I finished the front suspension, then the basics of the rear suspension with several different shades of Alcad 2 as well as Mr. Color's Metallics. The effect of the various shades really helps to make the suspension, brake & clutch reservoirs, as well as the radiator (which also received a black panel line wash)just pop. Finally, I detailed the upper water line that runs from the radiator through the cockpit to the engine. The pipe is wrapped in insulation, so I used a little modeling license creating it from layered masking tape, then made clamps out of another layer of masking tape. I painted the insulation Gloss Red, and the the clamps Aluminum. The last step was to paint up the outboard coil over shocks. Again, I used a little modeller's license as I painted the springs Gloss Red,the effect adds some much needed color to the rear suspension.
Finally I got to test fit the shell, and it does still fit without any needed pressure on my part.
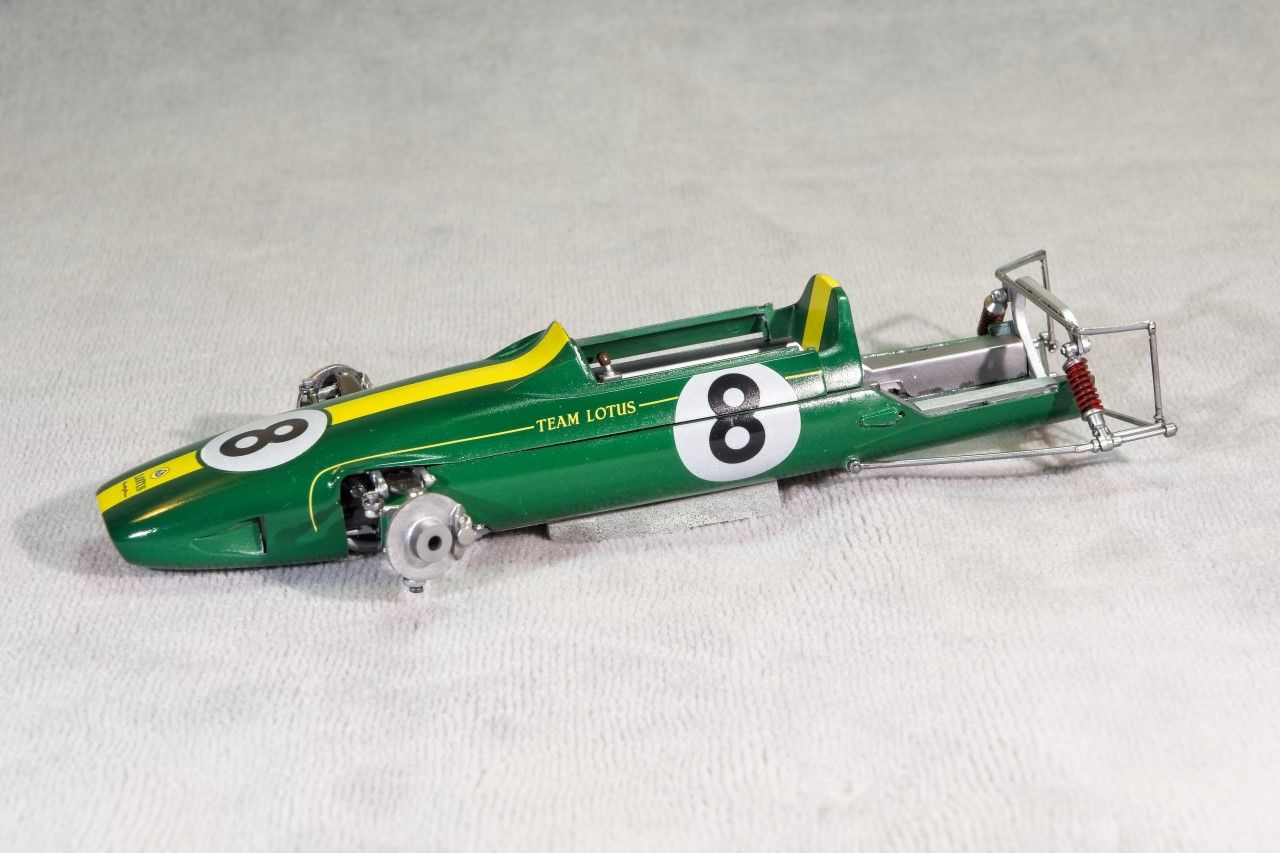
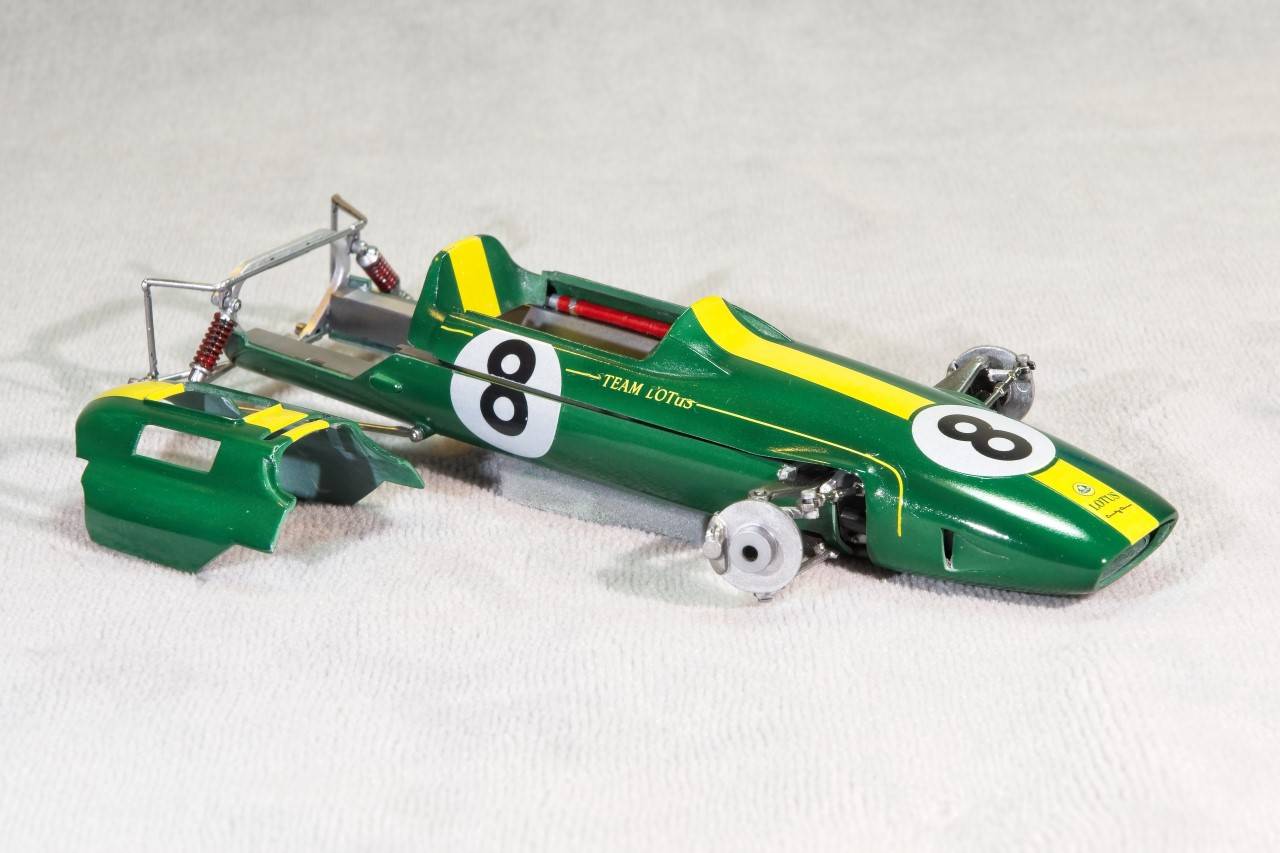
Then I pulled off the top of the shell for some better interior pictures.

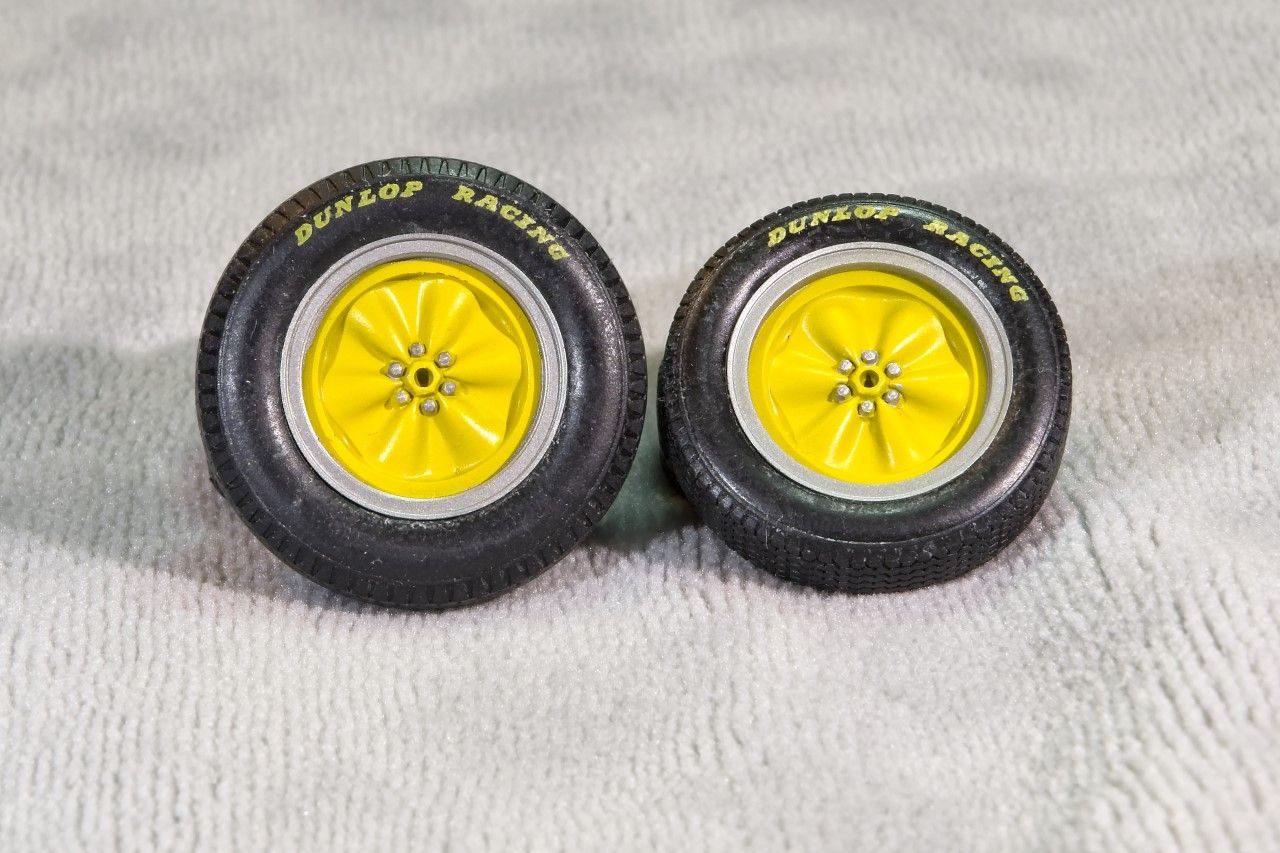
Now the fun really starts; those solid alloy wheels. I primed them with Mr Hobby lite gray primer rather then White, as I wanted the Yellow to be on the duller side, not super bright. I applied a good 9 lite coats of Tamiya Gloss Yellow, and let the wheels dry for a full day. I made masks with my Flex-0-file, but really had a hard time getting the single circles to cover correctly simply because I only had a ruler to measure the dia. with as I still haven't bought a decent set of Calipers So I made half circles each a half mm larger, and over lapped them. Worked out just fine. For the Aluminum which I also didn't want super shiny, I opted for Mr. Color Metalizer Aluminum. let them dry for a few days, then a clear coating of Alcad Semi Matt to further tone down the Aluminum and the Yellow. Finally I brush painted the lug nuts with good old Testors Silver enamel. Boy have those little bottles gotten expensive. The final touch was to add the tires which came pre-lettered.
 .
.
As usual, thanks for stopping by, and checking out my progress to date, it's always greatly appreciated.
Joel
While I wasn't thrilled with how the base color BRG came out, I had applied all the decals, then a clear gloss coat of Mr. Color C-46 Acrylic lacquer thinned 1:1 with Mr Hobby's Mr. Color #400 leveling Thinner. I applied light, even coats with my air brush @ a flow rate of 16 psi, then gave all the panels 3 full days to dry and cure. Next up was rubbing the gloss out with Alpha Emery Cloth sheets soaked in warm water: 6,000, 8,000, & 12,000. A quick wipe, and then air dried in my drying booth.
When dry I used Gravity's 3 part polishing system followed by their excellent GC-311 synthetic wax, then glued on the lower side body panels very carefully with Tamiya Extra Thin. By a pure stroke of luck I didn't get any on the body.
Next up I finished the front suspension, then the basics of the rear suspension with several different shades of Alcad 2 as well as Mr. Color's Metallics. The effect of the various shades really helps to make the suspension, brake & clutch reservoirs, as well as the radiator (which also received a black panel line wash)just pop. Finally, I detailed the upper water line that runs from the radiator through the cockpit to the engine. The pipe is wrapped in insulation, so I used a little modeling license creating it from layered masking tape, then made clamps out of another layer of masking tape. I painted the insulation Gloss Red, and the the clamps Aluminum. The last step was to paint up the outboard coil over shocks. Again, I used a little modeller's license as I painted the springs Gloss Red,the effect adds some much needed color to the rear suspension.
Finally I got to test fit the shell, and it does still fit without any needed pressure on my part.
Then I pulled off the top of the shell for some better interior pictures.
Now the fun really starts; those solid alloy wheels. I primed them with Mr Hobby lite gray primer rather then White, as I wanted the Yellow to be on the duller side, not super bright. I applied a good 9 lite coats of Tamiya Gloss Yellow, and let the wheels dry for a full day. I made masks with my Flex-0-file, but really had a hard time getting the single circles to cover correctly simply because I only had a ruler to measure the dia. with as I still haven't bought a decent set of Calipers So I made half circles each a half mm larger, and over lapped them. Worked out just fine. For the Aluminum which I also didn't want super shiny, I opted for Mr. Color Metalizer Aluminum. let them dry for a few days, then a clear coating of Alcad Semi Matt to further tone down the Aluminum and the Yellow. Finally I brush painted the lug nuts with good old Testors Silver enamel. Boy have those little bottles gotten expensive. The final touch was to add the tires which came pre-lettered.
.As usual, thanks for stopping by, and checking out my progress to date, it's always greatly appreciated.
Joel

Merlin

#017

Joined: June 11, 2003
KitMaker: 17,582 posts
Auto Modeler: 388 posts

Posted: Friday, August 16, 2019 - 07:53 AM UTC
Hi Joel
This is looking really excellent! You've definitely convinced me to hunt down one of these little gems!
All the best
Rowan
This is looking really excellent!
You've definitely convinced me to hunt down one of these little gems! All the best
Rowan


Szmann

Joined: September 02, 2014
KitMaker: 1,977 posts
Auto Modeler: 1,371 posts

Posted: Friday, August 16, 2019 - 11:30 PM UTC
Hi, Joel!
I finally caught up with your new (to me) build.
As usual, very instructive!
As I could see, you're having a good swing at Alclad metallics by now. Good. Quick tip: if you apply them right away over a compatible wet gloss black base, you avoid the peeling issue. However, if you have incompatible base, you can use Alclad Aqua Gloss to protect the metallic paint.
Other than that, you're doing superbly in this build so far and you're handling the incoming issues like a pro! Very good job indeed!
Gabriel
Joel_W
Joined: December 04, 2010
KitMaker: 11,666 posts
Auto Modeler: 2,974 posts
Posted: Saturday, August 17, 2019 - 12:23 AM UTC
Quoted Text
Hi Joel
This is looking really excellent!
All the best
Rowan
Rowan,
Thanks for checking out the Lotus 25, I'm thrilled that it's another reason for you to track down one of these as you put it little gems. The kit is Tamiya quality through and through.
Just remember this: You can never have enough Lotuses in your collection.
Joel
Joel_W
Joined: December 04, 2010
KitMaker: 11,666 posts
Auto Modeler: 2,974 posts
Posted: Saturday, August 17, 2019 - 12:42 AM UTC
Quoted Text
Hi, Joel!
I finally caught up with your new (to me) build.
As usual, very instructive!
As I could see, you're having a good swing at Alclad metallics by now. Good. Quick tip: if you apply them right away over a compatible wet gloss black base, you avoid the peeling issue. However, if you have incompatible base, you can use Alclad Aqua Gloss to protect the metallic paint.
Other than that, you're doing superbly in this build so far and you're handling the incoming issues like a pro! Very good job indeed!
Gabriel
Gabriel,
Really feels like old times with you posting and building on AutoModeler. As for my instructive type of build blog, I really enjoy doing it that way, and if it helps just one person, then all the extra work was well worth the effort.
As for the Alcads, I've never really been all that comfortable air brushing them. They Just never looked like they do on the Alcad site. One issue that I finally solved was using their Gloss Black. IMHO it's pure crap. Just never dries, and never is really silky smooth. Finally on this build I used my old reliable standard Tamiya Gloss Black really thinned out with Mr. Hobby #400. Huge difference. I did find that some of their colors for the types of metals they were supposed to be was just plain wrong. Both Steel and Stainless Steel are way to dark over a Black Gloss base, and even over a Gloss Gray still to dark. That's why I opted for White Airframe as well Duraluminum which looks more like the Stainless Steel I was after. Of course their regular Aluminum looks exactly like dull old Aluminum.
But I've also discovered that the small range of Metallics from Mr. Color look and work perfectly. So well, that you don't even need a base coat, and they dry hard as nails.
At this point I'm thinking that it's time to checkout the AK Metallics as they also don't need a basecoat which is a big plus for me.
As for the use of the Alcad Semi Matt clear, I used it so that I didn't eventually rub through the Aluminum bottom of the chassis from constant handling. It actually worked better then I thought as there just isn't any difference that I can see from the before and after. I did opt to also coat the wheels as I wanted to kill a lot of the shine, and the wheels then looked much closer to many of the non-restoration pictures I have. The rest of the metal finishes no matter the brand aren't clear coated as I try to remember to wear a pair of white cotton gloves, or at least one glove.
The hardest part of the whole build was multi colored wheels.
In any event, I'm looking forward to having you along for the ride.
Joel

AussieReg
#007
Joined: June 09, 2009
KitMaker: 8,156 posts
Auto Modeler: 2,953 posts
Posted: Saturday, August 17, 2019 - 11:44 AM UTC
Coming together beautifully Joel, great work!
Those wheels in particular came up really well. The yellow is just dull enough and the right shade to look like the painted alloy. Like you, I have found circle masks to be very difficult to cut and make fit neatly, so I have now taken to cutting 5 circles, quarter them all, and apply them as wedges with a slight overlap, and then use one quarter from the 5th circle for each wheel to fill the gap.
Cheers, D

Joel_W
Joined: December 04, 2010
KitMaker: 11,666 posts
Auto Modeler: 2,974 posts
Posted: Sunday, August 18, 2019 - 01:34 AM UTC
Quoted Text
Coming together beautifully Joel, great work!
Those wheels in particular came up really well. The yellow is just dull enough and the right shade to look like the painted alloy. Like you, I have found circle masks to be very difficult to cut and make fit neatly, so I have now taken to cutting 5 circles, quarter them all, and apply them as wedges with a slight overlap, and then use one quarter from the 5th circle for each wheel to fill the gap.
Cheers, D
D,
Thanks for the thumbs up, it's always greatly appreciated.
Glad to hear that I'm not the only one who had problems with circle masks. I never thought of cutting them into more then two parts, but I can see where that would make it easier then trying to get two halves to work. I did use a slight overlap, then a pc of scrap to cover the gap.
BTW, I saw your restart of the 1/24 scale Jug. I'm following your build as I still have a soft spot for them. Republic was all of 30 min from my families house, and Grumman's 15+ min in the opposite direction. The skies were always full of their newly built planes.
Joel
Joel

Stickframe
#362
Joined: December 01, 2013
KitMaker: 1,661 posts
Auto Modeler: 431 posts

Posted: Sunday, August 18, 2019 - 01:28 PM UTC
Hi Joel,
Wow - thats looking great! I like the bits of color contrast too - nice!
Cheers
Nick
Wow - thats looking great! I like the bits of color contrast too - nice!
Cheers
Nick
Joel_W
Joined: December 04, 2010
KitMaker: 11,666 posts
Auto Modeler: 2,974 posts
Posted: Monday, August 19, 2019 - 02:08 AM UTC
Nick,
Thanks for stopping by and checking out my Lotus 25 build, it's much appreciated.
Joel
Thanks for stopping by and checking out my Lotus 25 build, it's much appreciated.
Joel
RussellE
#306
Joined: June 27, 2010
KitMaker: 3,959 posts
Auto Modeler: 495 posts
Posted: Monday, August 19, 2019 - 09:53 AM UTC
Coming along nicely Joel
Those wheels are a standout item, for sure!
Those wheels are a standout item, for sure!
Joel_W
Joined: December 04, 2010
KitMaker: 11,666 posts
Auto Modeler: 2,974 posts
Posted: Monday, August 19, 2019 - 10:50 AM UTC
Quoted Text
Coming along nicely Joel
Those wheels are a standout item, for sure!
Russell,
Really glad that you stopped by, and that those wheels grabbed your attention. I had fears that I'd find a way to screw them up, but somehow I got through it without any issues.
Joel

Hwa-Rang

Joined: June 29, 2004
KitMaker: 6,760 posts
Auto Modeler: 2,182 posts

Posted: Monday, August 19, 2019 - 05:02 PM UTC
That looks mighty fine Joel. Always a joy to see your updates.
Joel_W
Joined: December 04, 2010
KitMaker: 11,666 posts
Auto Modeler: 2,974 posts
Posted: Tuesday, August 20, 2019 - 01:00 AM UTC
Quoted Text
That looks mighty fine Joel. Always a joy to see your updates.
Jesper,
Thanks my friend for stopping by and checking out my Lotus 25 build to date. It's always greatly appreciated.
Joel
Szmann
Joined: September 02, 2014
KitMaker: 1,977 posts
Auto Modeler: 1,371 posts
Posted: Tuesday, August 20, 2019 - 12:18 PM UTC
Quoted Text
As for the Alcads, I've never really been all that comfortable air brushing them. They Just never looked like they do on the Alcad site. One issue that I finally solved was using their Gloss Black. IMHO it's pure crap. Just never dries, and never is really silky smooth. Finally on this build I used my old reliable standard Tamiya Gloss Black really thinned out with Mr. Hobby #400. Huge difference. I did find that some of their colors for the types of metals they were supposed to be was just plain wrong. Both Steel and Stainless Steel are way to dark over a Black Gloss base, and even over a Gloss Gray still to dark. That's why I opted for White Airframe as well Duraluminum which looks more like the Stainless Steel I was after. Of course their regular Aluminum looks exactly like dull old Aluminum.
Well, that's the catch: when sprayed over a gloss black surface which is already dry, they have a tendency to look a little grainy (doesn't matter how smooth the black base is). Over a wet surface, they perform noticeable better, but it has to be compatible (enamel or lacquer).
As for their different "flavors", they are pretty much indistinguishable, you're right. I use the most often Aluminum Airframe and Chrome. Pale Gold is also nice. Copper isn't all that nice - I like much better the much cheaper Rust-oleum from the tin.
Gabriel
Joel_W
Joined: December 04, 2010
KitMaker: 11,666 posts
Auto Modeler: 2,974 posts
Posted: Wednesday, August 21, 2019 - 02:32 AM UTC
Quoted Text
Quoted TextAs for the Alcads, I've never really been all that comfortable air brushing them. They Just never looked like they do on the Alcad site. One issue that I finally solved was using their Gloss Black. IMHO it's pure crap. Just never dries, and never is really silky smooth. Finally on this build I used my old reliable standard Tamiya Gloss Black really thinned out with Mr. Hobby #400. Huge difference. I did find that some of their colors for the types of metals they were supposed to be was just plain wrong. Both Steel and Stainless Steel are way to dark over a Black Gloss base, and even over a Gloss Gray still to dark. That's why I opted for White Airframe as well Duraluminum which looks more like the Stainless Steel I was after. Of course their regular Aluminum looks exactly like dull old Aluminum.
Well, that's the catch: when sprayed over a gloss black surface which is already dry, they have a tendency to look a little grainy (doesn't matter how smooth the black base is). Over a wet surface, they perform noticeable better, but it has to be compatible (enamel or lacquer).
As for their different "flavors", they are pretty much indistinguishable, you're right. I use the most often Aluminum Airframe and Chrome. Pale Gold is also nice. Copper isn't all that nice - I like much better the much cheaper Rust-oleum from the tin.
Gabriel
Gabriel,
I've never heard of spraying Alcads or any Metallics over a still wet surface. I've always been under the impression that a smooth base is needed for the metallizer to have a metallic look to. the deep shine comes from the level of glossiness.
The graininess issue I've had from time to time is because the base coat wasn't glossy smooth.
I've gotten to the point of varying what color the gloss primer is so that the depth of the shine can be controlled. Gray is my go to color for a more worn or oxidized look especially on chassis pans and worn surfaces. Same goes for engines and transmissions.
As I said I've been very disappointed with many of the shades of Alcad that just don't look like what they're supposed to be. For that reason alone I've started to experiment with Mr. Colors Metallics, and I do like them a lot.
Joel
Joel_W
Joined: December 04, 2010
KitMaker: 11,666 posts
Auto Modeler: 2,974 posts
Posted: Sunday, August 25, 2019 - 03:58 AM UTC
Well, another week, and time for my latest update on the Coventry Climax Lotus 25.
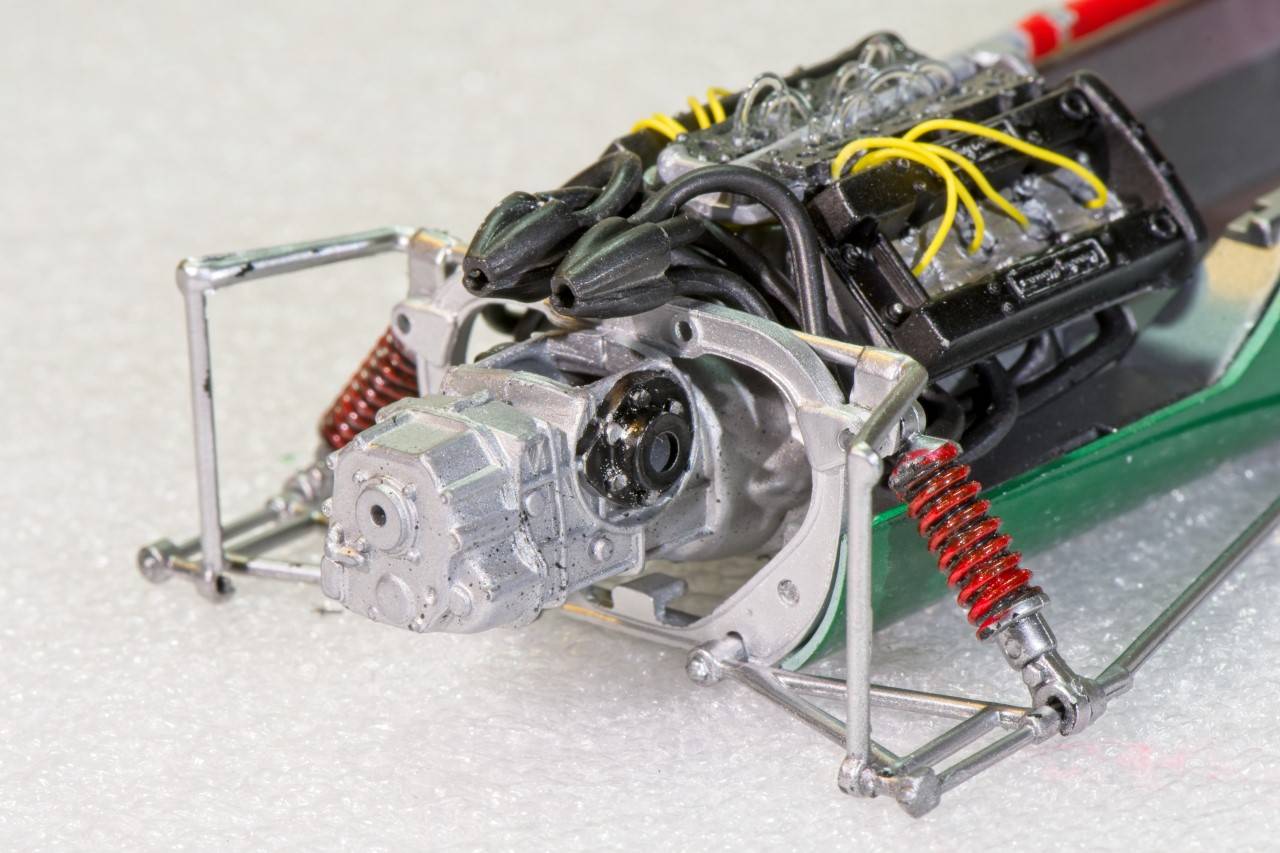
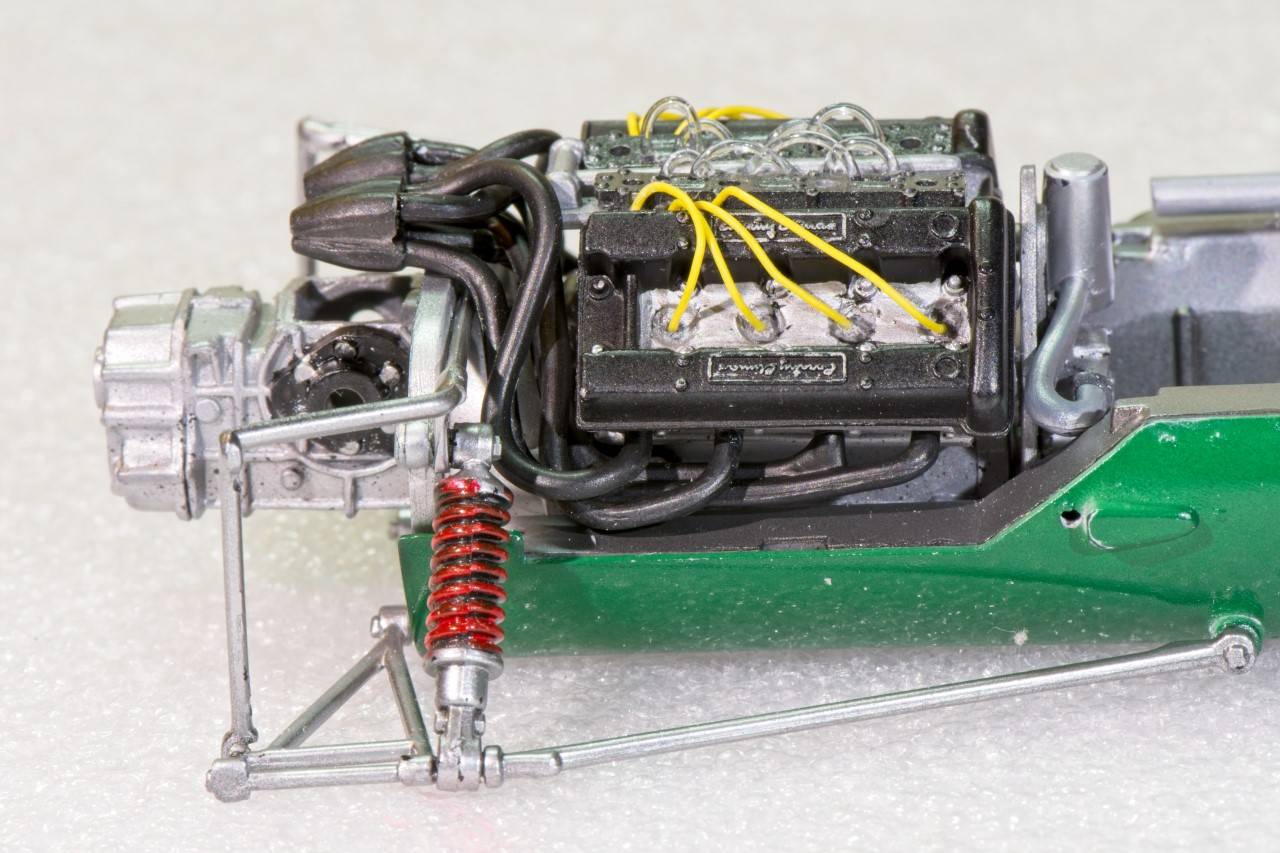
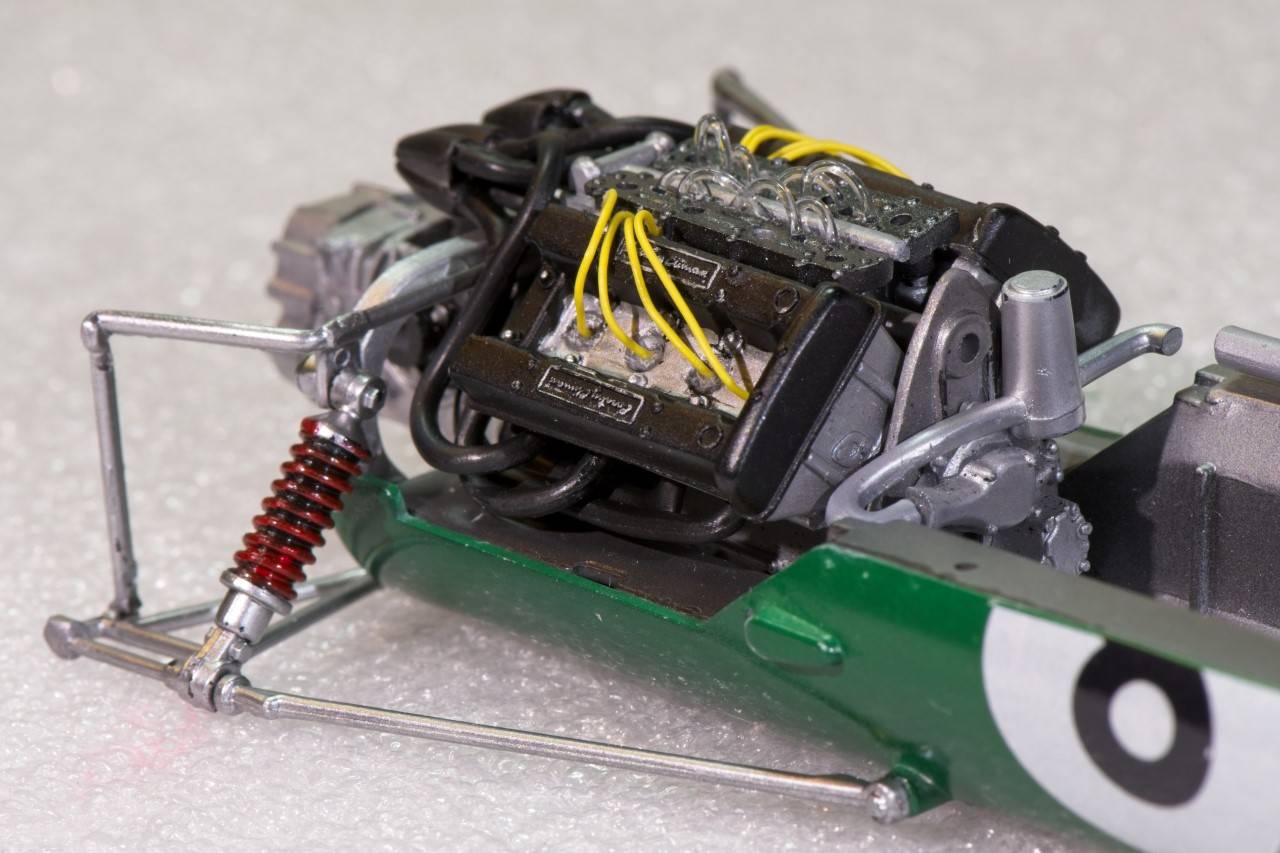
This week I focused on the engine assembly, which for a kit this old is really quite detailed, and as usual Tamiya got the parts to fit perfectly.
The 1.5 liter Coventry Climax V8 engine/transmission is just 3 large parts: Right side, left side, and the top of the block casting. These parts were primed with flat Black, then air brushed with Alcad 2 ALC 101 Aluminum. The oil pan was primed with Tamiya Semi gloss Black, then it was air brushed with Alcad 2 ALC 101 Aluminum for a slightly shinier look.
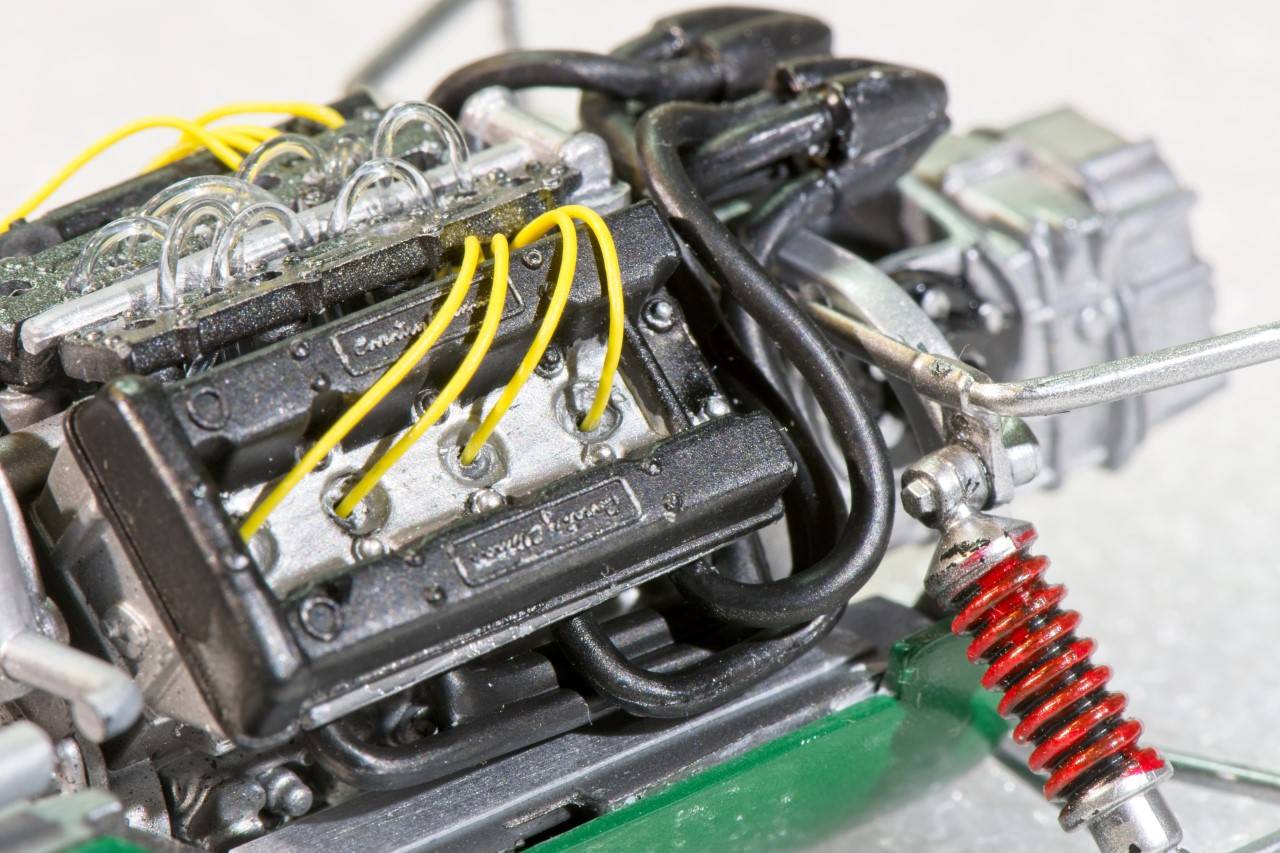
The engine has twin cam shafts for each bank of cyclinders, so there's two double valve covers, one for each bank that was painted Tamiya X-18 Semi Gloss Black. Then the raised lettering was picked out with a 5/0 paint brush, and good old Testors Enamel Silver paint in those very expensive 1/4 oz little bottles. I'm determined to use up those bottles before I switch to my newest find, Gunze's Super Metallics2 that you can actually use for hand painting, as well as air brushing once thinned 1:1. But be prepared for sticker shock as Sprue Brothers is selling them for $10.95 per bottle. I'm going with just 3 different colors for now as I want to move away from the Alcad's, I never muched liked how several of their colors look. All are too dark as far as I'm concerned.
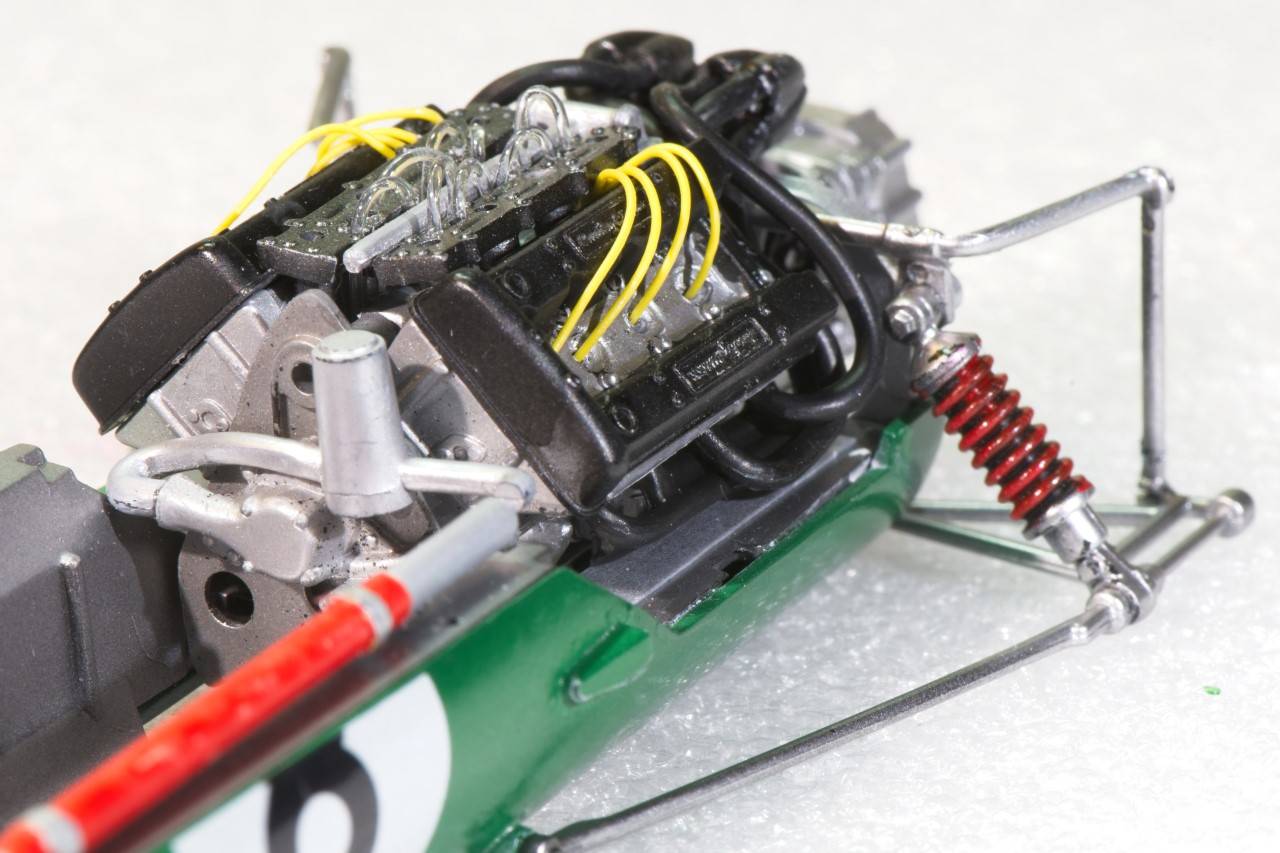
Then I glued on the plateforms for the fuel injector intakes, painted a slightly different tinted shade of Alcad 2 Aluminum. I've got several pictures of both the car that Clark drove as well as restorations. Clark's car had Black spark plug wires, while the restorations had either Yellow or Red. I decided that a little color variation was needed so I went went Yellow using my modeling license. Next I used that same license to run the fuel injection lines, as every picture has them run somewhat differently from the meter to the injectors. I opted to drill holes in the two plateforms right next to where the intakes mount, and ran the lines down to where the injectors would be at the base of the intakes. As usual, I used clear Fly Fishing leader as I have a nearly endless supply in various sizes from Bass Pro Shops.
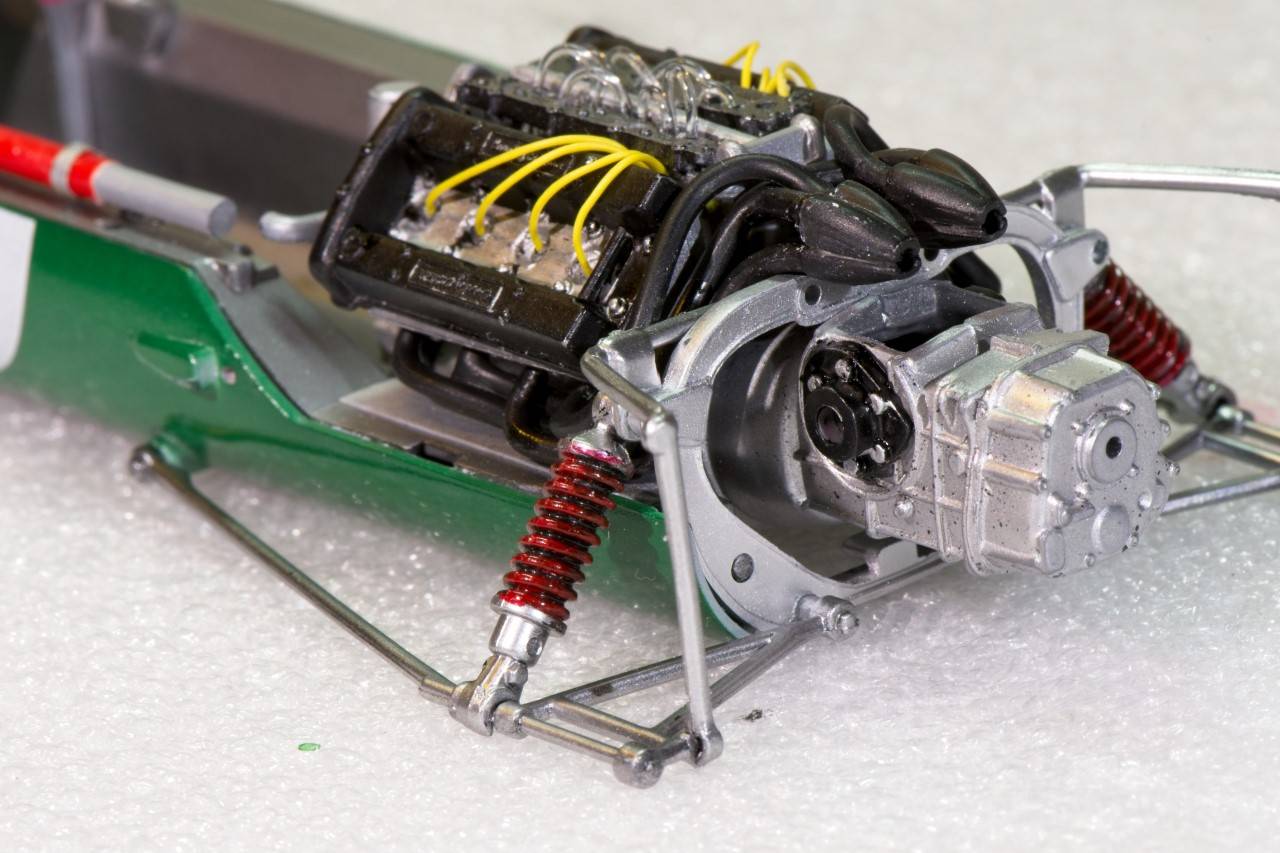
Next came the dreaded exhaust headers, which weren't that bad. They came as one 4 pipe pc with two for each bank, then the next one with two pipes one for each bank, and finally two single pipes one for each bank. The collector that each set of 4 exhaust pipes is attached to is two parts, with the lower half of each side molded directly to the 1st 4 pipe pc. The instructions call for the top halves to be glued in place after all the pipes are installed. Test fitting showed this to be a much harder way to align everything, so I glued the top halves in place, then ran the rest of the exhaust headers. Worked perfectly.
Finally I glued on the water pump, and aluminum lines, the Generator, and oil filter canister cover assembly, as the filter was a cloth fiber type that fits into the canister. You can tell this by the bolt on the bottom of the canister. Believe me I know only to well, as my MGBs had this, and it was a pain in the butt to change filters.
Now for the moment of truth. I slipped the engine into place, and it fit perfectly!! So I glued it in place from the bottom with Extra Thin.
As you can see in these way greater then 1:1 pictures, I need to spend quality time touching up all the issues where I just missed or screw up. In real life these issues really are hard to see, and being a one eye old man makes it just that much harder.
Here's some pictures of where I'm at on my build. And as usual, thanks for stopping by, it's always greatly appreciated.
Joel
This week I focused on the engine assembly, which for a kit this old is really quite detailed, and as usual Tamiya got the parts to fit perfectly.
The 1.5 liter Coventry Climax V8 engine/transmission is just 3 large parts: Right side, left side, and the top of the block casting. These parts were primed with flat Black, then air brushed with Alcad 2 ALC 101 Aluminum. The oil pan was primed with Tamiya Semi gloss Black, then it was air brushed with Alcad 2 ALC 101 Aluminum for a slightly shinier look.
The engine has twin cam shafts for each bank of cyclinders, so there's two double valve covers, one for each bank that was painted Tamiya X-18 Semi Gloss Black. Then the raised lettering was picked out with a 5/0 paint brush, and good old Testors Enamel Silver paint in those very expensive 1/4 oz little bottles. I'm determined to use up those bottles before I switch to my newest find, Gunze's Super Metallics2 that you can actually use for hand painting, as well as air brushing once thinned 1:1. But be prepared for sticker shock as Sprue Brothers is selling them for $10.95 per bottle. I'm going with just 3 different colors for now as I want to move away from the Alcad's, I never muched liked how several of their colors look. All are too dark as far as I'm concerned.
Then I glued on the plateforms for the fuel injector intakes, painted a slightly different tinted shade of Alcad 2 Aluminum. I've got several pictures of both the car that Clark drove as well as restorations. Clark's car had Black spark plug wires, while the restorations had either Yellow or Red. I decided that a little color variation was needed so I went went Yellow using my modeling license. Next I used that same license to run the fuel injection lines, as every picture has them run somewhat differently from the meter to the injectors. I opted to drill holes in the two plateforms right next to where the intakes mount, and ran the lines down to where the injectors would be at the base of the intakes. As usual, I used clear Fly Fishing leader as I have a nearly endless supply in various sizes from Bass Pro Shops.
Next came the dreaded exhaust headers, which weren't that bad. They came as one 4 pipe pc with two for each bank, then the next one with two pipes one for each bank, and finally two single pipes one for each bank. The collector that each set of 4 exhaust pipes is attached to is two parts, with the lower half of each side molded directly to the 1st 4 pipe pc. The instructions call for the top halves to be glued in place after all the pipes are installed. Test fitting showed this to be a much harder way to align everything, so I glued the top halves in place, then ran the rest of the exhaust headers. Worked perfectly.
Finally I glued on the water pump, and aluminum lines, the Generator, and oil filter canister cover assembly, as the filter was a cloth fiber type that fits into the canister. You can tell this by the bolt on the bottom of the canister. Believe me I know only to well, as my MGBs had this, and it was a pain in the butt to change filters.
Now for the moment of truth. I slipped the engine into place, and it fit perfectly!! So I glued it in place from the bottom with Extra Thin.
As you can see in these way greater then 1:1 pictures, I need to spend quality time touching up all the issues where I just missed or screw up. In real life these issues really are hard to see, and being a one eye old man makes it just that much harder.
Here's some pictures of where I'm at on my build. And as usual, thanks for stopping by, it's always greatly appreciated.
Joel
RussellE
#306
Joined: June 27, 2010
KitMaker: 3,959 posts
Auto Modeler: 495 posts
Posted: Sunday, August 25, 2019 - 06:20 PM UTC
always good to drop by and see what's happening in your workshop Joel!
Never disappointed.
Q: what did you make the spark plug leads from?
Never disappointed.
Q: what did you make the spark plug leads from?
Joel_W
Joined: December 04, 2010
KitMaker: 11,666 posts
Auto Modeler: 2,974 posts
Posted: Monday, August 26, 2019 - 12:34 AM UTC
Quoted Text
always good to drop by and see what's happening in your workshop Joel!
Never disappointed.
Q: what did you make the spark plug leads from?
Russell,
Glad you liked what you saw. I've actually fixed all the paint issues on the shocks, then I realized that once the tires/wheels go on, you'll never see them.
The spark plug wires are from a 4 color set of 1/24 scale ignition wires from HLJ. As I run out of various wires and cables my new resource is Detail Masters and my local big box Arts & Crafts store: AC Moore.
Joel
Szmann
Joined: September 02, 2014
KitMaker: 1,977 posts
Auto Modeler: 1,371 posts
Posted: Monday, August 26, 2019 - 06:05 PM UTC
Looking very good, Joel! It's really important to have good references. I was unsuccessfully looking up for Gordini rally car interior references and I couldn't find any. I'll make up "something".
As for the fuel lines, I would pain them with some clear yellow (orange) to simulate the fuel running thru.
I'm glad to see you're giving a run to those metallics. I'm curious myself about Mr. Hobby metallics, as well as about Extreme Metal range.
Gabriel
As for the fuel lines, I would pain them with some clear yellow (orange) to simulate the fuel running thru.
I'm glad to see you're giving a run to those metallics. I'm curious myself about Mr. Hobby metallics, as well as about Extreme Metal range.
Gabriel
Joel_W
Joined: December 04, 2010
KitMaker: 11,666 posts
Auto Modeler: 2,974 posts
Posted: Tuesday, August 27, 2019 - 03:03 AM UTC
Gabriel,
I just might try to paint a coat of Tamiya Clear Yellow on them. But new fuel lines were always clear, just not for very long.
I'll see what I can come up with a Gordini Rally/Race interior. Back in those days, the cars were the same exact ones as purchased from a dealer. The interior was stripped including carpets and radio if it had one to start with. A roll bar or cage was installed, new instruments which would vary by what the race car was going to be used for. One or two racing bucket seats, and a racing harness for each seat. A fire extinguisher was always installed. So going generic, you'll still be close.
As for the Metallics, everyone is raving about the Mr. Hobby/Mr. Color Super Metallic 2s. So it's a good place to start. Alcads have been around forever, and like I said, I'm not thrilled with a lot of the colors.
Oh, BTW, Tamiya's Lacquer paints will be in the states by the end of the year. Many places in Europe already have them. Paul from International Modeler did a review on them, and there now his go to paints. There that good. Tamiya even has a new thinner very similar to #400 leveling thinner, but he said it's even better!
Joel
RussellE
#306
Joined: June 27, 2010
KitMaker: 3,959 posts
Auto Modeler: 495 posts
Posted: Tuesday, August 27, 2019 - 09:57 AM UTC
Quoted Text
Quoted Textalways good to drop by and see what's happening in your workshop Joel!
Never disappointed.
Q: what did you make the spark plug leads from?
Russell,
Glad you liked what you saw. I've actually fixed all the paint issues on the shocks, then I realized that once the tires/wheels go on, you'll never see them.
The spark plug wires are from a 4 color set of 1/24 scale ignition wires from HLJ. As I run out of various wires and cables my new resource is Detail Masters and my local big box Arts & Crafts store: AC Moore.
Joel
 always the risk with any build Joel: we could spend hours, days even, on fine details only for them to hidden in the final result. Seen many an aircraft build suffering that
Thank you for the tip about the spark plug wires: ordered from my LHS
Stickframe
#362
Joined: December 01, 2013
KitMaker: 1,661 posts
Auto Modeler: 431 posts
Posted: Tuesday, August 27, 2019 - 11:02 AM UTC
Hi Joel - nice work on the engine and rear end! Looks great!
Theres a website, Teds Modeling Marketplace that sells all sorts of scale details - parts to wires - and they deliver on time - for pre tinted fuel lines, I found some at SpotModel - though far away, the parts get here pretty fast
Ok, keep up the good work!
Cheers
Nick
Theres a website, Teds Modeling Marketplace that sells all sorts of scale details - parts to wires - and they deliver on time - for pre tinted fuel lines, I found some at SpotModel - though far away, the parts get here pretty fast
Ok, keep up the good work!
Cheers
Nick
 |

WEB HOSTING BY


Copyright ©2021 Auto Modeler and Kitmaker Network, a subsidiary of Silver Star Enterprises
All Rights Reserved. Please read our Conditions of Use and Privacy Policy.
All Rights Reserved. Please read our Conditions of Use and Privacy Policy.