_GOTOBOTTOM
Cars
Discuss all types of automotive modeling here.
917k w xtra detail
Stickframe
#362
_VISITCOMMUNITY
California, United States
Joined: December 01, 2013
KitMaker: 1,661 posts
Auto Modeler: 431 posts
Posted: Monday, August 19, 2019 - 08:00 AM UTC
Hello model builders,

I jumped right into this project. I recently saw some photos of a Porsche 917k engine bay and decided I really wanted to give it a try. I also decided I'd try and detail the front end a bit. I purchased a Fujimi kit, the 1970, car 23, Le Mans winner. I don't have any affinity toward this particular car, but it was at the time, one of the few I could find that was available. I also purchased an HRM motor kit for it.

I started this about a week and a half ago, right after finishing a Ford GT 40 kit.

The Fujimi kit is pretty nice, the body shell is excellent, the parts all fit, but the detail in the unseen areas is pretty soft, like on control arms etc. The plastic is a bit unusual, in that it's strangely hard - feels like a kid's toy. Anyway, as I'm not cutting this one up too much, so it's fine to work with.

OK, on with the front end. I looked at plenty of photos before starting and found that the kit really doesn't offer much detail straight from the box and the small hood is removable, so my guess is me, or likely others would add some level of detail if they want to show it opened up.

Next I discovered the many variants of real version of this front end - including routing for ducting, chassis tubing, etc, so, I found a variant that fits the kit's basic chassis structure and went from there. Please see below:


As you can see above, there's plenty of opportunity to add onto the base kit to make it look a bit more convincing. In addition to some of the details being soft, if you build this OOB, you'll discover pretty big gaps between the rolling chassis and the body - who knows if they would be evident when you're looking at the kit - but, I could see gaps and didn't like them, so now they're mostly filled. Same with the housing for the fuel necks and the front firewall - those gaps were really big, not any more.

Next, I built the HRM motor over the weekend. It's a clean, good looking kit, that goes together really well. The wiring and fuel lines tho...really tested my patience! I based mine generally on this real engine:
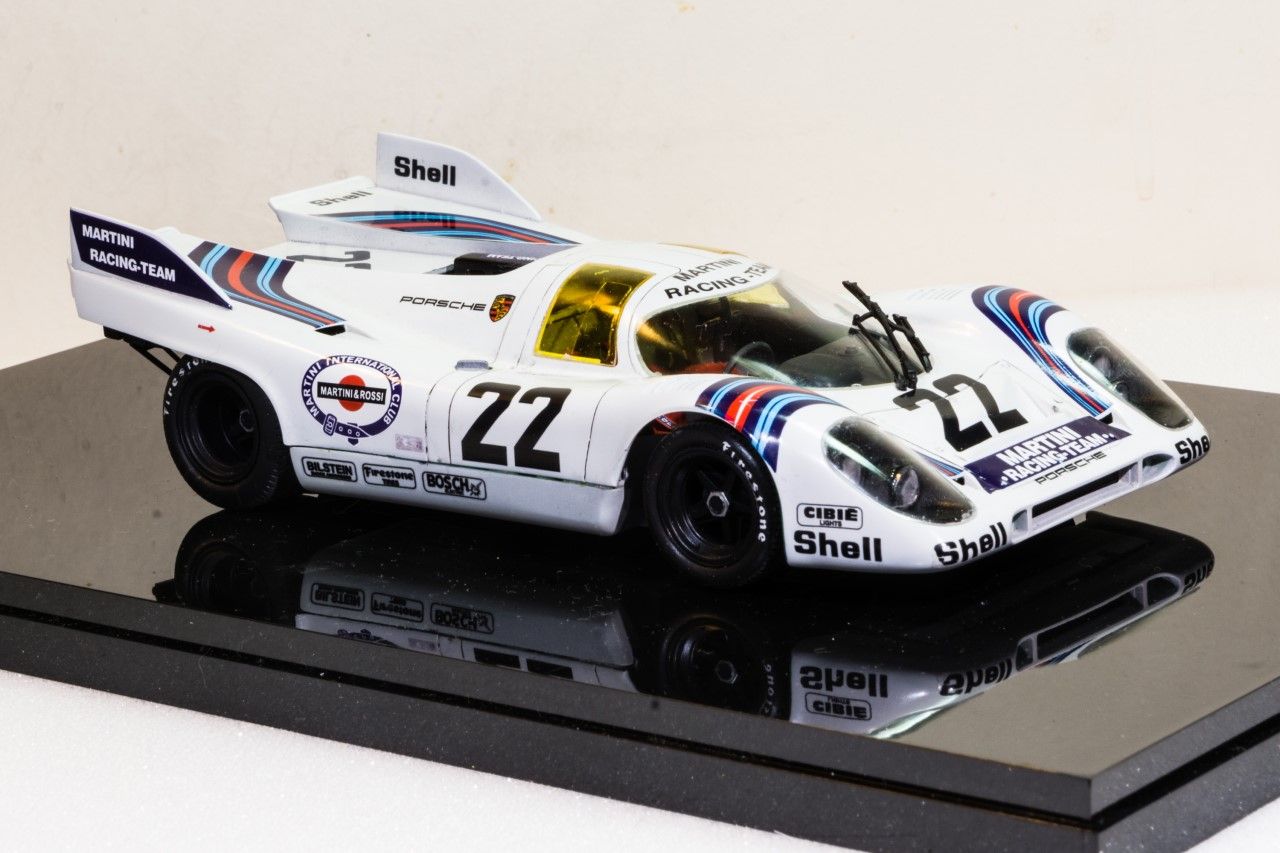


and mine:


This looks better in real life - the glare/shine is exaggerated in this "fantastic" photo - lol. Also, I want it to look a bit "race proven" and not spotless.

So - the wiring and tubing, there is a lot!! of both - slow and steady is all I can say, should you proceed with one of your own.

Next - I scratch built both of the throttle linkages - tiny springs and all. This was a fun little project by itself. The second linkage is between the rear distributor and air intake/fuel injectors. Nonetheless, I it's the same as this, and it eventually fit! and yes, the two are connected by a continuous rod.

And a few more:


So far so good - I managed to scuff up the paint during the wiring and tubing installation, which I'll touch up.

Next, on to test fitting - this is a really big motor!


Above you can see a mix and match of Fujimi, HRM and scratch built parts. As for the engine installation, I'm not sure of how to characterize exactly how difficult or not difficult this installation is, as we each have different level of experience, it gave me a run for my money, and the results seem worth it.

To make the frame/chassis go together reasonably cleanly, I drilled out the bottoms of the legs of the HRM chassis cross member and added a small metal rod to each. The rod is inserted into holes I drilled in the Fujimi chassis. I then added the long black chassis assembly to the top of the cross member. Then, temporarily taped this in place in the kit, and cut/fit/filed and CA glued the HRM chassis side frame members in place. I also added the correct cross bracing to the rear of the cabin firewall. This was less matter of fact than it might sound. That said, snug fit and all - so far it's all going together as I'd hoped it would.

OK - happy model building -

Cheers,

Nick


Joel_W
Staff MemberAssociate Editor
AUTOMODELER
_VISITCOMMUNITY
New York, United States
Joined: December 04, 2010
KitMaker: 11,666 posts
Auto Modeler: 2,974 posts
Posted: Monday, August 19, 2019 - 09:16 AM UTC
Nick,
I can't believe you accomplished all of this in a week's time. I can assure you that it would have taken me close to a month to not even come close to the amount of detailing you accomplished (not that I'm capable of it), plus the HRM engine. Your detailing is simply outstanding to say the least.

As for the HRM motor, as I mentioned to you previously, I've tried to find several of their motors, but they're next to impossible to find even on ebay.

The Fujimi 917K kits are nearly always out of stock literally everywhere. Why Fujimi doesn't just mass produce those kits is beyond me. They'd literally fly off the retail shelves. I did find one a few years ago at the Region 1 IPMS Noreastcon, the David Piper team car, I snapped it right up anyway, and that's with me still being a military aircraft modeler!

the 917K was my 1st car model, and it was as struggle to say the least, especially the gloss paint job. I also converted it to the Martini LeMans version, made a ton of shall we say errors along the way, but I did get it across the finish line.

At best I refer to myself as an enhancer, while you're a true detailer. You just might get me to up my game some.

Anyway, here's my Porsche 917K for comparison.

Joel


Szmann
_VISITCOMMUNITY
Netherlands Antilles
Joined: September 02, 2014
KitMaker: 1,977 posts
Auto Modeler: 1,371 posts
Posted: Monday, August 19, 2019 - 11:30 PM UTC
Nick, fantastic scratch!
That little engine looks "alive". Well done, mate!

Gabriel
covkid
_VISITCOMMUNITY
United Kingdom
Joined: March 13, 2015
KitMaker: 252 posts
Auto Modeler: 8 posts
Posted: Tuesday, August 20, 2019 - 03:29 AM UTC
Hi, loving this build.The engine is superb.

My all time favoutite race car. And its 50 this year.
regards jason
Stickframe
#362
_VISITCOMMUNITY
California, United States
Joined: December 01, 2013
KitMaker: 1,661 posts
Auto Modeler: 431 posts
Posted: Tuesday, August 20, 2019 - 05:42 AM UTC
Hi guys,

Thanks for dropping by.

Joel, you’re right, the HRM Kit is really nice. I found this about a month ago at model builders warehouse and they had it to me in no time. After I read your post I went back to the website and the kit now says sold out. I don’t know if they make it anymore. To your other point, it was harder to find the Fujimi kit!! I searched many sites before I found one in stock. Judging by the plastic, I’m guessing it’s an older kit.

Yeah, as far as time goes, for about a week after I came home at night I put a couple of hours into the front end - no big progress each night, but at the end of the week it was done. I then went out of town the next week for work, and spent several hours last weekend on the engine. The parts count isn’t all that high, but the tasks, like drilling all the holes for the ignition and fuel lines was slow going. Once it was primed and painted I had to redrill all the holes....then, assemble and wire it. The last step took the most time.

Unlike your builds, my paint doesn’t always work so well. It’s generally acceptable, but never as bright and clean as yours, D’s, Jesper’s, or Gabriel’s! So, I keep trying!

Hi Gabriel, glad to know you’re back, and thanks! The GT40 was a good primer for this build, as it was less straight forward - while each are challenging, this a bit less so as I haven’t cut the body up too much. The engine tho - not precisely difficult to assemble, but really a challenge to keep everything “tight” - the space it fits into is really small and there isn’t much actual room for things hanging out or being misaligned.

Howdy Covkid, thanks for the note! Yes, that engine...haha! It’s really a bummer that once this is done, most of that stuff won’t be visible!! Sort of like those nice Miniart T-55 engines!!

Ok gents, happy model building,

Nick
GaryKato
_VISITCOMMUNITY
California, United States
Joined: December 06, 2004
KitMaker: 3,694 posts
Auto Modeler: 79 posts
Posted: Tuesday, August 20, 2019 - 12:36 PM UTC
Time to watch "Le Mans" again.
AussieReg
Staff MemberAssociate Editor
AUTOMODELER
#007
_VISITCOMMUNITY
Victoria, Australia
Joined: June 09, 2009
KitMaker: 8,156 posts
Auto Modeler: 2,953 posts
Posted: Thursday, August 22, 2019 - 10:19 AM UTC
Hi Nick.

I would love to be a fly on the wall looking over your shoulder while you do all of this great scratch work. You make it sound quite effortless and get a great result!

Looking forward to more progress.

Cheers, D
Stickframe
#362
_VISITCOMMUNITY
California, United States
Joined: December 01, 2013
KitMaker: 1,661 posts
Auto Modeler: 431 posts
Posted: Saturday, August 24, 2019 - 04:51 PM UTC
Hey D -

First, thanks! Part two, I’ll quote the Allman Bros Band “I must’ve did somebody wrong...” what? So, yes, the scratchwork, I think I’m getting better as I go, and am picking up new ideas and tricks that I’m pleased to share; next, a less positive experience: me painting!! I’d like you to be around when I “try” to paint!! Lol - today, two fascinating and completely unrelated disasters while painting!!

First up, rattle can tamiya fine primer on the car body - how hard can that be?!? ...well, as usual I went outside to do this, warm, blue sky, bright and...windy!! I taped the 917 front and rear body parts onto a cardboard box - easy, primer on, no blobs etc, and, it turns out both pieces can fly!!! All it takes is a nice gust of wind and off they go! The really good news is the tamiya dries fast and the paint scratched not smeared/picked up debris when they hit the deck (a concrete sidewalk) - oh, and knocked off a brass sheet used as part of the rear air dam...nice...! So, I let it dry, sanded out the scratches, fixed the air dam and primed it again...no prob.

Then - I decided to throw the base coat of red on the lower body - easy enough, right??? Of course not - paint going on smooth, even coats, perfect...uh? Except, the airbrush won’t stop spraying!!! - lol - awesome - my recently praised (by ME!) Aiwata el cheapo Neo turned on me! - lol - damn thing, air valve stuck open. I mentioned recently that I ruined my trustworthy badgers - and have since replaced them but figured for an easy little job like this, na, I’ll use the Neo...good idea lol...

So, I’m pleased to share what I can about scratch work - if you guys can send me some good painting karma!

Ok - happy model building!

Cheers
Nick

Joel_W
Staff MemberAssociate Editor
AUTOMODELER
_VISITCOMMUNITY
New York, United States
Joined: December 04, 2010
KitMaker: 11,666 posts
Auto Modeler: 2,974 posts
Posted: Sunday, August 25, 2019 - 07:56 AM UTC
Nick,
You're only looking at the finished paint job. Believe me it was nerve racking as it was my 1st car in more then 40 years. Military Mat colors are way easier to paint. Paint modulation just looks like fading. Can't get away with any of that with a gloss paint job.

The secret I found to painting car bodies is just easy lite passes. I increase the amount of paint for the wet coats and slow down, but never, ever stop. I'm about 3 to 4 inches max from the body, never more or the paint dries before it hits the surface.

90% of the painting we do is just like painting a real car. We mask for a 2nd color. Honestly, we don't need a double action air brush. A good single action internal AB is perfect. You just need to be able to switch needles and cones. I use Grex AB's, and use the rear adjustment stop so I'm actually still painting like it's a single action AB. Just more parts to clean and replace as needed.

I watched and still do several guys on You Tube. Two are Japanese, and I don't understand a single word they say, but you don't have to. I carefully watch how they paint, and you can see the spray, so I get an idea of how much paint and PSI I need. Everyone paints differently. Just find a system that works for you, and stick with it.

The real hard part is learning how to wet sand, Polish, and wax. And I'm still learning car by car. And I still make a ton of mistakes. You guys only get to see the car when I've fixed, repaired, or even stripped and started over again.

Joel
Hwa-Rang
_VISITCOMMUNITY
Kobenhavn, Denmark
Joined: June 29, 2004
KitMaker: 6,760 posts
Auto Modeler: 2,182 posts
Posted: Sunday, August 25, 2019 - 05:00 PM UTC

Quoted Text

it turns out both pieces can fly!!!


Aren't racecars supposed to have great downforce

A shame about the parts taking their leave, but, by the sound of it, it should be an easy fix.

That's a serious amount of wiring, on the flat 12. Super job on the added details.
Joel_W
Staff MemberAssociate Editor
AUTOMODELER
_VISITCOMMUNITY
New York, United States
Joined: December 04, 2010
KitMaker: 11,666 posts
Auto Modeler: 2,974 posts
Posted: Monday, August 26, 2019 - 12:50 AM UTC

Quoted Text


Quoted Text

it turns out both pieces can fly!!!


Aren't racecars supposed to have great downforce

A shame about the parts taking their leave, but, by the sound of it, it should be an easy fix.

That's a serious amount of wiring, on the flat 12. Super job on the added details.


Jasper,

Like you, I'm amazed that Nick not only got all 12 spark plug wires for each cylinder bank properly installed, but managed to get both distributors wired up as well. And then just for fun he drilled and ran the fuel injection lines from the metering unit to each intake injector.

My one question is just how is he going to mount the motor to the chassis as there doesn't seem to be any motor mounts on the lower frame.

Joel
Stickframe
#362
_VISITCOMMUNITY
California, United States
Joined: December 01, 2013
KitMaker: 1,661 posts
Auto Modeler: 431 posts
Posted: Monday, August 26, 2019 - 08:06 AM UTC
HI Jesper and Joel,

thanks for stopping by -

Joel part 1 - thanks! yes, the art of painting...lots to learn there. I think I might complicate this by only painting with acrylics, lots of reasons, but I'm sticking with them. And, you're right - flat colors for armor are fairly forgiving - unlike the base color you use for a shiny auto finish. I have decided I like the alclad Aqua Gloss 2 - though i believe it is the culprit for my recent headaches with my airbrushes! - even though I thought I thoroughly rinsed them after use - apparently not!

Jesper and Joel, yes that engine is a beast! but really interesting to build - and, yes, includes a lot of wiring and tubing, so I've added a few more pics. First though, regarding installation, it is a very tight fit, as you'll see below, tabs are provide - on the front of the engine, and in the middle of the rear section of the chassis:


Thankfully the engine drops right into these - on the firewall and chassis.

Less graceful is the "top" of the Fujimi engine, which is for air intakes and a shroud - It's just chunky plastic so I made special pieces for both using scrap metal parts:


As you can see above, my solution is not thick/huge, I think it looks convincing, and you can still catch a glimpse of the distributors etc - which was a lot of work to build.

On to the body/chassis:


and a few more of the engine with my air boxes:


I left these in raw metal - I like the look. The small shrouds will be painted gloss black.

OK, I need to run - happy model building!

Cheers
Nick


Cosimodo
#335
_VISITCOMMUNITY
Auckland, New Zealand
Joined: September 03, 2013
KitMaker: 1,808 posts
Auto Modeler: 701 posts
Posted: Monday, August 26, 2019 - 12:40 PM UTC
Fantastic looking engine Nick. The detailing visible is superb. Plus all the extra work on the chassis/floorplan is very impressive.

cheers
Michael
Szmann
_VISITCOMMUNITY
Netherlands Antilles
Joined: September 02, 2014
KitMaker: 1,977 posts
Auto Modeler: 1,371 posts
Posted: Monday, August 26, 2019 - 06:24 PM UTC

Quoted Text


Joel part 1 - thanks! yes, the art of painting...lots to learn there. I think I might complicate this by only painting with acrylics, lots of reasons, but I'm sticking with them. And, you're right - flat colors for armor are fairly forgiving - unlike the base color you use for a shiny auto finish. I have decided I like the alclad Aqua Gloss 2 - though i believe it is the culprit for my recent headaches with my airbrushes! - even though I thought I thoroughly rinsed them after use - apparently not!


In my experience, Alclad Aqua GLoss II isn't that bad as a clear coat. I frequently use it to coat my metallic finishes to protect the pigment of my harsh Caribbean environment. I don't use it as a bodywork coat because it's much softer than urethanes and prone to scratching or matting just by regulat handling.
Quick tip: acrylics dry very fast: don't give a chance to Aqua Gloss to dry inside your airbrush. After you finish spraying, add some alcohol right away into the cup and a drop of acrylic color (the darker the better). Mix with the remaining Aqua Gloss, then clean the airbrush. Now you'll be able to see if any residue remains in the A/B.

Gabriel
Joel_W
Staff MemberAssociate Editor
AUTOMODELER
_VISITCOMMUNITY
New York, United States
Joined: December 04, 2010
KitMaker: 11,666 posts
Auto Modeler: 2,974 posts
Posted: Tuesday, August 27, 2019 - 03:17 AM UTC
Nick,
You're modeling on a whole different plane then most of us. As I've said, the engine is a masterpiece all by itself, and then you went ahead and super detailed the super detailed engine. Those two intake shrouds look great, which is saying something as the magnification is so great.

Thanks for the explanation of how the engine assembly is installed.

The pictures of the chassis just blows away my basically OOB build.

As for what paint you use, it really doesn't much matter. Nothing dries quicker then Lacquers. Then comes Acrylic lacquers. The issue is that they dry rock hard, harder then Lacquers, so wet sanding, rubbing them out, polishing, and waxing is more of an effort. But I've seen plenty of paint jobs done with them that are national winners. There's a guy a little younger then me: The Lone Wolf who still paints with Testors paints, and he's a constant winner at model car contests.

As for the Aqua Gloss, if it works for you, then stick with it till you want to move on. I use the Semi Matt as a clear coat for Metallics if I'm going to need to handle those parts or areas. Other then that I'm still using Mr Hobby's C46 Super Clear, but now I have two sources for their Super Clear III GX100 which is supposed to have a deeper shine.

Joel
Stickframe
#362
_VISITCOMMUNITY
California, United States
Joined: December 01, 2013
KitMaker: 1,661 posts
Auto Modeler: 431 posts
Posted: Wednesday, August 28, 2019 - 08:27 AM UTC
Hi guys,

Thanks for dropping by -

Michael, I'm glad you noticed the chassis work! it's fun to do, but, as I'm getting closer to finishing this build, I'm discovering that less and less of the interior will ever be seen again! - which is too bad - if nothing else the colors and materials are varied enough to make it interesting. It reminded my of dios I've seen that show cars torn down. I've built a few shop related dios - but, even in 1/35 scale they are huge, and I think my big dio days are done - so - I need to figure out a rational reason to show less body and more other stuff!

Gabriel, thanks for the advice! Yes, all my base colors are vallejo model air acrylics. I've been using the Aqua Gloss II, and have had a predicable (by me) challenge, spraying enough on to be a wet coat, but not so much that it pools. I know not a huge problem but one that seems relevant on these curvy race cars!

Hi Joel - thanks - I guess I need to earn my keep here somehow, as you (and Gabriel)among others do such damn nice work on the bodies!! lol - a real challenge for me.

Speaking of which, as the painting of the 917 body comes, up, I'm not sure I want to use all of the kit decals - I don't like the looks of the white stripes - either in terms of their "line" or the color against the red body - I might not use them - hopefully not a blasphemous statement by me, but I don't like the look....


OK - the rolling chassis/very lower body is done:


So - making lots of good progress - but, it's a drag that most of this will never bee seen again! In retrospect, if I were building this again, and closing it in, I think I'd scratch build the engine. While not easy, probably OK because most of the really nice details in the HRM kit, are hidden from view. I'll bet with some patience it could be done, and, sadly, I probably wouldn't do the front end work again. While it as really interesting to build, maybe not worth it in the end - who knows? My sense is I won't do it again until I start my next project!

Next week I'll be traveling for work, so won't be posting update photos for a while -

Ok, happy model building

Cheers
Nick


Joel_W
Staff MemberAssociate Editor
AUTOMODELER
_VISITCOMMUNITY
New York, United States
Joined: December 04, 2010
KitMaker: 11,666 posts
Auto Modeler: 2,974 posts
Posted: Wednesday, August 28, 2019 - 09:45 AM UTC
Nick,
To say that I'm more then impressed with both the quality and quantity of your detailing, is a understatement pure and simple. Not only that, but you're accomplishing it in for me would be record breaking time. Heck, I've spent months just adding what I'm fond of calling "Enhancing", not strictly detailing.

As for the decals, I've never used the Fujimi decals, as I usually go with AM decals when I feel it's necessary. But I don't recall seeing decals for the John Wyler 917s, which is strange considering how fast all of those Fujimi kits sell everywhere. Indy Cal only has the Martini decals, which is how I ended up doing that car. So you're only other option is to paint the stripes. There are options for the nose from just a straight stripe to the curved full radiator stripe.

Have a great business trip, and we'll be waiting for your next update for sure.

Joel

Cosimodo
#335
_VISITCOMMUNITY
Auckland, New Zealand
Joined: September 03, 2013
KitMaker: 1,808 posts
Auto Modeler: 701 posts
Posted: Wednesday, August 28, 2019 - 06:22 PM UTC

Quoted Text

Hi guys,

Thanks for dropping by -

Michael, I'm glad you noticed the chassis work! it's fun to do, but, as I'm getting closer to finishing this build, I'm discovering that less and less of the interior will ever be seen again! - which is too bad - if nothing else the colors and materials are varied enough to make it interesting. It reminded my of dios I've seen that show cars torn down. I've built a few shop related dios - but, even in 1/35 scale they are huge, and I think my big dio days are done - so - I need to figure out a rational reason to show less body and more other stuff!


This would work as a dio for your Porsche and help show off your build.


cheers

Michael
Joel_W
Staff MemberAssociate Editor
AUTOMODELER
_VISITCOMMUNITY
New York, United States
Joined: December 04, 2010
KitMaker: 11,666 posts
Auto Modeler: 2,974 posts
Posted: Thursday, August 29, 2019 - 02:44 AM UTC
Michael,
Now that's a great picture. the car in the background looks like a long tail Porsche 908. Do you have any idea where and when this picture was taken?

Joel
Cosimodo
#335
_VISITCOMMUNITY
Auckland, New Zealand
Joined: September 03, 2013
KitMaker: 1,808 posts
Auto Modeler: 701 posts
Posted: Thursday, August 29, 2019 - 12:44 PM UTC

Quoted Text

Michael,
Now that's a great picture. the car in the background looks like a long tail Porsche 908. Do you have any idea where and when this picture was taken?

Joel


Hi Joel, I sourced it from one of the many news stories on Ferdinand Piech, the 917 designer. I thought of Nick's dio dilemma when I saw it. I don't know the date of the photo but clearly that's the Pink Pig in the foreground which ran only at the 1971 Le Mans race where it crashed.

cheers
Michael
bluebell914
_VISITCOMMUNITY
Pennsylvania, United States
Joined: September 26, 2018
KitMaker: 61 posts
Auto Modeler: 49 posts
Posted: Thursday, August 29, 2019 - 12:59 PM UTC
I am just absolutely (and I hate that term "absolute") fall down, pull-my-hair-out stupified by your build. I've spent the better part of 3 months building the Sebring 917 and encountered so many problems with the support tubing. All I can say is WOW.
Joel_W
Staff MemberAssociate Editor
AUTOMODELER
_VISITCOMMUNITY
New York, United States
Joined: December 04, 2010
KitMaker: 11,666 posts
Auto Modeler: 2,974 posts
Posted: Friday, August 30, 2019 - 01:22 AM UTC

Quoted Text


Quoted Text

Michael,
Now that's a great picture. the car in the background looks like a long tail Porsche 908. Do you have any idea where and when this picture was taken?

Joel


Hi Joel, I sourced it from one of the many news stories on Ferdinand Piech, the 917 designer. I thought of Nick's dio dilemma when I saw it. I don't know the date of the photo but clearly that's the Pink Pig in the foreground which ran only at the 1971 Le Mans race where it crashed.

cheers
Michael


Michael,
Great call on the Pink Pig. At 1st I thought it was primer, but you can clearly see those infamous dotted lines going across the door.

That would be one of the greatest dioramas of all time for race cars if anyone could pull it off.

Joel
Stickframe
#362
_VISITCOMMUNITY
California, United States
Joined: December 01, 2013
KitMaker: 1,661 posts
Auto Modeler: 431 posts
Posted: Friday, August 30, 2019 - 02:16 PM UTC
Hey guys,

Thanks for dropping by!

Hi Joel, I appreciate the nice words, especially as your work is always so nice! I have fun tackling these details - always interesting to try!

As for the Fujimi decals, I’ll find out this weekend! My comment about the stripes is just opinion by me - I don’t think they look that great, although accurate to the car - the 917 has really long a sweeping lines and I’m not sure I think the stripes draw them out as well as they could - but - it’s a LeMans winner! stripes or not lol! I should just use them! But I might not - lol -

Hi Michael - yes, I recognized those dashed lines immediately - the pink pig! Hmm...you know, that is a future project of mine and it has lots of detail....maybe I do have another dio in me.....it would sure be a nice way to show off what’s under the body.....and even an excuse to weather a race car! Hmmmm...

Hi Patrick - thanks for stopping by - Yes - that chassis tubing....sure looks easy, once it’s done - less so in real time! I too wrestled with those delicate shapes. The toughest were the two, three pin arms in the rear. They really didn’t want to stick to the rest of the frame. So, to help them along, I carefully cut off the lower pins, as flush as I could to the visible frame tubes - then drilled small holes (I think with a #78 bit?) where the pins were, then insrted short (really short!) segments of brass rod. From there, I used regular plastic glue to attach the two upper pins, and then CA glued the brass rods into the lower chassis. I enlarged the lower “holes” to accept the rods. This was not a fast process - but, it did result in tight, clean fits that are fairly strong -

So - stick with your project! and Stay calm! - easier said than done, but, the results can be nice and worth the effort -

Hopefully I’ll get this finished and photographed this weekend - but won’t be able to post finished shots for about a week -

Happy model building!

Cheers
Nick
Joel_W
Staff MemberAssociate Editor
AUTOMODELER
_VISITCOMMUNITY
New York, United States
Joined: December 04, 2010
KitMaker: 11,666 posts
Auto Modeler: 2,974 posts
Posted: Saturday, August 31, 2019 - 01:16 AM UTC
Nick,
Even if you were building your 917 pure OOB, I can't believe that you've almost completed the build. I'm almost finished with the Lotus 25 and it's been 6 weeks, a new record for me.

Looking forward to your final update and pictures when you return from your business trip.

Joel
Stickframe
#362
_VISITCOMMUNITY
California, United States
Joined: December 01, 2013
KitMaker: 1,661 posts
Auto Modeler: 431 posts
Posted: Tuesday, September 10, 2019 - 08:02 AM UTC
Hi gents - yes, the Porsche 917k is done - and bright red:


It's sort of a bummer - you can't really see too much of the engine or other details once this it all buttoned up - I could have made the rear simply removable, as the kit would have you, but in real life, it lifts up so that's what I built, but you can't see much of the engine:


A few from inside, and bit less glare:


Above, you can see some of the interior...and below, no cheating- you can see and highs or lows in the paint...like where the top and bottom meet in the rt front...oh well!


And back to the great, bright, and shining outdoors!


I like the fact that the back deck is open:


Above - at least you get the impression that some part of this build isn't OOB! and below, parting shots:


And there you have my go at a 917k - really fun a build -

I've since moved on to a dual build - a much newer pair of GT's a Nissan and a Toyota - both from Tamiya and they each have fairly detailed engines, so there's plenty of potential for more! I forgot how smoothly those kits go together! wow. The Nissan is well underway and haven't started the Toyota - I'll post progress this week -

OK, thanks for having a look!

Cheers,

Nick


 _GOTOTOP