The Garage
For general automotive modeling or non-modeling topics.
Strip, Track & Trail Official Build Thread
Joel_W
Staff MemberAssociate Editor
AUTOMODELER
_VISITCOMMUNITY
New York, United States
Joined: December 04, 2010
KitMaker: 11,666 posts
Auto Modeler: 2,974 posts
Posted: Sunday, August 09, 2020 - 03:41 AM UTC
Just saw that this build is also listed on the GB entries list, so I thought I'd just do another duel posting. Honestly, I'm not planning on being able to finish this build before the end of the GB, but my plans are to finish it, then start my build for the upcoming GB.

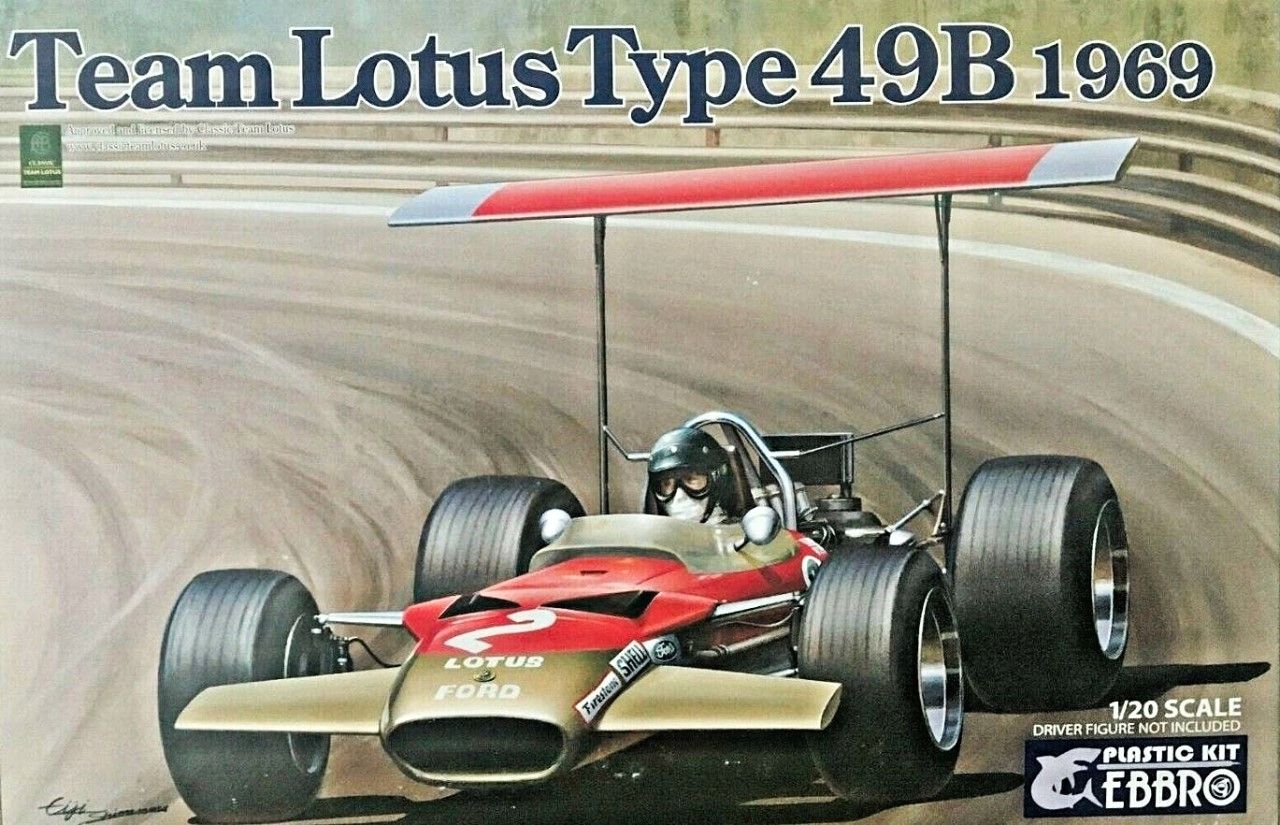
I took a few days off from actually doing any modeling, then decided on building the Ebbro 1/20 scale Rob Walker Lotus 49b. The kit comes as the final version of the Lotus 49b with exhaust ports on the top of the nose clip for the Radiator in that gaudy Red & Gold paint scheme, which was quite a shocker in 1968, at least it was to me. There were several modifications from the 1st generation Lotus 49 such as moving the front wheels forward by 3 inches, added a high rear wing, and wings to either side of the nose clip. The FIA also approved wider tires for the 1968 season.


Rob Walker ran a very competitive private Formula 1 team with works Lotus cars, but just one driver, who was a personal favorite of mine: Jo Siffert. He, like Clark could literally drive the wheels off any race car. Walker was pretty familar to most of us following F1 in the racing section of Road & Track magazine. Unfortunately, back then there was usually a lag of 2+ months or so between the race and his race article. But that's all we had back in the 1960's. As a side note, Walker never really worried about funding his team without the need for sponsors as his family took care of that issue. They owned Johnny Walker Scotch Whiskey.

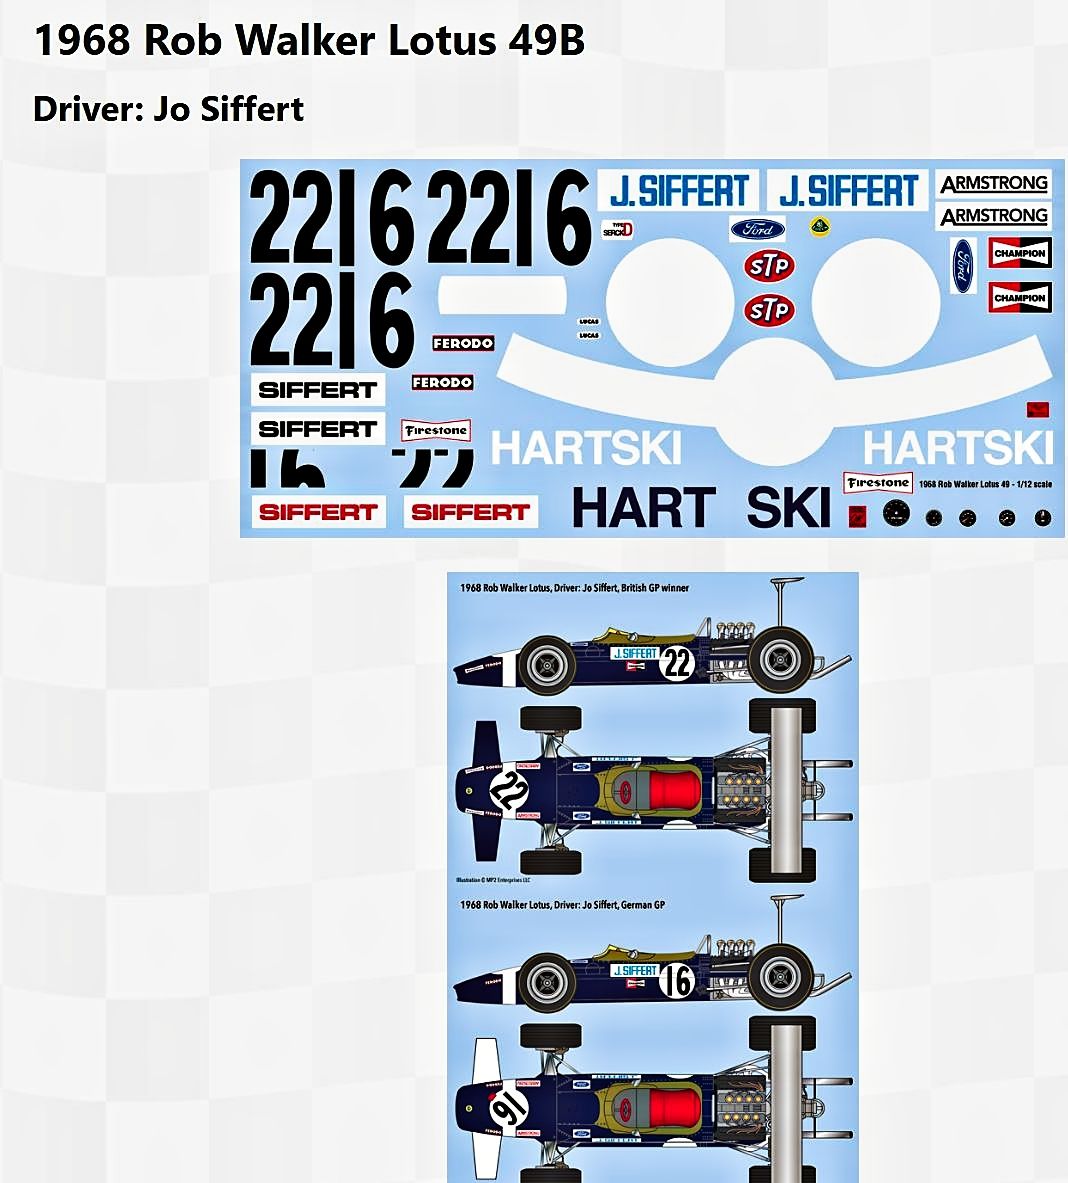
The Walker car was basically a one color Dark Blue, so matching it the best I can should be fairly straight forward. Fortunately, Indy Cals makes the correct decals for this car.

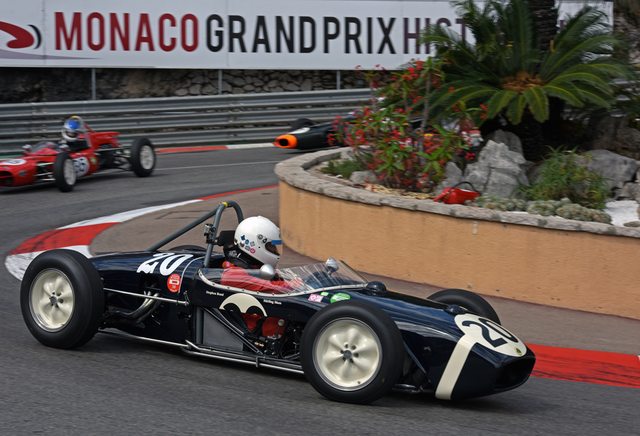
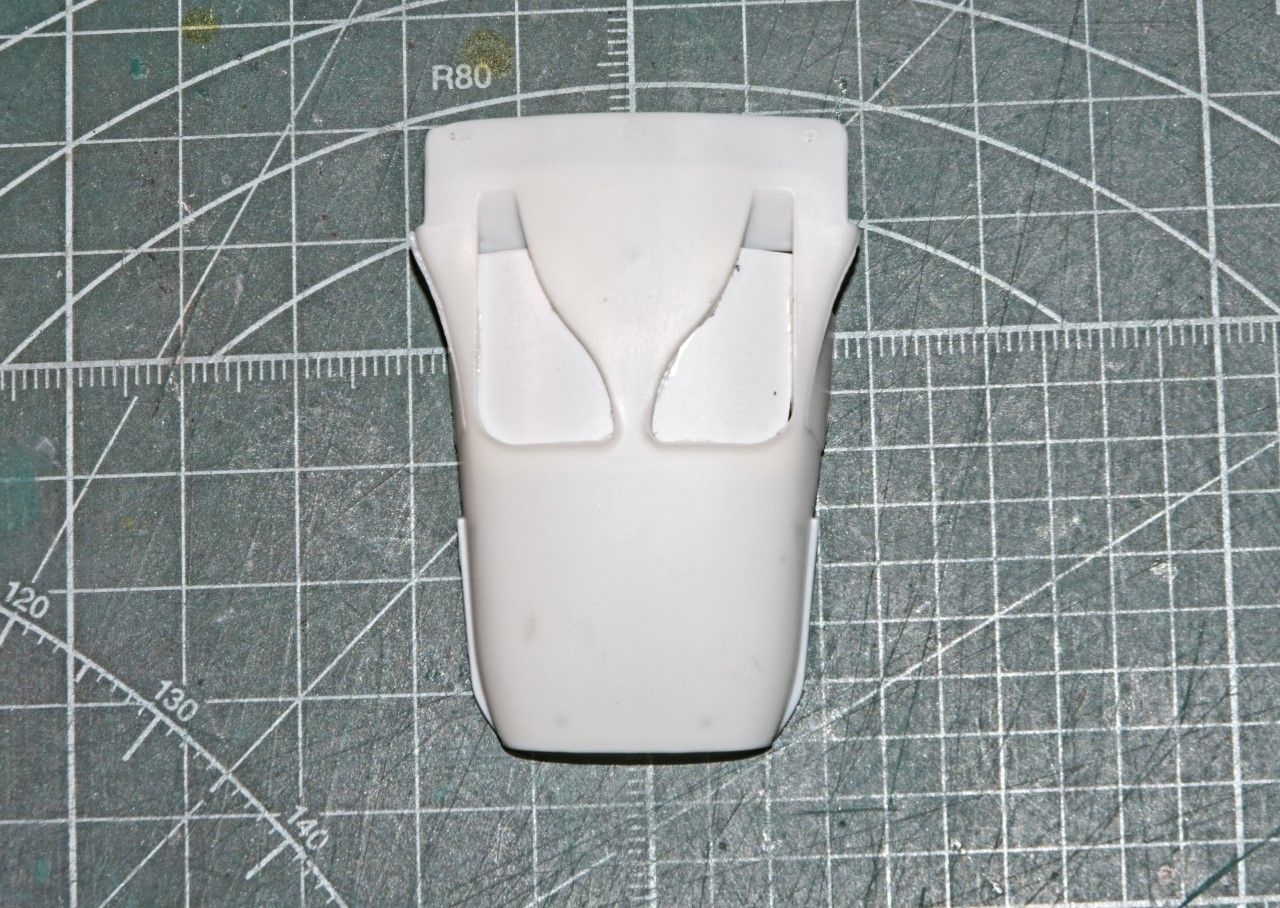
.

The major difference between Walker's 49b and the official team 49b was the nose and internal ducting to funnel the hot radiator air out and produce a little more downforce.

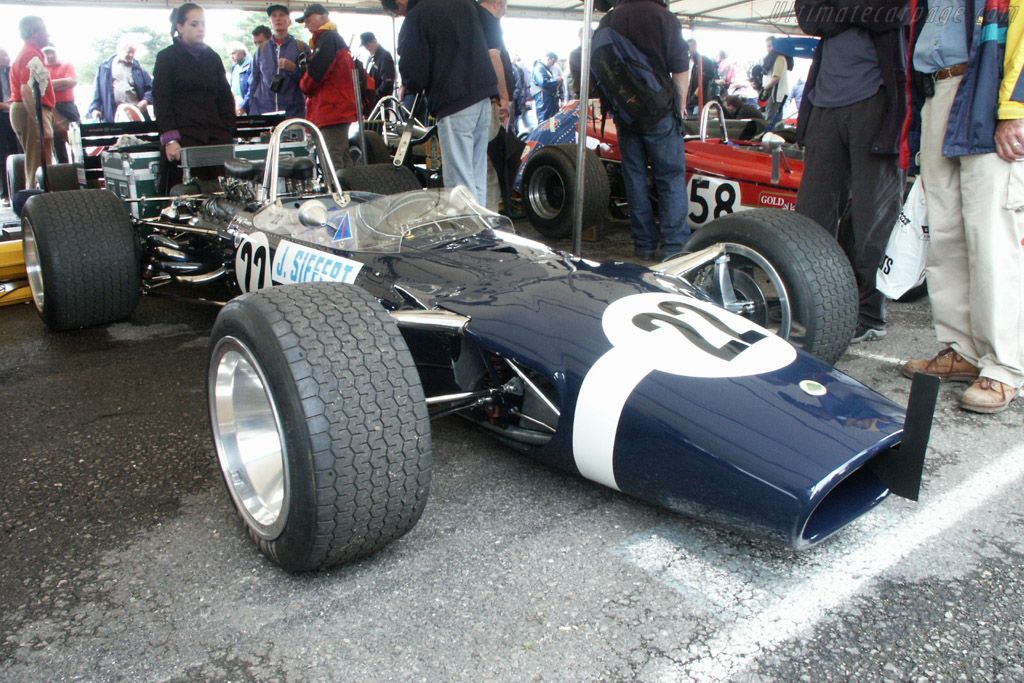
Here's the nose section of Walkers car:


and here's a look down at a model of the team car.
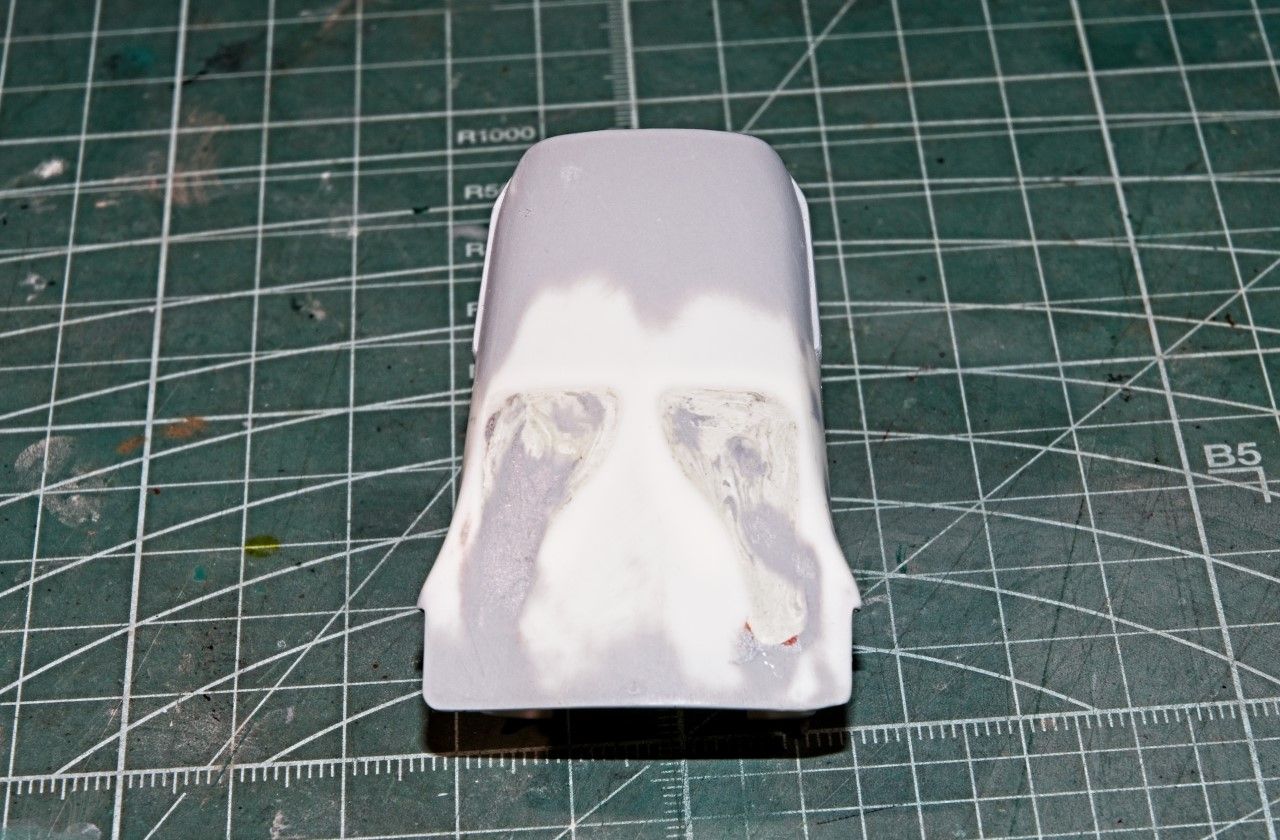
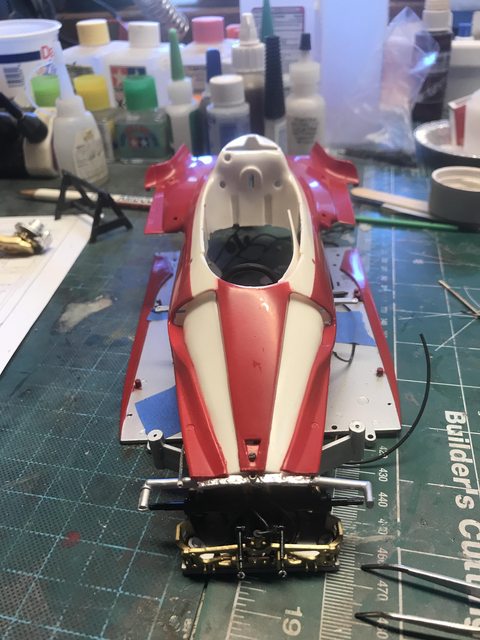
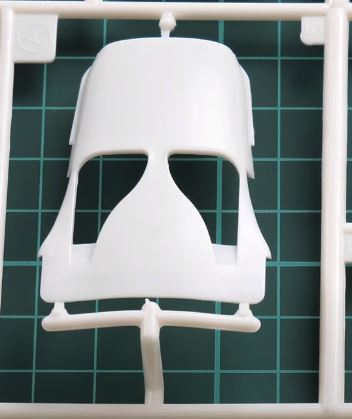


The kit part.


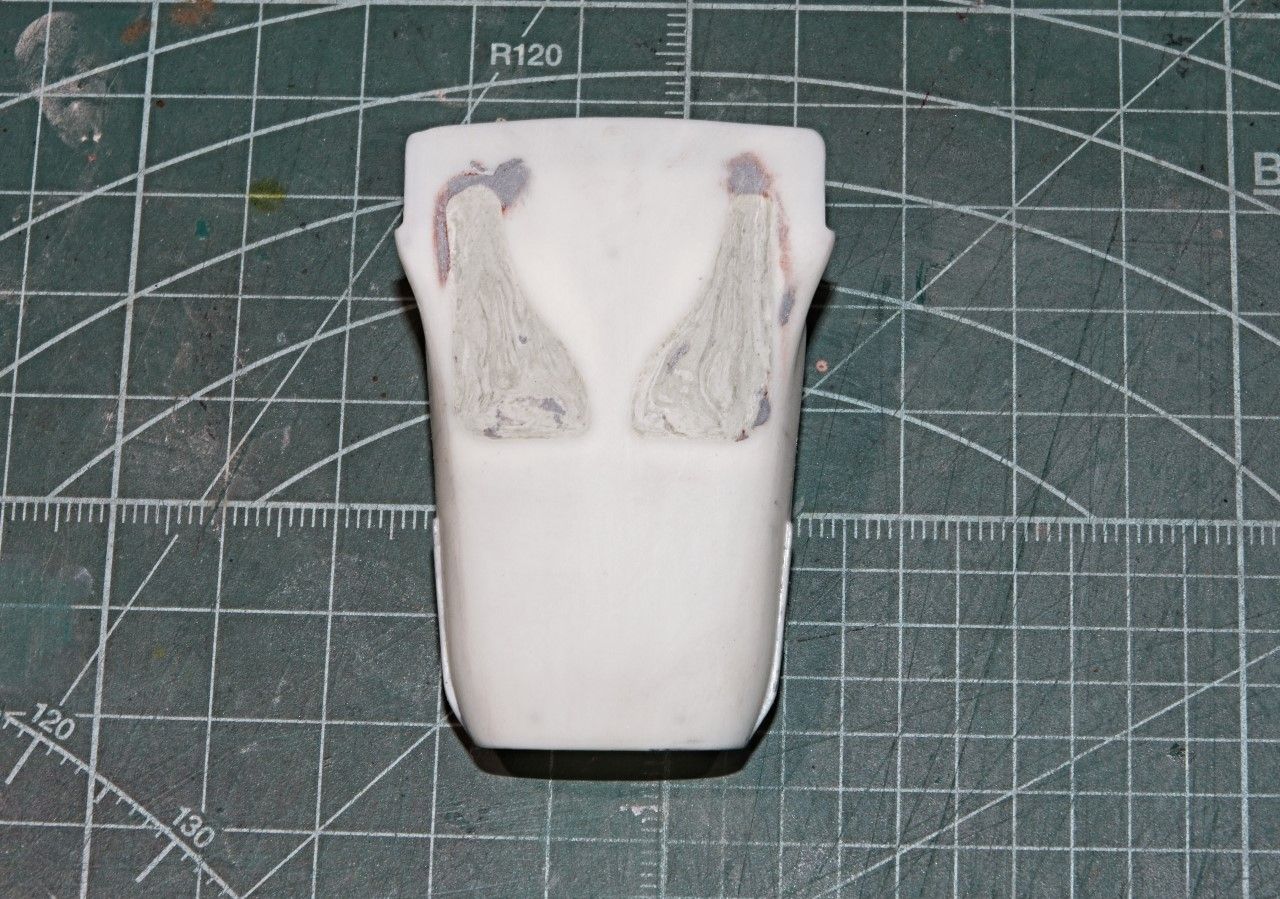
Added plastic sheet backing


Filled the openings with 2 part Apoxie Sculpt putty, then removed the excess using my fingers and water. Once dry I sanded to shape, then a coat of Bondo, followed by Tamiya putty thinned with Extra Thin to fill in any depressions and scratches.


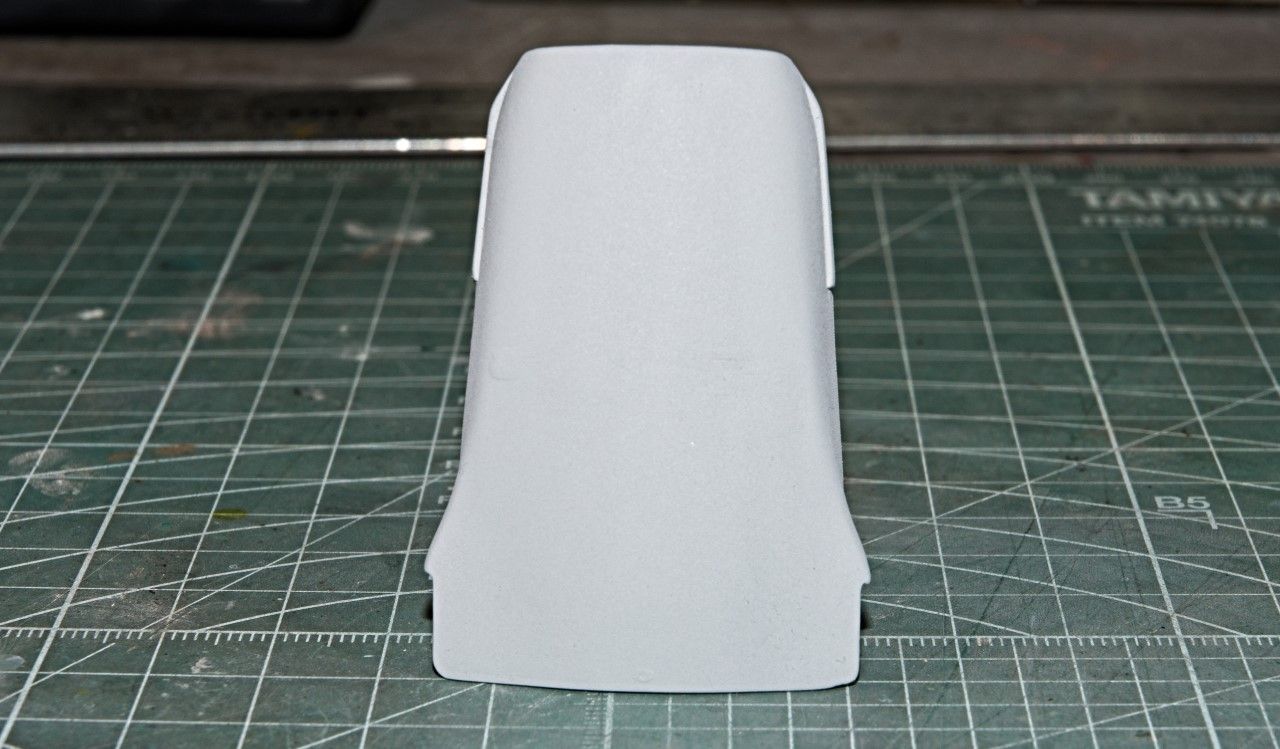
Up next is priming the nose and fixing all the issues that I'm sure I missed.

Joel
AussieReg
Staff MemberAssociate Editor
AUTOMODELER
#007
_VISITCOMMUNITY
Victoria, Australia
Joined: June 09, 2009
KitMaker: 8,156 posts
Auto Modeler: 2,953 posts
Posted: Sunday, August 09, 2020 - 03:48 AM UTC

Quoted Text

Just saw that this build is also listed on the GB entries list, so I thought I'd just do another duel posting. Honestly, I'm not planning on being able to finish this build before the end of the GB, but my plans are to finish it, then start my build for the upcoming GB.


Joel, I suspected that might be the case, but I thought I would throw a link to your dedicated build log in here anyway.

Cheers, D

Joel_W
Staff MemberAssociate Editor
AUTOMODELER
_VISITCOMMUNITY
New York, United States
Joined: December 04, 2010
KitMaker: 11,666 posts
Auto Modeler: 2,974 posts
Posted: Sunday, August 09, 2020 - 04:12 AM UTC
D,
Thanks for the listing. I'll really try to get it done in time, but less then two months is really cutting it short even for a min of added details. F1 cars always seem to hold some very interesting issues for me throughout the build.

Joel
Joel_W
Staff MemberAssociate Editor
AUTOMODELER
_VISITCOMMUNITY
New York, United States
Joined: December 04, 2010
KitMaker: 11,666 posts
Auto Modeler: 2,974 posts
Posted: Sunday, August 09, 2020 - 07:11 AM UTC
Well, as expected the priming of the nose cone showed that more work was needed, mostly concerning those removed air ducts. So I gave them another complete coat of Tamiya Gray putty, waited a full day and sanded them. I carefully with my finger nail went along the surface and any slight issue I covered with regular CA glue. let that dry for 1 hr, then sanded and rubbed out the entire nose cone as prep for re-priming.


Set up the paint booth, and since I have a jar of pre-thinned Mr. Finisher 1500 primer ready to go, all I needed to do was fill my Grex AB cup.

the results really speak for themselves. The finish is about the best that I hope to do.


Joel
Lakota
#123
_VISITCOMMUNITY
New Mexico, United States
Joined: November 17, 2008
KitMaker: 1,202 posts
Auto Modeler: 15 posts
Posted: Sunday, August 09, 2020 - 10:36 AM UTC
Howdy Y'all
Joel: That's some awesome body work. You always amaze me.
All: I've done very little work on my Corvette C7.R but I'm trying. I've got a question, the instructions say to put decals on the vinyl tires. How do I go about doing this? Do I gloss coat the tires, apply the decals, and put a flat coat on? Also, I've been sanding the two front tires all weekend and still don't have the seams out.
Am I doing something wrong? I'm using about a 600 grit sandpaper.


Take care and stay safe,
Don "Lakota"
Joel_W
Staff MemberAssociate Editor
AUTOMODELER
_VISITCOMMUNITY
New York, United States
Joined: December 04, 2010
KitMaker: 11,666 posts
Auto Modeler: 2,974 posts
Posted: Sunday, August 09, 2020 - 12:07 PM UTC
Don,
Thanks so much for your thumbs up on the nose cone. Honestly, I just got lucky.

My method for decaling rubber or vinyl tires are the same.

1-Wash the tires with soapy water. Let dry
2-Since the tires are rigid, you need a gloss base that will flex to some degree without cracking. I've found that my old jar of Pledge/Future works perfectly for this task. the trick is to apply a liberal coating with a paint brush. Half the time I need a 2nd coat so the surface is smooth and glossy.
3-Decal using the Micro system.
4-When the decals are dry, brush coat on another layer of Pledge to seal the decals.
5-weather to kill the brand new look of the tires if you want to.
6-air brush on a matt finish over the entire tire.

As far as the seams go, new tires always have a centerline seam due to the molding process. But the kit tires have seams that are way out of scale.

To remove or decrease them I 320/400/600 by hand. You can also use a electric drill with the tire mounted in the chuck to make quick work of those seams, but I always end up doing it by hand since both of my Dremels died from old age.

Looking forward to seeing your CR7 Vette update.

Joel

Lakota
#123
_VISITCOMMUNITY
New Mexico, United States
Joined: November 17, 2008
KitMaker: 1,202 posts
Auto Modeler: 15 posts
Posted: Sunday, August 09, 2020 - 12:21 PM UTC
Thank you Joel. I appreciate the quick response. Your method should save me some time on the tires. I only work on during the weekend but I'll try to get the body primed and sanded by next weekend.
Take care and stay safe,
Don "Lakota"
AussieReg
Staff MemberAssociate Editor
AUTOMODELER
#007
_VISITCOMMUNITY
Victoria, Australia
Joined: June 09, 2009
KitMaker: 8,156 posts
Auto Modeler: 2,953 posts
Posted: Sunday, August 09, 2020 - 12:52 PM UTC
Don, I'm with Joel on this one as well. My method is very similar:

Sand off most of the seam and rough up the tread area.
Wash with IPA to clean off any residue.
Spray with Future or Aqua Gloss to seal.
Spray with Dark Grey (Nato Black or Tyre Black).
Decals.
Flat clear to seal.

Great to see the 'Vette getting some love, looking forward to more updates!

Cheers, D
pnance26
_VISITCOMMUNITY
California, United States
Joined: January 22, 2016
KitMaker: 766 posts
Auto Modeler: 140 posts
Posted: Monday, August 10, 2020 - 02:25 AM UTC
Well, I only had one day off this weekend, so just a bit of progress made.

I realized that I had dislodged one of the pedals but it was located. I can get it back into place. And the red indicator "lights" are some button switches dipped into Tamiya Clear Red. Amazing what those two tiny elements add! I know I need to apply the Ferrari decal to the center of the wheel. I also need to find a very small "MOMO" decal and I wish I could find a very tiny "OFF" decal to put under the red button on the steering wheel as well. That actually should be a toggle switch but all the usual suspects are out of stock right now.


Cracks? What cracks? BMF does a fine job...


Final photo is a test fit of the underpiece for the naca ducts. In putting them in place, I have found another crack. But this one will take a bit of epoxy to repair. Anyway, this is progressing along... Also you can see that the replacement "arm" for the left front suspension is working well... that is actually the right angle from a sprue that was the correct diameter! Lucky find!


Your comments are ALWAYS welcome!
pnance26
_VISITCOMMUNITY
California, United States
Joined: January 22, 2016
KitMaker: 766 posts
Auto Modeler: 140 posts
Posted: Monday, August 10, 2020 - 02:30 AM UTC
Very nice job of filling those ducts! Can't even tell they were there!
pnance26
_VISITCOMMUNITY
California, United States
Joined: January 22, 2016
KitMaker: 766 posts
Auto Modeler: 140 posts
Posted: Monday, August 10, 2020 - 02:35 AM UTC
This past Sunday was the 70th anniversary of the birth of F1 at Silverstone in 1950.

As part of Sky Sports 1 coverage, they took three of Sterling Moss' cars out for a spin. What I thought was really cool was how the side panels for the Lotus, driven by Jensen Button, was in its Monaco configuration which meant the side panels were removed for cooling.

Try driving around these days with the driver so exposed!

Enjoy and I think there are three really cool model subjects here!


www.skysports.com/watch/video/sports/f1/12045890/moss-driving-special-feature

Here is the Lotus 18 with side panels removed...


Here's a statement for you... The Lotus dominance in the 60s came with a terrible cost, the Chapman’s lightweight mantra resulted in cars with serious structural flaws. The number of top drivers injured or killed in Lotus cars was considerable – notably Stirling Moss, Alan Stacey, Mike Taylor, Jim Clark, Mike Spence, Bobby Marshman, Graham Hill, Jochen Rindt, and Ronnie Peterson.
Joel_W
Staff MemberAssociate Editor
AUTOMODELER
_VISITCOMMUNITY
New York, United States
Joined: December 04, 2010
KitMaker: 11,666 posts
Auto Modeler: 2,974 posts
Posted: Monday, August 10, 2020 - 02:37 AM UTC
Patrick
Excellent progress for sure. the BMF worked great for covering those cracks, and your replacement fix for the missing front suspension arm looks perfect in the picture.

And thanks for your thumbs up on the nose modification, it's greatly appreciated.

joel
pnance26
_VISITCOMMUNITY
California, United States
Joined: January 22, 2016
KitMaker: 766 posts
Auto Modeler: 140 posts
Posted: Monday, August 10, 2020 - 03:50 AM UTC

Quoted Text

Howdy Y'all
Joel: That's some awesome body work. You always amaze me.
All: I've done very little work on my Corvette C7.R but I'm trying. I've got a question, the instructions say to put decals on the vinyl tires. How do I go about doing this? Do I gloss coat the tires, apply the decals, and put a flat coat on? Also, I've been sanding the two front tires all weekend and still don't have the seams out.
Am I doing something wrong? I'm using about a 600 grit sandpaper.


Take care and stay safe,
Don "Lakota"


Don, do you own a dremel tool or any kind of rotary tool with an adjustable speed?

Find a piece of dowel that will fit inside the tires. Take any kind of screw and screw it into the end of the dowel. Cut off the head of the screw, so now you have a shaft sticking out of the end of the dowel. Cut the dowel to about half again the width of your tire.

Insert the dowel in the tire. Now, chuck that into your rotary tools. Tighten the chuck.

Apply strip of sandpaper to a wooden block (they do make sandpaper with an adhesive backing or just use some Super 77). You now have a sanding block.

Turn on your rotary tool and apply the tire to the sanding block. Be careful not to apply too much pressure.

Now you get a nice, even sanding job all the way around your tire!

Sounds complicated but it really does save time!
Cosimodo
#335
_VISITCOMMUNITY
Auckland, New Zealand
Joined: September 03, 2013
KitMaker: 1,808 posts
Auto Modeler: 701 posts
Posted: Tuesday, August 11, 2020 - 09:49 PM UTC

Quoted Text

Is that the 1/12th Porsche, Michael?

Beautiful detailing!


Sorry I missed this Patrick. Yes it is 1/12 scale.

Thanks
Michael
Cosimodo
#335
_VISITCOMMUNITY
Auckland, New Zealand
Joined: September 03, 2013
KitMaker: 1,808 posts
Auto Modeler: 701 posts
Posted: Tuesday, August 11, 2020 - 09:55 PM UTC
So two major milestones.
Firstly, I have completed half of the steps in the instructions, that's 12, 13 and 14.

Step 12

Right hand side sidepod support and fuel pumps attachment points.

Step 13

Left hand side support plus Oil tank and pipes and hoses to pumps and radiators, front and back and overflow tank.

and Step 14, halfway point and also second major milestone, front and back finally come together


cheers
Michael
AussieReg
Staff MemberAssociate Editor
AUTOMODELER
#007
_VISITCOMMUNITY
Victoria, Australia
Joined: June 09, 2009
KitMaker: 8,156 posts
Auto Modeler: 2,953 posts
Posted: Tuesday, August 11, 2020 - 10:31 PM UTC
Michael, this build is getting more and more impressive! The fine detail is really stunning and you are really making it stand out from the crowd!

Great to see the half-way point passed and the completed frame on the bench.

Cheers, D
pnance26
_VISITCOMMUNITY
California, United States
Joined: January 22, 2016
KitMaker: 766 posts
Auto Modeler: 140 posts
Posted: Wednesday, August 12, 2020 - 01:10 AM UTC
Oh come on... that's the real thing, just put in the machine from "Honey, I Shrunk the Kids".

I know that it is MFH. Does it come with all the hose fittings and the beautiful chrome tank?

Beautiful, just beautiful work.
Joel_W
Staff MemberAssociate Editor
AUTOMODELER
_VISITCOMMUNITY
New York, United States
Joined: December 04, 2010
KitMaker: 11,666 posts
Auto Modeler: 2,974 posts
Posted: Wednesday, August 12, 2020 - 01:33 AM UTC
Michael,
What a great achievement reaching the halfway point in this super complex build. Your skill level has been more then what's needed to create what will surely be a master piece here for some time to come.

I, like Patrick did have the thought cross my mind that you've been reducing pictures of the real car build supplied by the Porsche Archives.

I think you know by now how much I'm looking forward to you completing the 2nd half of the build, and crossing the finish line with the checker flag waving.

Joel
Cosimodo
#335
_VISITCOMMUNITY
Auckland, New Zealand
Joined: September 03, 2013
KitMaker: 1,808 posts
Auto Modeler: 701 posts
Posted: Wednesday, August 12, 2020 - 11:26 AM UTC

Quoted Text

Michael, this build is getting more and more impressive! The fine detail is really stunning and you are really making it stand out from the crowd!

Great to see the half-way point passed and the completed frame on the bench.

Cheers, D


Thanks Damian. My biggest concern is the time because I am well past the halfway in that. I haven't started the body yet and I know the doors don't fit. It will be tight to the flag!

cheers
Michael
Cosimodo
#335
_VISITCOMMUNITY
Auckland, New Zealand
Joined: September 03, 2013
KitMaker: 1,808 posts
Auto Modeler: 701 posts
Posted: Wednesday, August 12, 2020 - 11:29 AM UTC

Quoted Text

Oh come on... that's the real thing, just put in the machine from "Honey, I Shrunk the Kids".

I know that it is MFH. Does it come with all the hose fittings and the beautiful chrome tank?

Beautiful, just beautiful work.


Hi Patrick,
Yes, it's all MFH except for the little brass clips I added for the hoses.
The oil tank is white metal and I decided to see what it would look like polished rather than painted. The bands are Alclad's dark aluminium, the oil pump is polished chrome from Alclad. The danger is the fuel tank oxidises over time back to the usual dull gray of white metal.

cheers
Michael
Cosimodo
#335
_VISITCOMMUNITY
Auckland, New Zealand
Joined: September 03, 2013
KitMaker: 1,808 posts
Auto Modeler: 701 posts
Posted: Wednesday, August 12, 2020 - 11:33 AM UTC

Quoted Text

Michael,
What a great achievement reaching the halfway point in this super complex build. Your skill level has been more then what's needed to create what will surely be a master piece here for some time to come.

I, like Patrick did have the thought cross my mind that you've been reducing pictures of the real car build supplied by the Porsche Archives.

I think you know by now how much I'm looking forward to you completing the 2nd half of the build, and crossing the finish line with the checker flag waving.

Joel


Thanks Joel. There are probably more photos of the engine/interior of this particular Porsche in the blog than you can find on line. Upside to that of course nobody is quite sure what it should look like.
I am hoping I can make the chequered flag with this but it will be tight.

cheers
Michael
AussieReg
Staff MemberAssociate Editor
AUTOMODELER
#007
_VISITCOMMUNITY
Victoria, Australia
Joined: June 09, 2009
KitMaker: 8,156 posts
Auto Modeler: 2,953 posts
Posted: Wednesday, August 12, 2020 - 01:07 PM UTC

Quoted Text

The danger is the fuel tank oxidises over time back to the usual dull gray of white metal.


Michael, I would suggest Alclad Aqua Gloss on the white metal. From what I've found it doesn't affect the sheen level and will protect it from the oxidising.

Cheers, D
Cosimodo
#335
_VISITCOMMUNITY
Auckland, New Zealand
Joined: September 03, 2013
KitMaker: 1,808 posts
Auto Modeler: 701 posts
Posted: Thursday, August 13, 2020 - 10:28 AM UTC

Quoted Text


Quoted Text

The danger is the fuel tank oxidises over time back to the usual dull gray of white metal.


Michael, I would suggest Alclad Aqua Gloss on the white metal. From what I've found it doesn't affect the sheen level and will protect it from the oxidising.

Cheers, D


I will give that a try.
Thanks for the tip.

cheers
Michael
PasiAhopelto
_VISITCOMMUNITY
Uusimaa, Finland
Joined: October 01, 2016
KitMaker: 514 posts
Auto Modeler: 44 posts
Posted: Thursday, August 13, 2020 - 04:07 PM UTC
Had a decal failure (user error), so I'll change my build to this:


AussieReg
Staff MemberAssociate Editor
AUTOMODELER
#007
_VISITCOMMUNITY
Victoria, Australia
Joined: June 09, 2009
KitMaker: 8,156 posts
Auto Modeler: 2,953 posts
Posted: Thursday, August 13, 2020 - 04:37 PM UTC

Quoted Text

Had a decal failure (user error), so I'll change my build to this:


Sorry to hear you've struck problems Pasi, I was looking forward to the Olds making more progress. The 240Z is a classic and made a great looking rally car, even I have managed to collect a street version along the way!


Good luck with the build, this should be a fun build to follow as well.

Cheers, D