_GOTOBOTTOM
Cars: Formula1
For Formula 1 racing modelers.
1/20 Tyrrell P34 1977 Monaco GP #4
Szmann
_VISITCOMMUNITY
Netherlands Antilles
Joined: September 02, 2014
KitMaker: 1,977 posts
Auto Modeler: 1,371 posts
Posted: Saturday, May 09, 2020 - 04:06 AM UTC


Conformity pic:


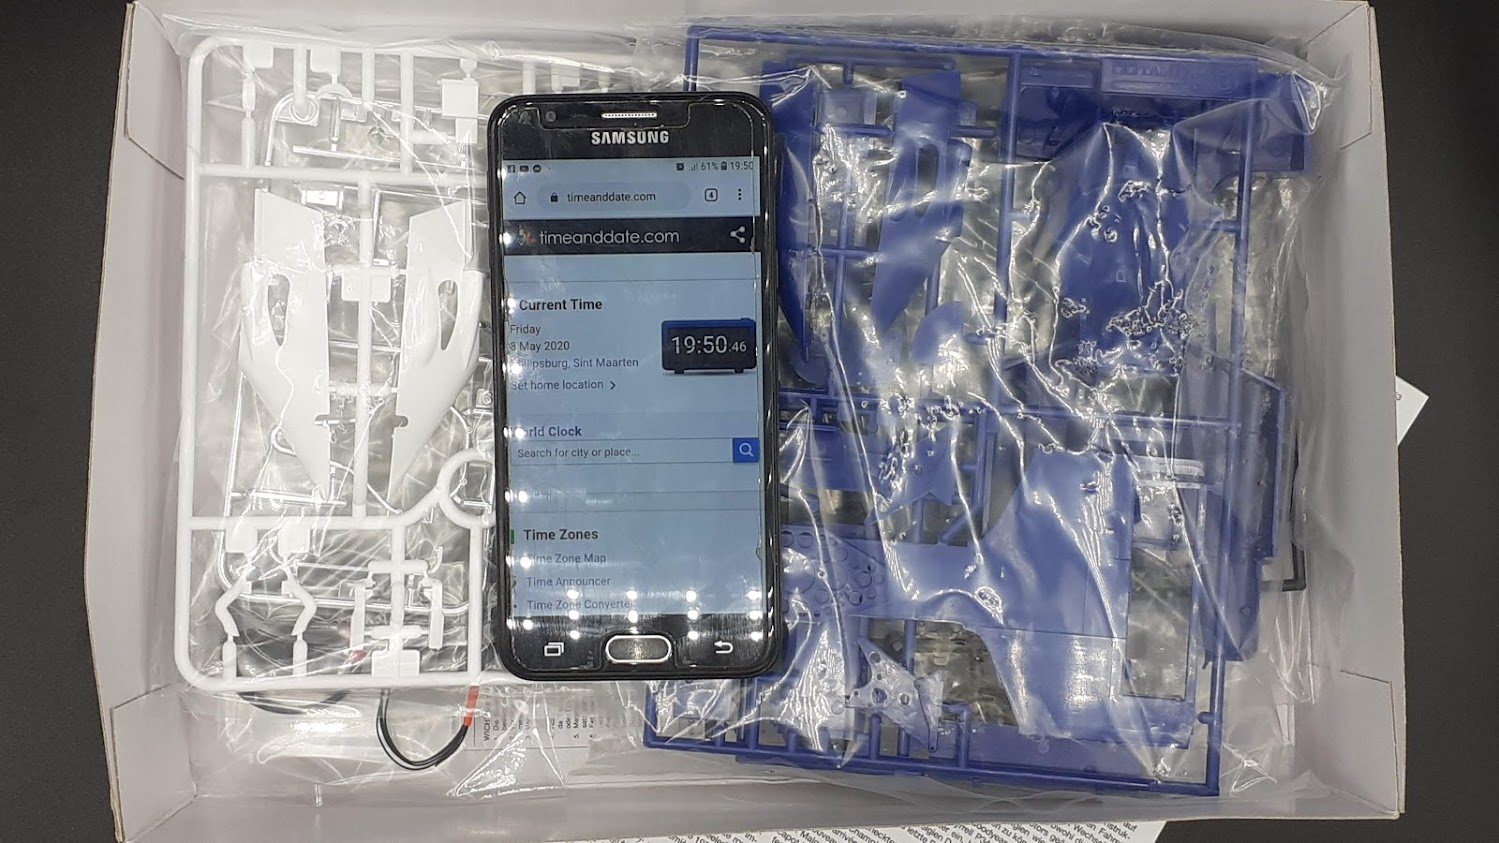
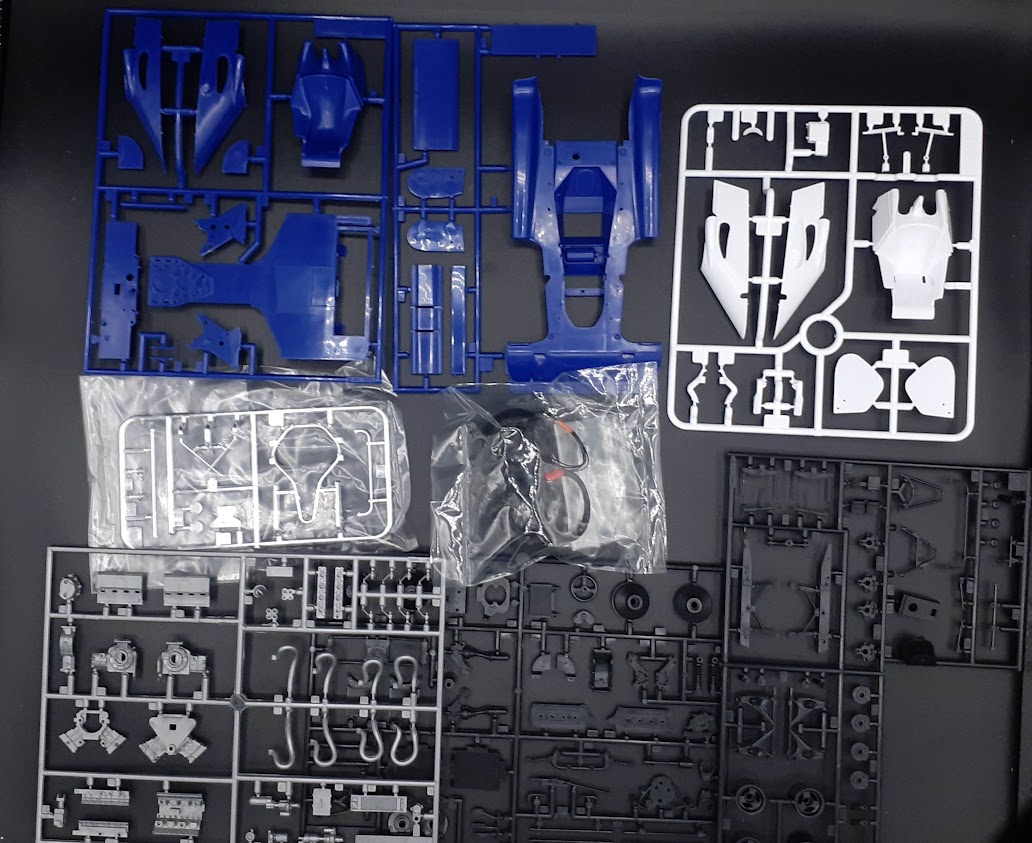
Not quite ready to cut into the plastic, but I had a quick look into the box and here I found a couple of interesting things.

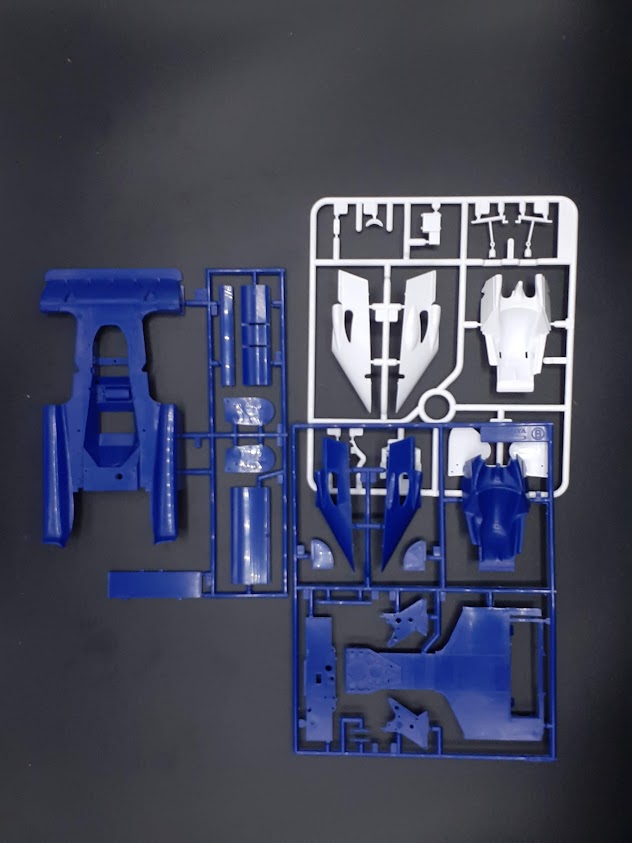
THe white sprue in this picture (sprue H) seems to be a latter addition to the kit. It duplicated some parts already present on the blue plastic sprues:


Here you can see the head to head comparison between cockpit cowling halves, with the windows in different shapes and the "bulbs" stylized differently. Also there is no sign of the frontal air intake Tom had to delete in his build. Also the tires seem to be from different batches, the front ones versus rear ones. The rear ones are noticeable softer and feel more fresh. Again pretty odd, there are 2 runs of poly caps as well, 6 molded with the front tires, and 4 individually cut and packed with the rear ones


Instructions are all typical Tamiya in fine print:


The kit also come with a frozen stance featureless pilot - decals provided for this little chap:


Decals have printed Tamiya on them, but look and feel more like Cartograf ones... very thin, a tad glossy and with the backing paper very sticky to bare hand touch


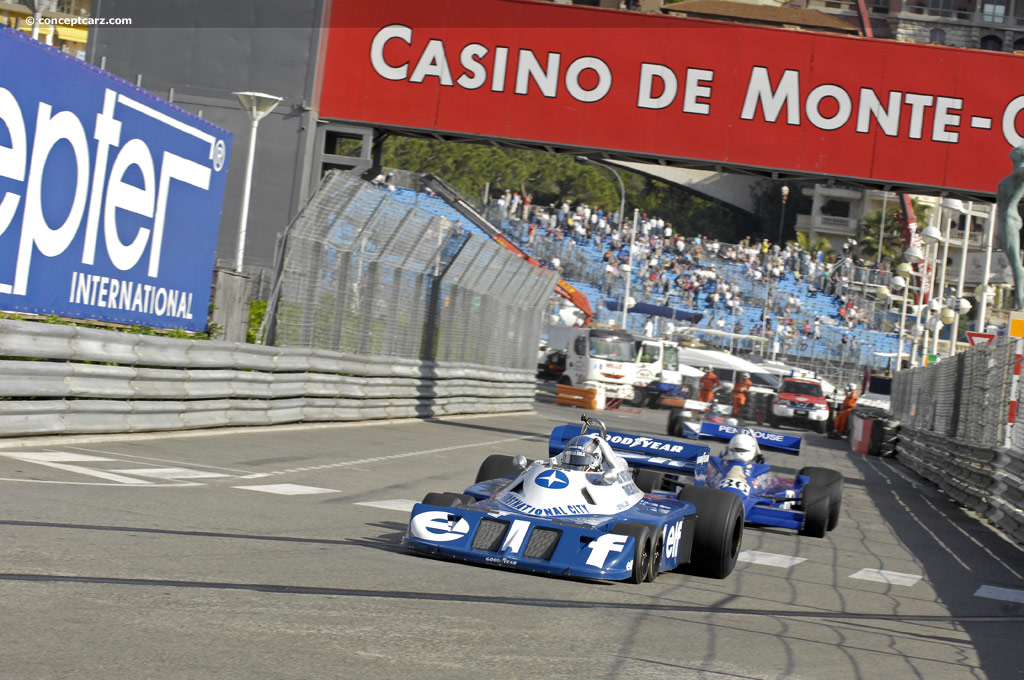
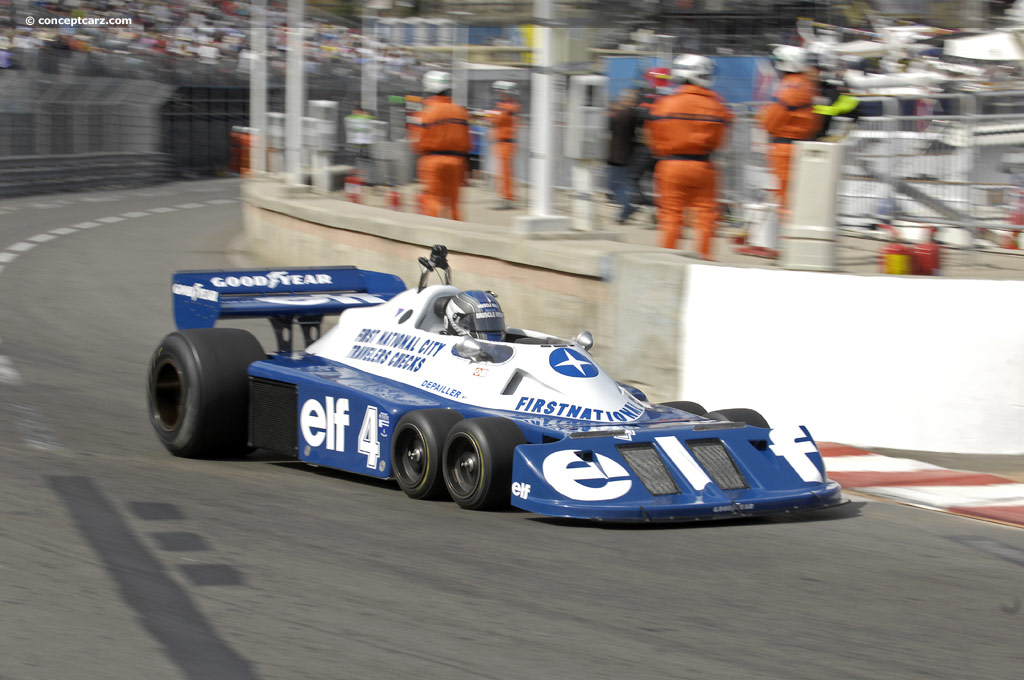
I was asked already what version I'm gonna build and I chose #4, P. Depailler, just because I didn't like Scheckter's attitude and I don't want to celebrate arrogance, winner in Sweden ot not.

That being said, the build it's going to be OOB as per owner's request - but you know hot this thing is, probably I will modify something if I really cannot live with it

Fortunately, there is a full video on YT with the 1977 Monaco race. Unfortunately, the quality is quite bad:


And here's another video, also claiming to be taken on 1977 Monaco GP, showing the Tyrrell driving without a cowling


For being a complete beginner on both 1:20 scale and F1 models, I rely pretty much on your criticism, observations, feed-back and help with documenting, guys!

Thanks!
Gabriel
Szmann
_VISITCOMMUNITY
Netherlands Antilles
Joined: September 02, 2014
KitMaker: 1,977 posts
Auto Modeler: 1,371 posts
Posted: Saturday, May 09, 2020 - 04:10 AM UTC
Stupid me, I didn't paid attention (again!) to the topic subject. Can you please migrate it in F1 section, please, Damian? Sorry for my incompetence!

Gabriel
Joel_W
Staff MemberAssociate Editor
AUTOMODELER
_VISITCOMMUNITY
New York, United States
Joined: December 04, 2010
KitMaker: 11,666 posts
Auto Modeler: 2,974 posts
Posted: Saturday, May 09, 2020 - 05:25 AM UTC
Gabriel,
the white cowl belongs to the 1977 P34 version while the all blue is from the 1976 ver. As Tom pointed out based on the race you're modeling, the cockpit windows to keep an eye on the tires varied in overall size.

The reviews I've read from time to time on Tamiya's P34 rate the model as excellent. And as an added bonus the Cosworth V8 is superbly modeled as well.

Joel
Szmann
_VISITCOMMUNITY
Netherlands Antilles
Joined: September 02, 2014
KitMaker: 1,977 posts
Auto Modeler: 1,371 posts
Posted: Saturday, May 09, 2020 - 05:43 AM UTC

Quoted Text

Gabriel,
the white cowl belongs to the 1977 P34 version while the all blue is from the 1976 ver. As Tom pointed out based on the race you're modeling, the cockpit windows to keep an eye on the tires varied in overall size.


Yes, the white cowling it's specific for the P34's second season, when the main sponsor changed from Elf to First National. I minded Tom's remark, and the blue sprue has a flat line at the bottom of the cut-out, while the white sprue has a waterdrop shape cutting. The size it's roughly the same.

Quoted Text

The reviews I've read from time to time on Tamiya's P34 rate the model as excellent. And as an added bonus the Cosworth V8 is superbly modeled as well.
Joel


Yes, what I have seen in other places point to a nicely detailed engine, but also to weak connection between the engine and the frame, poor front wheels alignment and some gap where the cowling meets the lower front body.
For what I can say at the first look, it seems to be a fine kit indeed.
Thanks for following, Joel!

Gabriel
Dixon66
_VISITCOMMUNITY
New Hampshire, United States
Joined: December 12, 2002
KitMaker: 1,500 posts
Auto Modeler: 645 posts
Posted: Saturday, May 09, 2020 - 06:43 AM UTC
Best of luck on this one G. Will be following and know you will do it more than justice.
Cosimodo
#335
_VISITCOMMUNITY
Auckland, New Zealand
Joined: September 03, 2013
KitMaker: 1,808 posts
Auto Modeler: 701 posts
Posted: Saturday, May 09, 2020 - 09:31 AM UTC
Amazing to see three of these six wheeler kits at the same time! Good luck with this Gabriel! And I am glad to see this done as Patrick Depailler, an over looked F1 driver.

Cheers
Michael
AussieReg
Staff MemberAssociate Editor
AUTOMODELER
#007
_VISITCOMMUNITY
Victoria, Australia
Joined: June 09, 2009
KitMaker: 8,156 posts
Auto Modeler: 2,953 posts
Posted: Saturday, May 09, 2020 - 11:22 AM UTC
Another build log that will be flagged in my "must-follow" list!


Quoted Text

Stupid me, I didn't paid attention (again!) to the topic subject. Can you please migrate it in F1 section, please, Damian? Sorry for my incompetence!

Gabriel


Done. No need to apologise, there is quite a lot to take in when starting a new topic.

Cheers, D
Szmann
_VISITCOMMUNITY
Netherlands Antilles
Joined: September 02, 2014
KitMaker: 1,977 posts
Auto Modeler: 1,371 posts
Posted: Saturday, May 09, 2020 - 11:35 AM UTC

Quoted Text

Best of luck on this one G. Will be following and know you will do it more than justice.


Thanks, David! I'll try my best, as usual. Thanks for following!

Michael, I think I owe apologies to Mr. Peterson - Scheckter was already with another team in 1977 - and #3 belonged to him. However, Patrick Depallier had driven the most GPs onboard P34 and contributed significantly to the team relative success - 3rd place in constructor's championship. Just the run on the mill guy like one of my other favourites - Barichello.

I dug as deep as I could into the internet and I found some interesting pics. The race of Monaco being so old, just a few sites are hosting pictures from the race, and the videos to be found are low resolution and difficult to "read".

Here's a selection of pics:

This first picture make me freeze - the Tyrrell pits before the race. As you can see, in the background Depailler cowling have 2 air intakes into the side of the cowling! - nothing like that in the kit. As I figured out later, that must be the day before the race, maybe during the qualifications, because...


... during the race, he uses another cowling without side intakes:


and I think this is the moment when his engine gave up - he was the first one to retire during the Monaco race:


Another picture showing some interesting detail, but more important the fact that the pilot's tub it's white by Depailler and not blue as Peterson's:


Yet another one here, suggesting the shape of the side windows on the white molded cowling are very accurate in the kit:


One close-up with Peterson's car, just to display some other interesting features, specially the brake cooling system:


One more pictures with the brakes:


And this is a picture from Interlagos, the same season, with both cars in different configuration, the mirrors are red now and the rear airfoil has the sponsor name upside down! Also now the Peterson's tub it's white and Depailler's is blue! Confusing indeed!


I guess the kit it's quite accurate after all - perhaps I'm going to find more details along this journey

Gabriel
Szmann
_VISITCOMMUNITY
Netherlands Antilles
Joined: September 02, 2014
KitMaker: 1,977 posts
Auto Modeler: 1,371 posts
Posted: Saturday, May 09, 2020 - 11:47 AM UTC

Quoted Text

Done. No need to apologise, there is quite a lot to take in when starting a new topic.

Cheers, D


Thanks, D.! Well, I should know better after years on AM forum Your kindness doesn't make me less dumb

Gabriel
Stickframe
#362
_VISITCOMMUNITY
California, United States
Joined: December 01, 2013
KitMaker: 1,661 posts
Auto Modeler: 431 posts
Posted: Saturday, May 09, 2020 - 02:47 PM UTC
Hi Gabriel,

Nice to the kit arrived! I’m curious to see how the fit and finish is, as it was not very good on the JP GP version -

Looking forward to your build

Cheers
Nick
Szmann
_VISITCOMMUNITY
Netherlands Antilles
Joined: September 02, 2014
KitMaker: 1,977 posts
Auto Modeler: 1,371 posts
Posted: Sunday, May 10, 2020 - 01:13 AM UTC

Quoted Text

Hi Gabriel,

Nice to the kit arrived! I’m curious to see how the fit and finish is, as it was not very good on the JP GP version -

Looking forward to your build

Cheers
Nick


Nick, the sprue H (the white one) it is a 2002 addition to the original kit (1997) and apparently fixes the cowling issue. Also some front suspension parts are re-casted there, the newer poly-caps are offered and the rear wheels are new runs, much softer than the ones from the original release. I will start the assembly today perhaps, and we will see how the parts will fit. Indeed, the lower part of the body has an uglish sink mark and some molding issues in the front that perhaps I'm not going to be able to correct.

Gabriel
thathaway3
_VISITCOMMUNITY
Michigan, United States
Joined: September 10, 2004
KitMaker: 1,610 posts
Auto Modeler: 6 posts
Posted: Sunday, May 10, 2020 - 06:44 AM UTC

Quoted Text


Here's a selection of pics:

This first picture make me freeze - the Tyrrell pits before the race. As you can see, in the background Depailler cowling have 2 air intakes into the side of the cowling! - nothing like that in the kit. As I figured out later, that must be the day before the race, maybe during the qualifications, because...


... during the race, he uses another cowling without side intakes:


Gabriel


Great shots! These make it pretty obvious that regardless of the configuration shown in the first photo PRIOR to the race, a change was made the day of the race! Notice that in addition to the fact that the two cowls are different (the wider one on Depailler's car covering not only the engine but the stabilizer bars), the straps holding the lower portion of the spoiler (black rubber??) on Peterson's car in front are much longer. The PE fret in the 1/12 provides both lengths and this is actually the first photo I've seen which actually has the longer ones.

So NOW the question is, where and when were THESE two photos taken?? They appear to be in Monte Carlo based on the background, but the obviously aren't from 1977. The front end is TOTALLY different with the two radiators there.


Szmann
_VISITCOMMUNITY
Netherlands Antilles
Joined: September 02, 2014
KitMaker: 1,977 posts
Auto Modeler: 1,371 posts
Posted: Sunday, May 10, 2020 - 08:56 AM UTC

Quoted Text

Notice that in addition to the fact that the two cowls are different (the wider one on Depailler's car covering not only the engine but the stabilizer bars), the straps holding the lower portion of the spoiler (black rubber??) on Peterson's car in front are much longer. The PE fret in the 1/12 provides both lengths and this is actually the first photo I've seen which actually has the longer ones.


That's why they say four eyes see better than two! I have noticed the straps, and I was thinking that I need to scratch them, since I have no extras, but I never noticed the difference in length! Now, since you focused my attention there, apparently the wider spoiler has no winglets as well!


Quoted Text


So NOW the question is, where and when were THESE two photos taken?? They appear to be in Monte Carlo based on the background, but the obviously aren't from 1977. The front end is TOTALLY different with the two radiators there.


Probably the year before, also on Monaco circuit. If you find the number three from the set and it's Scheckter's, then you know for sure!
I also read somewhere - but I cannot recall where - that in 1977 season Tyrrell ran with 1976 configuration in two races. If that is true, the things are really mixed up!

Gabriel
AussieReg
Staff MemberAssociate Editor
AUTOMODELER
#007
_VISITCOMMUNITY
Victoria, Australia
Joined: June 09, 2009
KitMaker: 8,156 posts
Auto Modeler: 2,953 posts
Posted: Sunday, May 10, 2020 - 11:16 AM UTC
Such a great library of reference shots for your here Gabriel. Really good for the purposes of confirming details and colours, but potentially bad for raising possible errors and corrections required.

Cheers, D
Cosimodo
#335
_VISITCOMMUNITY
Auckland, New Zealand
Joined: September 03, 2013
KitMaker: 1,808 posts
Auto Modeler: 701 posts
Posted: Sunday, May 10, 2020 - 12:48 PM UTC
[quote]
Quoted Text


So NOW the question is, where and when were THESE two photos taken?? They appear to be in Monte Carlo based on the background, but the obviously aren't from 1977. The front end is TOTALLY different with the two radiators there.


Tom,
These were taken at Monte Carlo but the Historic F1 series they run every year. The six wheeler was quite successful in those series because the fixed the front tyre problems.
If you look in the background, not many people in the stands, much more modern support vehicles etc.

cheers
Michael
thathaway3
_VISITCOMMUNITY
Michigan, United States
Joined: September 10, 2004
KitMaker: 1,610 posts
Auto Modeler: 6 posts
Posted: Sunday, May 10, 2020 - 01:11 PM UTC

Quoted Text


Probably the year before, also on Monaco circuit. If you find the number three from the set and it's Scheckter's, then you know for sure!
I also read somewhere - but I cannot recall where - that in 1977 season Tyrrell ran with 1976 configuration in two races. If that is true, the things are really mixed up!

Gabriel


I found an additional photo and I think I'm starting to have a different idea about when the "mystery" photo was taken.


I still suspect it was taken in Monaco BUT, doing some additional digging I found this photo on the Wikipedia site:


We know from your photos that the first photo couldn't have been at the race in 1977, and I am just about certain that it cannot have been taken in 1976 for a couple of reasons.

I don't think that the car ran in the First National City livery at all in 1976.

Moreover the Gran Prix in Monaco was the race run between the Gran Prix of Belgium (two weeks prior) and the Gran Prix of Sweden (two weeks later). There is just about no chance that the car ran in the dark blue ELF livery in Belgium and Sweden and in between at Monaco switched so dramatically in livery and configuration.

So since it almost certainly was not in 1976 and definitely NOT in 1977 as you've shown, when was it.

The answer may be contained in the information on the second photo (from Wikipedia) which says that it was taken at the Silverstone Classic in 2008! So it was not taken while the cars were actively competing on the F1 Circuit at all, and that leads me to speculate that the other photo, while it may be at Monaco, was actually taken MUCH later.

SO I'm pretty sure that the configuration AT the 1977 race is just as the kit and your photo shows.

So now the question is, just when did the twin radiator configuration show up?
thathaway3
_VISITCOMMUNITY
Michigan, United States
Joined: September 10, 2004
KitMaker: 1,610 posts
Auto Modeler: 6 posts
Posted: Monday, May 11, 2020 - 06:54 AM UTC

Quoted Text


So now the question is, just when did the twin radiator configuration show up?


Looks like I may have found the answer. There's a P34 Facebook Community and someone asked the question:


"Does anyone know which races the wider front end was used on the P34b chassis?"

The answer came back as follows:

"The 'wide' track P34 was first used at the French GP (Round 9). The car had also the nose radiators, only Depailler drove it. At the British GP (Round 10) both cars had the 'wide' track but only Depailler had the nose radiators. At the Austrian GP the two cars had the 'wide' track and nose radiators. Some minor body changes as the season moved on."

Based on this response it must be referring to the 1977 season, because in 1976, Round 9 was NOT in France, but at Brand's Hatch in GBR.

Worth noting is that in 1977, the GP of Monaco was round 6 and thus took place BEFORE the changes listed above.
Szmann
_VISITCOMMUNITY
Netherlands Antilles
Joined: September 02, 2014
KitMaker: 1,977 posts
Auto Modeler: 1,371 posts
Posted: Monday, May 11, 2020 - 02:53 PM UTC

Quoted Text


Such a great library of reference shots for your here Gabriel. Really good for the purposes of confirming details and colours, but potentially bad for raising possible errors and corrections required.

Cheers, D


I'm right behind you on that, D.! I am claiming here that I'm doing a OOB build and I started counting rivets already - btw, the rivets on the rear vertical fins need to be re-scribed Oh, may!

Quoted Text

Tom,
These were taken at Monte Carlo but the Historic F1 series they run every year. The six wheeler was quite successful in those series because the fixed the front tyre problems.
If you look in the background, not many people in the stands, much more modern support vehicles etc.

cheers
Michael


Excellent observation, Michael! I completely ignored the support vehicles before you rang the bell and - you're right. That Nissan behind cannot be a '77!

Quoted Text


Quoted Text


So now the question is, just when did the twin radiator configuration show up?


Looks like I may have found the answer. There's a P34 Facebook Community and someone asked the question:


"Does anyone know which races the wider front end was used on the P34b chassis?"

The answer came back as follows:

"The 'wide' track P34 was first used at the French GP (Round 9). The car had also the nose radiators, only Depailler drove it. At the British GP (Round 10) both cars had the 'wide' track but only Depailler had the nose radiators. At the Austrian GP the two cars had the 'wide' track and nose radiators. Some minor body changes as the season moved on."

Based on this response it must be referring to the 1977 season, because in 1976, Round 9 was NOT in France, but at Brand's Hatch in GBR.

Worth noting is that in 1977, the GP of Monaco was round 6 and thus took place BEFORE the changes listed above.


Thanks for following up on this, Tom!
Yes, the change must have been in '77 season, since the cowls are white, as you noted it in the previous post. It happened that I noticed that one of the P34 pictures in Wikipedia is crediting Tamiya collection (a '76 example). I am pretty sure now Tamiya knew what they were doing in 1977! The kit seems to be accurate after all in general lines.

UPDATE
And the first bits are going together!
Honestly, I was expecting bigger parts for the scale - but then I remembered that the engine it's only 3000cc, and thus smaller in 1/20 than most of 5L in 1/24th scale. However, the detail is there and plentiful. These first parts are for less than half engine!


With all complexity, the assembly progresses fast due Tamiya's precision olding:


The transmission it's a little bit more iffy - you can see here the mounting plate not too perfect - the oil pan doesn't fit too well also - but after some trimming and sanding the parts fit with a click!


The bottom plate it's quite poorly molded. First off, it has the ugly battery lid that have to be deleted. Id doesn't fit all that good and I couldn't miss the opportunity to explore more the use of Damian's Snake Oil®. I don't know if the pictures shows well, but all the internal detail it is visible on the exterior, and that plate needs serious re-working. I need probably to sand it flush and to use filler - primer, then re-scribe the detail as well. I'm not sure if the cut next to the battery compartment has to be there - I'm suspecting it is the On/Off button slot:


The assembly goes so easy that is addictive. I had to force myself out from the bench before I run too late!

Gabriel
Hwa-Rang
_VISITCOMMUNITY
Kobenhavn, Denmark
Joined: June 29, 2004
KitMaker: 6,760 posts
Auto Modeler: 2,182 posts
Posted: Wednesday, May 13, 2020 - 07:52 AM UTC
Great choice, of subject Gabriel and great to see so many helping "hands" chipping in with expert knowledge.
Szmann
_VISITCOMMUNITY
Netherlands Antilles
Joined: September 02, 2014
KitMaker: 1,977 posts
Auto Modeler: 1,371 posts
Posted: Thursday, May 14, 2020 - 01:54 PM UTC

Quoted Text

Great choice, of subject Gabriel and great to see so many helping "hands" chipping in with expert knowledge.


Thanks, Jesper. Apparently I'm the last one to put my hands on a P34! The subject it's great indeed, but I'm but no means in a virgin forest. I might be actually lucky that other modelers build it before me, because now I am benefiting of their knowledge, with big thanks, naturally!

UPDATE
I went over the bottom plate once more. Please note how good the sprue goo blends in after sanding. In the right corner I filled the gap and redid some sinks where needed:


Just as a teaser; here's how my sprue goo looks like. Too bad Damian haven't filled a patent application for it


Another "hot spot" was this sink mark here - all too visible on the body:


Sprue goo at work again:


Almost gone:


Gone for good!


From all the build blogs I've read, almost every single modeller complains about the cowl fitting. First off, the white casting it's much better than the blue one. Then, Tamiya provide an "yardstick" that has to be provisorily inserted inside the cowling for glueing, but it's often ignored. I glued it temporarily with white glue. That support alone is't enough to secure a smooth join edge, so I used the body as a template. Here I noticed that the alignment holes have raised edges from poor molding, and that would create a gap. I sanded the offending edges flat, and here's my cowling, nearly perfectly fitting:


I also installed the windows at this stage, because they are provided as a thin transparent sheet that has to bend and I preferred a styrene on styrene weld better than after painting. The windows are masked already before priming. On the right, you can see the bottom plate sanded smooth - all detail also gone, I'm going to re-scribe it later:


The body primed with MS + MLT = no frills. The bottom plate I primed it with Tamiya Surface Primer + MLT. I used it more like a filler than like a primer, actually. I applied it through my H&S Evolution 0.4mm setup and I mixed it as thick as I could. Immediately after application I was a little disappointed: it looked grainy, uneven and had a lot of "spray lint". The surprise went when I sanded it: not only it sand very easy with sanding sponges, but the result is as smooth as glass, using 1000 grit wet only. I really need to look further into it!


Probably the worst sub-assembly ever engineered by Tamiya. These headers are poorly molded and don't fit the way it should:


One should assemble these snake pits out of the headers but, even using the engine block as a template, one still needs some three extra hands - all could have much simpler if the header would have fitted precisely to the block. Not a deal beaker, but you can see here how much extra work it's needed to do the joints seamless:


Engine block and transmission primed with MS 1500 black and then painted with Alclad II Duraluminium, respectively Testors non-buffable Gun Metal. For this particular application, I like more the metallics over MS black than over gloss black:


Currently working on these parts. As you can see, Tamiya age speaks here - after priming most of these parts need to be re-worked one way or another:


P.S. I was tempted to add some rivets to the bottom plate along with the re-scribed lines, but I have considered overkill. I also lack reference pictures. Any opinion?

Thanks for tuning in!
Gabriel
AussieReg
Staff MemberAssociate Editor
AUTOMODELER
#007
_VISITCOMMUNITY
Victoria, Australia
Joined: June 09, 2009
KitMaker: 8,156 posts
Auto Modeler: 2,953 posts
Posted: Thursday, May 14, 2020 - 02:02 PM UTC

Quoted Text

Just as a teaser; here's how my sprue goo looks like. Too bad Damian haven't filled a patent application for it


Gabriel, you should be receiving a letter from my lawyer any day now!

The results from your extra efforts here are really good! The blending from the Sprue-Goo and surfacer look perfect, and the attention to the fit and finish on the assemblies will definitely pay off in the final result.

Once again, a great thread for information and techniques.

Cheers, D
Szmann
_VISITCOMMUNITY
Netherlands Antilles
Joined: September 02, 2014
KitMaker: 1,977 posts
Auto Modeler: 1,371 posts
Posted: Friday, May 15, 2020 - 04:08 AM UTC

Quoted Text

The results from your extra efforts here are really good! The blending from the Sprue-Goo and surfacer look perfect, and the attention to the fit and finish on the assemblies will definitely pay off in the final result.


I'm quite surprised to be honest by how easy it went. I remember filling and sanding forever in a couple of aircraft models for less gaps!


Quoted Text


Once again, a great thread for information and techniques.
Cheers, D


Thanks, D.! It will be nice if somebody needing references for the same kit in the future will run into this thread - I'm not saying it is complete, but it has a fair amount of documentation.

Gabriel
Szmann
_VISITCOMMUNITY
Netherlands Antilles
Joined: September 02, 2014
KitMaker: 1,977 posts
Auto Modeler: 1,371 posts
Posted: Friday, May 15, 2020 - 12:12 PM UTC
UPDATE
A few little things happened today - busy at work and the carpenter working for me cracked his radiator in my yard - though enough. However:
The distributor and the coil assembled. The wiring it is provided by the kit, and although in the instructions reads "vinyl", they are actually insulated thin copper wire:


Some detail picked by brush on the engine block - the light on my desk it's rather bad for metallics:


The distributor and the coil added to the block:


More parts were primed and / or painted, but they are drying now in my photo tent.
However, the little problem I have it is the blue. I have only enamel, from Testors (the same one I have used for Hot Wheels NASCAR, but too light for this build). I have also the appropriate Navy Blue from the tin can, but that one it's going to take forever to dry. I decided to apply the testors one over black primer - so don't be surprised when you'll see the pics tomorrow! I want to se the result - I can revert it any time at this stage.

Gabriel
Szmann
_VISITCOMMUNITY
Netherlands Antilles
Joined: September 02, 2014
KitMaker: 1,977 posts
Auto Modeler: 1,371 posts
Posted: Saturday, May 16, 2020 - 11:01 AM UTC
UPDATE
Exhaust headers painted with Alclad and "heated" with candy blues, also from Alclad range:


Exhausts added to the engine and the turbo ducts replicated from vinyl tubes:


The coil has the connector pin, but the connection it is not shown in the instructions manual:


Main body primed with MS 1500 Black:


Transmission and rear brake disks added to the frame:


Quite detailed assembly, but not the best molds:


Body parts in different stages. The bottom plate painted with Krylon silver modified to matte aluminum; the pilot's seat painted with TCP 005 White, slightly sanded, needs another coat of paint; the cowling primed with MS 1500 gray; the main body painted with Testor's Blue gloss enamel.


Gabriel
Joel_W
Staff MemberAssociate Editor
AUTOMODELER
_VISITCOMMUNITY
New York, United States
Joined: December 04, 2010
KitMaker: 11,666 posts
Auto Modeler: 2,974 posts
Posted: Sunday, May 17, 2020 - 03:22 AM UTC
Gabriel,
Nice painting and staining of the exhaust headers. your engine spark plug wiring really is coming along quite nicely.

The Tamiya transaxle and rear brakes do look rather good. I was never a big fan of the inboard brakes as they did tend to run much hotter then the more traditional outboard designs, often causing all sorts of braking issues.

You're certainly putti8ng my Lotus pace to shame these days.

joel
 _GOTOTOP