_GOTOBOTTOM
Cars
Discuss all types of automotive modeling here.
Nunu 1/24 scale Audi R8 LMS GT3
Joel_W
Staff MemberAssociate Editor
AUTOMODELER
_VISITCOMMUNITY
New York, United States
Joined: December 04, 2010
KitMaker: 11,666 posts
Auto Modeler: 2,974 posts
Posted: Friday, July 10, 2020 - 07:45 AM UTC
Finally time for another small update on the Audi R8 LMS GT3.

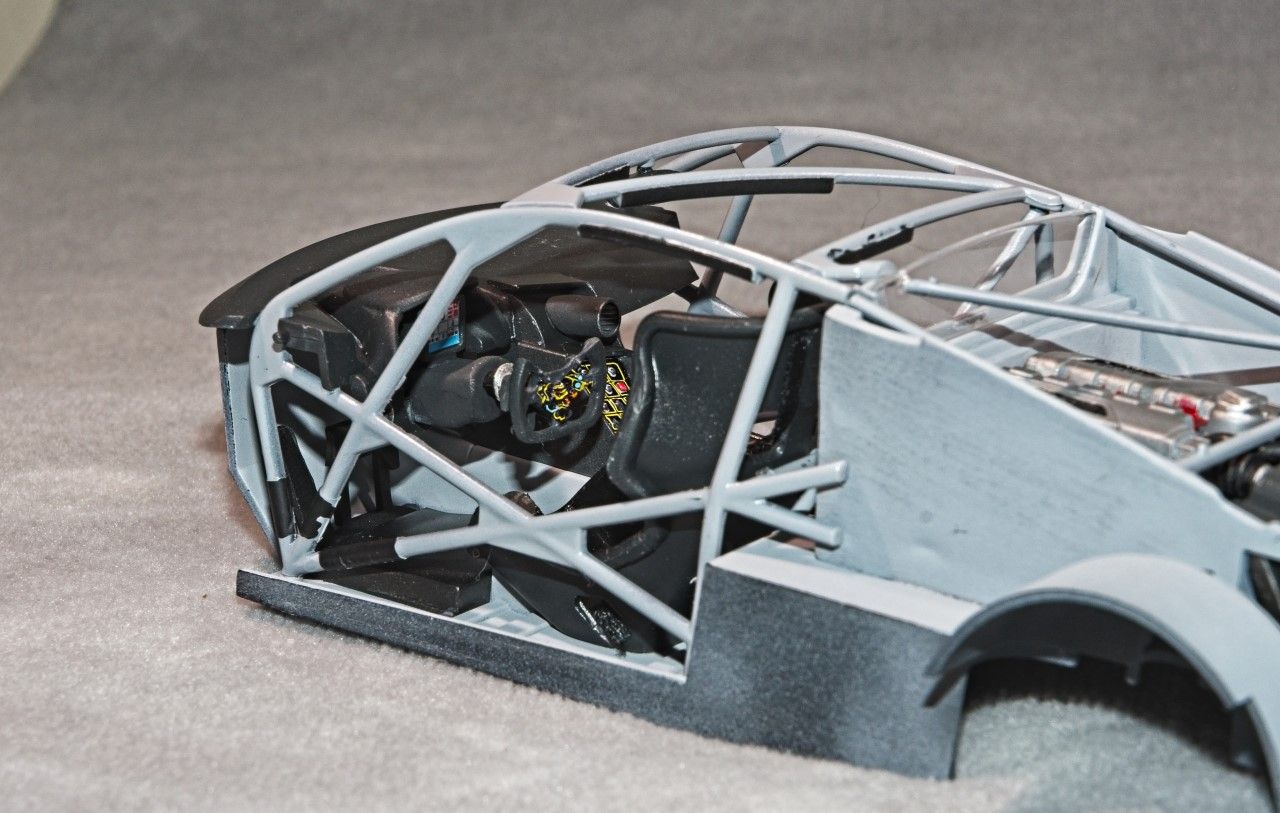
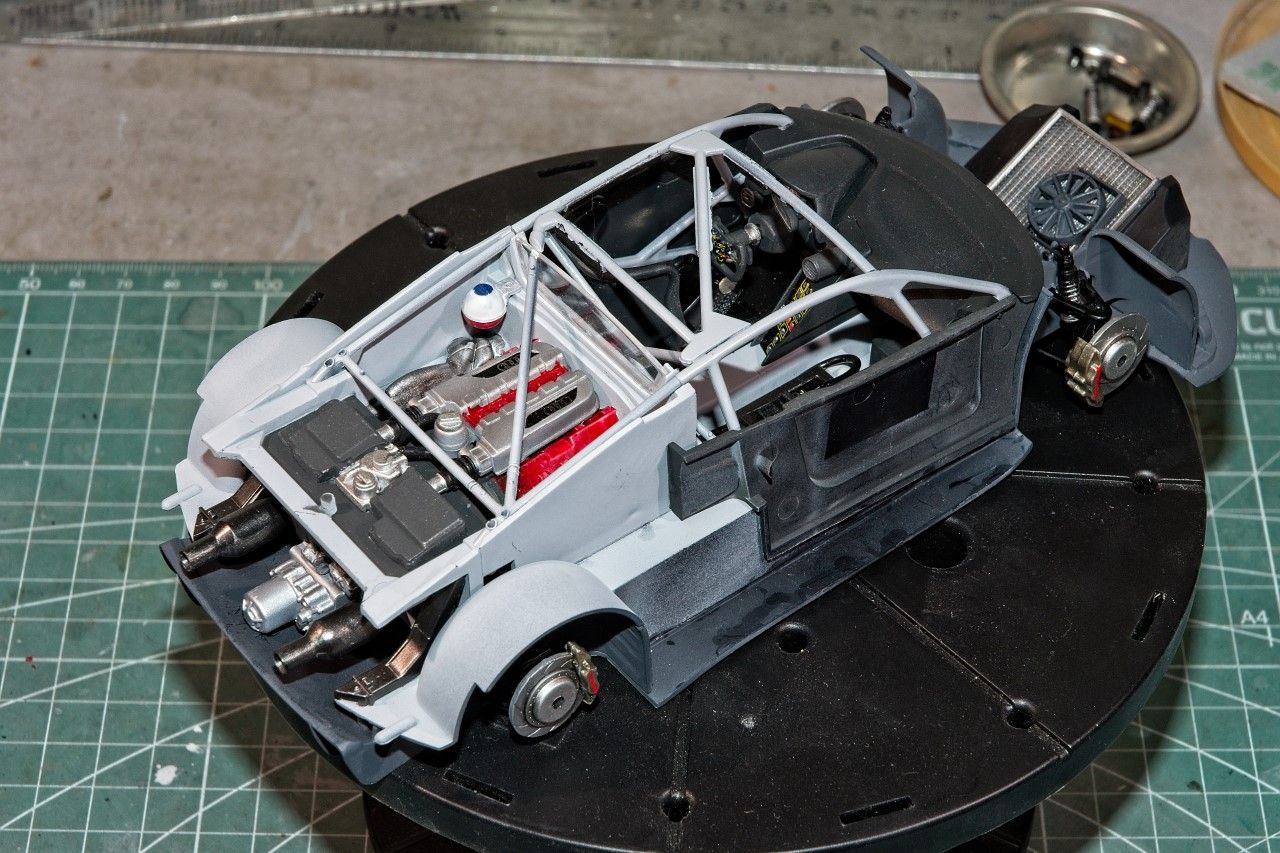
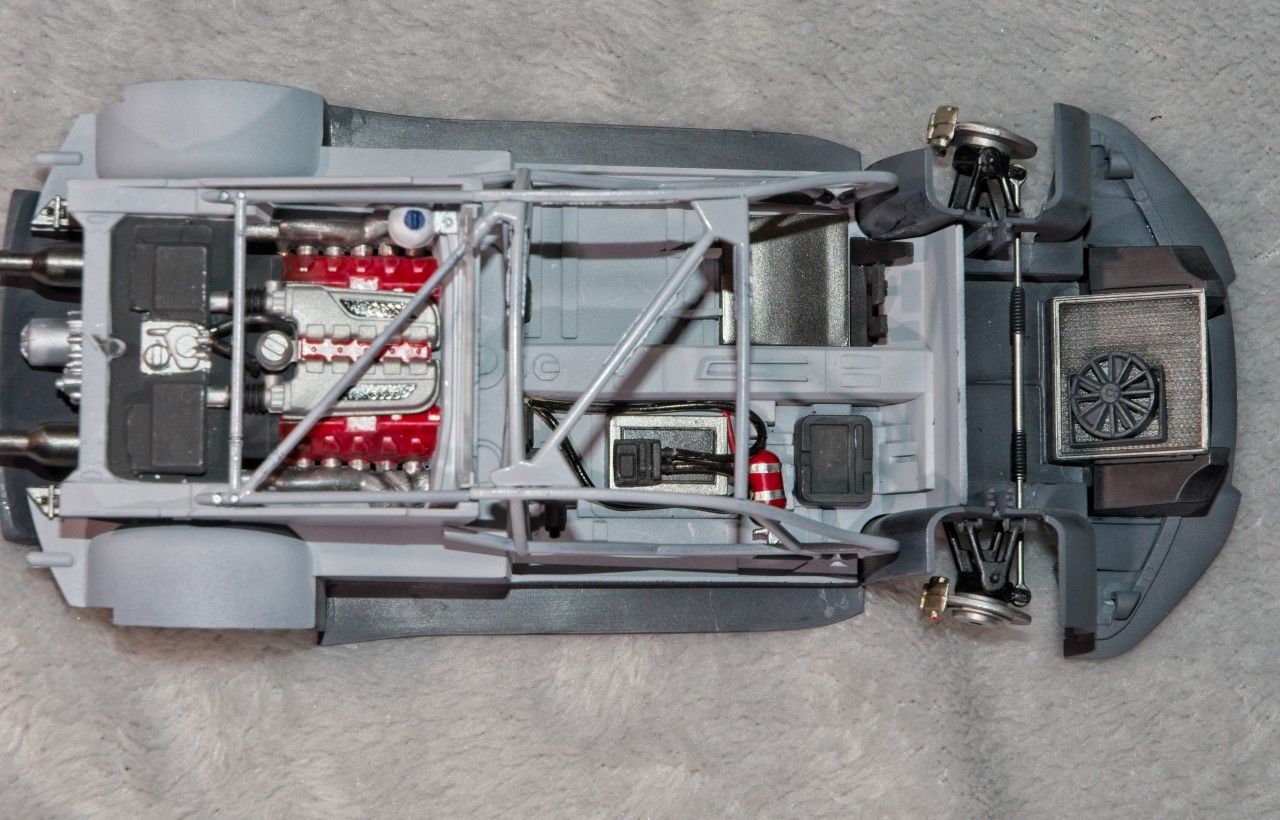
I started working on the driver's compartment which is comprised of various sub assemblies. The 1st one is the floor pan. Various electronic components were painted Flat Black then glued into position. I added three rubber clad electronic cables that I painted in Semi Gloss Black so that they just didn't disappear over the tops of the various Black boxes. Unfortunately, the lights just reflected way to much light back towards the camera. After seeing these pictures, maybe I should consider toning them down a tad. finally the fire extinguisher was painted bright gloss Red, and the holding straps were made from BMF. For me that's way easier said then done, but eventually I got both strips into place.


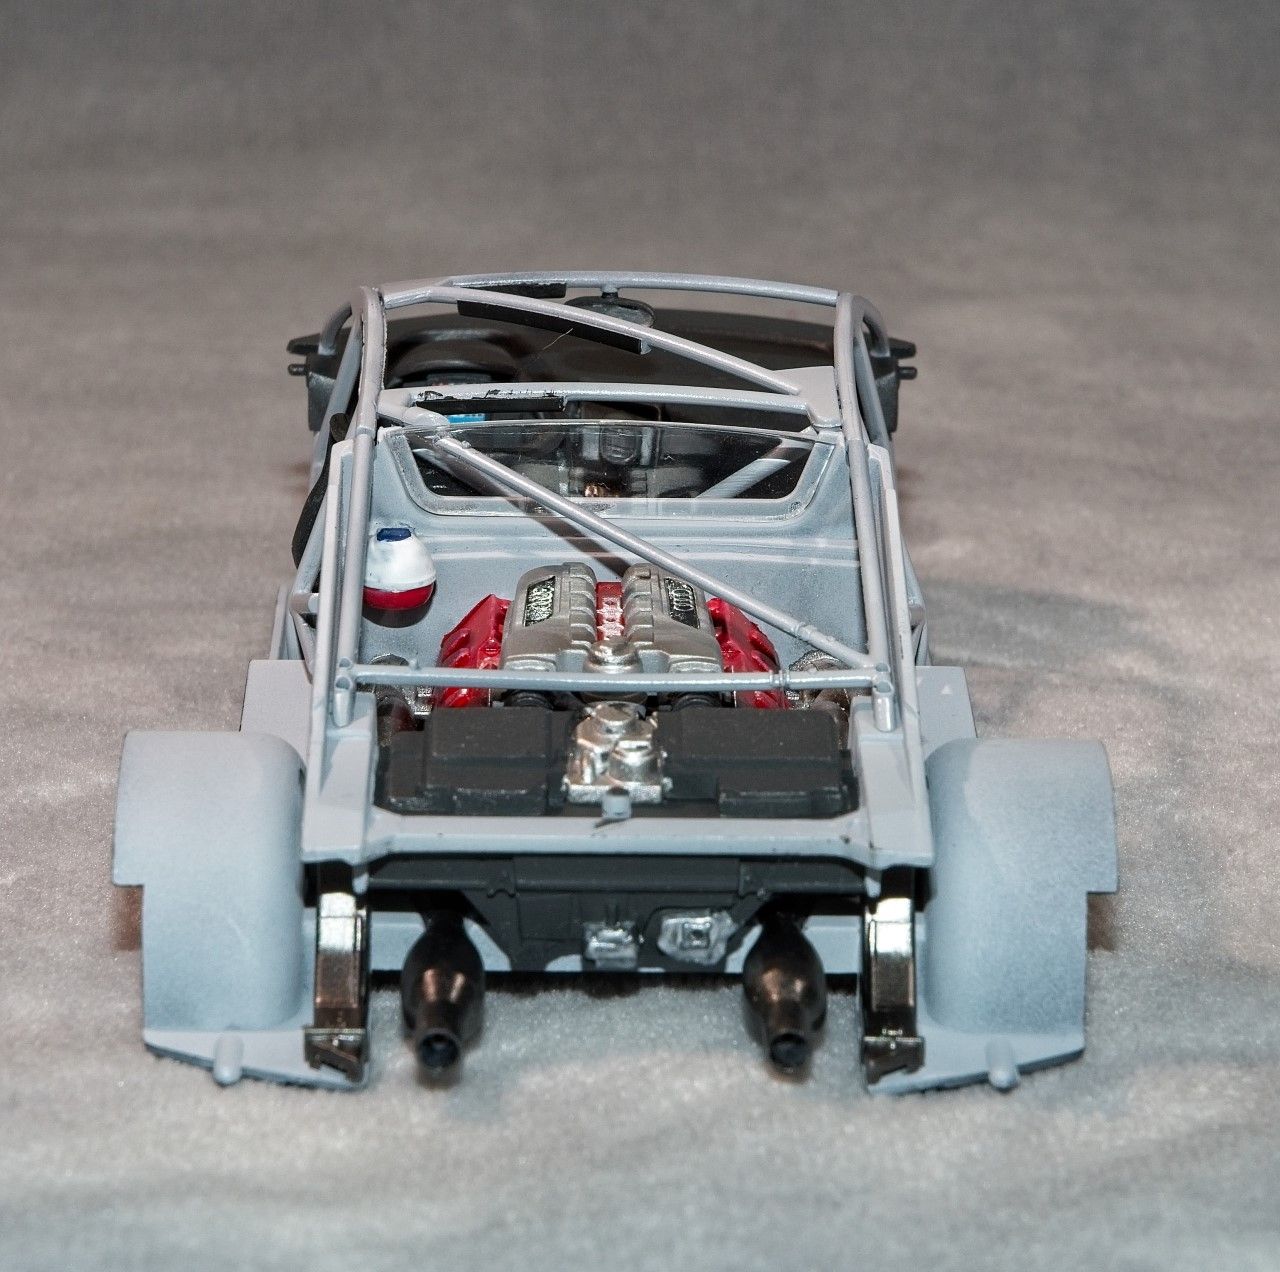
The exhausts are each just two halves that needed a little Tamiya putty to blend in the seams. I primed them Gloss Black then Alcad 2 Stainless Steel was air brushed on. The two engine compartment supports were also painted with Gloss Black followed by Alcad 2 Steel for a slightly different look.


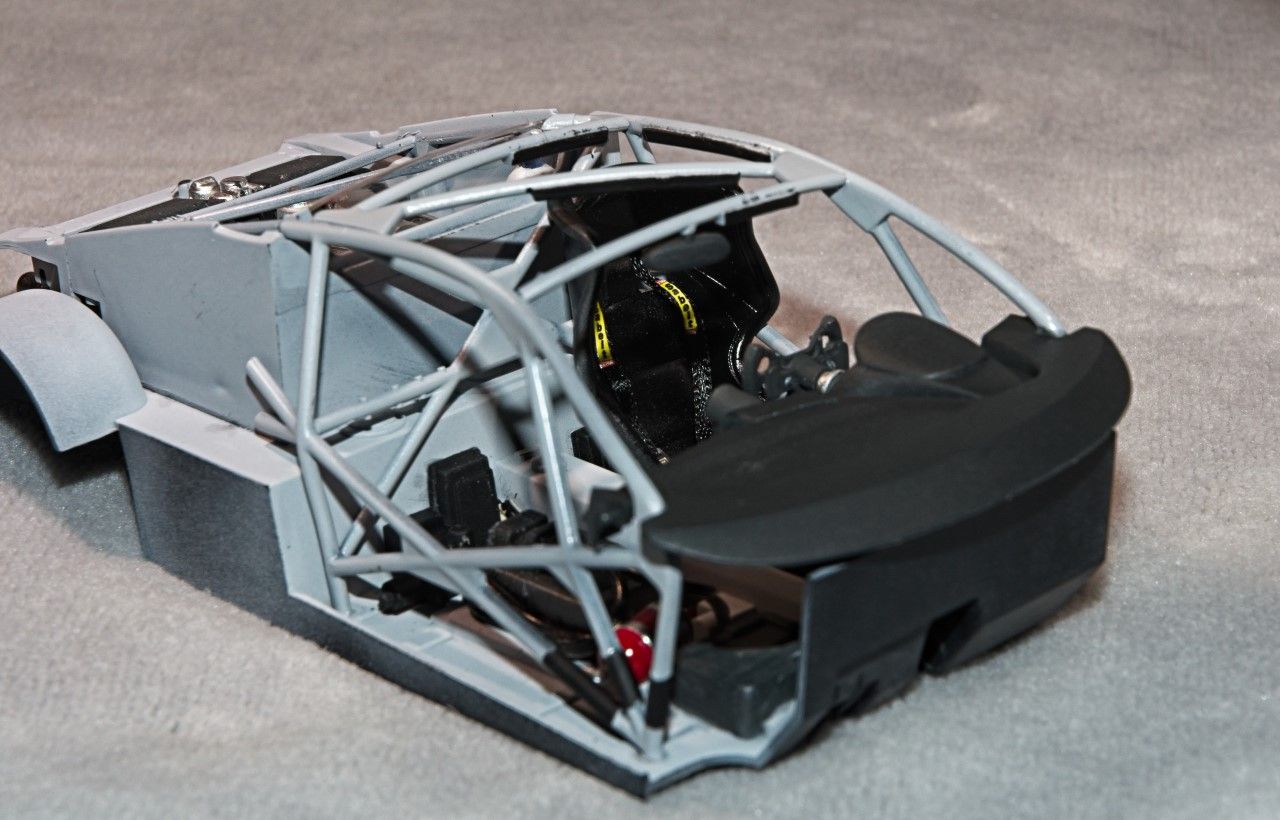
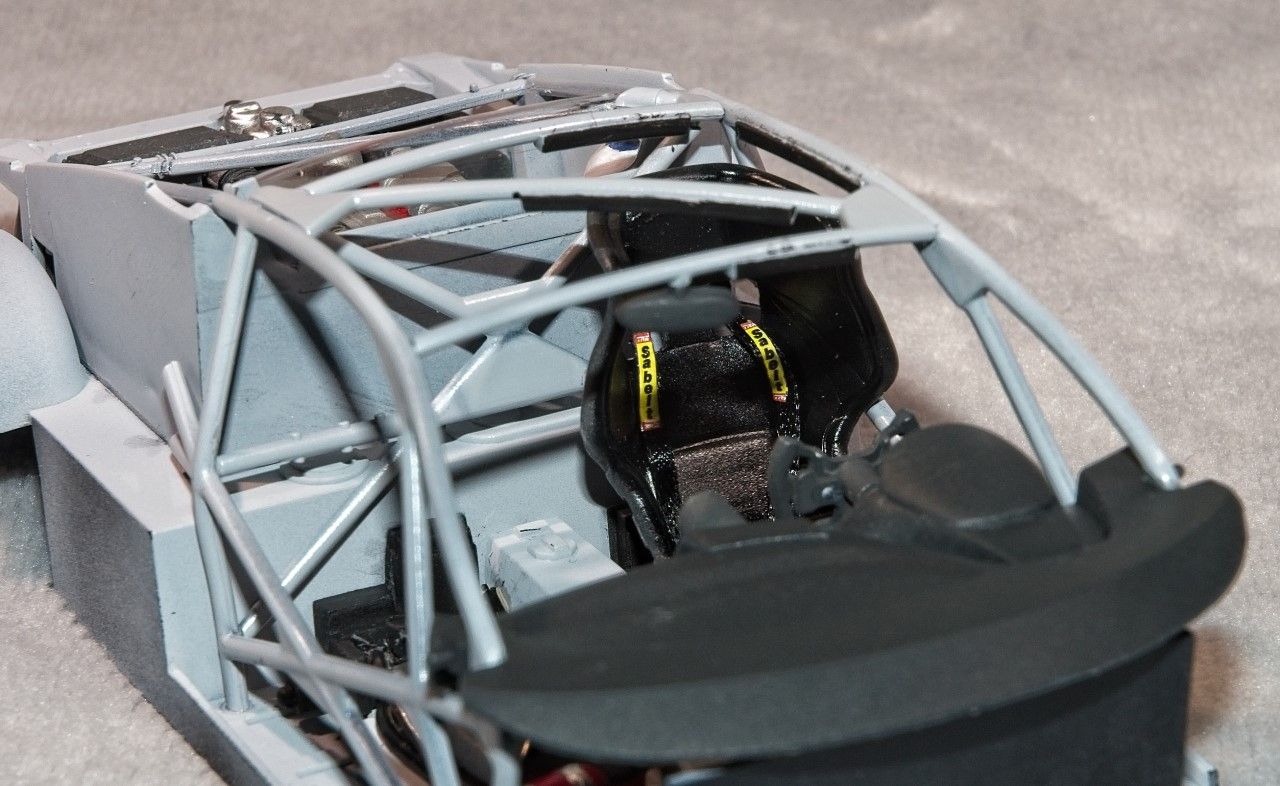
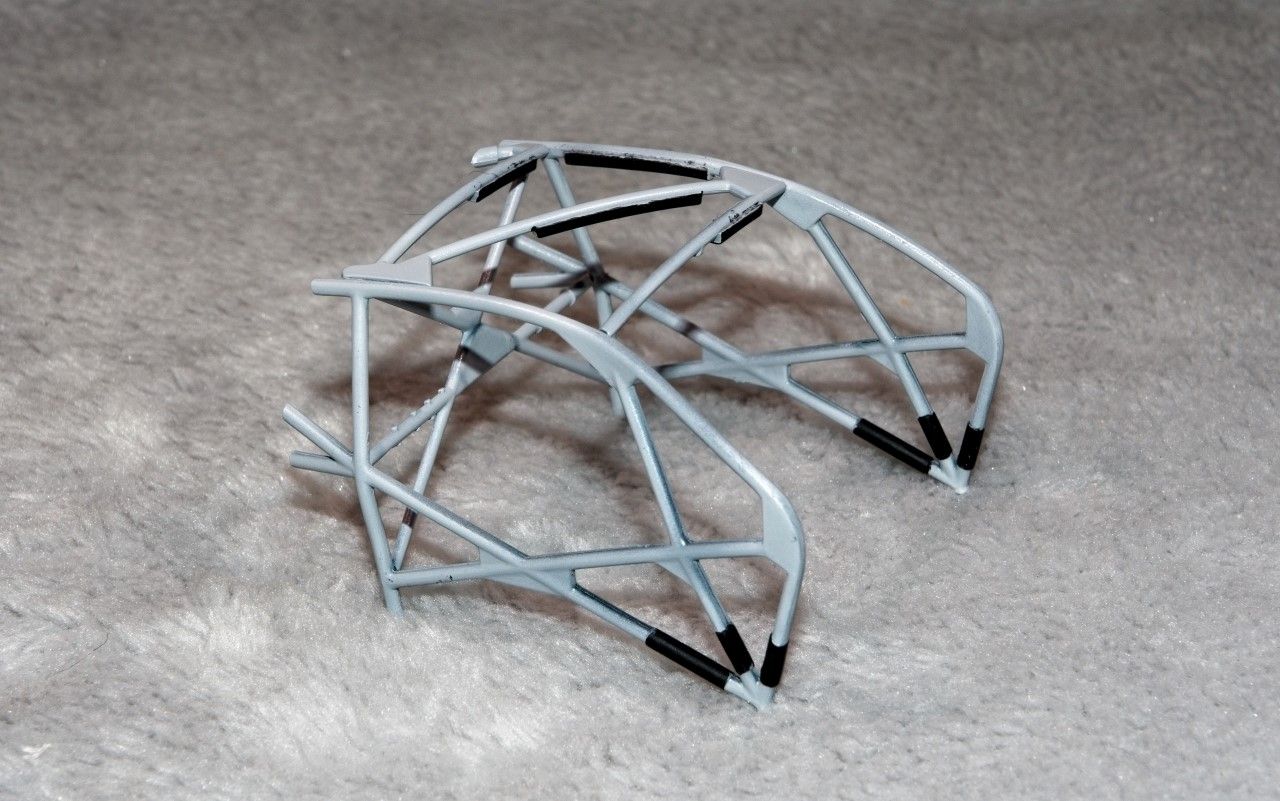
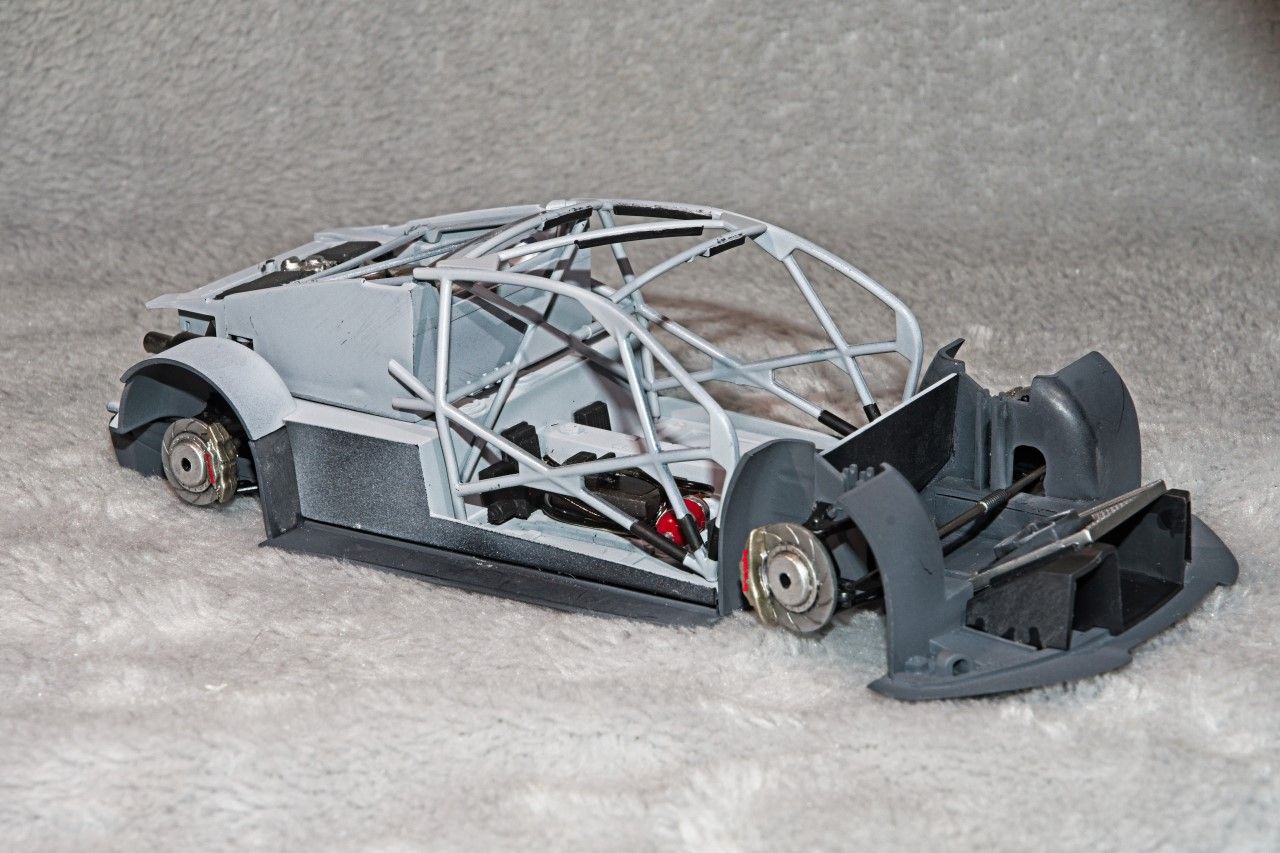
I then built up the interior roll cage that fits like a glove. Primed then painted a Neutral Gray followed by a coat of Mr. Color clear Gloss. When dry, I hand painted all the rubber pads flat Black.


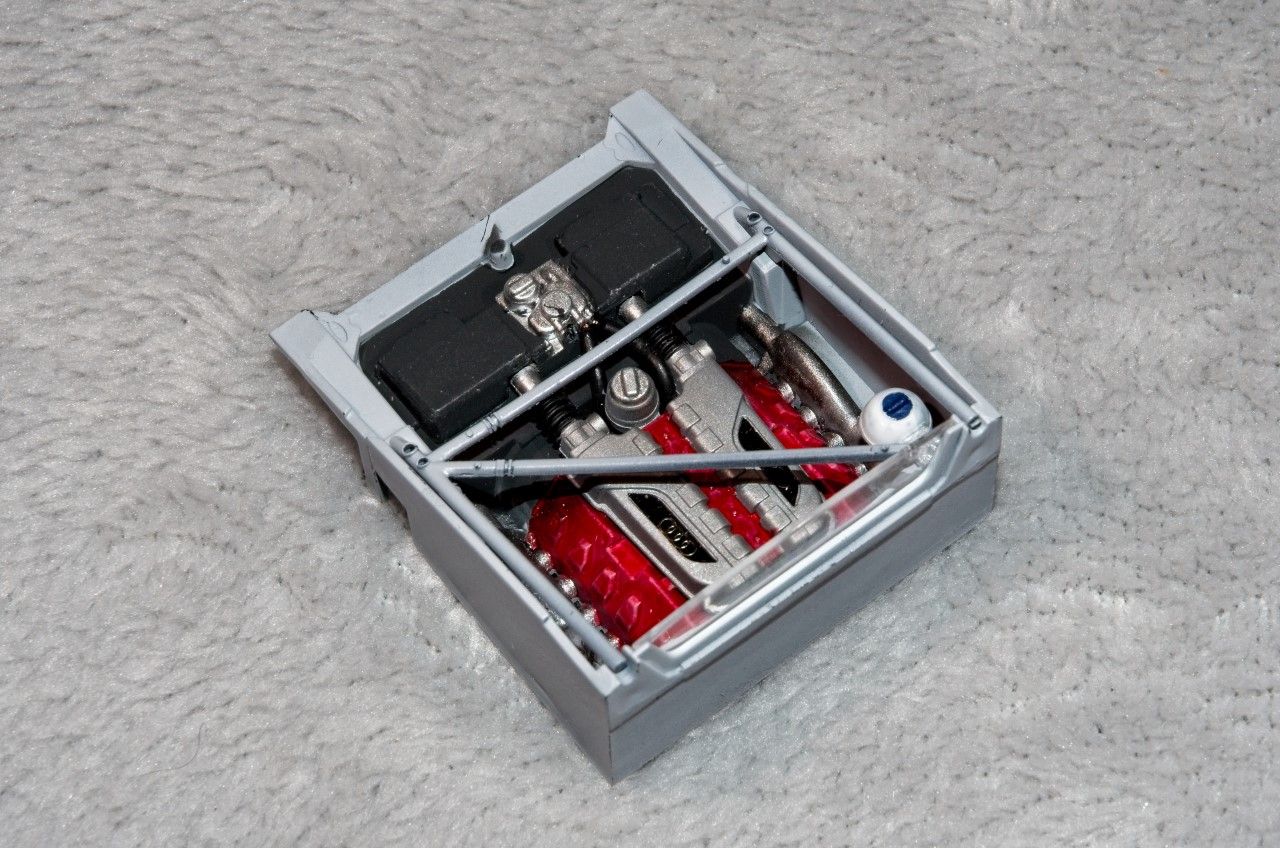
Up next is the engine compartment sub assembly. The engine and exhaust are molded into the compartment. This created the need for quite alot of masking as the compartment is neutral Gray, the back panel is Flat Black, the exhuasts are Metallic Metal, and the engine is a dull Red. So I decided to paint the engine and exhausts by hand. The engine fuel injection covers were air brushed Mr. Color Metallic 2 Silver which looks more like polished Aluminum, which is the metallic color I was looking for. When dry, the Audi decals were applied. The two intake lines were painted with Aluminum, and Nato Tamiya Rubber for the boots. The engine compartment support rails were painted exactly the same as the roll cage.


Now for the fun part. I dry fitted all the assemblies. The fit is nearly perfect, but some tweaking of the roll cage where it meets the engine compartment railing is necessary. Still it's starting to come together nicely.


And thanks for stopping by and checking out my build to date. As always, it's greatly appreciated.

Joel
Cosimodo
#335
_VISITCOMMUNITY
Auckland, New Zealand
Joined: September 03, 2013
KitMaker: 1,808 posts
Auto Modeler: 701 posts
Posted: Friday, July 10, 2020 - 02:04 PM UTC
No small update this Joel! Great work on the engine and cabin. Some lovely detail painting to highlight various parts which all add to the overall effect.

cheers
Michael
Joel_W
Staff MemberAssociate Editor
AUTOMODELER
_VISITCOMMUNITY
New York, United States
Joined: December 04, 2010
KitMaker: 11,666 posts
Auto Modeler: 2,974 posts
Posted: Saturday, July 11, 2020 - 01:47 AM UTC
Michael,
Thanks so much for your thumbs up on my progress to date. I greatly appreciate it.

Joel
Stickframe
#362
_VISITCOMMUNITY
California, United States
Joined: December 01, 2013
KitMaker: 1,661 posts
Auto Modeler: 431 posts
Posted: Sunday, July 12, 2020 - 07:29 AM UTC
Hi Joel

The Audi is looking good! you did a heck of job on that cast in place engine - I wish the model kit folks would just include engines! I guess we must be in the minority of the market place, in terms of being eager to add the detail. The whole project is looking good

Cheers
NIck

Joel_W
Staff MemberAssociate Editor
AUTOMODELER
_VISITCOMMUNITY
New York, United States
Joined: December 04, 2010
KitMaker: 11,666 posts
Auto Modeler: 2,974 posts
Posted: Sunday, July 12, 2020 - 10:04 AM UTC
Nick,
Great to see you on the boards, and thanks for stopping by and checking out my Audi build to date, it's always much appreciated.

Like you, I rather have a full engine/transmission then the current only lower end of the engine/transmission, and suspension that the Aoshima group that consists of Nunu, Beemax, & Platz whose been specializing in GT and Rally cars . This is the 1st time that I've actually ran into these being cast along with the engine compartment. The bare min of details are there and that's about it. Besides that one negative issue, their kits are some of the best on the market, and their decals are Cartograf quality.

Joel
RussellE
#306
_VISITCOMMUNITY
Victoria, Australia
Joined: June 27, 2010
KitMaker: 3,959 posts
Auto Modeler: 495 posts
Posted: Friday, July 17, 2020 - 01:21 AM UTC
Great to see this one progressing Joel...

That roll cage sure is something!
Joel_W
Staff MemberAssociate Editor
AUTOMODELER
_VISITCOMMUNITY
New York, United States
Joined: December 04, 2010
KitMaker: 11,666 posts
Auto Modeler: 2,974 posts
Posted: Friday, July 17, 2020 - 01:37 AM UTC
Russell,
Thanks my friend for stopping by and checking out the Audi's progress to date. It's much appreciated.

joel
Joel_W
Staff MemberAssociate Editor
AUTOMODELER
_VISITCOMMUNITY
New York, United States
Joined: December 04, 2010
KitMaker: 11,666 posts
Auto Modeler: 2,974 posts
Posted: Saturday, July 18, 2020 - 04:38 AM UTC
I started off the week painting the 4 wheels a Metallic Steel Gray, then the center hub stainless Steel, and finally a pin line wash of Tamiya Black panel line wash to help with the separation of wheel and hub. The tires are nicely molded, but haf this extremely rough texture that I really couldn't completely get rid of. I opted to hand brush on two coats of Pledge to help seal the tires as well as the gloss base for the Pirelli Pzeno decals. This time I did have some issues once the decals dried using my three part decaling method of Micro Sol, Micro Set, & Walther's Solvaset. So rather then air brushing on a coat of Testor's Glosscoat, I applied another hand brushed coat of Pledge. When it dried, problem solved. Gave the tires a full day to dry and cure, then I air brushed on a few coats of Testor's Dullcoat thinned 1:1 rather then my usual 2:3.


Now my attention turned to finishing up the driver's compartment. The dashboard, wheel assembly, and large button box on the right side side were all painted with Tamiya's Nato Black to kind of represent one type of Carbon fiber. Next I applied the decal to the steering wheel with all the buttons and dials, as well as the decal for the button box. Added the air vent to it, and dry brushed it with Aluminum so that the raised details kind of popped right out.

The seat is extremely well molded with clearly defined demarcation between the black leather and the Carbon Fiber seat. Nunu also took the time to include the proper openings for the 6 way harness assembly which made installing it all that much easier. I painted the CF part of the seat Nato Black, and the leather material Semi gloss Black, but is wasn't shiny enough, so I air brushed it with a coat of Testor's Gloss coat.

As with most of the Asian kits the harness assembly is just decals. So I made my own generic 6 way harness using the Gofer generic set. I still needed a main belt latch, so I dug through my PE spares and found one that would do nicely. My one complaint is that the design engineers at Audi really need to take us modelers into consideration when picking colors, as the Black Seat with a Black Harneess assembly inside the drivers compartment basically just fades into the shadows. So I used a little modelers license and found a pair of Yellow Harness labels for the Shoulder straps, and applied the decals with a very heavy dose of Solvaset so that they would settle down into the fabric's nooks and crannies.


All that was left to do was assemble the various sub assemblies. The dash literally fits like a glove which just amazed me as I seem to have issues with every build. The seat was also a drop in fit. The roll cage aligned perfectly with the 4 mounting holes, and the engine compartment finished up the interior assembly with another perfect fit.


Thanks to all for stopping by and checking out my build to date. As usual, it's always greatly appreciated.

Joel

RussellE
#306
_VISITCOMMUNITY
Victoria, Australia
Joined: June 27, 2010
KitMaker: 3,959 posts
Auto Modeler: 495 posts
Posted: Saturday, July 18, 2020 - 03:31 PM UTC
ooo, those wheels/tires look great Joel, and the interior is very nice !
Dixon66
_VISITCOMMUNITY
New Hampshire, United States
Joined: December 12, 2002
KitMaker: 1,500 posts
Auto Modeler: 645 posts
Posted: Saturday, July 18, 2020 - 11:42 PM UTC
Joel, this thing looks better and better with each update. Again, your struggles with items are always hidden by the results you display. Great work!
Joel_W
Staff MemberAssociate Editor
AUTOMODELER
_VISITCOMMUNITY
New York, United States
Joined: December 04, 2010
KitMaker: 11,666 posts
Auto Modeler: 2,974 posts
Posted: Sunday, July 19, 2020 - 03:11 AM UTC
David & Russell,
Thanks guys for your really positive comments. As always I truly appreciate them.

The tires were more of a struggle then I've had with tires for quite some time. The flash that showed after the decals had dried was just unacceptable. Fortunately, a heavy coat of hand brushed on Pledge solved that issue. Other then that I really didn't have a Plan B to fall back on.

Joel
Joel_W
Staff MemberAssociate Editor
AUTOMODELER
_VISITCOMMUNITY
New York, United States
Joined: December 04, 2010
KitMaker: 11,666 posts
Auto Modeler: 2,974 posts
Posted: Tuesday, July 28, 2020 - 04:26 AM UTC
Been a good 10 days since my last update, but work has slowly but consistently going on as I'm finally on the last lap with the finish line in sight.

The driver's compartment was the last of the sub assemblies required to assemble the full chassis. All that was left to add was the side panels which were previously painted with Tamiya Nato Black. Since this build is a curbside model on Steroids, there's just enough added details to the bottom of the chassis and suspension to make the build have just a little more visual interest to both the builder and viewer. The radiator and fan assembly is just a glue and drop in fit. The driver's cockpit needed perfect alignment and a nudge here and there, but it did literally pop into place.


Since the topside of the sill plates will be hidden from view once the body is attached, I really didn't pay any attention to how it looks during construction.


Next up was getting the shell ready for final assembly. So out came a piece of Micro Mesh #12,000, and a very light wet sanding to just smooth out any high or rough spots in the clear Gloss finish. Then the polishing proceeded with the 3 part Gravity polishing pastes, and finally their liquid wax.

Honestly, this is the best finish I've ever attained to date.


The four main glass pieces: front windsheild, rear window, and both side windows have a rubber gasket between each of them and the body. Nunu supplies these as sectioned decals, but I opted to go with the Decalas masks instead. Each one fit like a glove. I Airbrushed on plain old Mr. Color Matt Black as it will look glossy no matter what as you view them through the glass. After masking, I didn't have a single touch up. Another world record for me.


I still have the two side air intakes directly behind the side windows to install, which are painted, decaled, polished, and waxed. All the lights, lenses, and misc. parts are next, so there's still a fair amount of work to accomplish before i cross the finish line.

And thanks to all for stopping by and checking out my progress to date. It's always much appreciated.

Joel
Dixon66
_VISITCOMMUNITY
New Hampshire, United States
Joined: December 12, 2002
KitMaker: 1,500 posts
Auto Modeler: 645 posts
Posted: Tuesday, July 28, 2020 - 06:23 AM UTC

Quoted Text

Honestly, this is the best finish I've ever attained to date.

Joel


Yes, it most certainly is. Excellent work.
Joel_W
Staff MemberAssociate Editor
AUTOMODELER
_VISITCOMMUNITY
New York, United States
Joined: December 04, 2010
KitMaker: 11,666 posts
Auto Modeler: 2,974 posts
Posted: Tuesday, July 28, 2020 - 09:36 AM UTC
David,
Thanks so much for your Thumbs up. It's greatly appreciated.

joel
AussieReg
Staff MemberAssociate Editor
AUTOMODELER
#007
_VISITCOMMUNITY
Victoria, Australia
Joined: June 09, 2009
KitMaker: 8,156 posts
Auto Modeler: 2,953 posts
Posted: Tuesday, July 28, 2020 - 11:42 AM UTC
Super work Joel, this build is really looking good as it heads down the home straight.

Cheers, D
Cosimodo
#335
_VISITCOMMUNITY
Auckland, New Zealand
Joined: September 03, 2013
KitMaker: 1,808 posts
Auto Modeler: 701 posts
Posted: Tuesday, July 28, 2020 - 01:32 PM UTC
The body looks amazing Joel, such a smooth shiny finish. Nice masking on the windows, I didn't realise that they weren't decals until I read the text. Looking forward to the final pictures.

cheers
Michael
Joel_W
Staff MemberAssociate Editor
AUTOMODELER
_VISITCOMMUNITY
New York, United States
Joined: December 04, 2010
KitMaker: 11,666 posts
Auto Modeler: 2,974 posts
Posted: Wednesday, July 29, 2020 - 12:56 AM UTC
Michael & Damian,
Thanks guys for your thumbs up. It's greatly appreciated.

To me plastic modeling is plastic modeling no matter the type of model: Car, Plane, Boat, or Armor, what separates them is how we paint them, and the finish we're trying to achieve. By far, cars have been the hardest for me. A super smooth and deep glossy paint scheme was next to impossible to achieve, and more times then not the build was a total disaster. After a few attempts, I went back to military aircraft for a few more years.

3 plus years ago I just wanted to finally get super serious about cars, specifically race cars, and classic road cars. But the darn painting process just drove me nuts. So that's been my focus from day 1. And it hasn't been an easy journey by any means. I really struggled, but slowly by following just a few car builders on You Tube I developed a process that had promise, and was easily repeatable. The Audi as I said is by far the best overall paint job and finish I've done to date.

Joel
Joel_W
Staff MemberAssociate Editor
AUTOMODELER
_VISITCOMMUNITY
New York, United States
Joined: December 04, 2010
KitMaker: 11,666 posts
Auto Modeler: 2,974 posts
Posted: Friday, July 31, 2020 - 05:49 AM UTC
The Final Update

Well, the Audi R8 LMS GT3 crossed the finish line this morning. A build that I completely enjoyed from the green flag to the checker flag. The fit of 99% of the parts was perfect. The only issue I had was getting the chassis 4 mounting pins to slide into their respective mounting holes in the body. Honestly, it was mostly my fault as the build up of various coats of paint was the major culprit. The fit was so tight and accurate that the diffuser was a tad to tight to slide into its proper position as well under the rear deck without a little light scraping. Still, I needed more pressure then I thought was prudent, but just when I was ready to take a break, everything literally just popped into place. The fit is just simply outstanding.

As I mentioned during the build, my main focus has been, is, and will be the paint job from primer prep to the final coat of wax. Honestly, the Audi is my best over all paint job to date. i still have a ways to go, but as long as I keep on making progress, I'm looking forward to each and every build.

Now comes the hard part of actually having to decide on my next build, and getting started on it.

Thanks to all of you that have stayed the course, and especially to those that have also posted. I can assure each of you that it's greatly appreciated.

Joel


AussieReg
Staff MemberAssociate Editor
AUTOMODELER
#007
_VISITCOMMUNITY
Victoria, Australia
Joined: June 09, 2009
KitMaker: 8,156 posts
Auto Modeler: 2,953 posts
Posted: Friday, July 31, 2020 - 11:31 AM UTC
Absolutely gorgeous build Joel, such a rich red colour and a beautifully deep gloss finish. Definitely right up there with the best!

Congratulations on getting yet another speed demon across the finish line and in the display cabinet, and I'm definitely looking forward to following your next adventure.

Cheers, D
Joel_W
Staff MemberAssociate Editor
AUTOMODELER
_VISITCOMMUNITY
New York, United States
Joined: December 04, 2010
KitMaker: 11,666 posts
Auto Modeler: 2,974 posts
Posted: Saturday, August 01, 2020 - 01:42 AM UTC
D,
Thanks for your huge thumbs up. It's always greatly appreciated. As for the color, the Red just pops better then any other color I've ever painted a race car to day. Even the Camel Lotus 88t doesn't pop like the Audi.

As I posted, I'm still trying to figure out what to start building now.

Joel
Cosimodo
#335
_VISITCOMMUNITY
Auckland, New Zealand
Joined: September 03, 2013
KitMaker: 1,808 posts
Auto Modeler: 701 posts
Posted: Saturday, August 01, 2020 - 04:36 PM UTC
That is an awesome looking car Joel! While I am not that interested in modern cars that Audi looks just perfect for the job and you have built it brilliantly.
Also looking forward to your next build. Always great to follow.

cheers
Michael
RussellE
#306
_VISITCOMMUNITY
Victoria, Australia
Joined: June 27, 2010
KitMaker: 3,959 posts
Auto Modeler: 495 posts
Posted: Sunday, August 02, 2020 - 12:17 AM UTC
Joel, I can only 2nd what Damian and Michael have said and congratulate you on another fine build

You continue to keep the bar high, and that red paint job is a real eye catcher! Glad you changed from silver...
Joel_W
Staff MemberAssociate Editor
AUTOMODELER
_VISITCOMMUNITY
New York, United States
Joined: December 04, 2010
KitMaker: 11,666 posts
Auto Modeler: 2,974 posts
Posted: Sunday, August 02, 2020 - 05:18 AM UTC
Michael & Russell,
Thanks guys for your really positive comments. It sure makes the whole build worth the time and effort to get it across the finish line.

Joel
BlackWidow
_VISITCOMMUNITY
European Union
Joined: August 09, 2009
KitMaker: 1,732 posts
Auto Modeler: 23 posts
Posted: Sunday, August 09, 2020 - 05:47 AM UTC
Sorry for catching up this build a little late, Joel. I have some strenuous weeks behind and before me at work doing vacation replacement for collegues.

I followed your build silently (as most) and this is a wonderful paint job! The red in combination with black looks very good. The overall work looks great! Kudos!

I do understand, that it's always not easy to start a new build when you've just finished the old one. It's a matter of motivation - same here ...

Stay safe and keep building models!
Torsten
Joel_W
Staff MemberAssociate Editor
AUTOMODELER
_VISITCOMMUNITY
New York, United States
Joined: December 04, 2010
KitMaker: 11,666 posts
Auto Modeler: 2,974 posts
Posted: Sunday, August 09, 2020 - 06:05 AM UTC
Torsten,
Thanks so much for you most positive words, they're always greatly appreciated.

As always, I know that you're following my builds while saving your comments till I'm across the finish line.

So glad to hear that all is well and you've got more work then you can handle. Unemployment here is nearly at Depression levels. Of course I'm retired and doing just fine.

Joel
 _GOTOTOP