

Ken,
I can't believe I missed nearly the whole build since my last visit. I'm just blown away at both the amount of work you've accomplished on the build, but the quality of your work.
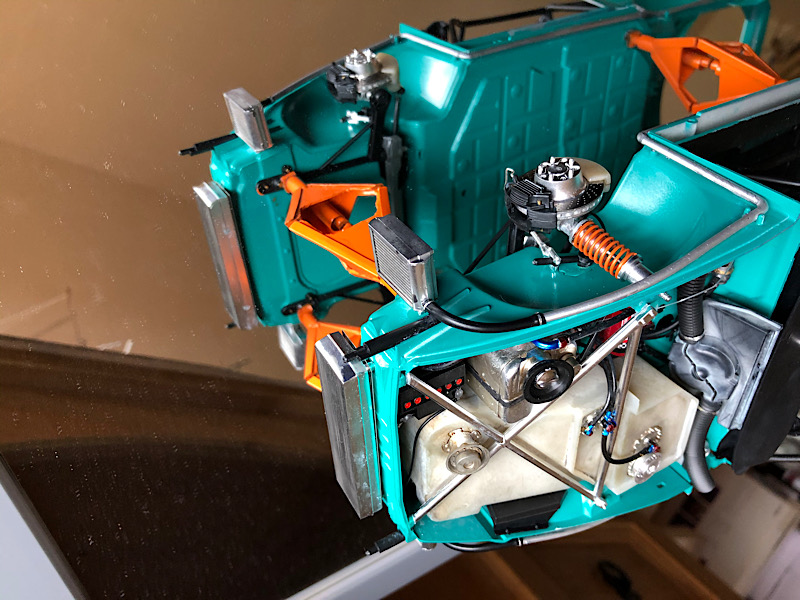
The engine just blew me away at how you replicated the various aluminum castings. The fiberglass components really look like fiberglass, not a shade of paint.
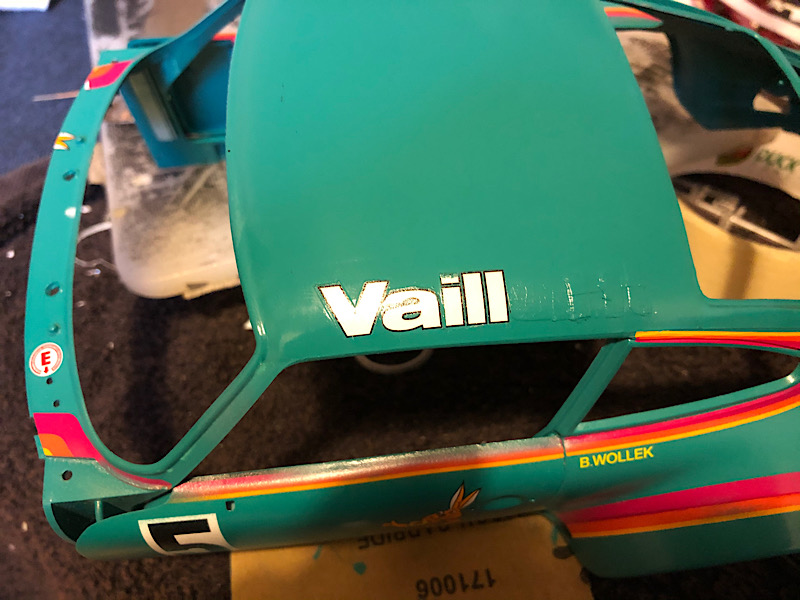
I was really surprised that you've gotten the entire shell painted, decaled, and now you're in the process of Glossing it. Those Tamiya decals really do look good. Tamiya sure has come a long way in the decal department. As for your clear Gloss issue, could very well be humidity. I just don't paint when it's raining, like today's Tropical storm. We went from a drought to a monsoon in one afternoon.
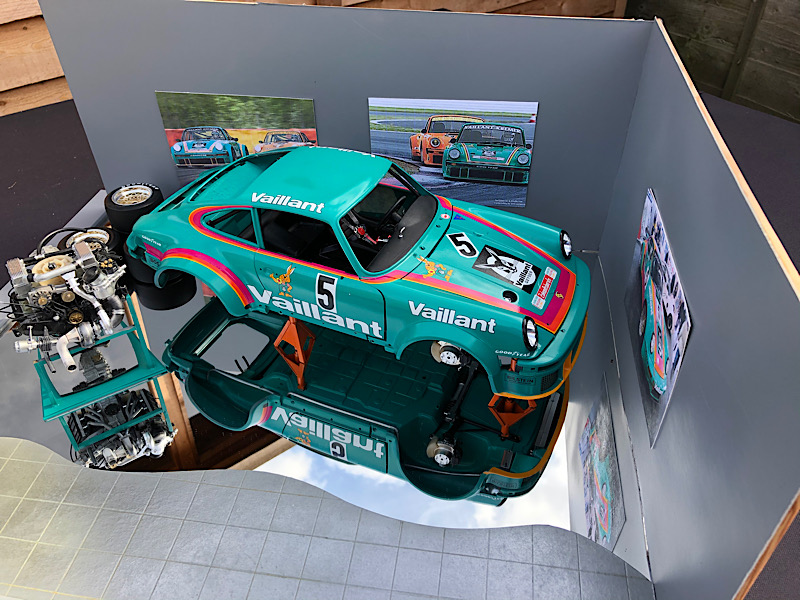
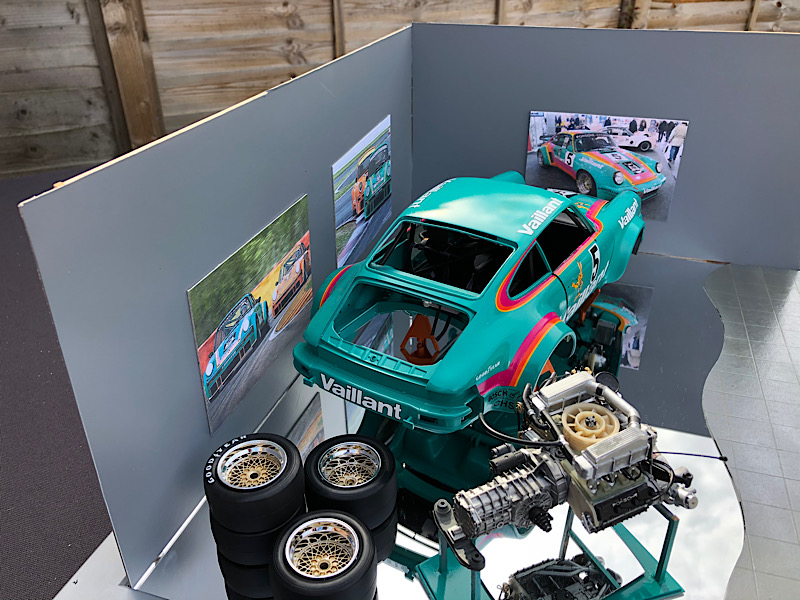
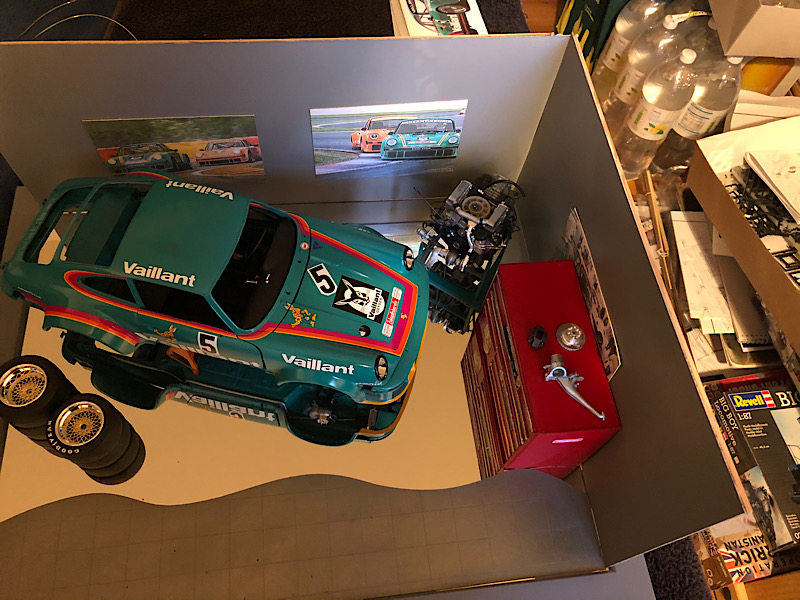
As for your display, I'd go for the two walls with pictures of the car on track. The tires could then be stacked by a corner of both pictures. I do agree with Damian that you should consider moving the car at a angle more towards the center.
Joel


Go to automodeler.com for the current dynamic site!
Cars
Discuss all types of automotive modeling here.
Discuss all types of automotive modeling here.
Hosted by Jim Starkweather
Tamiya 1/12 Porsche 934

Joel_W

Joined: December 04, 2010
KitMaker: 11,666 posts
Auto Modeler: 2,974 posts

Posted: Friday, July 10, 2020 - 08:21 AM UTC


kpnuts

Joined: December 20, 2013
KitMaker: 1,179 posts
Auto Modeler: 647 posts
Posted: Saturday, July 11, 2020 - 08:22 AM UTC
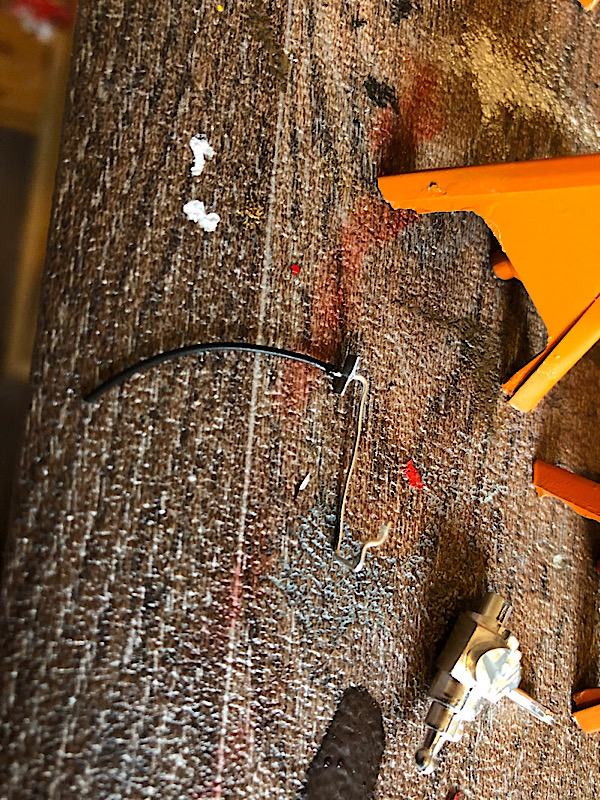
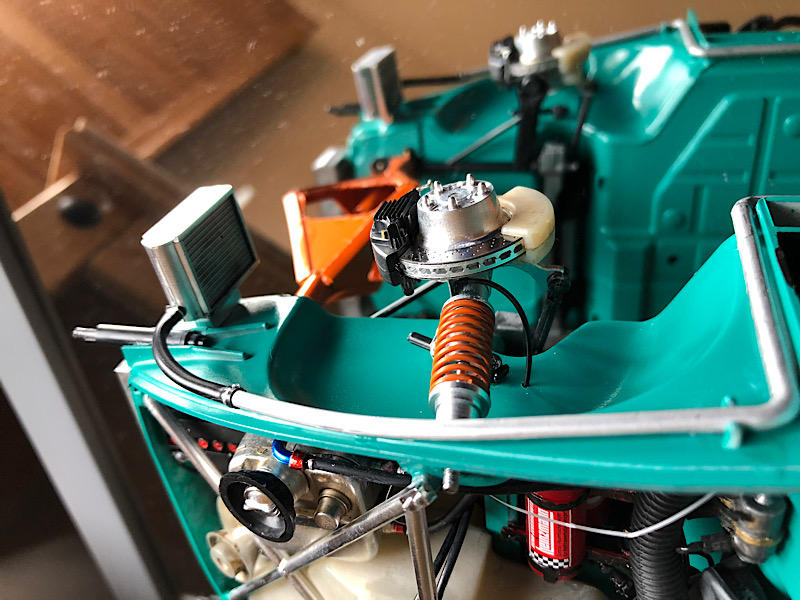
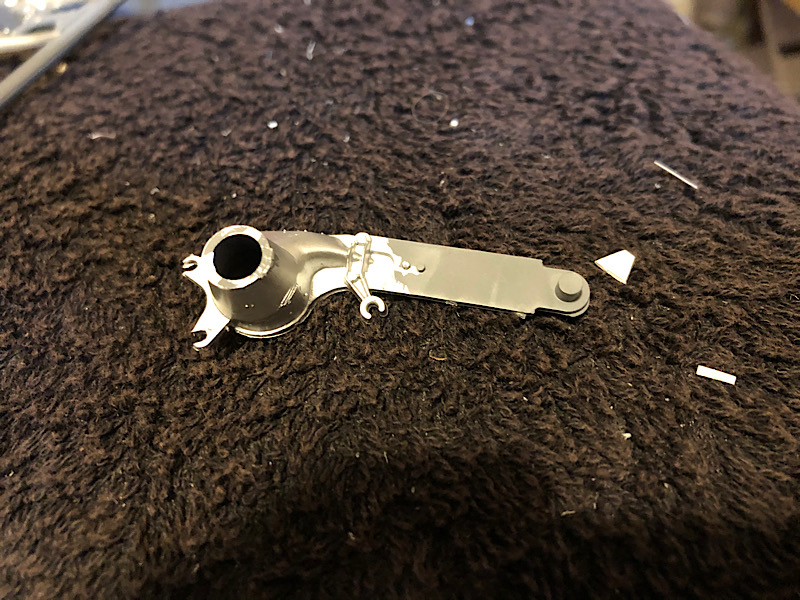
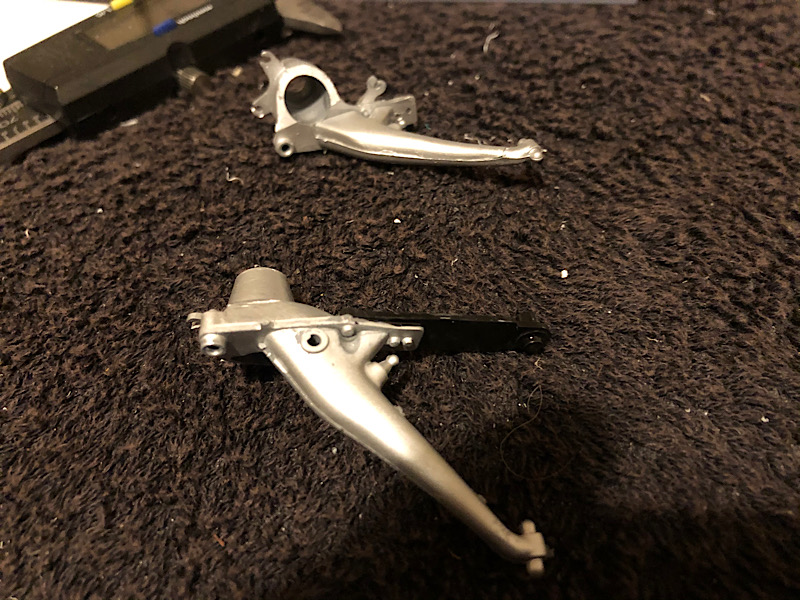
Hi all I decided to add the brake pipes to this kit and was going to use wire but then realised that the working steering and suspension wouldn't work so I added the bracket to the suspension leg and then added a flexible hose from that. Should I mention this was my third attempt(no ones perfect)
kpnuts
Joined: December 20, 2013
KitMaker: 1,179 posts
Auto Modeler: 647 posts
Posted: Sunday, July 12, 2020 - 06:04 AM UTC
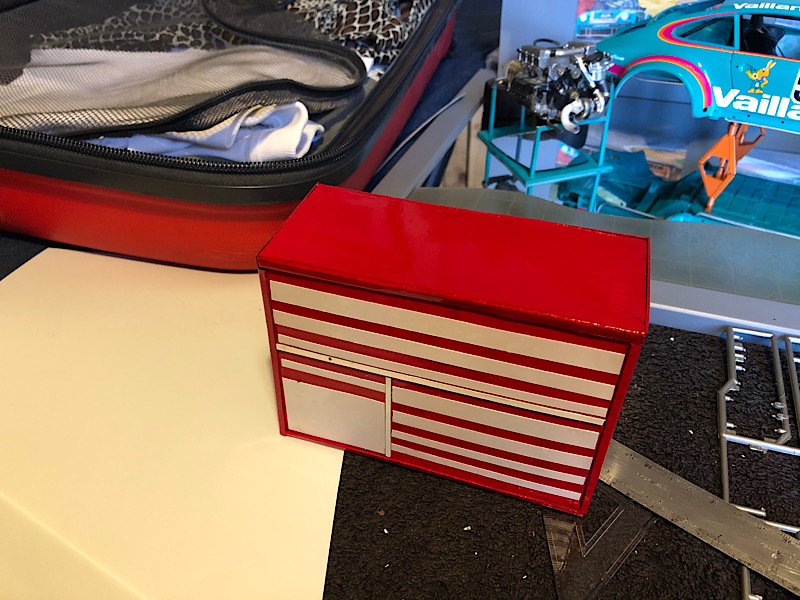
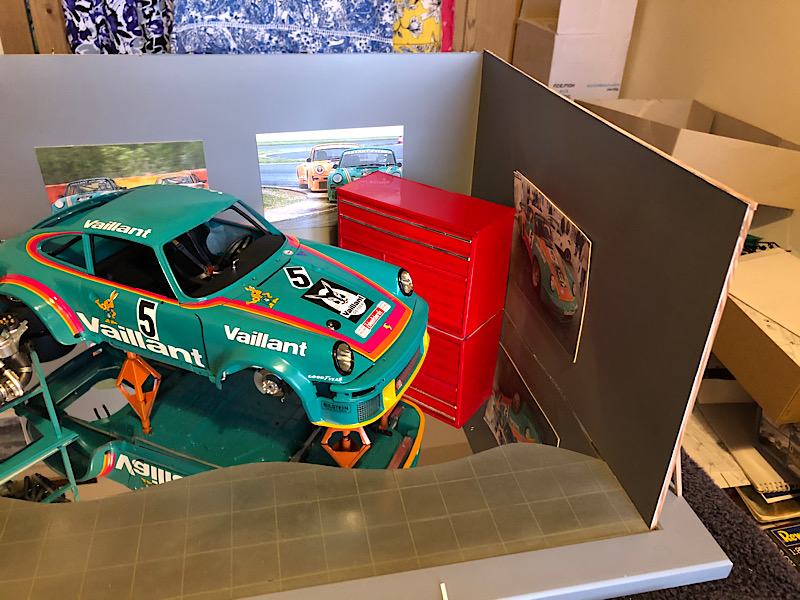
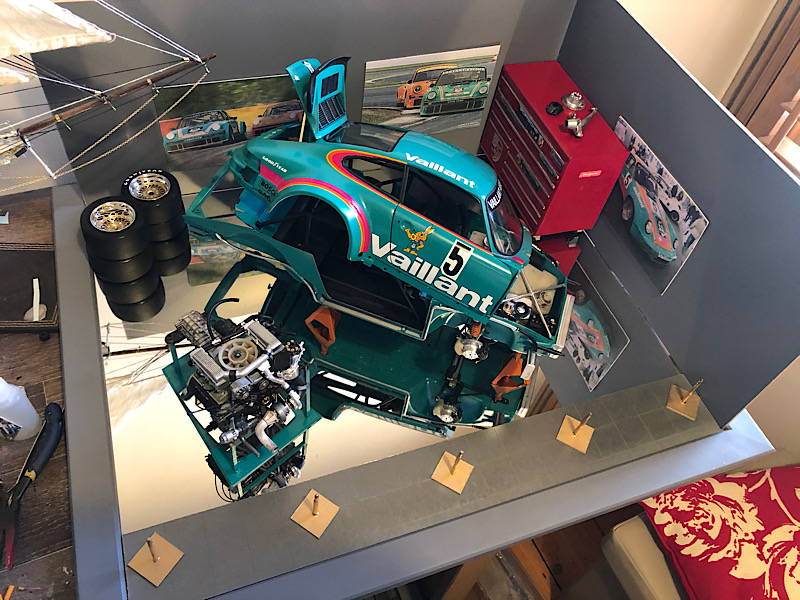
Hi all made a start on the display base, still need to make a tool chest for the back corner.

Stickframe

#362
Joined: December 01, 2013
KitMaker: 1,661 posts
Auto Modeler: 431 posts

Posted: Sunday, July 12, 2020 - 07:31 AM UTC
Hi Ken -
Great idea and build - the car looks great. Also a nice way to not hide all the detail -
cheers
Nick
Great idea and build - the car looks great. Also a nice way to not hide all the detail -
cheers
Nick

Cosimodo
#335

Joined: September 03, 2013
KitMaker: 1,808 posts
Auto Modeler: 701 posts

Posted: Sunday, July 12, 2020 - 09:04 PM UTC
Great display. That engine looks awesome on it's stand.
cheers
Michael
cheers
Michael
Joel_W
Joined: December 04, 2010
KitMaker: 11,666 posts
Auto Modeler: 2,974 posts
Posted: Monday, July 13, 2020 - 12:44 AM UTC
Ken,
I'm just blown away with both the added details and the detail painting to make the kit parts just POP out at the viewer.
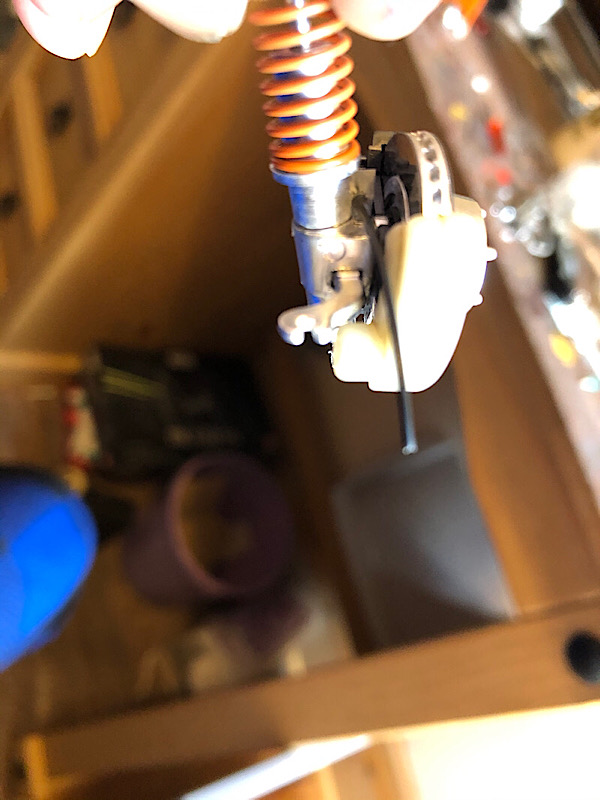
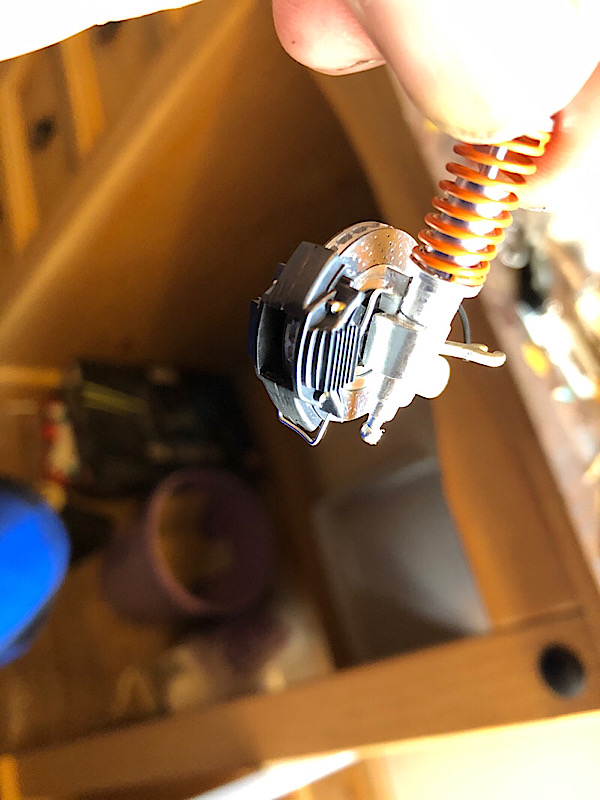
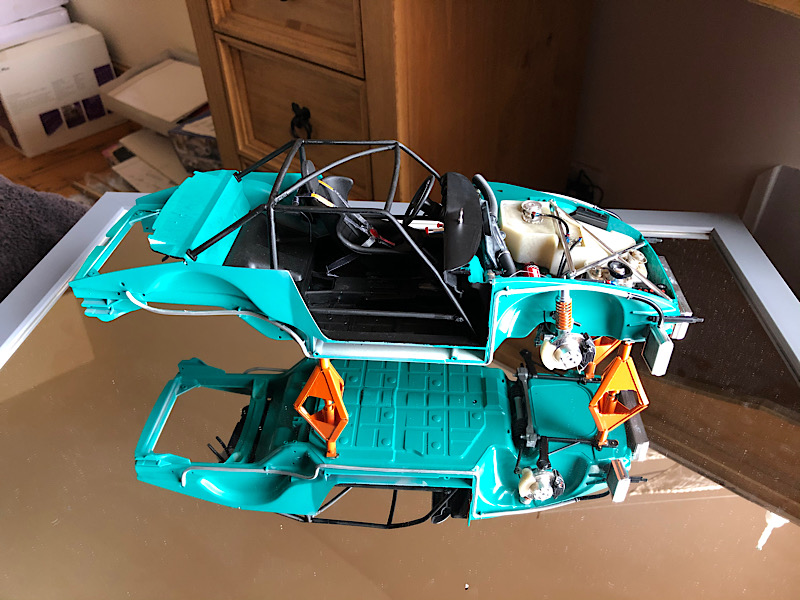
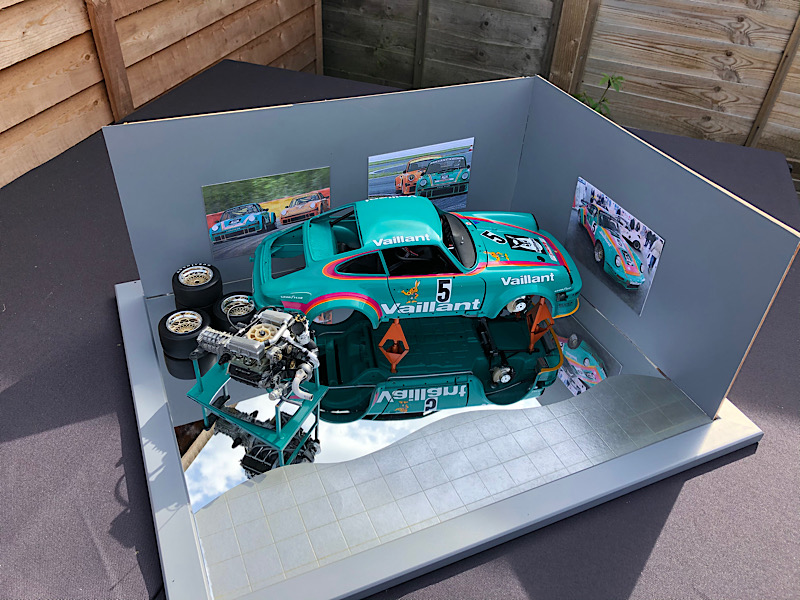
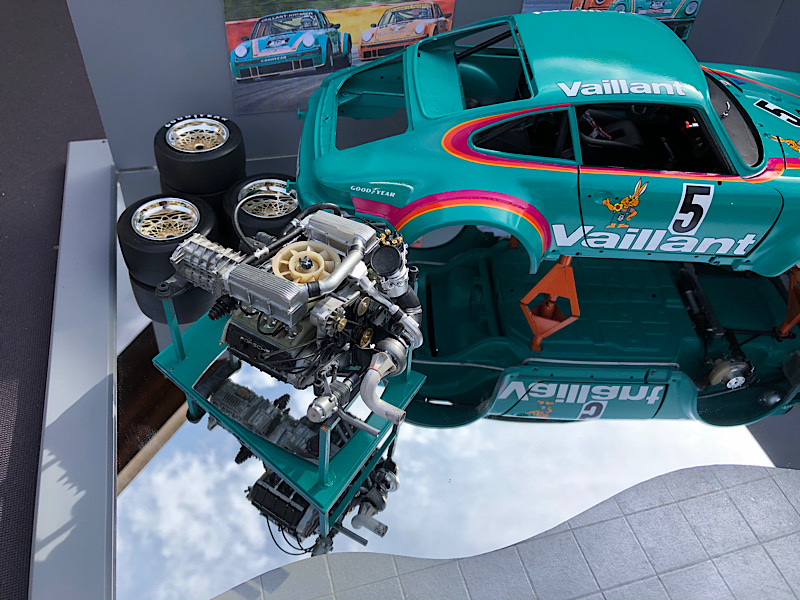
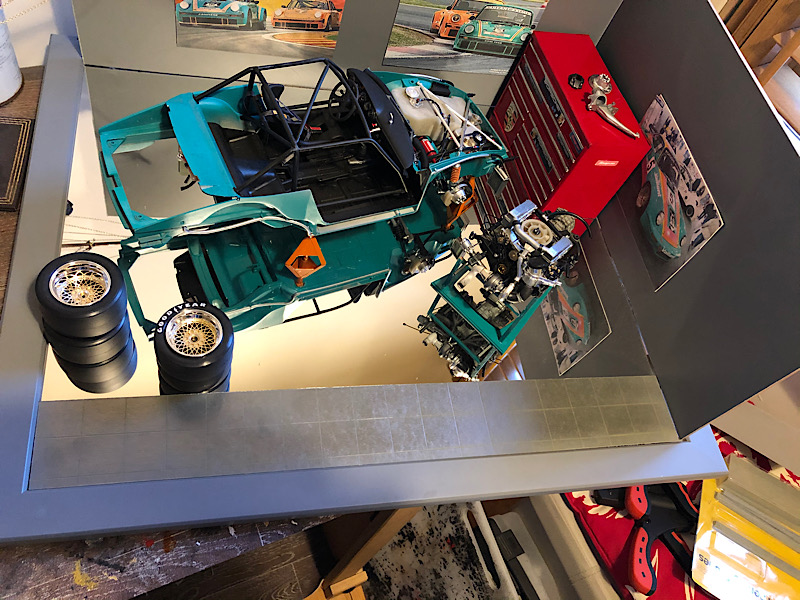
The start to the diorama is fantastic. the decision to have the Porsche 934 up on Jack stands so that the tires can be stacked by the wall, allows us to view the details of the suspensions and brake assemblies up close and personal. And having the engine on it's own work stand also allows for us to appreciate the Porsche power plant, and your excellent detailing of it.
Joel
I'm just blown away with both the added details and the detail painting to make the kit parts just POP out at the viewer.
The start to the diorama is fantastic. the decision to have the Porsche 934 up on Jack stands so that the tires can be stacked by the wall, allows us to view the details of the suspensions and brake assemblies up close and personal. And having the engine on it's own work stand also allows for us to appreciate the Porsche power plant, and your excellent detailing of it.
Joel
kpnuts
Joined: December 20, 2013
KitMaker: 1,179 posts
Auto Modeler: 647 posts
Posted: Tuesday, July 14, 2020 - 08:15 AM UTC
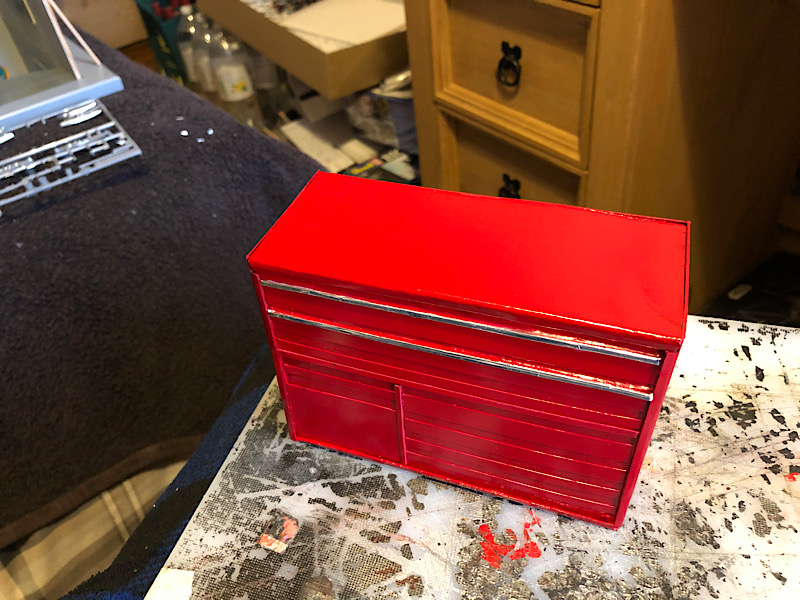
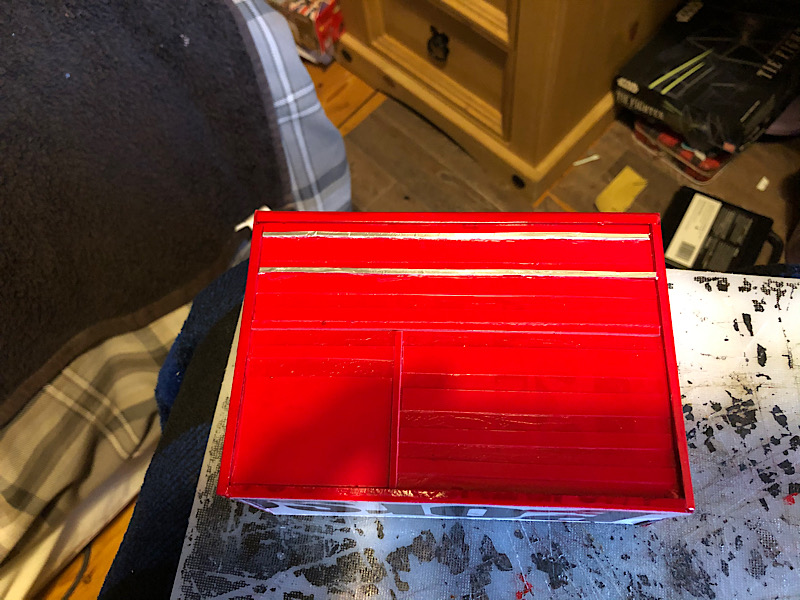
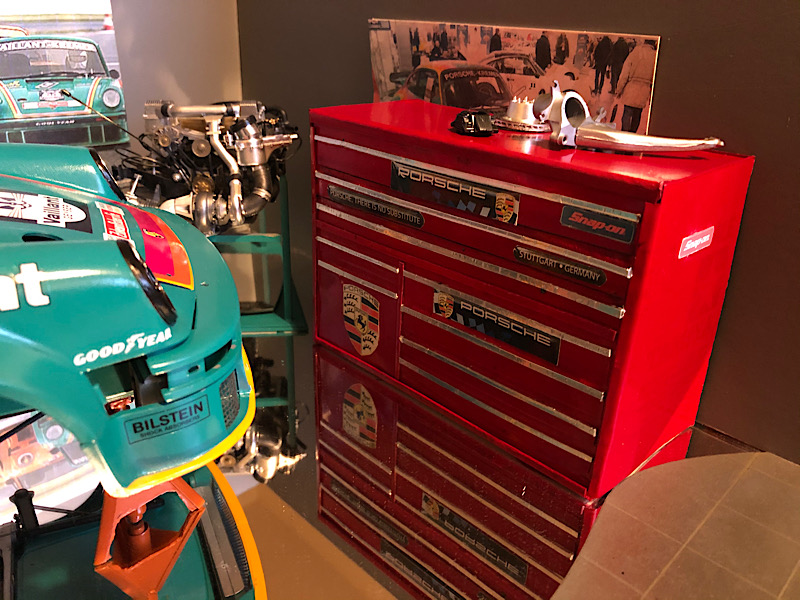
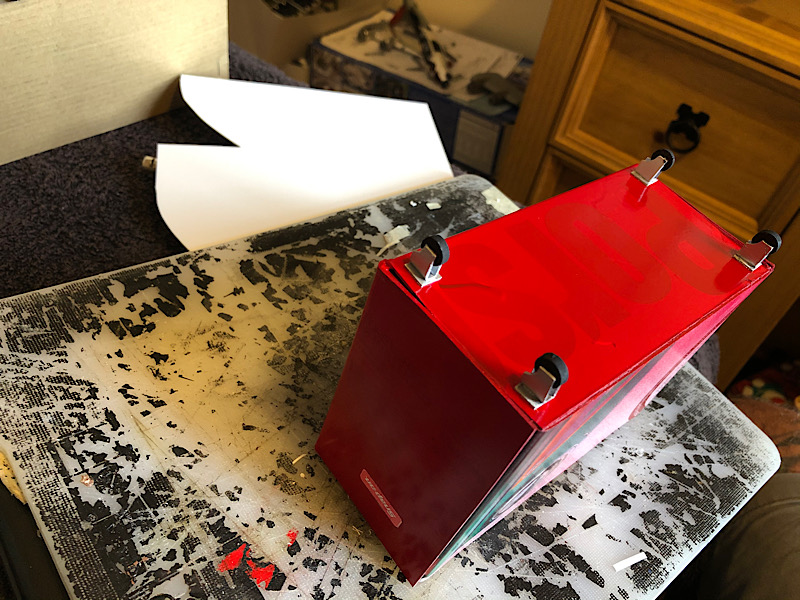
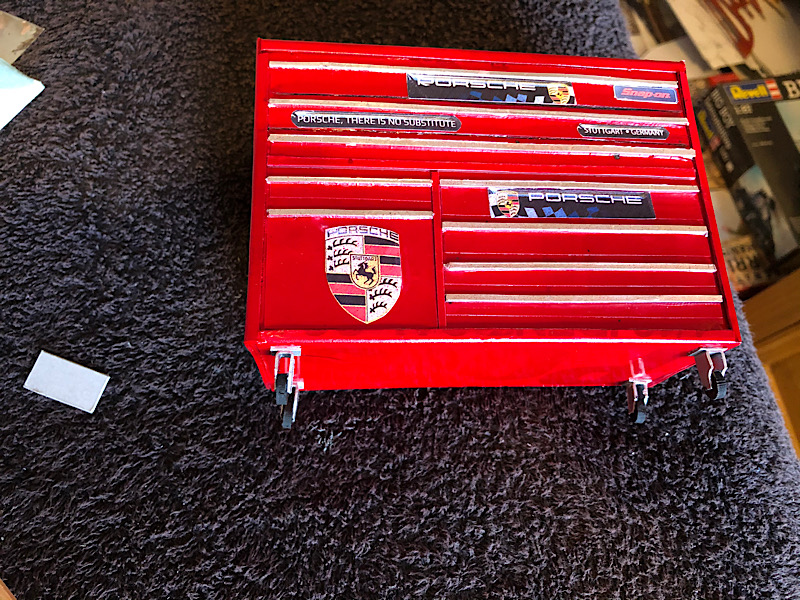
Made a start on a tool chest for it.
Joel_W
Joined: December 04, 2010
KitMaker: 11,666 posts
Auto Modeler: 2,974 posts
Posted: Tuesday, July 14, 2020 - 08:59 AM UTC
Ken,
Your toolkit is just amazing.

Your toolkit is just amazing.

AussieReg

#007

Joined: June 09, 2009
KitMaker: 8,156 posts
Auto Modeler: 2,953 posts

Posted: Tuesday, July 14, 2020 - 12:35 PM UTC
Excellent concept Ken, and outstanding execution! This is a beautifully eye-catching display and really shows off the level of detail and quality of your workmanship.
Great stuff, I love it!
Cheers, D
Great stuff, I love it!
Cheers, D

kpnuts
Joined: December 20, 2013
KitMaker: 1,179 posts
Auto Modeler: 647 posts
Posted: Thursday, July 16, 2020 - 08:09 AM UTC
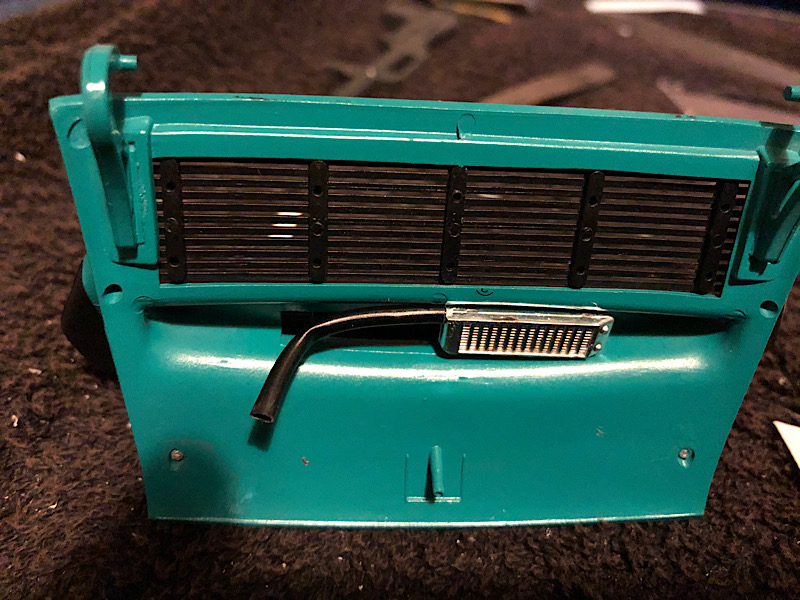
Ok so I need something on the tool chest but most of the car is built so not much choice but the rear suspension, problem is the spring plate is moulded integral with the suspension arm (on the car if you were working on the suspension arm you would have left the spring plate on ) so I cut it off and made a new spring plate separate to put on the car (still got to make the casters for the tool chest)


Joel_W
Joined: December 04, 2010
KitMaker: 11,666 posts
Auto Modeler: 2,974 posts
Posted: Thursday, July 16, 2020 - 11:20 AM UTC
Ken,
Your diorama is simply amazing. All the various elements work so well together that it replicates real life to a tee.
Joel
Your diorama is simply amazing. All the various elements work so well together that it replicates real life to a tee.
Joel
kpnuts
Joined: December 20, 2013
KitMaker: 1,179 posts
Auto Modeler: 647 posts
Posted: Thursday, July 16, 2020 - 05:37 PM UTC
Thanks Joel, I am quite pleased with how its going.
kpnuts
Joined: December 20, 2013
KitMaker: 1,179 posts
Auto Modeler: 647 posts
Posted: Wednesday, July 22, 2020 - 08:26 AM UTC
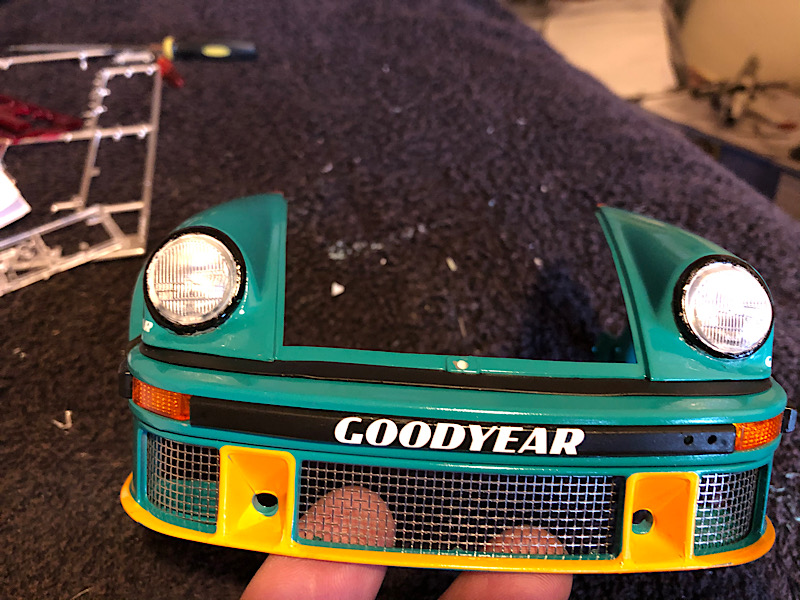
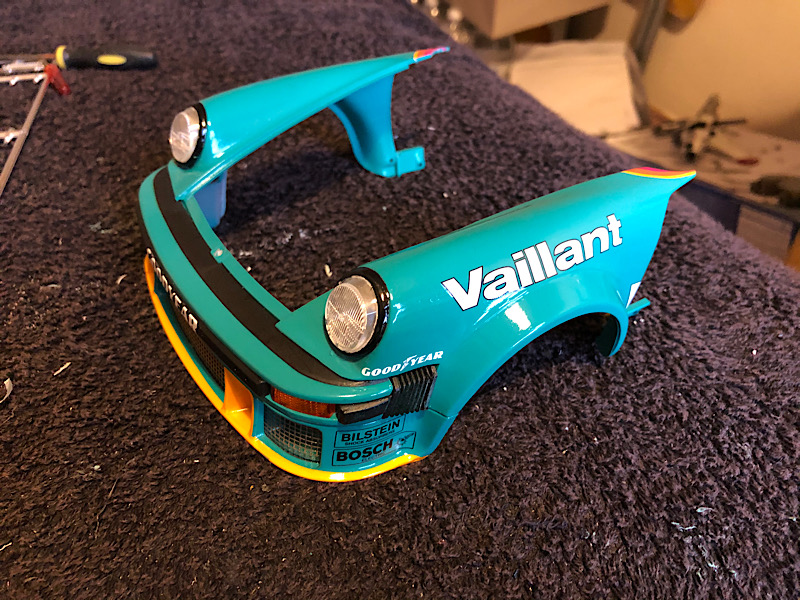
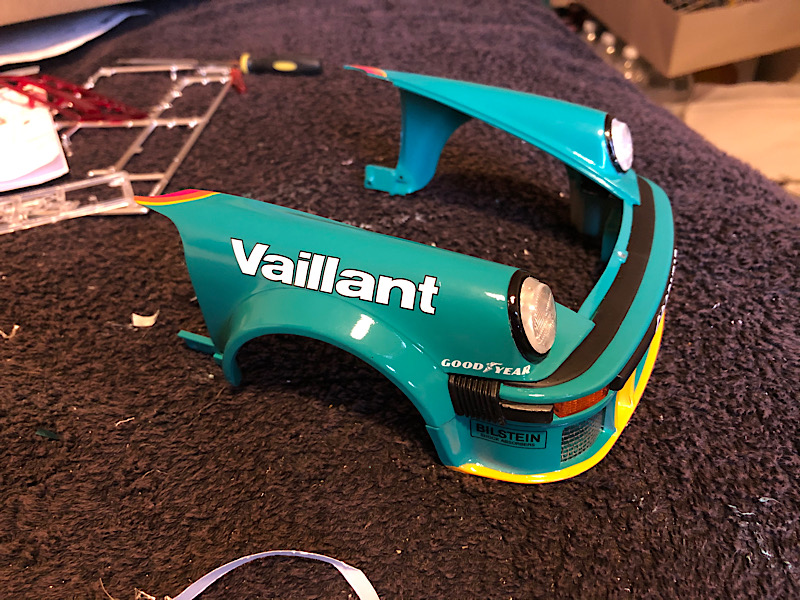
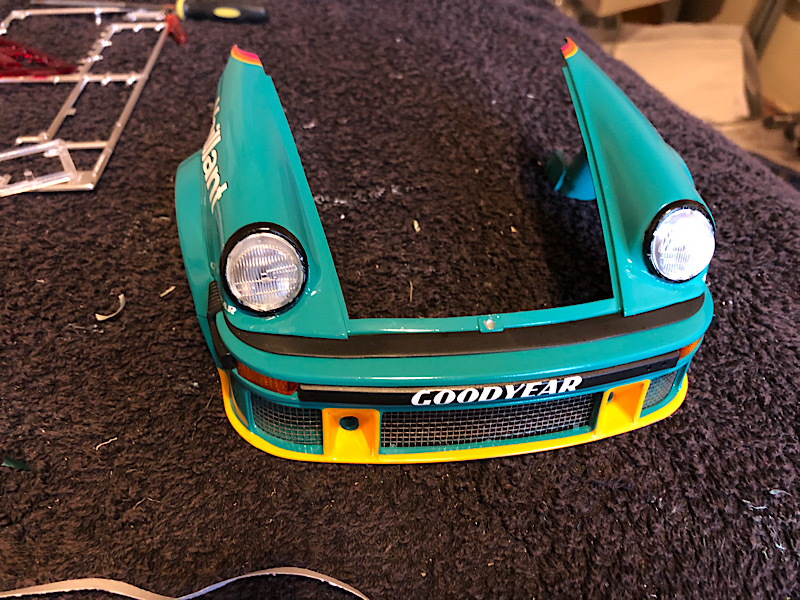
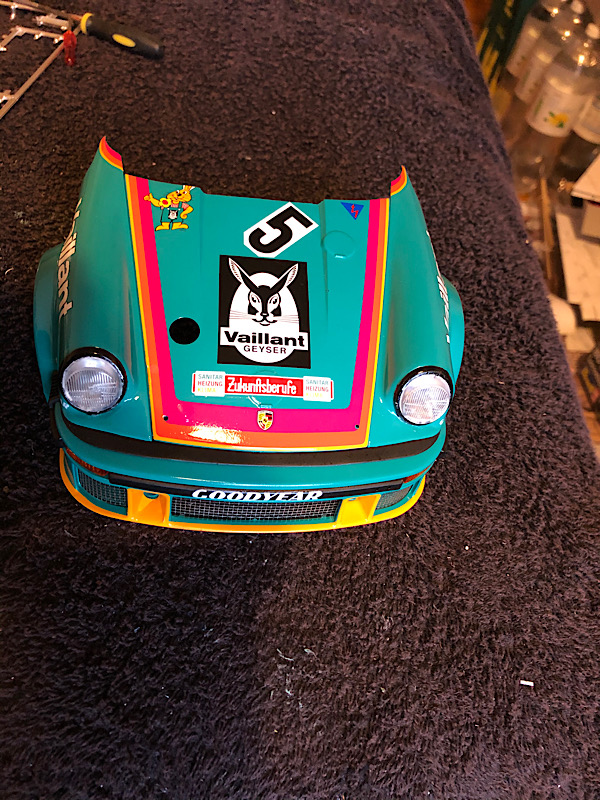
Hi all well the front end is finished. On the last leg now.
pnance26
Joined: January 22, 2016
KitMaker: 766 posts
Auto Modeler: 140 posts

Posted: Wednesday, July 22, 2020 - 10:19 AM UTC
The build is quite impressive but I do have a question or two...
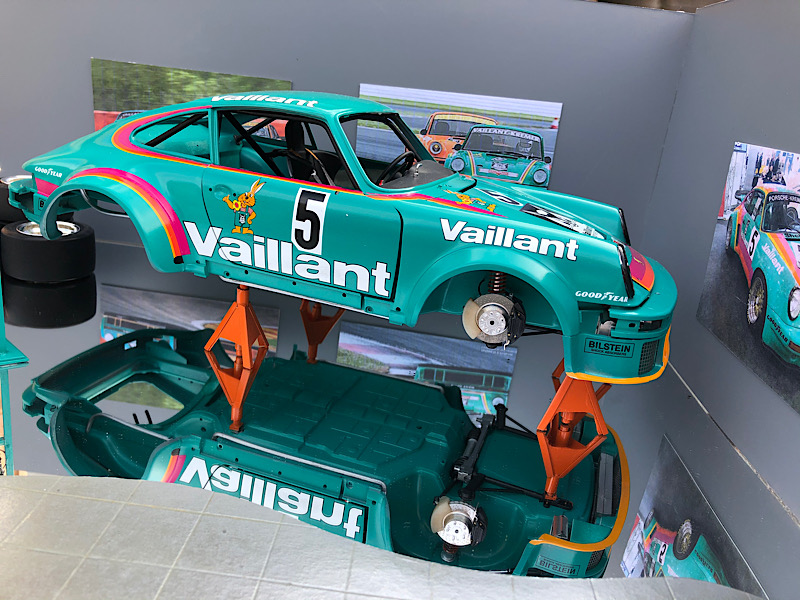
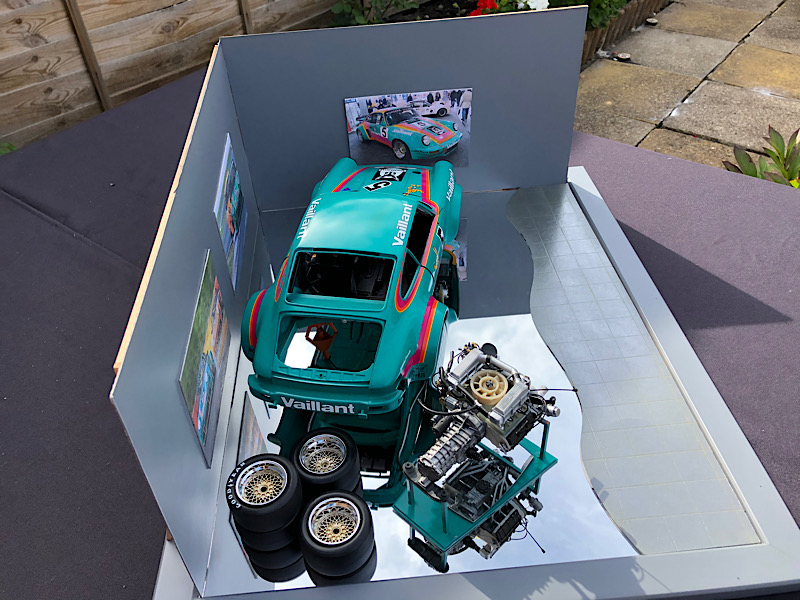
Why the emphasis on the mirror for the body when nothing shows underneath but the pan? Also, the tool box, to me, looks a bit large for the diorama. Also, stuffing that beautiful engine over in the corner is a shame. I would do away with the mirror under it on the carriage and bring it back out front.
Also, why did you choose to not fill the gap between the front clip and the fender? On a race car, that gap would be an aerodynamic nightmare. Would it have affected your build? Just curious because that line is a must fill for me.
Too bad you had to split the orange decal on the right front to get it to lay down...
Otherwise, it is an amazing build. Thanks for sharing!
Joel_W
Joined: December 04, 2010
KitMaker: 11,666 posts
Auto Modeler: 2,974 posts
Posted: Thursday, July 23, 2020 - 02:49 AM UTC
Ken,
The front clip rear looks good. Way better then my 1/24 scale version. The decals just laid down and look like you painted them on.
as far as the mirror under the car, I'm assuming that up close and personal, one can see both the detailed front and rear suspensions that don't show up very well in the pictures. The one under the engine is a must.
Joel
kpnuts
Joined: December 20, 2013
KitMaker: 1,179 posts
Auto Modeler: 647 posts
Posted: Thursday, July 23, 2020 - 09:18 AM UTC
Yes when the suspension is added it will be more interesting also when I add the cables and pipes to the rear engine compartment.
Damaged the roof and had to respray the whole thing again (if the rest of the masking comes off like this I think I got away with it)
Cut some of the tiles away from the edge to give a bit more room to display things.
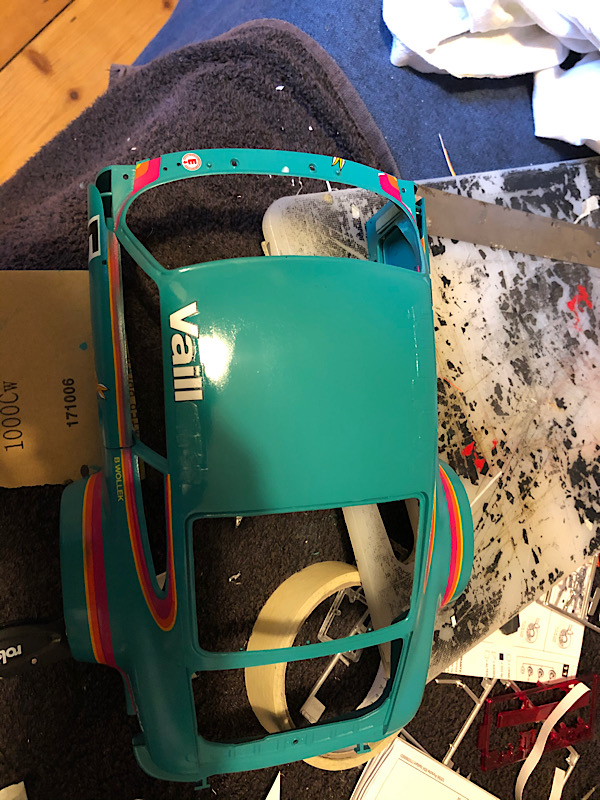
Damaged the roof and had to respray the whole thing again (if the rest of the masking comes off like this I think I got away with it)
Cut some of the tiles away from the edge to give a bit more room to display things.
AussieReg
#007
Joined: June 09, 2009
KitMaker: 8,156 posts
Auto Modeler: 2,953 posts
Posted: Thursday, July 23, 2020 - 11:41 AM UTC
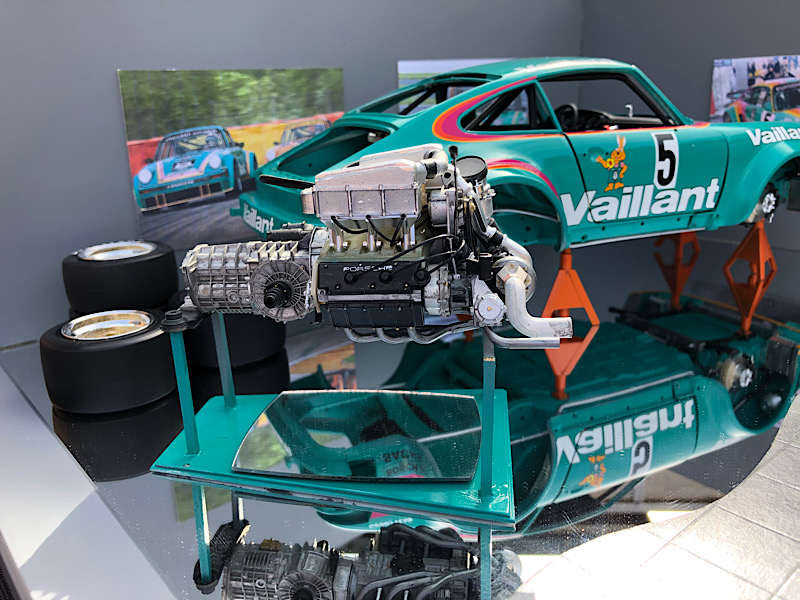
I like this layout much better, the engine on full display and not hidden away. Maybe place one of the wheels in the empty spot beside the rear LH quarter, or a small tool tray perhaps.
Cheers, D
Cheers, D
Joel_W
Joined: December 04, 2010
KitMaker: 11,666 posts
Auto Modeler: 2,974 posts
Posted: Friday, July 24, 2020 - 01:15 AM UTC
Ken,
What on earth happened to the Roof? Seems like you've come down with a case of Joel Luck. I'm sure that you'll get it back to the 100% it was at before.
I fully agree with Damian how much better the balance is with the engine brought to the front, as well as giving the viewer that much more eye candy to see.
Joel
kpnuts
Joined: December 20, 2013
KitMaker: 1,179 posts
Auto Modeler: 647 posts
Posted: Friday, July 24, 2020 - 02:32 AM UTC
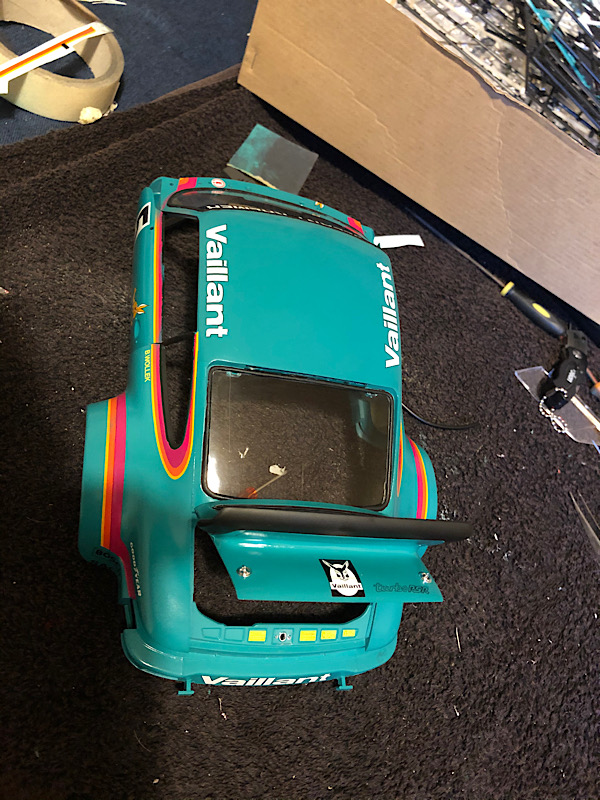
Thanks guys, I dropped it on the floor and it landed roof down, lots of scuff Mark's some over the decals, I think I've rescued it (got all the masking off and no bleeding over the decals) just a little light wet and dry to try and get rid of the masking edging and I think we're good to go.
Joel_W
Joined: December 04, 2010
KitMaker: 11,666 posts
Auto Modeler: 2,974 posts
Posted: Friday, July 24, 2020 - 03:05 AM UTC
Ken,
I've got my fingers crossed.
Joel
I've got my fingers crossed.
Joel
kpnuts
Joined: December 20, 2013
KitMaker: 1,179 posts
Auto Modeler: 647 posts
Posted: Saturday, July 25, 2020 - 08:24 AM UTC
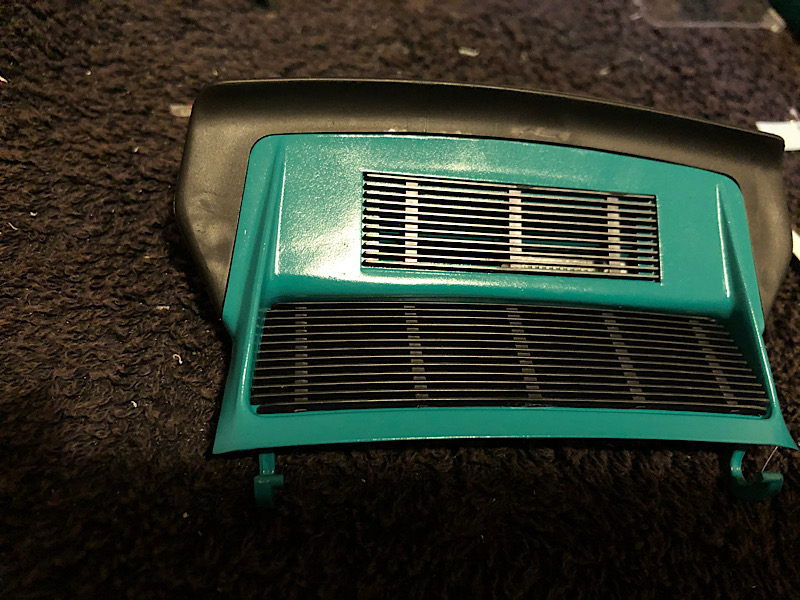
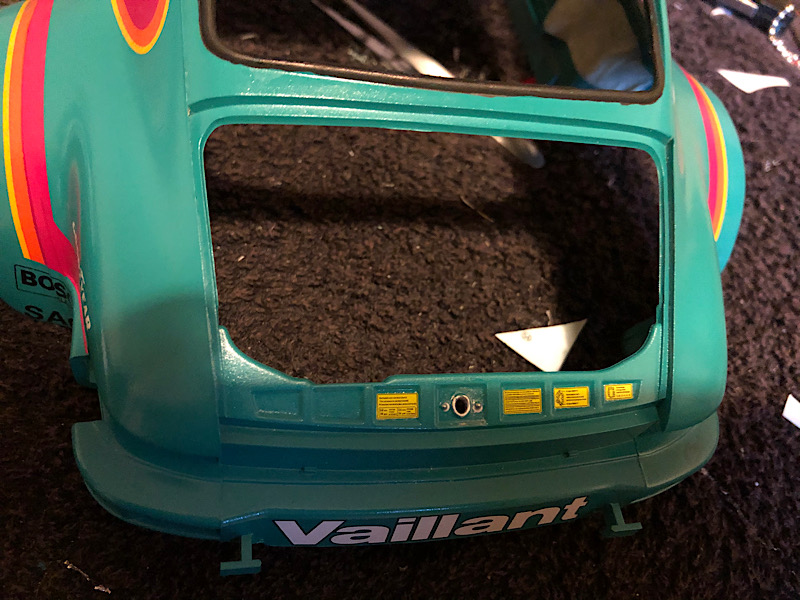
Did some work on the boot lid and the body.


Joel_W
Joined: December 04, 2010
KitMaker: 11,666 posts
Auto Modeler: 2,974 posts
Posted: Sunday, July 26, 2020 - 02:23 AM UTC
Ken,
The trunk looks great, but the star of your update is the roof. You really nailed that fix.
Joel
The trunk looks great, but the star of your update is the roof. You really nailed that fix.
Joel
AussieReg
#007
Joined: June 09, 2009
KitMaker: 8,156 posts
Auto Modeler: 2,953 posts
Posted: Sunday, July 26, 2020 - 03:46 AM UTC
Quoted Text
Ken,
The trunk looks great, but the star of your update is the roof. You really nailed that fix.
Joel
Ditto, no arguments here!
Cheers, D

Dixon66
Joined: December 12, 2002
KitMaker: 1,500 posts
Auto Modeler: 645 posts

Posted: Sunday, July 26, 2020 - 07:40 AM UTC
Quoted Text
Quoted TextKen,
The trunk looks great, but the star of your update is the roof. You really nailed that fix.
Joel
Ditto, no arguments here!
Cheers, D
X3
kpnuts
Joined: December 20, 2013
KitMaker: 1,179 posts
Auto Modeler: 647 posts
Posted: Sunday, July 26, 2020 - 08:28 AM UTC
Thanks guys, I like the fact it shows I'm getting more gooder(: a couple of years ago that would have been bin fodder.
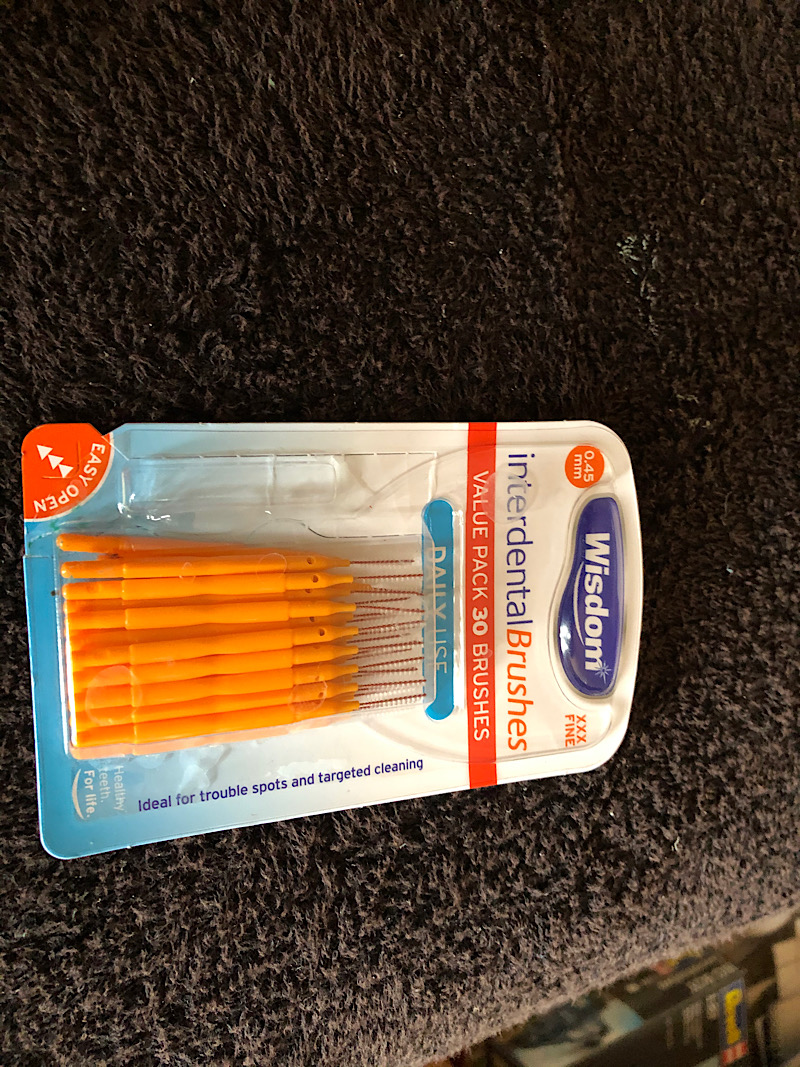
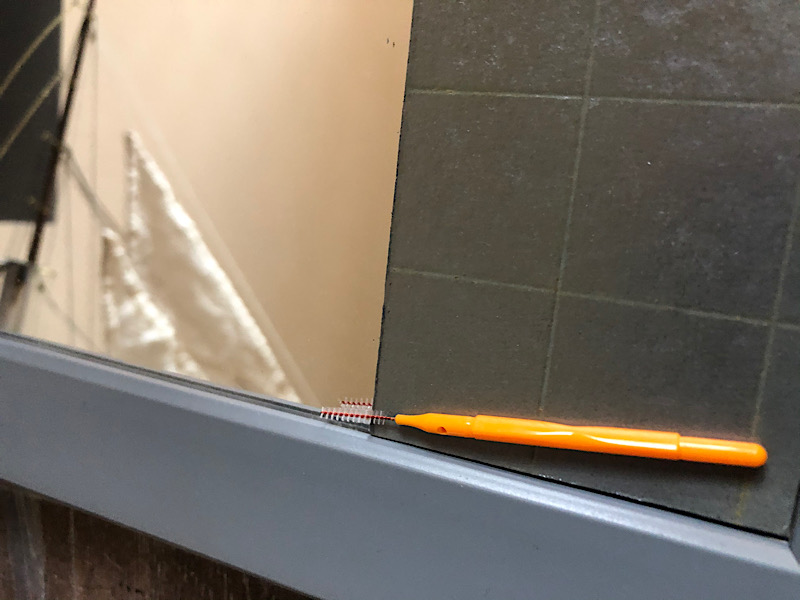
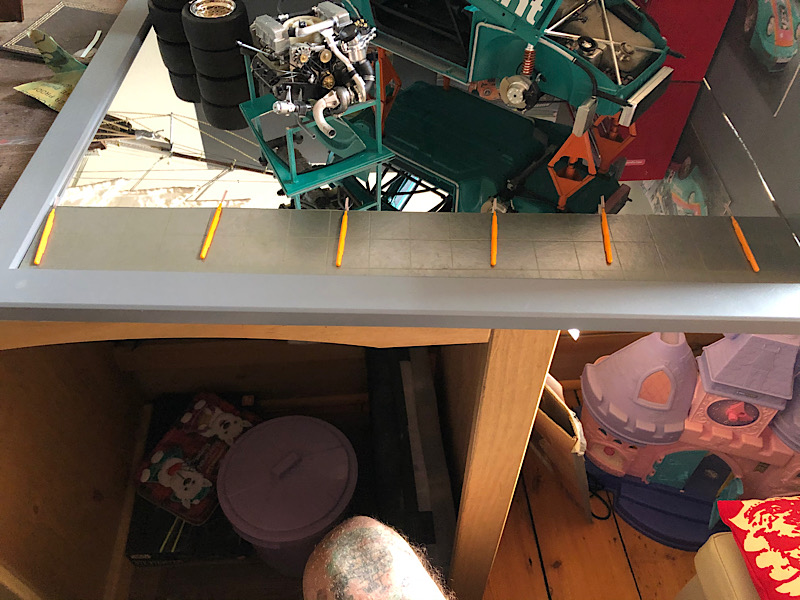
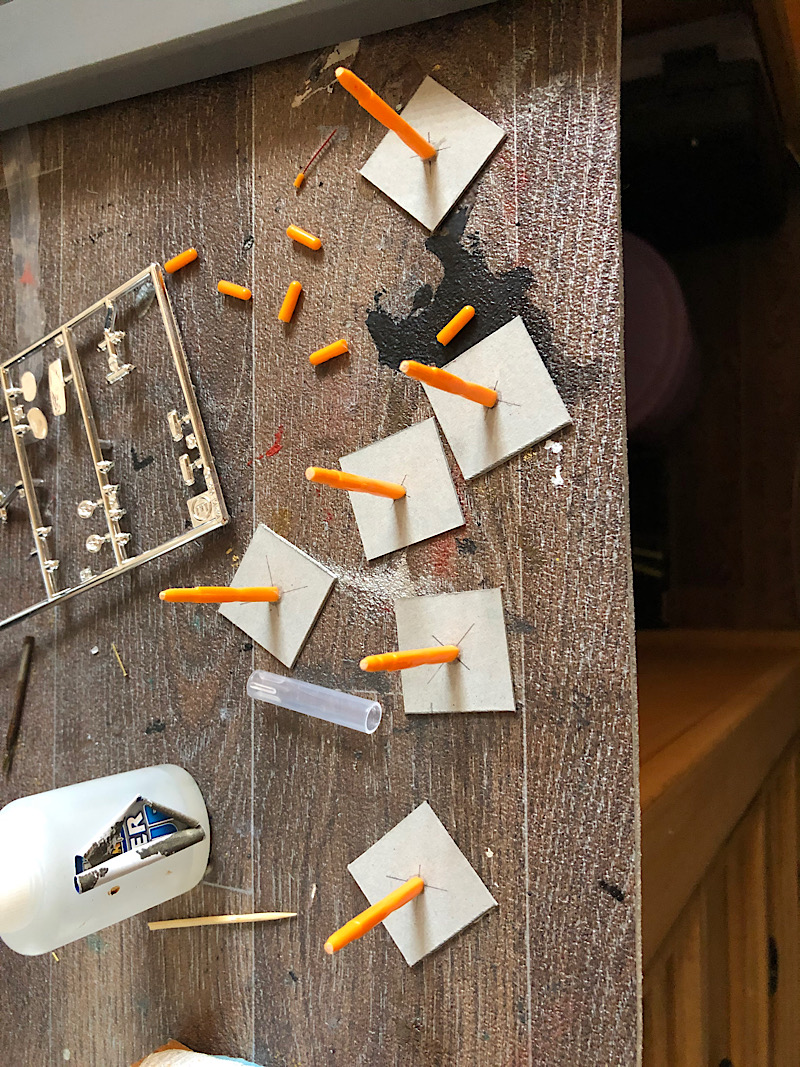
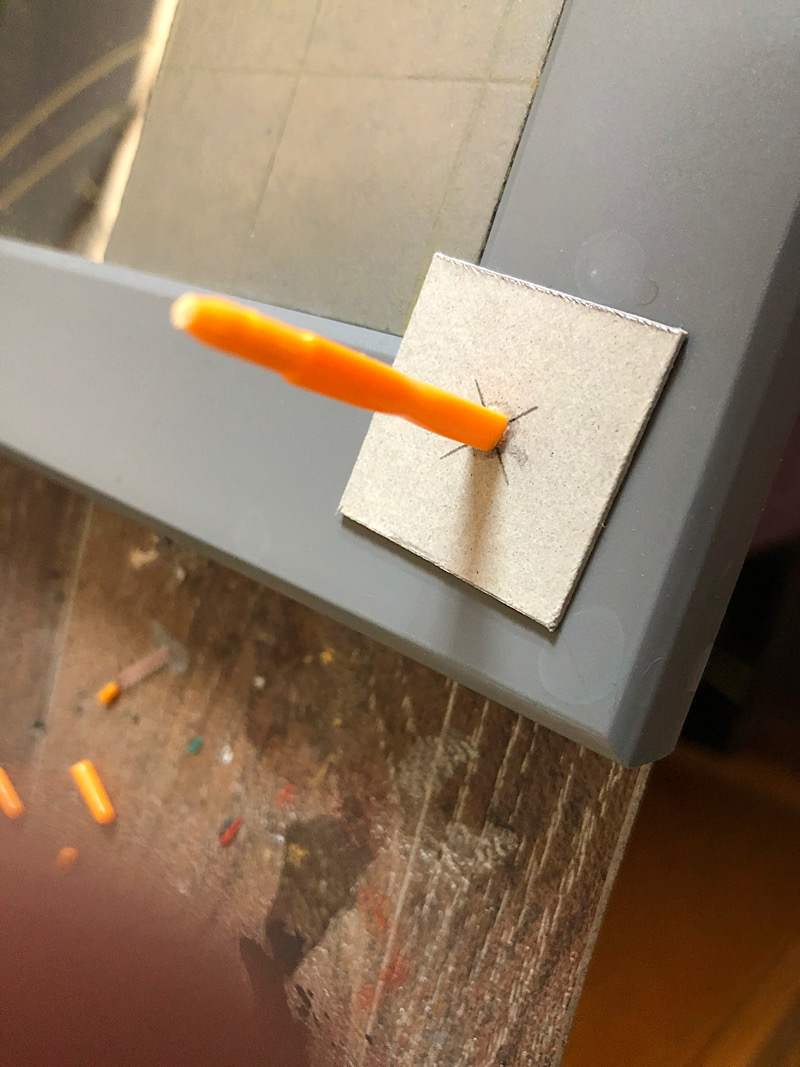
Hi all I saw these dental sticks in a shop somewhere and thought they must be usefull in modelling, well I've found a first use for them.
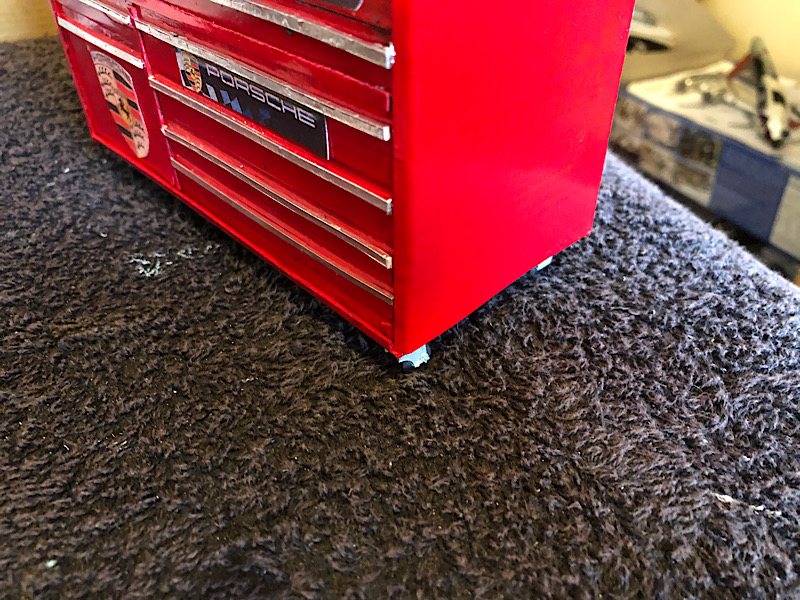
Also made the casters for the tool chest.
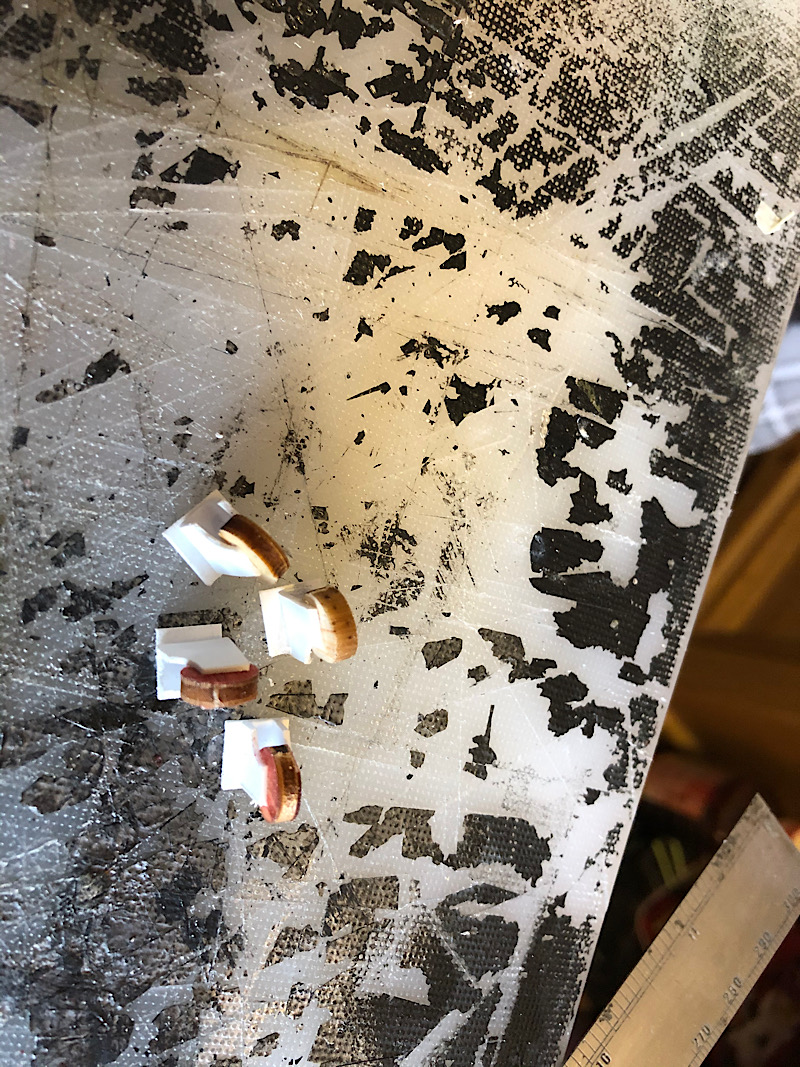
Hi all I saw these dental sticks in a shop somewhere and thought they must be usefull in modelling, well I've found a first use for them.
Also made the casters for the tool chest.
 |

WEB HOSTING BY


Copyright ©2021 Auto Modeler and Kitmaker Network, a subsidiary of Silver Star Enterprises
All Rights Reserved. Please read our Conditions of Use and Privacy Policy.
All Rights Reserved. Please read our Conditions of Use and Privacy Policy.