BMW 507 Coupe and Cabrio Dual Build
Joel_W
 Associate Editor
New York, United States
Joined: December 04, 2010
KitMaker: 11,666 posts
Auto Modeler: 2,974 posts
Posted: Friday, August 21, 2020 - 01:04 AM UTC
D,
Now that hardtop really looks like it was meant to fit. I'd certainly say that's one great job of Rub Goldberg modeling.

Joel
On my Workbench:
Monogram 1/24 scale 427 Shelby Cobra
Just Completed:
Beemax 1/24 scale BMW M3 E30 1992 Evolution II
AussieReg
Associate Editor 
#007
Victoria, Australia
Joined: June 09, 2009
KitMaker: 8,156 posts
Auto Modeler: 2,953 posts
Posted: Friday, August 21, 2020 - 02:54 AM UTC
Quoted Text
D,
Now that hardtop really looks like it was meant to fit. I'd certainly say that's one great job of Rub Goldberg modeling.
Joel
Spot on Joel, a lot more complicated than it really needed to be! It would have been perfect if the hard top would just sit in place without glue, easy to lift off for display.
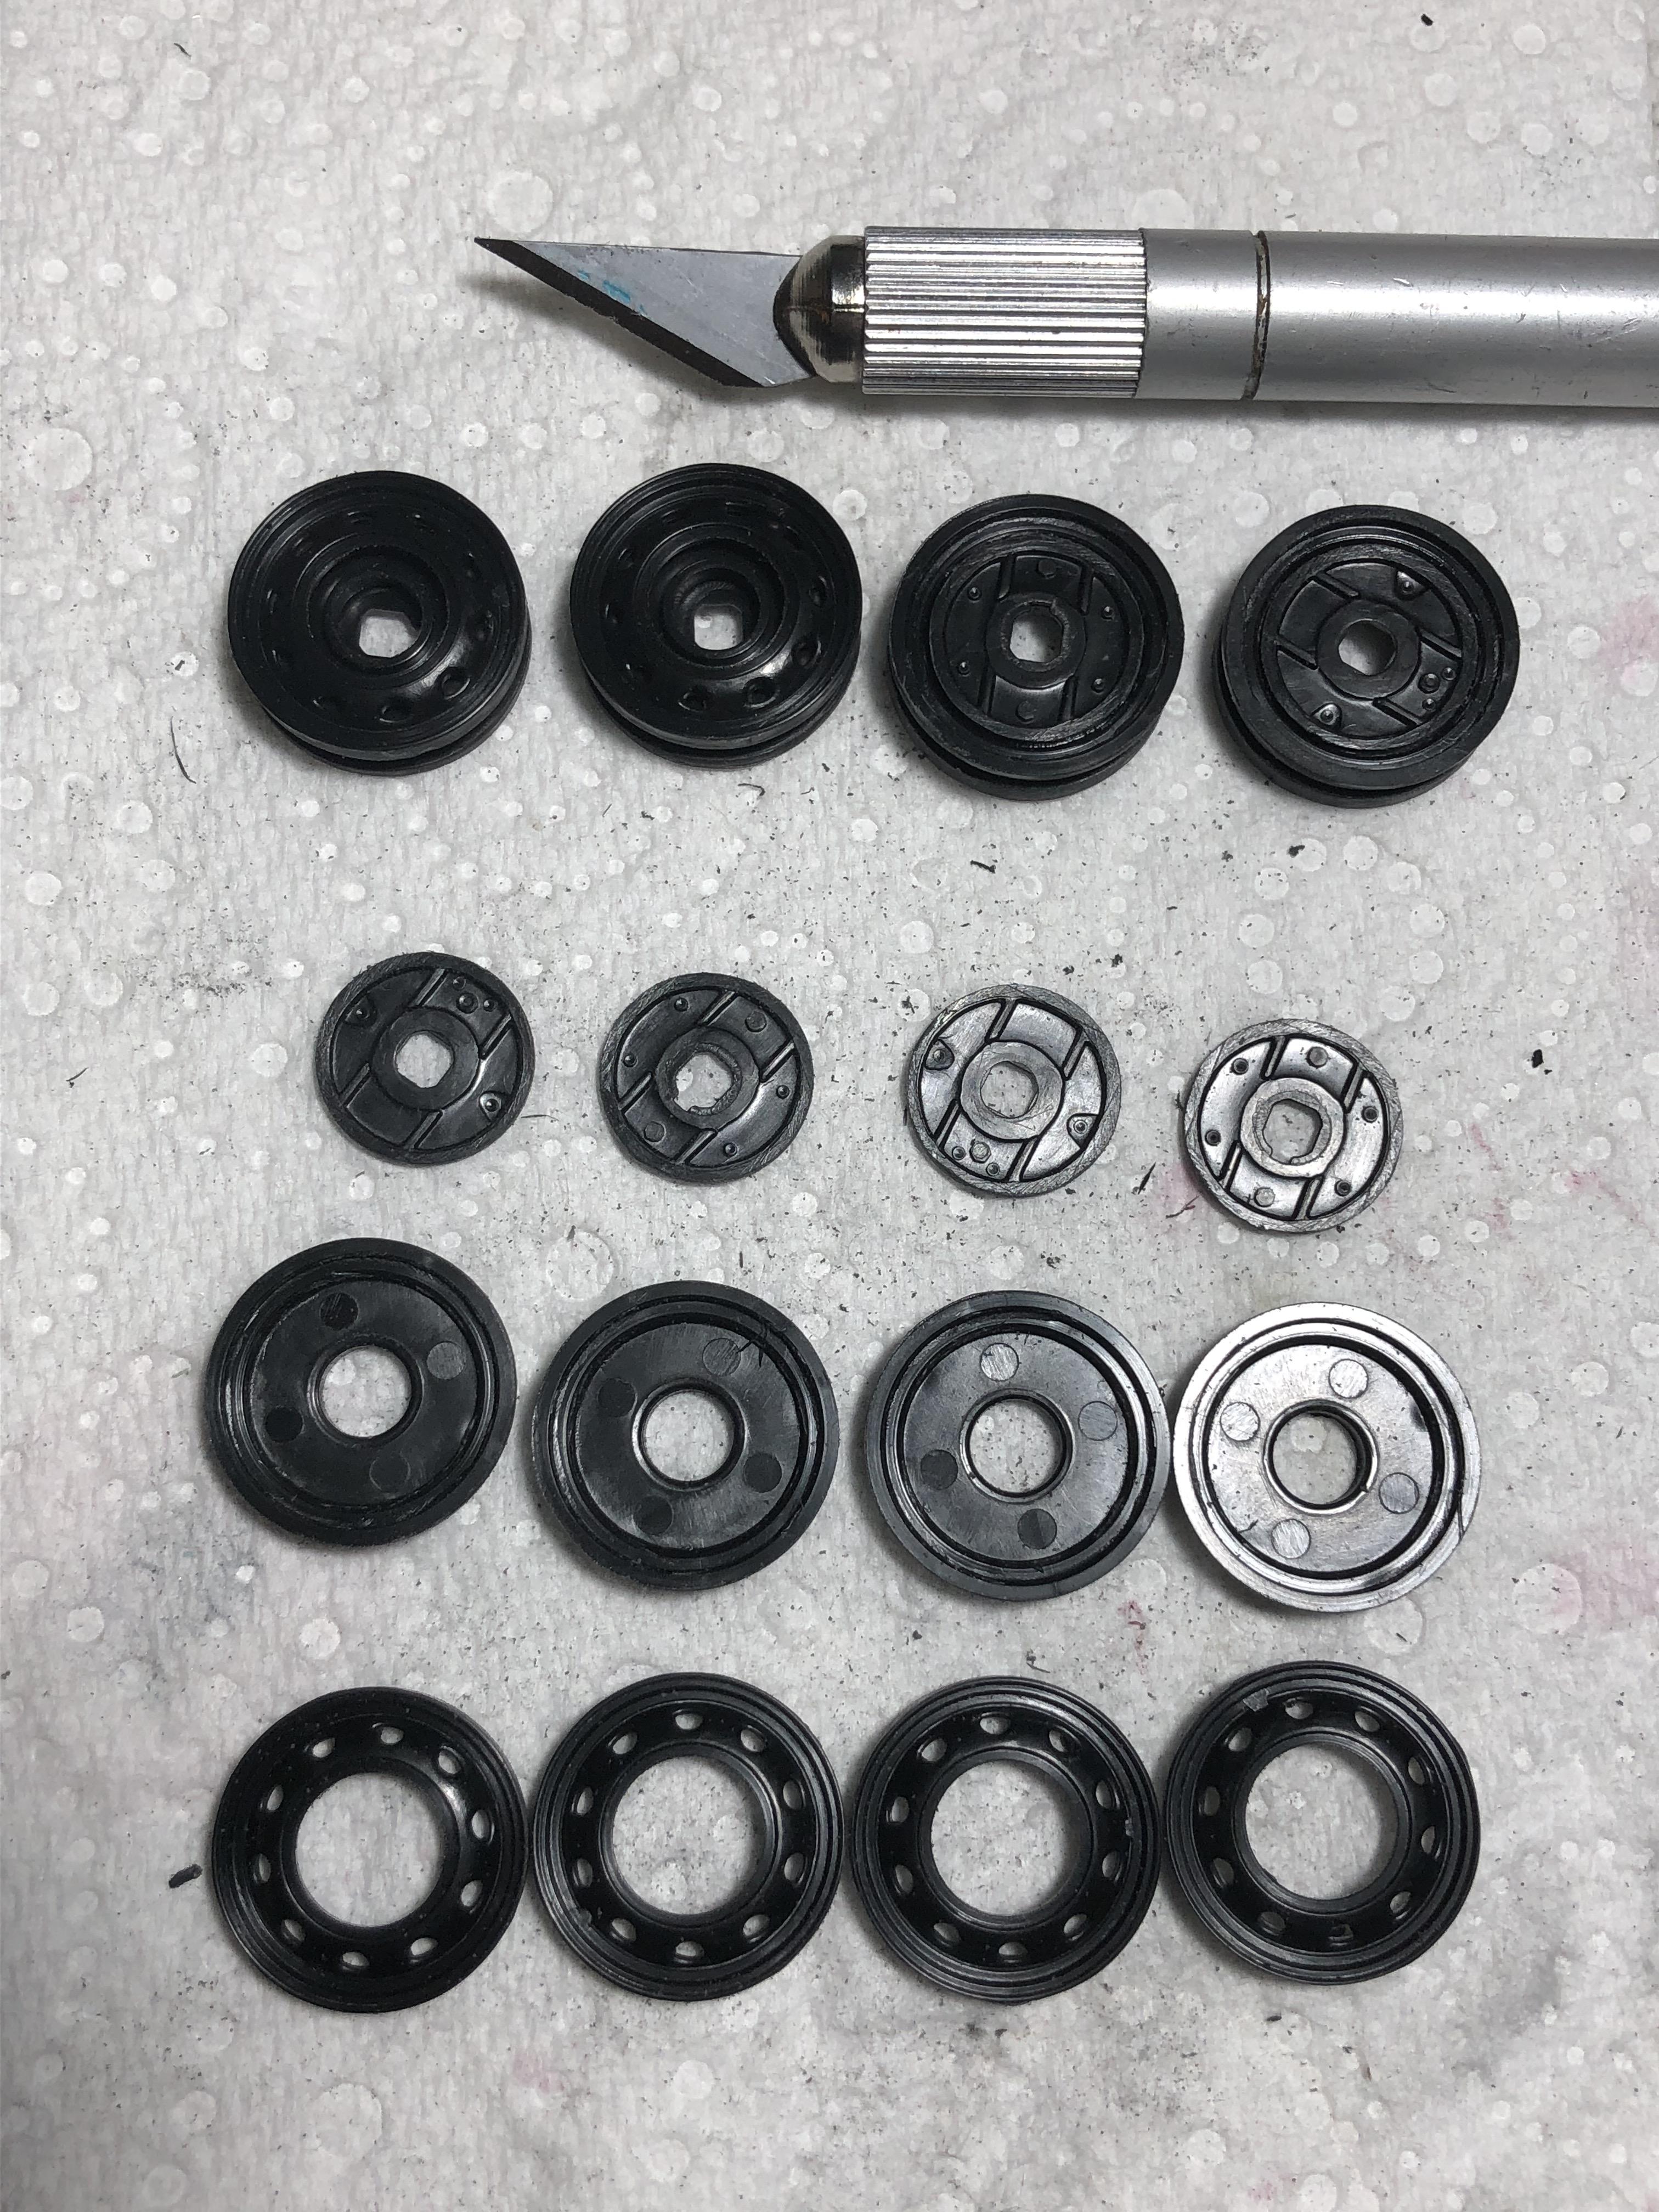
A bit of production line assembly tonight, I built up the two sets of wheels.
Of course, accompanied by a glass or two of Shiraz to lubricate the machinery!
Cheers, D
ON the bench
Revell 1/24 '53 Corvette (building as '54)
Revell 1/24 BMW 507 Coupe and Cabrio
Italeri 1/48 Me262 B-1a/U1 Nightfighter
Monogram 1/24 '57 Chevy Nomad
Dragon 1/350 USS Frank Knox DD-742
Netherlands Antilles
Joined: September 02, 2014
KitMaker: 1,977 posts
Auto Modeler: 1,371 posts
Posted: Friday, August 21, 2020 - 07:23 AM UTC
Following this one as time allows,
D..
I also noted the bad match of the top. Not so pleasant gift.
Gabriel

Gabriel
Many of my builds can be seen on YT in video format. Please check 'Panzergrau Models' Channel.
New Hampshire, United States
Joined: December 12, 2002
KitMaker: 1,500 posts
Auto Modeler: 645 posts
Posted: Friday, August 21, 2020 - 10:42 AM UTC
Looking good so far D. Masterful job on the hard top correction.
I love the smell of Tenax in the morning....It smells like a day off work.
I drive a Jeep, but i still bleed Ford Blue....
AussieReg
Associate Editor #007
Victoria, Australia
Joined: June 09, 2009
KitMaker: 8,156 posts
Auto Modeler: 2,953 posts
Posted: Friday, August 21, 2020 - 11:25 AM UTC
Joel, Gabriel, David, many thanks for checking in!
I'm happy with the result on the hard top, and hoping to get some primer shot on both bodies today. My biggest fear is that the pressure needed to pull the hard top down might have also warped the body. Sitting it on a flat surface it seems ok, but I will know for sure once I get to mating it up with the rolling chassis.
Looking at some finer details, it's time for a level of compromise to be accepted. The kit wheels are somewhere between the Von Goertz Cabrio and the Surtees Coupe.
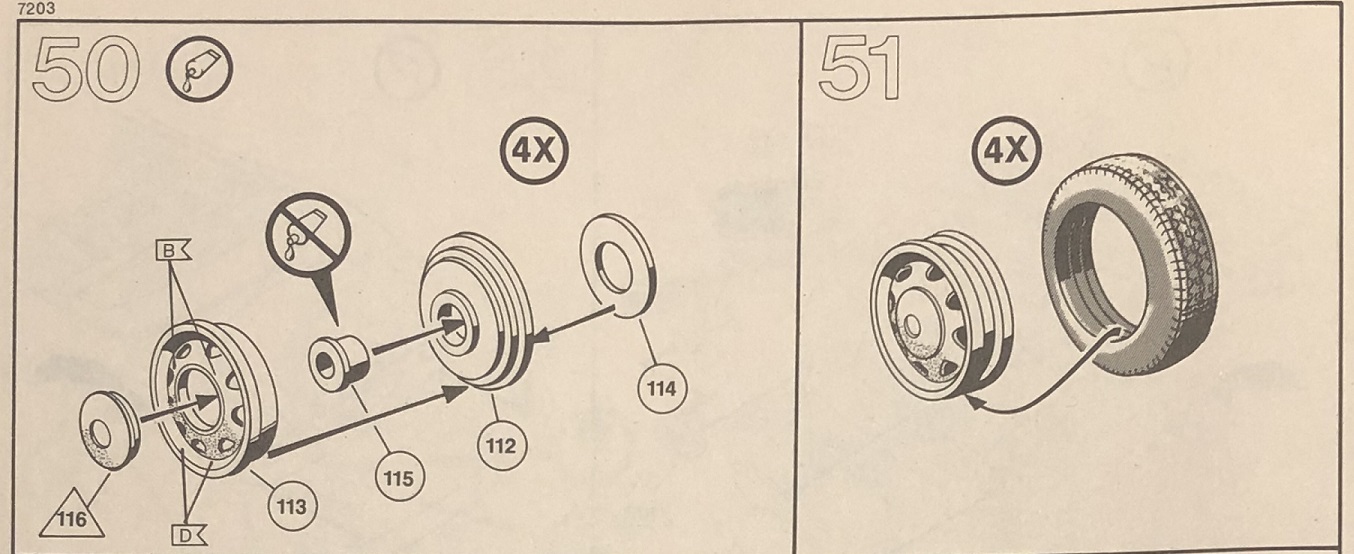
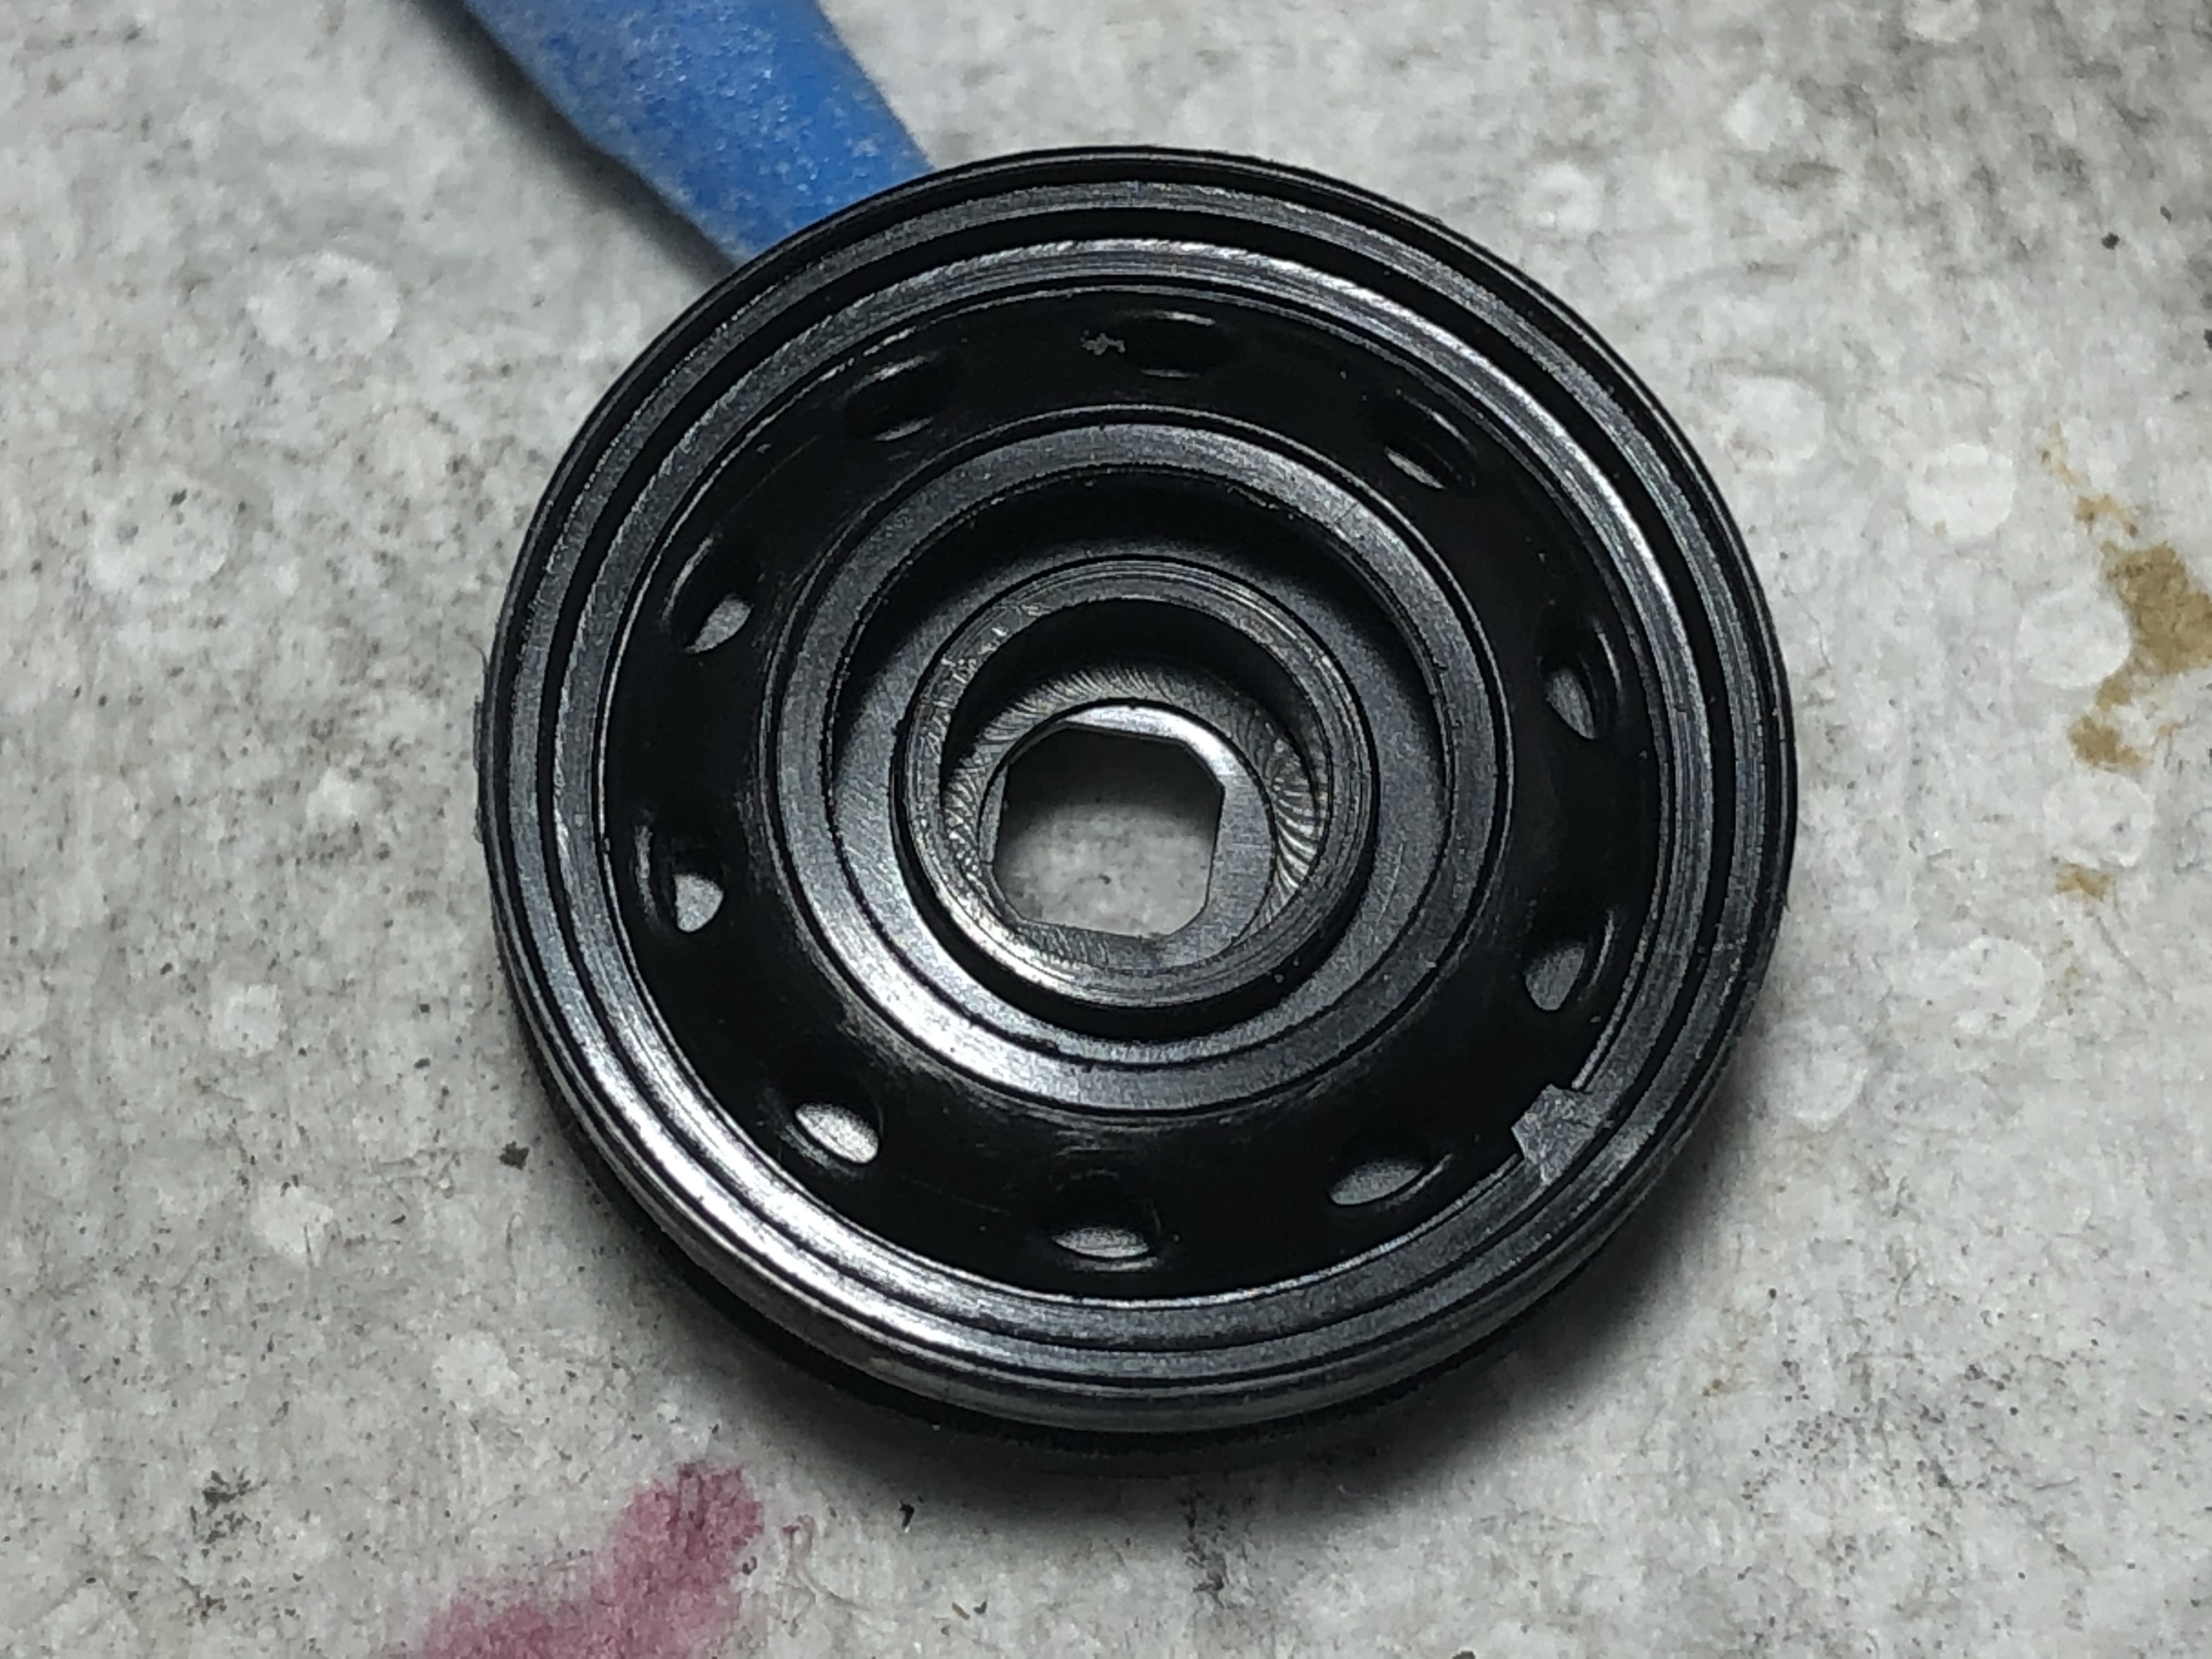
They nicely represent the "claw" style outer rim of the Cabrio -
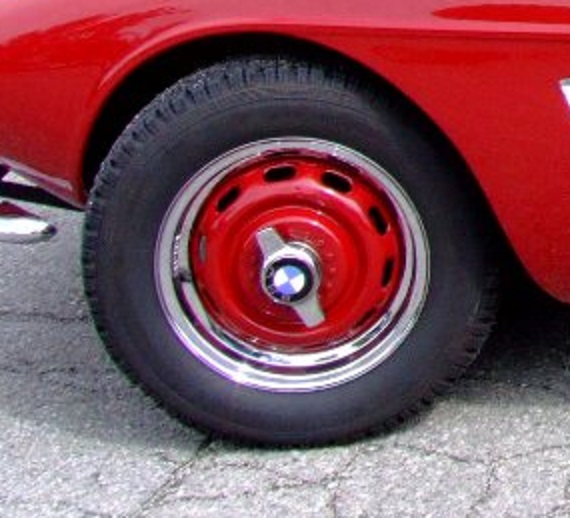
but with the chrome hubcap of the Coupe -
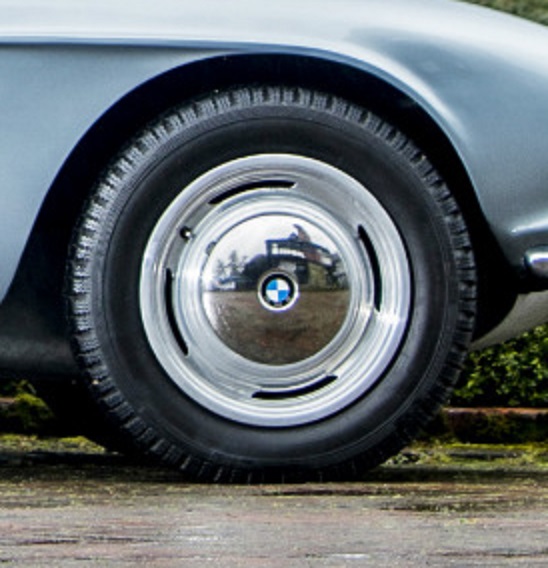
So, compromise reached, I'm going to aim at Aluminium rims, body colour outers and chrome hubs on both builds.
Cheers, D
ON the bench
Revell 1/24 '53 Corvette (building as '54)
Revell 1/24 BMW 507 Coupe and Cabrio
Italeri 1/48 Me262 B-1a/U1 Nightfighter
Monogram 1/24 '57 Chevy Nomad
Dragon 1/350 USS Frank Knox DD-742
Joel_W
Associate Editor New York, United States
Joined: December 04, 2010
KitMaker: 11,666 posts
Auto Modeler: 2,974 posts
Posted: Friday, August 21, 2020 - 11:39 AM UTC
D,
Good thinking on the compromise on the wheels. Will look perfect on both cars.
Joel
On my Workbench:
Monogram 1/24 scale 427 Shelby Cobra
Just Completed:
Beemax 1/24 scale BMW M3 E30 1992 Evolution II
#306
Victoria, Australia
Joined: June 27, 2010
KitMaker: 3,959 posts
Auto Modeler: 495 posts
Posted: Friday, August 21, 2020 - 02:13 PM UTC
Sprue Goo! What marvelous stuff you've invented there, D

Stay home and build models!
In 1/72
Gloster Gladiator MkII for the Bi-planes Campaign
In 1/350
Airfix 1:350 Type 45 Destroyer
AussieReg
Associate Editor #007
Victoria, Australia
Joined: June 09, 2009
KitMaker: 8,156 posts
Auto Modeler: 2,953 posts
Posted: Friday, August 21, 2020 - 02:21 PM UTC
Quoted Text
Sprue Goo! What marvelous stuff you've invented there, D
I'd love to take the credit Russ, but like everything else I do, it's begged, borrowed or stolen from another modeler online somewhere! I just constantly tweak the mix with a dash of TET or a couple of sticks of sprue.
Cheers, D
ON the bench
Revell 1/24 '53 Corvette (building as '54)
Revell 1/24 BMW 507 Coupe and Cabrio
Italeri 1/48 Me262 B-1a/U1 Nightfighter
Monogram 1/24 '57 Chevy Nomad
Dragon 1/350 USS Frank Knox DD-742
AussieReg
Associate Editor #007
Victoria, Australia
Joined: June 09, 2009
KitMaker: 8,156 posts
Auto Modeler: 2,953 posts
Posted: Friday, August 21, 2020 - 09:36 PM UTC
I managed some time on the airbrush today, loaded up with MS1500 Black primer and shot about 20 parts from various builds I have scattered around!
I primed the engines, radiators and rims for both of the 507's as well as the body (after some fiddly chrome masking) and bonnet of the Coupe.
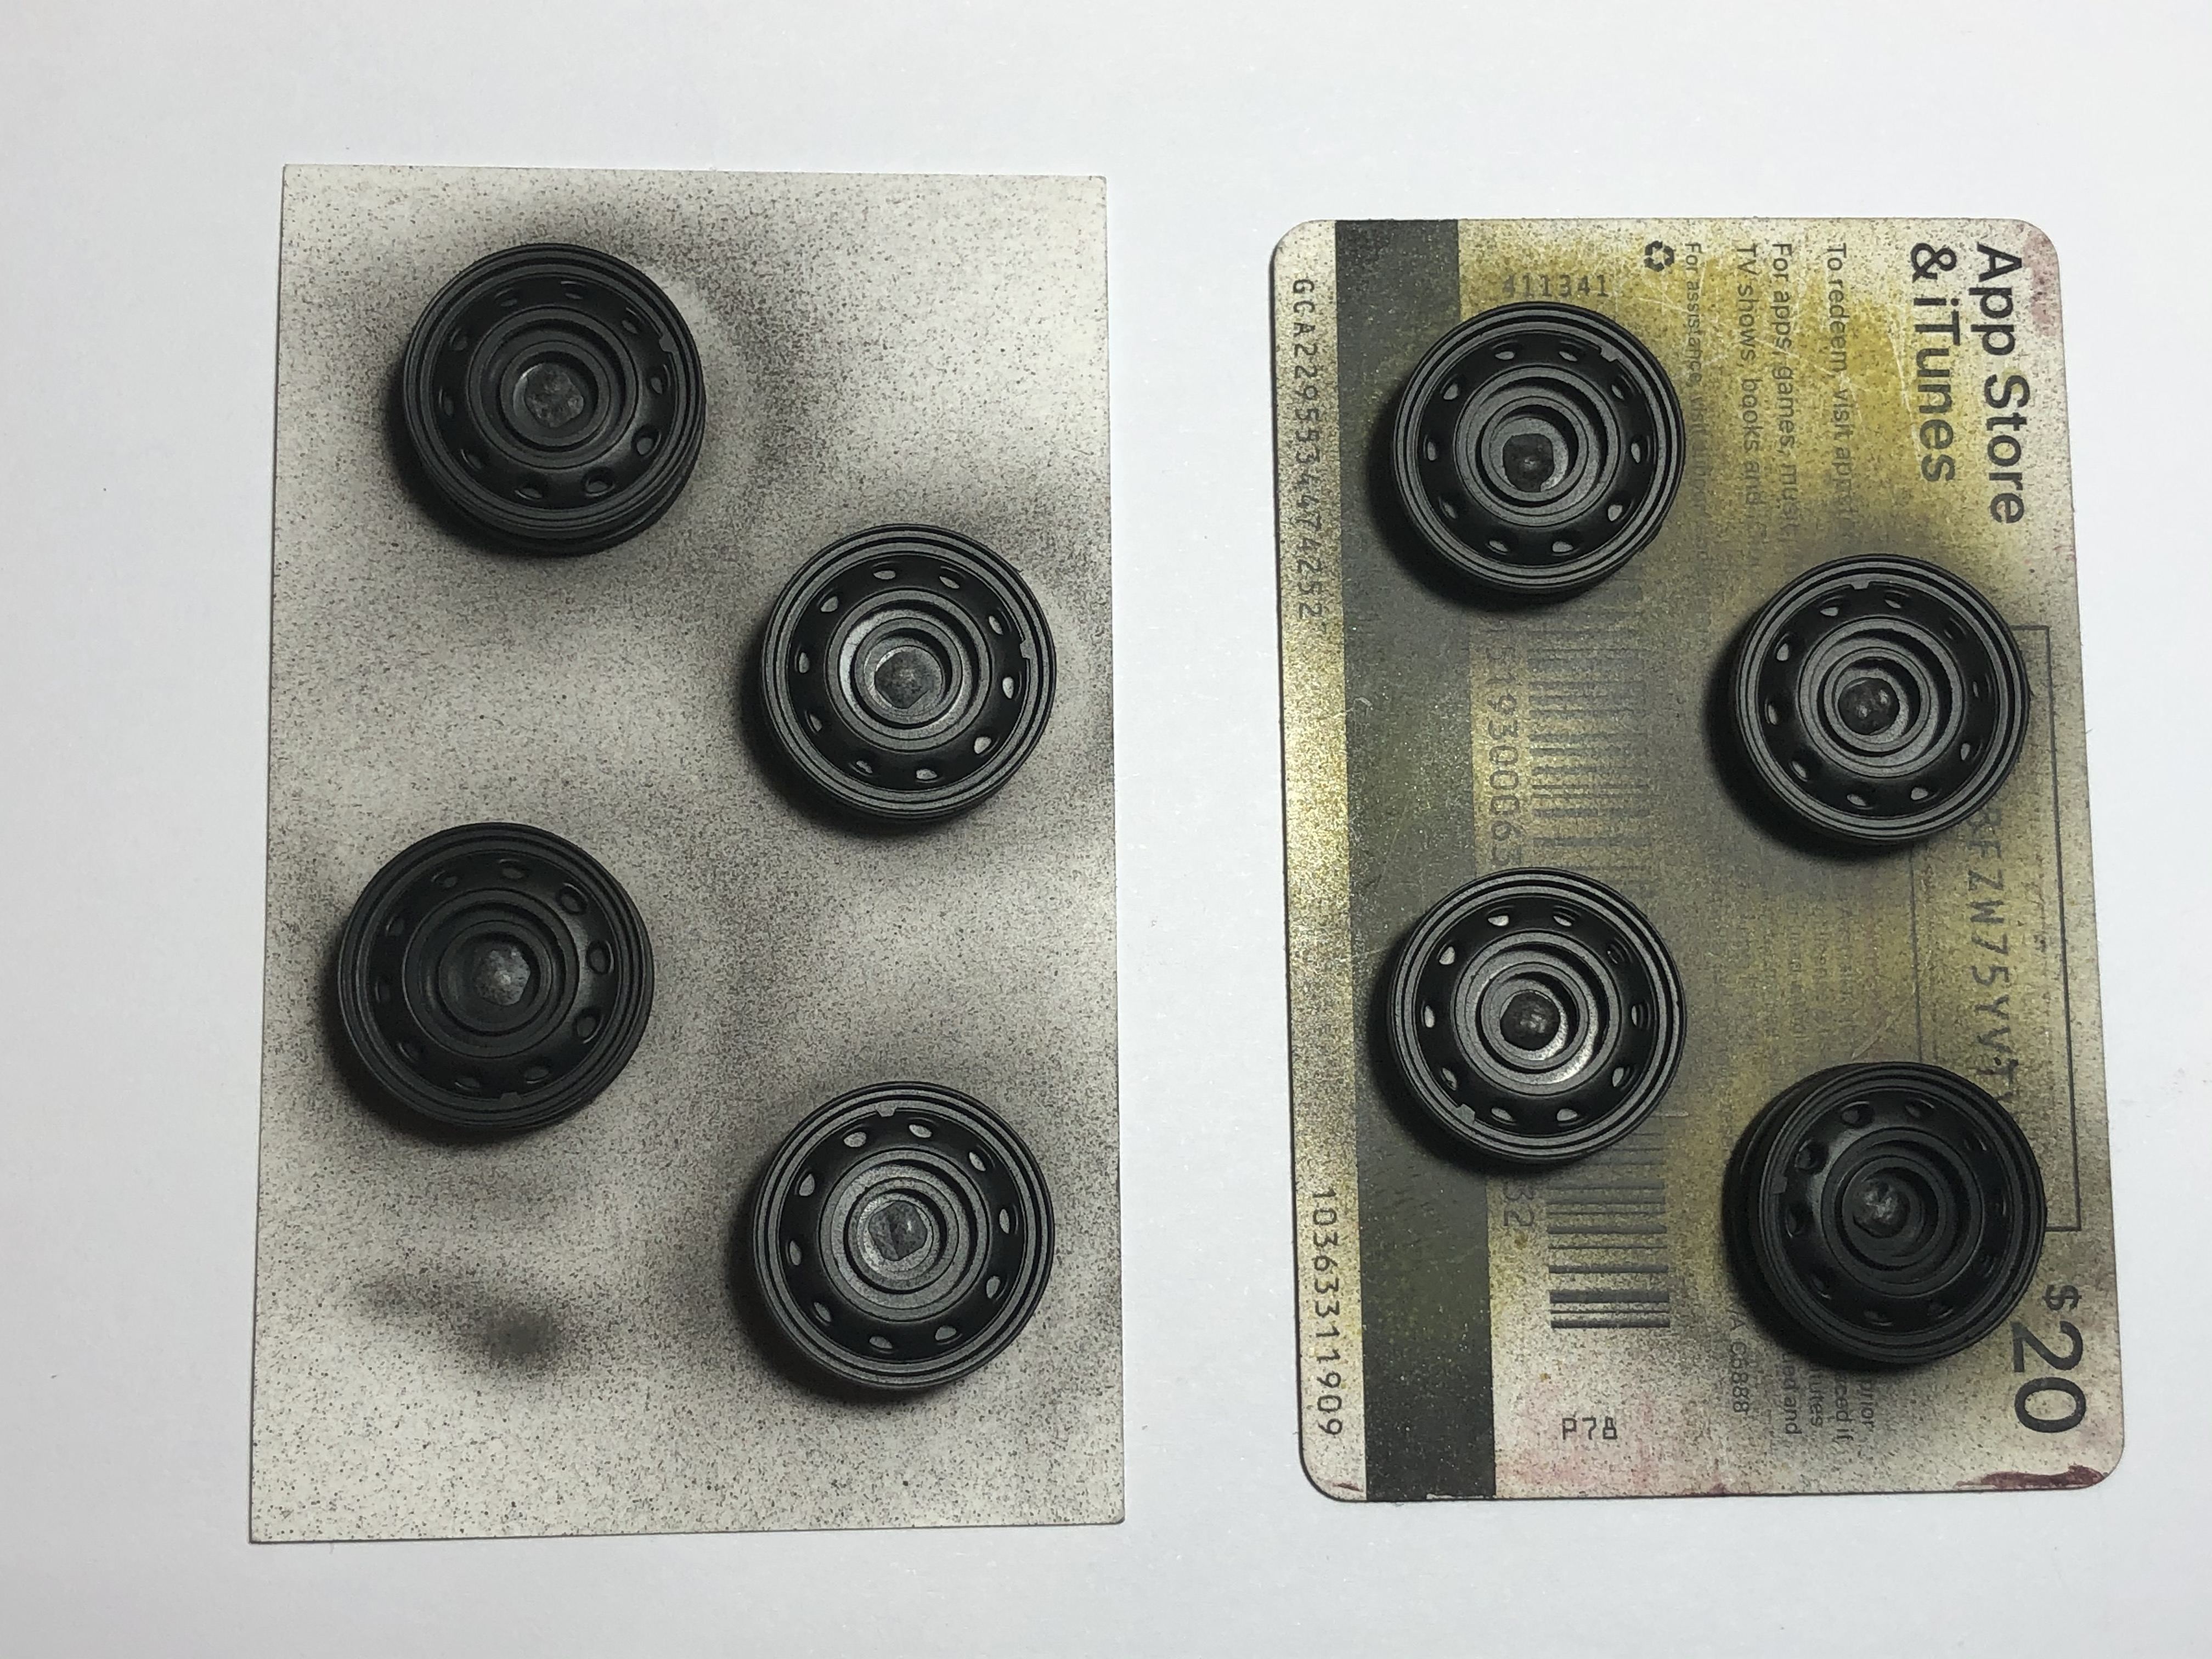
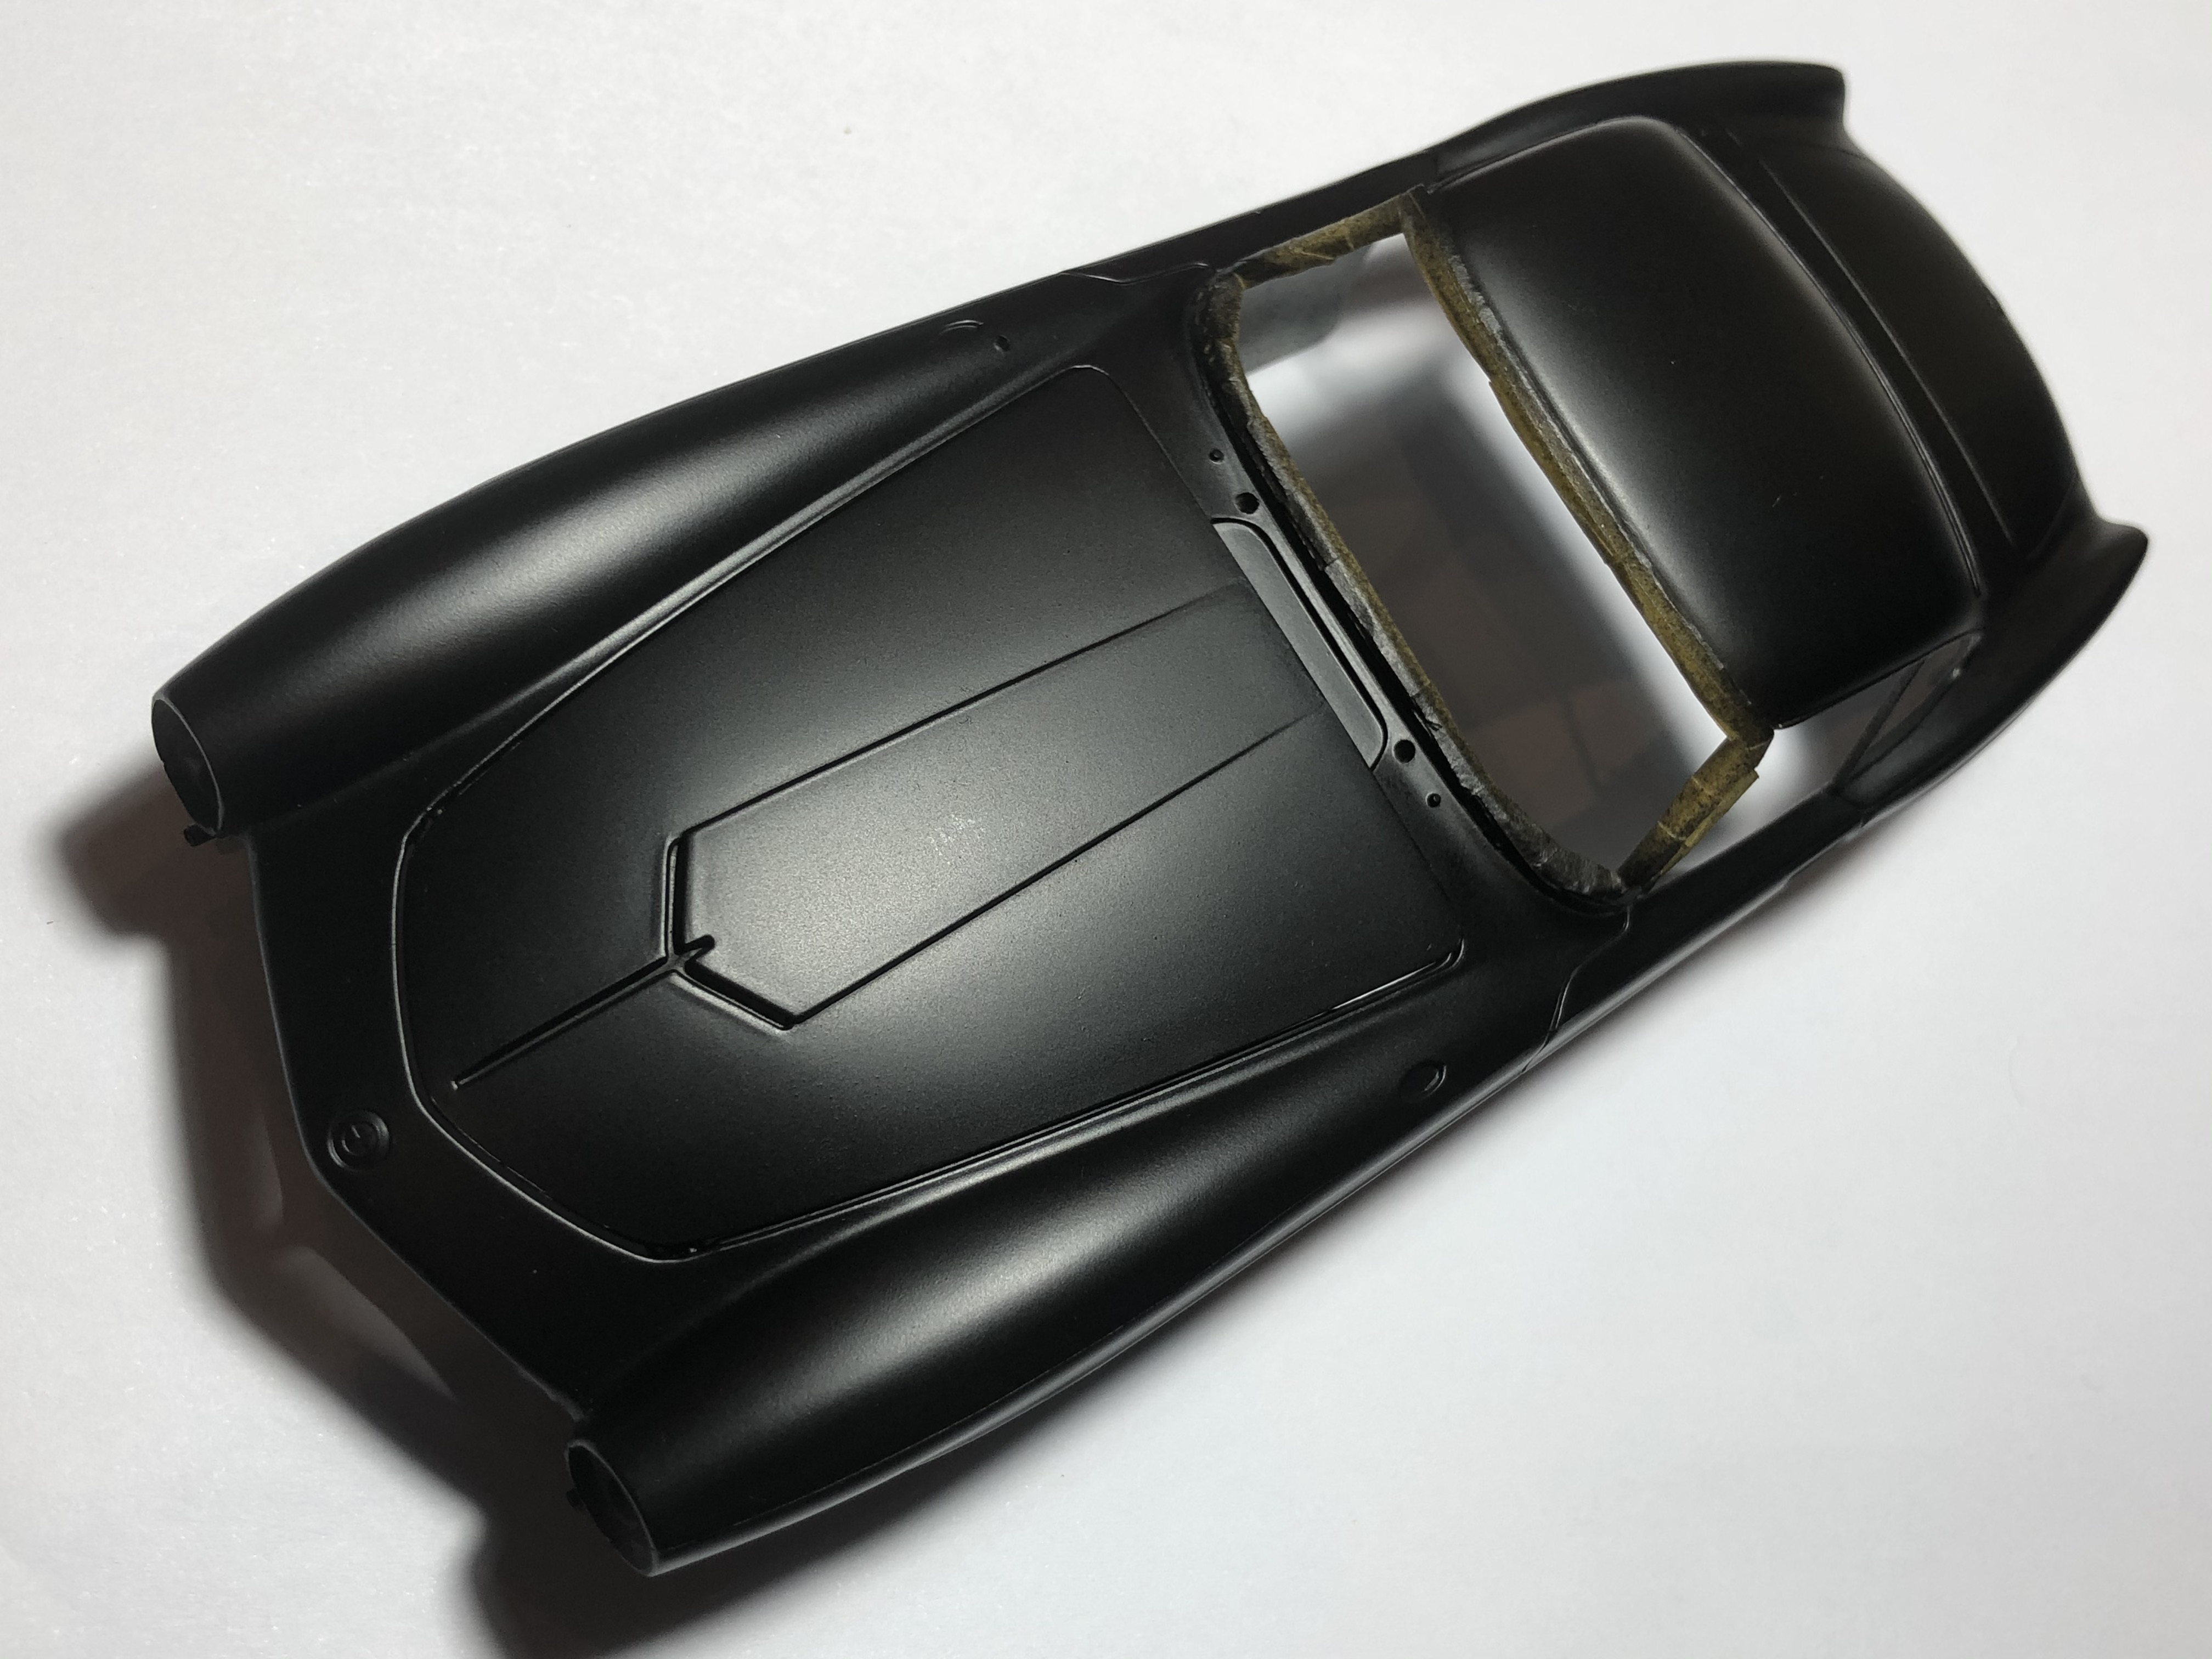
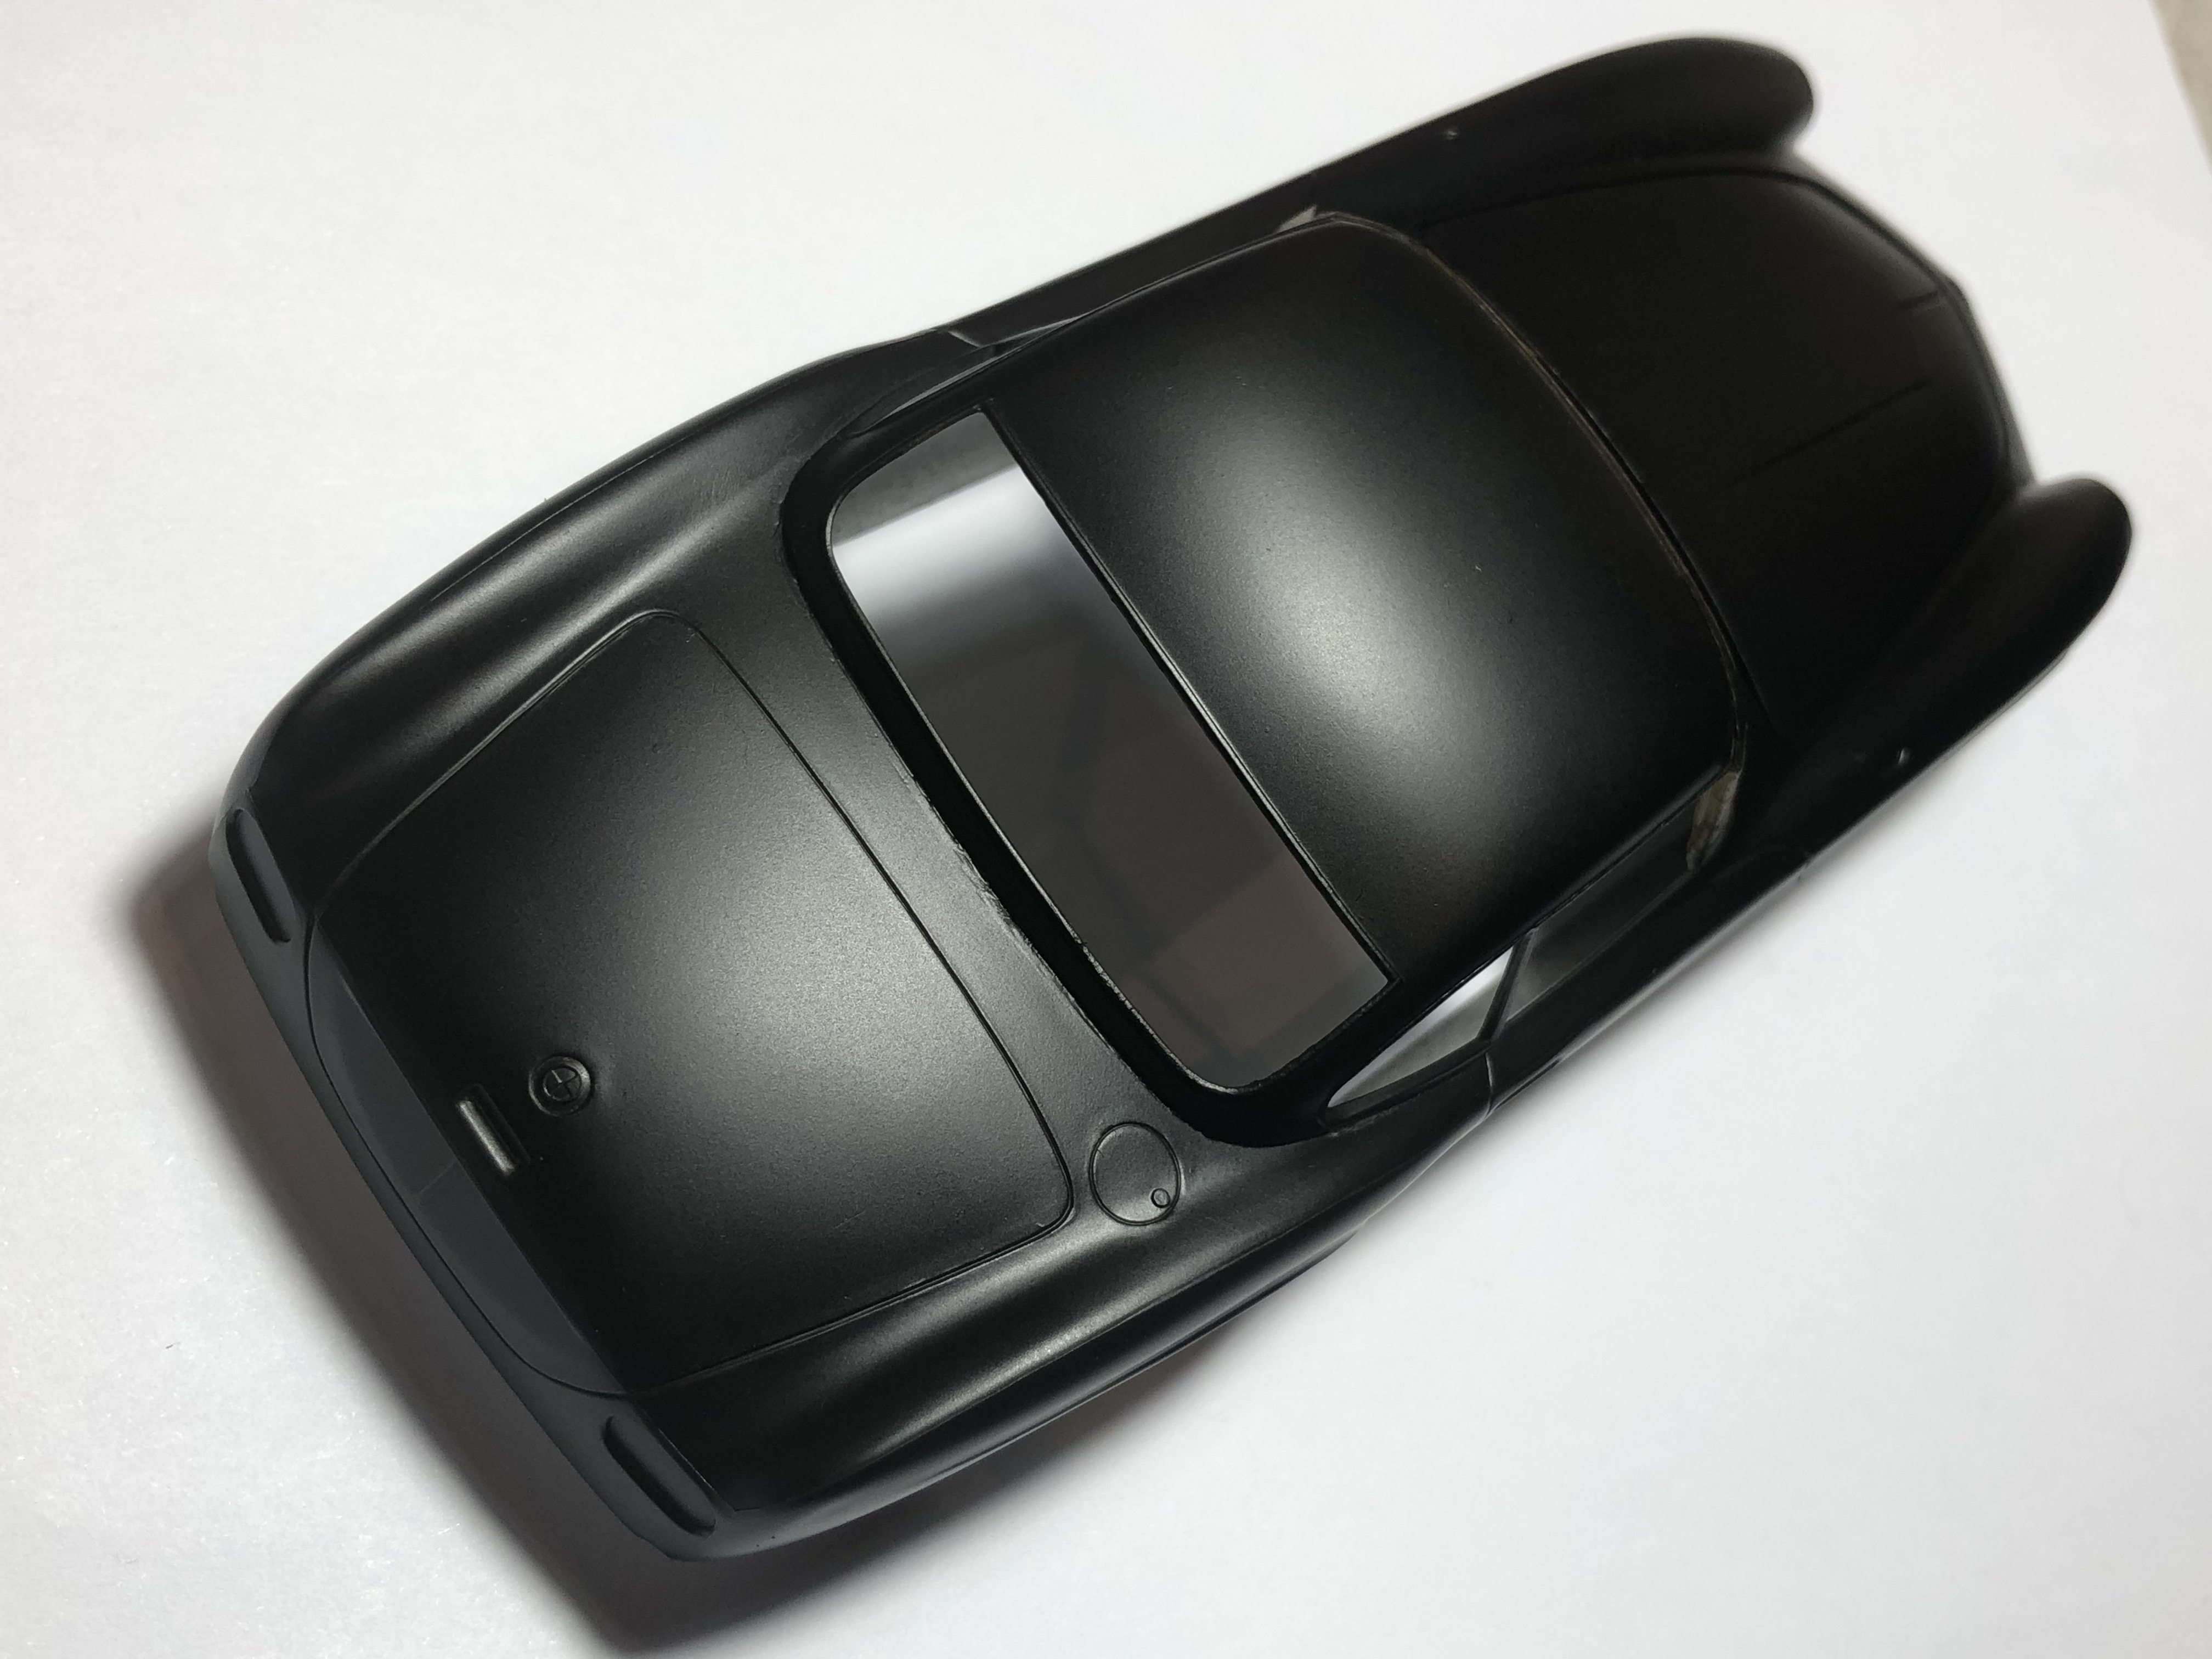
The Coupe got black primer for the basically silver top coat colour. The Cabrio will get MS1500 Grey primer for the red top coat.
I will shoot the interior next, then fine wet sand and spot prime if required.
Cheers, D
ON the bench
Revell 1/24 '53 Corvette (building as '54)
Revell 1/24 BMW 507 Coupe and Cabrio
Italeri 1/48 Me262 B-1a/U1 Nightfighter
Monogram 1/24 '57 Chevy Nomad
Dragon 1/350 USS Frank Knox DD-742
Netherlands Antilles
Joined: September 02, 2014
KitMaker: 1,977 posts
Auto Modeler: 1,371 posts
Posted: Saturday, August 22, 2020 - 01:26 AM UTC
The black primer looks excellent - the coveted "eggshell" semi-gloss.
Note on red: it is very sensitive to the primer colour
white, yellow, gold beige primer -> "permanent" intense red;
gray primer -> desaturated, "shallow" red, sometimes with pinkish tones
black primer -> "deep" cherry glossy red.
Also red is known as a very weak blocker - you need at least 2 coats over any of the primers - most probably over black and gray.
Gabriel
Gabriel
Many of my builds can be seen on YT in video format. Please check 'Panzergrau Models' Channel.
Joel_W
Associate Editor New York, United States
Joined: December 04, 2010
KitMaker: 11,666 posts
Auto Modeler: 2,974 posts
Posted: Saturday, August 22, 2020 - 02:21 AM UTC
D,
Wheels look excellent in the black primer coat as does the body shell.
Gotta say that you've been on some roll with builds as of late.
Joel
On my Workbench:
Monogram 1/24 scale 427 Shelby Cobra
Just Completed:
Beemax 1/24 scale BMW M3 E30 1992 Evolution II
AussieReg
Associate Editor #007
Victoria, Australia
Joined: June 09, 2009
KitMaker: 8,156 posts
Auto Modeler: 2,953 posts
Posted: Saturday, August 22, 2020 - 01:05 PM UTC
Quoted Text
Also red is known as a very weak blocker - you need at least 2 coats over any of the primers - most probably over black and gray.
Many thanks for the advice Gabriel, much appreciated. I have MS1500 White in my arsenal as well, but it might be difficult to get an even coverage over the white plastic. My plan might be to give a light base coat of MS1500 Grey to check for any required surface work, then a top coat of MS1500 White.
Quoted Text
Wheels look excellent in the black primer coat as does the body shell.Gotta say that you've been on some roll with builds as of late.
Thanks Joel. One of the side "benefits" of not getting much sleep is a bit of bench time at the moment.
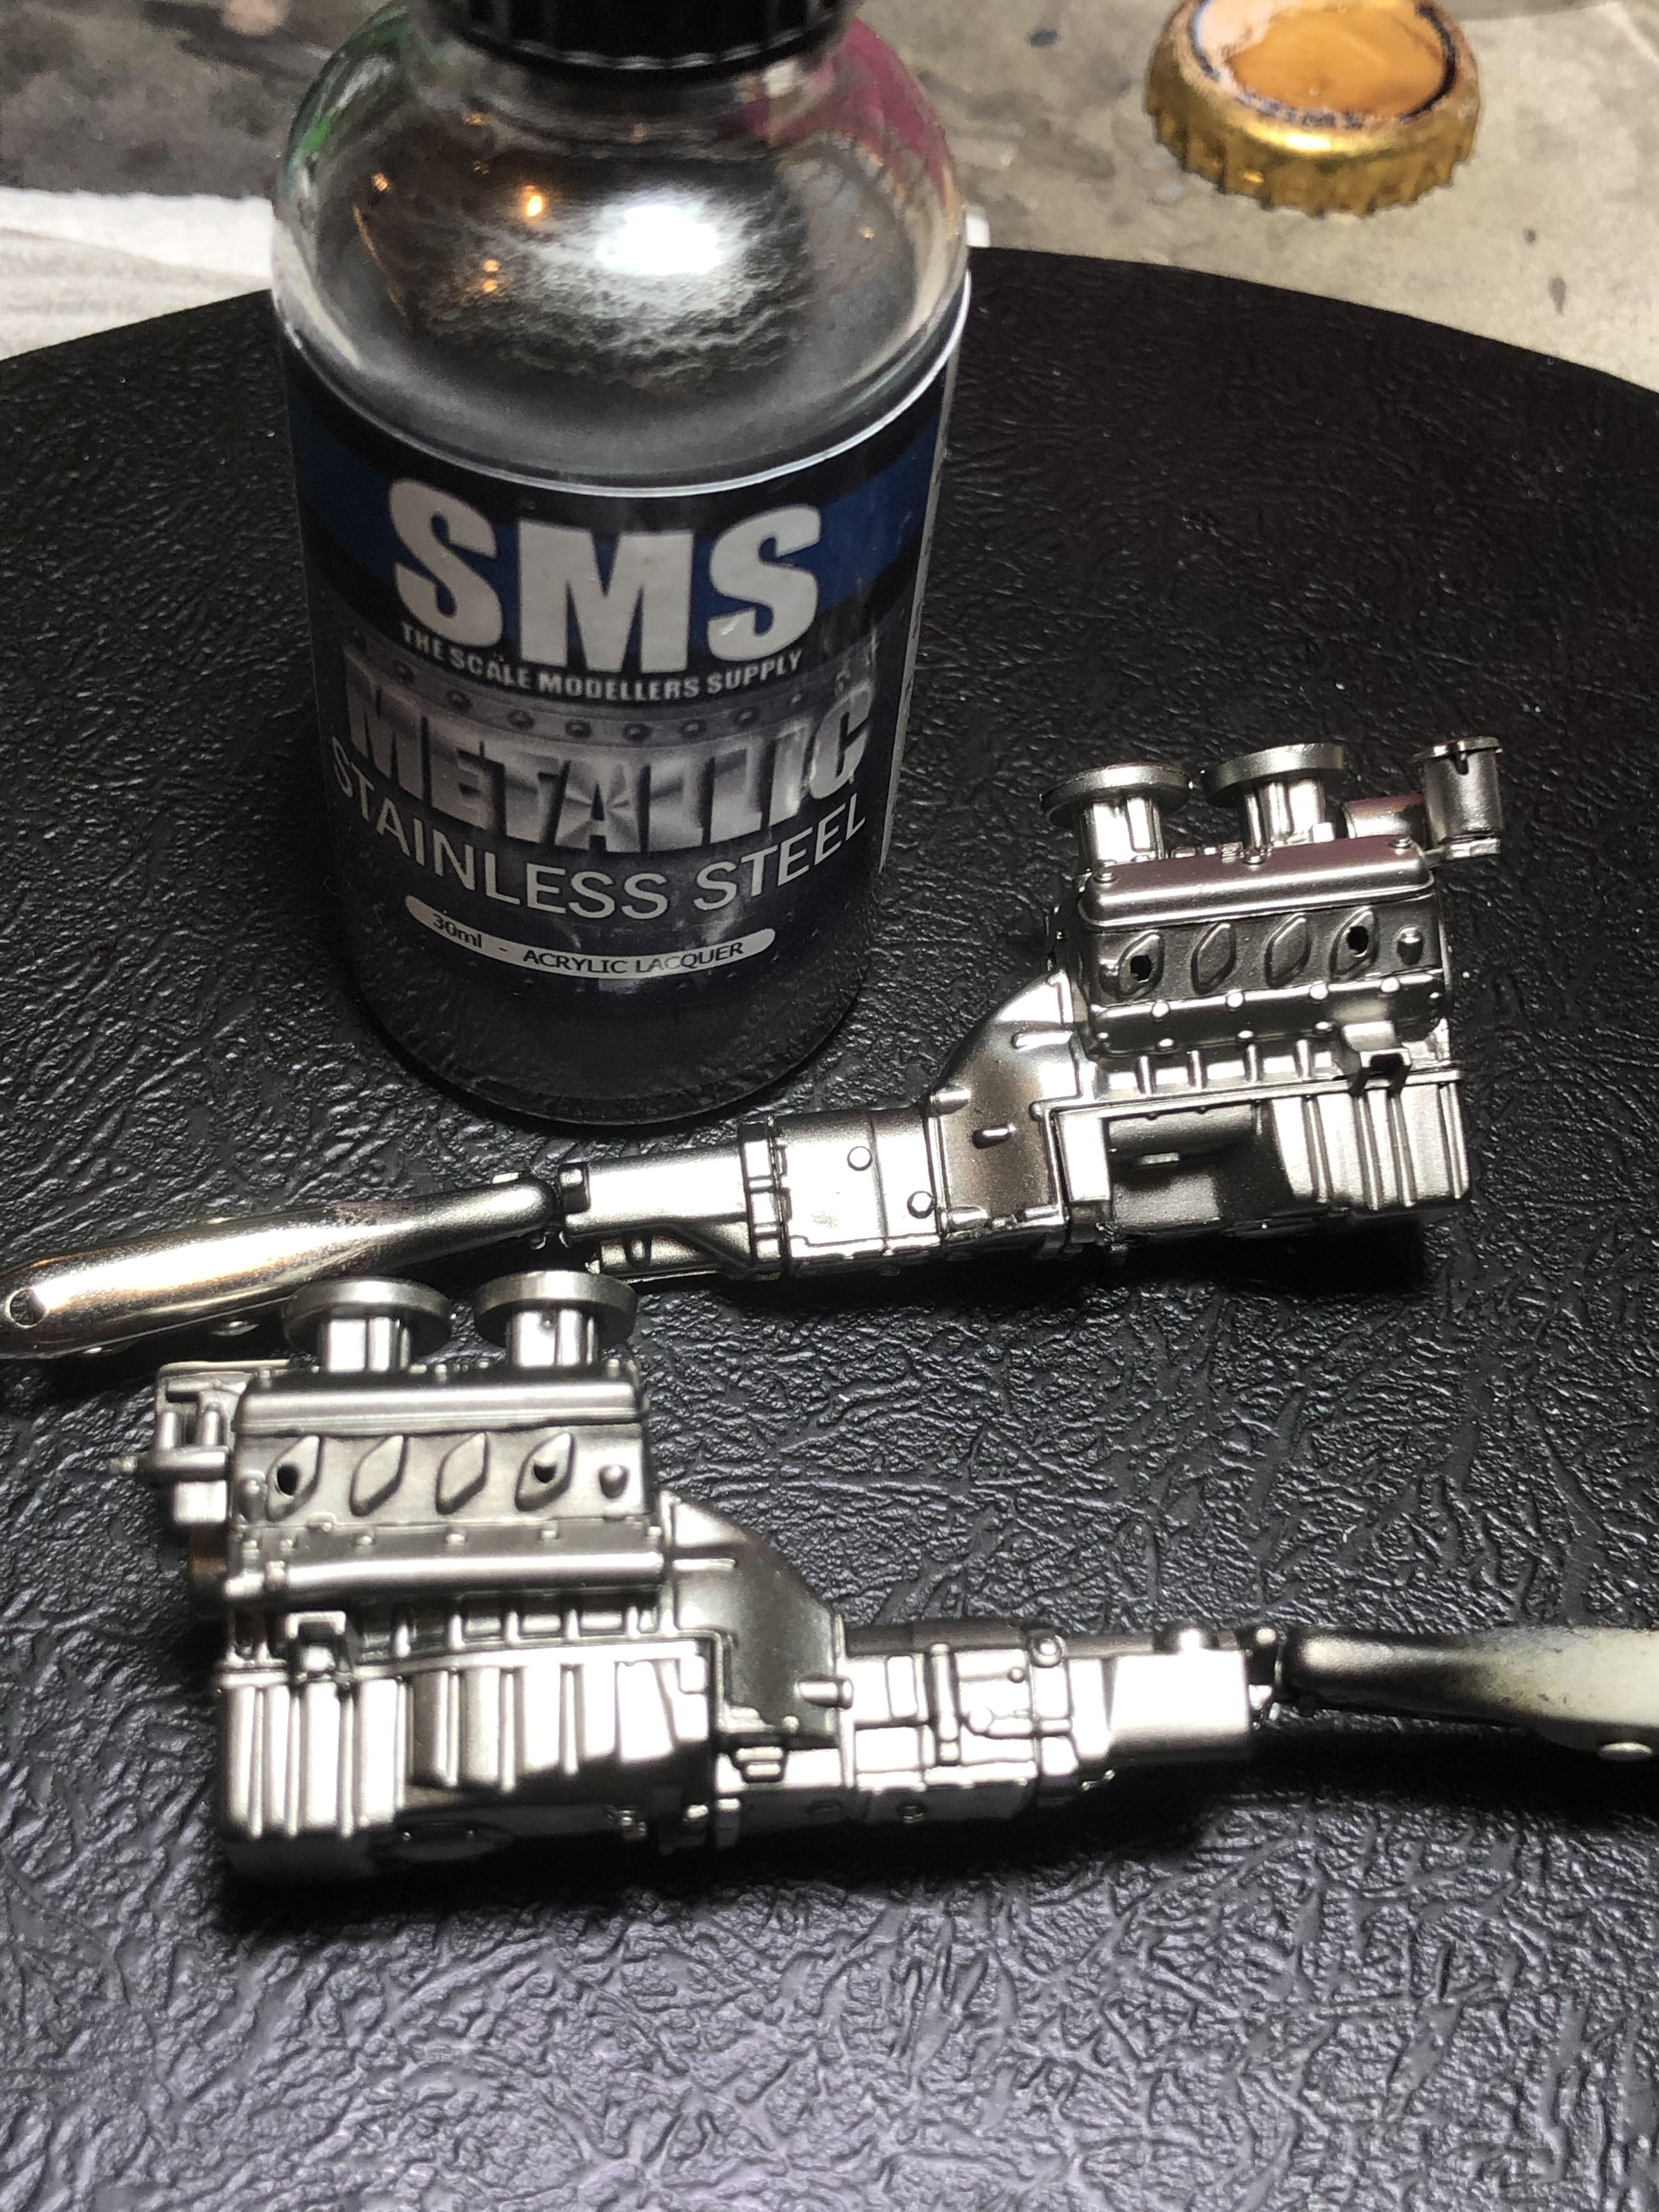
Meanwhile, the engines got a shot of SMS Stainless Steel. Over the satin of the MS1500 Black this looks like a great base for further detailing.
Cheers, D
ON the bench
Revell 1/24 '53 Corvette (building as '54)
Revell 1/24 BMW 507 Coupe and Cabrio
Italeri 1/48 Me262 B-1a/U1 Nightfighter
Monogram 1/24 '57 Chevy Nomad
Dragon 1/350 USS Frank Knox DD-742
Netherlands Antilles
Joined: September 02, 2014
KitMaker: 1,977 posts
Auto Modeler: 1,371 posts
Posted: Saturday, August 22, 2020 - 01:32 PM UTC
Quoted Text
I have MS1500 White in my arsenal as well, but it might be difficult to get an even coverage over the white plastic. My plan might be to give a light base coat of MS1500 Grey to check for any required surface work, then a top coat of MS1500 White.
It is the perfect solution in your case, I believe. I did exactly the same in reverse on my
Lotus - first primer gray MS to see properly all dings and scratches, then black which I wanted as my underlying shade.
I don't know if SMS paints are enchanted or you upped your skill with metallics by a mile - I assume both - but you're delivering superb performances lately with the kinky metallics. Excellent!
Gabriel
Gabriel
Many of my builds can be seen on YT in video format. Please check 'Panzergrau Models' Channel.
AussieReg
Associate Editor #007
Victoria, Australia
Joined: June 09, 2009
KitMaker: 8,156 posts
Auto Modeler: 2,953 posts
Posted: Saturday, August 22, 2020 - 02:12 PM UTC
Quoted Text
It is the perfect solution in your case, I believe. I did exactly the same in reverse on my Lotus - first primer gray MS to see properly all dings and scratches, then black which I wanted as my underlying shade.
Your Lotus is looking great, I just saw the photos of the second BRG coat on and it is such a deeeeeeeeeep shade!
Quoted Text
I don't know if SMS paints are enchanted or you upped your skill with metallics by a mile - I assume both - but you're delivering superb performances lately with the kinky metallics. Excellent!
Definitely more paint quality than skills Gabriel. I highly recommend these paints to anybody to try out (not just because I know Scott, the owner of the company). They shoot and cover beautifully straight from the bottle, and in very hot weather a couple of drops of MLT in the airbrush cup keeps them flowing without tip or air drying problems.
Scott has just sent an order of 4,150 bottles to his first UK distributor, and an even bigger order is about to be despatched to the US.
Cheers, D
ON the bench
Revell 1/24 '53 Corvette (building as '54)
Revell 1/24 BMW 507 Coupe and Cabrio
Italeri 1/48 Me262 B-1a/U1 Nightfighter
Monogram 1/24 '57 Chevy Nomad
Dragon 1/350 USS Frank Knox DD-742
Joel_W
Associate Editor New York, United States
Joined: December 04, 2010
KitMaker: 11,666 posts
Auto Modeler: 2,974 posts
Posted: Sunday, August 23, 2020 - 01:23 AM UTC
D,
I'm going to be doing basically the same my standard MS 1500 Gray primer and then a true base coat of white before the color coat on my new build: Beemax BMW M3 EVO 30. The base white doesn't have to be full coverage like a color coat. At least that's the theory I'm going with.
That SMS Steel looks fantastic. I gotta checkout who carries those Metallics here in the states, and give them a try.
Joel
On my Workbench:
Monogram 1/24 scale 427 Shelby Cobra
Just Completed:
Beemax 1/24 scale BMW M3 E30 1992 Evolution II
AussieReg
Associate Editor #007
Victoria, Australia
Joined: June 09, 2009
KitMaker: 8,156 posts
Auto Modeler: 2,953 posts
Posted: Sunday, August 23, 2020 - 01:45 AM UTC
Quoted Text
That SMS Steel looks fantastic. I gotta checkout who carries those Metallics here in the states, and give them a try.
You won't be disappointed Joel, they really are great paints!
I'm looking forward to some progress reports on your new build as well, those Beemax kits look to be a really nice thing!
Cheers, D
ON the bench
Revell 1/24 '53 Corvette (building as '54)
Revell 1/24 BMW 507 Coupe and Cabrio
Italeri 1/48 Me262 B-1a/U1 Nightfighter
Monogram 1/24 '57 Chevy Nomad
Dragon 1/350 USS Frank Knox DD-742
Netherlands Antilles
Joined: September 02, 2014
KitMaker: 1,977 posts
Auto Modeler: 1,371 posts
Posted: Sunday, August 23, 2020 - 02:41 AM UTC
Quoted Text
Quoted Text
That SMS Steel looks fantastic. I gotta checkout who carries those Metallics here in the states, and give them a try.
www.usagundamstore.com
You won't be disappointed Joel, they really are great paints!
I'm looking forward to some progress reports on your new build as well, those Beemax kits look to be a really nice thing!
Cheers, D
I was going to ask the same question regarding the paint supplier in US. Definitely worth a try - at least the metallic range as TCP are disappointing in that compartment.
Also I am very interested in Beemax progress,
JoelGabriel
Gabriel
Many of my builds can be seen on YT in video format. Please check 'Panzergrau Models' Channel.
AussieReg
Associate Editor #007
Victoria, Australia
Joined: June 09, 2009
KitMaker: 8,156 posts
Auto Modeler: 2,953 posts
Posted: Monday, August 24, 2020 - 11:10 AM UTC
When you go down the detailing rabbit-hole, be prepared for some surprises!
The ignition coil on the Von Goertz Cabrio is mounted on the top of the engine -
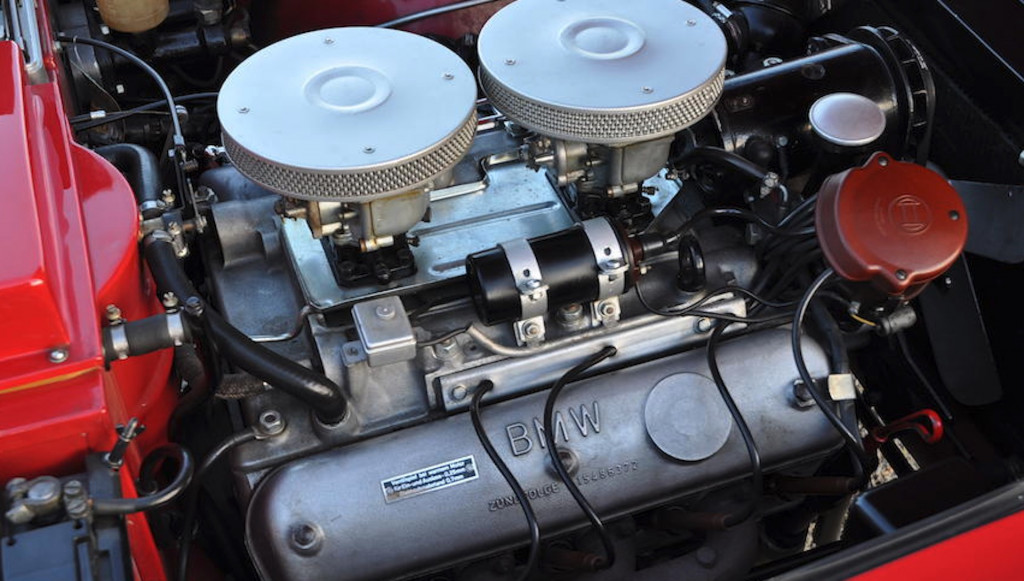
On the Surtees Coupe it's nowhere to be seen!
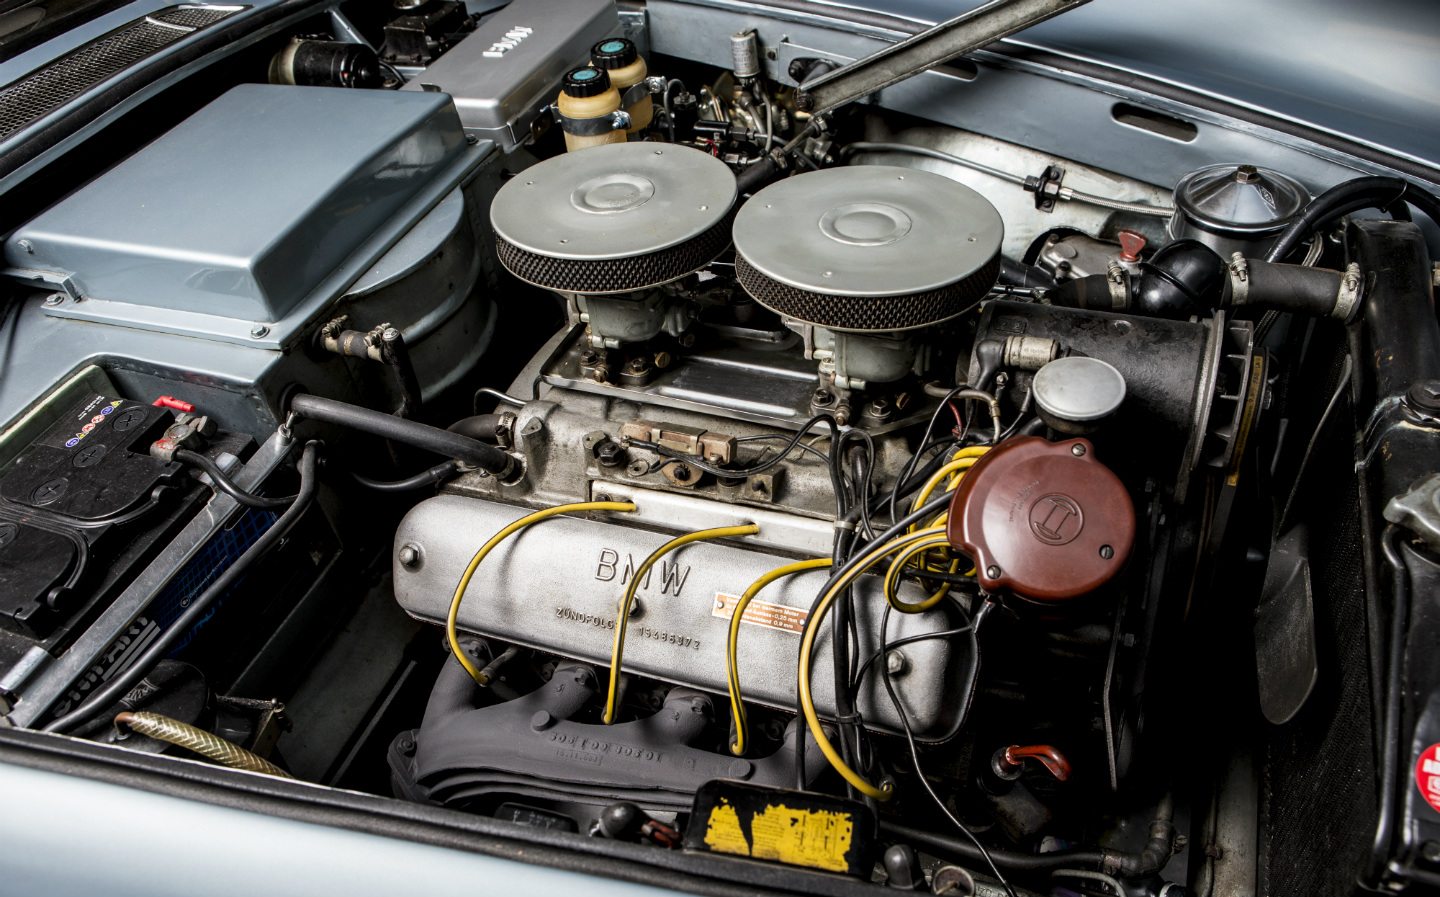
The black coil lead looks like it is heading down to the side wall on the inner fender, so I might try to fit the coil there.
Fun times ahead.
Cheers, D
ON the bench
Revell 1/24 '53 Corvette (building as '54)
Revell 1/24 BMW 507 Coupe and Cabrio
Italeri 1/48 Me262 B-1a/U1 Nightfighter
Monogram 1/24 '57 Chevy Nomad
Dragon 1/350 USS Frank Knox DD-742
Netherlands Antilles
Joined: September 02, 2014
KitMaker: 1,977 posts
Auto Modeler: 1,371 posts
Posted: Monday, August 24, 2020 - 02:32 PM UTC
Quoted Text
The black coil lead looks like it is heading down to the side wall on the inner fender, so I might try to fit the coil there.
... yet the mount seems to be still on the engine head; the sleeve that protects the cable in the first example it is also gone. I suspect a lousy mechanic in the second example.
Gabriel
Gabriel
Many of my builds can be seen on YT in video format. Please check 'Panzergrau Models' Channel.
#335
Auckland, New Zealand
Joined: September 03, 2013
KitMaker: 1,808 posts
Auto Modeler: 701 posts
Posted: Monday, August 24, 2020 - 02:44 PM UTC
I would go with the first photo since that looks right and the bracket is there in the second. You never know when the second photo was taken, maybe in a garage, and the coil had been removed for replacement especially as it looks like the leads are still there.
cheers
Michael
Campaign:
Strip, Track and Trail - Porsche 917/20 - On the bench
Phantoms at 60 - F-4J Marines
Below 1000 tons - M50 minesweeper - Sailed for duty
AussieReg
Associate Editor #007
Victoria, Australia
Joined: June 09, 2009
KitMaker: 8,156 posts
Auto Modeler: 2,953 posts
Posted: Monday, August 24, 2020 - 10:25 PM UTC
It would make more sense to have the coil in the correct location for both builds, I think I will go that way!
Beginning work on the engine details tonight, some paint on the alternator and distributor, and started on a few of the ignition leads. I'm happy with how they look so far.
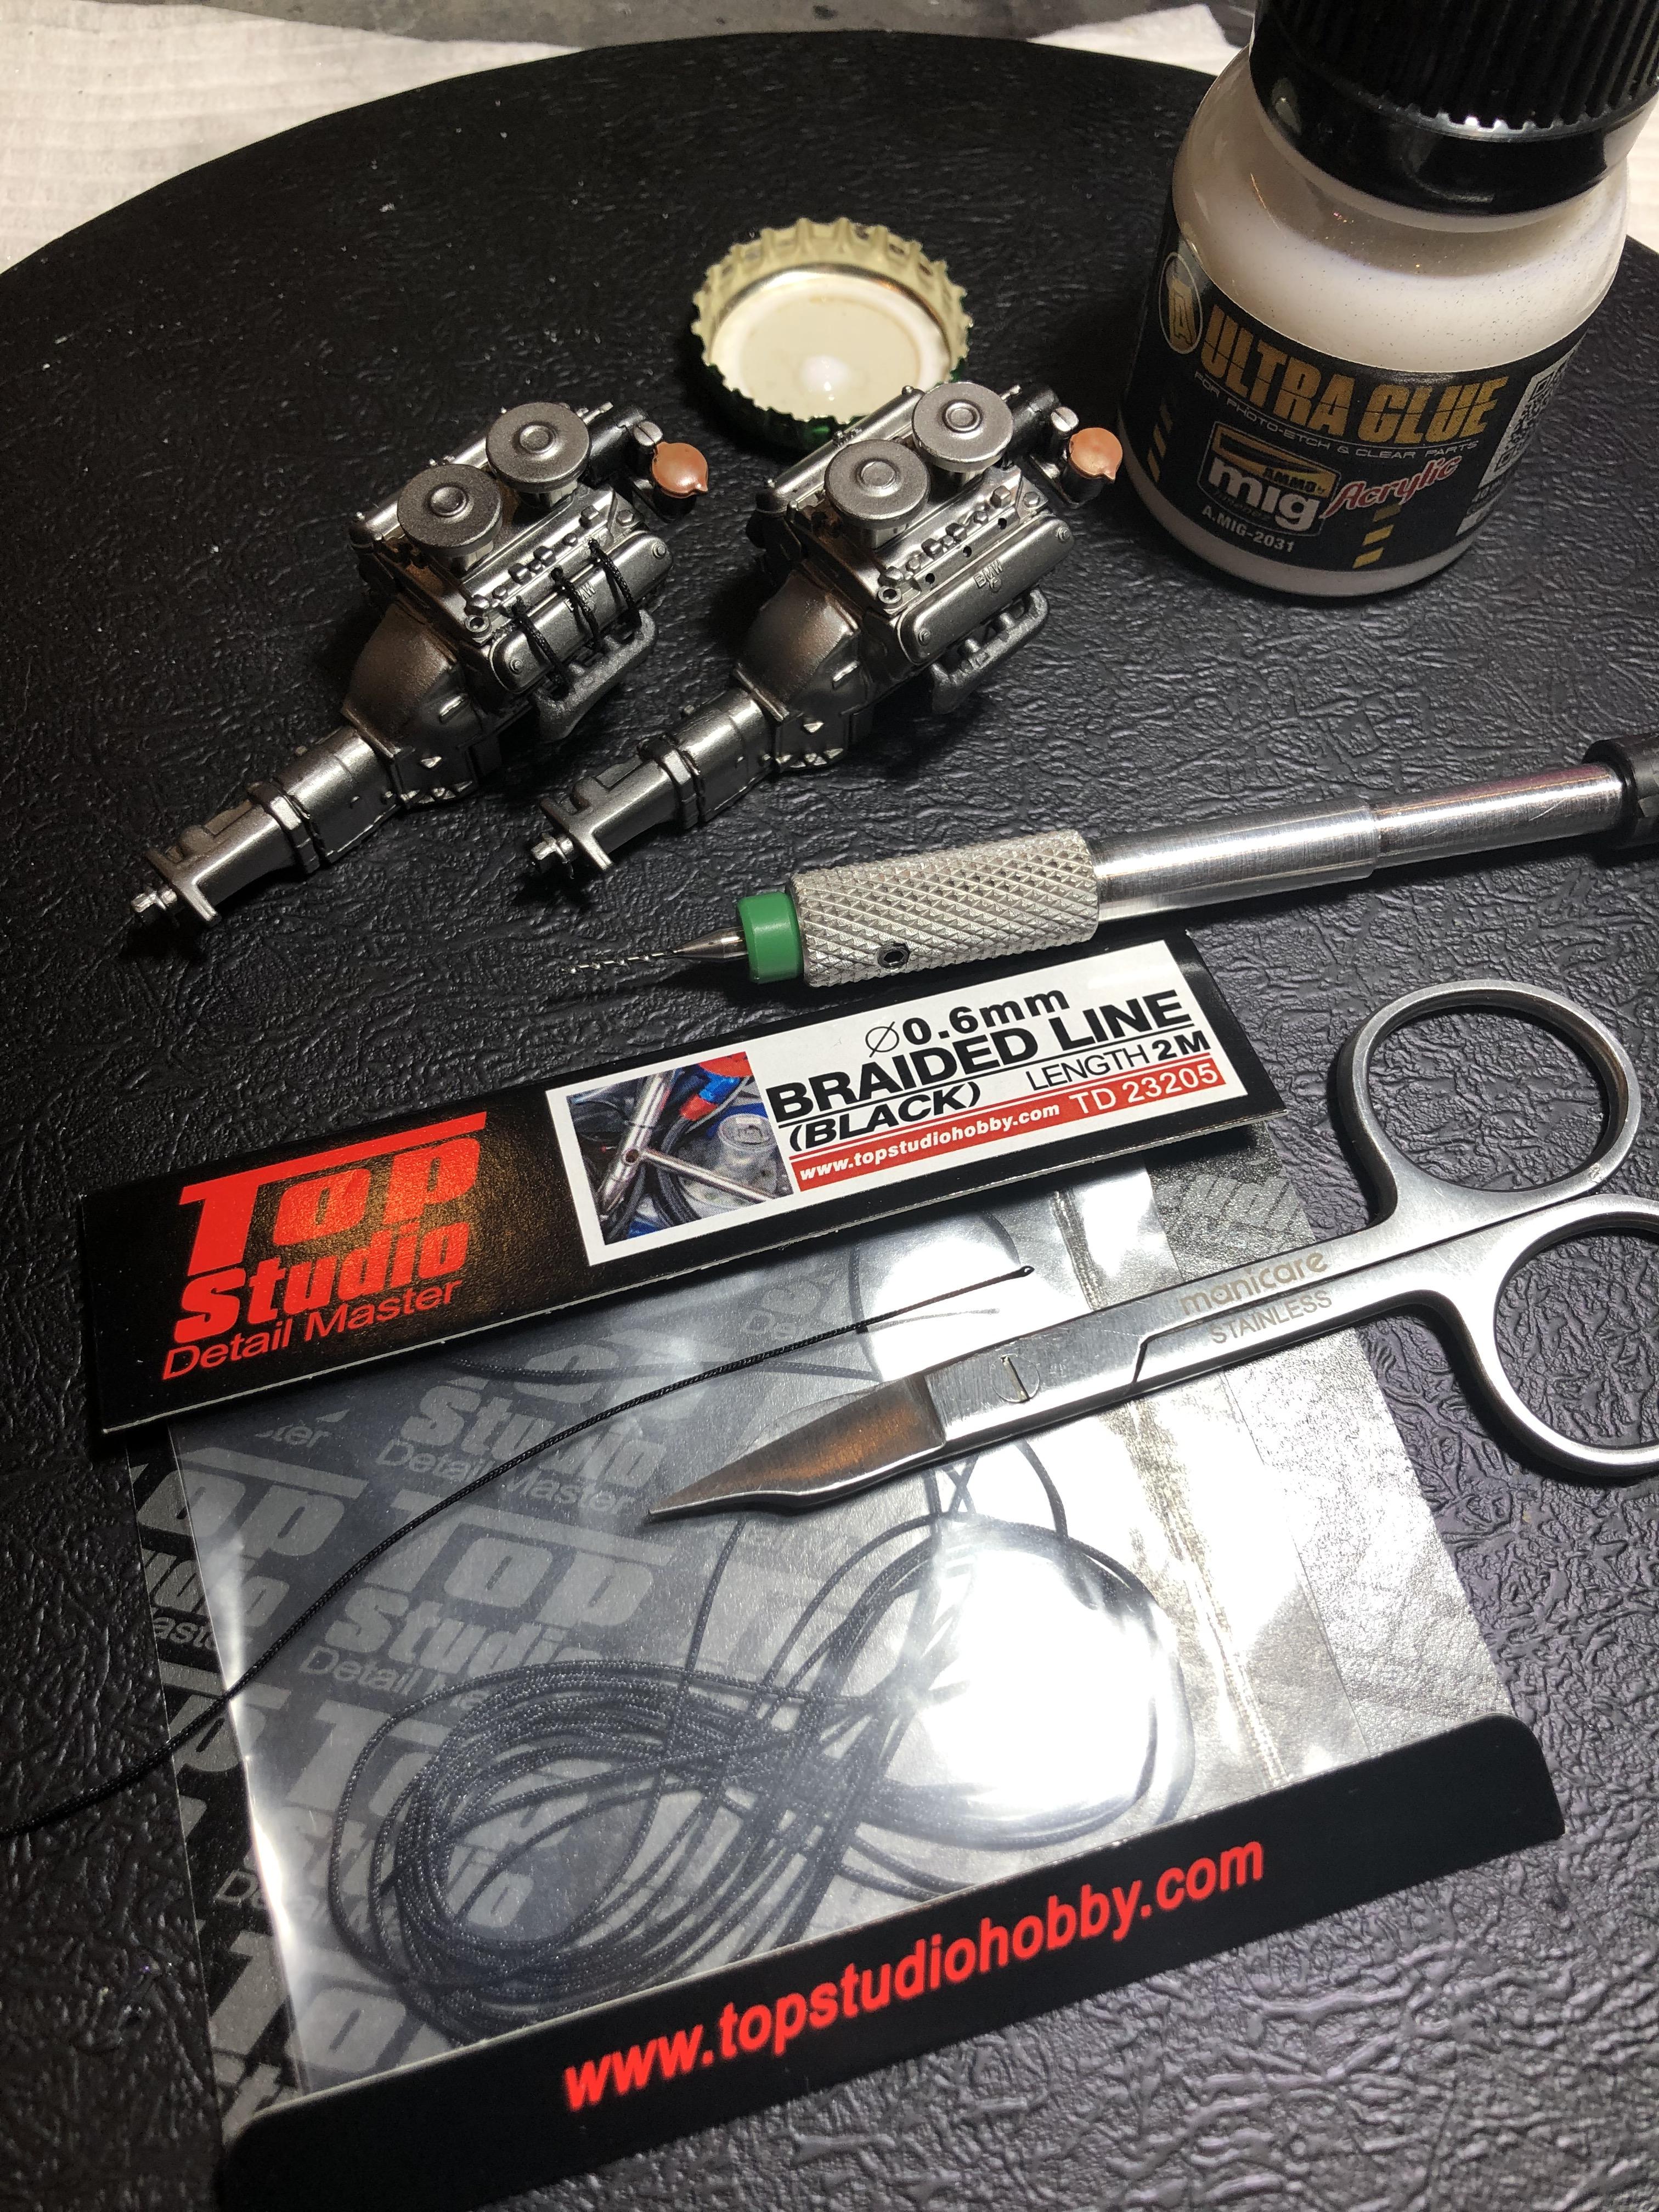
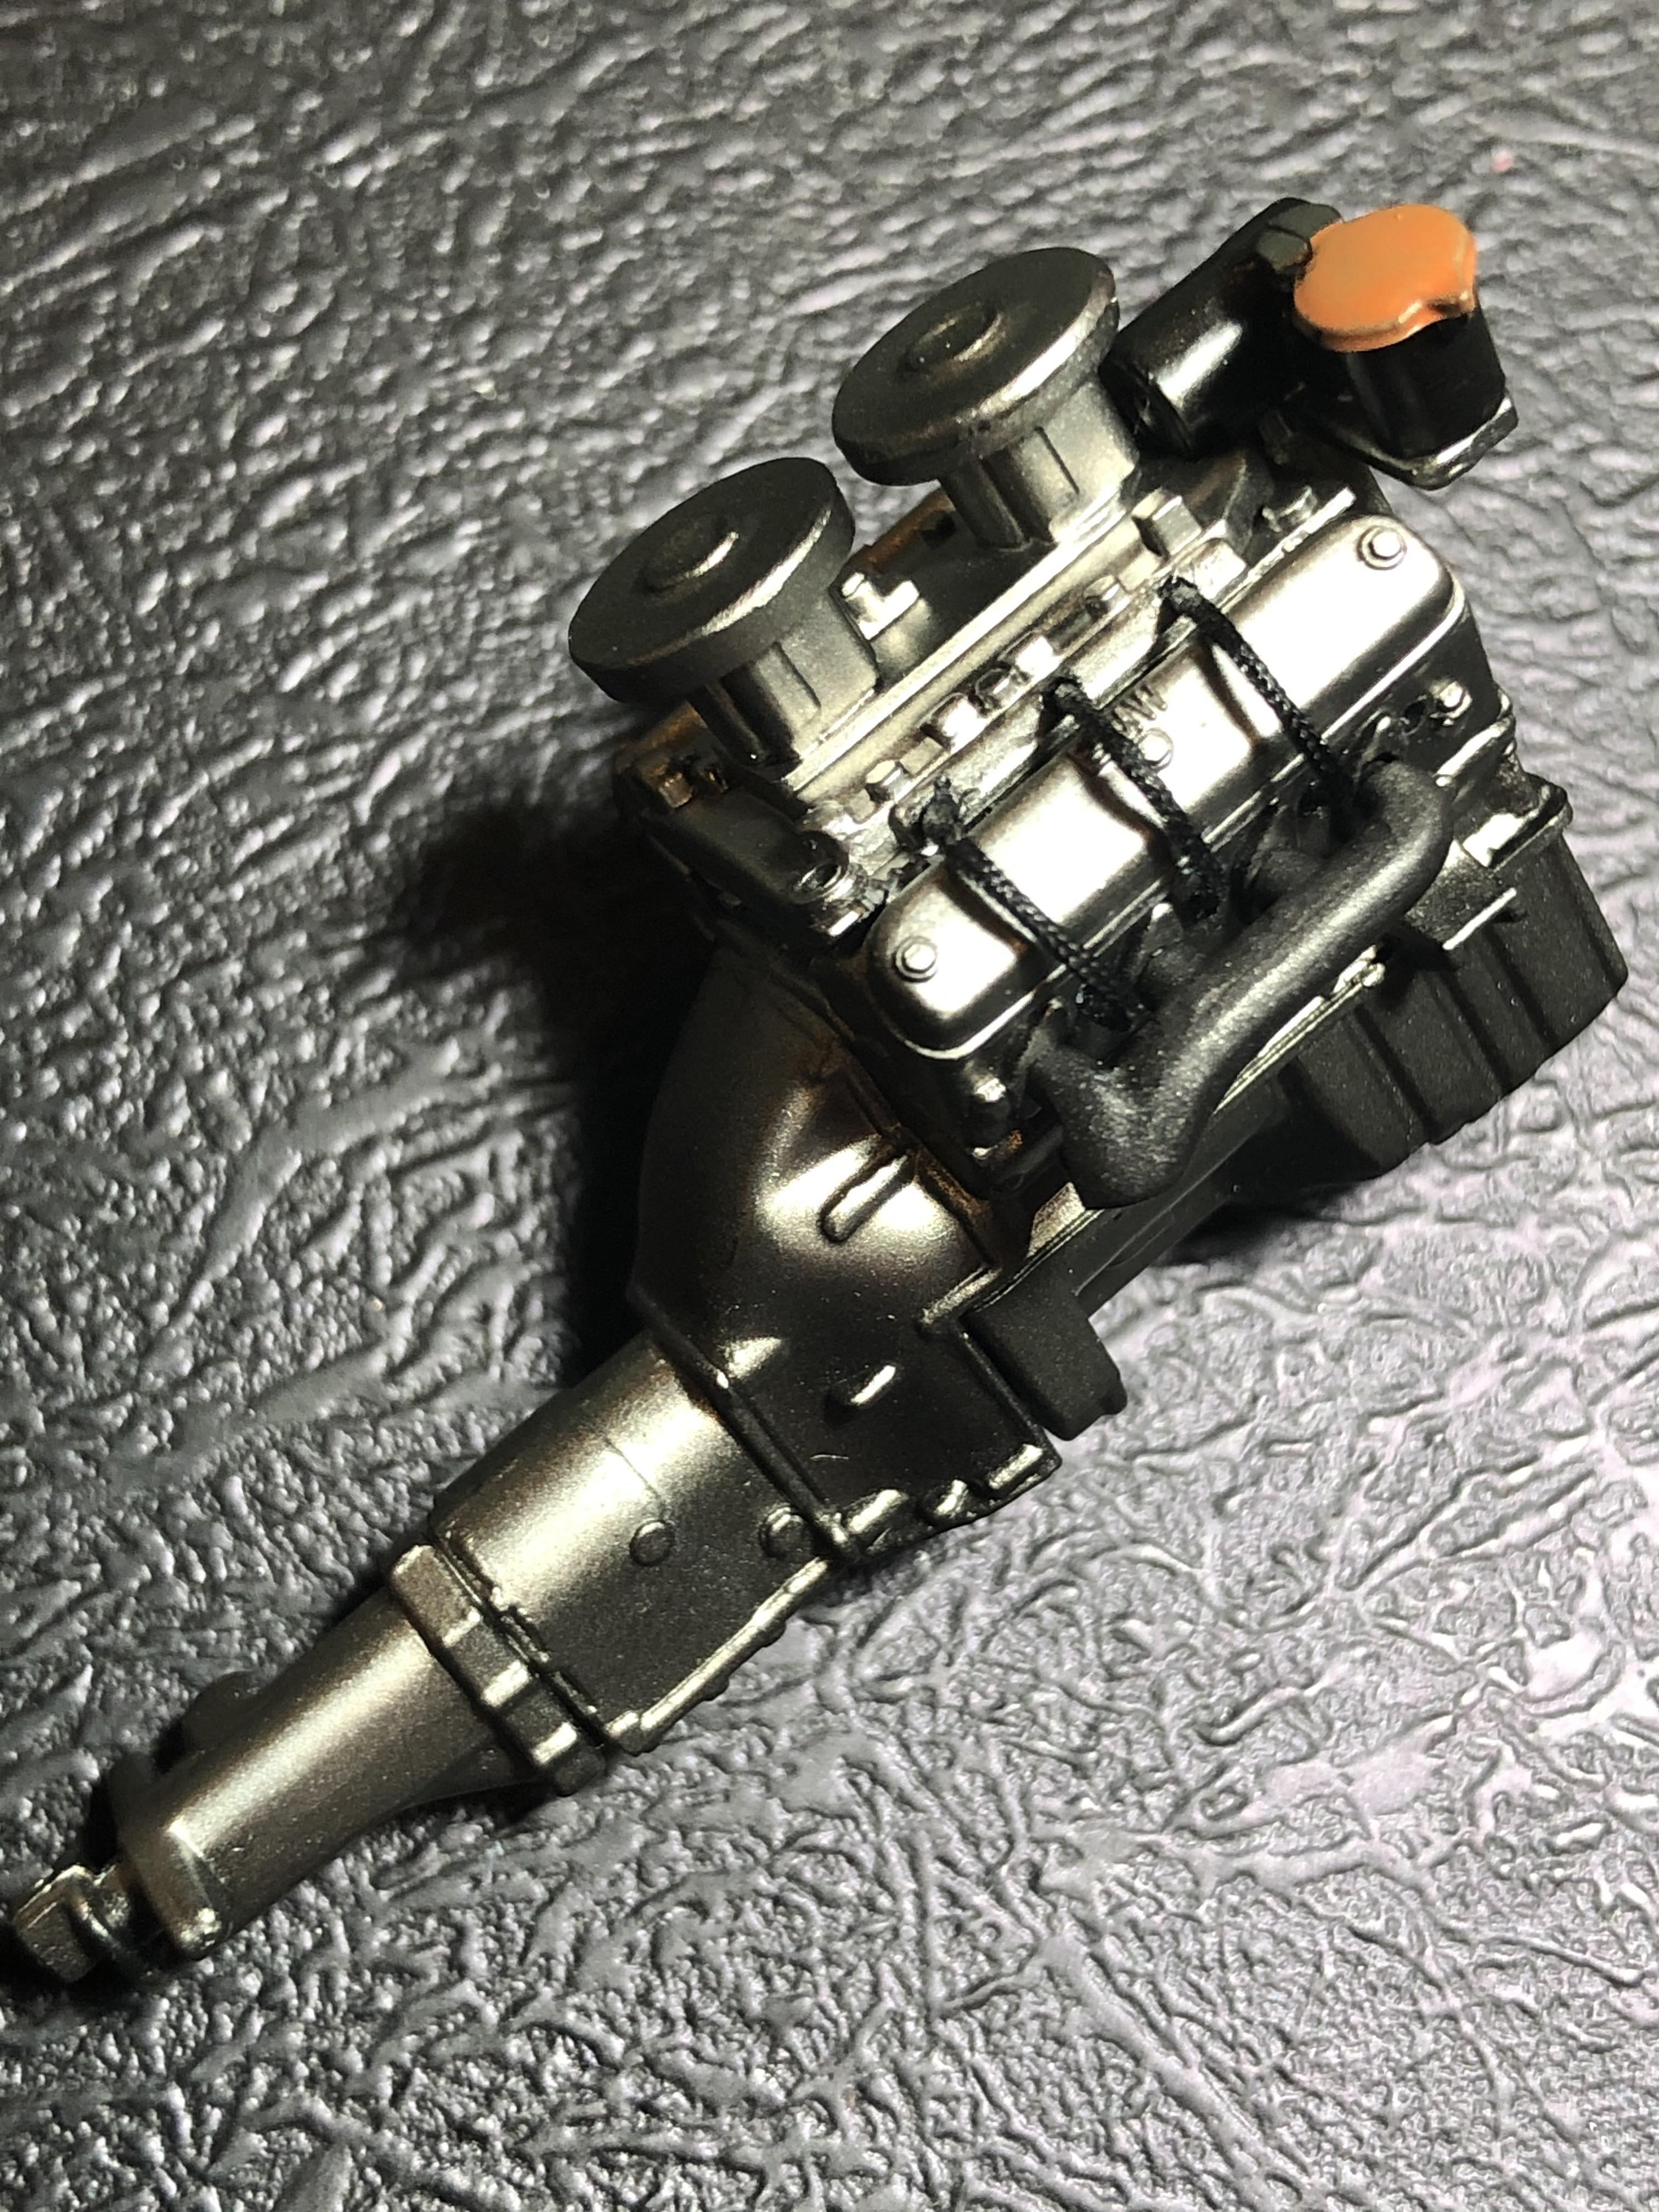
I might paint the leads yellow on the second engine, still undecided, and the distributor cap needs to be a bit more red and darker.
Cheers, D
ON the bench
Revell 1/24 '53 Corvette (building as '54)
Revell 1/24 BMW 507 Coupe and Cabrio
Italeri 1/48 Me262 B-1a/U1 Nightfighter
Monogram 1/24 '57 Chevy Nomad
Dragon 1/350 USS Frank Knox DD-742
Kobenhavn, Denmark
Joined: June 29, 2004
KitMaker: 6,760 posts
Auto Modeler: 2,182 posts
Posted: Monday, August 24, 2020 - 11:00 PM UTC
Black primer looks nice and smooth.
Love the metal look, of the engine. I need to look for SMS paint.
Ignition coils are not that fond of heat, so it might have been for that reason the coil was moved away, from the engine.
On the workbench:
MPC: 1972 Pontiac GTO
Revell: 1965 Mustang
Verlinden 120mm guard of the marine.
Revell: 2010 Camaro
Monogram: 1931 Rolls Royce
Italeri: LVT2 Amtrac
AussieReg
Associate Editor #007
Victoria, Australia
Joined: June 09, 2009
KitMaker: 8,156 posts
Auto Modeler: 2,953 posts
Posted: Monday, August 24, 2020 - 11:08 PM UTC
Quoted Text
Black primer looks nice and smooth.
Love the metal look, of the engine. I need to look for SMS paint.
Ignition coils are not that fond of heat, so it might have been for that reason the coil was moved away, from the engine.
Thanks Jesper.
The first UK/EU stockist for SMS paints will be Frome Model Centre, their stand has already arrived but the paint has just left Australia. Keep an eye on their website
HERE , and I will keep you all updated as well.
Cheers, D
ON the bench
Revell 1/24 '53 Corvette (building as '54)
Revell 1/24 BMW 507 Coupe and Cabrio
Italeri 1/48 Me262 B-1a/U1 Nightfighter
Monogram 1/24 '57 Chevy Nomad
Dragon 1/350 USS Frank Knox DD-742
Joel_W
Associate Editor New York, United States
Joined: December 04, 2010
KitMaker: 11,666 posts
Auto Modeler: 2,974 posts
Posted: Tuesday, August 25, 2020 - 05:18 AM UTC
D,
Thanks for the link, it's much appreciated.
Both engines really do look quite nice especially with the spark plug wires added.
Like I said earlier, you're really flying through this double build.
joel
On my Workbench:
Monogram 1/24 scale 427 Shelby Cobra
Just Completed:
Beemax 1/24 scale BMW M3 E30 1992 Evolution II
#335
Auckland, New Zealand
Joined: September 03, 2013
KitMaker: 1,808 posts
Auto Modeler: 701 posts
Posted: Tuesday, August 25, 2020 - 02:23 PM UTC
Good start on the engine wiring Damian. I'll be interested to see how far you go with it! The Sistine chapel is within reach
cheers
Michael
Campaign:
Strip, Track and Trail - Porsche 917/20 - On the bench
Phantoms at 60 - F-4J Marines
Below 1000 tons - M50 minesweeper - Sailed for duty


