_GOTOBOTTOM
Cars: Other Racing
For automotive racing topics not already covered.
Beemax 1/24 scale 1992 BMW M3 E30 EVO II
Joel_W
Staff MemberAssociate Editor
AUTOMODELER
_VISITCOMMUNITY
New York, United States
Joined: December 04, 2010
KitMaker: 11,666 posts
Auto Modeler: 2,974 posts
Posted: Friday, August 28, 2020 - 06:15 AM UTC
After loosing my Mojo for the Ebbro Lotus 49b mostly due to the issues I was having with the nose cone, it became my 1st Shelf Queen in nearly two years. Oh well, it had to happen sooner or later. So I took some time off as the issues with the Cataract surgery which were being created by the other two eye diseases I have were really starting to get to me. Finally, I decided to take a trip through my stash and just look for a less complicated, but enjoyable build that would catch my attention. It didn't take long when I spotted the Beemax 1/24 scale 1992 BMW M3 E30 Evolution II race car that was raced in the German Grand Touring Championship Series better known at the DTM, using the FIA's Group A regulations. During that rules package era, BMW just ruled the series year after year till 1990.

In 1987 BMW used it's production M3 series to develop a car specifically for the DTM championship, and thus produced just enough cars to meet the min requirements. By 1990 the M3 design was really starting to get old and no longer the leader of the pack. So BMW designed the Evolution II series which added ABS and a 6 speed gearbox. The 1992 version was the last variant as the rules package changed for 1993.

For 1992 BMW sent their top factory driver, Johnny Cecotto to the Fina Team to drive one of their cars and challenge for the DTM Championship. But there were other teams that ran the EVO II version, and one such team was fielded by Brun Motorsport with Jagermeister as their main sponsor.

Usually Beemax offerings only have one set of decals for one car, or at best both team cars, but in this early Beemax offering they have both the Fina and Jagermeister team cars.


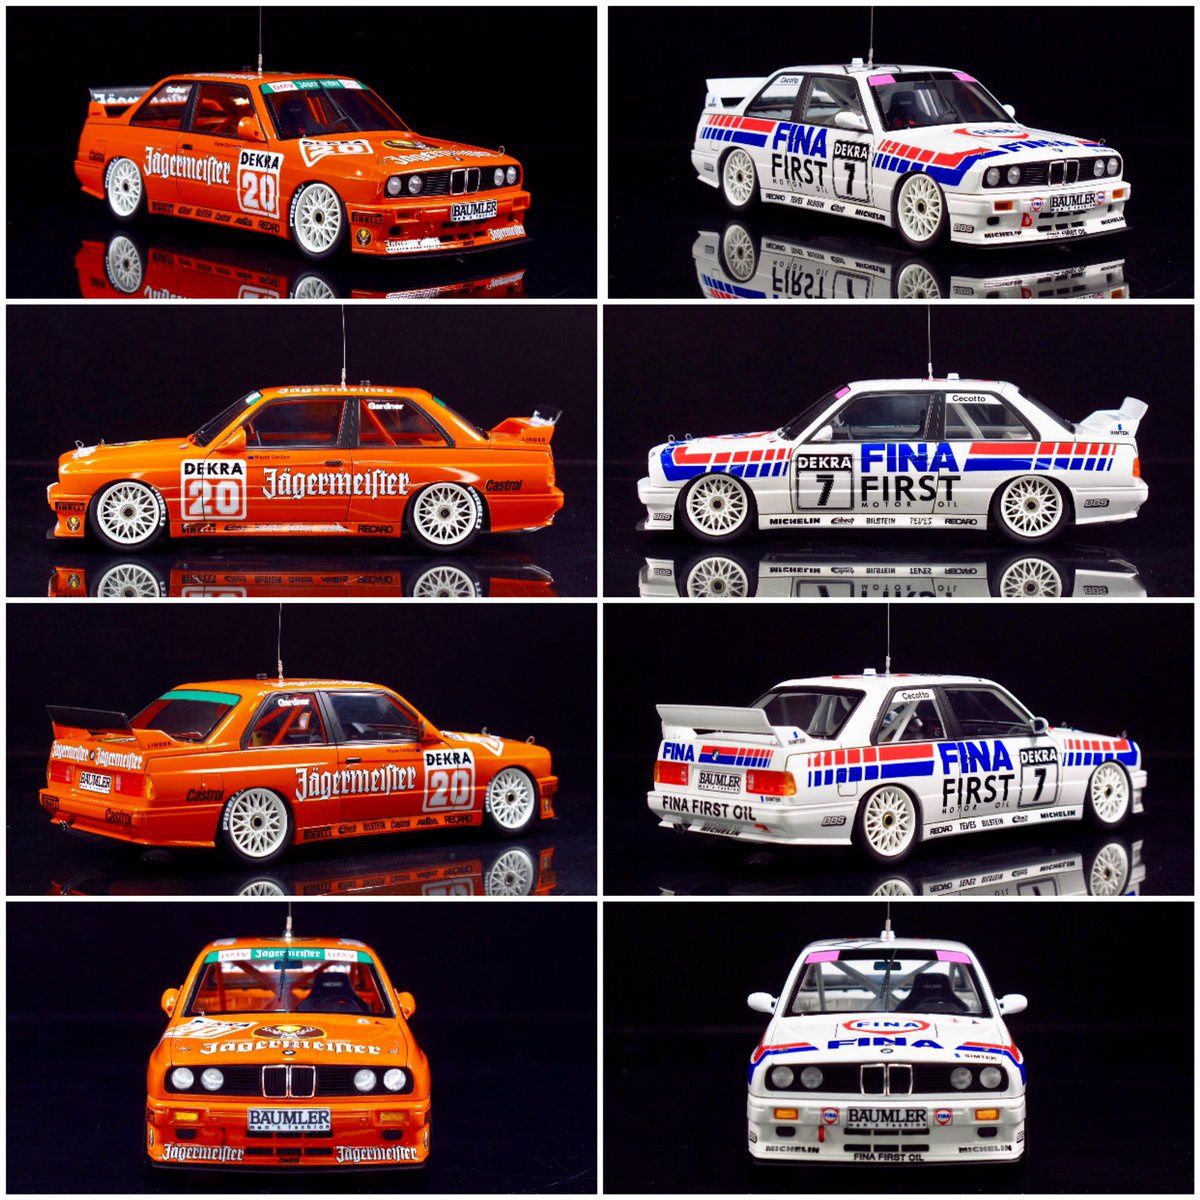
I decided to build the Brun Jagermeister #20 car as a much needed change of pace from so many basically white race cars, and I just happen to have a brand new bottle of the correct color by Gravity.

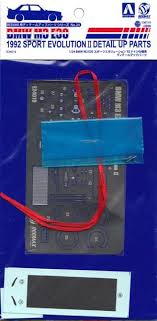
Rarely do I order any AM these days, but for this build I bought their Detail up set that consists of a fret of PE, full seat harness, and even some Carbon Fiber decals. Unfortunately, it costs nearly as much of the kit did.


I also bought the Decalas window masks which are the best I've ever used. I try to buy them for all my builds if possible.


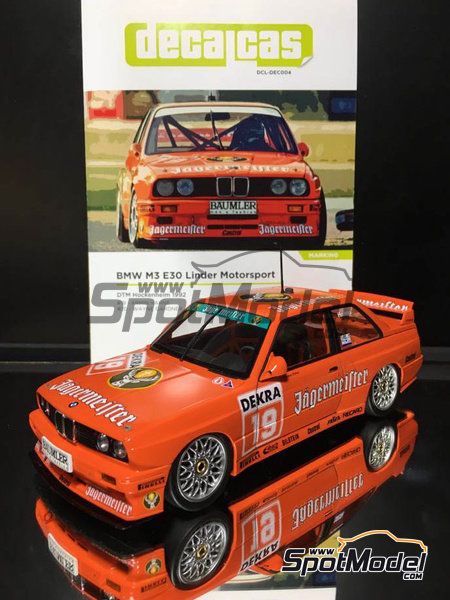
Both of the decal sheets were designed and printed in house. Both have perfect registration and colors, and look their usual just thin enough. I've used their decals before, and honestly, they're the equal to Cartograf. They're just that good.


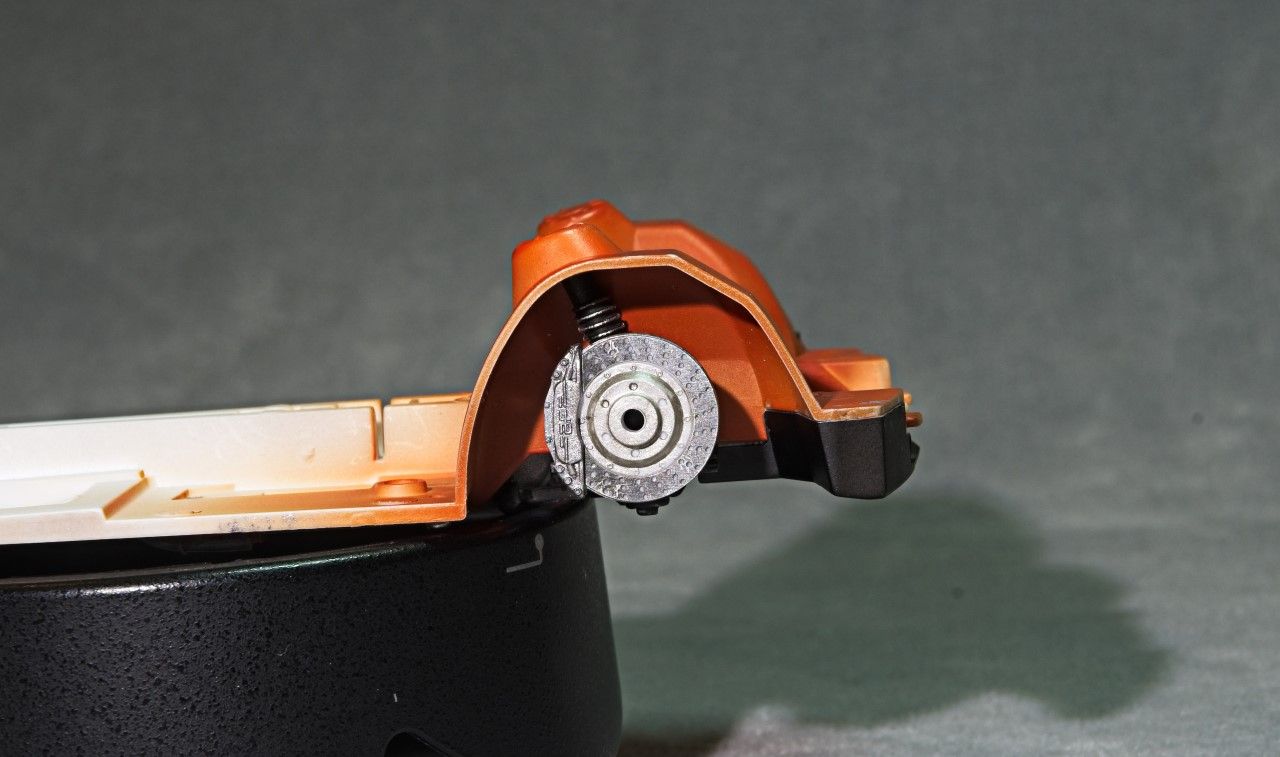
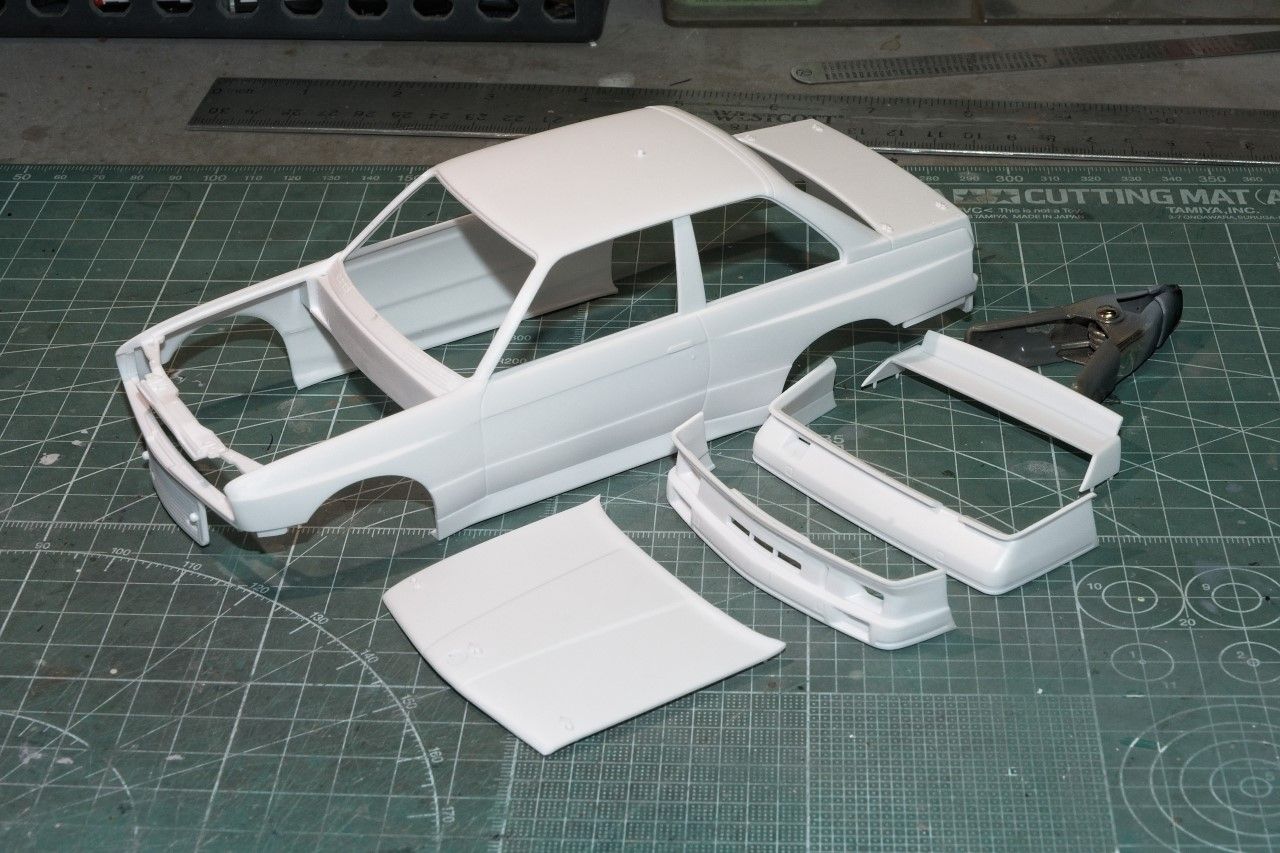
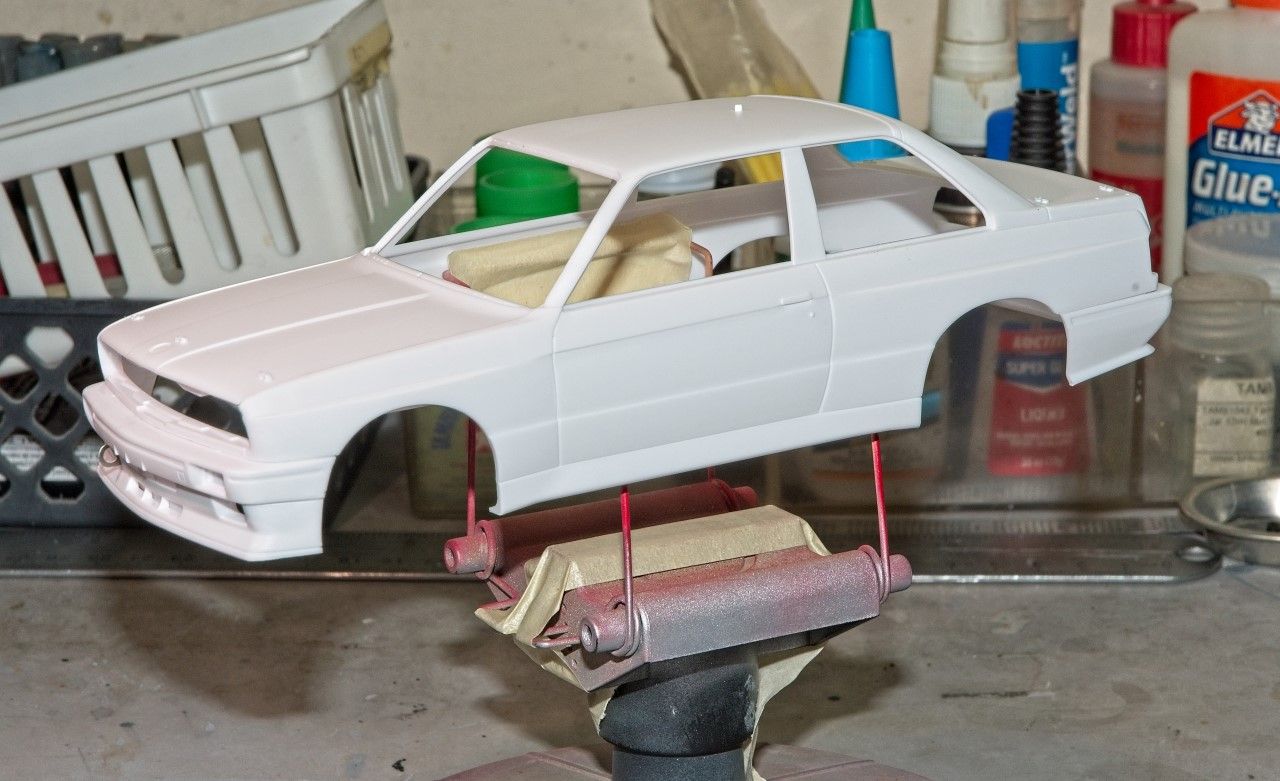
Ok, time to get started on the kit. My work flow is almost always the same, which is building up the basic shell, then primer, paint, decals, sealing, polishing, and finally waxing. And this kit lends itself to my procedure to a "T" with 7 basic parts to be fitting and glued minus the rear spoiler, and 2 side door mirrors.


I also added PE toe hooks both front and back. Here's the super easy to fashion front hook.


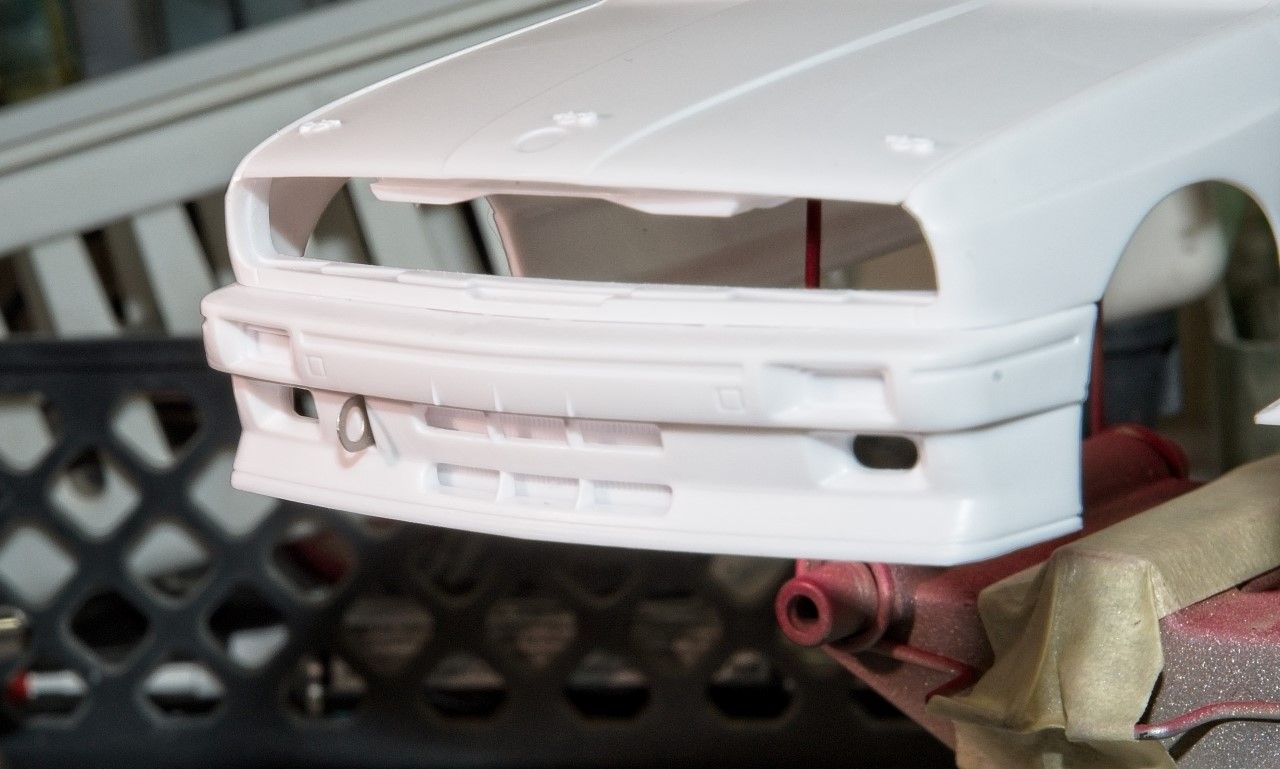
Every part had a perfect fit, so I was prepping for the primer coat in no time. Primer was Mr. Finisher Gray #1500.


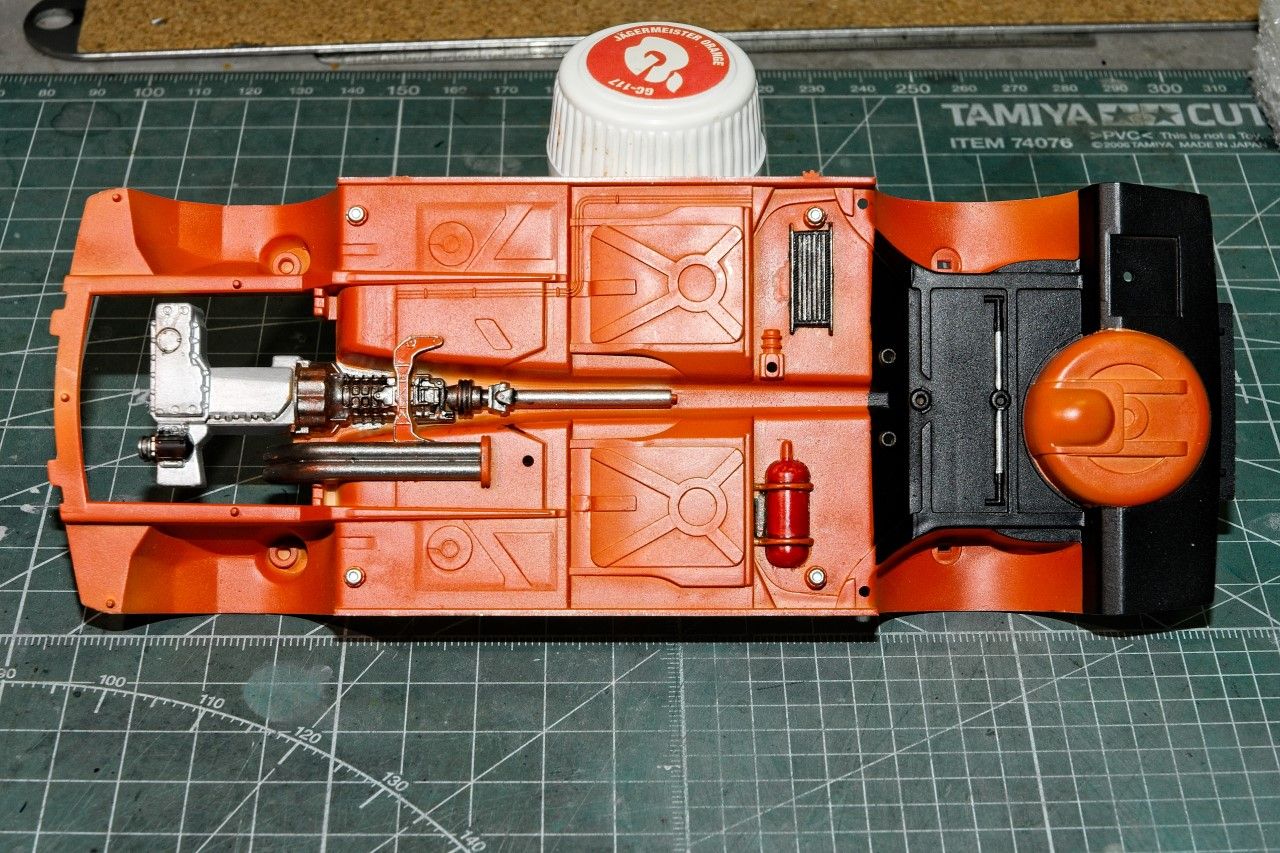
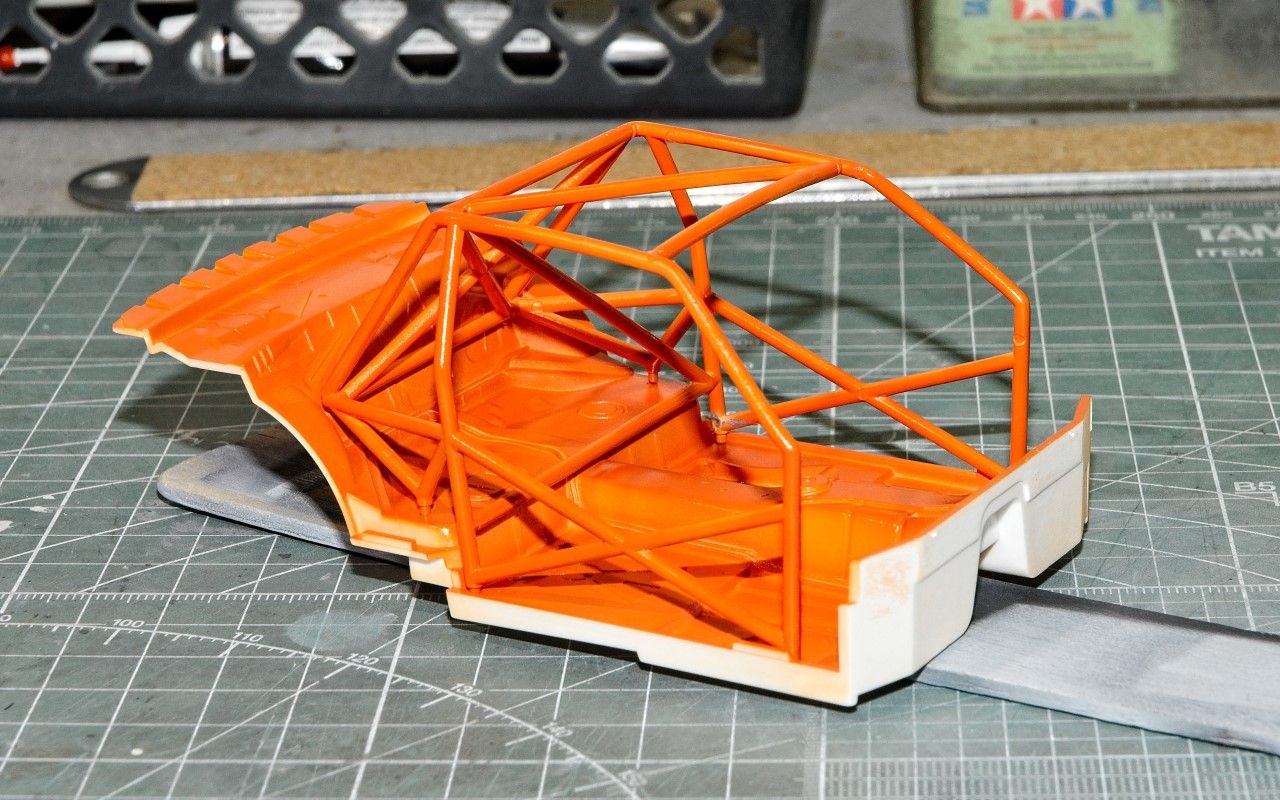
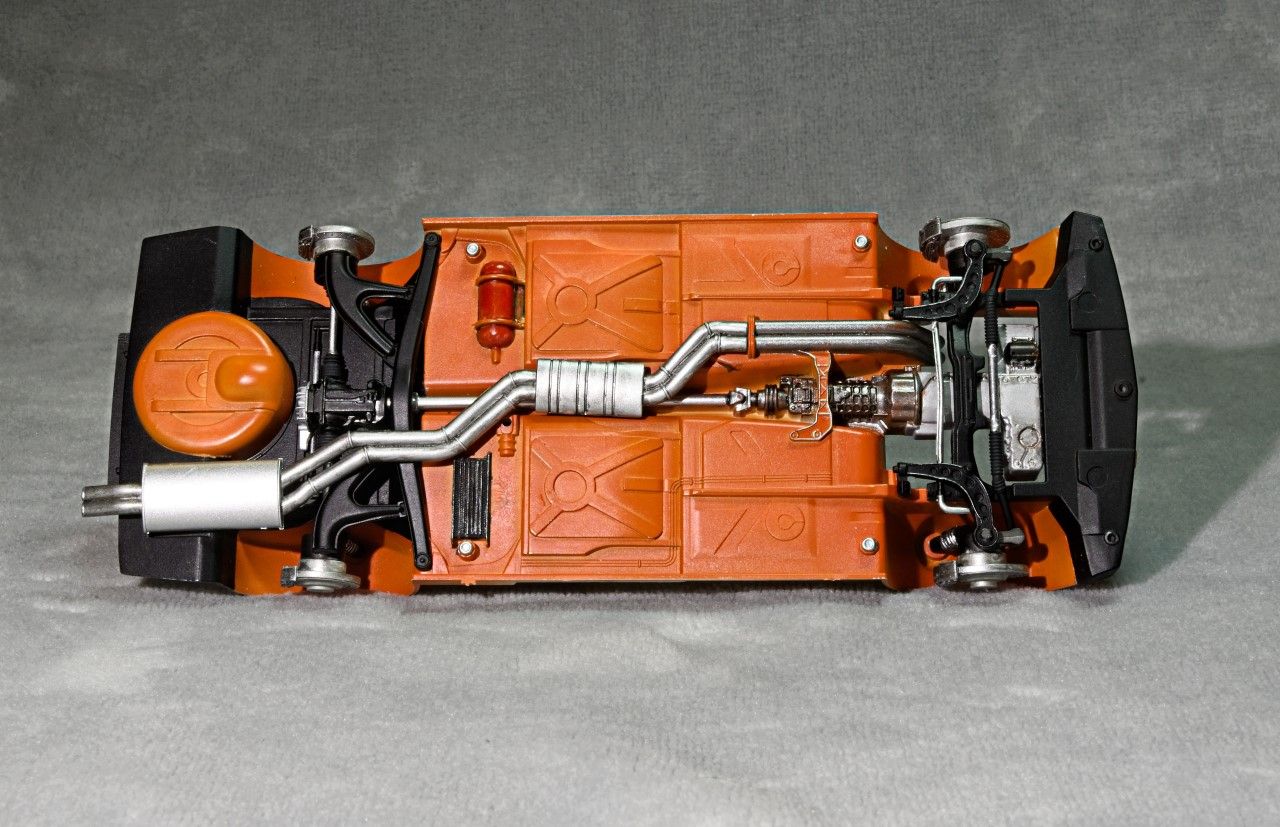
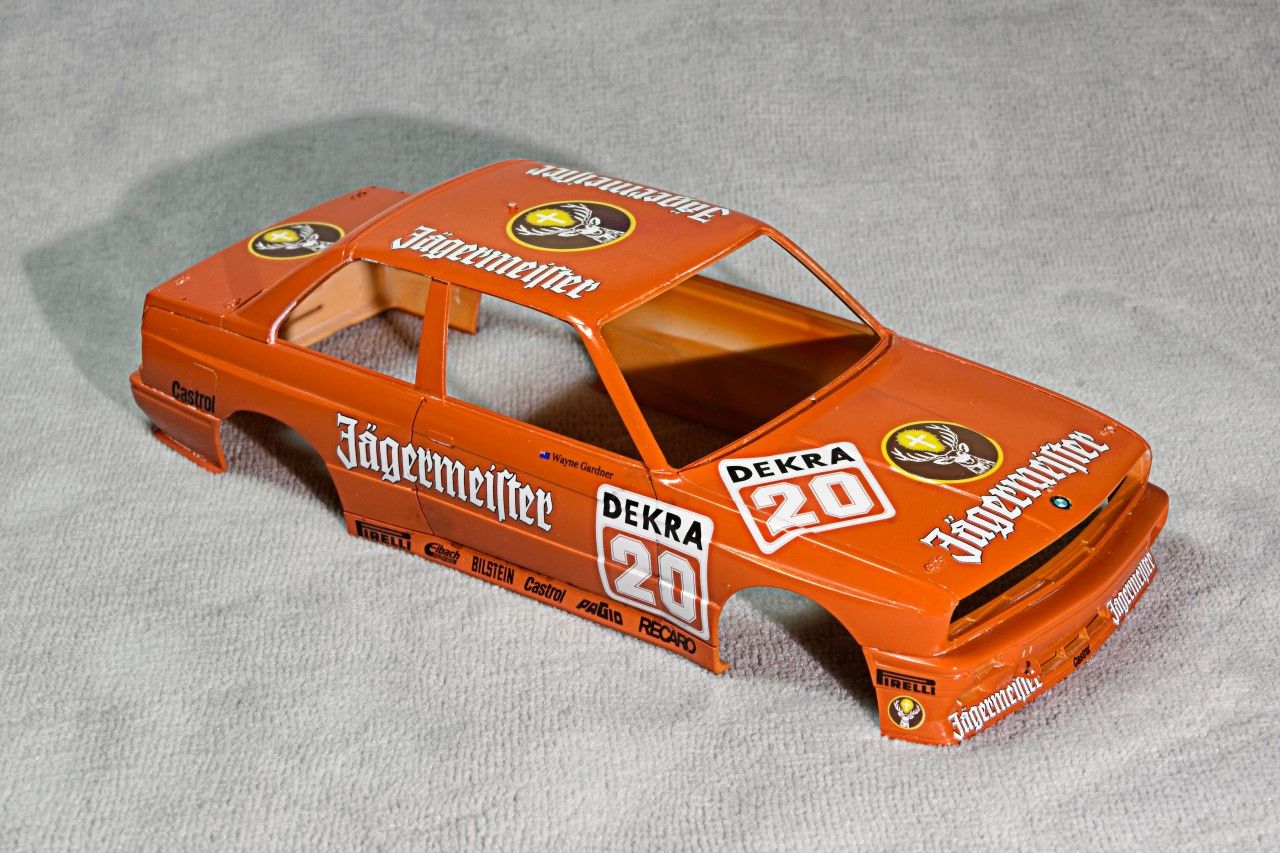
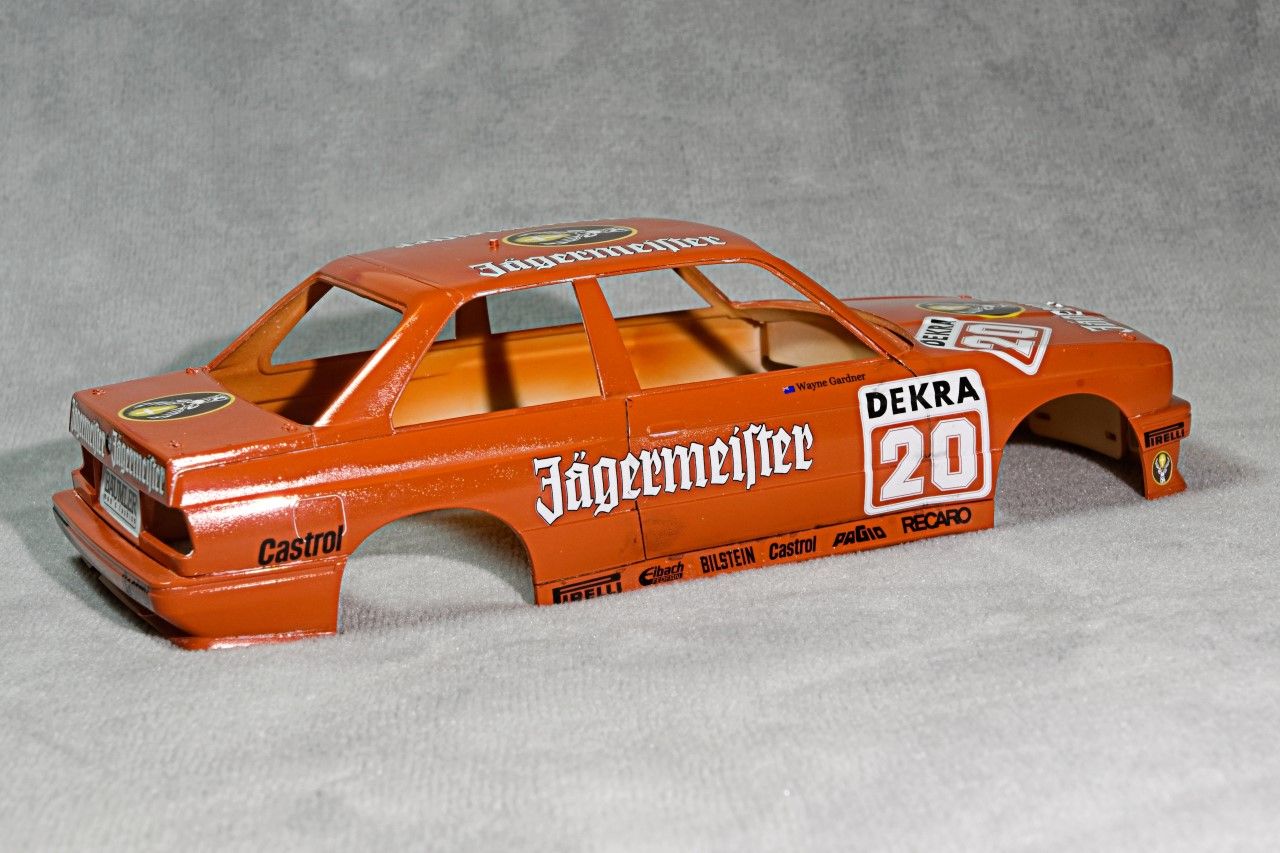
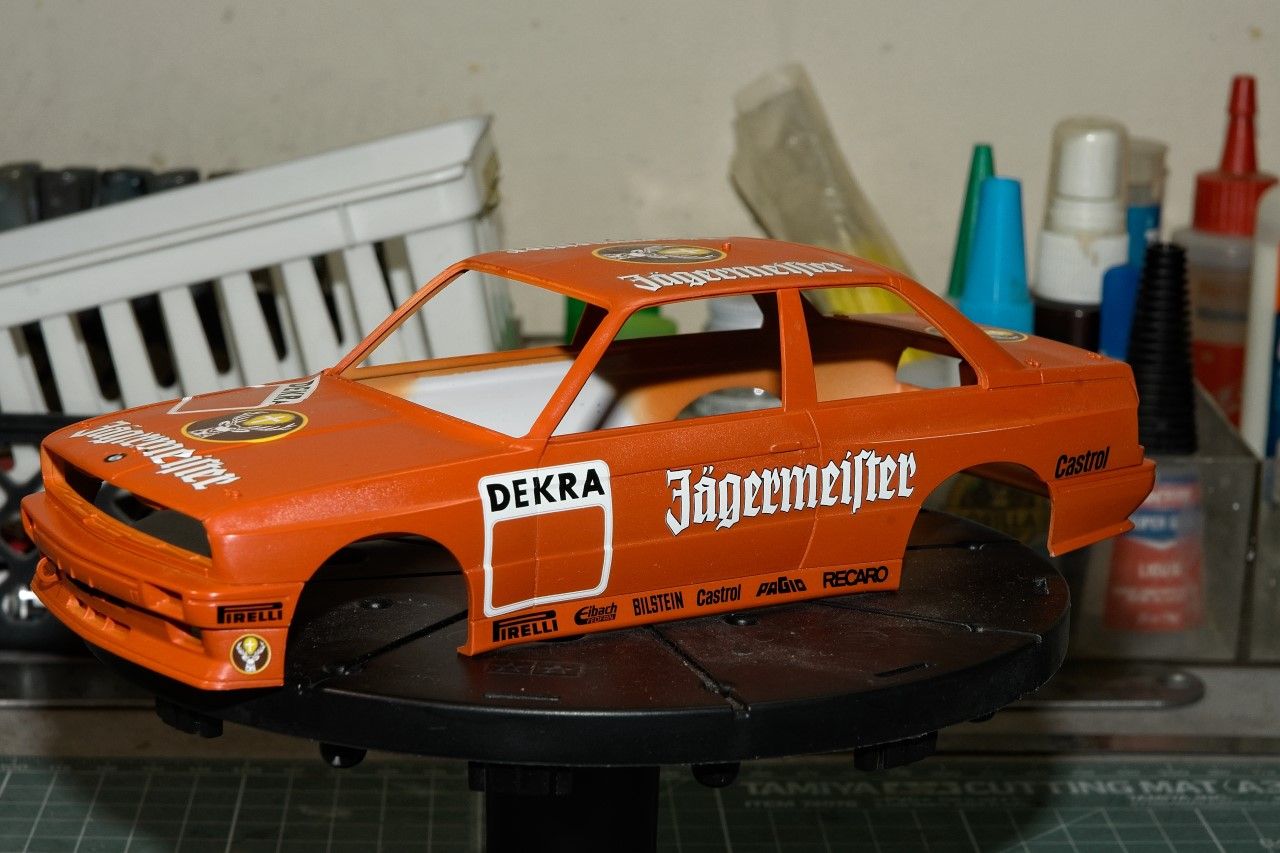
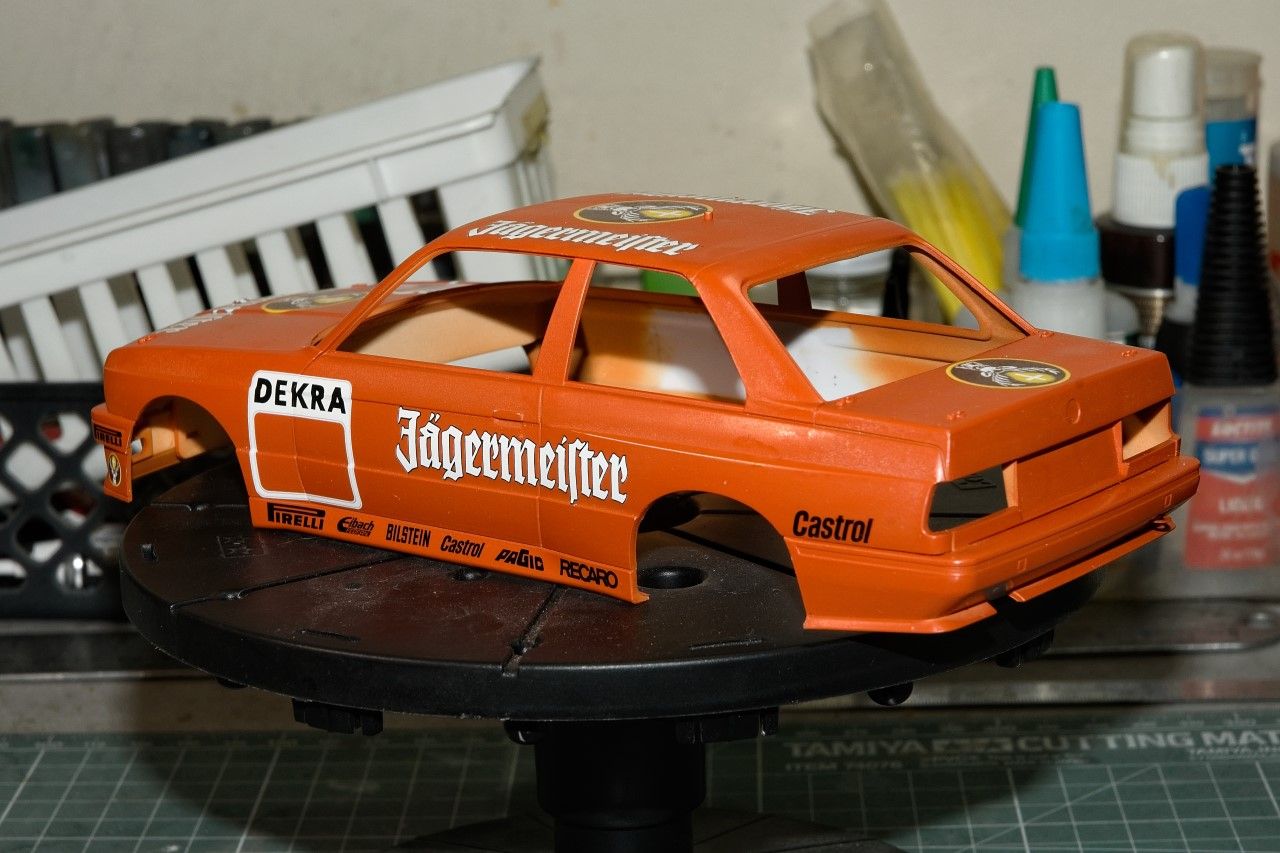
I managed to get the shell painted, but the color took almost the entire bottle of Gravity paint. A 1st for me. Naturally, the Jagermeister Brun car needed ths entire interior, roll cage, and the full under chassis under tray painted in their famous Orange paint. So I'm going to have to try and mix some using Tamiya Orange and Red. Unfortunately, I just totally forgot to take a few pictures of the painted shell.

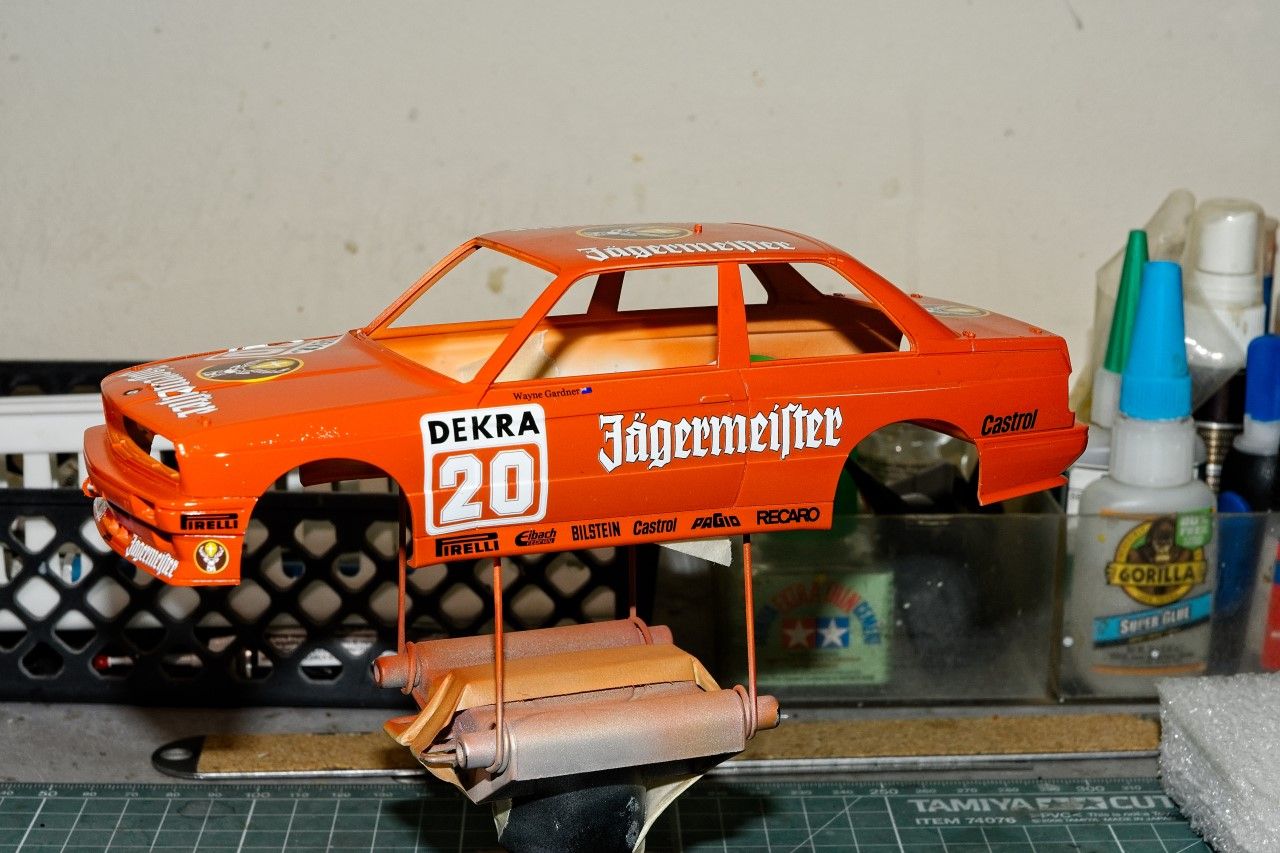
on the 3rd day after eye surgery, i tried to find a pair of over the counter readers so that I could try to decal. 2.5X coupled with my Optivisor worked ok. I slowly started the decaling process using my tried and true 3 step process Of Micro Set, Micro Sol, and finally Solvaset. I'm about 2/3 of the way through as it's taking me forever with limited eyesight till I get temp new bi-focals and computer glasses. Here's two pictures to give you an idea of the Brilliant Orange color, and the decals to date.


If nothing else, doing some modeling is helping me to focus on something else besides the recovery period, and what I can really expect after the eye surgery.

Joel

Szmann
_VISITCOMMUNITY
Netherlands Antilles
Joined: September 02, 2014
KitMaker: 1,977 posts
Auto Modeler: 1,371 posts
Posted: Friday, August 28, 2020 - 06:59 AM UTC
Joel, glad to see you in full swing to recovery. Both schemes are gripping but - as you reckon - the orange one stands out as one of the most popular liveries.
The small details are the salt and pepper of any build - that towing hook looks fantastic all by itself there.
And yes - as usual - great start and consistent update. Following...

Gabriel
Dixon66
_VISITCOMMUNITY
New Hampshire, United States
Joined: December 12, 2002
KitMaker: 1,500 posts
Auto Modeler: 645 posts
Posted: Friday, August 28, 2020 - 07:06 AM UTC
More Jagermeister Orange, I love it!

More importantly, glad to see you getting back at it.
Hwa-Rang
_VISITCOMMUNITY
Kobenhavn, Denmark
Joined: June 29, 2004
KitMaker: 6,760 posts
Auto Modeler: 2,182 posts
Posted: Friday, August 28, 2020 - 07:34 AM UTC
Great choice of subject Joel. Love that "Here I am" orange color of the Jägermeister M3.

Just read, an article, in my favorite US car magazine, swedish "Power magazine" about a guy, with a seriously fast'71 Chevelle(Big blower) The guy recalls some of his previous cars, before turning towards US cars. He had a BMW M3, with a huge turbo, making 1000HP, on the wheels. That engine didn't live for long, the block split lengthwise. BOOM!
Joel_W
Staff MemberAssociate Editor
AUTOMODELER
_VISITCOMMUNITY
New York, United States
Joined: December 04, 2010
KitMaker: 11,666 posts
Auto Modeler: 2,974 posts
Posted: Friday, August 28, 2020 - 08:26 AM UTC
David,
Thought that you'd like my choice of team & sponsor

Joel
Joel_W
Staff MemberAssociate Editor
AUTOMODELER
_VISITCOMMUNITY
New York, United States
Joined: December 04, 2010
KitMaker: 11,666 posts
Auto Modeler: 2,974 posts
Posted: Friday, August 28, 2020 - 08:29 AM UTC
Jasper,
So glad that you like my choice of team rather then the Fina car, which I was seriously thinking about.

1,000 hp out of that engine surely was a death sentence. I'm surprised it lasted even for a few runs.

Joel
AussieReg
Staff MemberAssociate Editor
AUTOMODELER
#007
_VISITCOMMUNITY
Victoria, Australia
Joined: June 09, 2009
KitMaker: 8,156 posts
Auto Modeler: 2,953 posts
Posted: Friday, August 28, 2020 - 11:37 AM UTC
Really wonderful to see another build hit your bench Joel, and what a great way to start the thread! Body built, prepped, primed, painted and decals under way!

I'm hooked, following all the way!

Cheers, D
Joel_W
Staff MemberAssociate Editor
AUTOMODELER
_VISITCOMMUNITY
New York, United States
Joined: December 04, 2010
KitMaker: 11,666 posts
Auto Modeler: 2,974 posts
Posted: Friday, August 28, 2020 - 12:10 PM UTC
D,
Thanks for your constant most positive support. You know just how much I appreciate it.

Would have been just a tad better if I had actually remembered to take a few pics of the painted shell.

Joel
Joel_W
Staff MemberAssociate Editor
AUTOMODELER
_VISITCOMMUNITY
New York, United States
Joined: December 04, 2010
KitMaker: 11,666 posts
Auto Modeler: 2,974 posts
Posted: Friday, August 28, 2020 - 12:16 PM UTC
Gabriel,
My apologies buddy. Don't know how I forgot to reply to your post

The Orange is a winner anyway we look at it. As for the PE tow hooks, I'm still amazed that I didn't screw up either one, but there's a lot more PE to go, and I'm not exactly the world's best when it comes to bending the pieces correctly.

Modeling is for guys like us is definitely one ofthe best medicines going.

Joel
Szmann
_VISITCOMMUNITY
Netherlands Antilles
Joined: September 02, 2014
KitMaker: 1,977 posts
Auto Modeler: 1,371 posts
Posted: Friday, August 28, 2020 - 02:06 PM UTC

Quoted Text

Gabriel,
My apologies buddy. Don't know how I forgot to reply to your post

The Orange is a winner anyway we look at it. As for the PE tow hooks, I'm still amazed that I didn't screw up either one, but there's a lot more PE to go, and I'm not exactly the world's best when it comes to bending the pieces correctly.

Modeling is for guys like us is definitely one ofthe best medicines going.

Joel


No worries, Joel, I figured out you didn't skip me with intention. I would have followed the thread anyways!

I just had a look at a set of PEs for International Lonestar. Oh, my - so tempting!

Gabriel
Joel_W
Staff MemberAssociate Editor
AUTOMODELER
_VISITCOMMUNITY
New York, United States
Joined: December 04, 2010
KitMaker: 11,666 posts
Auto Modeler: 2,974 posts
Posted: Saturday, August 29, 2020 - 01:00 AM UTC
Gabriel,
I always thank and reply to everyone for taking the time to post on one of my blogs, but to skip a close friend is what surely would be in the old days, plan old Blasphemy.

Joel
Joel_W
Staff MemberAssociate Editor
AUTOMODELER
_VISITCOMMUNITY
New York, United States
Joined: December 04, 2010
KitMaker: 11,666 posts
Auto Modeler: 2,974 posts
Posted: Sunday, September 06, 2020 - 07:03 AM UTC
Finally got enough accomplished for a small update.

I finished all the decaling, then gave the decals 2 days to dry and cure.

In the meantime my focus returned to the chassis, interior, and the roll cage. I knew that I had enough Gravity paint left in the bottle to paint both the interior and the roll cage, but it never occurred to me that the chassis was also painted in the Jagmeister Orange, and I wasn't to sure I had enough paint to accomplish that. Turns out that I had just barely enough.

Once the chassis was painted and dried for a few days, the rear section was painted Flat black. Then I started to hand paint all the molded on details that even included the bottom of the engine & transmission. Took a while as I really struggled to see what I was actually doing, since I'm not at the stage yet of getting new bifocals and computer glasses. So it's been quite an adventure for sure. Still another two weeks to go for that exam, and then the wait for both pairs of glasses.


Now my attention turned back to the body shell, chassis, and roll cage, as all three assemblies needed to be glossed. As my standard practice, I used Mr. Color's C046 Clear lacquer gloss thinned with their #400 leveler thinner. Here's the shell just glossed but not rubbed out, nor polished.


And here's the chassis with the roll cage just dry fitted to see what it actually looks like.


I spent a lot more time air brushing all the suspension components, brake assemblies, etc. but didn't take any pictures of them until they're installed on the chassis.

Joel
Dixon66
_VISITCOMMUNITY
New Hampshire, United States
Joined: December 12, 2002
KitMaker: 1,500 posts
Auto Modeler: 645 posts
Posted: Sunday, September 06, 2020 - 11:26 AM UTC
For someone who says that they can't see well, everything looks spot on. Well done!
AussieReg
Staff MemberAssociate Editor
AUTOMODELER
#007
_VISITCOMMUNITY
Victoria, Australia
Joined: June 09, 2009
KitMaker: 8,156 posts
Auto Modeler: 2,953 posts
Posted: Sunday, September 06, 2020 - 11:35 AM UTC
Coming together beautifully Joel, every time I see that Jaeger Orange it is just a really striking scheme.

Cheers, D
Cosimodo
#335
_VISITCOMMUNITY
Auckland, New Zealand
Joined: September 03, 2013
KitMaker: 1,808 posts
Auto Modeler: 701 posts
Posted: Sunday, September 06, 2020 - 12:10 PM UTC
Looking great Joel! I am very envious you have this on your desk. I would to have this build underway.

cheers
Michael
Joel_W
Staff MemberAssociate Editor
AUTOMODELER
_VISITCOMMUNITY
New York, United States
Joined: December 04, 2010
KitMaker: 11,666 posts
Auto Modeler: 2,974 posts
Posted: Monday, September 07, 2020 - 01:43 AM UTC
David,
I only wish that were true, and my triple killer list of eye diseases was one big joke, but unfortunately, it's the honest truth. I truly struggle to make any progress on my builds these days, and hope that the both new pair of glasses will help with the close up vision. Only time will tell.

As for the progress I've made to date, so glade that you like what you've seen.

Joel
Joel_W
Staff MemberAssociate Editor
AUTOMODELER
_VISITCOMMUNITY
New York, United States
Joined: December 04, 2010
KitMaker: 11,666 posts
Auto Modeler: 2,974 posts
Posted: Monday, September 07, 2020 - 01:45 AM UTC
D,
Thanks for checking out my latest update, and liking what you've seen. I fully agree that the Jagmeister bright Orange paint scheme is one of the most striking in closed wheel racing these days.

Joel
Joel_W
Staff MemberAssociate Editor
AUTOMODELER
_VISITCOMMUNITY
New York, United States
Joined: December 04, 2010
KitMaker: 11,666 posts
Auto Modeler: 2,974 posts
Posted: Monday, September 07, 2020 - 01:47 AM UTC
Michael,
Thanks for your thumbs up, as it's much appreciated.

At the pace you're completing your Pink Pig build, you'll have your next build on your bench pretty darn soon.

Joel
rdt1953
_VISITCOMMUNITY
New Jersey, United States
Joined: February 06, 2015
KitMaker: 1,098 posts
Auto Modeler: 52 posts
Posted: Monday, September 07, 2020 - 01:56 PM UTC
Glad to see you back at it - looks good to me !
Joel_W
Staff MemberAssociate Editor
AUTOMODELER
_VISITCOMMUNITY
New York, United States
Joined: December 04, 2010
KitMaker: 11,666 posts
Auto Modeler: 2,974 posts
Posted: Tuesday, September 08, 2020 - 01:30 AM UTC
Richard,
Thanks for checking in to see how I'm doing, and how the Bimmer is progressing. Glad that you like what you saw so far.

Joel
Szmann
_VISITCOMMUNITY
Netherlands Antilles
Joined: September 02, 2014
KitMaker: 1,977 posts
Auto Modeler: 1,371 posts
Posted: Tuesday, September 08, 2020 - 04:18 AM UTC
Good progress, Joel I sort of like the "uni" theme all around the car.
Even with your eyes difficulties, your detail work remains top notch.

Gabriel
Joel_W
Staff MemberAssociate Editor
AUTOMODELER
_VISITCOMMUNITY
New York, United States
Joined: December 04, 2010
KitMaker: 11,666 posts
Auto Modeler: 2,974 posts
Posted: Tuesday, September 08, 2020 - 04:37 AM UTC
Thanks Gabriel for your thumbs up. Coming from you it always means a great deal to me.

I kind of like the plainer single color schemes these days myself. Not to mention just how much easier they are to apply.

Joel
Joel_W
Staff MemberAssociate Editor
AUTOMODELER
_VISITCOMMUNITY
New York, United States
Joined: December 04, 2010
KitMaker: 11,666 posts
Auto Modeler: 2,974 posts
Posted: Saturday, September 12, 2020 - 05:37 AM UTC
Time for another update on my BMW M3.

I finished painting and then detail painting the rest of the lower suspension components. as well as the basically stock road exhaust system. Duel exhaust pipes continued from the exhaust header pipes to what must surely be a catalytic converter, and then to a street legal muffler. I'm assuming that the rules must have required the use of the stock exhaust system. Otherwise, why use it?


All four disc brakes were one piece units that were detail painted. The AM detail set had metal disc cover plates that I CA glued into place. Just behind each disc brake assembly the coil over shock is visible. But once the wheel and tires are attached, one will never see either. Maybe I should start to give some consideration to making or buying jack stands so that I can display at least one brake assembly moving forward with other builds. The wheels are removable, so I just might add that feature to this build down the road.


Next up I revisited the body shell. I rubbed out the Mr. Color Gloss Clear Coat with 4,000 through 12,000 Micro Mesh emery cloth pcs, then polished and waxed it with the Gravity system. Honestly, I'm truly disappointed with how the body shell turned out. This definitely isn't one of my better efforts. What looks like orange peel in places isn't. It's the surface of the plastic that for some reason felt rough to the touch, more like what you'd expect on a piece of armor, and certainly not like any Beemax kit I've built previously. I did give it a light rub and buff with 1-3,000 Tamiya sponges, and thought that I'd taken care of the issue, but it sure doesn't look like I did. I even thought about stripping, refinishing, and repainting. I'd have to order a new bottle of paint, but I couldn't find the correct decals even on ebay, so I'm just going to live with it and move on.


Joel


AussieReg
Staff MemberAssociate Editor
AUTOMODELER
#007
_VISITCOMMUNITY
Victoria, Australia
Joined: June 09, 2009
KitMaker: 8,156 posts
Auto Modeler: 2,953 posts
Posted: Saturday, September 12, 2020 - 11:03 PM UTC
Joel, you've got some lovely detail work going on there on the underside, really neat job! Good idea having one corner of the car up on a stand to show off the work there.

It's very frustrating that the finish isn't what you really wanted. I think I can see the roughness that you mean in the photo from the RHS rear quarter, but not in any other photos. I'm sure you can angle it in the display cabinet so you show its best side.

Looking forward to more updates.

Cheers, D
Dixon66
_VISITCOMMUNITY
New Hampshire, United States
Joined: December 12, 2002
KitMaker: 1,500 posts
Auto Modeler: 645 posts
Posted: Saturday, September 12, 2020 - 11:36 PM UTC
The underside looks great, many series require full exhaust.

It is still a decent looking body shell. The color pops and is so distinctive.
 _GOTOTOP