Emergency Vehicle Charger
North Carolina, United States
Joined: November 28, 2005
KitMaker: 2,216 posts
Auto Modeler: 522 posts
Posted: Thursday, January 08, 2009 - 01:35 PM UTC
Howdy boys,
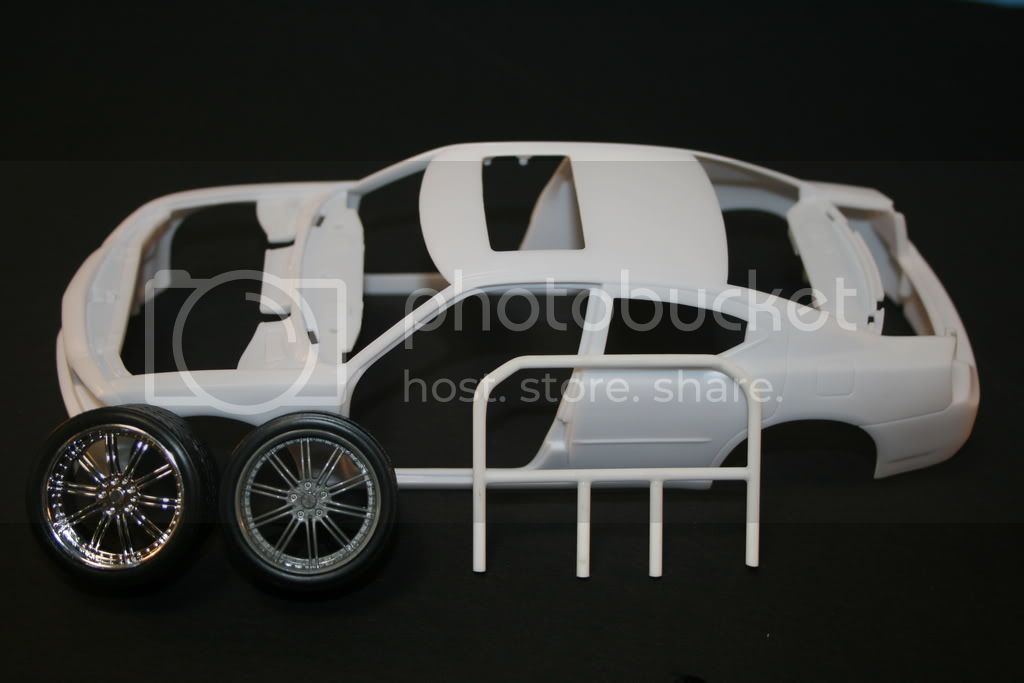
This is my emergency vehicle build Dodge Charger. Still don't know if I'm gonna do her as an unmarked car or what. Anyways, I cleaned up the body (3 hours worth) and started de-chromeing the wheels. There are three things I wanted to do to turn this into a cop car.
1. Light bar
2. Push bar for the front
3. Interior divider between front seats and rear seats.
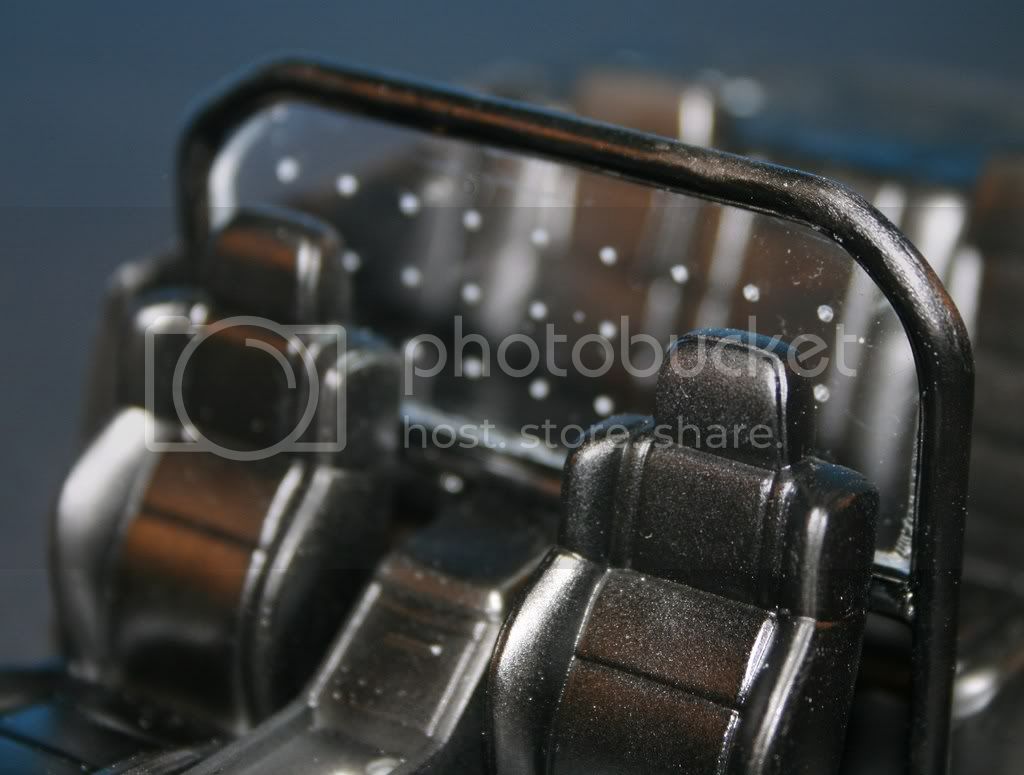
You can see in the picture my attempt at making the divider. It's evergreen sprue cut and glued together. I made the bends in the corners by holding the sprue over a candle. For the top section of this I have cut a CD case to fit and will drill little bitty holes all in it to depict the pic I got from the net. This is pretty much my first ever attempt at scratch building anything and so far I'm pretty happy with it.

I gotta tell you guys, after building this little divider thingy and drawing up a few sets of plans for the T2K campaign, as well as gettin' stuff together for the rat rod build...........I'm damn near out of the OOB building phase. This scratch building, rat rodding, what if building stuff is WAY more fun than building stuff to look like box art.

More updates to follow as soon as I get time to do something.
Hermon

"Those who would give up Essential Liberty
to purchase a little Temporary Safety,
deserve neither Liberty nor Safety."
Benjamin Franklin
Myanmar
Joined: March 05, 2004
KitMaker: 4,011 posts
Auto Modeler: 851 posts
Posted: Thursday, January 08, 2009 - 02:05 PM UTC
This should be interesting. Good idea using the CD case. The thickness is probably about accurate to scale too.
If you place a sheet of the desired sized graph paper behind it. This will expedite the marking for the hole positions.

i watched a scale plastic figure crawl along the edge . . . of an exacto blade . . . that's my dream , it's my nightmare . . . . . . . crawling , slithering . . . . . along the edge . . . . . . of an exacto . . . . . blade . . . . and surviving
Illinois, United States
Joined: February 10, 2004
KitMaker: 2,058 posts
Auto Modeler: 310 posts
Posted: Thursday, January 08, 2009 - 02:18 PM UTC
Leaning, you are, towards the Dark Side, young Mopar-lover. Eventually kits will be a thing of the past. Let the Dark Side of modeling consume you and wrap you in it's intimidating embrace.
It all starts with a bit of CD gem case cutting and evergreen extrusion bending...then...sheet plastic.
Be prepared.
And, other than those wheels, it's going to look great. And those wheels are no reflection on your skills. They are just kit-supplied.
Cheers,
Cuhail

Campaigns:
Stop, Look and Listen -ENDS 1-31-10
ACUTR Again-STARTS 08-18-09
What if? -STARTS 06-01-09
On the bench:
1/35 Scratchbuilt Rail Tank
North Carolina, United States
Joined: November 28, 2005
KitMaker: 2,216 posts
Auto Modeler: 522 posts
Posted: Friday, January 09, 2009 - 01:55 PM UTC
Hey Murphy, your pic is a dead ringer for my old football coach. Gotta warn ya though, I've grown a little in the past 20 years. You ain't gonna make me run the hill anymore old man. And if you try hittin' me in the helmet with your dang clipboard now, I might do more than put a rainbow sticker on your rear bumper.


...........hope the coach don't read this.
Thanks for the interest guys. Good news, I did some scrounging around and found that an F4 Hellcat wing section fits almost perfect in that sunroof hole. Bit of putty and sanding and I believe that problem is solved. Bad news is the CD case was my sons. AC/DC now resides in a sock in his top drawer.

Hermon
"Those who would give up Essential Liberty
to purchase a little Temporary Safety,
deserve neither Liberty nor Safety."
Benjamin Franklin
Illinois, United States
Joined: February 10, 2004
KitMaker: 2,058 posts
Auto Modeler: 310 posts
Posted: Friday, January 09, 2009 - 02:19 PM UTC
....yeah...trust me. I ain't the coach type. I'm just a big guy who collects swords and builds wicked models. (Don't tell anyone, but, I'm really just a pussycat

)
As for the second part, here is another suggestion.
Do you have an old gift card? Once all used up, it becomes either:
A. Landfill waste, or
B. a sunroof filler on a new Charger...or something.
Sand both sides until white, hold the white card up to the sunroof, and through the other side, trace the opening. Cut out the shape and fill that hole. Putty and sand smooth, inside and out.
Hope I help,
Cuhail
Campaigns:
Stop, Look and Listen -ENDS 1-31-10
ACUTR Again-STARTS 08-18-09
What if? -STARTS 06-01-09
On the bench:
1/35 Scratchbuilt Rail Tank
North Carolina, United States
Joined: November 28, 2005
KitMaker: 2,216 posts
Auto Modeler: 522 posts
Posted: Friday, January 09, 2009 - 03:35 PM UTC
Quoted Text
Do you have an old gift card? Once all used up, it becomes either:
A. Landfill waste, or
B. a sunroof filler on a new Charger...or something.
Thats what I like about this place. Cool people with great ideas that aren't above helping stupid people get better.
Just so happens there's a bunch of Toys-R-Us and Barns and Noble cards left over from Christmas' past. We get a bunch of computer junk parts at work (printers, keyboards, etc.) that we have to take to the recycle center. I've been tinkering with bits and pieces of them but the plastic is way too thick. Thanks Murphy.
Hermon
"Those who would give up Essential Liberty
to purchase a little Temporary Safety,
deserve neither Liberty nor Safety."
Benjamin Franklin
Illinois, United States
Joined: February 10, 2004
KitMaker: 2,058 posts
Auto Modeler: 310 posts
Posted: Friday, January 09, 2009 - 03:49 PM UTC
Meh, you're not stupid, you just have a different level of experience. Ignorance can be cured with good questions and many answers.
Answer when you know, ask when you don't. That's what modelers here have loyally done for years and years now. Why break tradition?
Glad I could help. I wish I had a good answer for those rims.
Cuhail
Campaigns:
Stop, Look and Listen -ENDS 1-31-10
ACUTR Again-STARTS 08-18-09
What if? -STARTS 06-01-09
On the bench:
1/35 Scratchbuilt Rail Tank
New York, United States
Joined: December 07, 2004
KitMaker: 1,888 posts
Auto Modeler: 806 posts
Posted: Friday, January 09, 2009 - 04:11 PM UTC
Hermon so far i like the ideas you have for this build, i would paint the wheels a semi gloss black that would draw less attention to them, just an idea.

North Carolina, United States
Joined: November 28, 2005
KitMaker: 2,216 posts
Auto Modeler: 522 posts
Posted: Saturday, January 10, 2009 - 04:06 AM UTC
Thanks Robert, actually that's exactly what I was planning on. Got the last wheel soaking in Simple Green right now. Gonna spray'em flat black then add a light coat of gloss.
Murphy, the gift card thing works great. I've also used it to cut out the sides of the front push bar and to make a little lap top computer I'll mount inside near the center consoul.
More pic's soon..............unless the wife has other plans.

Hermon
"Those who would give up Essential Liberty
to purchase a little Temporary Safety,
deserve neither Liberty nor Safety."
Benjamin Franklin
North Carolina, United States
Joined: November 28, 2005
KitMaker: 2,216 posts
Auto Modeler: 522 posts
Posted: Saturday, January 10, 2009 - 04:11 AM UTC
This is something like what I'm shooting for. Gotta figure out something for the decals. If not then she'll be undercover or something.

Hermon
"Those who would give up Essential Liberty
to purchase a little Temporary Safety,
deserve neither Liberty nor Safety."
Benjamin Franklin
Myanmar
Joined: March 05, 2004
KitMaker: 4,011 posts
Auto Modeler: 851 posts
Posted: Saturday, January 10, 2009 - 06:15 AM UTC
wow, what app did you create that image in? nice.
i watched a scale plastic figure crawl along the edge . . . of an exacto blade . . . that's my dream , it's my nightmare . . . . . . . crawling , slithering . . . . . along the edge . . . . . . of an exacto . . . . . blade . . . . and surviving
North Carolina, United States
Joined: November 28, 2005
KitMaker: 2,216 posts
Auto Modeler: 522 posts
Posted: Saturday, January 10, 2009 - 07:52 AM UTC
I didn't create it. I stole it from somewhere on the net.
Forgot to add, the kit doors are gull wing and are made to display open. I removed the hinge part and fitted the door but the door had about a 2mm gap at the top and lock side. I have added some styrene and sanded it down. Much better now.

Hermon
"Those who would give up Essential Liberty
to purchase a little Temporary Safety,
deserve neither Liberty nor Safety."
Benjamin Franklin
New York, United States
Joined: December 07, 2004
KitMaker: 1,888 posts
Auto Modeler: 806 posts
Posted: Saturday, January 10, 2009 - 03:25 PM UTC
Hermon if you build it as a police car and not an under cover car what will you use for the light bar.
North Carolina, United States
Joined: November 28, 2005
KitMaker: 2,216 posts
Auto Modeler: 522 posts
Posted: Saturday, January 10, 2009 - 03:57 PM UTC
Robert, I was gonna use the toothbrush light like Bob is doing on his big truck. Can't find anything that would work ie. a blue or clear toothbrush. Everything I've found at CVS or the dollar store is red, green or purple. Looking around the house I noticed that the wife had a box of plastic forks & spoons stashed away. The handles are clear and skinny and almost the perfect scale. Just gotta cut, sand and spray it with some clear blue.
I'm in the process of messin' with it now. If it works I'll post a pic of it. If it looks like crap I'll use it to stir paint.
Hermon
"Those who would give up Essential Liberty
to purchase a little Temporary Safety,
deserve neither Liberty nor Safety."
Benjamin Franklin
New York, United States
Joined: December 07, 2004
KitMaker: 1,888 posts
Auto Modeler: 806 posts
Posted: Sunday, January 11, 2009 - 01:50 AM UTC
I was going to suggest spraying clear plastic clear red or blue but it sounds like you have everything under control. Looks like the decals may be the toughest part of the build.
Myanmar
Joined: March 05, 2004
KitMaker: 4,011 posts
Auto Modeler: 851 posts
Posted: Sunday, January 11, 2009 - 05:00 AM UTC
Maybe a F/T or Buy request post into the (Buy, Sell or Trade) forum for the light bar and search lights from these kits if anyone built a civilian stock version and doesn't need the cop options.
http://www.hobbylinc.com/htm/rmx/rmx851928.htmhttp://www.revell.com/catalog/products/85-1928.htmlI saw the Revell in the lower link at Michaels and another LHS.
Of course it will not be the same as making your own and the cool dude status that goes with it...
i watched a scale plastic figure crawl along the edge . . . of an exacto blade . . . that's my dream , it's my nightmare . . . . . . . crawling , slithering . . . . . along the edge . . . . . . of an exacto . . . . . blade . . . . and surviving
North Carolina, United States
Joined: November 28, 2005
KitMaker: 2,216 posts
Auto Modeler: 522 posts
Posted: Sunday, January 11, 2009 - 07:31 AM UTC
Yeah your way would probably have been better but then I'm used to being a cool dude.
Here are some update pic's. First one is the front seat/rear seat divider I scratch built. It turned out ok actually. I didn't sand the tube frame extra fine hoping it would look more like padding.

Next pic is the rest of my scratch building. I made a push bar for the front of the car using pieces from a gift card (thanks Murphy) and round evergreen sprue. I heated and bent it to conform to the front of the car.
The light bar I made from a clear plastic spoon handle. The blue and red light locations are wrong and I got some fingerprints in it. It looks OK but I think now that I know what I'm doing I'm gonna make a new, better one.
The pieces at the bottom of the pic, still attached to sprue are left over stuff from some airplane kits I'm gonna piece together to make some fog lights to put on the push bar.

I gotta say thanks to whoever thought up this emergency vehicle build. This isn't exactly the kind of thing that usually gets me excited but if it hadn't been for this build this kit would probably set on the shelf for years without being touched. It's also given me a reason to dive into scratch building stuff and I'm having a freakin' blast.
Stay tuned, and thanks for lookin'
Hermon
"Those who would give up Essential Liberty
to purchase a little Temporary Safety,
deserve neither Liberty nor Safety."
Benjamin Franklin
North Carolina, United States
Joined: November 28, 2005
KitMaker: 2,216 posts
Auto Modeler: 522 posts
Posted: Sunday, January 11, 2009 - 02:45 PM UTC
Well I've gone about as far as I can go now. Body is prepped and all the pieces done. Can't paint her till I figure out what to do about decals. I'll put her on the shelf till I can get it sorted out and get ready for the rat rod build.
Hermon
"Those who would give up Essential Liberty
to purchase a little Temporary Safety,
deserve neither Liberty nor Safety."
Benjamin Franklin
New York, United States
Joined: December 07, 2004
KitMaker: 1,888 posts
Auto Modeler: 806 posts
Posted: Sunday, January 11, 2009 - 03:36 PM UTC
Hermon have you tried this web site they have lots of decals for police cars,
http://www.chimneyvilledecals.com/124125police.html, they also have light bars.
Washington, United States
Joined: September 20, 2007
KitMaker: 861 posts
Auto Modeler: 339 posts
Posted: Sunday, January 11, 2009 - 05:54 PM UTC
Also be sure to check
http://www.policecarmodels.com for decals and other fun things. But be warned - they have a lot of stuff you'll be tempted to buy!
-YL
BTW, the build is looking good. The spoon-into-lightbar is certainly a novel idea.
North Carolina, United States
Joined: November 28, 2005
KitMaker: 2,216 posts
Auto Modeler: 522 posts
Posted: Monday, January 12, 2009 - 10:45 AM UTC
Hey thanks for the links guys. I found decals on both sites that will work.
Quoted Text
BTW, the build is looking good. The spoon-into-lightbar is certainly a novel idea.
Thanks Yoni. The plastic spoon handle actually works great. My first attempt, the one pictured ain't so hot because I rushed through it and didn't print out a reference pic to go by for the markings. I'll do another better one.
Hermon
"Those who would give up Essential Liberty
to purchase a little Temporary Safety,
deserve neither Liberty nor Safety."
Benjamin Franklin
Florida, United States
Joined: April 16, 2007
KitMaker: 106 posts
Auto Modeler: 2 posts
Posted: Wednesday, January 21, 2009 - 03:36 PM UTC
Hi Hermon,
Great build so far. In Davie, FL the cops are using the Charger in some dark gray color with interior emergency lights only. Nothing big, but the really cool thing is that they have the identification markings GHOSTED into the paint. You cant tell them at first, but once they get near you, you can see their markings. Those cars look great.
Just a suggestion.
Mike
North Carolina, United States
Joined: November 28, 2005
KitMaker: 2,216 posts
Auto Modeler: 522 posts
Posted: Thursday, January 22, 2009 - 01:19 PM UTC
Michael, anything with ghost markings is cool. Don't know how you'd pull that off in small scale but it would be cool. I've sent off for some Colorado HP markings for my Charger. Silver overall with the blue/black markings. Only problem is it'll take 4 to 6 weeks to get them.
Hermon
"Those who would give up Essential Liberty
to purchase a little Temporary Safety,
deserve neither Liberty nor Safety."
Benjamin Franklin
North Carolina, United States
Joined: November 28, 2005
KitMaker: 2,216 posts
Auto Modeler: 522 posts
Posted: Monday, February 02, 2009 - 11:04 AM UTC
Well, my decals came in today. I ordered Colorado HP decals but they sent me a set for Philidelphia city police.
No problem. But wether it's totally accurate or not I don't care. My cop car will still be silver even if it will be wearing decals made for a white car.
Hermon
"Those who would give up Essential Liberty
to purchase a little Temporary Safety,
deserve neither Liberty nor Safety."
Benjamin Franklin
North Carolina, United States
Joined: November 28, 2005
KitMaker: 2,216 posts
Auto Modeler: 522 posts
Posted: Wednesday, February 11, 2009 - 10:56 AM UTC
Sorry guys, some idiot (ME) screwed up my photobucket account. Lemmie start this again.
This is the shell. Had to fill in the sunroof and glue down the hood/trunk and doors. You can see the crappy wheels I have to work with. I stripped off the chrome and will paint them black. The white thing is the beginings of a divider I'm scratch building.
Other scratch built goodies. The light bar is made from a plastic spoon handle. Front push bar is evergreen sprue and an old gift card. The other pieces I will make into fog lights.

Here is the divider finished. Glass part is a CD case cut to size and drilled with holes.
The car is actually painted at this point but there are still some tiny scratches in the top where the sunroof was filled in so I'll resand it and shoot it again.
Hermon
"Those who would give up Essential Liberty
to purchase a little Temporary Safety,
deserve neither Liberty nor Safety."
Benjamin Franklin