

Go to automodeler.com for the current dynamic site!


Cars
Discuss all types of automotive modeling here.
Discuss all types of automotive modeling here.
Hosted by Jim Starkweather
Rat Rod 1941 Chevy Pickup

WindSword70

Joined: December 13, 2005
KitMaker: 153 posts
Auto Modeler: 47 posts

Posted: Thursday, January 22, 2009 - 07:50 AM UTC
Your brain shifter cracks me up--really works for me.

rv1963
Joined: December 07, 2004
KitMaker: 1,888 posts
Auto Modeler: 806 posts

Posted: Thursday, January 22, 2009 - 08:38 AM UTC
Thanks Gary at first i didn't think the brain shifter would work but so far all responses have been positive, i just love building rat rods. 

Yoni_Lev
Joined: September 20, 2007
KitMaker: 861 posts
Auto Modeler: 339 posts

Posted: Thursday, January 22, 2009 - 12:34 PM UTC
OK, I have to ask...where did you GET the brain?
-YL

VonCuda
Joined: November 28, 2005
KitMaker: 2,216 posts
Auto Modeler: 522 posts

Posted: Thursday, January 22, 2009 - 01:31 PM UTC
Been giving this whole "brain" thing some thought Robert and I think you should scratch up a radio.............and put some eyeball knobs on it. 
Sorry, I had to do that. But seriously, the seat. Did you wrap it with paper and then put the rips in it or how exactly did you do it? It looks great and the cow skin look is just too cool.
Hermon
Sorry, I had to do that. But seriously, the seat. Did you wrap it with paper and then put the rips in it or how exactly did you do it? It looks great and the cow skin look is just too cool.
Hermon

rv1963
Joined: December 07, 2004
KitMaker: 1,888 posts
Auto Modeler: 806 posts
Posted: Thursday, January 22, 2009 - 01:42 PM UTC
Oh yes the brain i made that from scratch using epoxy sculpt, pretty easy to do just takes a little time to sculpt something that small. The seat took a bit longer, first mount a round steel cutting bit in my Dremel motor tool and than i grind down the plastic from the back till it's paper thin, next from the front i use my xacto knife to punch through the thinned plastic making the rips, last i tear the cotton off a few q-tips and glue it in from the back to simulate the stuffing than i paint and weather.
rv1963
Joined: December 07, 2004
KitMaker: 1,888 posts
Auto Modeler: 806 posts
Posted: Friday, January 23, 2009 - 04:44 AM UTC
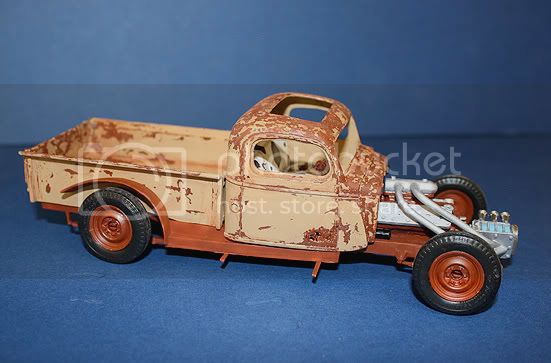
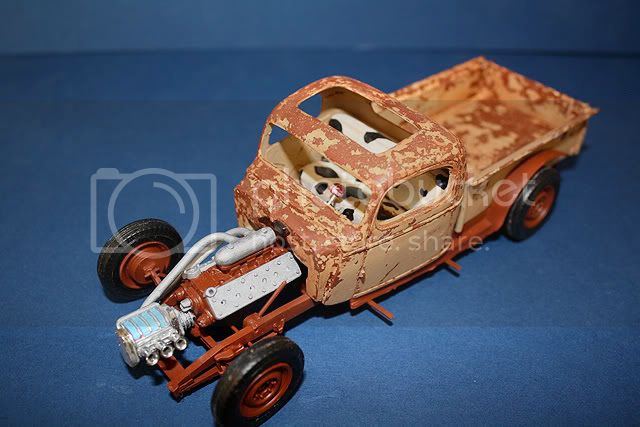

Well guys i finally got some paint on the cab and bed, this is only the first stage of weathering on these body parts, i also put a quick coat of paint on the rims and engine because i got tired of looking at the white styrene plastic.
WindSword70
Joined: December 13, 2005
KitMaker: 153 posts
Auto Modeler: 47 posts
Posted: Friday, January 23, 2009 - 08:37 AM UTC
Nice paint work so far!

KoSprueOne

Joined: March 05, 2004
KitMaker: 4,011 posts
Auto Modeler: 851 posts

Posted: Friday, January 23, 2009 - 01:19 PM UTC
Wow, great looking beat up paint job on it. very convincing.

rv1963
Joined: December 07, 2004
KitMaker: 1,888 posts
Auto Modeler: 806 posts
Posted: Friday, January 23, 2009 - 01:45 PM UTC
Thanks guys i am now working on the hood and front end.
VonCuda
Joined: November 28, 2005
KitMaker: 2,216 posts
Auto Modeler: 522 posts
Posted: Friday, January 23, 2009 - 02:31 PM UTC
I love the engine and interior, but the paint and especially the rust holes are awsome. I may go back and try and do the rust hole thing on my rat rod. Yours looks great.
Any reason in particular you went with the chasis color on the engine block?
Hermon
Any reason in particular you went with the chasis color on the engine block?
Hermon
rv1963
Joined: December 07, 2004
KitMaker: 1,888 posts
Auto Modeler: 806 posts
Posted: Friday, January 23, 2009 - 04:27 PM UTC
Thanks Hermon, i used the rust color on the engine as a base coat and because i am going to try alternate between the rust and Guards red with a kind of stippling affect to get a very rusty engine with only a hint of red, i am not shore if my answer makes sense but i hope so. I have already painted the hood and front piece and i am working on a few small details hope to post soon.
Yoni_Lev
Joined: September 20, 2007
KitMaker: 861 posts
Auto Modeler: 339 posts
Posted: Friday, January 23, 2009 - 06:48 PM UTC
That looks great, Robert. Good call on both the body color and the addition of the sunroof. Leaving the running board supports intact is another nice detail.
I love the skinny, cut-down rear fenders, too!
-YL
rv1963
Joined: December 07, 2004
KitMaker: 1,888 posts
Auto Modeler: 806 posts
Posted: Saturday, January 24, 2009 - 12:52 AM UTC
Thanks Yoni, i left the running board supports there for 2 reasons on for looks the other to support the exhaust and mufflers.
VonCuda
Joined: November 28, 2005
KitMaker: 2,216 posts
Auto Modeler: 522 posts
Posted: Saturday, January 24, 2009 - 06:37 AM UTC
Quoted Text
Thanks Hermon, i used the rust color on the engine as a base coat and because i am going to try alternate between the rust and Guards red with a kind of stippling affect to get a very rusty engine with only a hint of red, i am not shore if my answer makes sense but i hope so.
Makes perfect sense Robert. I'd never have thought of that. Again, the things I'm learning here are making a BIG difference in how I build my own kits now.
Two questions: Did you use the same method on the rust holes as you did on the seats? As in using the dremel tool to remove material. Second question, have you considered makeing some type of roll up or pull back canvase looking tarp for the sunroof opening? I think that would be cool and go right along with your trucks theme. Just a thought.

Hermon

old-dragon
Joined: August 30, 2005
KitMaker: 3,289 posts
Auto Modeler: 1,620 posts

Posted: Saturday, January 24, 2009 - 09:40 AM UTC
I used aluminum foil for my top insert...easy to peel up the edges, rip or tear and it's easily painted.
rv1963
Joined: December 07, 2004
KitMaker: 1,888 posts
Auto Modeler: 806 posts
Posted: Saturday, January 24, 2009 - 10:22 AM UTC
Thanks Yoni thanks Bob, yes i used the same method on the rust holes as on the seats, i do think the sun roof area looks a little plain and was considering a small wind deflector but i also like your idea of a rolled up canvas maybe the canvas can be rolled around a thin piece of wire and glued to the roof as a support and than painted kaki, i will be working on this idea you gave me wright after i finish wiring the engine.

sroth88
Joined: August 13, 2007
KitMaker: 109 posts
Auto Modeler: 39 posts

Posted: Sunday, January 25, 2009 - 10:35 AM UTC
I am impressed the truck is really coming alone. The paint and engine look great love the blower.
Sheldon
Sheldon
rv1963
Joined: December 07, 2004
KitMaker: 1,888 posts
Auto Modeler: 806 posts
Posted: Sunday, January 25, 2009 - 12:05 PM UTC
Thanks Sheldon, i am almost finished with the details on the engine so i will post some new pics Monday.

Hwa-Rang

Joined: June 29, 2004
KitMaker: 6,760 posts
Auto Modeler: 2,182 posts

Posted: Sunday, January 25, 2009 - 11:02 PM UTC
The weathering looks great Robert. Man that engine is cool.
rv1963
Joined: December 07, 2004
KitMaker: 1,888 posts
Auto Modeler: 806 posts
Posted: Monday, January 26, 2009 - 09:21 AM UTC

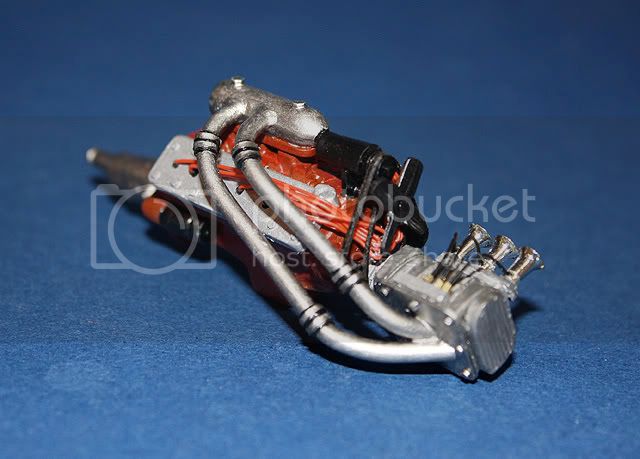
Thanks Jesper here are a couple of pics with most of the engine done before weathering, it's kinda a shame to dirty it up it's so pretty now but my Rat Rod must have a dirty engine.
VonCuda
Joined: November 28, 2005
KitMaker: 2,216 posts
Auto Modeler: 522 posts
Posted: Monday, January 26, 2009 - 12:12 PM UTC
Nice Robert! Very, very nice.
Only thing I'd personally change is I'd take off the fan and use and electric cooling fan since the one bolted to the water pump is gonna be 6 feet from the radiator.
Hermon
Only thing I'd personally change is I'd take off the fan and use and electric cooling fan since the one bolted to the water pump is gonna be 6 feet from the radiator.
Hermon
rv1963
Joined: December 07, 2004
KitMaker: 1,888 posts
Auto Modeler: 806 posts
Posted: Monday, January 26, 2009 - 02:08 PM UTC
Thanks Hermon i hear you about the distance but it looks so good sitting there, i don't have any electric fans in my parts box but i may build one from scratch and add it.
old-dragon
Joined: August 30, 2005
KitMaker: 3,289 posts
Auto Modeler: 1,620 posts
Posted: Monday, January 26, 2009 - 02:11 PM UTC
The fan is just to cool off the blower...you know how those things make heat!

Cuhail
Joined: February 10, 2004
KitMaker: 2,058 posts
Auto Modeler: 310 posts

Posted: Monday, January 26, 2009 - 06:47 PM UTC
Rob, that motor is awesome! It is kinda sad to dirty it up, but, it's a rat rod!
The rest is pleasantly ugly. I see a dio of her in the weeds next to a road with the driver like, fishing...or something. Nice work man!
Cuhail


rv1963
Joined: December 07, 2004
KitMaker: 1,888 posts
Auto Modeler: 806 posts
Posted: Tuesday, January 27, 2009 - 12:55 AM UTC
Thanks Bob thanks Murph, thanks to Bob for pointing out how the fan would cool off the hot blower, but i think i will still need some kind of fan for the radiator. I have already done most of the weathering to the engine and hope to install it today. Update to come soon.
but i think i will still need some kind of fan for the radiator. I have already done most of the weathering to the engine and hope to install it today. Update to come soon. |

WEB HOSTING BY


Copyright ©2021 Auto Modeler and Kitmaker Network, a subsidiary of Silver Star Enterprises
All Rights Reserved. Please read our Conditions of Use and Privacy Policy.
All Rights Reserved. Please read our Conditions of Use and Privacy Policy.