new chopper on the block 1/12 scale
Alberta, Canada
Joined: January 19, 2008
KitMaker: 6,743 posts
Auto Modeler: 64 posts
Posted: Monday, March 23, 2009 - 01:50 PM UTC
Having all of my kits pack up and shipped . I was feeling out of the loop with nithing to build . Until I came across this kit a yard sale , so I said what the hell . Since my paints and tools are still here this will give me something to do for the time being .
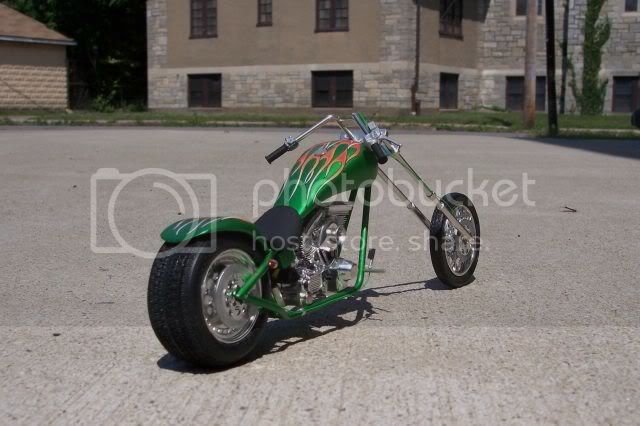
Starting with Rvells kit custom chopper aces wild . the front forks were lenghted and the first mock up done . Still trying to figuar what to do about the rear fender It needs to be made small then what it is . any suggestions would be great .
so far this is what I have done .


so far this is what I have done . any suggestions would be great . This is my first chopper that I have ever done which is way of the norm on I do .
New York, United States
Joined: January 29, 2004
KitMaker: 3,836 posts
Auto Modeler: 256 posts
Posted: Monday, March 23, 2009 - 04:50 PM UTC
Hello Terri,
Good start so far and a great choice of model. If I may suggest is changing out the rake and trail on the forks.
Look here....
Fork detail 

To have it look right the frame should be horizontal with the ground.

But if you're after that old school look then just leave it as.
As to your rear fender, not sure which way you need it to be smaller. My guess is your using the kits tire so your not making it thinner...so I'd say pin it to the frame and decide what looks great. A great look would be is to cut it around center of the upper center of the tire or just (just) past. Have a good goggle image search to find some ideas.
If youre up to it is to widen the tank, assemble, find center, cut and then fill in with sheet plastic to as wide as needed.
Here is my webshot folder with my chopper, my not help but may give you an idea.
Chopper Do a search here as there were a few other members who built and customized their own choppers.
Joe
It feels like bible camp
Only Im not crying pretending Im somewhere else.
Happy Modeling
Joe
Alberta, Canada
Joined: January 19, 2008
KitMaker: 6,743 posts
Auto Modeler: 64 posts
Posted: Tuesday, March 24, 2009 - 01:25 AM UTC
Hey , thank -you Joe for the feed back . Very helpful with the links . I know about the rake from custom building mountain bikes , for us in this field the higher the crank is off the ground the more ground clearence we have the better for getting over crap in the way on the trails . I guess this is different when building a chopper . The front fork has a removable pin so when I'm finished the project it can easily be box up for shipping . So I will go back and change that on it so the frame is level with the ground .
the rear fender needs to be thinned down lots and needs some kind of design in it . I like the way you did yours so I might give that a try . The brake caliplers will need improvements as well since only one side is provided in the kit boxing and wouldn't have any real function in real life . , rotors are nice , but the chrome plating needs to be cleaned out of the holes . come to think it of it lots of work needs to be done on this kit . ( not a big fan on Revell kits )
As for the colour of the bike I'm going with a polished surface on alum from allcad II seal that with future and the stripes will be masked off sprayed with Tamiya clear red , remove the mask and the spray clear blue . Parts that are chromed will get the easy off treatment today .
I did have a look on the site here for other builds , but yours seems to the only one with pics left . once again Joe thank you for your feed back and encouragment on this project .

Alberta, Canada
Joined: January 19, 2008
KitMaker: 6,743 posts
Auto Modeler: 64 posts
Posted: Tuesday, March 24, 2009 - 04:59 AM UTC
Chrome parts are soaking in their bath of easy-off and back to it with the saw and knife .I'll have some pics up later on today of the progress .
New York, United States
Joined: January 29, 2004
KitMaker: 3,836 posts
Auto Modeler: 256 posts
Posted: Tuesday, March 24, 2009 - 05:45 AM UTC
Cool...looking forward to seeing it.
Joe
It feels like bible camp
Only Im not crying pretending Im somewhere else.
Happy Modeling
Joe
Alberta, Canada
Joined: January 19, 2008
KitMaker: 6,743 posts
Auto Modeler: 64 posts
Posted: Tuesday, March 24, 2009 - 11:53 AM UTC
Well Joe with you only being the one who seems interested in this project . I hope you find it to be enjoyable .
I redid the rake on the front forks and thats about as far as I got . My first attempt for the forks was week so I filled the plastic tubing with brass rod and super glue for a stronger join . I know they seem a little on the long side , but I really like the looks of it . Still have some modification's to do with the frame .
Let me know what you think .
Alberta, Canada
Joined: January 19, 2008
KitMaker: 6,743 posts
Auto Modeler: 64 posts
Posted: Tuesday, March 24, 2009 - 11:56 AM UTC
Opps forgot the pics !!!!


New York, United States
Joined: January 29, 2004
KitMaker: 3,836 posts
Auto Modeler: 256 posts
Posted: Tuesday, March 24, 2009 - 01:45 PM UTC
Now she looking good,I also like the long forks. A little dangerous for the road
but hey its a show bike right! I see the rest of the parts were de-chromed, alclad paint right. Have you figured out the fender problem yet and what about the seat, will you be doing a custom seat. I like using Poly-Clay for alot of stuff, armor bags to just about anything. My seat was made from the clay. Mold it, cook it and finish up with some sanding. For that leather satin finish, I mixed 50-50 Tamiyas NATO Black to X-1Black.
Seeing your build has me thinking of doing another myself, something radical

Waiting for the next progress post,
Joe
It feels like bible camp
Only Im not crying pretending Im somewhere else.
Happy Modeling
Joe
New York, United States
Joined: December 07, 2004
KitMaker: 1,888 posts
Auto Modeler: 806 posts
Posted: Tuesday, March 24, 2009 - 11:55 PM UTC
Nice work so far Terri, i like the length on the front forks the stance looks better now than stock, i agree the fear fender needs to be thinned also, i to have one of these kits i think it's the Bone Daddy but i think they are all pretty much the same. I will be watching for your next update.
Alberta, Canada
Joined: January 19, 2008
KitMaker: 6,743 posts
Auto Modeler: 64 posts
Posted: Wednesday, March 25, 2009 - 01:22 AM UTC
Thanks Joe and Robert

I do have another one of the aces wild along with the Gambler , Wicked , High Roller and the one difference between the kits is the frame with a few interchangeable parts but nothing to get excited about . nice rims on some of them . A wider rear tire would be nice but I haven't seen to many accessories for choppers in 1/12 scale . I spent quite a bit of time looking on the net at rear fenders for some ideas on the ratio of the Rear to front fender last night . And I came up with this and did some cutting on the seat . Joe I don't have the putty you are talking about so I have to use the kit part . still have some work and plan out how it will mounted to the frame . So far the over all view of the bike has a pleasing appearance to it .

Still have some thinning on the fender and blending in some areas but that is the basic shape I will go with . It has a good relation to the front fender . Now what to do about the mounting brackets !
more to come soon...................................
Alberta, Canada
Joined: January 19, 2008
KitMaker: 6,743 posts
Auto Modeler: 64 posts
Posted: Wednesday, March 25, 2009 - 12:00 PM UTC
Some more has been done . Before the fender gets mounted in place with the brackets the seat was my main focus . Now this has to have a smooth ride and need to have some kind of a spring in place and with the seat rework having most of the plastic removed it left a huge void in that area .Raiding the parts box and PE parts brackets where made for under the seat and for the new cross member on the frame . The spring is still being constructed . he seat is only tacked place for now .
Alberta, Canada
Joined: January 19, 2008
KitMaker: 6,743 posts
Auto Modeler: 64 posts
Posted: Wednesday, March 25, 2009 - 12:07 PM UTC
Did it again forgot to include the pic .......................

Illinois, United States
Joined: August 30, 2005
KitMaker: 3,289 posts
Auto Modeler: 1,620 posts
Posted: Wednesday, March 25, 2009 - 01:27 PM UTC
Hey, we're building bikes again...cool!
Nice job so far terri. That front fedner can be flipped either way and does change the look of the bike...might I suggest that next time you use aluminum tubing for the forks...it's alot stronger and polishes up really nice.
You pick a color{s} out yet for this cycle?
...I do wish either revell or somebody would come out with some other harley motors for these bikes...knuckleheads...shovelheads...old WR's even....
-I say I have two kids- one son & one daughter...my wife says she has three- one son ,one daughter and one husband.
...and don't tell yourself you can't do it....it'll just take longer then
Alberta, Canada
Joined: January 19, 2008
KitMaker: 6,743 posts
Auto Modeler: 64 posts
Posted: Wednesday, March 25, 2009 - 02:46 PM UTC
Quoted Text
Hey, we're building bikes again...cool!
Nice job so far terri. That front fedner can be flipped either way and does change the look of the bike...might I suggest that next time you use aluminum tubing for the forks...it's alot stronger and polishes up really nice.
You pick a color{s} out yet for this cycle?
...I do wish either revell or somebody would come out with some other harley motors for these bikes...knuckleheads...shovelheads...old WR's even....
Thanks Dave , I really have no idea on what the hell I'm doing here but so far I'm enjoying the build . I'm used to building WW1 aircraft , yes out side of the norm and I have a thing for detail !
I did filp the fender but didn't like the look of it . As for the tubing if I had some on hand I would have used that ( I ran out ) and I haven't made it to the hobby shop here yet . In a new city and still learning my way around .
I have lots of bolts and nuts to add to her but having a few prombles with the oil lines and the linkage for the chulck . I want to add the plumbing with likage , all that extra stuff but have no idea where some of this goes !! Hey it doesn't have have wings !!!!!
Looking on the net is a failing situation . Yes I know what my colours are going to . After the tins have been polished then sprayed with alclad and sealed with future . pin striping will be added and then sprayed with Tamiya clear red . when dry off with the masking and then a few coats of tamiya clear blue . Just not sure on the frame yet .
Alberta, Canada
Joined: January 19, 2008
KitMaker: 6,743 posts
Auto Modeler: 64 posts
Posted: Thursday, March 26, 2009 - 04:50 PM UTC
Getting out the airbrush after a long winters nap , digging thriugh the paint box .............no clear red at all ? must be the paint gremlins hiding out just waiting for me to reach for that small jar . Change of plans on that colour now . I was going to go with a hot pink after coming with the conclusion it just wouldn't look right . So the colour will be guards red which will suit this project just fine .
frame and tins are ready for paint , once this is drying time to detail the engine ! I should have pics up tomorrow night or the day after

Alberta, Canada
Joined: January 19, 2008
KitMaker: 6,743 posts
Auto Modeler: 64 posts
Posted: Saturday, March 28, 2009 - 04:34 AM UTC
Small up date .......The Red has been spray yesterday afternoon and is on the tacky side , weather isn't the greatest here at the moment taking a little longer to dry before I can handle it . Turned out really well to my own surprise . I should be able to spray the alclad today, I hope . I should have pics up later today .
but don't hold me to that !
Alberta, Canada
Joined: January 19, 2008
KitMaker: 6,743 posts
Auto Modeler: 64 posts
Posted: Saturday, March 28, 2009 - 10:53 AM UTC
Alberta, Canada
Joined: January 19, 2008
KitMaker: 6,743 posts
Auto Modeler: 64 posts
Posted: Saturday, March 28, 2009 - 11:07 AM UTC
The head tube , I boxed the area in . was to lazy to clean up the mess I made with the super glue . Then over that reinfoucements plates where glued on . I tried to do weld lines but didn't turn out all that well . Over all I'm happy with the appreance of it . Same with the paint job as well .
New York, United States
Joined: January 29, 2004
KitMaker: 3,836 posts
Auto Modeler: 256 posts
Posted: Saturday, March 28, 2009 - 05:14 PM UTC
Looking great Terri, paint looks smooth. Will you be clear coating to a polished shine! Oh what PE was used for the seat bracket, nice idea.
Quoted Text
Joe I don't have the putty you are talking about
What I was talking about was clay...look at
this Now for a fatter rear tire, see if you can find someone with an old spare 1/12 scale car tire from one of the older Revell Vette's or even a 1/16 scale cars from Revell. They have been used in the 1/1 bikes and I built one a few years back (before the Revell chopper coming out) using one...look pretty good.
I built most of the kit while using the engine from a toy chopper...
some photos Quoted Text
I want to add the plumbing with likage , all that extra stuff but have no idea where some of this goes
What are you after, I'll see what I could do to help.
She's coming along great, looking to your next posting,
Joe
It feels like bible camp
Only Im not crying pretending Im somewhere else.
Happy Modeling
Joe
Alberta, Canada
Joined: January 19, 2008
KitMaker: 6,743 posts
Auto Modeler: 64 posts
Posted: Sunday, March 29, 2009 - 01:00 AM UTC
Thanks Joe fot the kinds words , yes I will clear coat it when the paint has dried for a few more days . Needs to harden up more . I really don't like sparying enamels because of that and takes forever to clean out the airbrush afterwards . It was the only red I had on hand . (next one will be a hot pink !) Cool idea on using the kit tires from 1/12 scale car . I will have to keep that in mind .
The PE parts that I used for the seat brackets I robbed from a hood hinge kit for stock cars and grant line nut's and bolt's and plastic rod drilled out . I use a lot of car PE parts for detailing my WW1 aircraft and other items from the train guys . Which reminds me , need to make a tirp to the trian shop to pick up more nuts and bolts , run out of the the ones I need .
I have started anding ones the engine nd pick up some mags on choppers and have some great pics for the plumbing . Thank you for the offer on the help Joe ! I have heard of the clay before , just never used it . In the future I will look into it . Thanks for the link on that , must helpful ! Nice chopper to turned out really well Don't have the bare metal foil , but I will spray alclad polished aluminum and some others from the testors line . I'll have some more pics up in a few days of the progress

Colorado, United States
Joined: December 25, 2004
KitMaker: 3,770 posts
Auto Modeler: 359 posts
Posted: Sunday, March 29, 2009 - 10:17 AM UTC
Terri,
Nah grrrl, there are a bunch of us watching this build...just lurkin' if you will.
Your build and Joe's has got me really thinking about a chopper....I've got a couple of eBay searches set for just this possibility. I really don't know what I'm looking for, just that I'd really like to do one. I'm tossed between a 1/12 bike and a 1/24-25 trike....dunno.
Lookin' very good right now....red's hot!
Mike
Illinois, United States
Joined: August 30, 2005
KitMaker: 3,289 posts
Auto Modeler: 1,620 posts
Posted: Sunday, March 29, 2009 - 04:07 PM UTC
I absolutely love that tank!!!!!! That's what I wanted to do for mine, but settled for the straight type...I like the curled downward version of yours much better!
I've never been a fan of the "skinny tank" choppers...if she's got a fat rear tire, she needs a fat tank! {imho}
-I say I have two kids- one son & one daughter...my wife says she has three- one son ,one daughter and one husband.
...and don't tell yourself you can't do it....it'll just take longer then
Alberta, Canada
Joined: January 19, 2008
KitMaker: 6,743 posts
Auto Modeler: 64 posts
Posted: Monday, March 30, 2009 - 04:19 AM UTC
Quoted Text
Terri,
Nah grrrl, there are a bunch of us watching this build...just lurkin' if you will.
Your build and Joe's has got me really thinking about a chopper....I've got a couple of eBay searches set for just this possibility. I really don't know what I'm looking for, just that I'd really like to do one. I'm tossed between a 1/12 bike and a 1/24-25 trike....dunno.
Lookin' very good right now....red's hot!
Mike
Thanks Mike ! Glad you are enjoying this build so far . Would be great to see you build a chopper as well , the more the better ! i don't ever recall there being model kits of bikes in 1/24 scale ? The trike would be great to see .
I'm not sure what is really out for chopper kits , only seem to be able to find the revell kits .
Alberta, Canada
Joined: January 19, 2008
KitMaker: 6,743 posts
Auto Modeler: 64 posts
Posted: Monday, March 30, 2009 - 04:21 AM UTC
Quoted Text
I absolutely love that tank!!!!!! That's what I wanted to do for mine, but settled for the straight type...I like the curled downward version of yours much better!
I've never been a fan of the "skinny tank" choppers...if she's got a fat rear tire, she needs a fat tank! {imho}
It is a fantastic looking tank ! How did you make it there Joe ?
Alberta, Canada
Joined: January 19, 2008
KitMaker: 6,743 posts
Auto Modeler: 64 posts
Posted: Monday, March 30, 2009 - 07:43 AM UTC
another small up date , the front forks and disc brakes along with the exhaust have been spray testors chrome . I find the kit chrome parts to look to much toy like .
The engine parts have been sprayed alclad aluminum and waiting for things to dry up .
Pics will be up later tonight .


