_GOTOBOTTOM
Trucks
Scale truck modeling topics.
"OTR" caspers 'Blood & Custard'
casper
_VISITCOMMUNITY
Nelson, New Zealand
Joined: August 01, 2005
KitMaker: 395 posts
Auto Modeler: 107 posts
Posted: Sunday, May 02, 2010 - 11:14 PM UTC
all,
Well since I tend to build in a somewhat different manner to most people I thought I'd show some WIP pic's.
WARNING - those who are squeamish with knifes brutalizing perfectly good kit parts please look away now .
My aim for this build is :
a. spend zero money
b. use only bits'n'pieces I already have (excluding scrounging the cab)
c. use no resin or AM parts
Right the knife is poised to do damage so off we go:


More to follow.

Roger
casper
_VISITCOMMUNITY
Nelson, New Zealand
Joined: August 01, 2005
KitMaker: 395 posts
Auto Modeler: 107 posts
Posted: Sunday, May 02, 2010 - 11:21 PM UTC
Pt II,
Needed to make some wood patterns for the cab side/rear panels and a nose cone then its off to the kitchen and bake some plastic:


I must be getting better at this vac-forming lark since there were no burnt fingers or melted plastic .

Roger
casper
_VISITCOMMUNITY
Nelson, New Zealand
Joined: August 01, 2005
KitMaker: 395 posts
Auto Modeler: 107 posts
Posted: Sunday, May 02, 2010 - 11:30 PM UTC
,
Right, time for some serious butchering, but first a bit of panel filling (rear of cab).
Followed by removing all trim.


Next job is to rebuild the rain gutters and make a radiator cowl, suppose I should build some doors to (worst part of any cab build).
Thoughts/comments good and bad most welcome.

Roger.
casper
_VISITCOMMUNITY
Nelson, New Zealand
Joined: August 01, 2005
KitMaker: 395 posts
Auto Modeler: 107 posts
Posted: Monday, May 03, 2010 - 01:18 AM UTC
all,
Just borrowed another cab to show the 'before and after' modification.
I know a lot of you are probably thinking thats a lot of shagging around just to raise the cab but trust me there is method to my madness .


Roger.
casper
_VISITCOMMUNITY
Nelson, New Zealand
Joined: August 01, 2005
KitMaker: 395 posts
Auto Modeler: 107 posts
Posted: Monday, May 03, 2010 - 01:24 AM UTC

Just thought I'd better reveal what I'm trying to build ,
'Blood & Custard' is of course referring to British Railways colour scheme.
So here it is - more British than cricket and cucumber sandwiches:

Scammell Scarab 3-tonner.

Roger.
jimb
_VISITCOMMUNITY
New York, United States
Joined: August 25, 2006
KitMaker: 2,539 posts
Auto Modeler: 1,405 posts
Posted: Monday, May 03, 2010 - 02:07 AM UTC
Sure looks interesting! What's it used for? Looks like it's used for shuttling luggage/cargo around the rail yard.

Jim
VonCuda
_VISITCOMMUNITY
North Carolina, United States
Joined: November 28, 2005
KitMaker: 2,216 posts
Auto Modeler: 522 posts
Posted: Monday, May 03, 2010 - 10:54 AM UTC
I'm no where near your skill level, but this is really going to be a fun one to watch. Really nice subject.

Hermon
old-dragon
_VISITCOMMUNITY
Illinois, United States
Joined: August 30, 2005
KitMaker: 3,289 posts
Auto Modeler: 1,620 posts
Posted: Monday, May 03, 2010 - 03:29 PM UTC
Now "that" is different! Cool!
Build on bro!


...btw, you didn't say what your using for sheet stock thickness..inquirering minds wish to know since I'm going to try that vac-u-form stuff one of these years!
casper
_VISITCOMMUNITY
Nelson, New Zealand
Joined: August 01, 2005
KitMaker: 395 posts
Auto Modeler: 107 posts
Posted: Monday, May 03, 2010 - 11:35 PM UTC
,
Jim - the Scarabs are usually thought of as city/town delivery trucks - from the railhead to the business areas (mainly because the various Railways were the major purchaser's, but they were hooked up to various different trailers - short wheelbase tipper trailers, street sweepers, box trailers etc, also the tractor units alone had different uses - a couple were used as recovery vehicles for Dartmoor Tunnel there were also long wheelbase tractor units used as refuse trucks etc.
Hermon - for the compliment (hope I can live up to your expectations .
Bob - For that vac-forming job I used 1mm (.040") since it needed to be .75mm (.030") to blend with the kit thickness. As a sort of generalised rule the plastic will lose about .25mm (.010") when heated and vacuumed - of course that theory gets blown out of the water depending on the heating temp and vac pressure .
Must off now, got a chassis to mark up, cut out and glue together.

Roger.
casper
_VISITCOMMUNITY
Nelson, New Zealand
Joined: August 01, 2005
KitMaker: 395 posts
Auto Modeler: 107 posts
Posted: Wednesday, May 05, 2010 - 12:24 AM UTC
all,
Had hoped to have basic chassis rails done today but made a few booboo's so decided to mess around with the nose cone instead. Thankfully I vac-formed 4 cones because this is trimming attempt #3 . Sort of looks right (correct by all the measurements I have ).
Just waiting for the putty to dry on the dirty great ejector marks on the cab ceiling then I can slap the internal bracing in.


Roger.
animal
_VISITCOMMUNITY
Joined: December 15, 2002
KitMaker: 4,503 posts
Auto Modeler: 217 posts
Posted: Wednesday, May 05, 2010 - 10:22 AM UTC
This is going to be a very cool build. I have never seen this type of vehicle before. Very interesting for sure.
Modelbouwerke
_VISITCOMMUNITY
Antwerpen, Belgium
Joined: August 25, 2006
KitMaker: 794 posts
Auto Modeler: 179 posts
Posted: Wednesday, May 05, 2010 - 10:47 AM UTC
Like what I see so far.
Is going to be something special.

Erikssson.
old-dragon
_VISITCOMMUNITY
Illinois, United States
Joined: August 30, 2005
KitMaker: 3,289 posts
Auto Modeler: 1,620 posts
Posted: Wednesday, May 05, 2010 - 11:18 AM UTC
Looks kinda like a vespa on steroids-
Is it me or does that hood/nose/bonnet thingy look about .010 too high...or are you going to blend in with filler?....
PunyViking
_VISITCOMMUNITY
Akershus, Norway
Joined: November 02, 2008
KitMaker: 94 posts
Auto Modeler: 21 posts
Posted: Wednesday, May 05, 2010 - 12:58 PM UTC
Looking real good so far! The real bike/car/truck is not one of the prettiest looking cars/bikes/trucks I have ever seen, so therefore I like it!

When you are vac-forming like that, doesn't you use a lot of styrene sheets? That must be expensive or? I don't even think about vac-forming with the prices of styrenesheets I have access to.

Can't wait to see the finished model!
casper
_VISITCOMMUNITY
Nelson, New Zealand
Joined: August 01, 2005
KitMaker: 395 posts
Auto Modeler: 107 posts
Posted: Wednesday, May 05, 2010 - 09:26 PM UTC
all,
for the comments.
I've always looked for the more obscure vehicles to build, the more weird or quirky the more I want to build it .

Roger
casper
_VISITCOMMUNITY
Nelson, New Zealand
Joined: August 01, 2005
KitMaker: 395 posts
Auto Modeler: 107 posts
Posted: Wednesday, May 05, 2010 - 09:33 PM UTC

Quoted Text

Looks kinda like a vespa on steroids-
Is it me or does that hood/nose/bonnet thingy look about .010 too high...or are you going to blend in with filler?....


.
Your old eyes aren't failing ya - can't do the final trimming till the firewall (hmmm it's not actually a firewall since the engine is behind the cab ) lets call it the footwell is sorted out and I can't do that till the chassis and steering mechanism is done so the nose cone is just propped there for the pic .

Roger
casper
_VISITCOMMUNITY
Nelson, New Zealand
Joined: August 01, 2005
KitMaker: 395 posts
Auto Modeler: 107 posts
Posted: Wednesday, May 05, 2010 - 09:45 PM UTC

Quoted Text

Looking real good so far! The real bike/car/truck is not one of the prettiest looking cars/bikes/trucks I have ever seen, so therefore I like it!

When you are vac-forming like that, doesn't you use a lot of styrene sheets? That must be expensive or? I don't even think about vac-forming with the prices of styrenesheets I have access to.

Can't wait to see the finished model!


PunyViking,
Has the sort of looks only a mother could love .
I get sheet plastic in 1500x900mm (5x3') sheets (all the common thicknesses) for about the same price as a packet of Evergreeen or Plastruct sheet. Plus I return the waste trimmings for recycling and get paid for the returns so each piece vac-formed only costs 20-50 cents .

Roger
okdoky
_VISITCOMMUNITY
Scotland, United Kingdom
Joined: April 30, 2007
KitMaker: 1,597 posts
Auto Modeler: 63 posts
Posted: Thursday, May 06, 2010 - 08:19 AM UTC
Hi Casper ,,,,,, long time no speak!!!!!!

Great to see your work again. Is this using bits of the 1/24 Emhar Bedford? Looking fantastic already.

Will be watching this one.

All the best

Nige
old-dragon
_VISITCOMMUNITY
Illinois, United States
Joined: August 30, 2005
KitMaker: 3,289 posts
Auto Modeler: 1,620 posts
Posted: Thursday, May 06, 2010 - 12:10 PM UTC

Quoted Text

Looking real good so far! The real bike/car/truck is not one of the prettiest looking cars/bikes/trucks I have ever seen, so therefore I like it!

When you are vac-forming like that, doesn't you use a lot of styrene sheets? That must be expensive or? I don't even think about vac-forming with the prices of styrenesheets I have access to.

Can't wait to see the finished model!


Like casper said, those big sheets are the way to go...you nearly pay double single pack price for what's easily 6 times as much plastic sheet compared to the little singles packs. Check around your area for a retailer or supplier or try for one here in the states to send direct to you.
casper
_VISITCOMMUNITY
Nelson, New Zealand
Joined: August 01, 2005
KitMaker: 395 posts
Auto Modeler: 107 posts
Posted: Friday, May 07, 2010 - 02:42 PM UTC

Quoted Text

Hi Casper ,,,,,, long time no speak!!!!!!
Great to see your work again. Is this using bits of the 1/24 Emhar Bedford? Looking fantastic already.
Will be watching this one.
All the best
Nige


Nige,
Yep the cab is the 24th Emhar Bedford. A friend is currently building a Bedford MLA (double cab fire truck) so I got the spare cab in exchange for making his cab roof and engine side panels.
Just been side-tracked from the Scarab build while I make a start on an Austin/Morris/BMC/Leyland FG cab - will probably do it as an ACUTR build.
for the comments
Hope your projects are going well.

Roger.
old-dragon
_VISITCOMMUNITY
Illinois, United States
Joined: August 30, 2005
KitMaker: 3,289 posts
Auto Modeler: 1,620 posts
Posted: Friday, May 07, 2010 - 03:04 PM UTC

Quoted Text

A friend is currently building a Bedford MLA (double cab fire truck) Roger.


..you mean one of these?
bedford fire truck
casper
_VISITCOMMUNITY
Nelson, New Zealand
Joined: August 01, 2005
KitMaker: 395 posts
Auto Modeler: 107 posts
Posted: Friday, May 07, 2010 - 03:27 PM UTC
Sorry Bob - you are way off-course there, as thats a D-Series.
Heres an MLA:

and this is the Austin/Morris/BMC/Leyland FG cab I'm going to have a bash at making:

might be biting off more than I can chew on this one though .

Roger.
VonCuda
_VISITCOMMUNITY
North Carolina, United States
Joined: November 28, 2005
KitMaker: 2,216 posts
Auto Modeler: 522 posts
Posted: Friday, May 07, 2010 - 03:36 PM UTC

Quoted Text


might be biting off more than I can chew on this one though .

Roger.


Man, if you actually scratch build that thing you'll be my new hero. What a great looking rig! Beautiful lines and the curved glass in the front corners is beautiful.


Hermon
okdoky
_VISITCOMMUNITY
Scotland, United Kingdom
Joined: April 30, 2007
KitMaker: 1,597 posts
Auto Modeler: 63 posts
Posted: Friday, May 07, 2010 - 05:08 PM UTC

Quoted Text

this is the Austin/Morris/BMC/Leyland FG cab I'm going to have a bash at making:

might be biting off more than I can chew on this one though .

Roger.


Roger

Just a thought !

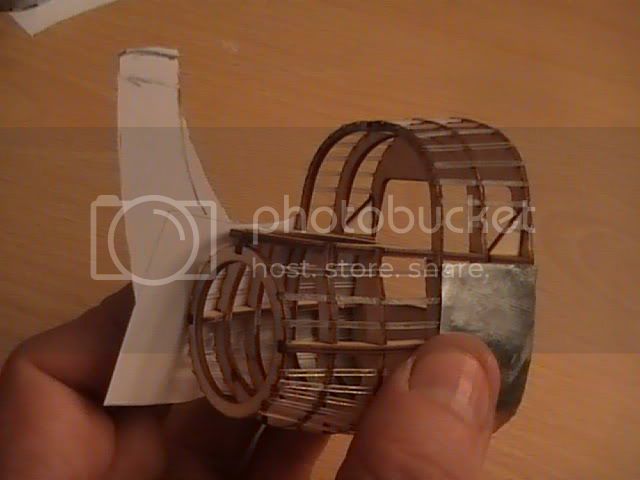
How about sketching out the profiles of the roof and each curved panel section individually for one side like a ship hull using thick plastic sheet in the same way they did the lancaster 1/32 model.

Reverse the profile for the opposite side. And then use a spine to get the profiles to line through the centre.


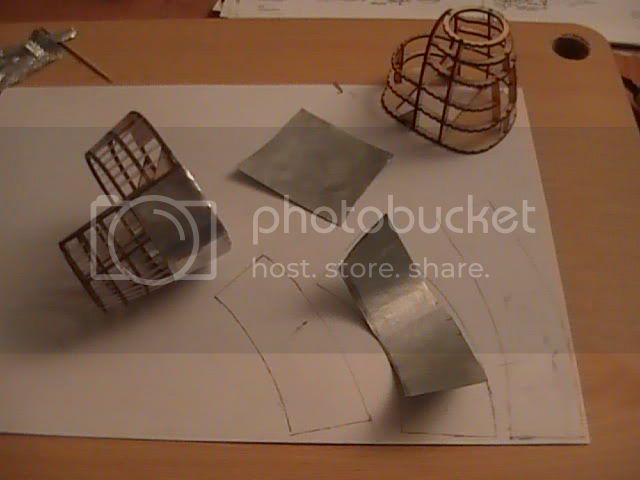
Then use paper to test fit sheets to wrap gradually around the panels the same way I skinned the lanc.


Leave excess and cut a panel of aluminium sheet.


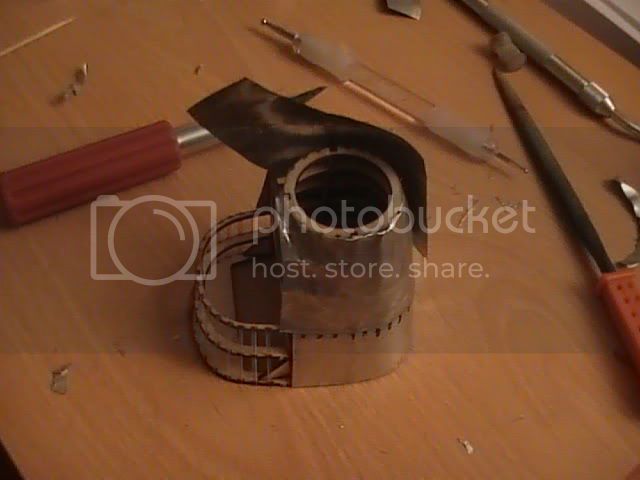
Glue the panels gradually onto the formers and form the tin foil to shape. Don't try to use too big a panel and build the shape up gradually.


For the smaller convex to concave panels use smaller panels of aluminium.


Use body filler to sand, blend and fill the panels

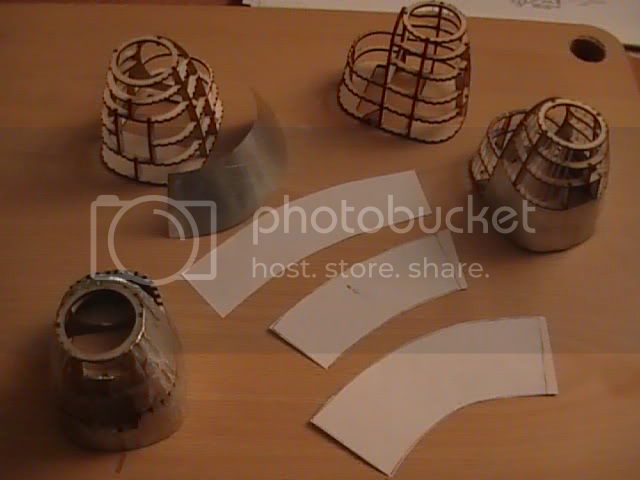
Once you have the shape, cut out the excess plastic of the formers inside.

The aluminium is real easy to cut and make openings and you can strengthen the frames inside before sanding the window opening to match the frame.

Hopefully it would only be the windows you would have to vac form to fit the openings.

Hope to see your progress.

Nige


old-dragon
_VISITCOMMUNITY
Illinois, United States
Joined: August 30, 2005
KitMaker: 3,289 posts
Auto Modeler: 1,620 posts
Posted: Saturday, May 08, 2010 - 02:56 AM UTC
Nige, a 1/32 lancaster?!...dang that would be huge{and cool}.

Roger, sorry, my mistake, but I like that one anyway. What's the realtime diameter of those drive wheels on yours....looks to be roughly 12".
 _GOTOTOP