

Go to automodeler.com for the current dynamic site!


Hosted by Jim Starkweather
1/25 Revell '57 Caddy Eldo Brougham -custom

old-dragon

Joined: August 30, 2005
KitMaker: 3,289 posts
Auto Modeler: 1,620 posts

Posted: Saturday, January 01, 2011 - 03:02 AM UTC
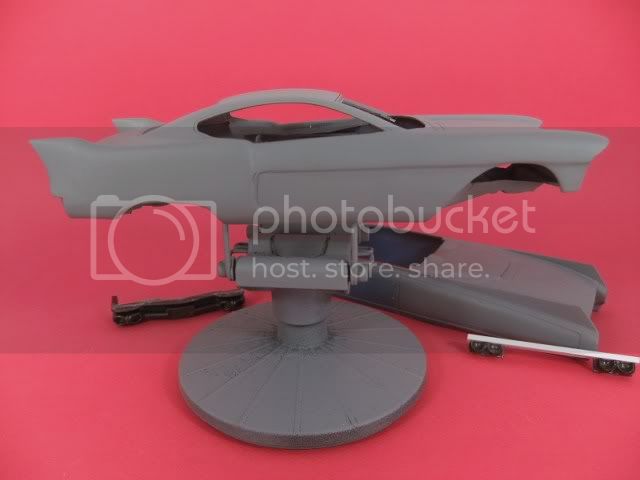
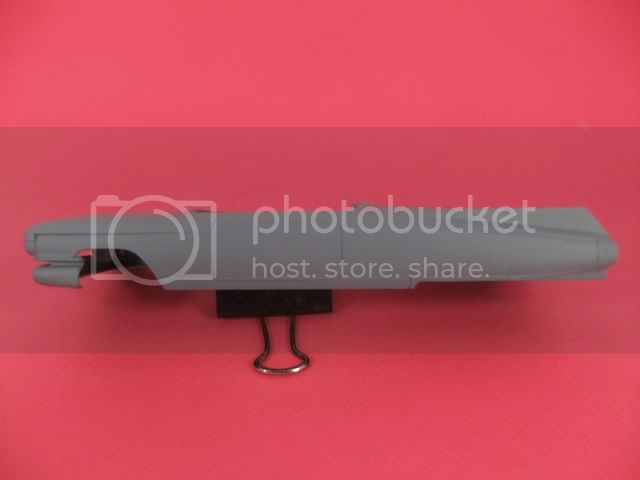
Speaking of panel lines...the keen observer will note that the back of this car is void of any panel lines at the moment....same with the side doors. That's because I'm still deciding what angles or places to place the new doors at- remember, this used to be a 4 door. The back end is tricky since I'm having a hard time trying to decide whether I want a "trunk" or a "hatchback" here....I'm going to have to decide here real soon I guess!
old-dragon
Joined: August 30, 2005
KitMaker: 3,289 posts
Auto Modeler: 1,620 posts
Posted: Sunday, January 09, 2011 - 03:22 PM UTC
Well, I'm 95% done...minor tweeks to do yet and it's ready for Paint!
Alot of resanding after bright light inspection and then repriming....
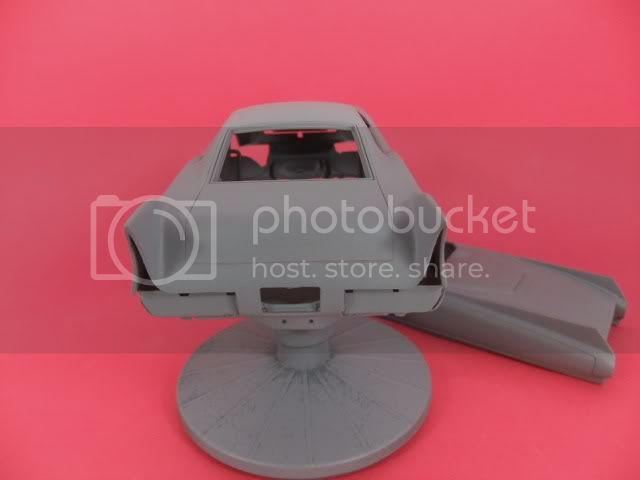
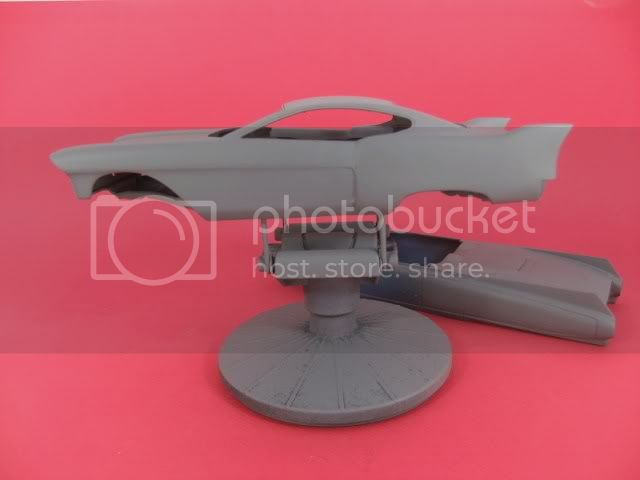
Got a hatchback now-{ I like to be different!}
The doors need to be scribed yet, but that's no big deal....
-Top pic by the side scoop is a thin spot...Hmmmm...how'd that '59 roadster get in there?!
Alot of resanding after bright light inspection and then repriming....
Got a hatchback now-{ I like to be different!}
The doors need to be scribed yet, but that's no big deal....
-Top pic by the side scoop is a thin spot...Hmmmm...how'd that '59 roadster get in there?!
old-dragon
Joined: August 30, 2005
KitMaker: 3,289 posts
Auto Modeler: 1,620 posts
Posted: Saturday, January 15, 2011 - 05:05 AM UTC
Ok, was hit up by a few folks for additional photos of the '59...so here we go.

...trying to make a low and long cruiser here too but the grill up front still needs "something". I'm shooting for an inward raked look.
Back to the '57....
...trying to make a low and long cruiser here too but the grill up front still needs "something". I'm shooting for an inward raked look.
Back to the '57....

Hwa-Rang

Joined: June 29, 2004
KitMaker: 6,760 posts
Auto Modeler: 2,182 posts

Posted: Saturday, January 15, 2011 - 08:46 AM UTC
Man that looks good Bob.
old-dragon
Joined: August 30, 2005
KitMaker: 3,289 posts
Auto Modeler: 1,620 posts
Posted: Monday, January 17, 2011 - 03:20 PM UTC
Thanks friend!
A note to anyone who tries this kit...when you glue the upper and lower body halves together and even think your going to handle it later{sanding of any kind} Please...do yourself a favor and add some inner plates of some kind to both halves to better tie them together...they love to flex and stress crack on the outside of the body....alot! The spot behind the side scoops and over the rear wheel wells has been giving me repeted grief lately!
Guess I can see why they tossed that type of body assembly in favor of the modern one piece body that I now so much better appreciate than I did before- 
A note to anyone who tries this kit...when you glue the upper and lower body halves together and even think your going to handle it later{sanding of any kind} Please...do yourself a favor and add some inner plates of some kind to both halves to better tie them together...they love to flex and stress crack on the outside of the body....alot! The spot behind the side scoops and over the rear wheel wells has been giving me repeted grief lately!
Guess I can see why they tossed that type of body assembly in favor of the modern one piece body that I now so much better appreciate than I did before-
old-dragon
Joined: August 30, 2005
KitMaker: 3,289 posts
Auto Modeler: 1,620 posts
Posted: Sunday, January 23, 2011 - 12:18 PM UTC
Dark purple anyone?
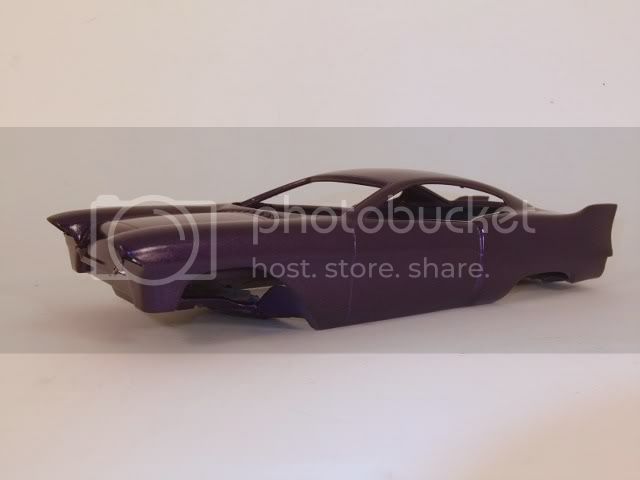
One light coat and then a full wet coat have been applied here...I figure two more after she dries and a wetsand with 10-12k grit.
One light coat and then a full wet coat have been applied here...I figure two more after she dries and a wetsand with 10-12k grit.
Hwa-Rang
Joined: June 29, 2004
KitMaker: 6,760 posts
Auto Modeler: 2,182 posts
Posted: Sunday, January 23, 2011 - 11:07 PM UTC
Love your choice of color.

AussieReg

#007

Joined: June 09, 2009
KitMaker: 8,156 posts
Auto Modeler: 2,953 posts

Posted: Sunday, January 23, 2011 - 11:18 PM UTC
Niiiiiiiiiice OD !!
This is coming along beautifully, very well done sir.
This is coming along beautifully, very well done sir.

old-dragon
Joined: August 30, 2005
KitMaker: 3,289 posts
Auto Modeler: 1,620 posts
Posted: Monday, January 24, 2011 - 10:38 AM UTC
Thanks J and D, but I'm not done yet!
I wetsanded the body last night with 6000 grit and went thru to the primer on some of the edges but I wanted to get this smooth as possible. I'd figure 2 more wet coats of paint, followed by 3 clear coats. I like to get 2-3 wet coats on before any major wetsanding goes on even with clear. I'm using Lacquer so drying time is fast but if your going to use Enamel paint give yourself lots more drying time...like 2-3 days...maybe a week during the summer months because of humidity.
To get a nice smooth finish one must get the body as smooth as possible 1st, then maintain that while painting, so wetsanding between coats is needed. If you go thru the 1st or so coat of color don't sweat it...just add more coats till she's covered and smooth.....then go with the clear coats the same way. Any runs or high spots of metallic or pearl will look odd when you sand them smooth so take your time and coat evenly to avoid extra work afterwards.
We all have seen the nice boxart cars that look sooooo darn smooth but they don't tell you how much effort went into that....but it's really not that much effort if you go slow and easy.
old-dragon
Joined: August 30, 2005
KitMaker: 3,289 posts
Auto Modeler: 1,620 posts
Posted: Saturday, February 19, 2011 - 10:32 AM UTC
Ok, got the 3rd coat of purple on today...been busy...and will let that sit till the end of the week where I'll progressively wet sand her with high grits to smooth it all out. After that I'll mask off the body and hit it with alclad chrome where it needs it.
I've got the two bumper pieces soaking in stripper right now - I removed the 4 round oem tail lights on them and will smooth them over and alclad them too in chrome. I'l still be left with the two outer vertical lenses that will now be all-in-one lights for a cleaner look.
Looking back I suppose I should have made some rear wheelwell covers but that'll have to be the next one{'49 merc full custom}.
As a side note, after I finalize the front end on my '59 caddy roaster I plan on an "aircraft style" paintjob....WWII-ish. This will be interesting!......more to follow.
AussieReg
#007
Joined: June 09, 2009
KitMaker: 8,156 posts
Auto Modeler: 2,953 posts
Posted: Saturday, February 19, 2011 - 12:22 PM UTC
Excuses excuses excuses, all this talk and no pics, not sure if I believe you !
old-dragon
Joined: August 30, 2005
KitMaker: 3,289 posts
Auto Modeler: 1,620 posts
Posted: Sunday, February 20, 2011 - 02:27 AM UTC
Quoted Text
Excuses excuses excuses, all this talk and no pics, not sure if I believe you !
Uh..huh, and just how much work have ya gotten done on "your" opel blitz firetruck buddy?!........yeah, thought so!....

...let me go check the parts to see if they're stripped- nope, tossed that old stuff out and just poured a fresh batch of purple power...when it starts to congeal from being used it gets weeker. I did snap a pic of the pre soak parts and I'll snap one of the afterwards too. Just for you unfinished other project skeptics{yes, that was aimed at one given individual who shall remain nameless}

rv1963
Joined: December 07, 2004
KitMaker: 1,888 posts
Auto Modeler: 806 posts

Posted: Sunday, February 20, 2011 - 02:43 AM UTC
Great work on the caddy Bob don't see body mods like this to often.
old-dragon
Joined: August 30, 2005
KitMaker: 3,289 posts
Auto Modeler: 1,620 posts
Posted: Sunday, February 20, 2011 - 02:51 AM UTC
Quoted Text
Great work on the caddy Bob don't see body mods like this to often.
Thank you and , well, "Why not"?!
While there are just a few kits that I consider sacred, anything else is up for grabs modification wise. Why build normal?

KoSprueOne

Joined: March 05, 2004
KitMaker: 4,011 posts
Auto Modeler: 851 posts

Posted: Sunday, February 20, 2011 - 05:06 AM UTC
deep purple... the body mods resemble something Batman-ish, then the color reminds me of the Joker
This is lookin' rad, OD !

This is lookin' rad, OD !

Headhunter506
Joined: December 01, 2007
KitMaker: 1,575 posts
Auto Modeler: 13 posts

Posted: Saturday, March 05, 2011 - 12:23 PM UTC
Interesting build. It does bear more than a passing resemblance to Boyd Coddington's Chezoom:

old-dragon
Joined: August 30, 2005
KitMaker: 3,289 posts
Auto Modeler: 1,620 posts
Posted: Saturday, March 05, 2011 - 04:10 PM UTC
Joe, It's that era of fins, big bumpers and chrome.
I haven't lost track of this one....polished the body and I'm still tweeking the idea of the trim. Add stripping old chrome off and preping for new alclad chrome. Wondering about side pipes....
The biggest hurdle lately is trying the subtle art of grafting in a ferrari interior into that beast...there's no being subtle there and it's fighting me.
 |

WEB HOSTING BY


Copyright ©2021 Auto Modeler and Kitmaker Network, a subsidiary of Silver Star Enterprises
All Rights Reserved. Please read our Conditions of Use and Privacy Policy.
All Rights Reserved. Please read our Conditions of Use and Privacy Policy.