Kobenhavn, Denmark
Joined: June 29, 2004
KitMaker: 6,760 posts
Auto Modeler: 2,182 posts
Posted: Sunday, January 26, 2014 - 03:28 AM UTC
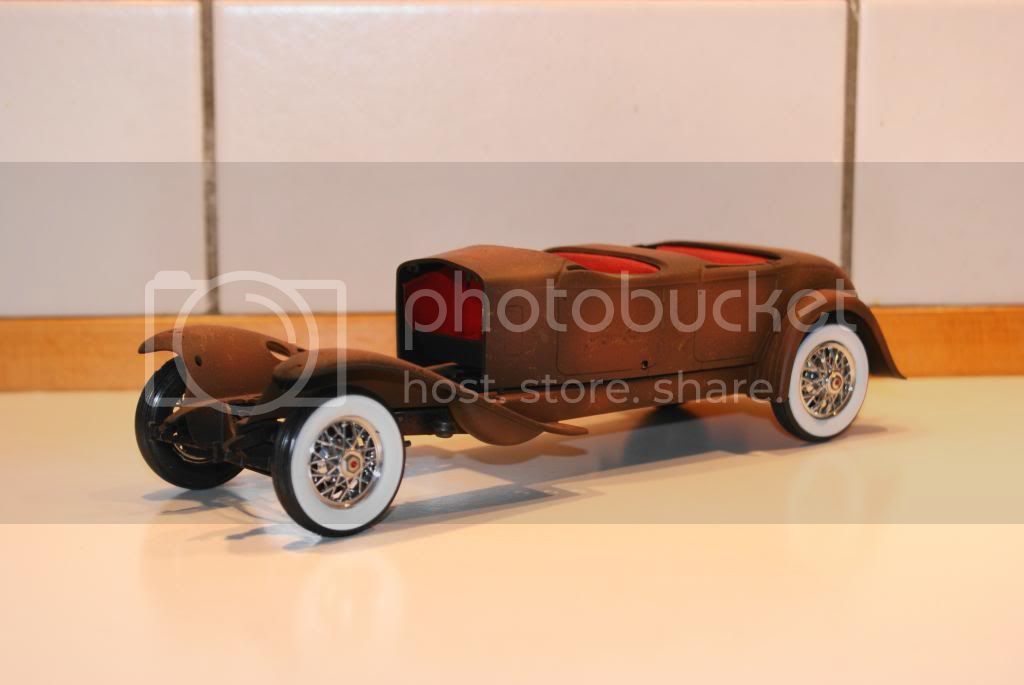
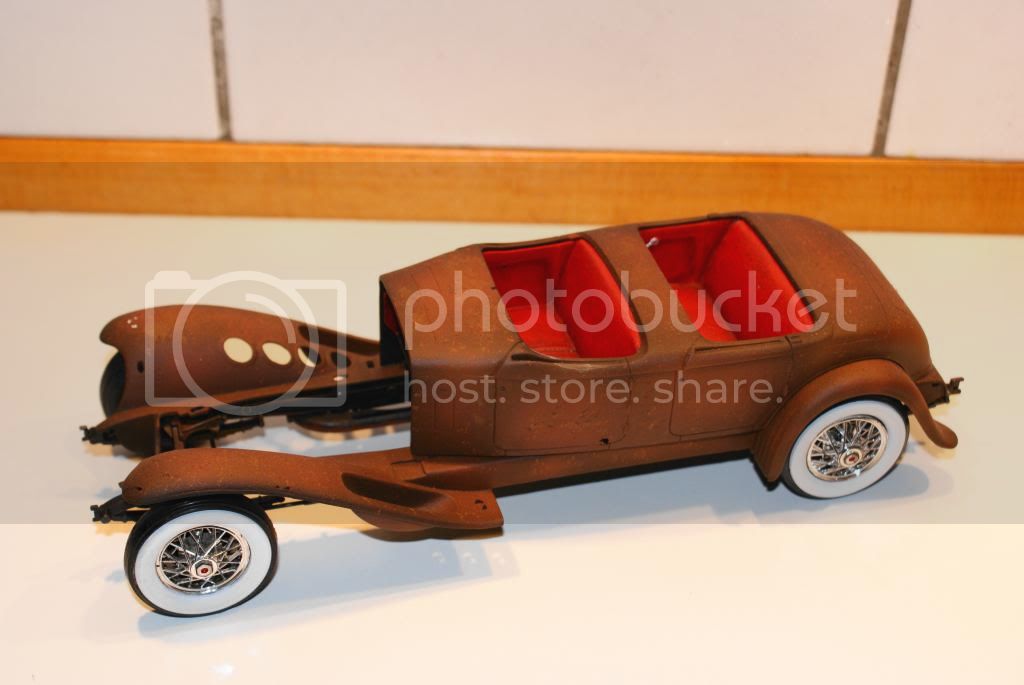
This old old garage queen I started some 35 years ago. The kit I got as a kid and I was way to Young to assemble it. Back then I slapped some paint on it, semi assembled it and gave up. Now I will attempt to bring it back, from the dead. I did not expect the paint, I used all those years ago, to be easily removed and it wasn't.
I knew it could never be turned into a showroom model, so the only choice was to turn it into a garage find.
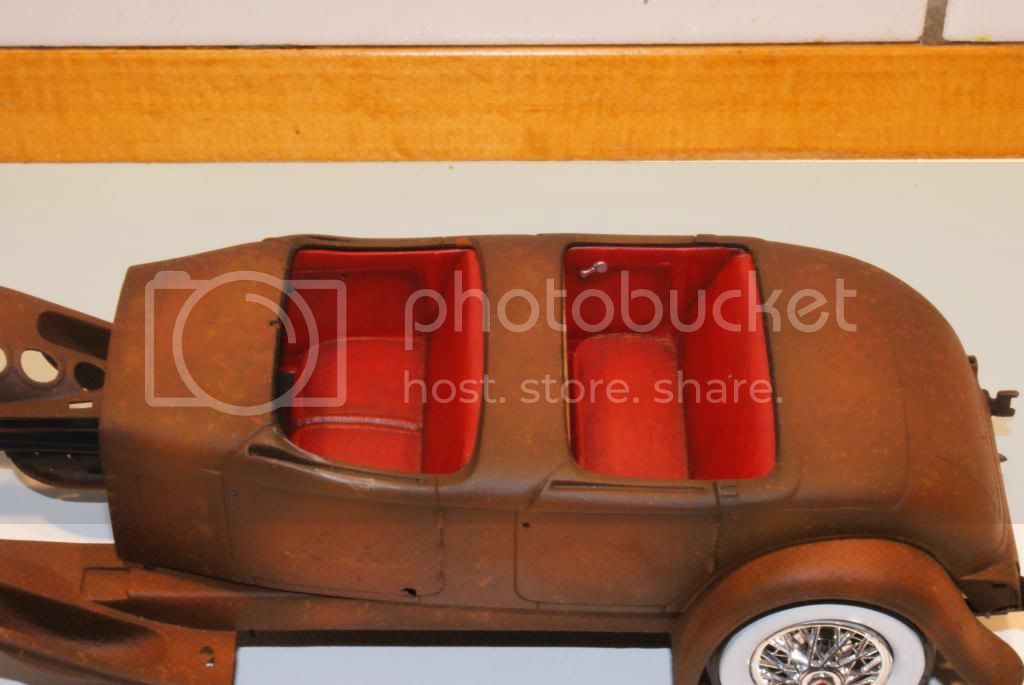
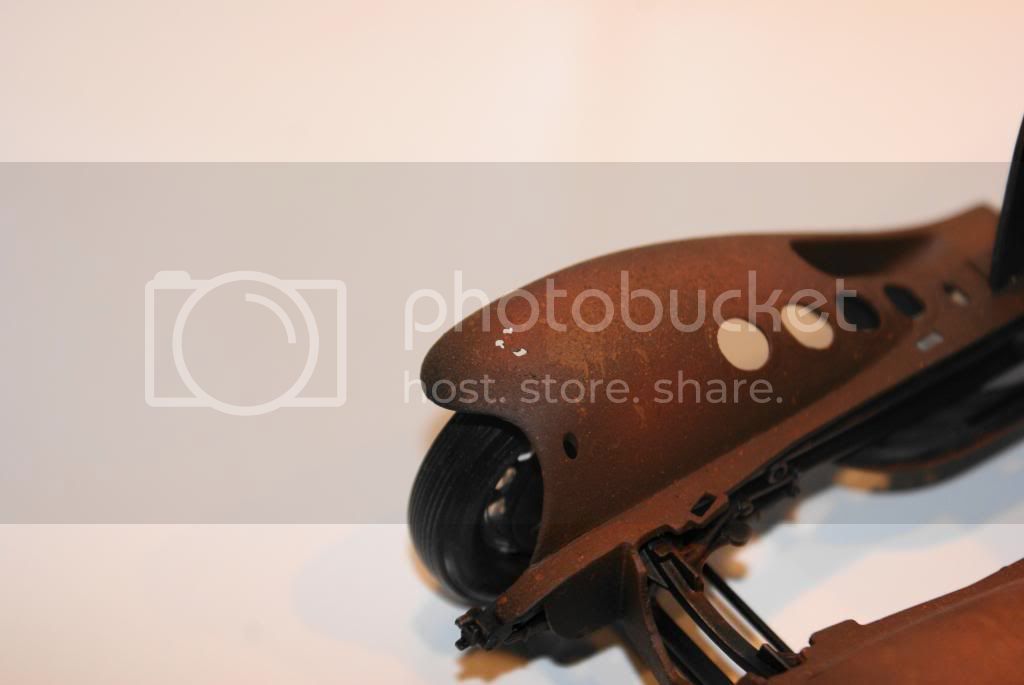
I made rust holes, by grinding the bakside of the body panels, with my Dremel.I covered the seat's with masking tape, which has a textured surface. This should be more visible once I drybrush it. Seat's are painted with oil's
The body has been airbrushed with various rust colored acrylics.
The plan is to apply AK's "Worn effect" and "heavy chipping" medium and spray paint Tamiya's semi gloss Black ontop of that.
On the workbench:
MPC: 1972 Pontiac GTO
Revell: 1965 Mustang
Verlinden 120mm guard of the marine.
Revell: 2010 Camaro
Monogram: 1931 Rolls Royce
Italeri: LVT2 Amtrac
England - South East, United Kingdom
Joined: January 11, 2003
KitMaker: 4,307 posts
Auto Modeler: 231 posts
Posted: Sunday, January 26, 2014 - 05:04 AM UTC
Looking really good so far - are the whitewalls going to be discoloured?
Bulldog#3
Grumpy Old Modeller No1
Growing old disgracefully!
Istanbul, Turkey / Türkçe
Joined: December 05, 2007
KitMaker: 953 posts
Auto Modeler: 157 posts
Posted: Sunday, January 26, 2014 - 12:14 PM UTC
Looks good so far Jesper...

AussieReg
 Associate Editor
#007
Victoria, Australia
Joined: June 09, 2009
KitMaker: 8,156 posts
Auto Modeler: 2,953 posts
Posted: Sunday, January 26, 2014 - 05:07 PM UTC
Looking great Jesper, love the rust effect.
Cheers, D
ON the bench
Revell 1/24 '53 Corvette (building as '54)
Revell 1/24 BMW 507 Coupe and Cabrio
Italeri 1/48 Me262 B-1a/U1 Nightfighter
Monogram 1/24 '57 Chevy Nomad
Dragon 1/350 USS Frank Knox DD-742
Kobenhavn, Denmark
Joined: June 29, 2004
KitMaker: 6,760 posts
Auto Modeler: 2,182 posts
Posted: Sunday, January 26, 2014 - 10:55 PM UTC
Thanks guy's.
Dave: The whitewall's will be discolored, using washes and pigments.
On the workbench:
MPC: 1972 Pontiac GTO
Revell: 1965 Mustang
Verlinden 120mm guard of the marine.
Revell: 2010 Camaro
Monogram: 1931 Rolls Royce
Italeri: LVT2 Amtrac
Kobenhavn, Denmark
Joined: June 29, 2004
KitMaker: 6,760 posts
Auto Modeler: 2,182 posts
Posted: Friday, July 18, 2014 - 01:34 AM UTC
A Little update.
Drilled out some of the instruments and added a few pieces of wire, protruding from the holes.

I drybrushed the interior, which definitely brings out the masking tape I used for crakcled leather effect.
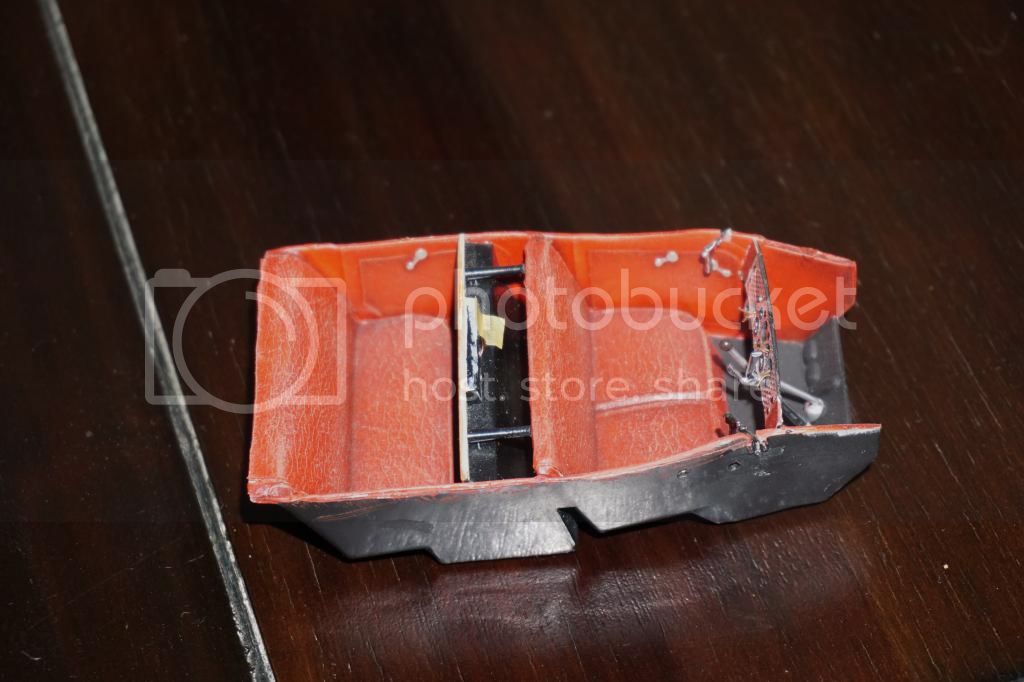
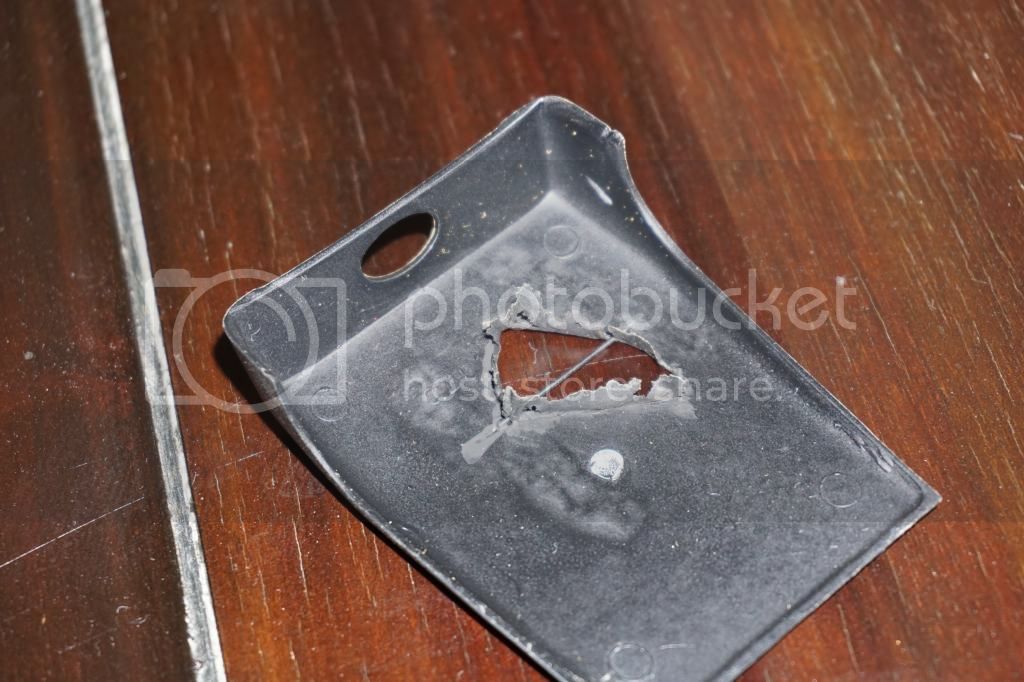
Cut a hole in the top. Didn't want a torn look, but a look of decay. I cut the hole and added Tamiya putty to the edge of the hole. When the putty was semi dry I dragged the putty downwards, with a tweezer.

On the workbench:
MPC: 1972 Pontiac GTO
Revell: 1965 Mustang
Verlinden 120mm guard of the marine.
Revell: 2010 Camaro
Monogram: 1931 Rolls Royce
Italeri: LVT2 Amtrac
New York, United States
Joined: August 25, 2006
KitMaker: 2,539 posts
Auto Modeler: 1,405 posts
Posted: Friday, July 18, 2014 - 02:26 PM UTC
"Socialism is a philosophy of failure, the creed of ignorance, and the gospel of envy, its inherent virtue is the equal sharing of misery." ---- Winston Churchill
California, United States
Joined: October 21, 2007
KitMaker: 3,684 posts
Auto Modeler: 294 posts
Posted: Sunday, July 20, 2014 - 04:12 AM UTC
This one is looking sharp Jesper. Looking forward to how the weathered black top coat comes out.
Kobenhavn, Denmark
Joined: June 29, 2004
KitMaker: 6,760 posts
Auto Modeler: 2,182 posts
Posted: Tuesday, November 25, 2014 - 02:04 AM UTC
On the workbench:
MPC: 1972 Pontiac GTO
Revell: 1965 Mustang
Verlinden 120mm guard of the marine.
Revell: 2010 Camaro
Monogram: 1931 Rolls Royce
Italeri: LVT2 Amtrac
AussieReg
Associate Editor #007
Victoria, Australia
Joined: June 09, 2009
KitMaker: 8,156 posts
Auto Modeler: 2,953 posts
Posted: Tuesday, November 25, 2014 - 07:32 AM UTC
ON the bench
Revell 1/24 '53 Corvette (building as '54)
Revell 1/24 BMW 507 Coupe and Cabrio
Italeri 1/48 Me262 B-1a/U1 Nightfighter
Monogram 1/24 '57 Chevy Nomad
Dragon 1/350 USS Frank Knox DD-742
Netherlands Antilles
Joined: September 02, 2014
KitMaker: 1,977 posts
Auto Modeler: 1,371 posts
Posted: Tuesday, November 25, 2014 - 06:27 PM UTC
Another good one, Jesper! That's a model I would love to build myself too. I like the loose wires hanging from the dashboard. Note on the engine: I think the exhaust manifold should be rusty too... Otherwise, superb! Thanks for sharing!
Gabriel
Many of my builds can be seen on YT in video format. Please check 'Panzergrau Models' Channel.
California, United States
Joined: October 21, 2007
KitMaker: 3,684 posts
Auto Modeler: 294 posts
Posted: Wednesday, December 03, 2014 - 07:35 PM UTC
Keep it going Jesper, lets see this one on the shelf!
#521
Kentucky, United States
Joined: April 13, 2011
KitMaker: 9,465 posts
Auto Modeler: 106 posts
Posted: Thursday, December 04, 2014 - 01:03 AM UTC
May I suggest some rust colored pastel chalk to put a LITTLE rust on the hood grills and the dashboard.
Kobenhavn, Denmark
Joined: June 29, 2004
KitMaker: 6,760 posts
Auto Modeler: 2,182 posts
Posted: Monday, December 08, 2014 - 11:41 AM UTC
Thanks guy's
I agree, the exaust manifold needs more rust. I have used quite a lot of dark chipping color on the manifold, but it doesn't show well in the pictures. Will add more rust though.
Dusenberg used quite a lot of polished aluminium and polished stainless steel. It has been quite difficult to find out which materials were used where. as far as I have been able to find out the dash is polished aluminium. Not sure about the hood mesh panels. All chrome parts have been rubed lightly with steelwhool and given a layer of matt acrylics varnish. You cant put an even layer of acrylics varnish on chrome parts, so it gives and uneven dull/worn look. Doesn't show well in the pictures though.
On the workbench:
MPC: 1972 Pontiac GTO
Revell: 1965 Mustang
Verlinden 120mm guard of the marine.
Revell: 2010 Camaro
Monogram: 1931 Rolls Royce
Italeri: LVT2 Amtrac
Kobenhavn, Denmark
Joined: June 29, 2004
KitMaker: 6,760 posts
Auto Modeler: 2,182 posts
Posted: Monday, January 12, 2015 - 02:44 PM UTC
On the workbench:
MPC: 1972 Pontiac GTO
Revell: 1965 Mustang
Verlinden 120mm guard of the marine.
Revell: 2010 Camaro
Monogram: 1931 Rolls Royce
Italeri: LVT2 Amtrac
AussieReg
Associate Editor #007
Victoria, Australia
Joined: June 09, 2009
KitMaker: 8,156 posts
Auto Modeler: 2,953 posts
Posted: Monday, January 12, 2015 - 06:21 PM UTC
Looking great Jesper, really nice work.
ON the bench
Revell 1/24 '53 Corvette (building as '54)
Revell 1/24 BMW 507 Coupe and Cabrio
Italeri 1/48 Me262 B-1a/U1 Nightfighter
Monogram 1/24 '57 Chevy Nomad
Dragon 1/350 USS Frank Knox DD-742
Netherlands Antilles
Joined: September 02, 2014
KitMaker: 1,977 posts
Auto Modeler: 1,371 posts
Posted: Monday, January 12, 2015 - 08:33 PM UTC
Jesper, she's the Queen! Nice work, I've been waiting for new posts. Thanks for sharing! After you finish, you can restore it

Gabriel
Many of my builds can be seen on YT in video format. Please check 'Panzergrau Models' Channel.
New York, United States
Joined: December 07, 2004
KitMaker: 1,888 posts
Auto Modeler: 806 posts
Posted: Monday, January 12, 2015 - 10:37 PM UTC
Great work on the Duesy Jesper, I like the way you did the canvas top with the rod and the hanging cloth.
The dirty engine looks good also, I like the direction the entire model is going.
Kobenhavn, Denmark
Joined: June 29, 2004
KitMaker: 6,760 posts
Auto Modeler: 2,182 posts
Posted: Tuesday, January 13, 2015 - 11:15 AM UTC
On the workbench:
MPC: 1972 Pontiac GTO
Revell: 1965 Mustang
Verlinden 120mm guard of the marine.
Revell: 2010 Camaro
Monogram: 1931 Rolls Royce
Italeri: LVT2 Amtrac
North Carolina, United States
Joined: November 28, 2005
KitMaker: 2,216 posts
Auto Modeler: 522 posts
Posted: Wednesday, January 14, 2015 - 04:55 AM UTC
Jesper this is one of the coolest builds I've seen in a while. That's the first time I've ever heard of using tape to make interior upholstery and it turned out awesome. Putting the small rod through the hole in the fabric top was genius. It really made the hole look authentic.
Might I suggest a windscreen with broken glass....like you did with the headlight?
Really super build. It's given me a number of great ideas for the future.

"Those who would give up Essential Liberty
to purchase a little Temporary Safety,
deserve neither Liberty nor Safety."
Benjamin Franklin
Kobenhavn, Denmark
Joined: June 29, 2004
KitMaker: 6,760 posts
Auto Modeler: 2,182 posts
Posted: Wednesday, January 14, 2015 - 12:02 PM UTC
Thanks Hermon.
Quoted Text
Might I suggest a windscreen with broken glass....like you did with the headlight?
Already done
On the workbench:
MPC: 1972 Pontiac GTO
Revell: 1965 Mustang
Verlinden 120mm guard of the marine.
Revell: 2010 Camaro
Monogram: 1931 Rolls Royce
Italeri: LVT2 Amtrac
Kobenhavn, Denmark
Joined: June 29, 2004
KitMaker: 6,760 posts
Auto Modeler: 2,182 posts
Posted: Tuesday, February 17, 2015 - 11:57 AM UTC
On the workbench:
MPC: 1972 Pontiac GTO
Revell: 1965 Mustang
Verlinden 120mm guard of the marine.
Revell: 2010 Camaro
Monogram: 1931 Rolls Royce
Italeri: LVT2 Amtrac
Grumpyoldman
_ADVISOR Florida, United States
Joined: October 17, 2003
KitMaker: 15,338 posts
Auto Modeler: 203 posts
Posted: Tuesday, February 17, 2015 - 07:44 PM UTC
Really nice finished model Jesper.
Character is what you do when no one is looking.
Few things are harder to put up with than a good example.- Mark Twain
Make yourself an honest man, and then you may be sure that there is one less scoundrel in the world.--Thomas Carlyle
#257
Ontario, Canada
Joined: October 11, 2011
KitMaker: 812 posts
Auto Modeler: 108 posts
Posted: Tuesday, February 17, 2015 - 10:22 PM UTC
Jesper, Great build. Fantastic weathering. Why restore it. I suggest you build a showroom quality version and display them side by side.
Modelling is something we never perfect. We should never quit learning new tricks and be willing to share what we have learned on our own.
Kobenhavn, Denmark
Joined: June 29, 2004
KitMaker: 6,760 posts
Auto Modeler: 2,182 posts
Posted: Sunday, February 22, 2015 - 12:44 PM UTC
Thanks Dave and Darrell.
Darrell: I would never ever restore this one
I actually have one more in my stash, which I do plan to build nice'n'shiny.
On the workbench:
MPC: 1972 Pontiac GTO
Revell: 1965 Mustang
Verlinden 120mm guard of the marine.
Revell: 2010 Camaro
Monogram: 1931 Rolls Royce
Italeri: LVT2 Amtrac


