

Hi, guys
Does anybody ever attempted to scratch build headlamps?
I bought a Triumph from Minicraft (bargain price, so no expectations whatsoever). The body shell is well molded and nice... I am rather happy with the purchase (It may be I will review the kit). I intend to do some scratch building on this one. The firewall and the foot wells are horrible but I can deal with that.
The main problem it is: the headlamps are molded with their frames as a single piece and (horror horroris!) they are chromed! to paint the "glass" over at this scale will make the things even worst. I figured out I can drill off the "glass," preserve the frame and... what then?
I have no spares because I am mainly a soft-skin modeller (1/35 scale).
Any suggestion highly appreciated.
Merry Christmas and warm regards.


Go to automodeler.com for the current dynamic site!
Cars
Discuss all types of automotive modeling here.
Discuss all types of automotive modeling here.
Hosted by Jim Starkweather
Help with head lamps

Szmann

Joined: September 02, 2014
KitMaker: 1,977 posts
Auto Modeler: 1,371 posts

Posted: Tuesday, December 23, 2014 - 07:54 PM UTC


DaveCox

Joined: January 11, 2003
KitMaker: 4,307 posts
Auto Modeler: 231 posts

Posted: Tuesday, December 23, 2014 - 08:36 PM UTC
I think I've got the same model (Triumph TR3?)
I drilled out the headlamps and made the glass from two-part resin glue, with the light frames resting on polythene sheet so that I could peel them off afterwards.
The slight yellowish tint of the glue doesn't look too bad considering this was a 1950s car and most lights then looked like that!
I drilled out the headlamps and made the glass from two-part resin glue, with the light frames resting on polythene sheet so that I could peel them off afterwards.
The slight yellowish tint of the glue doesn't look too bad considering this was a 1950s car and most lights then looked like that!


VonCuda

Joined: November 28, 2005
KitMaker: 2,216 posts
Auto Modeler: 522 posts

Posted: Tuesday, December 23, 2014 - 09:03 PM UTC
Gabriel, I've done this a few times using clear sprue.
As Dave said, you can drill out the lamp portion and use it as a base. Next, heat a piece of clear sprue and let a blob of it drip into the now empty headlamp socket. When it's dry you can use various grades of sanding sticks to polish it and it will eventually look like clear glass.
I used a similar method to make a police car light bar using a portion of a clear tooth brush, sanded, polished, and buffed and sprayed clear Tamiya blue on it to the desired effect.

VonCuda
Joined: November 28, 2005
KitMaker: 2,216 posts
Auto Modeler: 522 posts
Posted: Tuesday, December 23, 2014 - 09:08 PM UTC
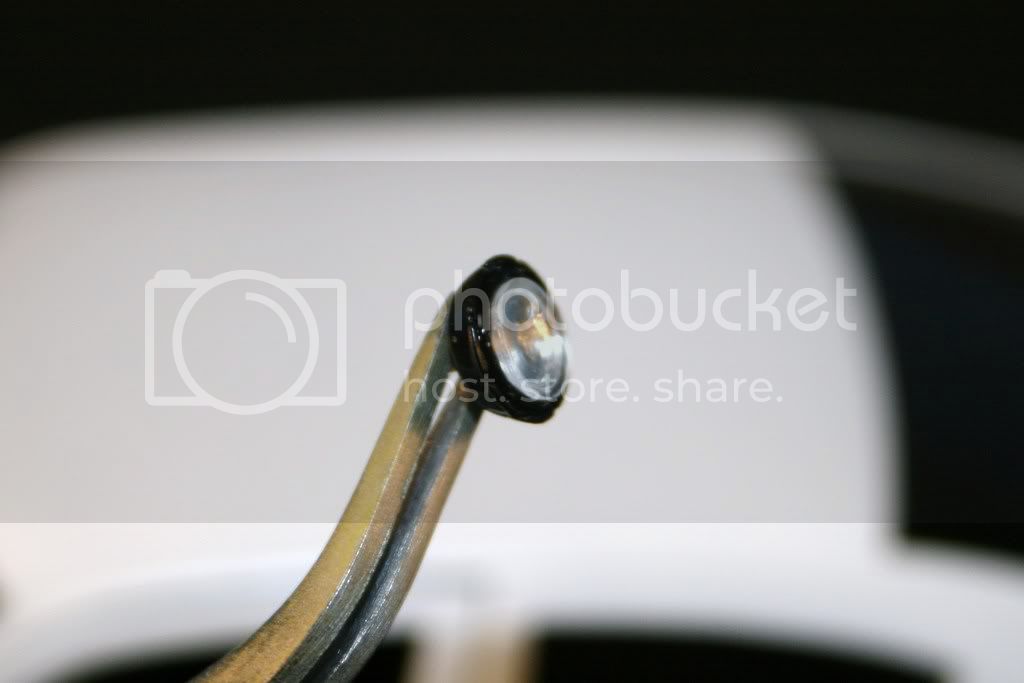
Gabriel, here is a finished product I made using the heated sprue method.
Forgot to add....if you paint the drilled out socket of the headlamp with silver paint prior to adding the heated clear sprue, it will have the same magnifying effect as a real headlamp.
Hope this helps!
Forgot to add....if you paint the drilled out socket of the headlamp with silver paint prior to adding the heated clear sprue, it will have the same magnifying effect as a real headlamp.
Hope this helps!
Szmann
Joined: September 02, 2014
KitMaker: 1,977 posts
Auto Modeler: 1,371 posts
Posted: Tuesday, December 23, 2014 - 09:45 PM UTC
Quoted Text
I think I've got the same model (Triumph TR3?)
I drilled out the headlamps and made the glass from two-part resin glue, with the light frames resting on polythene sheet so that I could peel them off afterwards.
The slight yellowish tint of the glue doesn't look too bad considering this was a 1950s car and most lights then looked like that!
Thank you very much, Dave. Indeed, it is a TR 3A. Your solution is simple and effective. I will give it a try. Once more, thank you for finding an answer to my issue. Warm regards.
Szmann
Joined: September 02, 2014
KitMaker: 1,977 posts
Auto Modeler: 1,371 posts
Posted: Tuesday, December 23, 2014 - 09:54 PM UTC
Quoted Text
Gabriel, here is a finished product I made using the heated sprue method.
Forgot to add....if you paint the drilled out socket of the headlamp with silver paint prior to adding the heated clear sprue, it will have the same magnifying effect as a real headlamp.
Hope this helps!
Hermon, thank you for the ideea. It does help! Your result is excellent (WOW!) But in this particular case, if I drill out the molded piece, I get a circular frame, not a socket. I'm going to use a backplate (painted silver) as Dave suggested and pour resin into the frame... it should be working.
Nonetheless, your help is greatly appreciated and is good to store it in my arsenal for future projects - it applies very well for AFVs too. Warm regards.
 |

WEB HOSTING BY


Copyright ©2021 Auto Modeler and Kitmaker Network, a subsidiary of Silver Star Enterprises
All Rights Reserved. Please read our Conditions of Use and Privacy Policy.
All Rights Reserved. Please read our Conditions of Use and Privacy Policy.