_GOTOBOTTOM
Cars: Muscle Cars
60's & 70's Classics
Ferrari F50 Barchetta Build review
Szmann
_VISITCOMMUNITY
Netherlands Antilles
Joined: September 02, 2014
KitMaker: 1,977 posts
Auto Modeler: 1,371 posts
Posted: Monday, March 02, 2020 - 04:31 AM UTC
C C Lee 1/24 Ferrari F50 Barchetta build review

With too many kits for review and commissions, with another GB on AutoModeller ready to start and the next TCC contest in the making, I have no choice but to plunge head first into a new build.

C C Lee? Never heard of them!

The kit comprises:
- one red sprue and the body shell molded in red as well
- 2 grey plastic sprues with engine and frame parts
- 2 black plastic sprues with interior and underside parts
- 1 sprue clear plastic with glazed surfaces
- 4 vinyl tires
- 1 small decal sheet
- 1 instructions manual in Japanese only (it may be as well Korean, Vietnamese or Cantonese for what I can read)
- 1 electric motor
- 2 electric contact blades
- 1 geared axle
- 1 rubber band
- 1 tube with something inside - I cannot read the ideograms

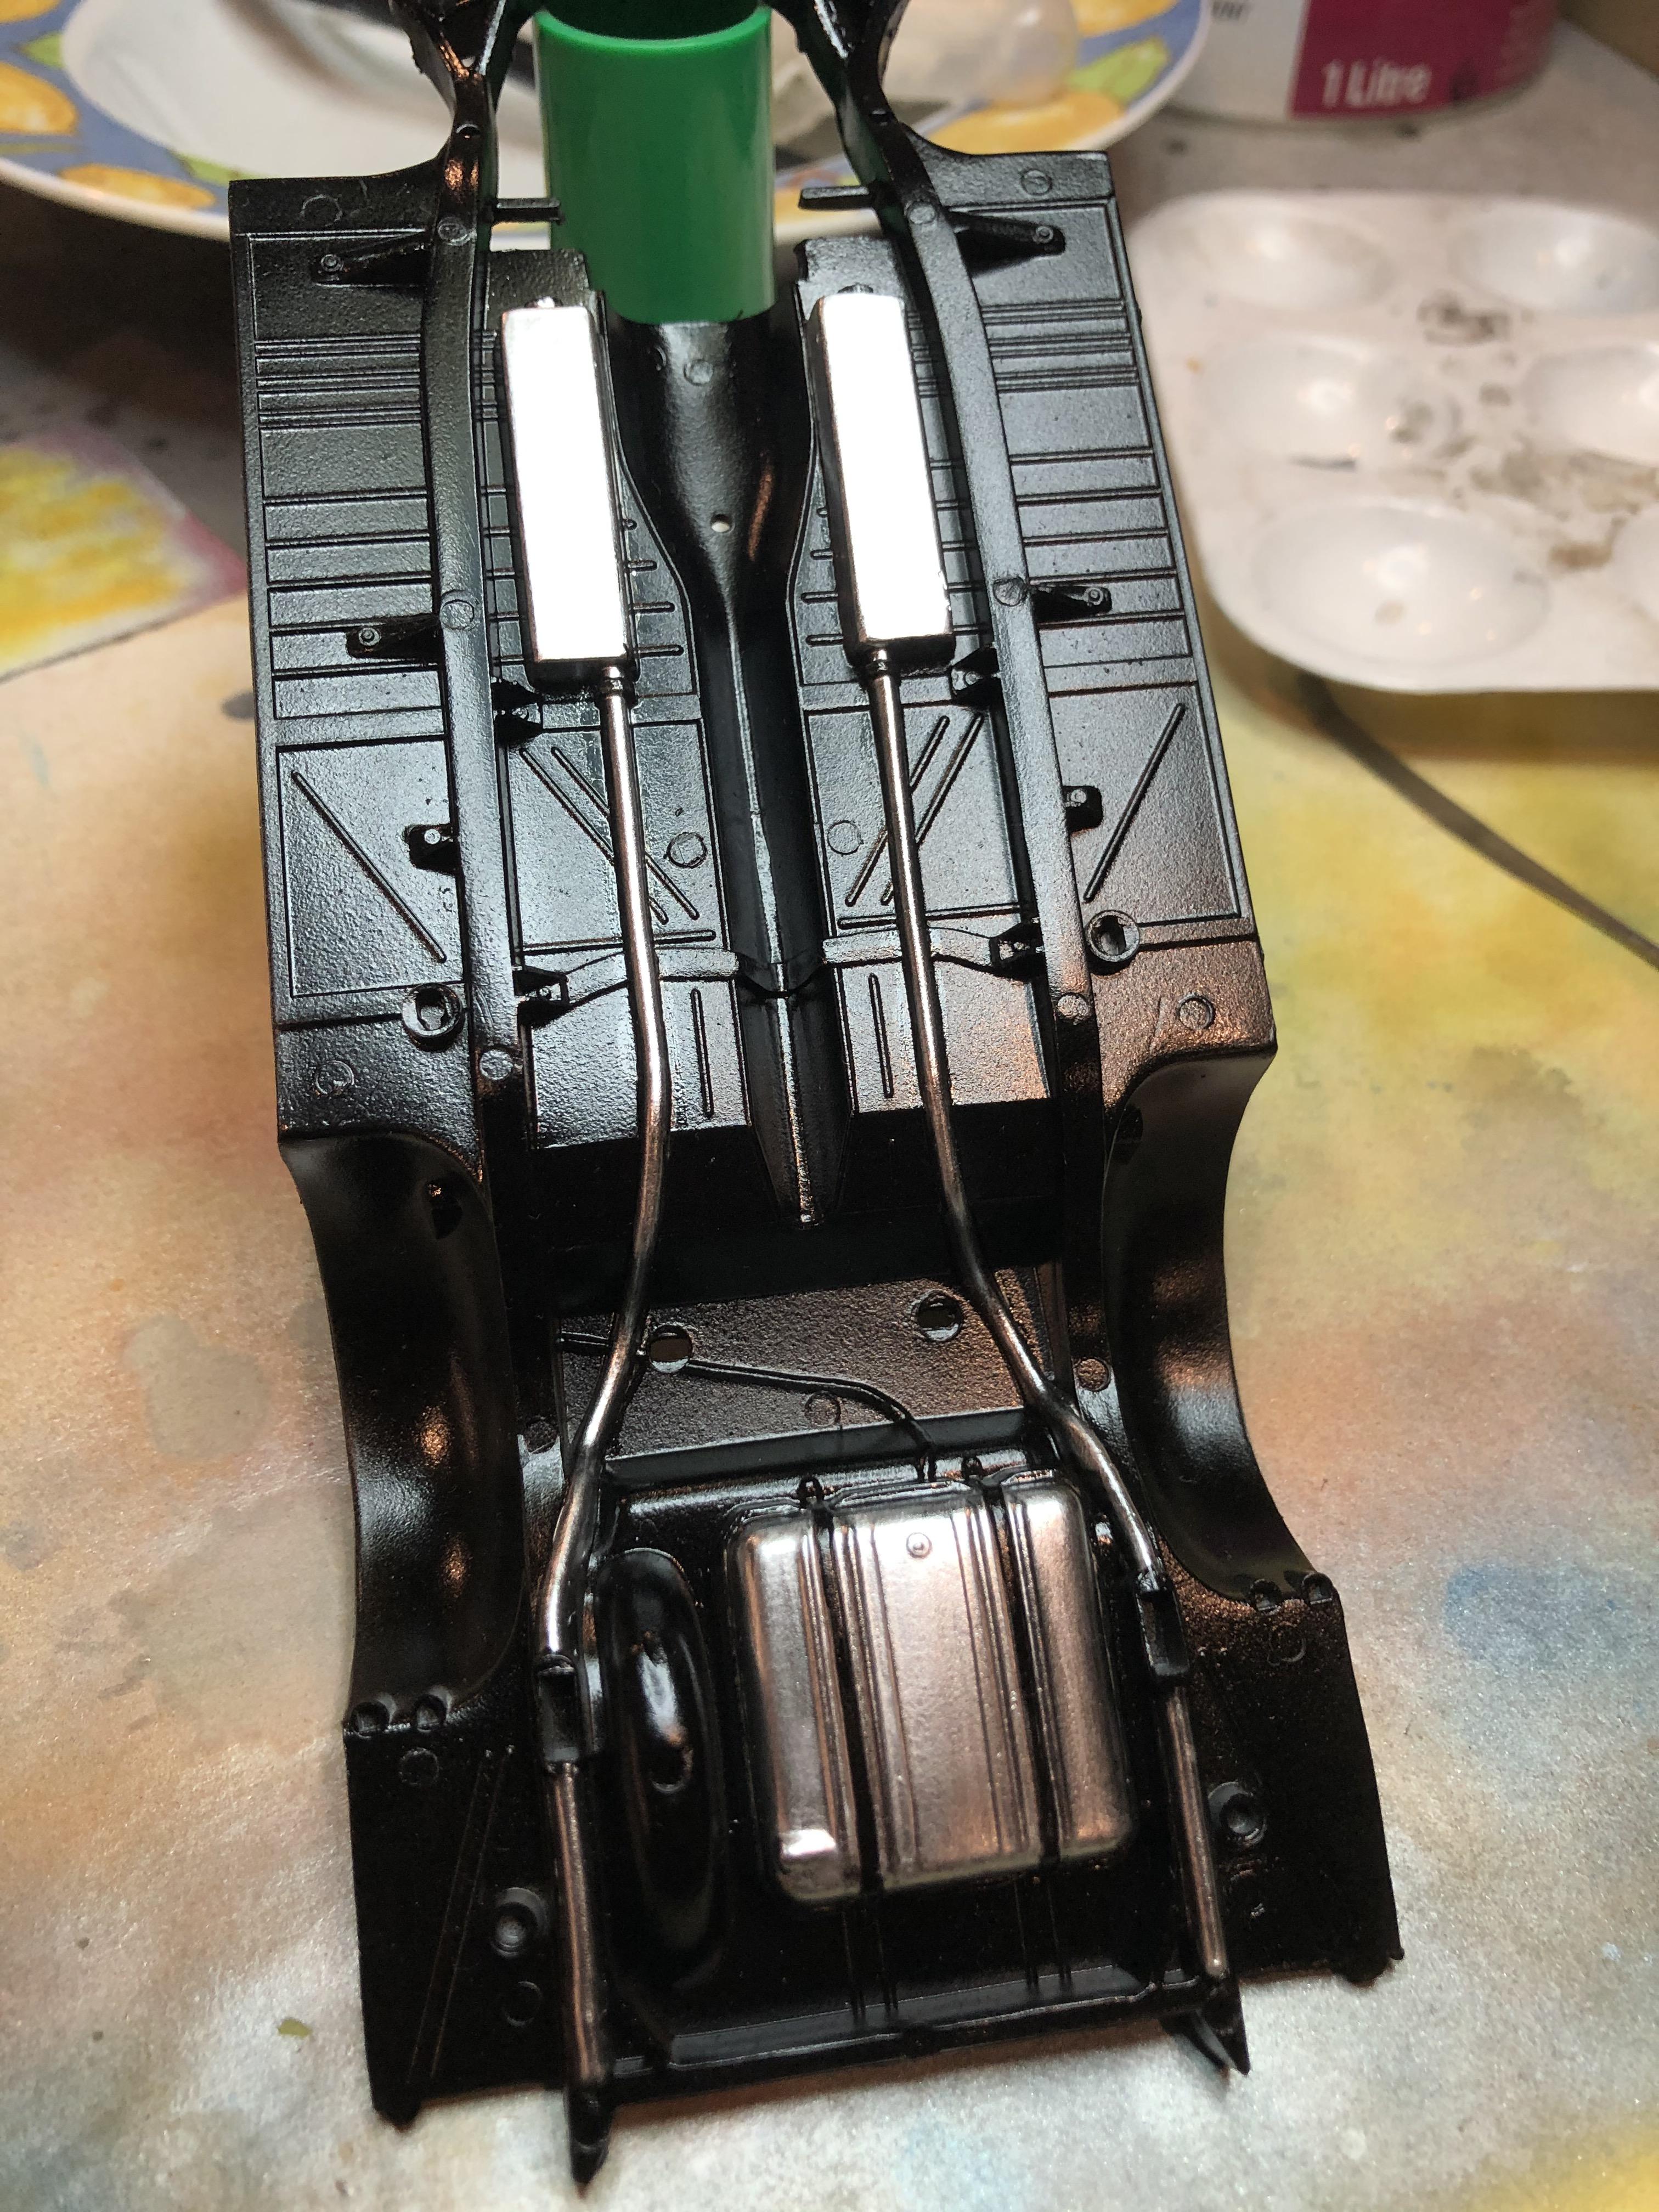
Some gray parts, the clear parts and the red ones look very nicely molded, while the black plastic ones look rather "meh" and devoid of detail.

I couldn't find any copyright year stamped anywhere, but I guess the kit originates in '70s or '80s, by the molding technology and the presence of the electric motor (which I'm not going to use)


On the cover there is a picture of the completed model


Plastic contents of the kit and the instructions manual


Decal sheet in bad registry


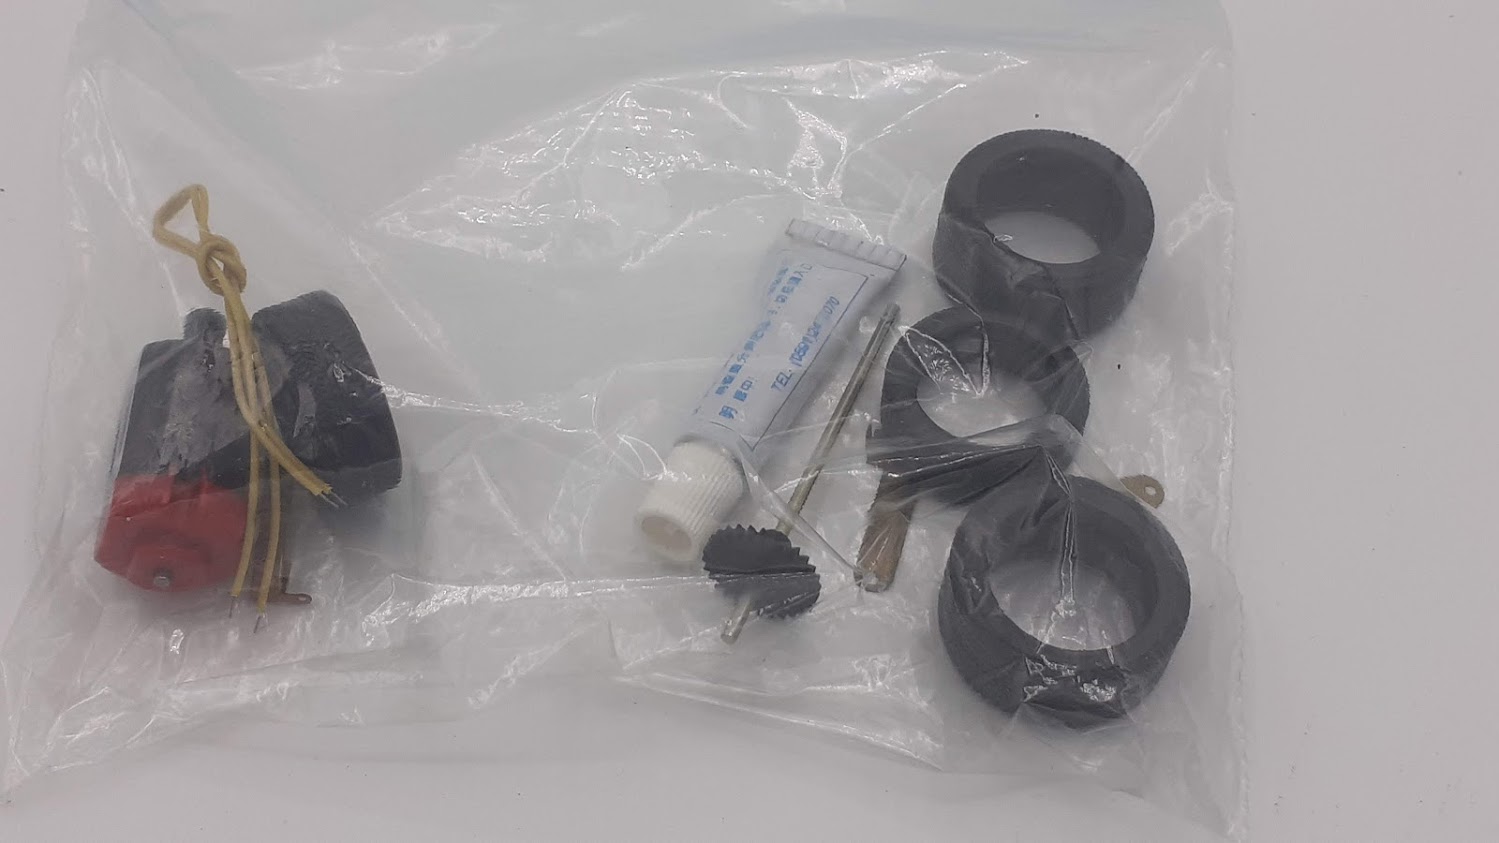
Useless (for me) extras, safe for the tires.

Now, my ambition is to finish this build before April 1st so I can join the AM GB with my NASCAR from the start, but, again, my March schedule is going to be devastating with regard to available free time.

Gabriel
Scarred
_VISITCOMMUNITY
Washington, United States
Joined: March 11, 2016
KitMaker: 1,792 posts
Auto Modeler: 52 posts
Posted: Monday, March 02, 2020 - 09:01 AM UTC
Now I got a Rush song stuck in my head.

The tube is model cement, seen it in everything from armor, planes and warships ship kits from Japan in the 70's. I've always found the tube damaged in some way and the glue dried out.

I'll be watching this build. Have fun!
AussieReg
Staff MemberAssociate Editor
AUTOMODELER
#007
_VISITCOMMUNITY
Victoria, Australia
Joined: June 09, 2009
KitMaker: 8,156 posts
Auto Modeler: 2,953 posts
Posted: Monday, March 02, 2020 - 09:39 AM UTC
I will be following this build Gabriel, a cool looking sports car from a manufacturer that we don't often see.

From the SCALEMATES page it seems that this kit was released later than 2000.

Cheers, D
Szmann
_VISITCOMMUNITY
Netherlands Antilles
Joined: September 02, 2014
KitMaker: 1,977 posts
Auto Modeler: 1,371 posts
Posted: Monday, March 02, 2020 - 10:05 AM UTC

Quoted Text

Now I got a Rush song stuck in my head.

The tube is model cement, seen it in everything from armor, planes and warships ship kits from Japan in the 70's. I've always found the tube damaged in some way and the glue dried out.

I'll be watching this build. Have fun!


Thank you for your interest, Patrick. I not even dare and open the tube

Gabriel
Szmann
_VISITCOMMUNITY
Netherlands Antilles
Joined: September 02, 2014
KitMaker: 1,977 posts
Auto Modeler: 1,371 posts
Posted: Monday, March 02, 2020 - 10:16 AM UTC

Quoted Text

I will be following this build Gabriel, a cool looking sports car from a manufacturer that we don't often see.

From the SCALEMATES page it seems that this kit was released later than 2000.

Cheers, D


The year is marked 200x, so the author of the entry is guessing as well - as I said, there is nowhere on the box, sprues, decals or instructions manual any reference. However, I found out during my reference collection raid, that the model F50 was released in the year before Ferrari's 50th anniversary - hence the name. The anniversary was in October 23rd, 2014. Unless the CC Lee have employed any time travelers, that late '14 date places the kit at the beginning of 2015, so the release year on Scalemates should be changed to 201x instead of 200x.
Now, for sure CC Lee have time travelers, because the molding technology, the instructions manual layout and the content of the kits are typically for '80s .
It resembles very much as layout the Porsche 959 I built a while ago...

Gabriel
Szmann
_VISITCOMMUNITY
Netherlands Antilles
Joined: September 02, 2014
KitMaker: 1,977 posts
Auto Modeler: 1,371 posts
Posted: Monday, March 02, 2020 - 01:49 PM UTC
First update - amazing find!

Well well! I eventually found it! It took me to put together 4 pieces to realize I found the worst kit to ever work on. Actually the kit found me, since it was sent for build review Just look inside these parts: ejector pins interfering with the locator pins, flash all over, unrecognizable alignment pins and all. This kit has it all


The first parts glued together. Letting alone the butt end fit, the warping and the cavernous gaps, the worst is the quality of the plastic, reminiscent of Revell's '70s silver plastic, just worse. Much worse. It takes forever to activate with Tamiya Extra Thin which, initially, seems to have no effect. And when, finally, it does activate, it takes forever to dry:


There is more bad coming: because the instructions drawings are represented in a very flat perspective, it is really difficult to estimate the assembly angle of the pieces in the absence of reliable alignment pins. So I found myself forced to keep assembling just to use next part as a template for guessing the angle. I had no intention to add the exhaust pipes and the mufflers to the engine before painting, but I had to, otherwise I would never know in what angle the exhaust manifolds are joining the engine block. Dear me, I just finished a Moebius! I'm using the brushes here as supports for the pieces, waiting for the glue to dry forever like. Oh, my!


I'm really curious how I'm going to pull this one out: There is no skip forward, since the engine it is all too visible thru the glass cover of F50!

Gabriel
AussieReg
Staff MemberAssociate Editor
AUTOMODELER
#007
_VISITCOMMUNITY
Victoria, Australia
Joined: June 09, 2009
KitMaker: 8,156 posts
Auto Modeler: 2,953 posts
Posted: Monday, March 02, 2020 - 02:21 PM UTC
Oh dear! I can't wait to see your build review on this beast, that is providing it doesn't end up in the recycling bin

Cheers, D
Szmann
_VISITCOMMUNITY
Netherlands Antilles
Joined: September 02, 2014
KitMaker: 1,977 posts
Auto Modeler: 1,371 posts
Posted: Monday, March 02, 2020 - 11:58 PM UTC

Quoted Text

Oh dear! I can't wait to see your build review on this beast, that is providing it doesn't end up in the recycling bin

Cheers, D


Trashing it is a very attractive option right now, but I don't own the kit

Gabriel
Joel_W
Staff MemberAssociate Editor
AUTOMODELER
_VISITCOMMUNITY
New York, United States
Joined: December 04, 2010
KitMaker: 11,666 posts
Auto Modeler: 2,974 posts
Posted: Tuesday, March 03, 2020 - 11:04 AM UTC
Gabriel,
Oh my!! you've got my Revell Roush Mustang gluing issues beat by a country mile. I've never seen so many pin marks on a few pieces before. But since it's a closed wheel car, the suspension parts facing up will be inside the body and not visible. The bottom sides hopefully don't have any ejector pin marks.

What really is puzzling is that a kit dating only back a few years has an electric motor and gear assembly. Wonder where they came up with the idea from?

Joel
AussieReg
Staff MemberAssociate Editor
AUTOMODELER
#007
_VISITCOMMUNITY
Victoria, Australia
Joined: June 09, 2009
KitMaker: 8,156 posts
Auto Modeler: 2,953 posts
Posted: Tuesday, March 03, 2020 - 11:13 AM UTC

Quoted Text

Gabriel,
Oh my!! you've got my Revell Roush Mustang gluing issues beat by a country mile. I've never seen so many pin marks on a few pieces before. But since it's a closed wheel car, the suspension parts facing up will be inside the body and not visible. The bottom sides hopefully don't have any ejector pin marks. Joel


I thought I had fun with the underside of my '55, there are 25 ejector pin points on the one part!


At least these are masked a bit by the black paint, and some even look like they belong, but Gabriels parts look to be a clean-up nightmare

Cheers, D
Szmann
_VISITCOMMUNITY
Netherlands Antilles
Joined: September 02, 2014
KitMaker: 1,977 posts
Auto Modeler: 1,371 posts
Posted: Tuesday, March 03, 2020 - 02:23 PM UTC

Quoted Text

Gabriel,
Oh my!! you've got my Revell Roush Mustang gluing issues beat by a country mile. I've never seen so many pin marks on a few pieces before. But since it's a closed wheel car, the suspension parts facing up will be inside the body and not visible. The bottom sides hopefully don't have any ejector pin marks.


I'm taken aback too! I agree, most of them are out of sight but still!


Quoted Text


What really is puzzling is that a kit dating only back a few years has an electric motor and gear assembly. Wonder where they came up with the idea from?

Joel


My best guess is that the had (or bought) some old F-40 stock and cast anew only the interior and the body shell. That will explain the huge difference in plastic quality and molding between black, red and silver parts.


Quoted Text


I thought I had fun with the underside of my '55, there are 25 ejector pin points on the one part!


Haha! Damian, I'm quite sure your part holds the record for the most "pinned" one. My engine bloc has "only" 12, of which "only" 4 were interfering with the assembly process

UPDATE - I will let you know when two parts will fit together

(Sigh!)

The engine odyssey continues with adding the engine bottom. Well, it is hard to see any engine there, between the clothes pins and clamps, but you have to take my word for it. The part was horribly warped away from the bloc and sideways, that I had to glue it bit by bit, waiting for the glue to set before pressing down forward for another millimeter. A few seconds job on a Tamiya kit has become an full evening job on CC Lee kit!


Waiting for the glue to set on the engine, I started working on the body. Completely different plastic, soft and glossy this time, on which TET works without a hitch. The softness of the plastic provided me with some superficial scratches as well, but so far I'm thankful - isn't as bad as I thought it will be:


Well, no big surprise here. The frame of the triangular window has collapsed inside the box and it's ready to break:


For symmetry, same goes for the other side oh, well...


My solution to this problem it was to glue the windows inside the frame at this early stage, and to make sure the bent frames are glued to the edges of the windows. Even if I smeared a little the window with TET, it's all fine - I'm going to polish it and mask it before priming:


The spoiler and the engine hood came as separate parts, and of course they don't fit. Here you can see the gap running along the join line:


With the shell, the usual drill: removing parting lines, cleaning up flash, removing scratches, re-scribing panel lines... you know the job:


Here are the body parts scuffed up with 1500 grit sandpaper, but not quite ready for primer. First I need to patch the gap between spoiler and rear engine deck, and also to polish and mask the triangular windows:


For sure I'm going to need at least couple heavy coats of primer on this one, so it's never too early to start working on the body shell!

Cheers!
Gabriel
Joel_W
Staff MemberAssociate Editor
AUTOMODELER
_VISITCOMMUNITY
New York, United States
Joined: December 04, 2010
KitMaker: 11,666 posts
Auto Modeler: 2,974 posts
Posted: Wednesday, March 04, 2020 - 03:20 AM UTC
Gabriel,
Boy do I feel your pain and frustration with this build. You get a medal just for actually starting the kit with every intention of crossing the finish line. I'd have long ago tossed it and called it a day.

Looking forward to the body primed after your repair and prep work.

Joel
Szmann
_VISITCOMMUNITY
Netherlands Antilles
Joined: September 02, 2014
KitMaker: 1,977 posts
Auto Modeler: 1,371 posts
Posted: Wednesday, March 04, 2020 - 05:14 PM UTC

Quoted Text

Gabriel,
Boy do I feel your pain and frustration with this build. You get a medal just for actually starting the kit with every intention of crossing the finish line. I'd have long ago tossed it and called it a day.

Looking forward to the body primed after your repair and prep work.

Joel


:) I would appreciate much more a Tamiya kit than a medal right now - but thank you for your compassion. I know you had also some struggles with add-on parts in your kits, and you never gave up. For what I remember you have 100% kit completion ratio on AutoModeler (current build excluded).

Update
I had to deal with the triangular windows first, and I sanded them flush with the frame. Now the frame of the windshield, the windows proper and the pillars are one piece, the bend from the pillars removed and the whole assembly sturdier.


Next step it was to restore the clarity of the windows, and I did that by progressively sanding with 1500 and 3000 grit sandpaper, followed by all three grades of Tamiya polishing compounds


The restored windows masked for the remaining of the build, to protect them. I don't know if you have noticed in the previous image that the edge of the pillar where it meets the "glass" it is a little distorted as the pillar was bent. When I masked, I used a straight edge with the intention to correct the shape of the pillar by painting:


... and yes, I wanted to do the rear end gap too, but I realized one side was only half glued - I mush have moved it when fixing the other end of the spoiled. I redid the joint, secured it with Tamiya masking tape, I let it set overnight:


Oh, yeah! Let's not forget my precious engine. The basic assembly is finished. Please kindly note the gaps on the left side of the engine bottom, at the middle and at the closer end


Also other two gaps in the left of the image and right behind the front engine cover on the right hand side. If would this be for real, you couldn't even fill the engine with oil - it would have emptied faster than one can pour thru the oil filler hole!


After I took these last two beautiful pictures, I trimmed as much as I could from the still present flash, I rounded a few curves from the exhaust assembly, smoothing the scarred surfaces with TET as I went. When I had enough of this pleasant to addiction activity, I put it aside for priming. Yes, I decided to prime it first with grey for better visibility, but also I am unsure how the stubborn silver plastic will react to the putty.

Gabriel
Joel_W
Staff MemberAssociate Editor
AUTOMODELER
_VISITCOMMUNITY
New York, United States
Joined: December 04, 2010
KitMaker: 11,666 posts
Auto Modeler: 2,974 posts
Posted: Thursday, March 05, 2020 - 02:41 AM UTC
Gabriel,
Nice job on the glass side windows, the fit is perfect. And with masking, then painting, I doubt that anyone will ever notice the slight issue with the pillar.

As for the engine wholes, gaps, and generally crappy fit, I'd say that the Commodore would be rolling over in his grave that any model company would butcher one of his engines/transaxles like this company has. At least it's a display model so you won't be pouring any oil, or fluids in any time soon For the most part all of this will be hidden under the body, so there's where all your focus should be moving forward.

And as for my perfect build record, unfortunately, it ain't so. I tossed the old Tamiya 1/18 scale Lola T160 as just way to much effort for just to little gain. But that's it as far as I can recall.

Joel
Szmann
_VISITCOMMUNITY
Netherlands Antilles
Joined: September 02, 2014
KitMaker: 1,977 posts
Auto Modeler: 1,371 posts
Posted: Thursday, March 05, 2020 - 08:14 AM UTC

Quoted Text


And as for my perfect build record, unfortunately, it ain't so. I tossed the old Tamiya 1/18 scale Lola T160 as just way to much effort for just to little gain. But that's it as far as I can recall.

Joel


Ugh, I missed that episode!

Yes, only the air intakes and the top of the engine will be seen thru the rear glass panel, from a normal perspective, and I think you're right, but I think I'm suffering a little from AMS.

Gabriel
AussieReg
Staff MemberAssociate Editor
AUTOMODELER
#007
_VISITCOMMUNITY
Victoria, Australia
Joined: June 09, 2009
KitMaker: 8,156 posts
Auto Modeler: 2,953 posts
Posted: Thursday, March 05, 2020 - 11:21 AM UTC
You are making good progress and your remedies for the kit problems are excellent so far!

I can't say that I have ever "binned" a kit, although I came very close with the old Modelcraft F-82E Twin Mustang. Definitely the worst fitting kit I have ever encountered. Several kits have however been moved from the bench to the "paint mule" box, with the remaining parts going in the spares box. This kit would be getting very close to that point.

Cheers, D
Szmann
_VISITCOMMUNITY
Netherlands Antilles
Joined: September 02, 2014
KitMaker: 1,977 posts
Auto Modeler: 1,371 posts
Posted: Thursday, March 05, 2020 - 02:15 PM UTC

Quoted Text

You are making good progress and your remedies for the kit problems are excellent so far!

I can't say that I have ever "binned" a kit, although I came very close with the old Modelcraft F-82E Twin Mustang. Definitely the worst fitting kit I have ever encountered. Several kits have however been moved from the bench to the "paint mule" box, with the remaining parts going in the spares box. This kit would be getting very close to that point.

Cheers, D


D., the only Mintcraft I ever owned was a TR3 and I gifted a kid with. It was just to bad. I doubt my Ferrari can do it in the spare box either, because it is just too atypical. Maybe the wheels, tires and brake disks. But I'm gonna hold into it until the finish!

UPDATE
The spoiler was well glued in place today and I could work it out. First I masked along the badly mating edges:


Then I applied a liberal amount of Tamiya putty:


When the putty was dry enough to hold an edge but not hard, I removed the masking tape. In this way, the seam line to be corrected is very visible and very easy to deal with by sanding across:


The putty sanded down with a nail file, then smoothed out with 600 grit sandpaper, followed by wet sanding with 2000 grit:


Finally I was able to dry-fit the whole body together:


But, being a "Barchetta", I find it much nicer looking with the roof down. However, I'm going to paint the roof too with the body.:


Cheers!
Gabriel
Joel_W
Staff MemberAssociate Editor
AUTOMODELER
_VISITCOMMUNITY
New York, United States
Joined: December 04, 2010
KitMaker: 11,666 posts
Auto Modeler: 2,974 posts
Posted: Friday, March 06, 2020 - 02:42 AM UTC
Gabriel,
Nice going on the contouring of the rear quarter panel. Should look dead on once it's primed & then painted.

Joel
Szmann
_VISITCOMMUNITY
Netherlands Antilles
Joined: September 02, 2014
KitMaker: 1,977 posts
Auto Modeler: 1,371 posts
Posted: Friday, March 06, 2020 - 04:18 AM UTC

Quoted Text

Gabriel,
Nice going on the contouring of the rear quarter panel. Should look dead on once it's primed & then painted.

Joel


By using solvent based putty, I might experience some sinking, but I am prepared for it This occasion would have been the perfect opportunity to try Damian's brevetted sprue-goo, but I was too lazy to make any

UPDATE - two or more parts fit together, eventually

i primed the engine. This coat of primer was intended only to help me identify the assembly errors and imperfections. It worked quite good and now I was able to identify more errors than I knew of


Better news with the interior. The parts actually fit. All of them. The casting is still bad, but the breakdown is quite brilliant. Half bath tub molding is very smart: minimizes the assembly yet let full access for painting / masking. The door cards not only fit perfectly, but they have a very wide contact surface. The dash is again very cleverly parted in two, with a horizontal and a vertical component - just brilliant in its simplicity! The seats fit just fine.


The interior primed and some sanding done - as said, the molding is sloppy - and detailing of the seats started. I used some craft acrylic red for the inserts - a rather bad choice with respect to the paint's quality, but I like the shade. One more coat of red paint was applied after this picture was taken


... and now I'm preparing and evil plan to hijack your focus on this build )) Stay tuned!

Cheers!
Gabriel
Joel_W
Staff MemberAssociate Editor
AUTOMODELER
_VISITCOMMUNITY
New York, United States
Joined: December 04, 2010
KitMaker: 11,666 posts
Auto Modeler: 2,974 posts
Posted: Friday, March 06, 2020 - 12:33 PM UTC
Gabriel,
Gotta say that the engine/transaxle looks a million times better with some primer on it. The interior is certainly coming along nicely. I'm sure that the end results of the two tone seats and I'm guessing door panels will be up to your usual standards.

As for using D's magic goop, it does in fact shrink as it dries and cures. It's just the nature of the beast as anything that's in a semi liquid state will shrink as it's liquid base evaporates. The key is having the fill line higher then the plastic base line. Hope that makes some sense.

Joel
AussieReg
Staff MemberAssociate Editor
AUTOMODELER
#007
_VISITCOMMUNITY
Victoria, Australia
Joined: June 09, 2009
KitMaker: 8,156 posts
Auto Modeler: 2,953 posts
Posted: Friday, March 06, 2020 - 02:33 PM UTC
Indeed, it does tend to shrink a bit, but one of the benefits is that the next application if required bonds fully to the first.
As Joel said, a slightly high build works beautifully.

Cheers, D
Szmann
_VISITCOMMUNITY
Netherlands Antilles
Joined: September 02, 2014
KitMaker: 1,977 posts
Auto Modeler: 1,371 posts
Posted: Saturday, March 07, 2020 - 12:13 AM UTC
Joel and Damian, it makes perfect sense what are you saying. when I apply solvent based putty as I did, the bead remaining after removing the masking tape stands proud. If I let it dry overnight the evaporation process is done and the putty doesn't shrink noticeable further by itself. The shrinkage reappear when I apply solvent based primer or paint which reactivate the putty. That's why I said I am prepared for it when the primer will show the small sinking, I will fill it up with Tamiya Surface Primer bead, let it cure and re-prime. Usually it works on small surfaces / cracks. On larger surfaces it's more of a problem, as I encountered in my Dacia 1100 build, where I couldn't stop the shrinkage not even after three recalls and I used some acrylic putty as buffer between putty and primer. It worked.

Gabriel
Hwa-Rang
_VISITCOMMUNITY
Kobenhavn, Denmark
Joined: June 29, 2004
KitMaker: 6,760 posts
Auto Modeler: 2,182 posts
Posted: Saturday, March 07, 2020 - 01:15 AM UTC
You're doing a great job, on an awful kit. Even though you might rather bin this kit, look at the bright side, if(when) you pull this off, every future build will be pure bliss.
Szmann
_VISITCOMMUNITY
Netherlands Antilles
Joined: September 02, 2014
KitMaker: 1,977 posts
Auto Modeler: 1,371 posts
Posted: Saturday, March 07, 2020 - 02:05 AM UTC

Quoted Text

You're doing a great job, on an awful kit. Even though you might rather bin this kit, look at the bright side, if(when) you pull this off, every future build will be pure bliss.


You're right, Jesper! Dealing with this kind if kit can be very rewarding if you can manage to do something half decent out of it. But also can put you off bench for a while... it's all about the right timing.
And, yes, if I manage to get it to the end, I'll be joyriding next Revell-Monogram (or not?! ) In the box the next kit looks very good, but I had surprises.

Gabriel
Joel_W
Staff MemberAssociate Editor
AUTOMODELER
_VISITCOMMUNITY
New York, United States
Joined: December 04, 2010
KitMaker: 11,666 posts
Auto Modeler: 2,974 posts
Posted: Saturday, March 07, 2020 - 02:15 AM UTC
For years, and I literally mean for years, I had issues with Squadron Green Stuff, which is what we used as filler. Some guys used Bondo sealer for putty work, but it acted just like Green Stuff did.

I lay on a good coat to fill and cover every seam back in the 1970's on my aircraft models, as that was all the rage then. Then after a day or two it felt rock hard, looked dry, and you could gentlely scribe it with your fingernail, as rescribing hadn't been invented as yet. We all air brushed with Pactra enamels without primer. Actually, no one made a real primer back then either. Took about 2-3 weeks to finish a 1/72 scale aircraft. 1st competition was our local club. The model looked as I had finished it. But by the time I got the IPMS regional, the seams started to show slightly And this happened on every build. It happened to all of us using Lacquer based fillers. No one really had an answer to this issue, as none of us knew what was actually causing it to occur.

I didn't find out the reasons why till several years ago when Chuck, a incredible large Scale aircraft modeler from Canada said that it was caused by the fact that the traditional putties still had a small amount of LT within it's structure, and over a long period of time, lets say a good month, it evaporated off. Chuck's method was to bypass this issue was to fill small openings with just thick CA glue. For larger openings he uses pcs of scrap plastic for a base, then super thick CA glue. Give it a few hours to dry, then sand. Don't wait 24 hrs or it's so hard that sanding becomes a major job.

So CA glue is my go to filler for larger areas, but I do still prefer Tamiya filler when I need it for feathering.

Joel
 _GOTOTOP