

Thanks for the support gents, very much appreciated as always. I'm really happy with the colour and depth of clear on the red Cabrio now, it just needs a polish to cut back a bit of the surface roughness.
Cheers, D


Go to automodeler.com for the current dynamic site!
Cars
Discuss all types of automotive modeling here.
Discuss all types of automotive modeling here.
Hosted by Jim Starkweather
BMW 507 Coupe and Cabrio Dual Build

AussieReg

#007

Joined: June 09, 2009
KitMaker: 8,156 posts
Auto Modeler: 2,953 posts

Posted: Sunday, September 20, 2020 - 12:05 PM UTC

AussieReg
#007
Joined: June 09, 2009
KitMaker: 8,156 posts
Auto Modeler: 2,953 posts
Posted: Monday, September 21, 2020 - 02:49 AM UTC
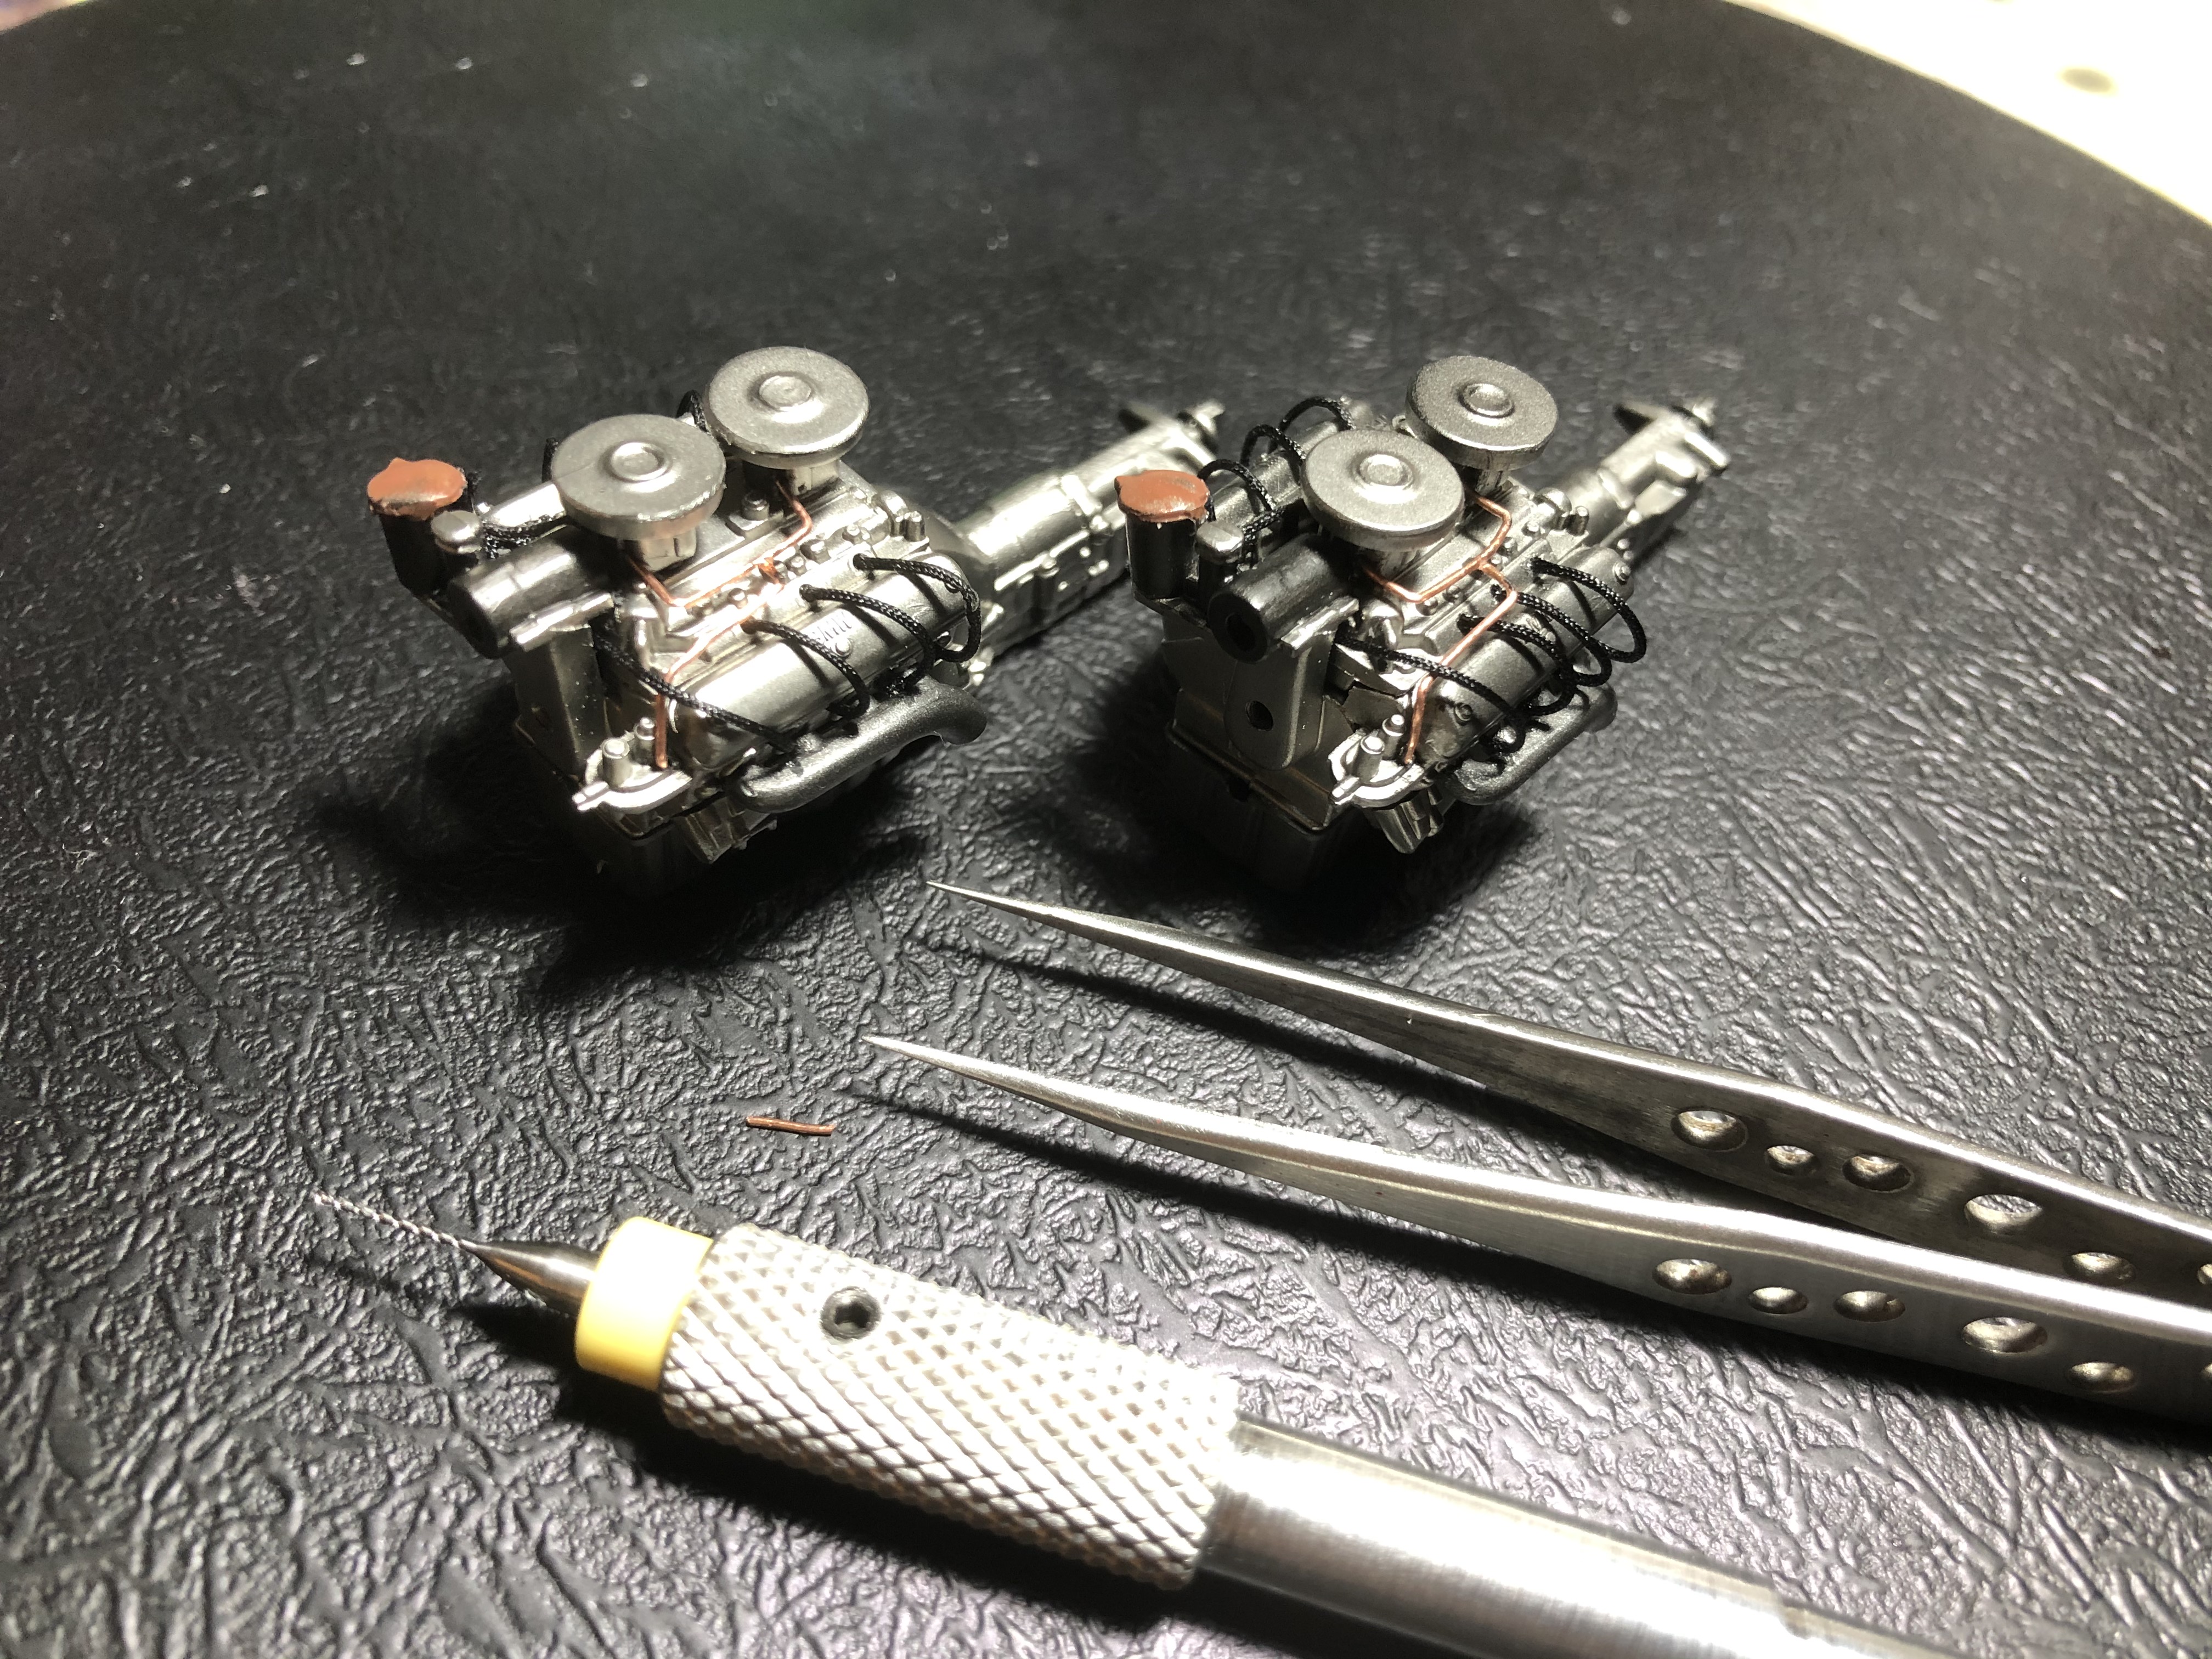
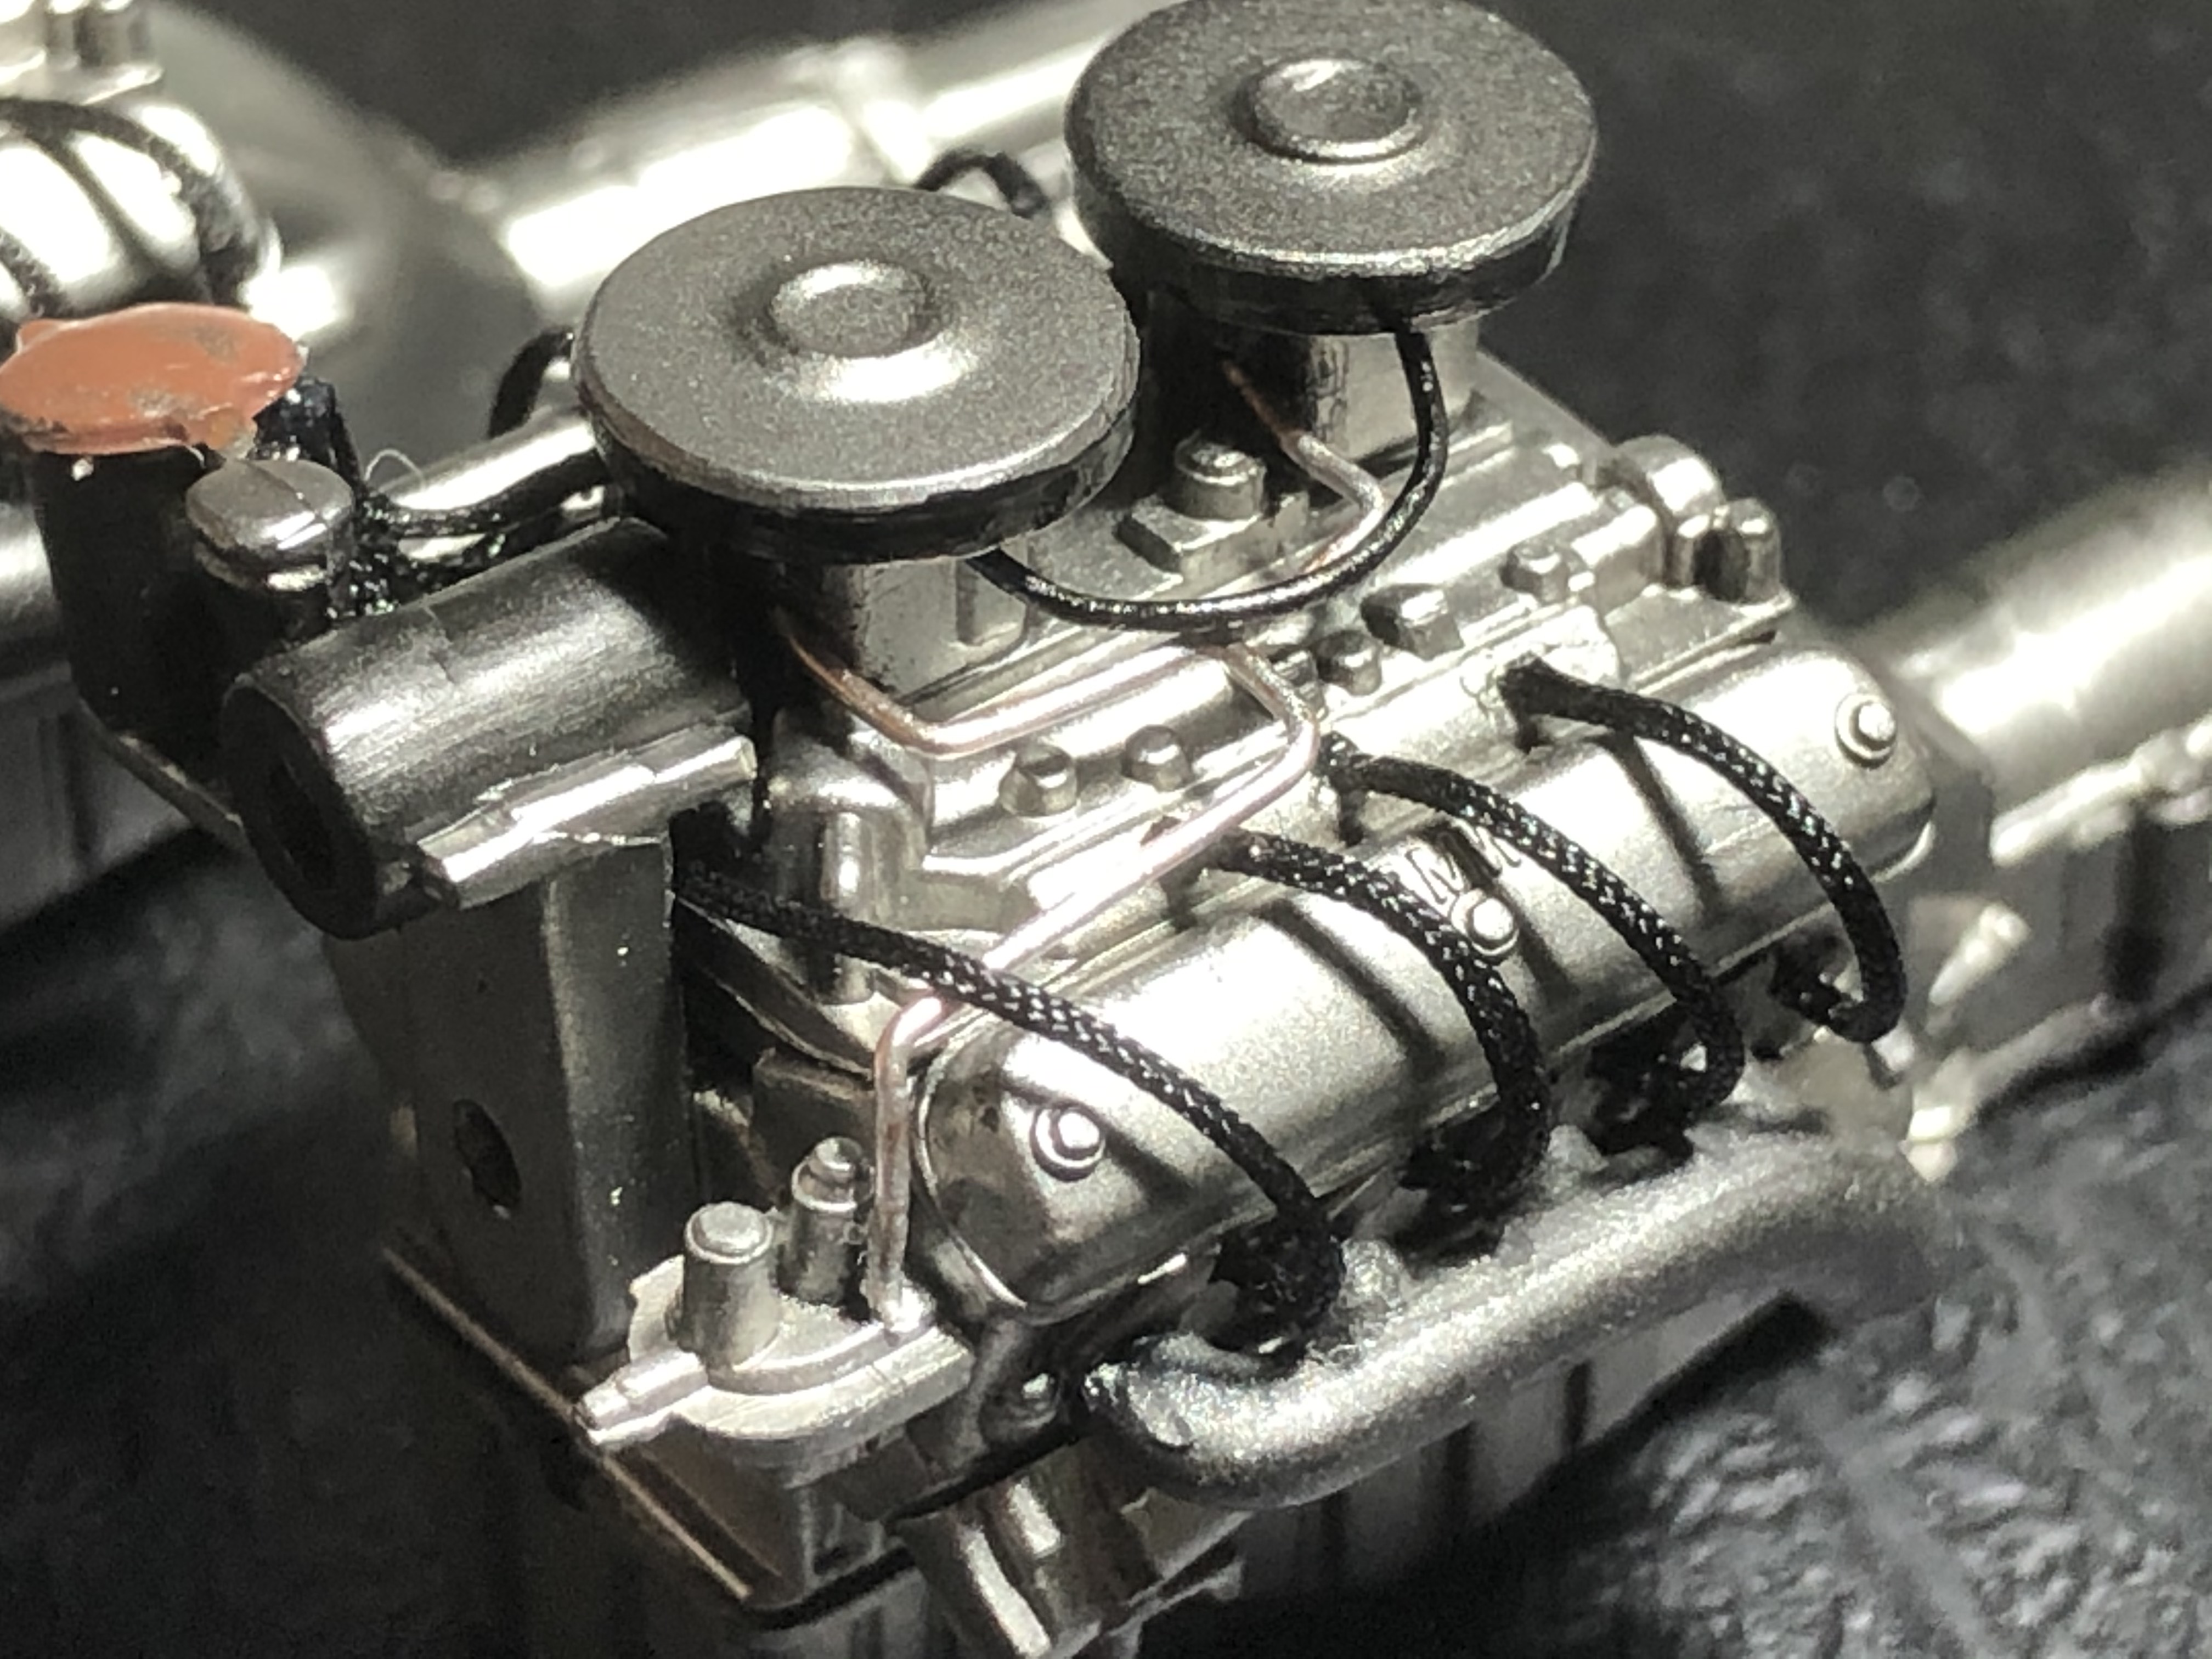
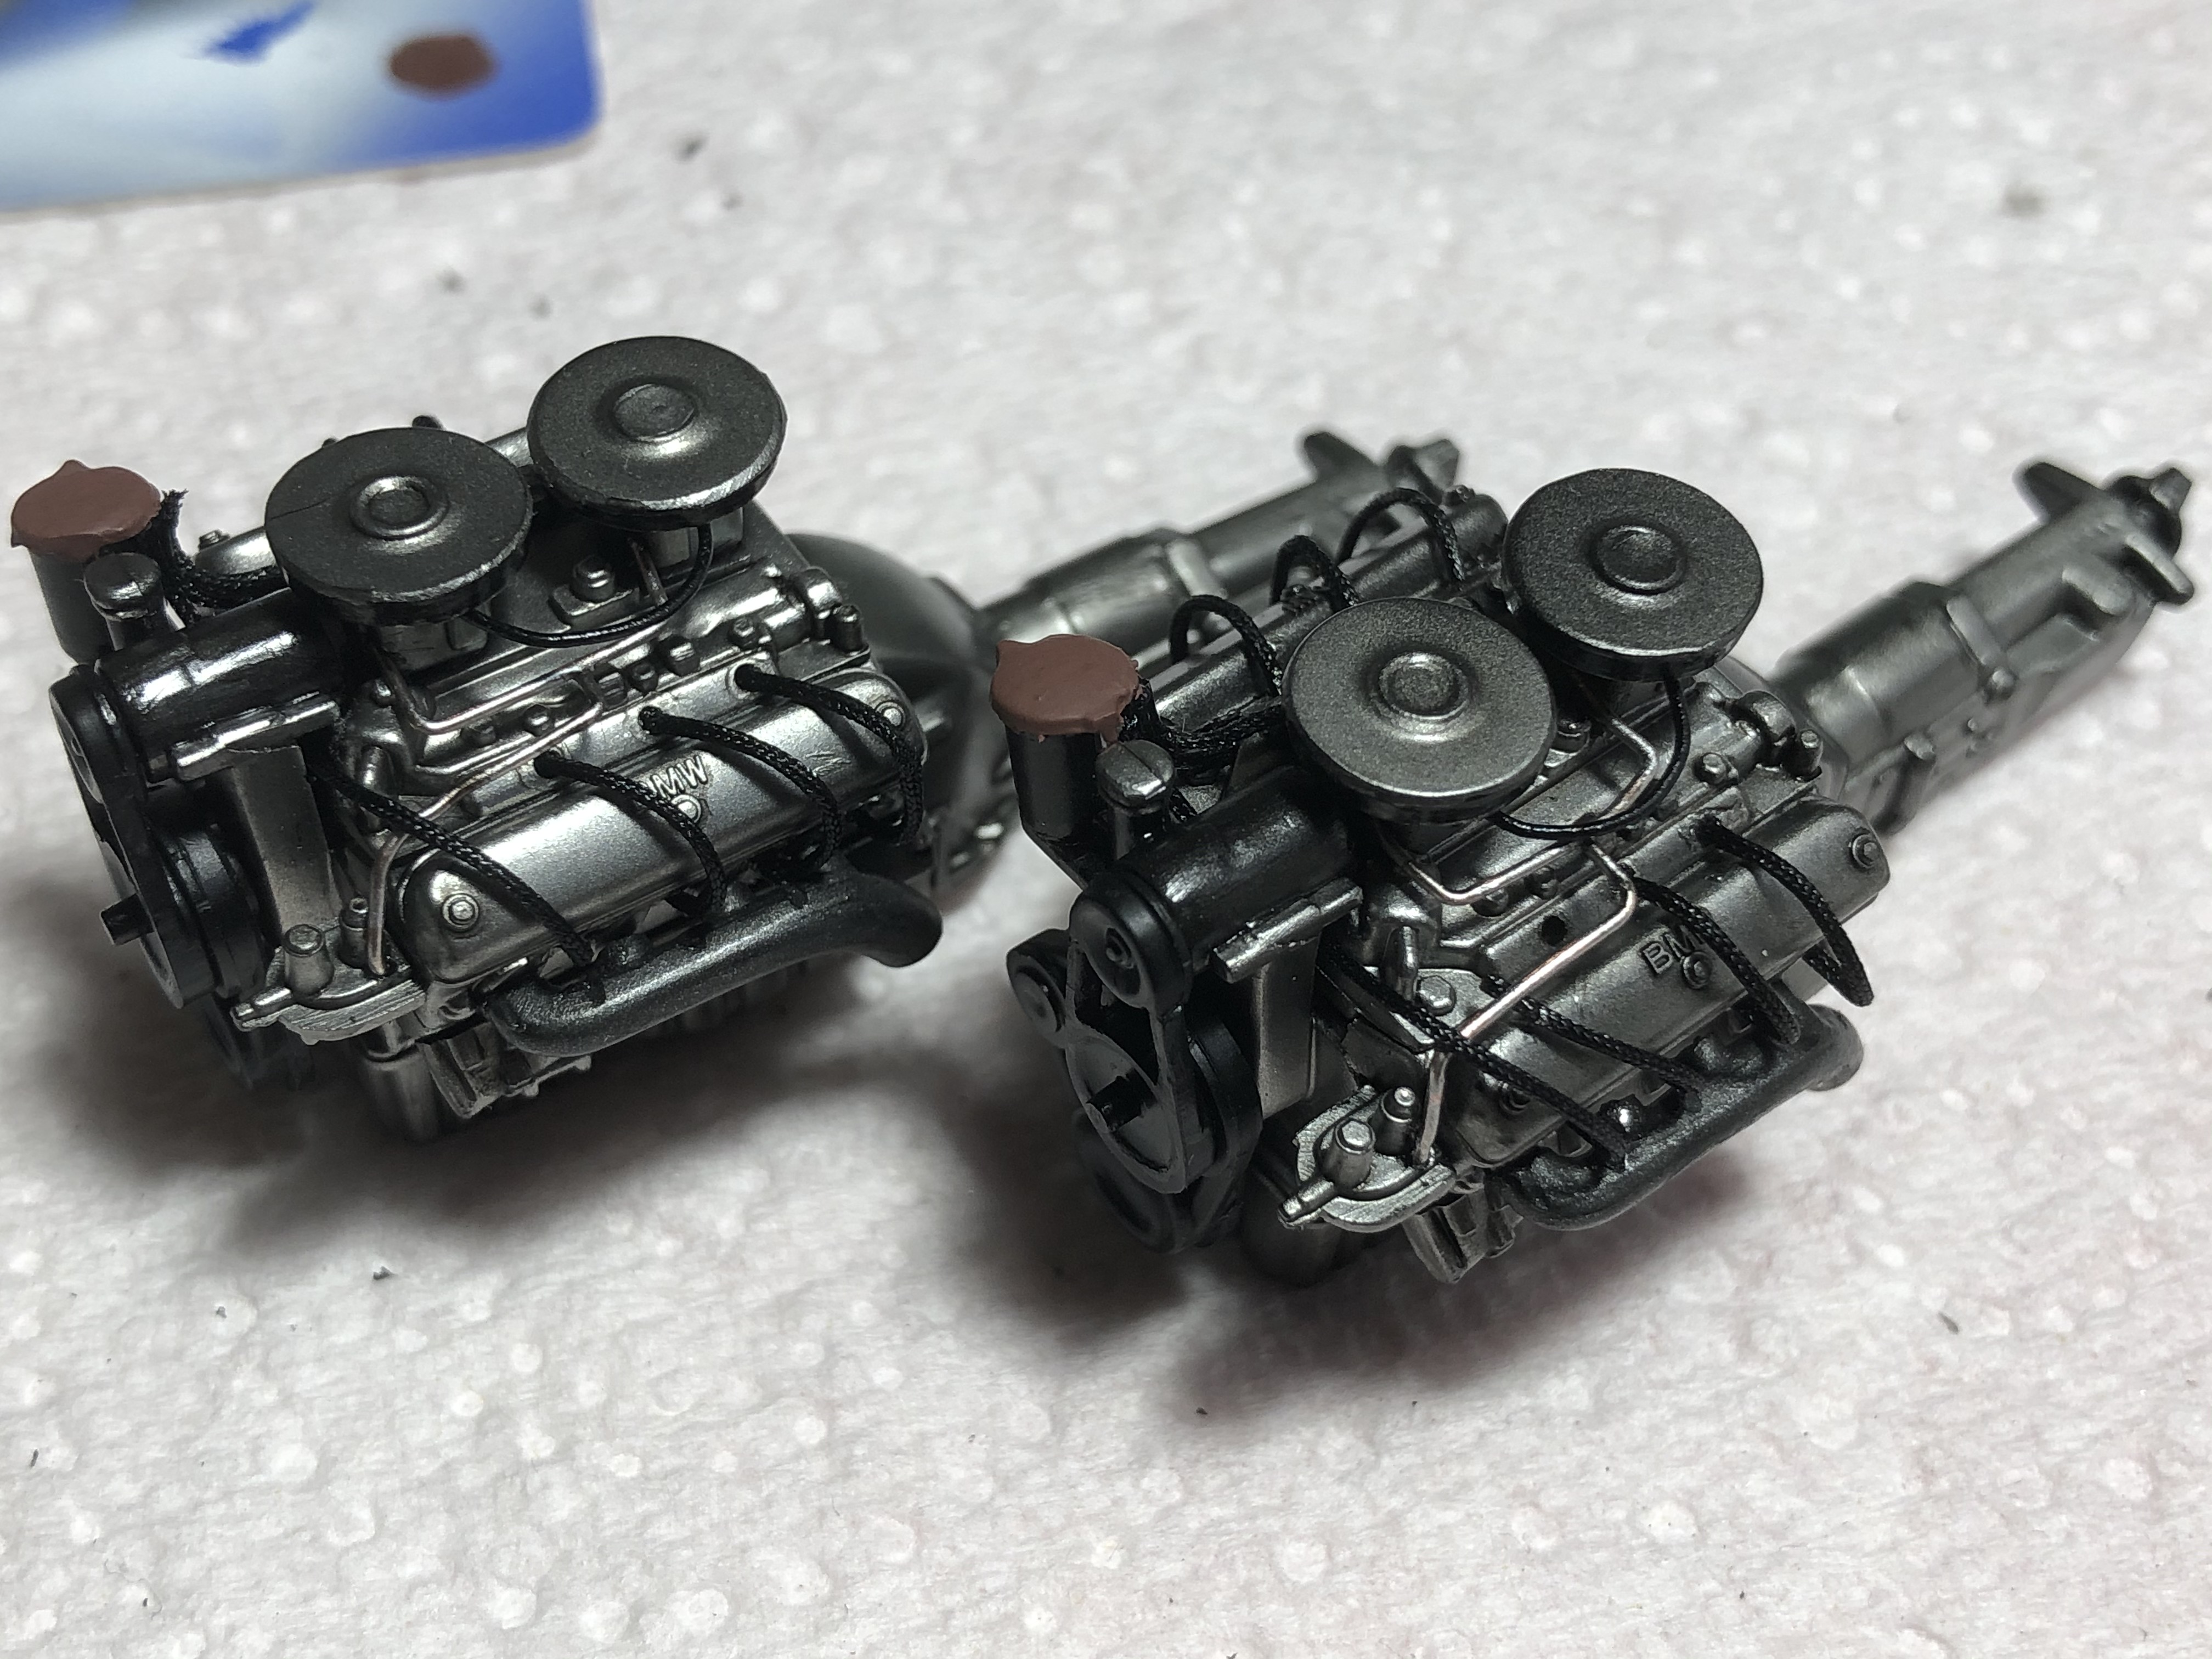
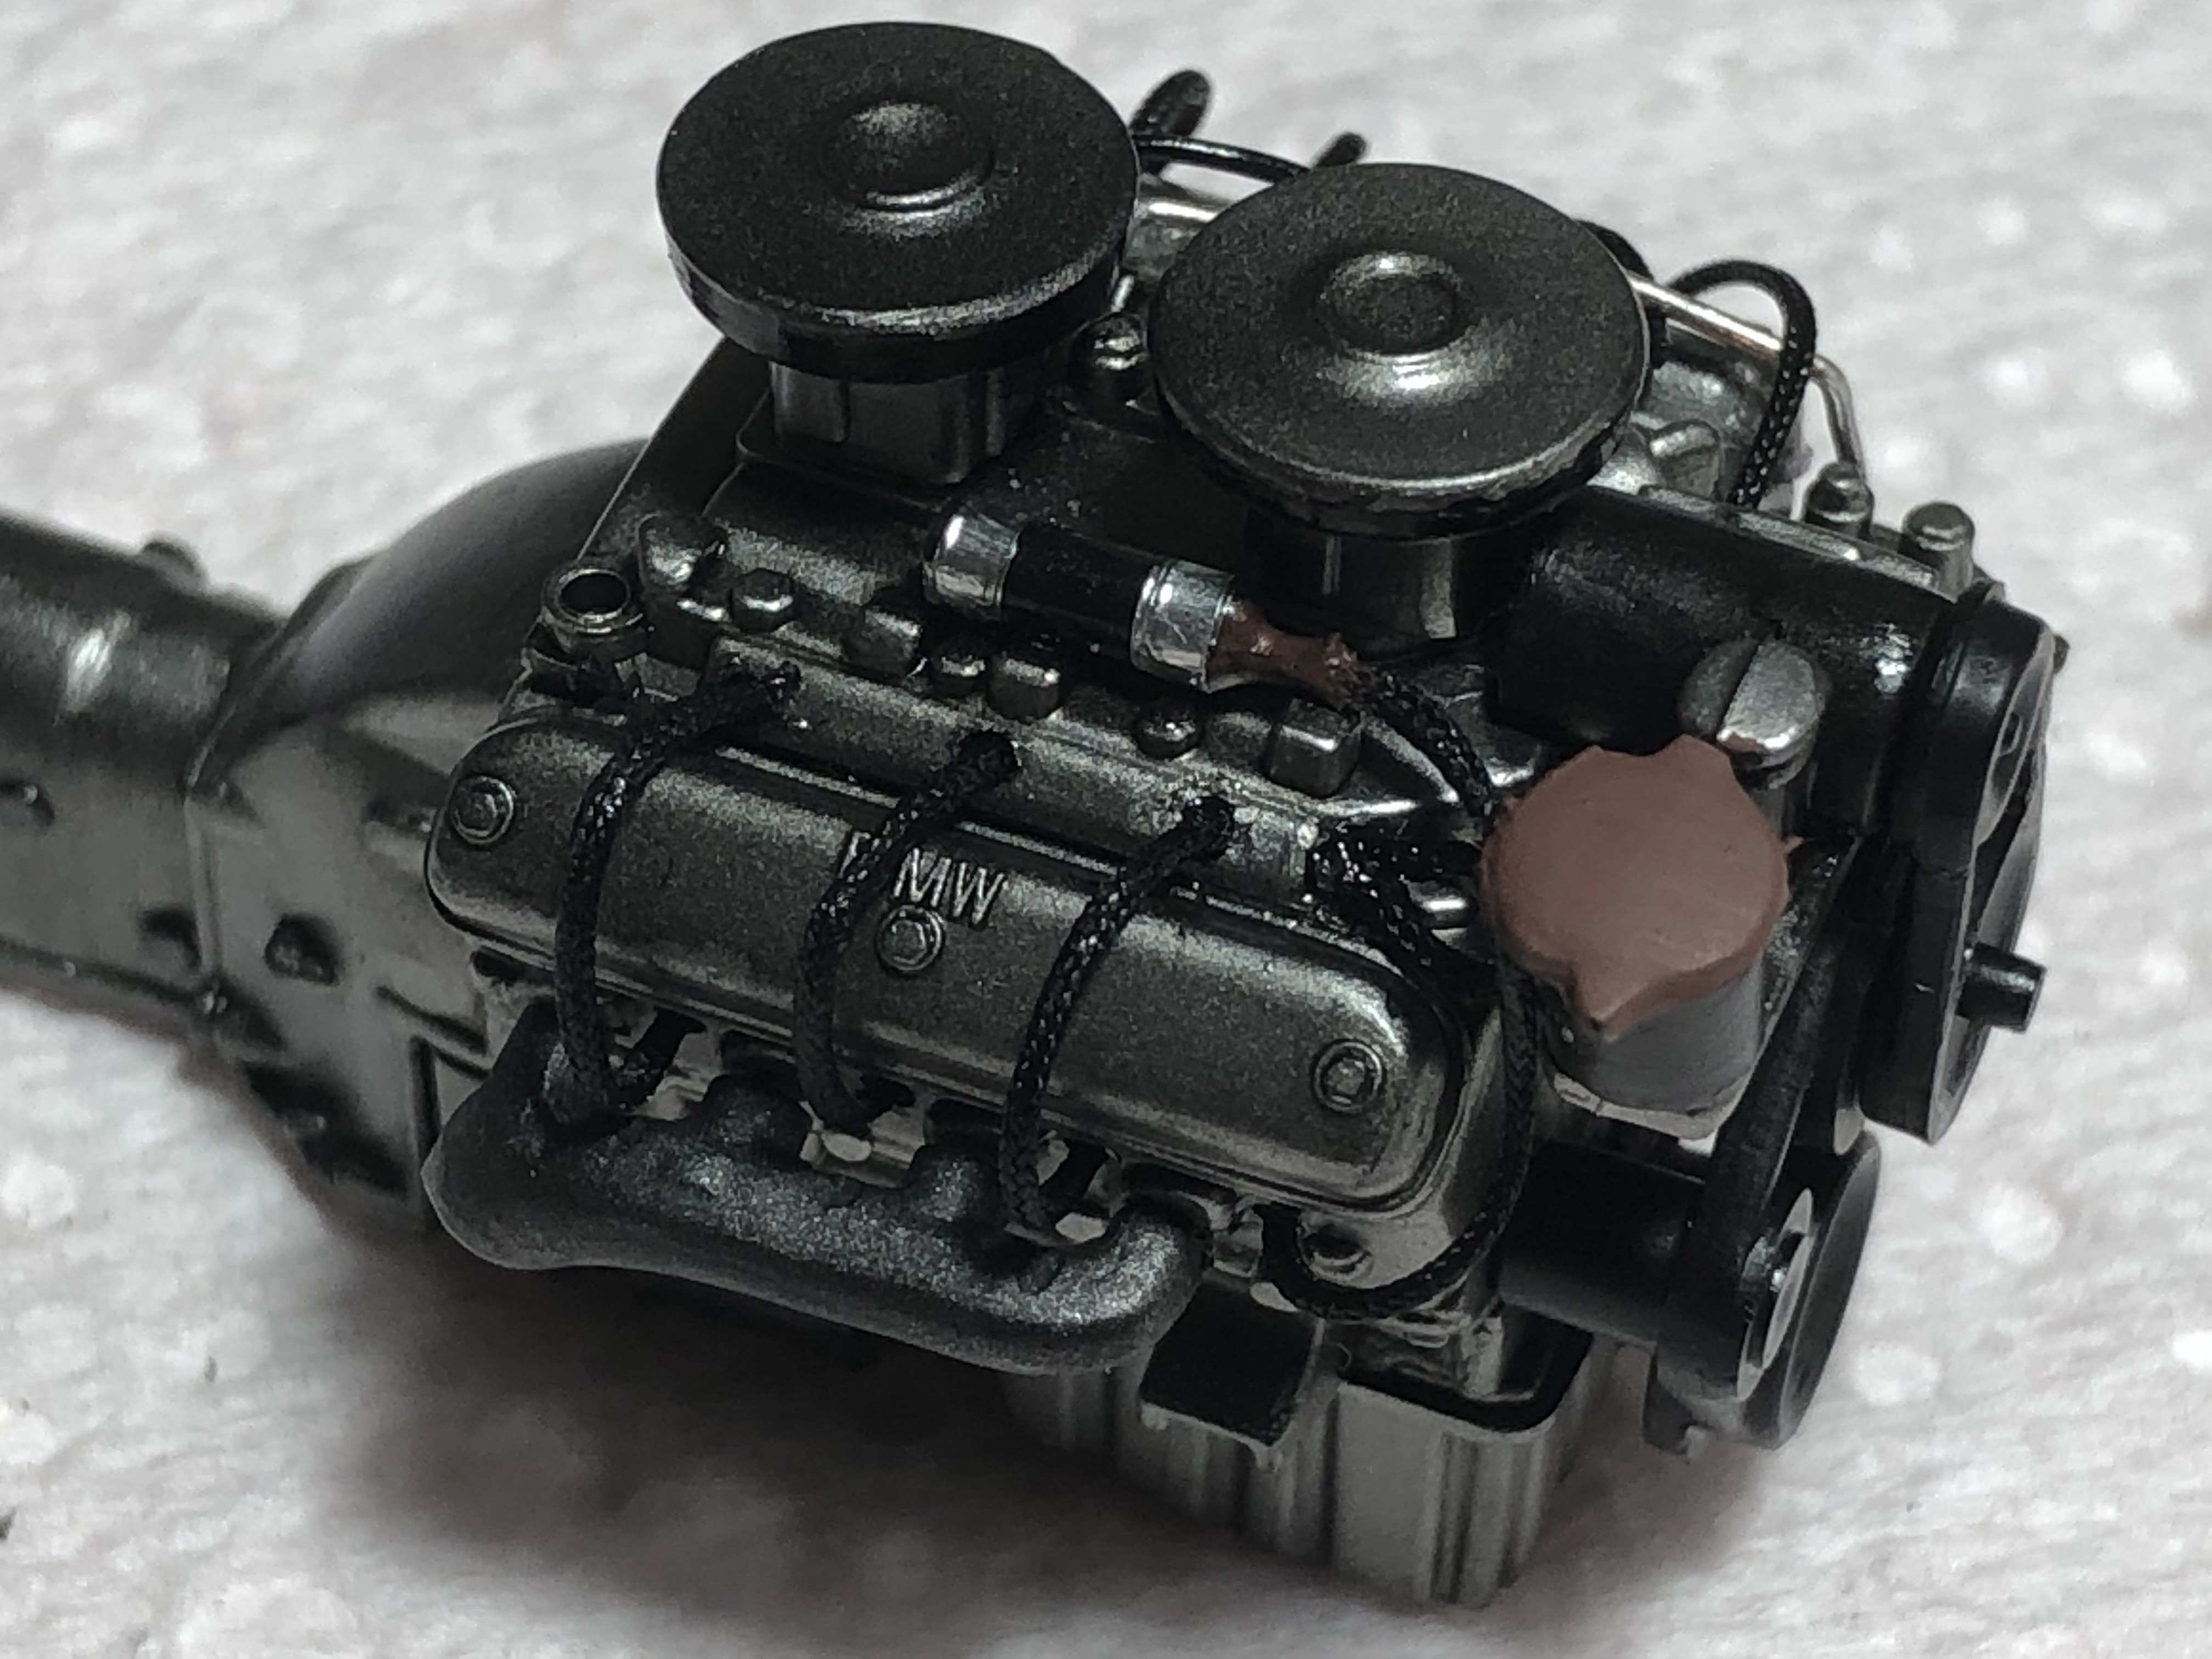
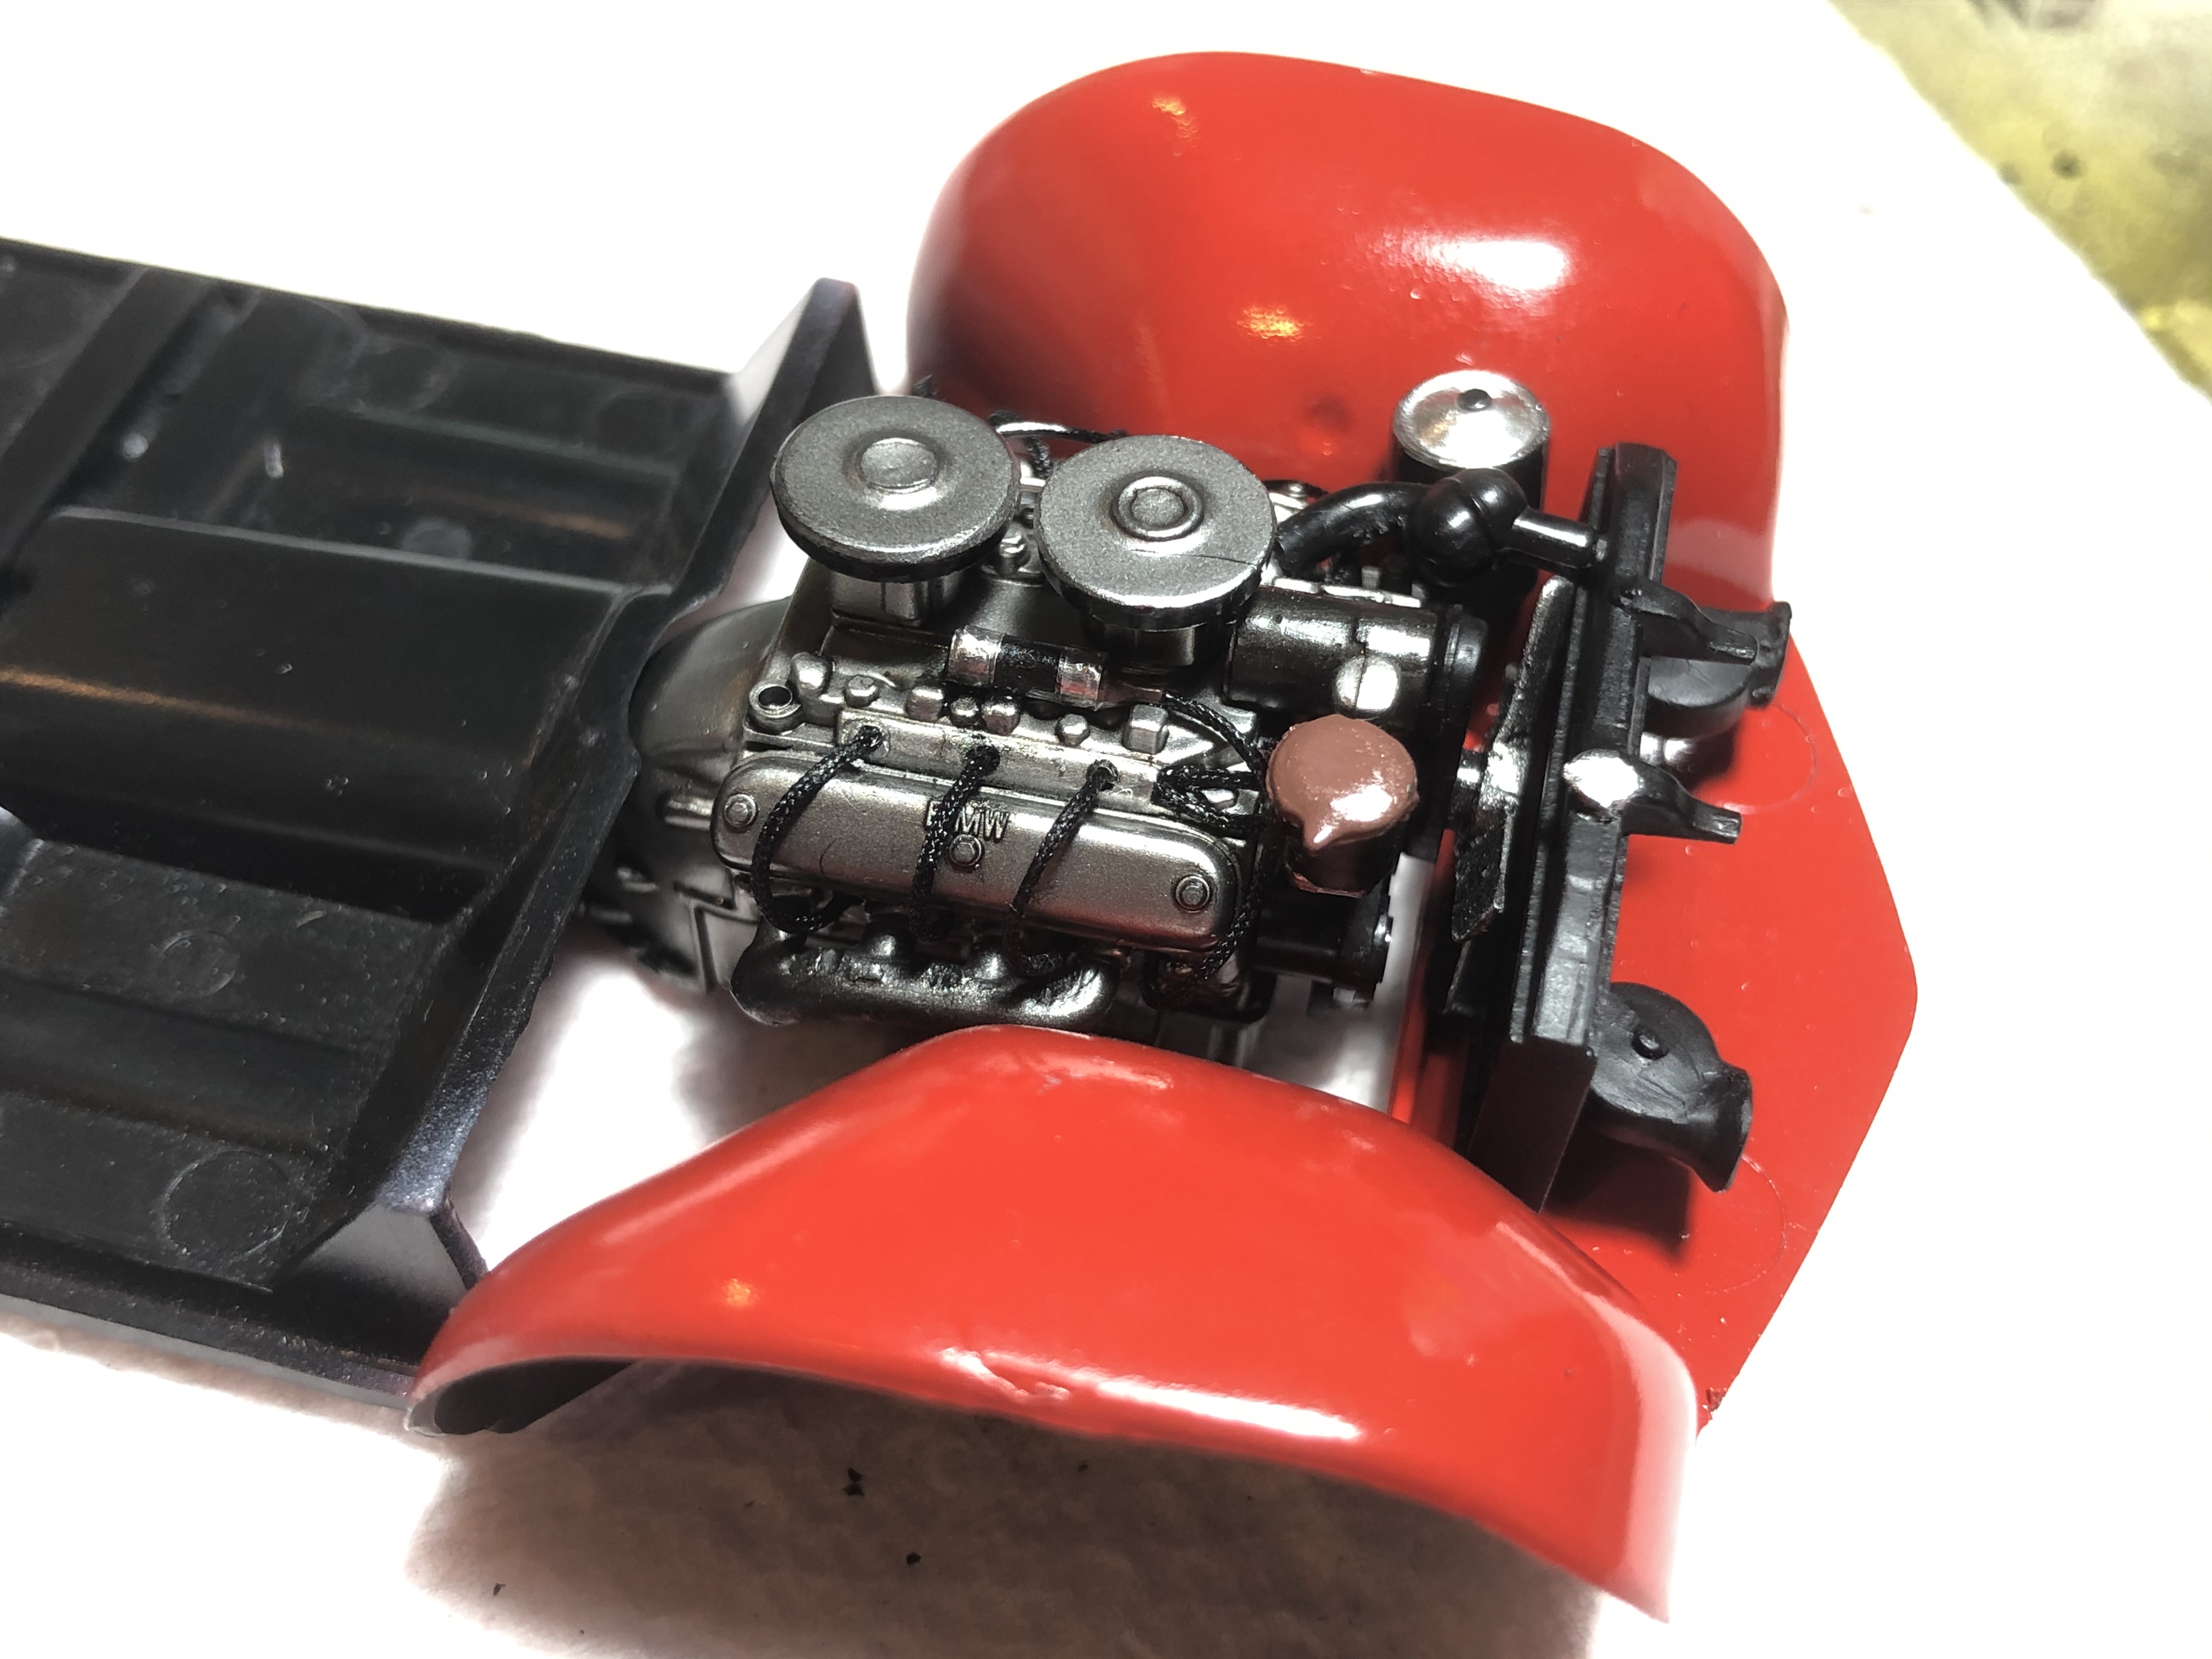
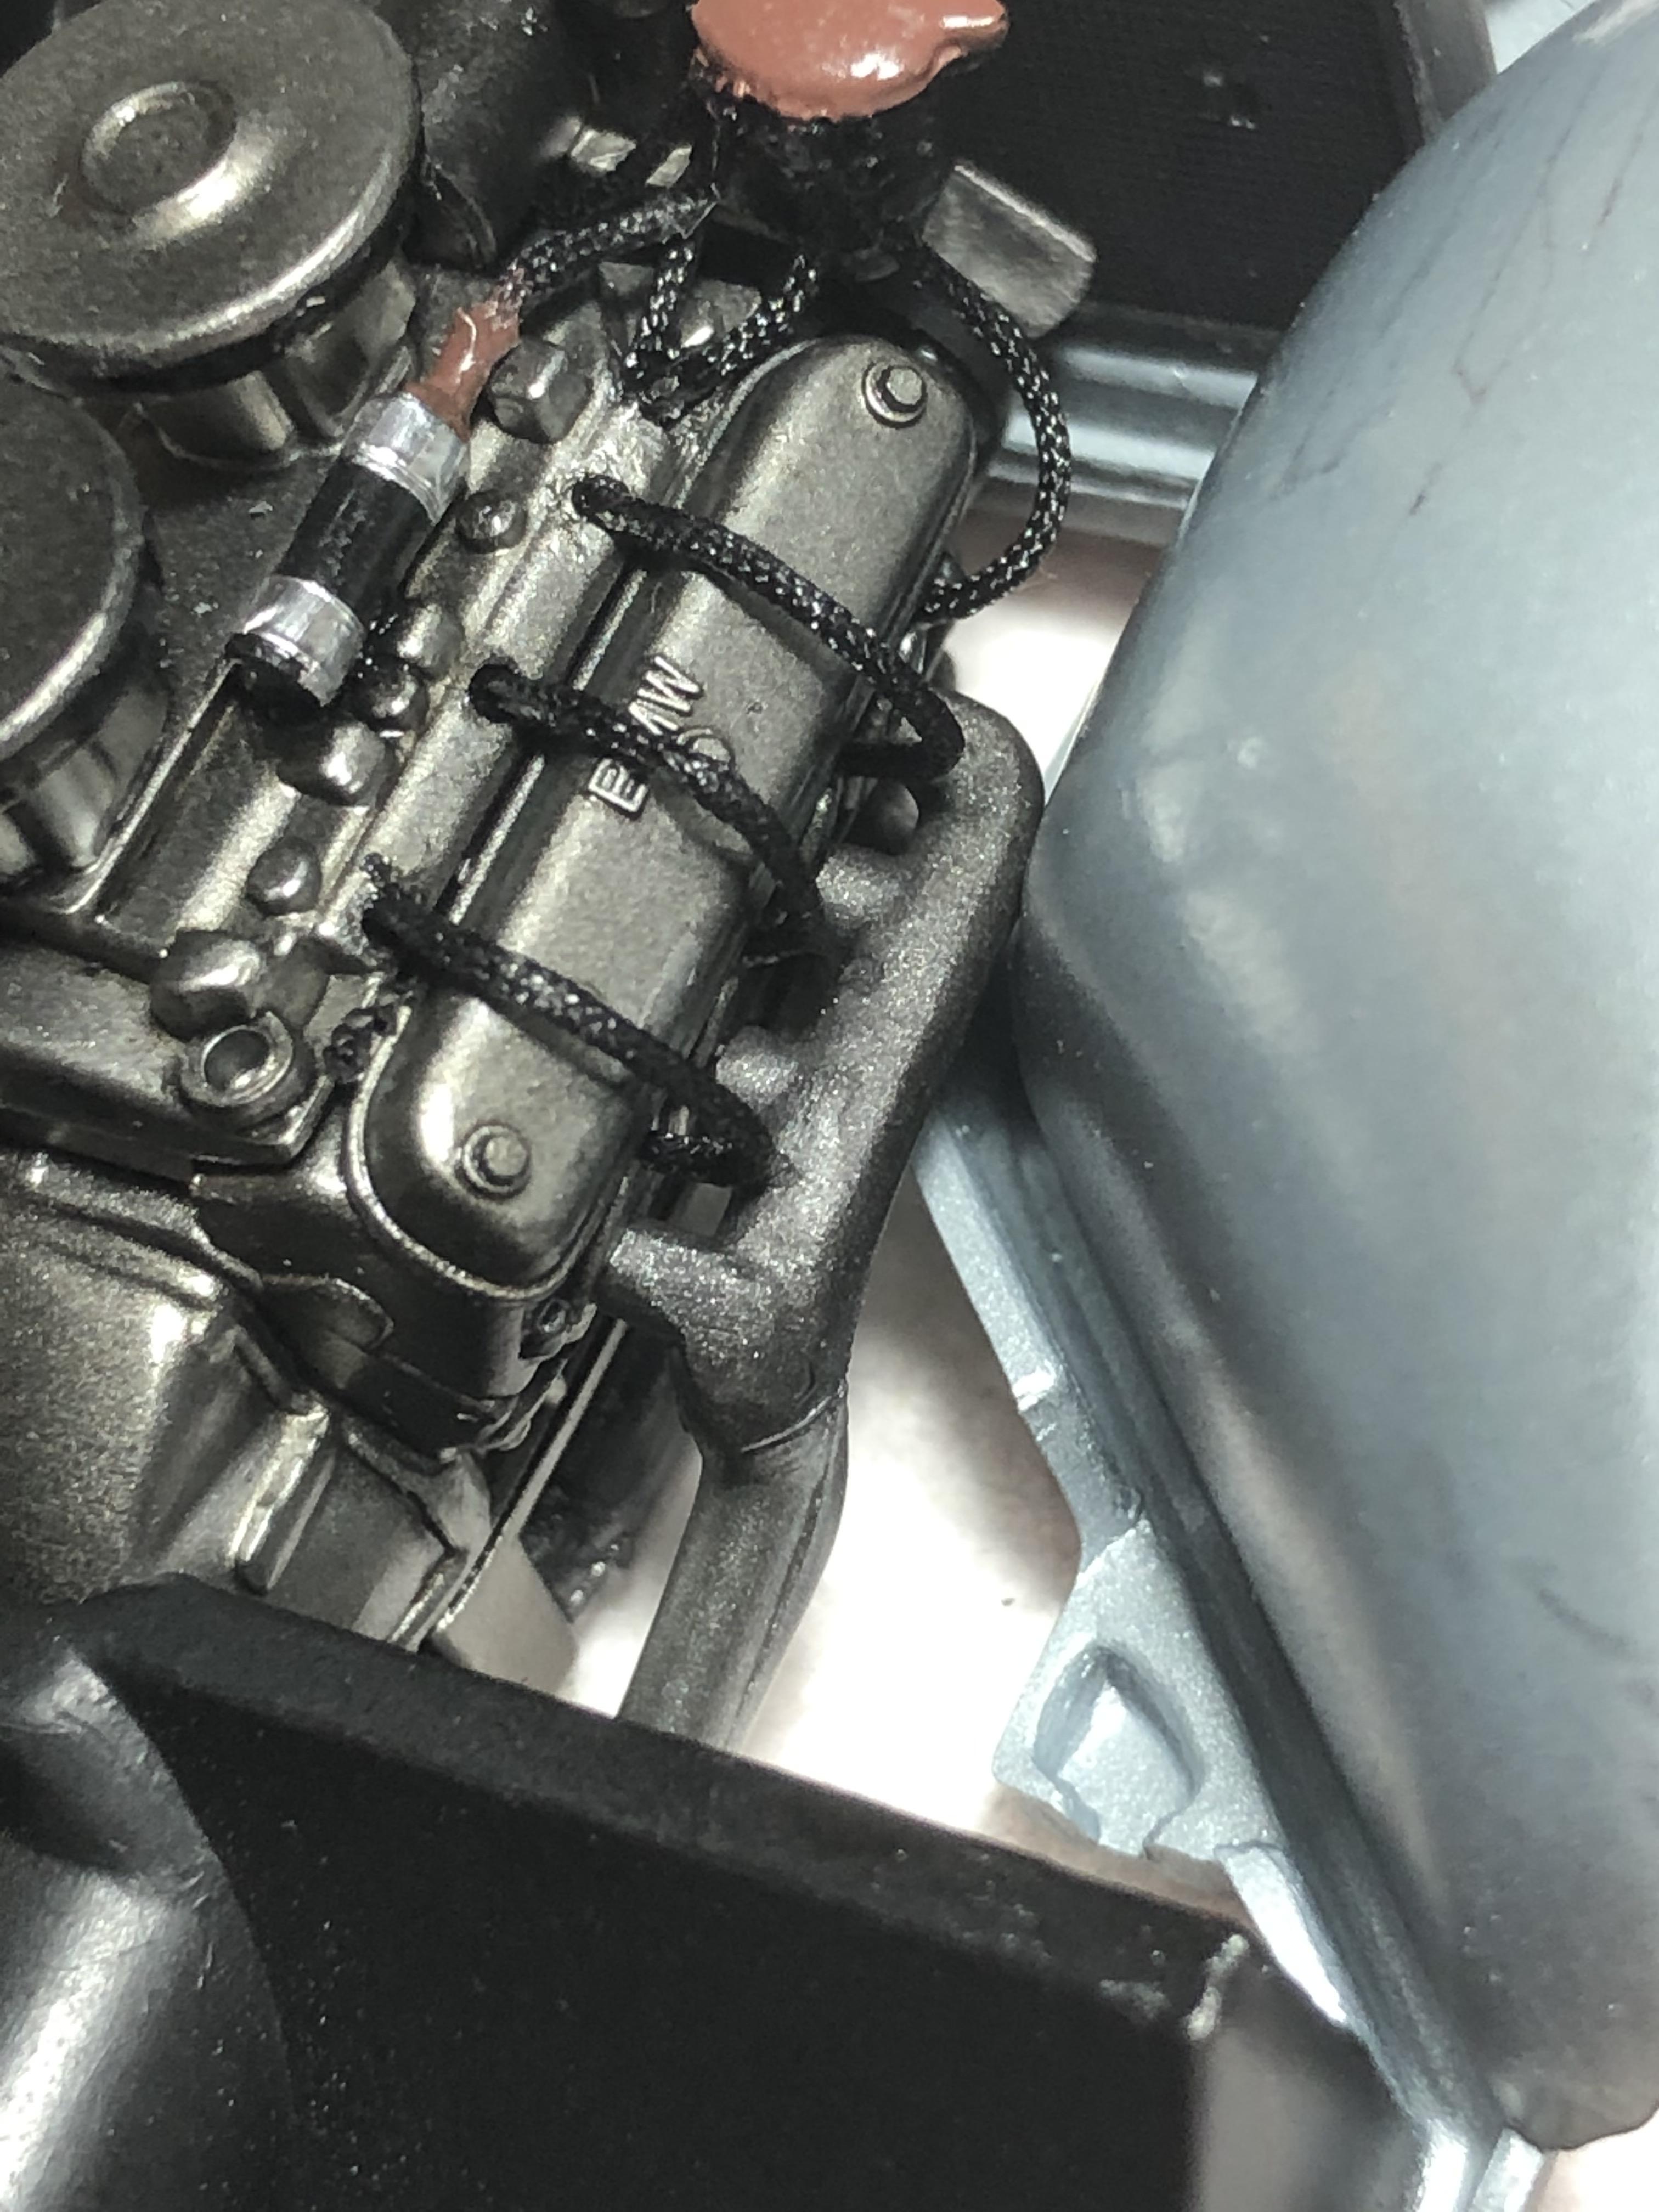
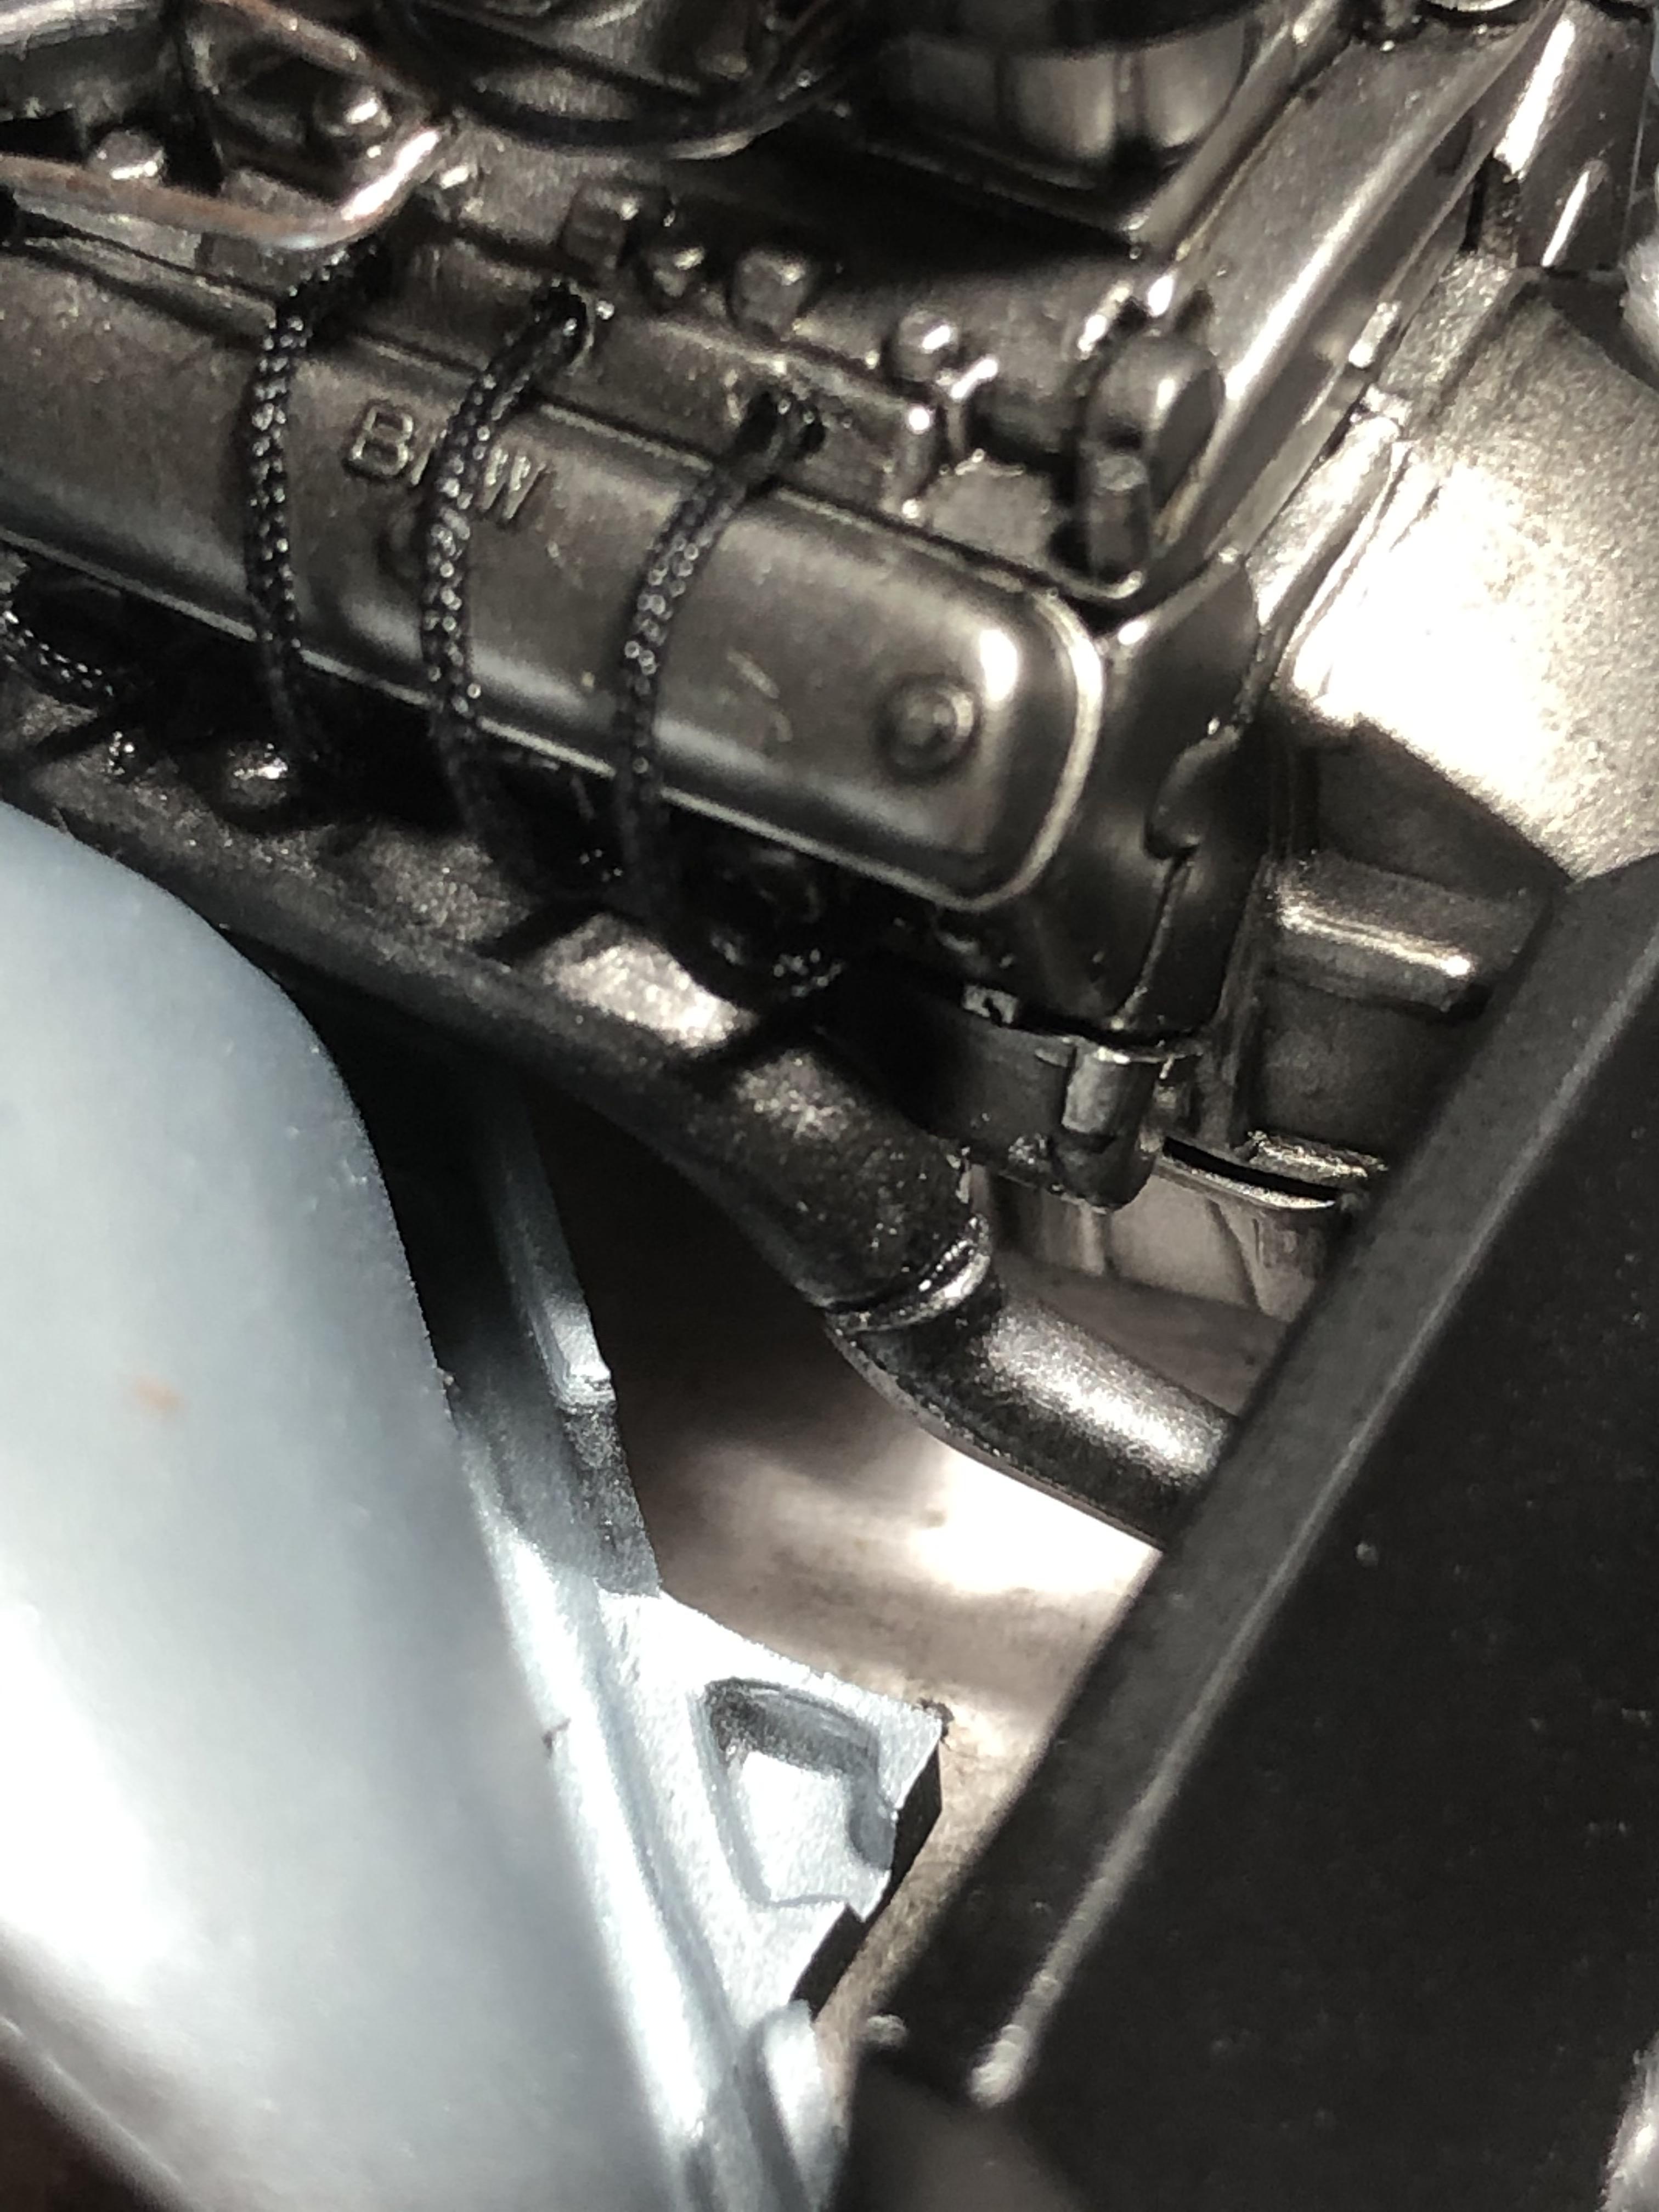
Tonight I put the bodies aside and did some more work on the engines. I've completed the extra detailing that I can do prior to installing the engines, and once they are in place in the engine bay I might see if a bit more wiring can fit in.
All of the ignition wires and the scratch-made coils are in place and connected to the distributor on the RHS.
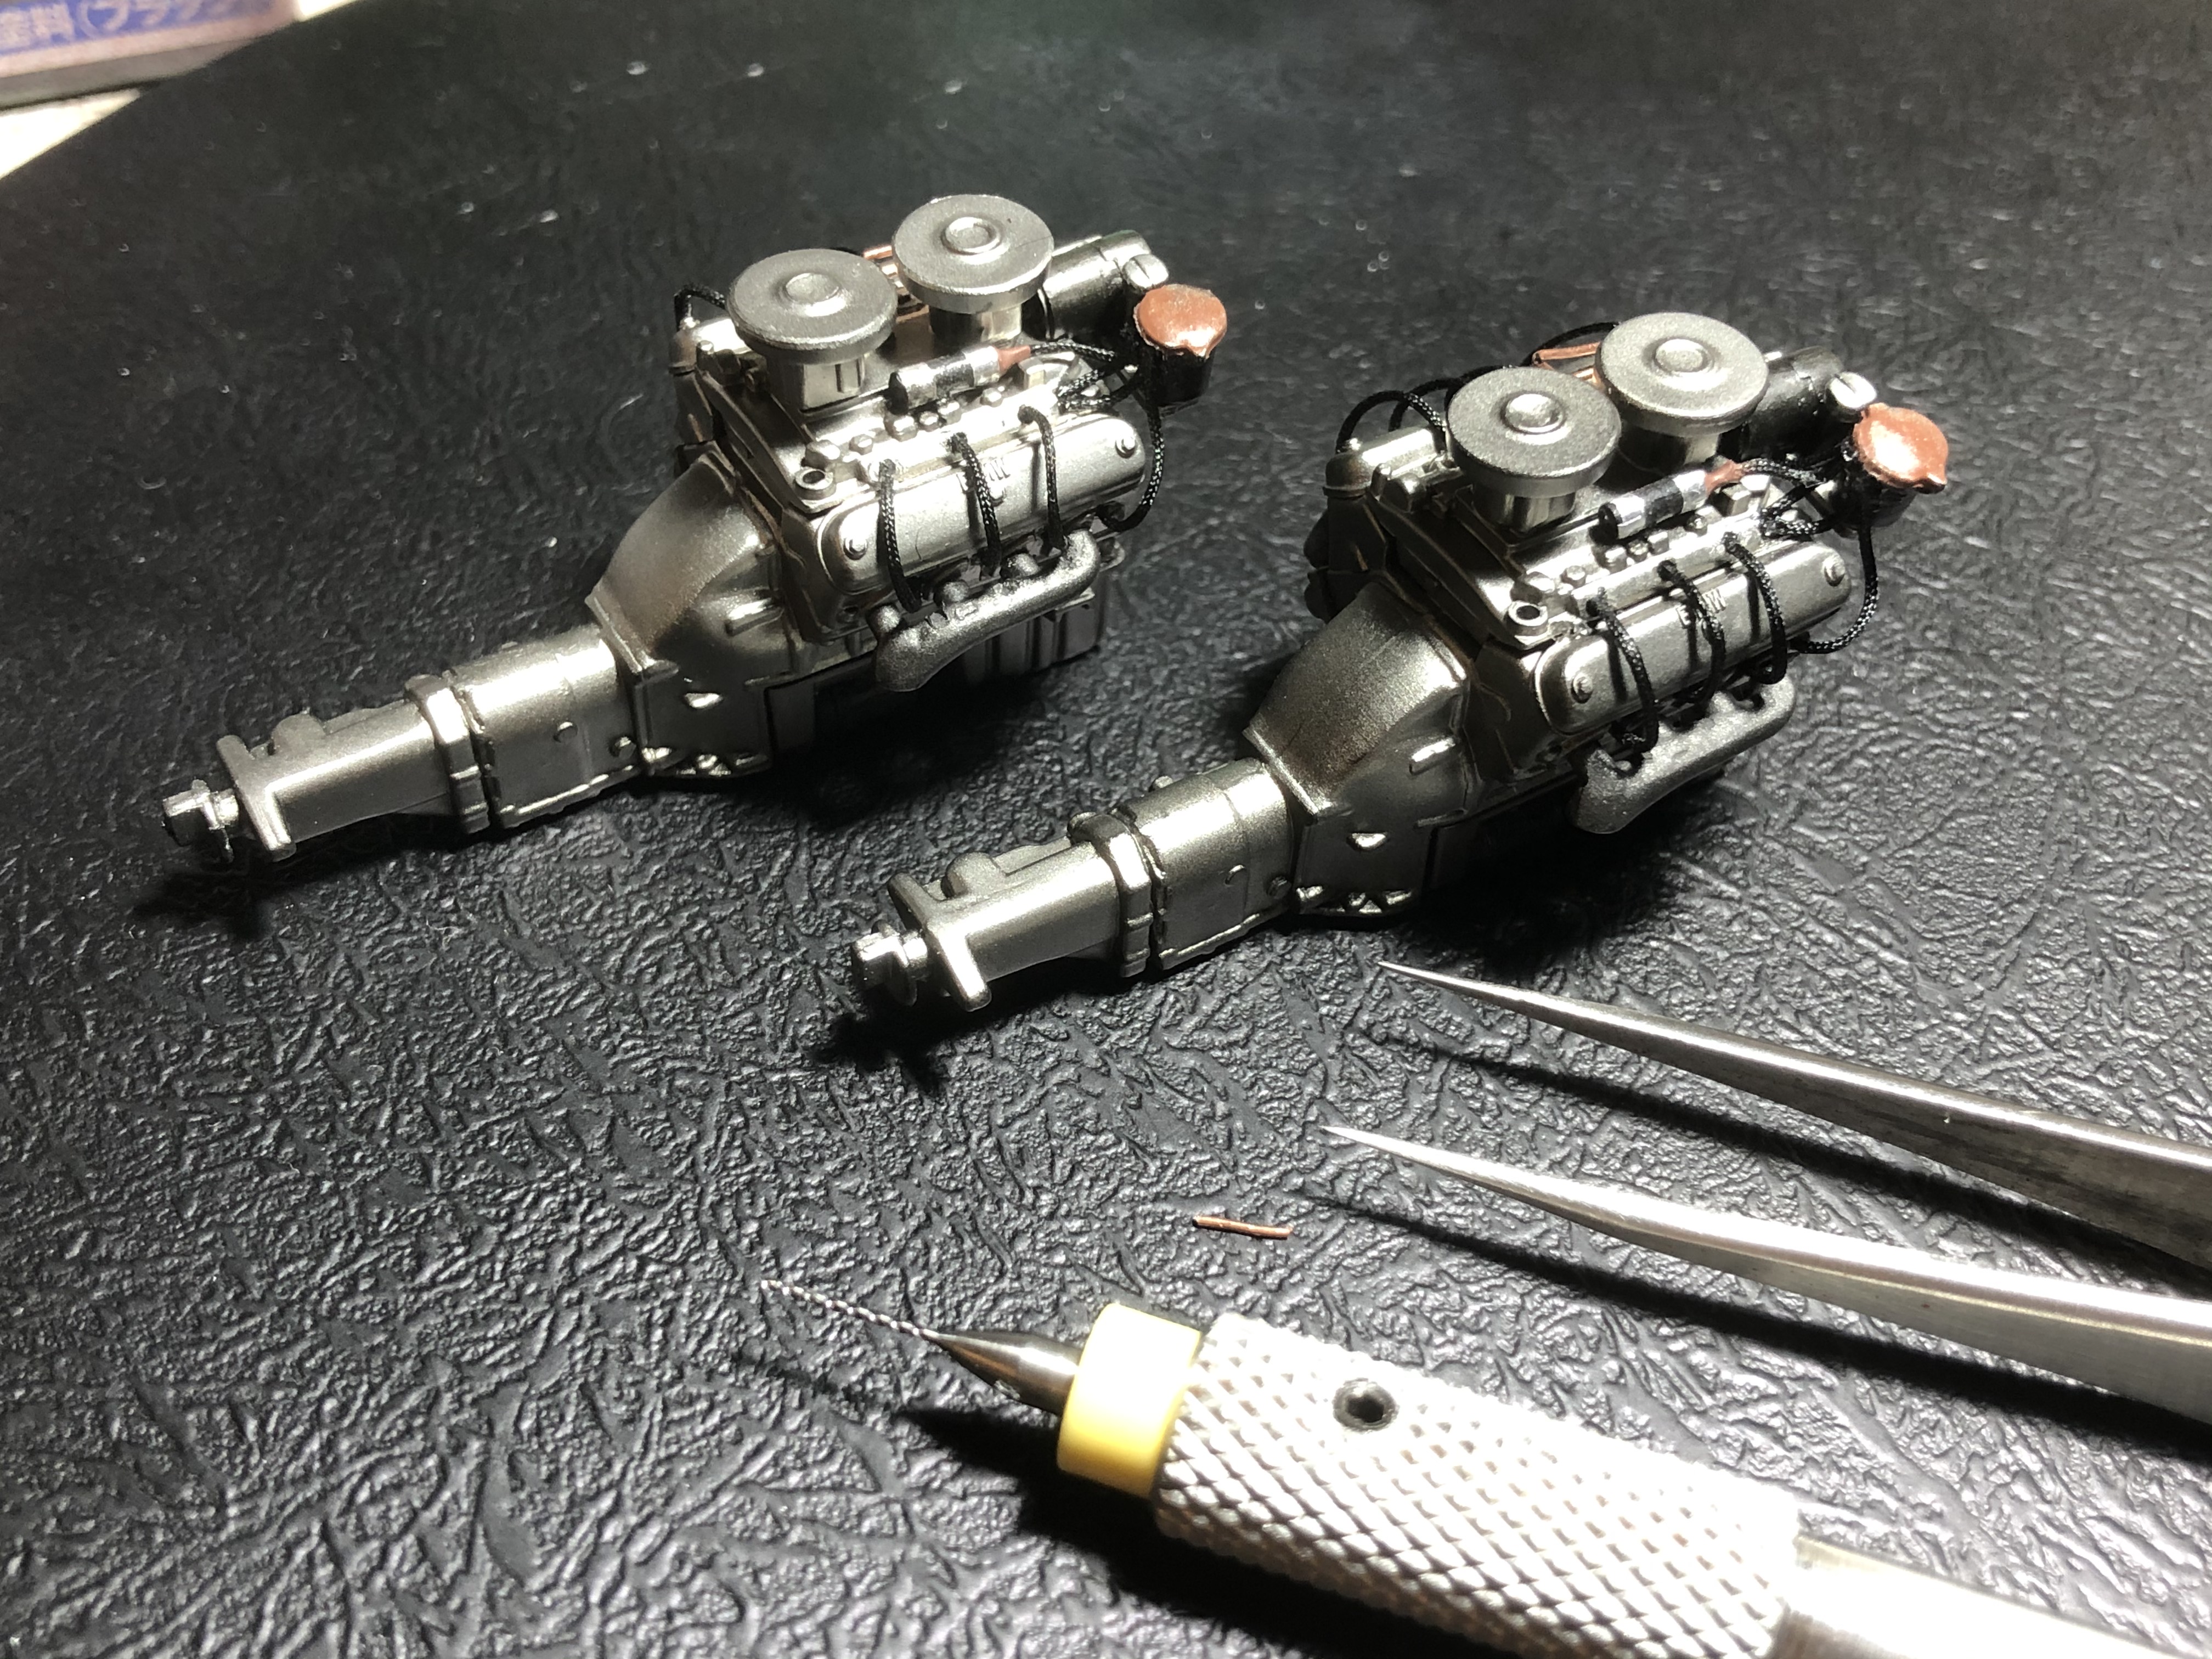
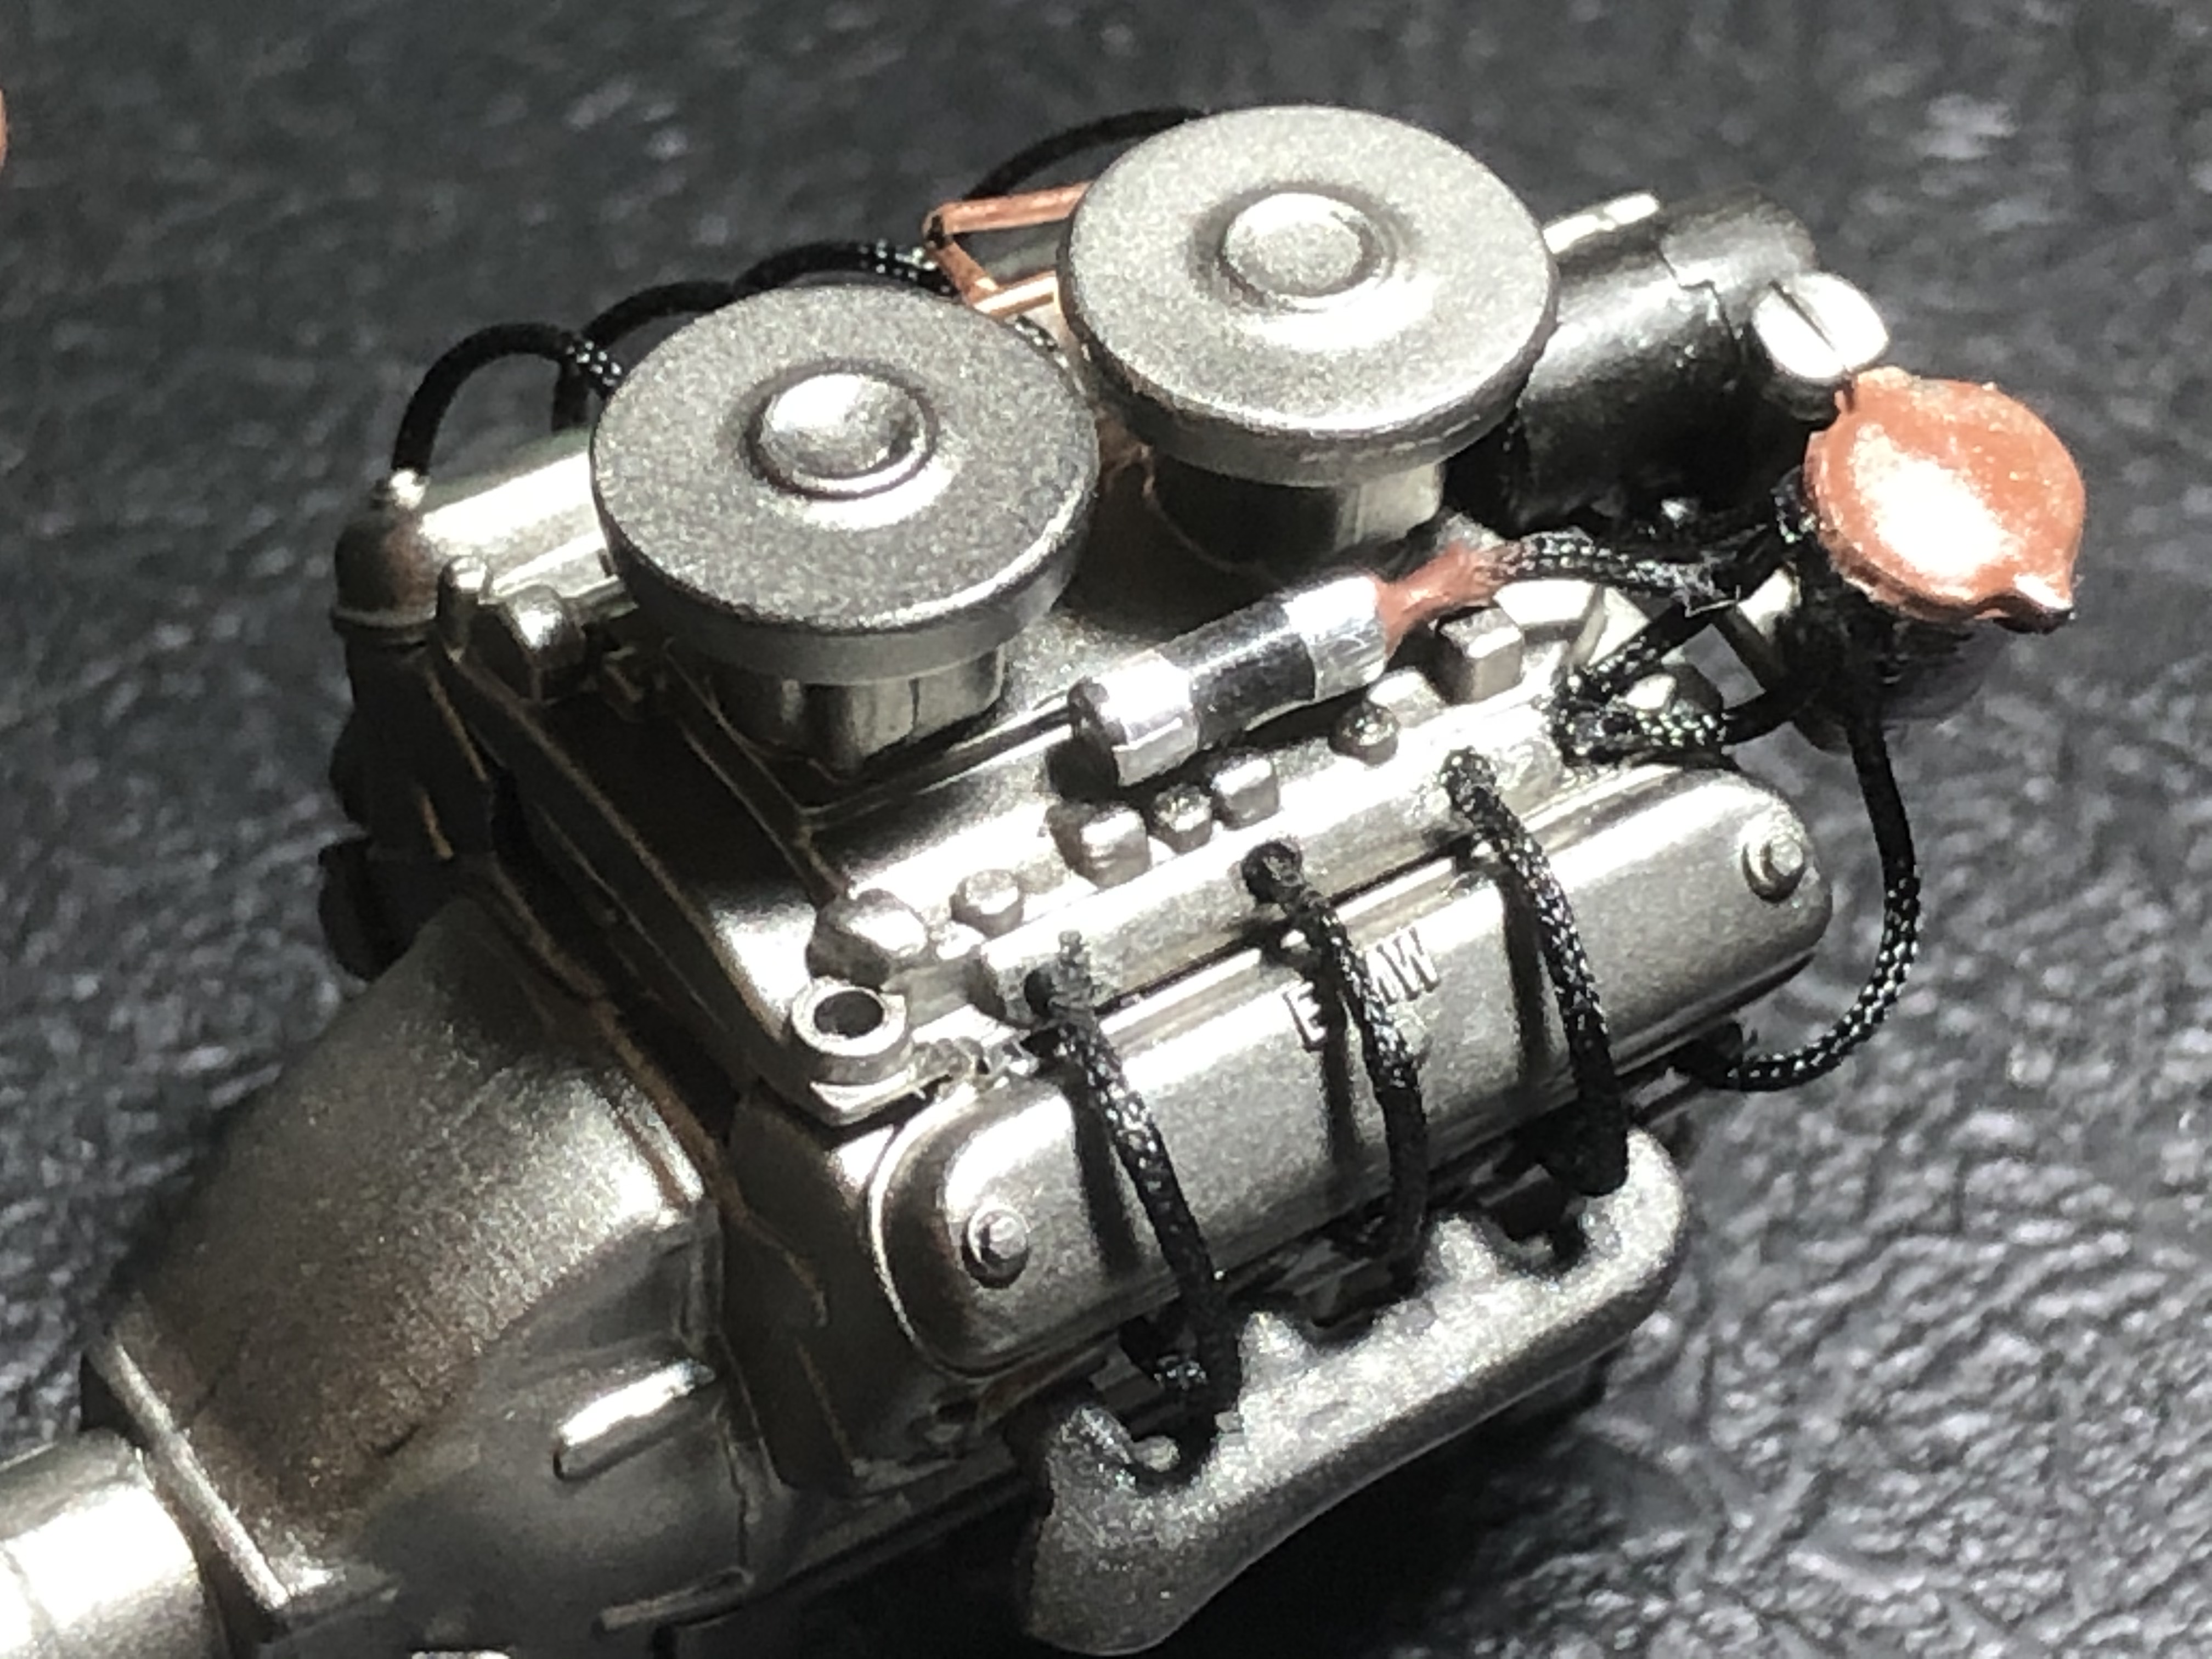
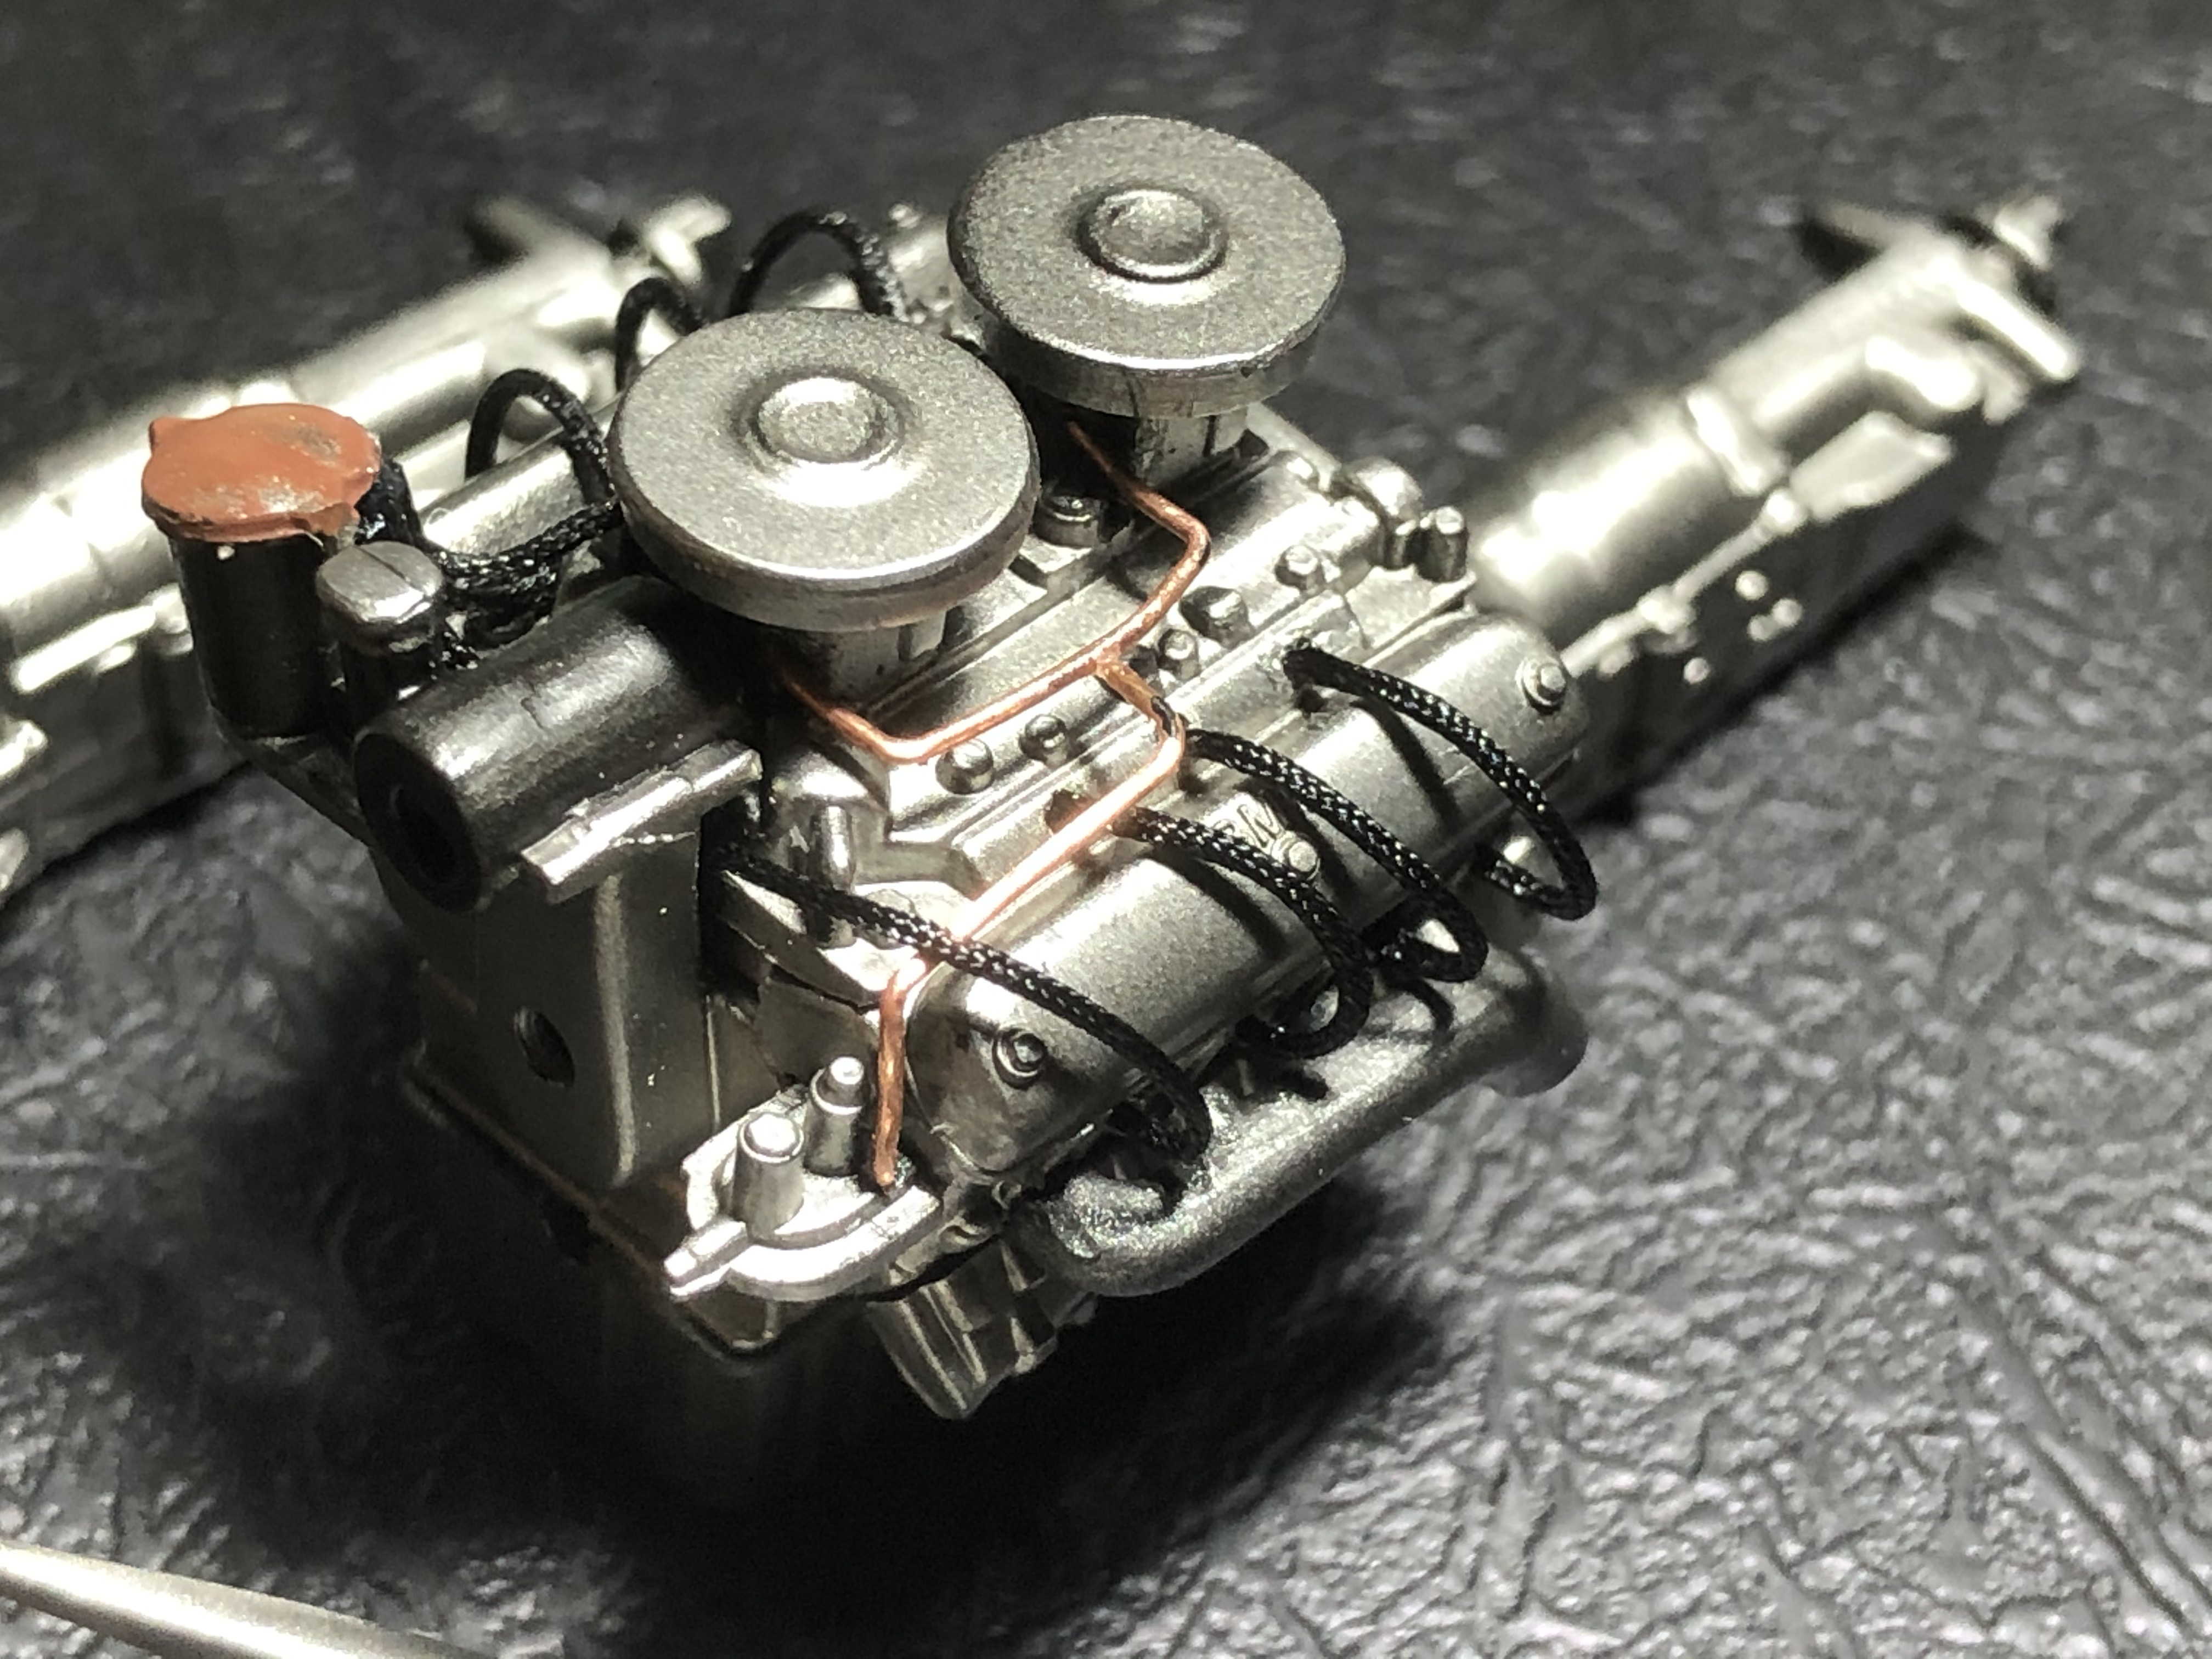
And on the LHS i decided to play with some 0.6mm Copper wire and add in the fuel lines from the fuel pump to the twin carbs.
Cheers, D
All of the ignition wires and the scratch-made coils are in place and connected to the distributor on the RHS.
And on the LHS i decided to play with some 0.6mm Copper wire and add in the fuel lines from the fuel pump to the twin carbs.
Cheers, D

Dixon66

Joined: December 12, 2002
KitMaker: 1,500 posts
Auto Modeler: 645 posts

Posted: Monday, September 21, 2020 - 07:58 AM UTC
Looking great Damian. The carb plumbing looks quite nice.
As an aside, 20 years ago I worked in the printed circuit board manufacturing industry, which is when I started using carbide PCB drill bits like you are using. The drill spindles in the machines were pneumatic and could run at 100 thousand RPM. They could punch through 1mm/.040" FR4 fiberglass at 10 times a second depending on the size of the bit. Thanks for bringing back memories from long ago with just a simple inclusion in a photo. I only have a few bits left now. LOL
As an aside, 20 years ago I worked in the printed circuit board manufacturing industry, which is when I started using carbide PCB drill bits like you are using. The drill spindles in the machines were pneumatic and could run at 100 thousand RPM. They could punch through 1mm/.040" FR4 fiberglass at 10 times a second depending on the size of the bit. Thanks for bringing back memories from long ago with just a simple inclusion in a photo. I only have a few bits left now. LOL
AussieReg
#007
Joined: June 09, 2009
KitMaker: 8,156 posts
Auto Modeler: 2,953 posts
Posted: Monday, September 21, 2020 - 11:48 AM UTC
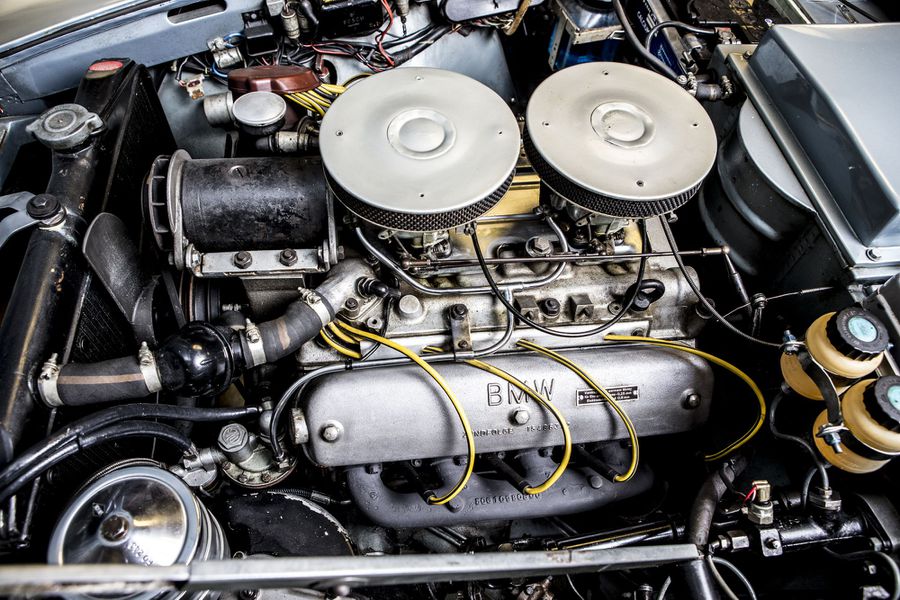
Thanks David. It was fun tinkering with the copper wire to get it to shape. I started out using an old guitar string, but they are just too hard to bend to shape in these tight spots, and have absolutely no give in them once in place. I just need to decide whether to paint the fuel lines to match the reference image, or leave them copper to make them stand out.
They are ridiculously cheap and just so useful to have lying around. I bought a bunch a couple of years back and I think I've only broken 1 or 2.
Cheers, D
Quoted Text
Thanks for bringing back memories from long ago with just a simple inclusion in a photo. I only have a few bits left now. LOL
They are ridiculously cheap and just so useful to have lying around. I bought a bunch a couple of years back and I think I've only broken 1 or 2.
Cheers, D

Cosimodo

#335

Joined: September 03, 2013
KitMaker: 1,808 posts
Auto Modeler: 701 posts

Posted: Monday, September 21, 2020 - 04:45 PM UTC
Damian,
Engines are looking really good though I think I would paint the copper to match your picture. The leads are very tidy and the fuel lines make a real difference. Are you going to get any more on there?
cheers
Michael
Engines are looking really good though I think I would paint the copper to match your picture. The leads are very tidy and the fuel lines make a real difference. Are you going to get any more on there?
cheers
Michael

Hwa-Rang

Joined: June 29, 2004
KitMaker: 6,760 posts
Auto Modeler: 2,182 posts

Posted: Monday, September 21, 2020 - 05:01 PM UTC
Excellent detailing D. Even a little bit of wire, here and there, makes a big difference.
I agree, with Michael, paint the fuel lines.
I agree, with Michael, paint the fuel lines.
AussieReg
#007
Joined: June 09, 2009
KitMaker: 8,156 posts
Auto Modeler: 2,953 posts
Posted: Monday, September 21, 2020 - 05:14 PM UTC
Thanks guys! I'm thinking I will chrome paint the fuel lines. I will probably add the black U-tube between the carbs (not sure what it is, looks like air line, possibly a vacuum tube) prior to installing the engines. Once the engine bays are decked out I will see what else I can add in without doing too much damage!
Cheers, D
Cheers, D
AussieReg
#007
Joined: June 09, 2009
KitMaker: 8,156 posts
Auto Modeler: 2,953 posts
Posted: Tuesday, September 22, 2020 - 02:43 AM UTC
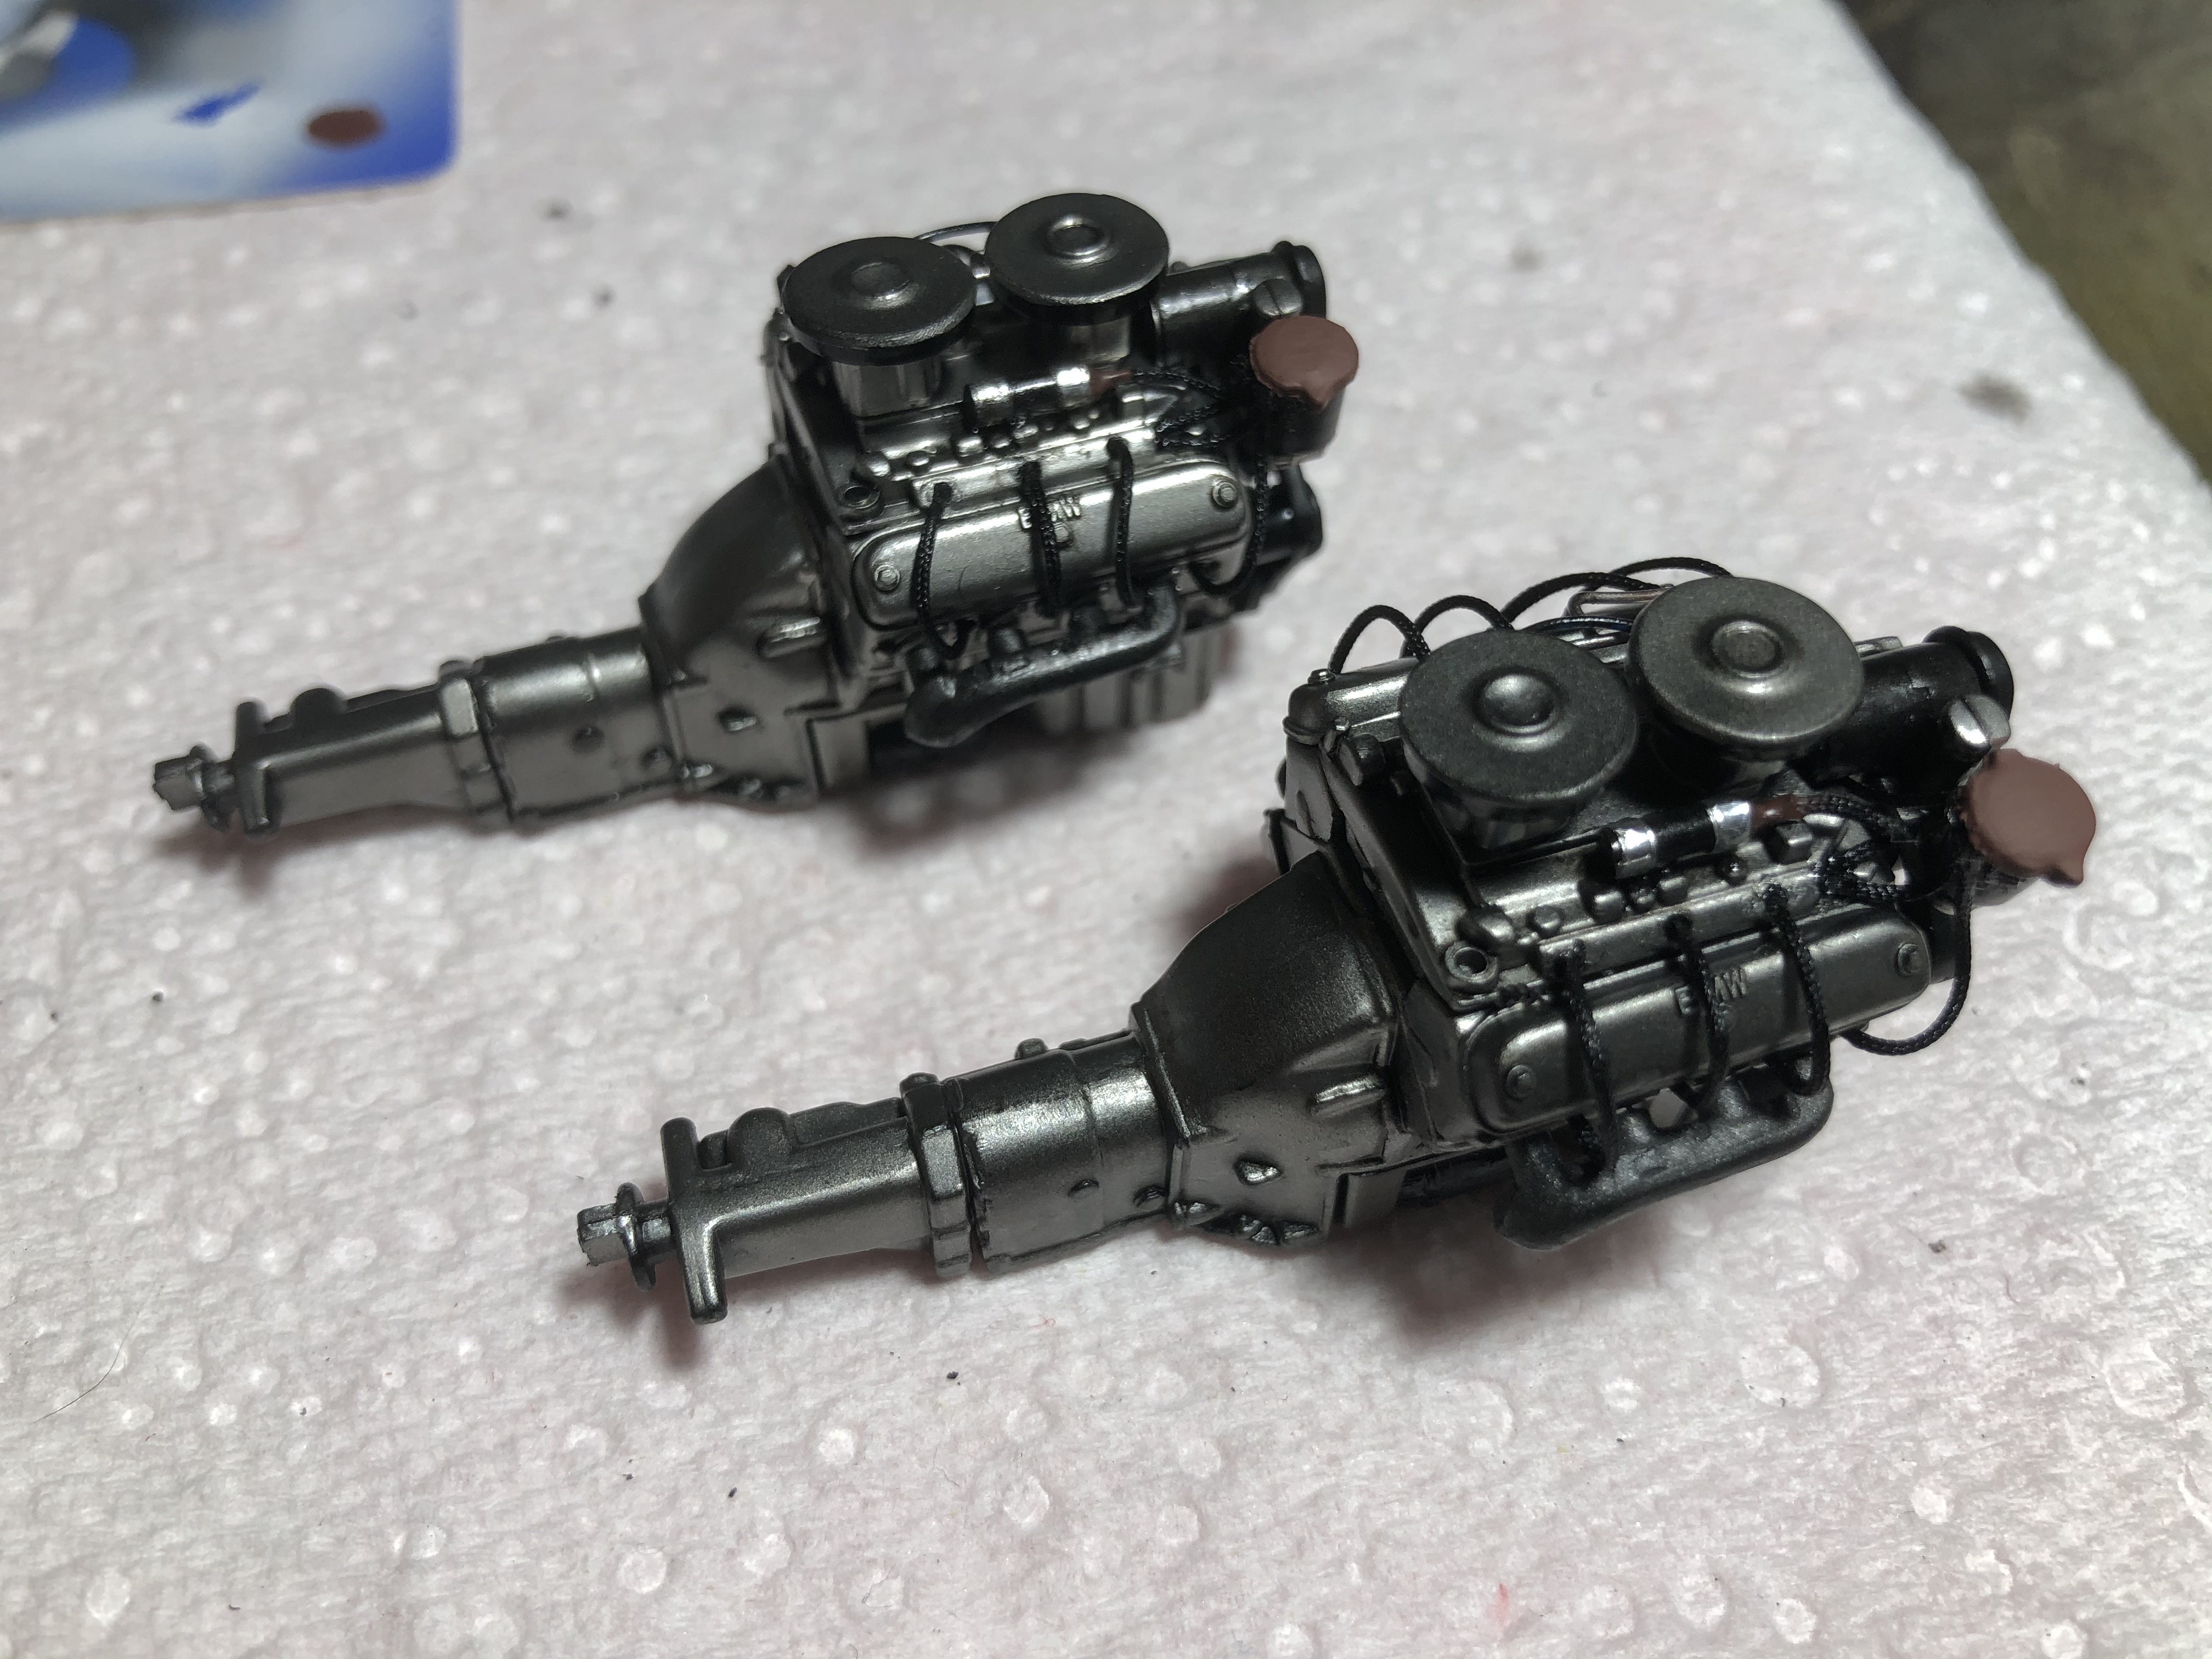
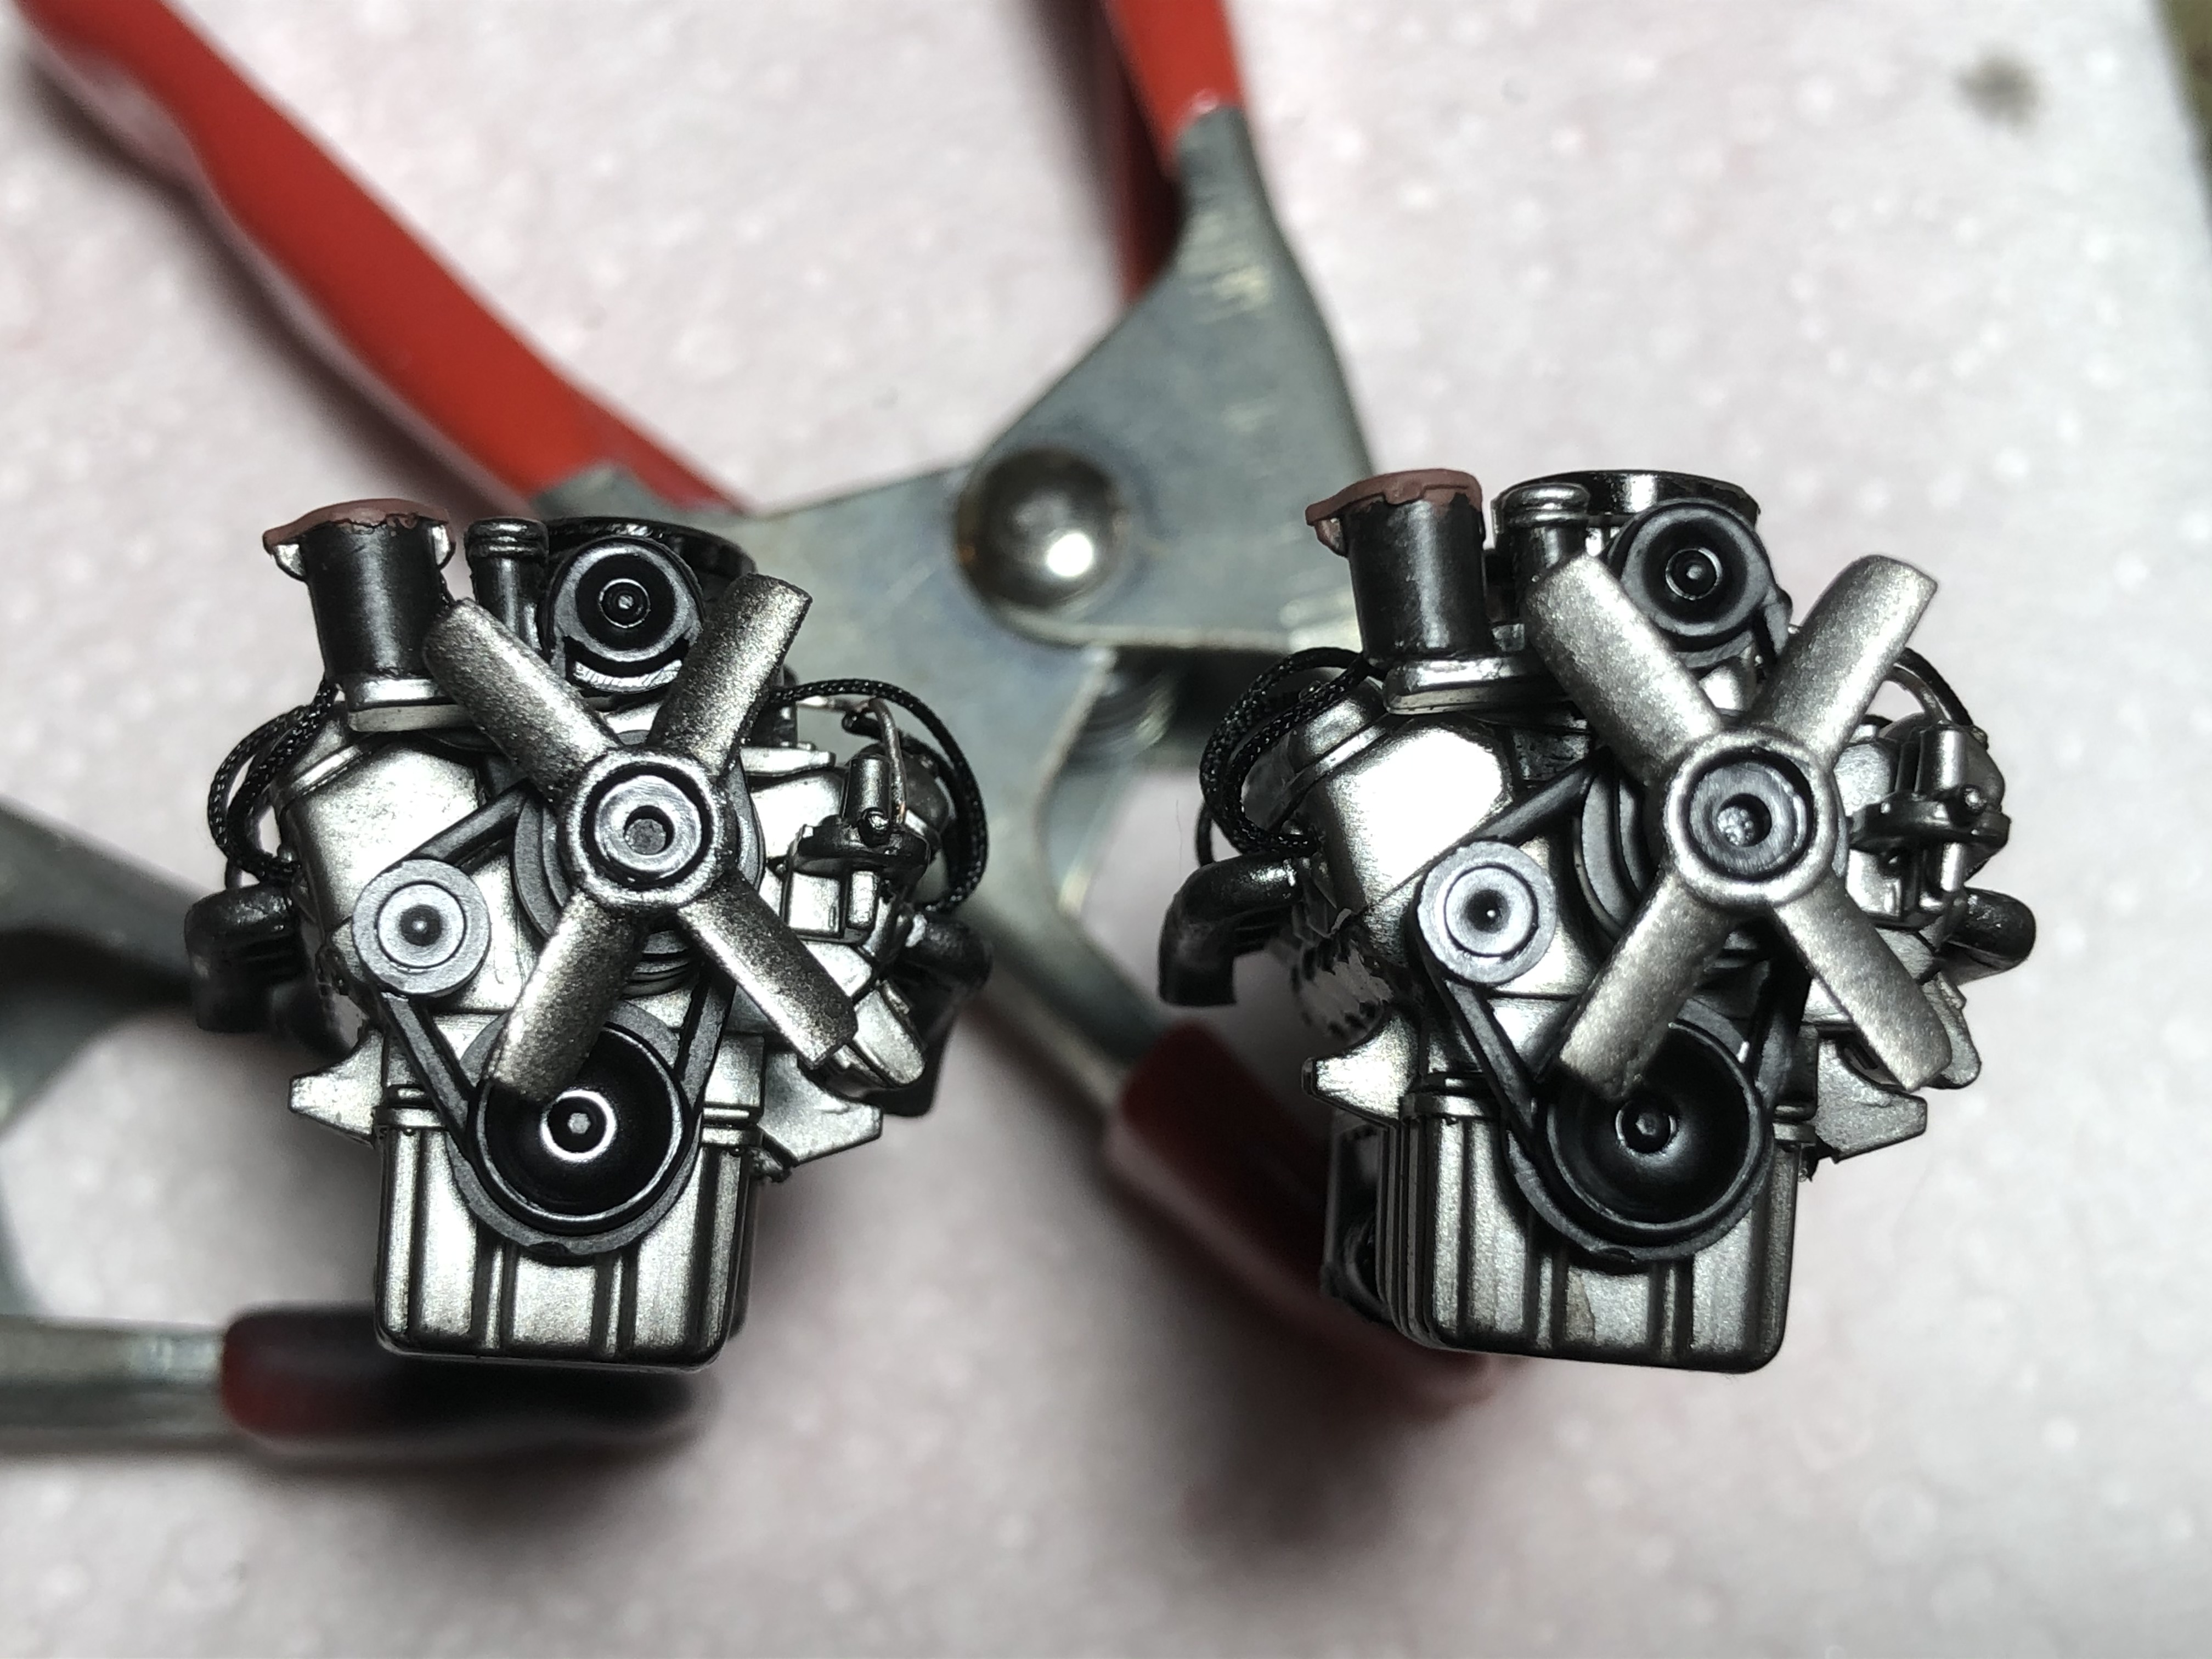
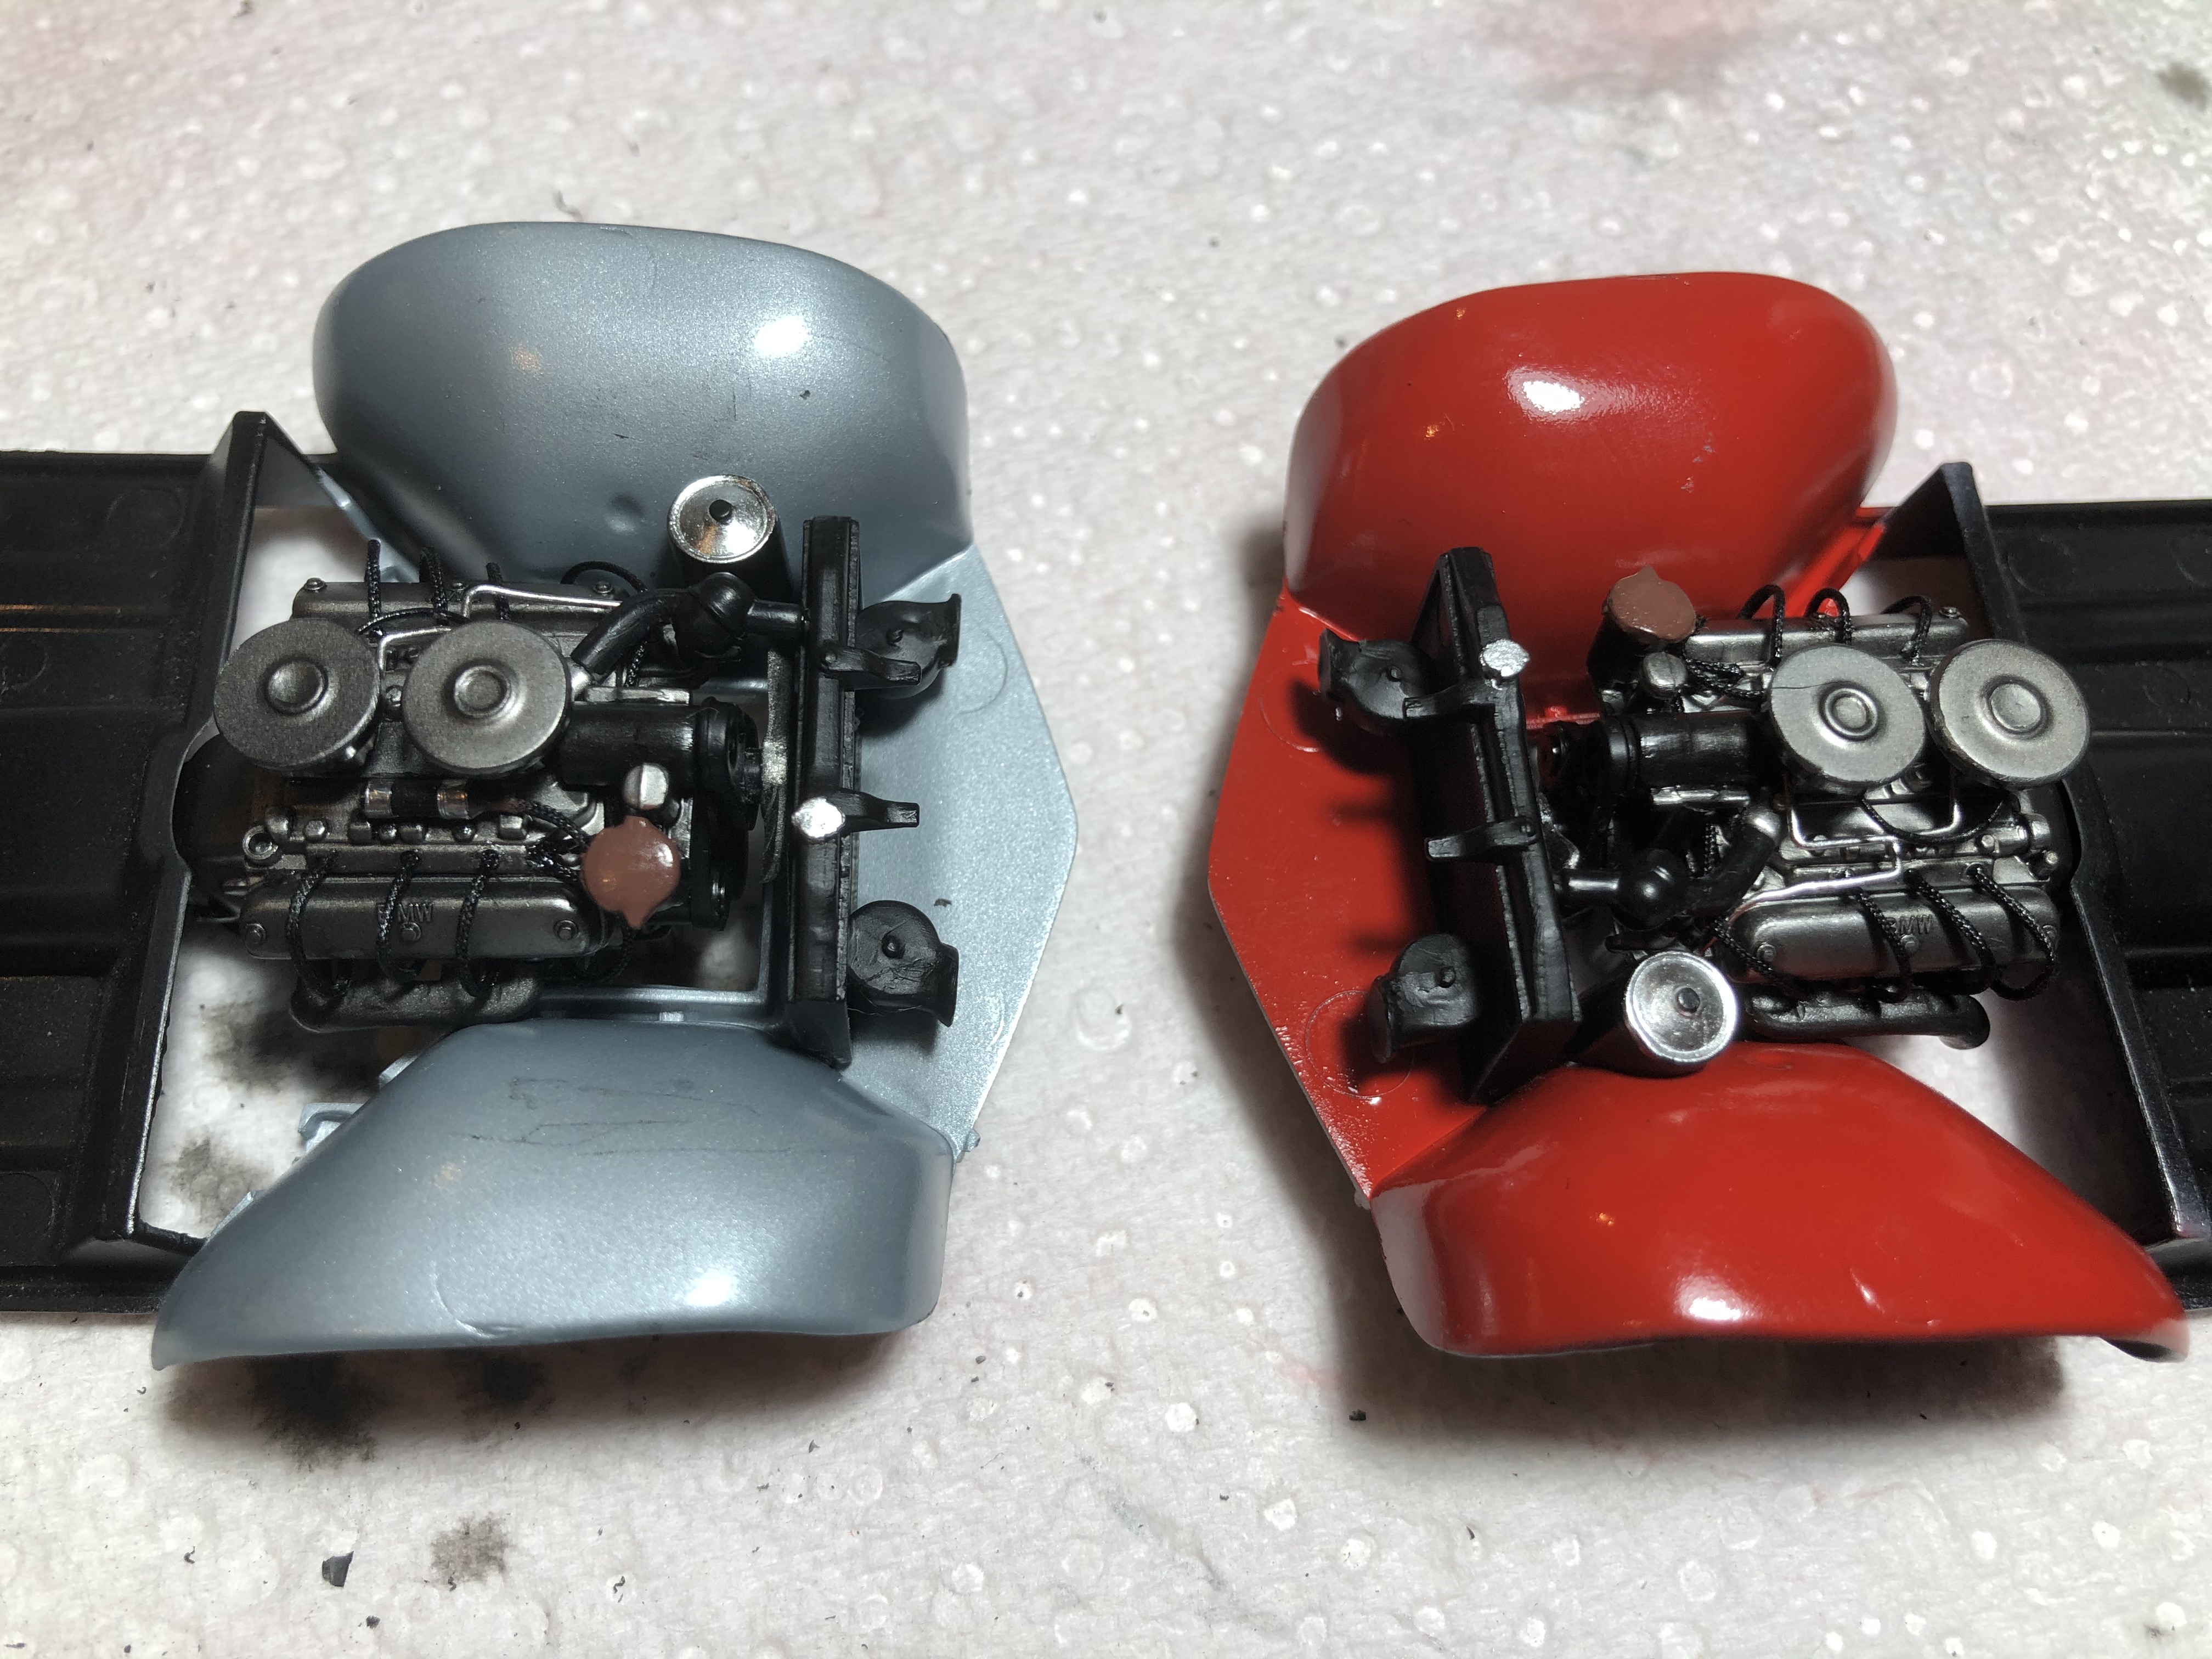
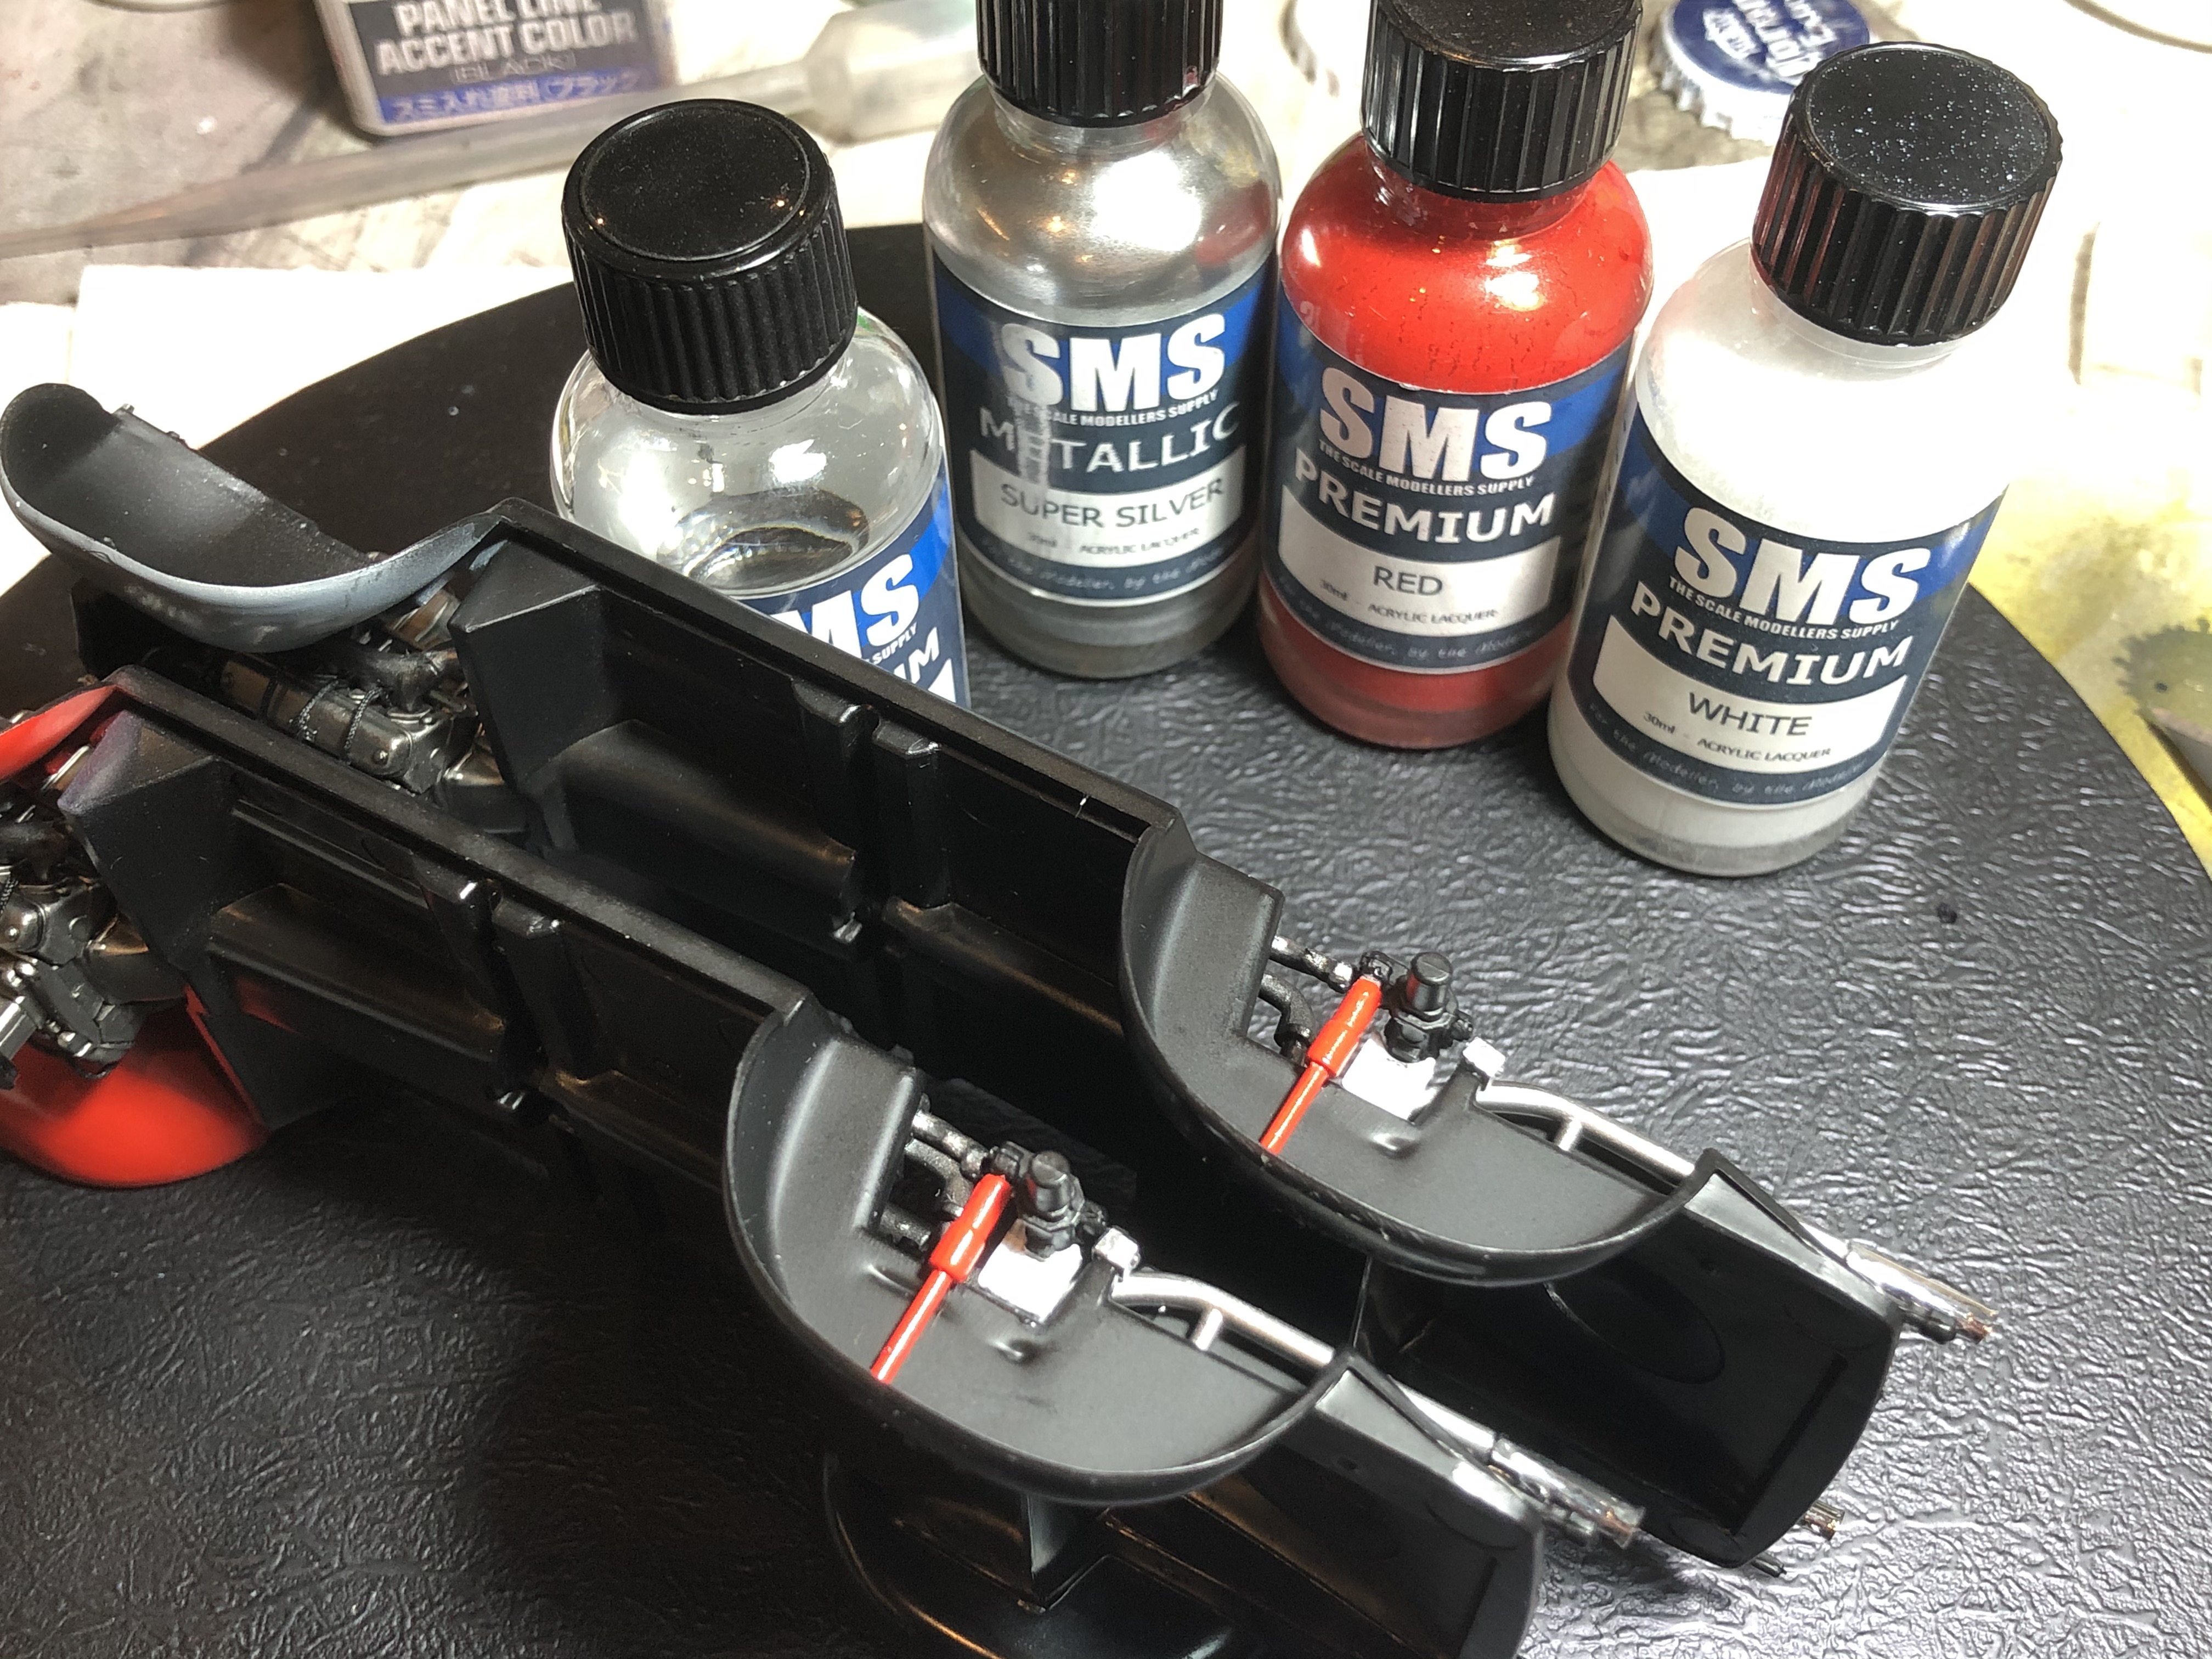
A little more tinkering tonight. I painted the fuel lines with Vallejo Metal Colour Chrome and they do look much better!
The black tube was made using offcuts from the bright blue ignition wires from my recent '55 Chevy Pro Sportsman build, coloured with a black Sharpie texta. It pays to be a squirrel and hoard lots of tiny junk!
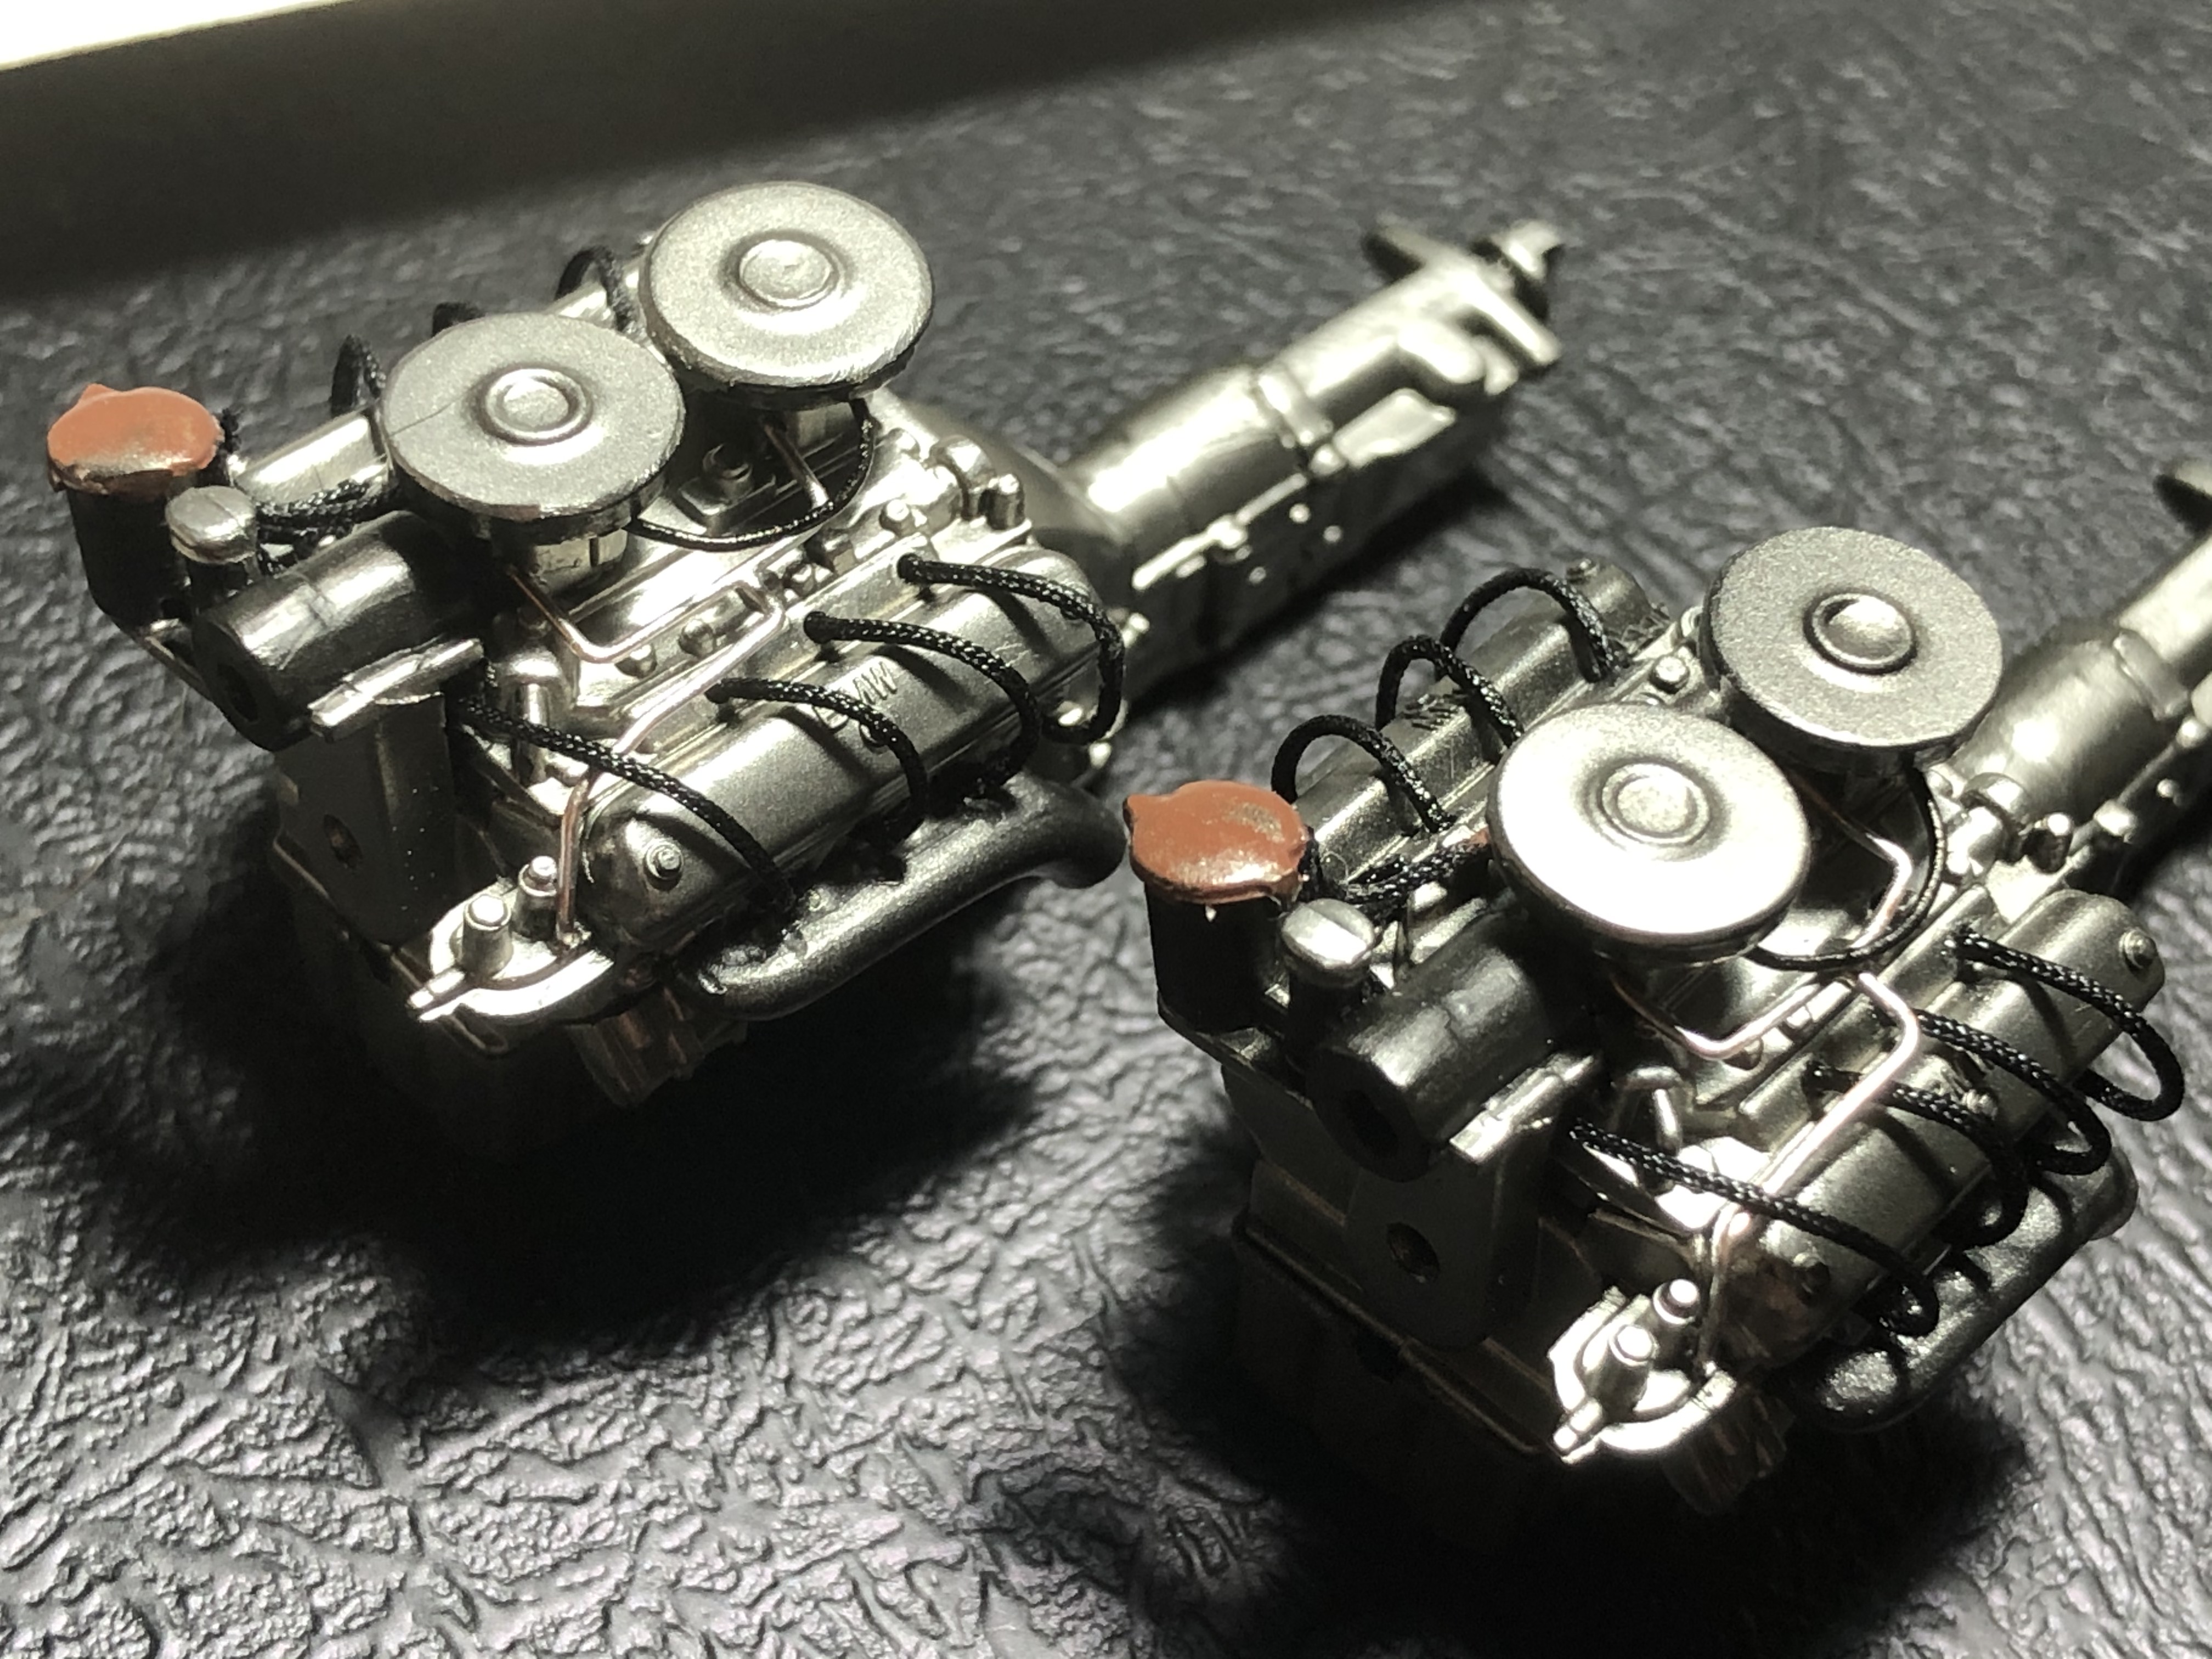
The belt/pulley assembly went on next.
The fan itself is called out as Aluminium in the instructions, so I gave them a coat of Tamiya Flat Aluminium acrylic. It looks a bit bright against the reference images, so once they are cured I will tone them down with a black filter.
Once the fans go on, the whole assemblies will get a pin wash, and then installed in the engine bay, and on to the underside assembly!
Cheers, D
The black tube was made using offcuts from the bright blue ignition wires from my recent '55 Chevy Pro Sportsman build, coloured with a black Sharpie texta. It pays to be a squirrel and hoard lots of tiny junk!
The belt/pulley assembly went on next.
The fan itself is called out as Aluminium in the instructions, so I gave them a coat of Tamiya Flat Aluminium acrylic. It looks a bit bright against the reference images, so once they are cured I will tone them down with a black filter.
Once the fans go on, the whole assemblies will get a pin wash, and then installed in the engine bay, and on to the underside assembly!
Cheers, D

Joel_W
Joined: December 04, 2010
KitMaker: 11,666 posts
Auto Modeler: 2,974 posts

Posted: Tuesday, September 22, 2020 - 02:58 AM UTC
D,
Your engine detailing really looks great. Glad that you decided to paint the fuel lines the proper color, as back in the good old days I do remember that the fuel lines like in my MGBs and my brother's Triumph were Aluminum, not Copper. Not sure why other then that the Copper may tend to react to the gas mixtures used back then.
As for that black line, it's most likely not a vacuum tube as the large dia. circular bend really tends to look like how a sheathed cable would look. Back then it was common practice to have a cable from one carb to the other to advance the Choke system equally between both carbs. There's a 2nd cable that goes directly through the firewall and into the back of the dashboard, which would might very well attach to the pull/push knob for the mechanical choke.
Joel

AussieReg
#007
Joined: June 09, 2009
KitMaker: 8,156 posts
Auto Modeler: 2,953 posts
Posted: Tuesday, September 22, 2020 - 04:46 PM UTC
Thanks Joel, good info and I think you're right on the money! The tube running from the back of the second carb and to the firewall beside the two yellow bottles looks like it connects to the same point. I will definitely be adding that once the engine is in place (best I pre-drill now!).
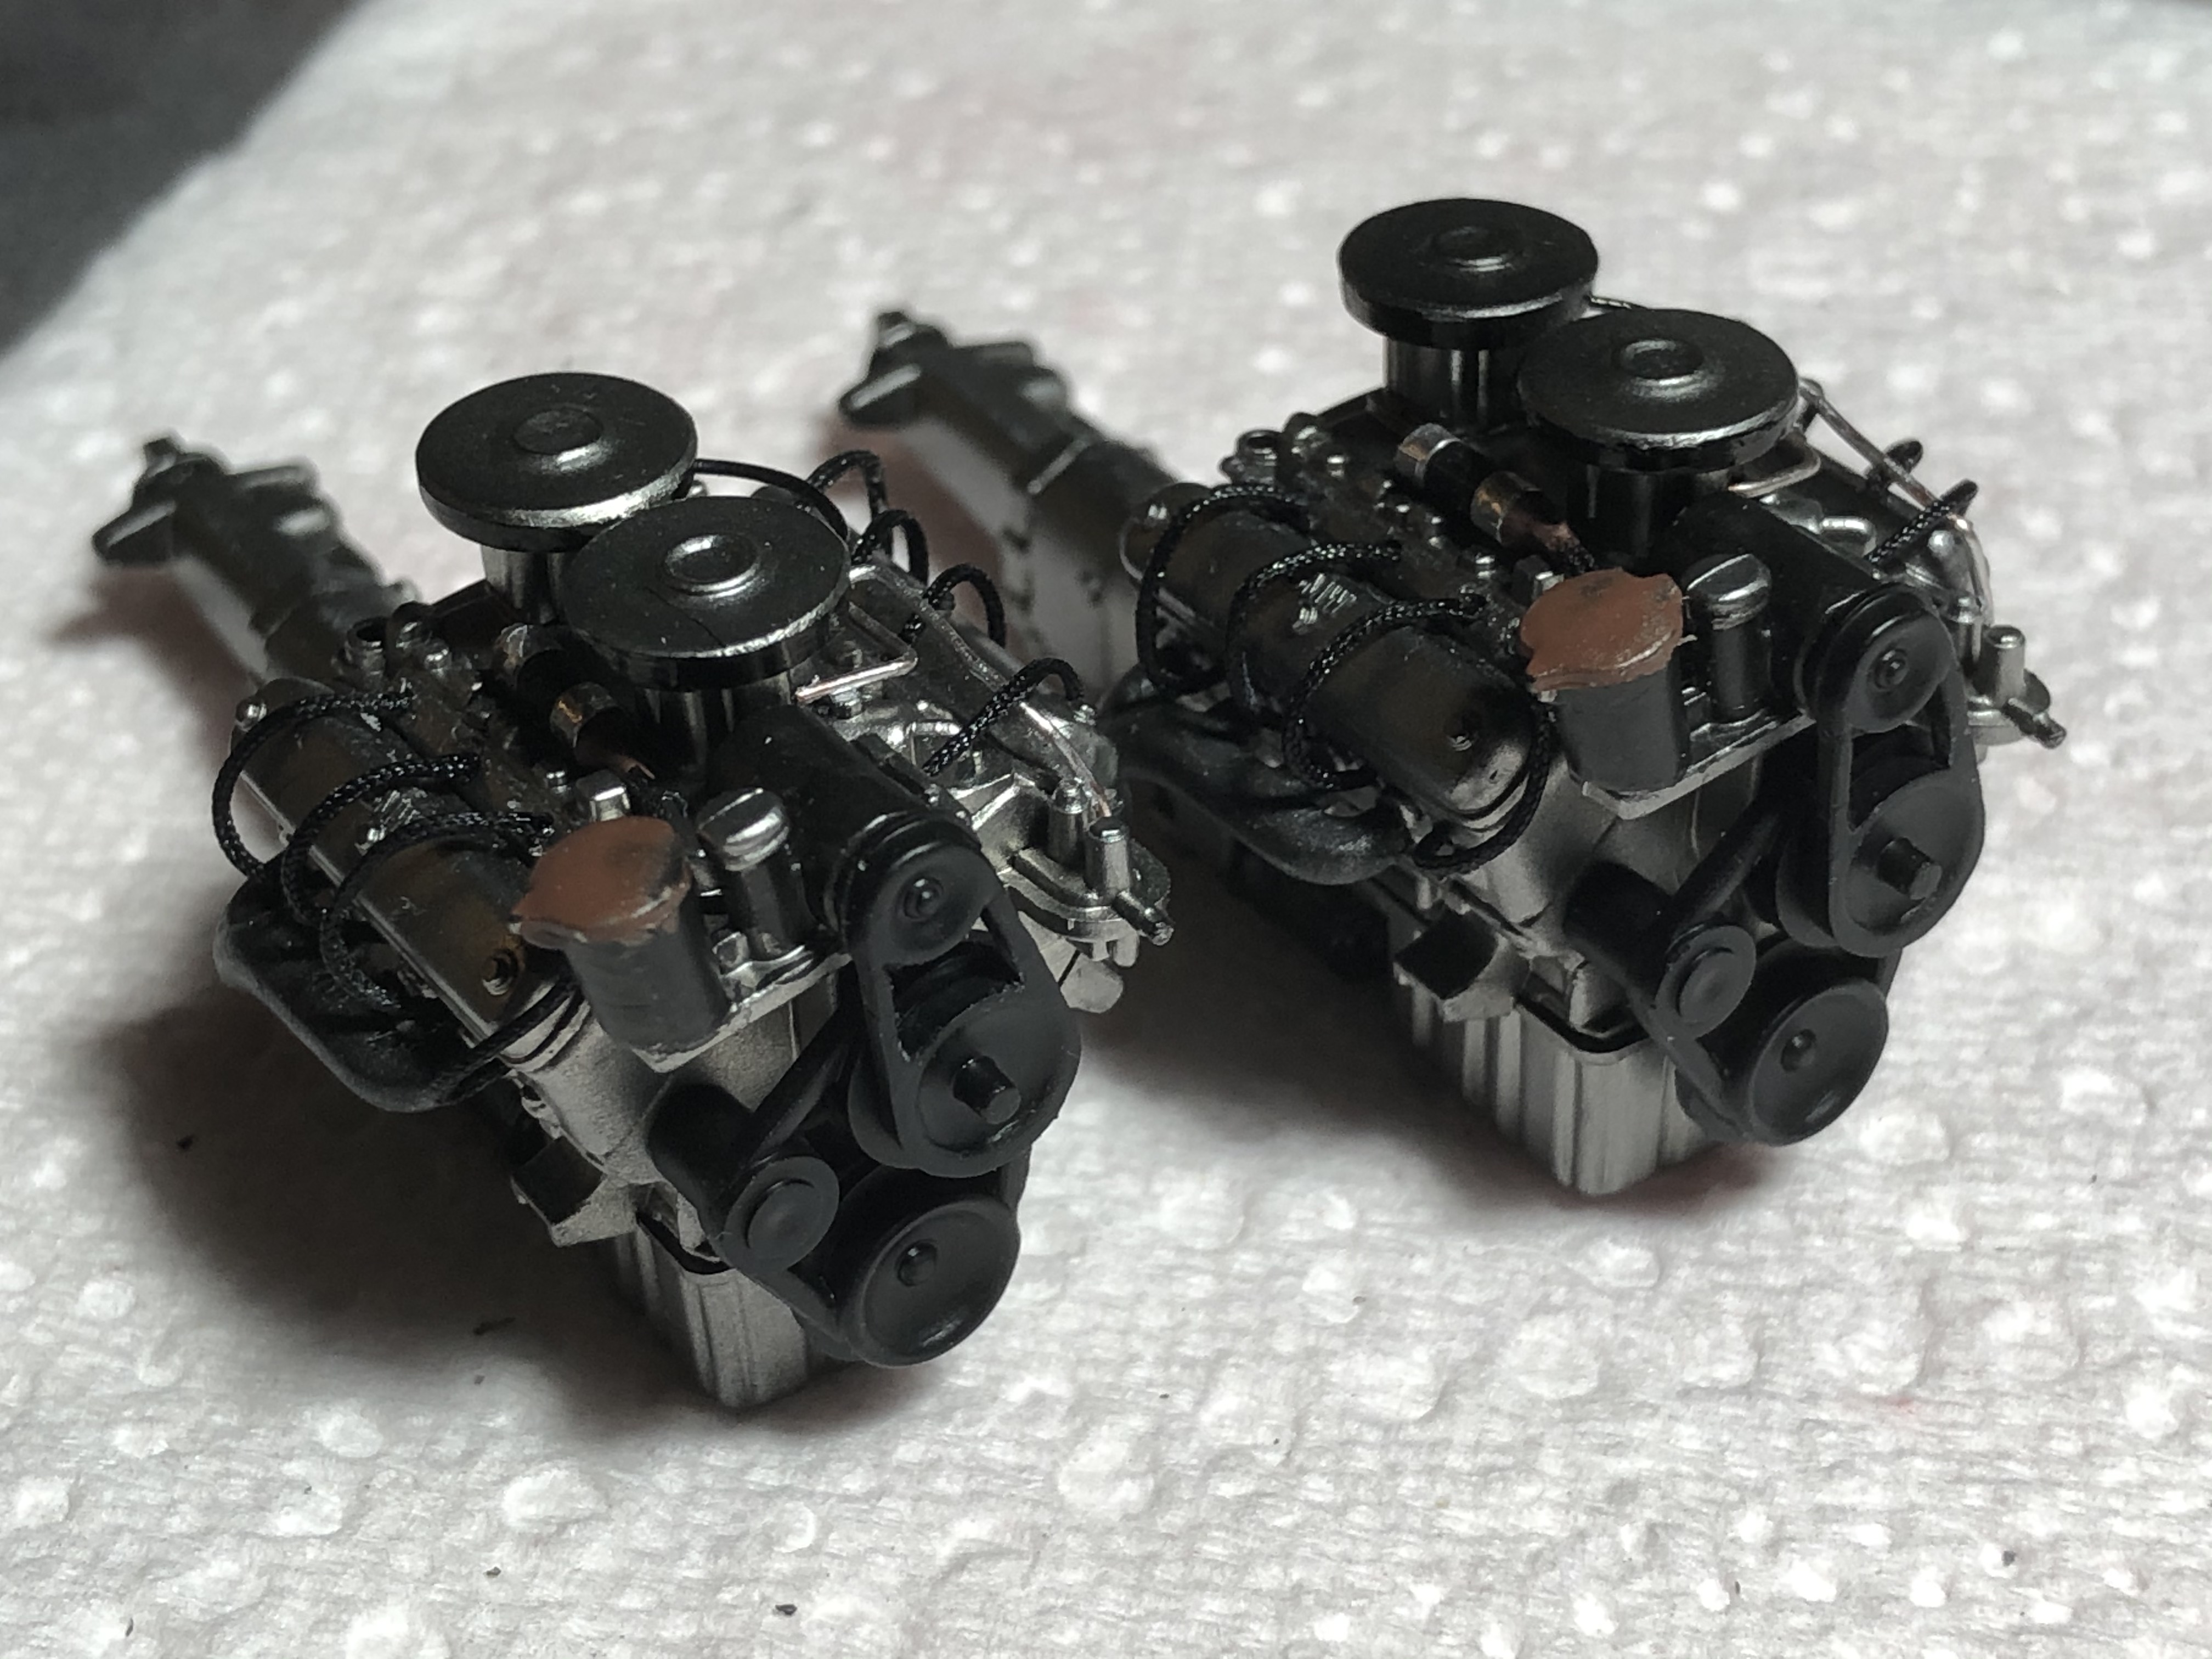
Another update, I LOVE this stage!
Before and after shot of the fan blades, Tamiya Flat Aluminium on the LHS, and with a Tamiya Black PLW filter on the RHS. I'm much happier with the darker colour there.

And on to giving the overall engines a PLW. It really is amazing how the details just jump out with that little bit of dark shadow around them, and a light overall black filter really gives them a "lived-in" look.
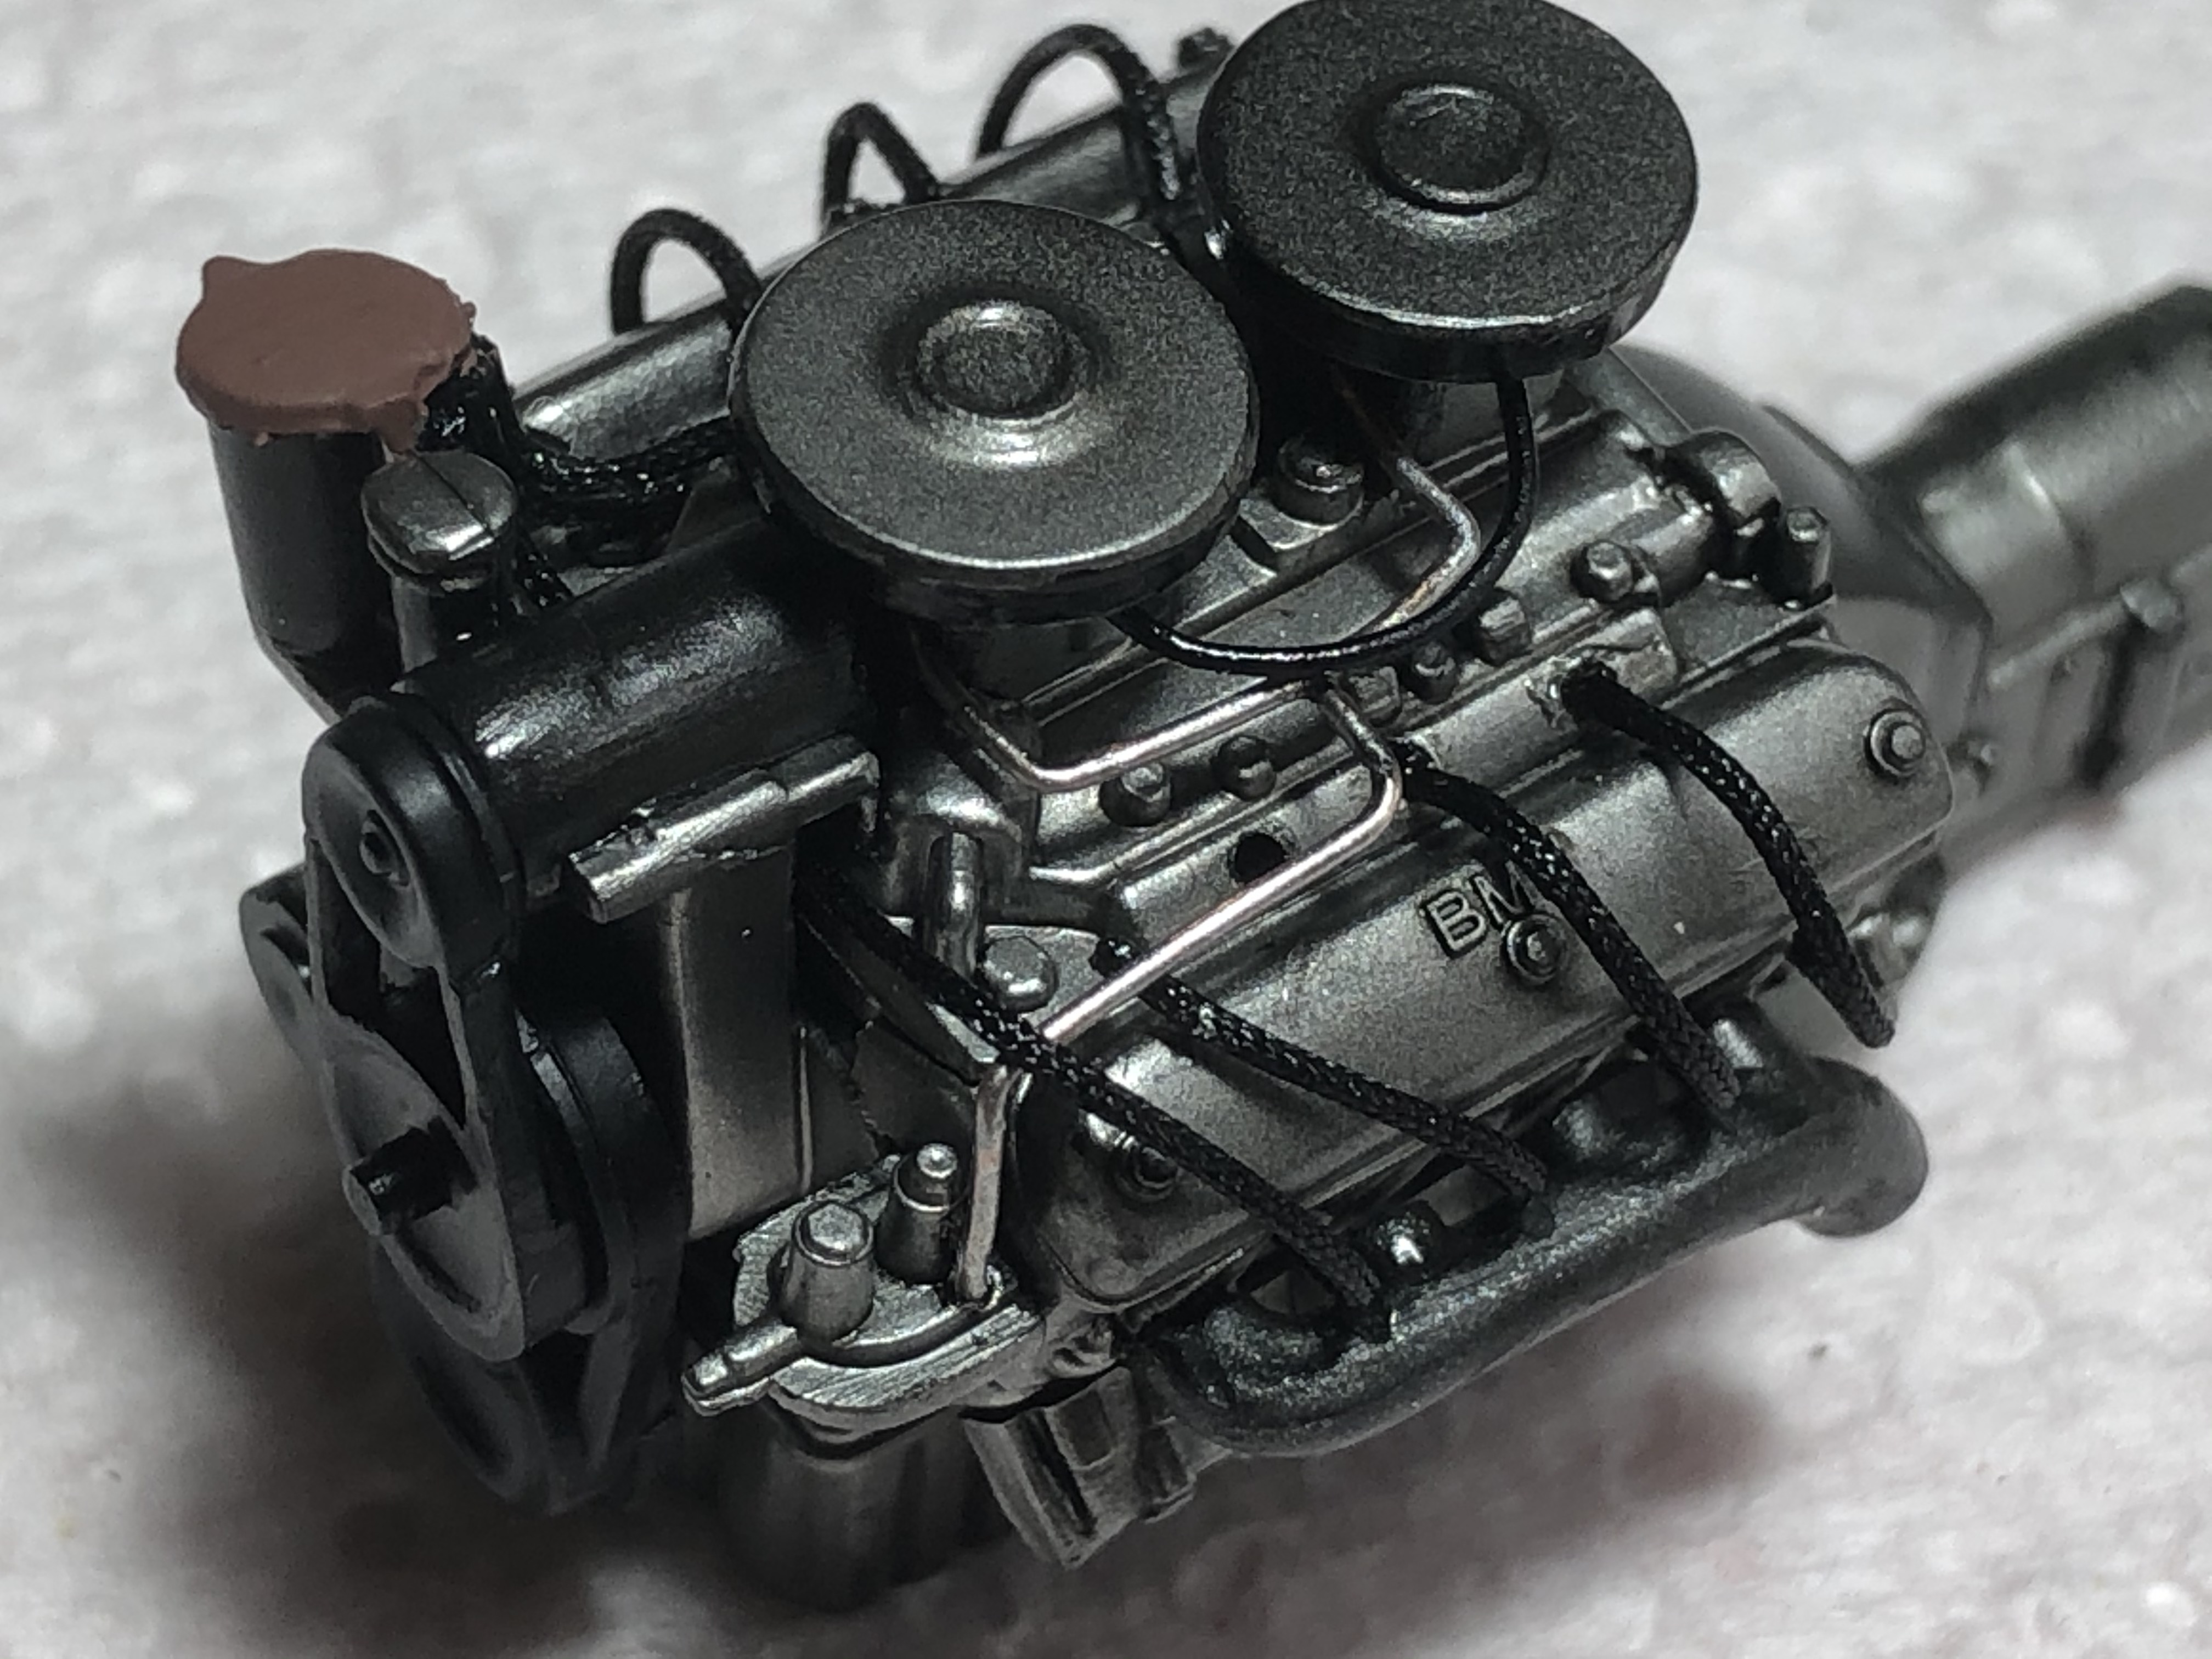
Cheers, D
EDIT - I picked up in the last image there that one of the ignition leads had escaped its location. It has been reprimanded and put back more securely.
Another update, I LOVE this stage!
Before and after shot of the fan blades, Tamiya Flat Aluminium on the LHS, and with a Tamiya Black PLW filter on the RHS. I'm much happier with the darker colour there.
And on to giving the overall engines a PLW. It really is amazing how the details just jump out with that little bit of dark shadow around them, and a light overall black filter really gives them a "lived-in" look.
Cheers, D
EDIT - I picked up in the last image there that one of the ignition leads had escaped its location. It has been reprimanded and put back more securely.

TwogluedThumbs
Joined: August 13, 2020
KitMaker: 9 posts
Auto Modeler: 2 posts

Posted: Tuesday, September 22, 2020 - 09:14 PM UTC
Hi Damian engine detailing 
Amazing finish on body paint work. Following along.
Cheers Tom.
Amazing finish on body paint work. Following along.
Cheers Tom.

RussellE
#306
Joined: June 27, 2010
KitMaker: 3,959 posts
Auto Modeler: 495 posts
Posted: Tuesday, September 22, 2020 - 10:46 PM UTC
Those engines look really good, D 

AussieReg
#007
Joined: June 09, 2009
KitMaker: 8,156 posts
Auto Modeler: 2,953 posts
Posted: Tuesday, September 22, 2020 - 11:25 PM UTC
Tom, Russ, many thanks for checking in, I appreciate the support!
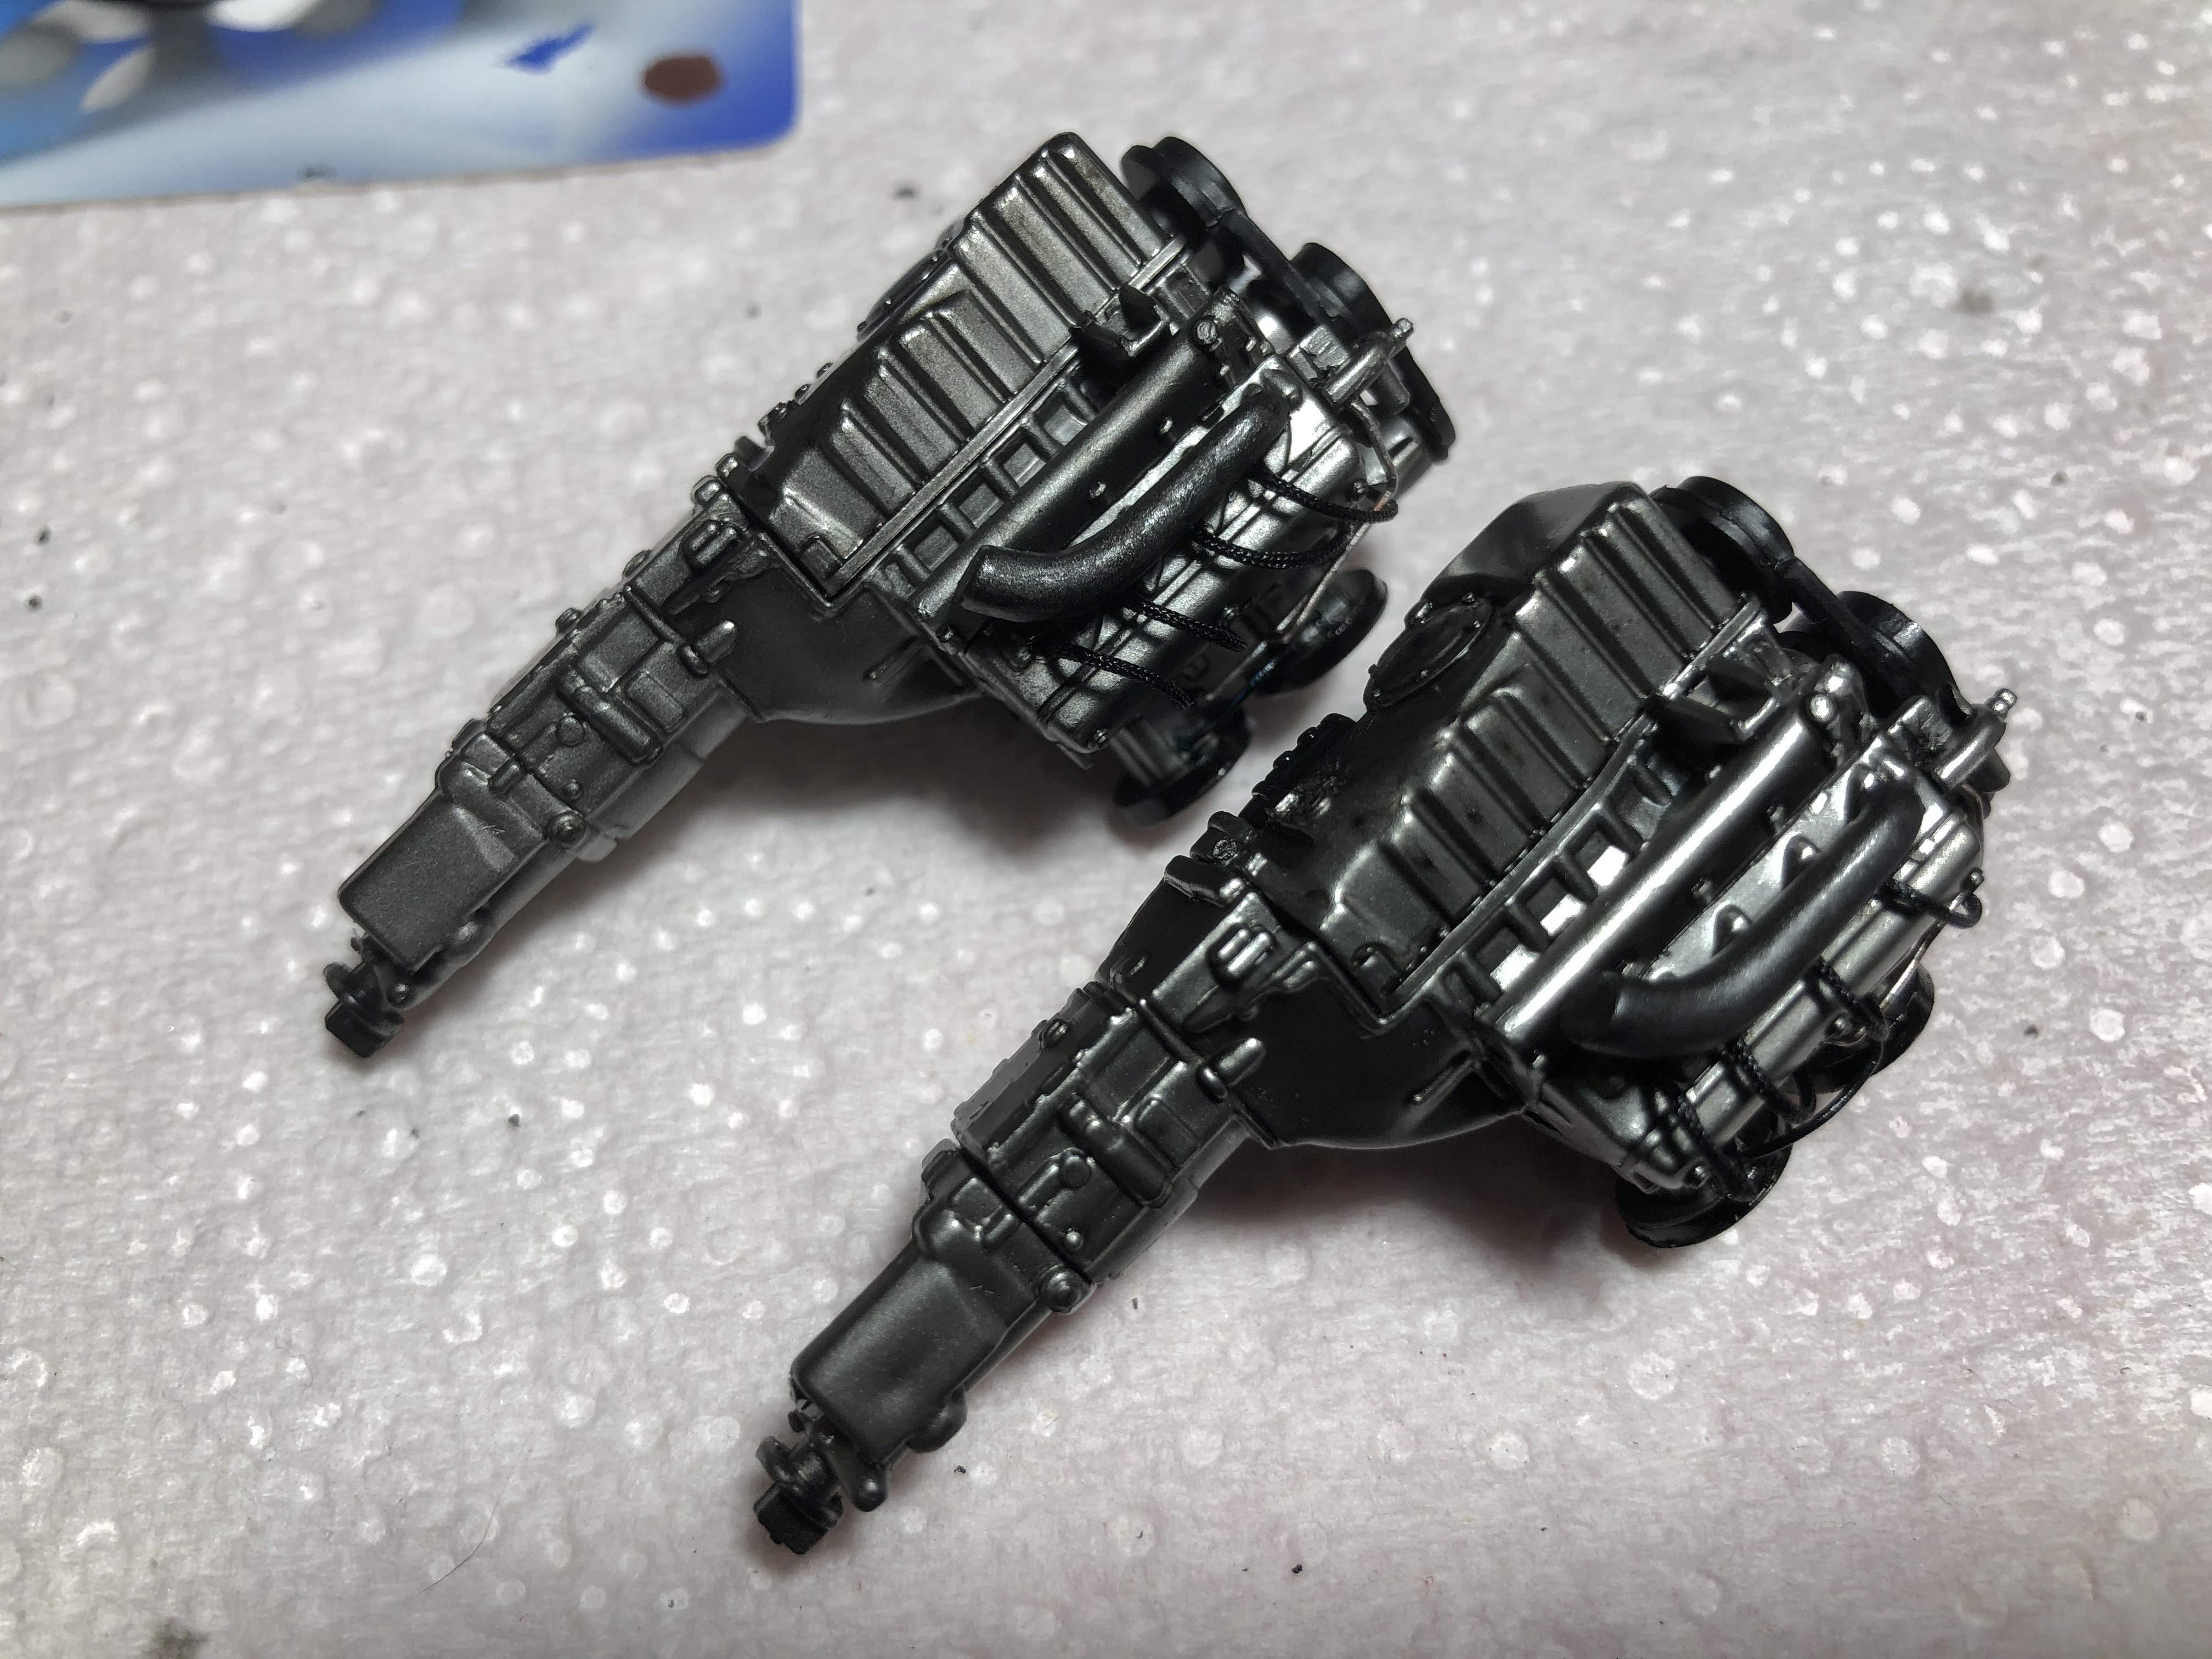
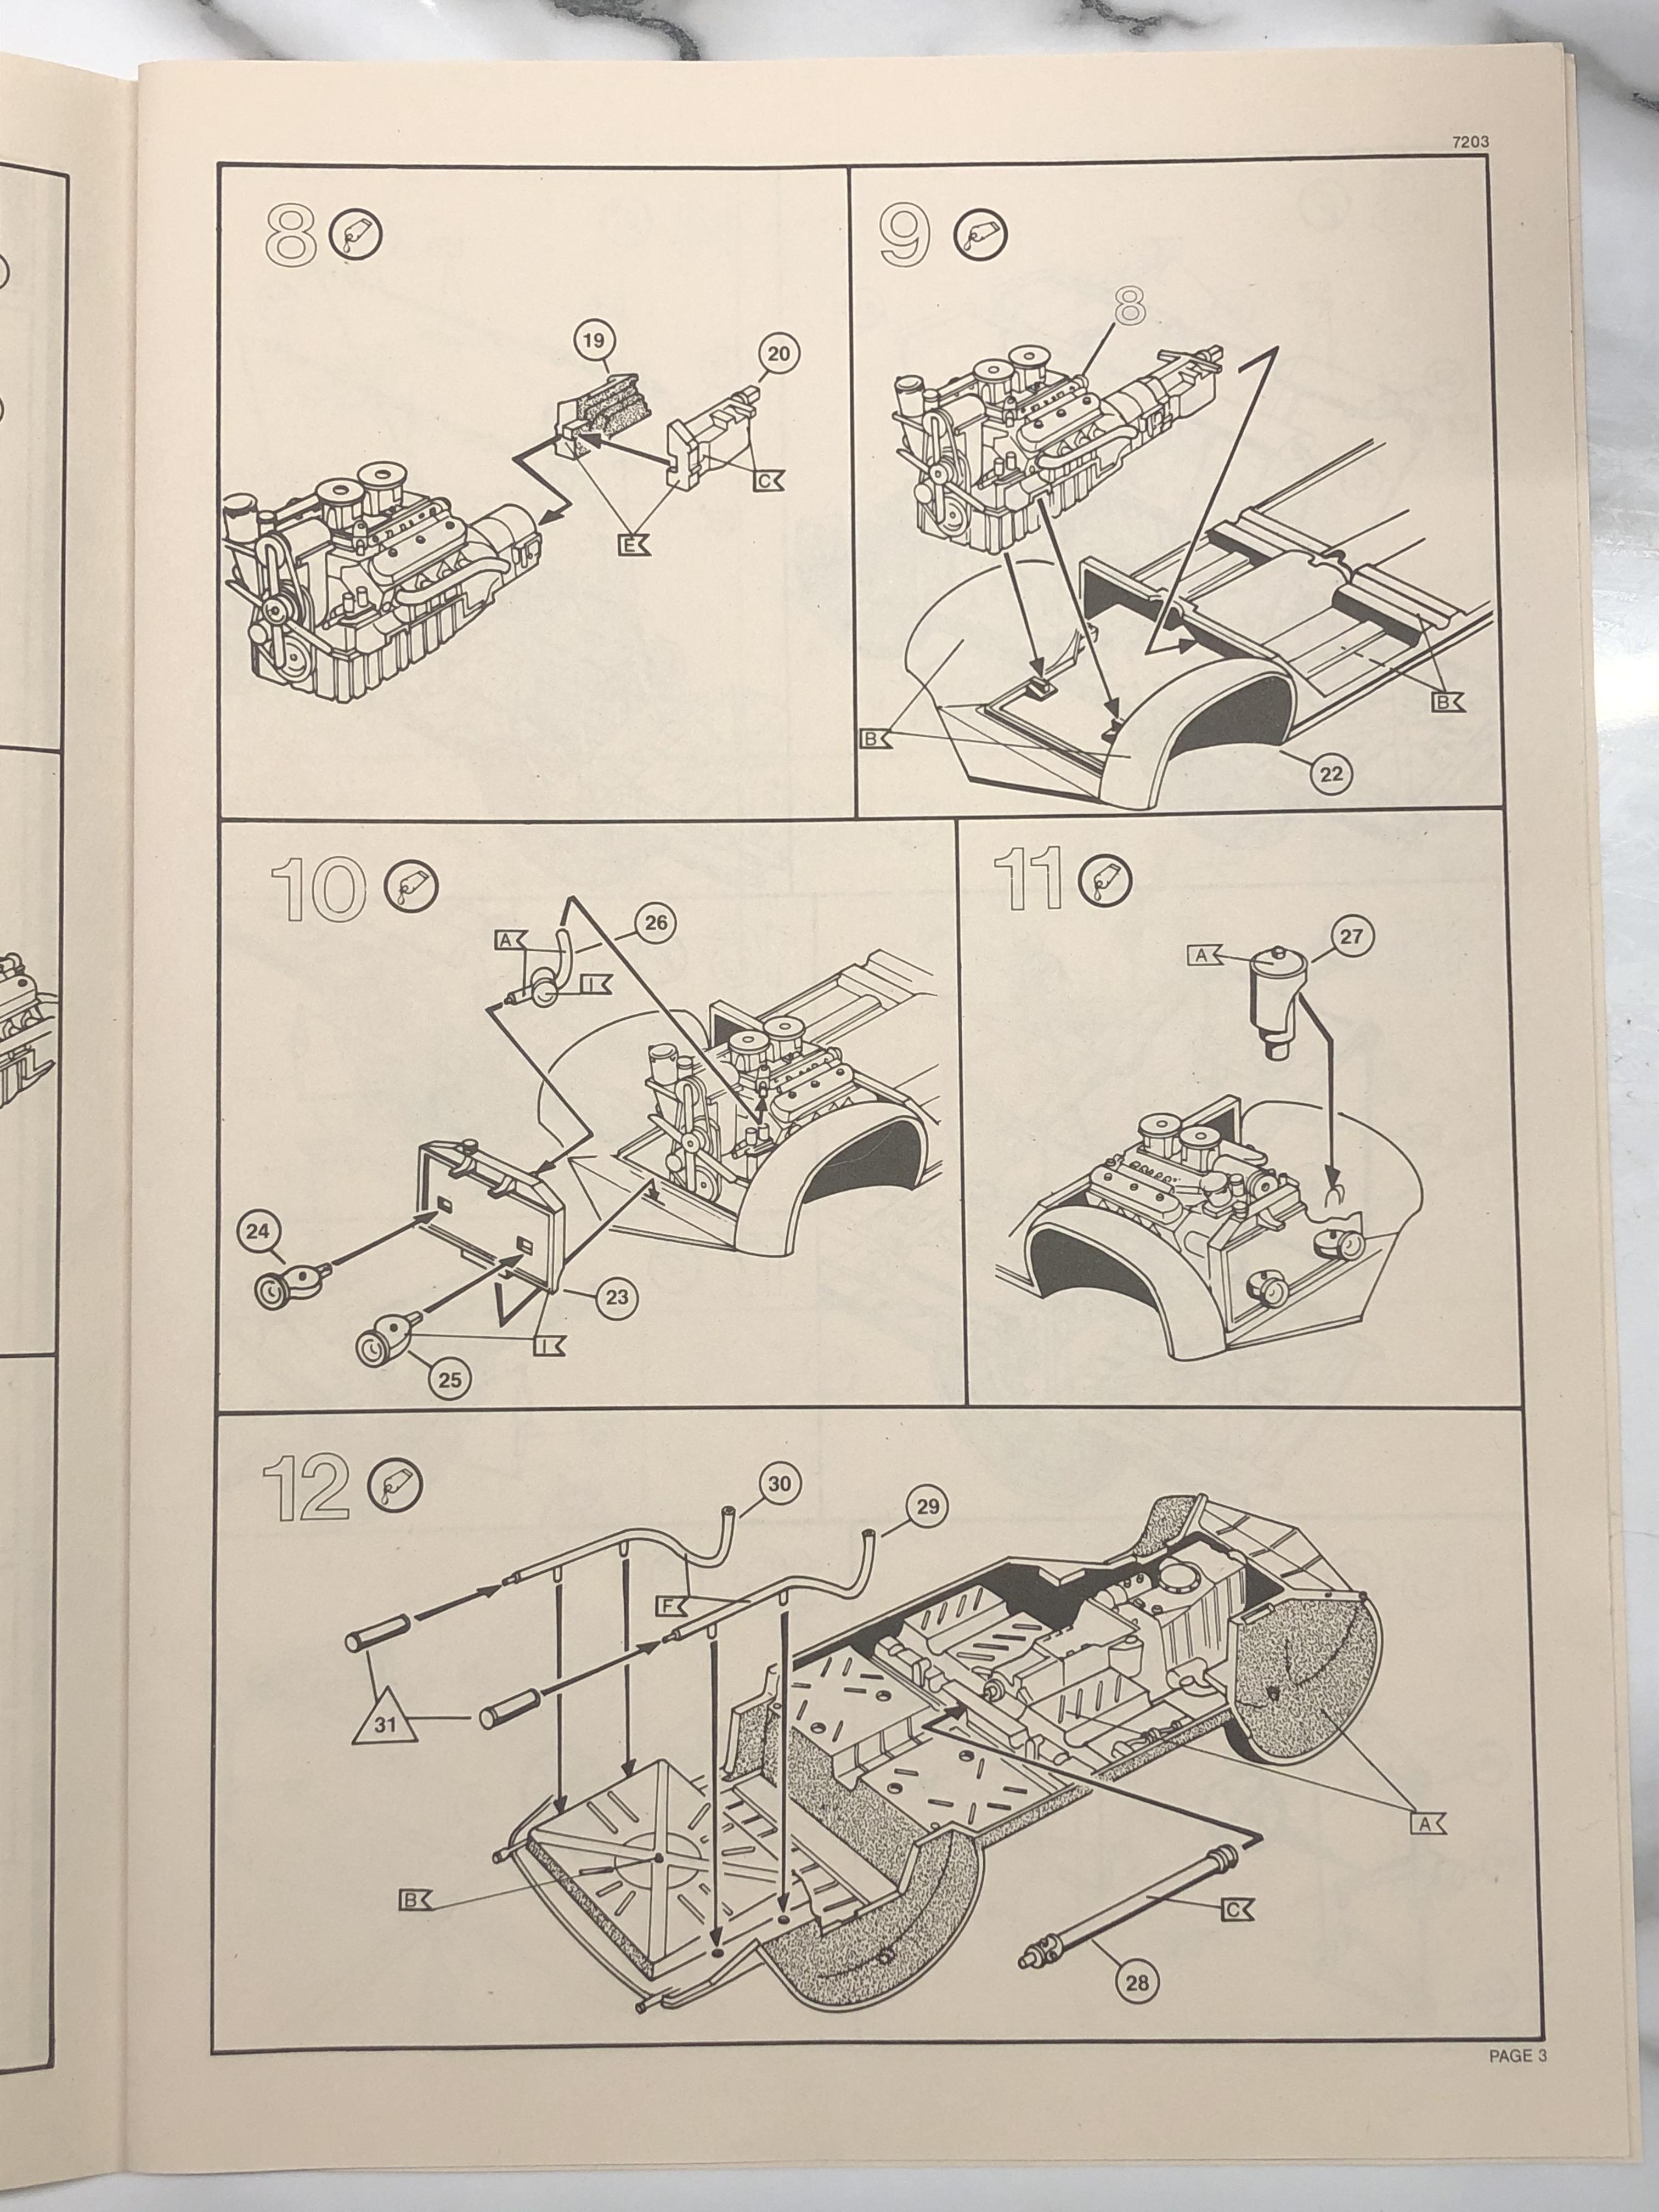
Instructions Steps 9,10, and 11 are next up.
The Coupe was up first.
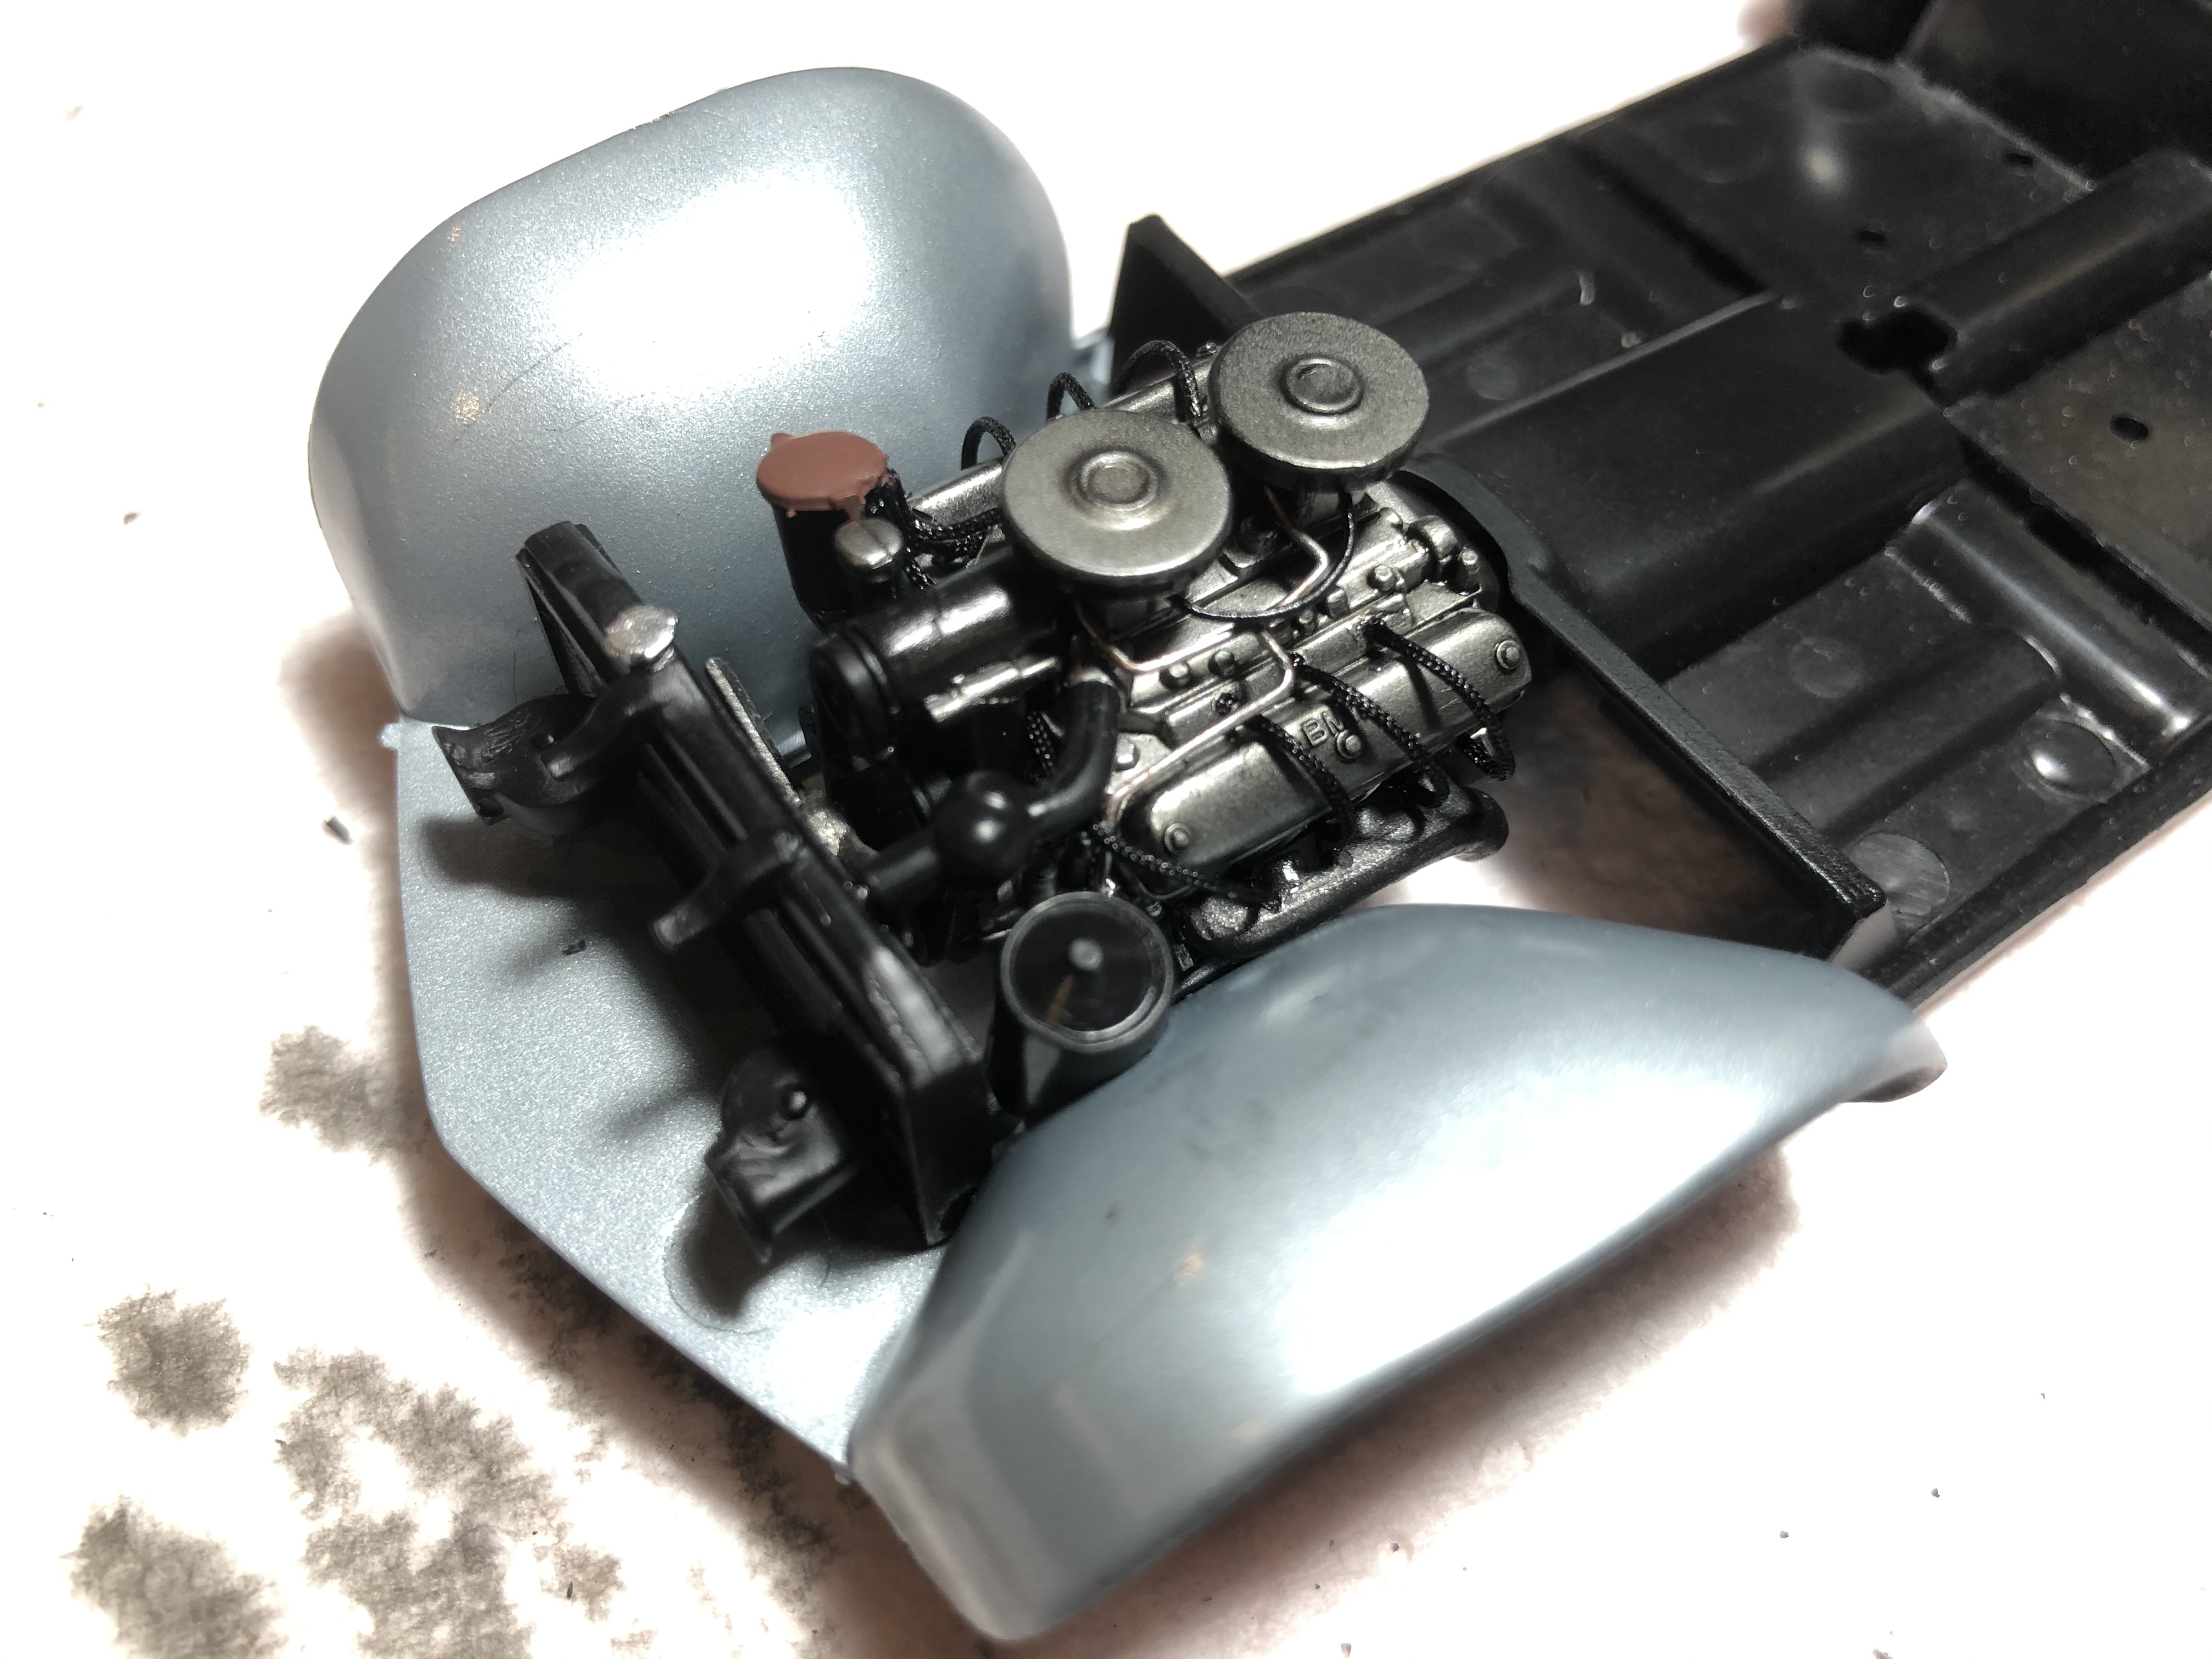
The engine assembly dropped in very neatly, but after that there was a little bit of tweaking required to get a neat fit. The locating spigot on the back of the fan needed to be cut back by about half otherwise the fan pressed against the radiator. Luckily I did some test dry fitting and identified this before I glued the fan in place. The locating tab on the bottom of the radiator needed some sanding to get the radiator to sit vertically, and the lower side edges of the radiator needed to be sanded in very slightly to stop the radiator from pressing outwards against the inner guards. The upper water hose needed to be reworked where it connected with the engine assembly, it was about 1.5 mm too long and has a slot underneath that locates it in place. All minor works, and then it all fell into place easily.
Off now to repeat the steps on the Cabrio.
Cheers, D
Instructions Steps 9,10, and 11 are next up.
The Coupe was up first.
The engine assembly dropped in very neatly, but after that there was a little bit of tweaking required to get a neat fit. The locating spigot on the back of the fan needed to be cut back by about half otherwise the fan pressed against the radiator. Luckily I did some test dry fitting and identified this before I glued the fan in place. The locating tab on the bottom of the radiator needed some sanding to get the radiator to sit vertically, and the lower side edges of the radiator needed to be sanded in very slightly to stop the radiator from pressing outwards against the inner guards. The upper water hose needed to be reworked where it connected with the engine assembly, it was about 1.5 mm too long and has a slot underneath that locates it in place. All minor works, and then it all fell into place easily.
Off now to repeat the steps on the Cabrio.
Cheers, D
Joel_W
Joined: December 04, 2010
KitMaker: 11,666 posts
Auto Modeler: 2,974 posts
Posted: Wednesday, September 23, 2020 - 12:04 AM UTC
D,
The "Twins" really do look outstanding. Love how one looks so much at home in the engine compartment of the coupe. Great catch on the fan.
Just loving this duel build.
Joel
The "Twins" really do look outstanding. Love how one looks so much at home in the engine compartment of the coupe. Great catch on the fan.
Just loving this duel build.
Joel
AussieReg
#007
Joined: June 09, 2009
KitMaker: 8,156 posts
Auto Modeler: 2,953 posts
Posted: Wednesday, September 23, 2020 - 12:25 AM UTC
Quoted Text
Just loving this duel build. Joel
Me too mate, definitely not Tamiya "fall together" kits, but very enjoyable and much better than some of my recent builds.
When you're on a roll, keep rolling!
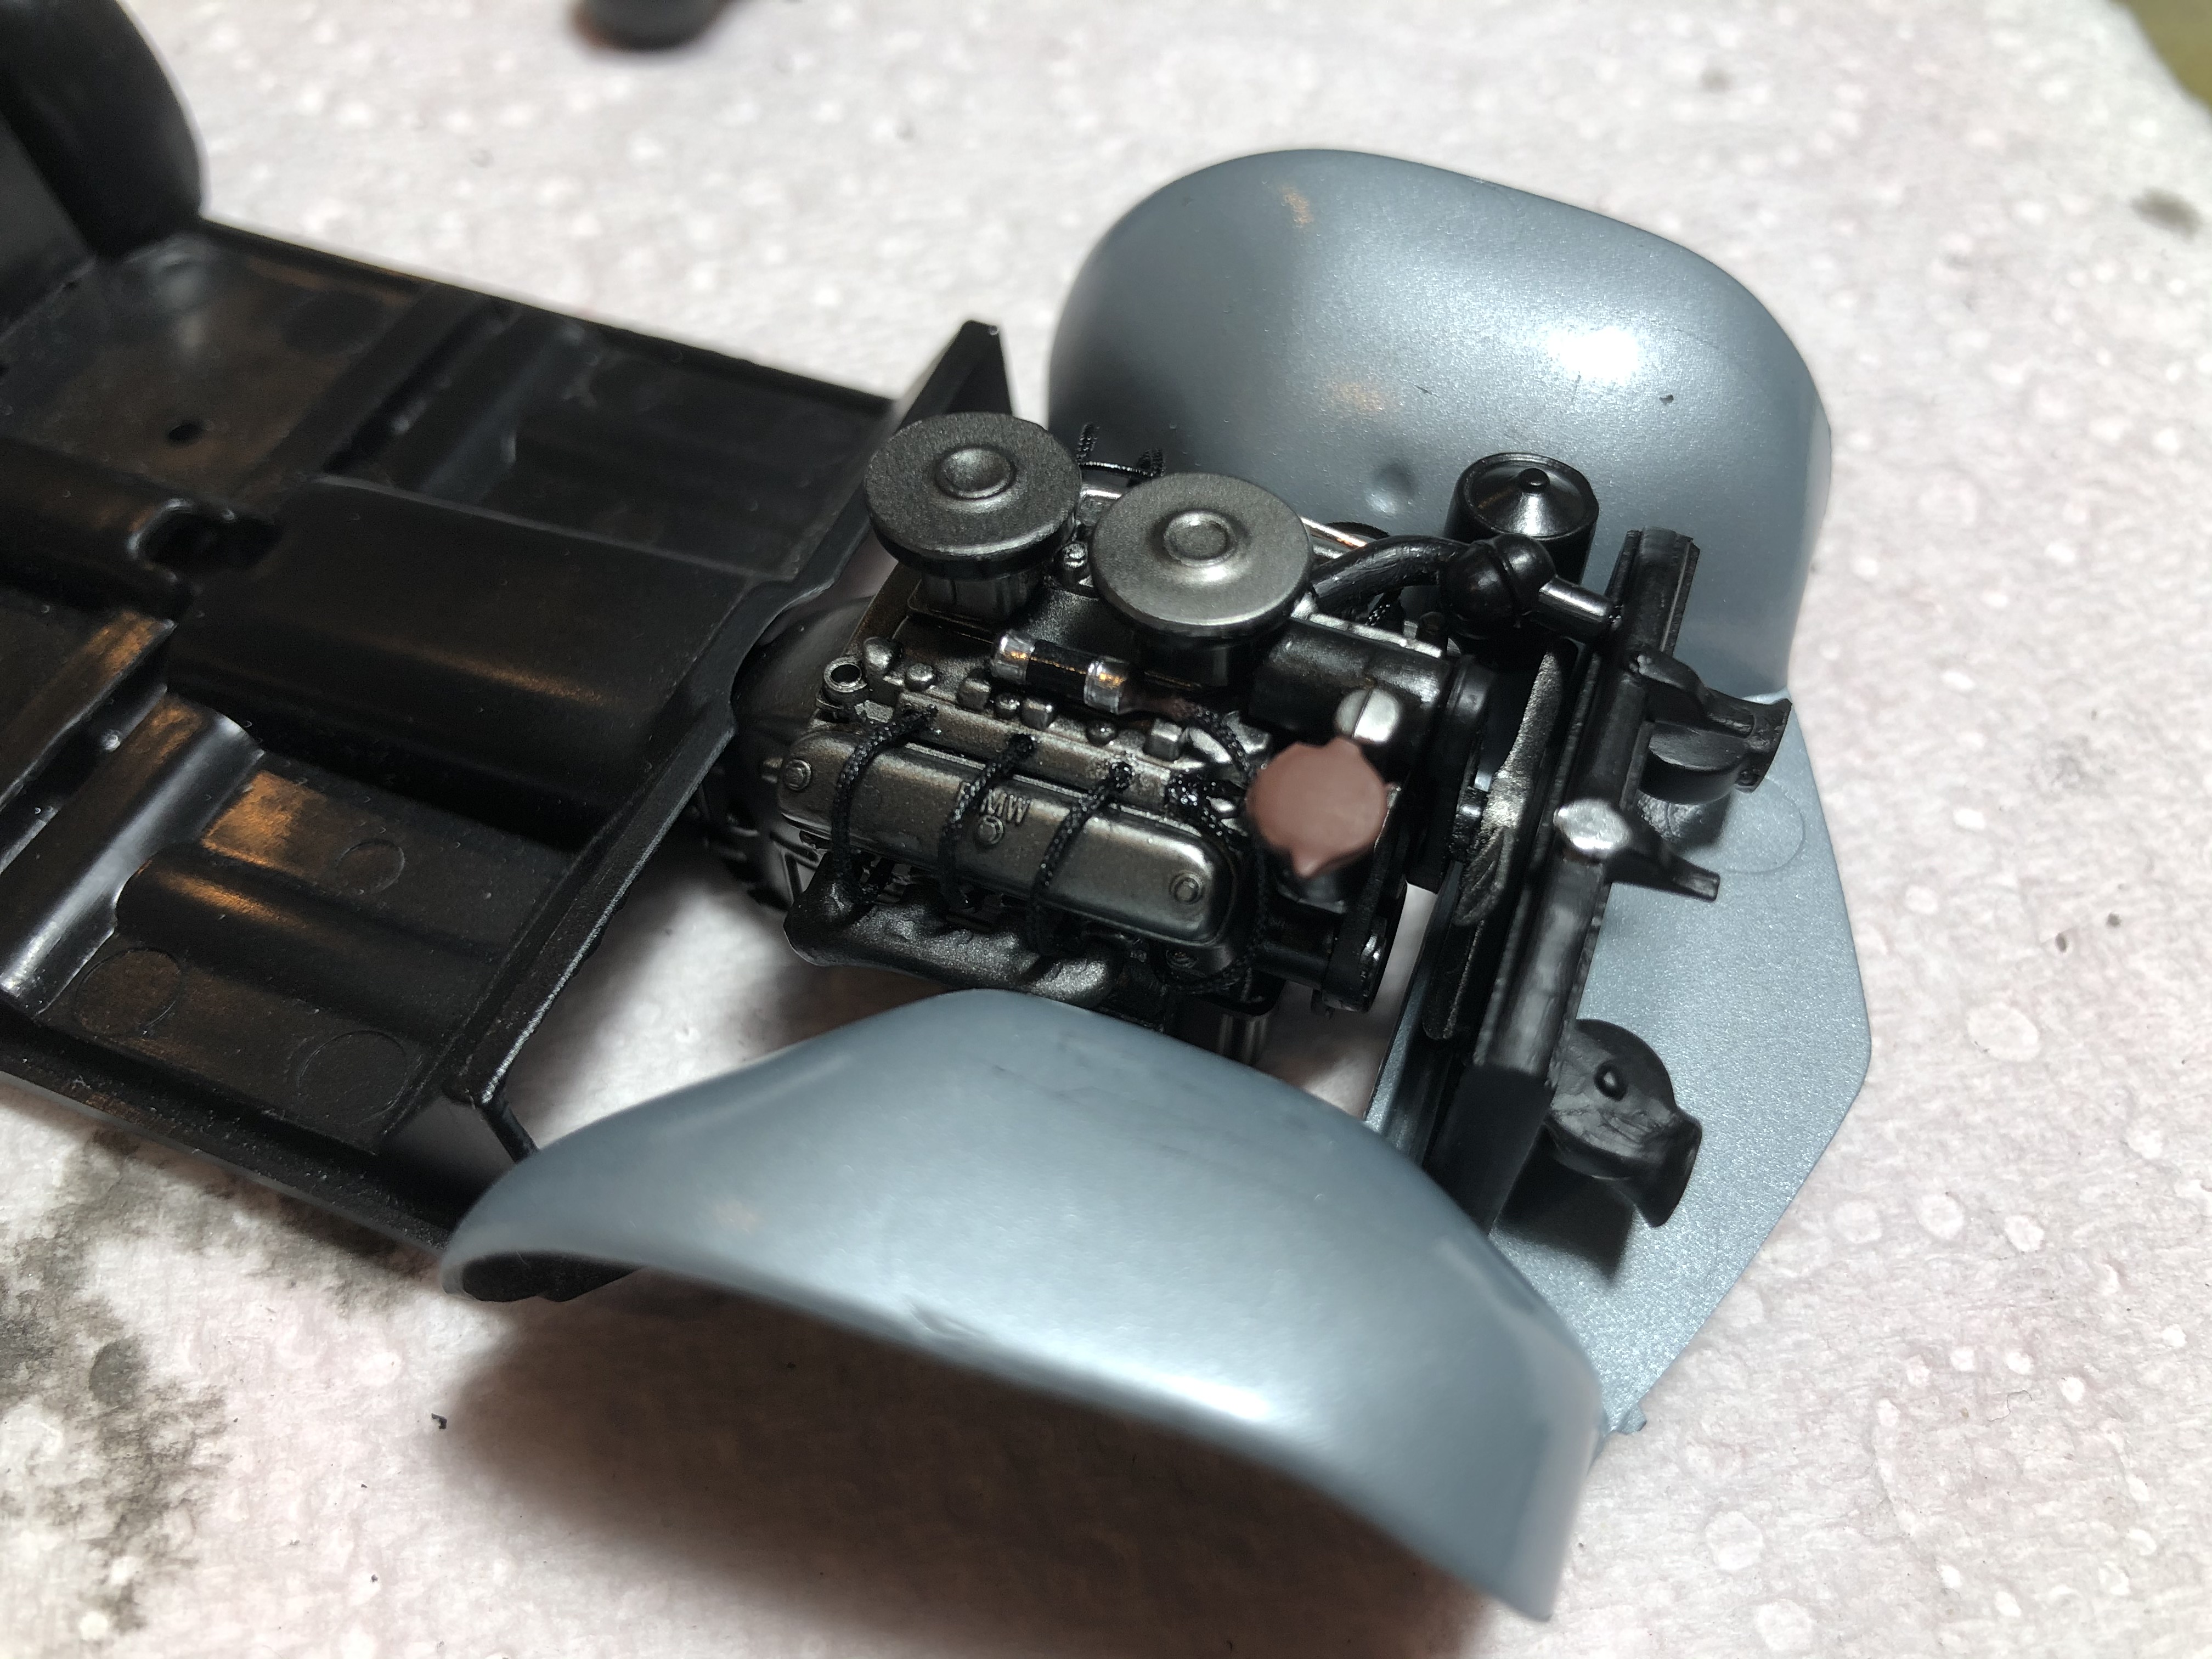
For the keen eye, I've touched up the brown distributor cap and given it a drop of Aqua Clear, and also gave the top of the reservoir (maybe oil?) a quick coat of Vallejo Metal Color Chrome. A couple more small touch-ups to do, nothing major, then ready to flip them over and install the drive train and exhaust components.
Cheers, D
Joel_W
Joined: December 04, 2010
KitMaker: 11,666 posts
Auto Modeler: 2,974 posts
Posted: Wednesday, September 23, 2020 - 02:18 AM UTC
D,
The Gloss Brown is the exact color and finish I remember from back in the 60's. Looks perfect. As for that reservoir it's seats right on top of the oil filter housing, so it's gotta be for an oil reserve.
Joel
The Gloss Brown is the exact color and finish I remember from back in the 60's. Looks perfect. As for that reservoir it's seats right on top of the oil filter housing, so it's gotta be for an oil reserve.
Joel
AussieReg
#007
Joined: June 09, 2009
KitMaker: 8,156 posts
Auto Modeler: 2,953 posts
Posted: Wednesday, September 23, 2020 - 01:02 PM UTC
Ok, so I might have sat up a bit late last night 

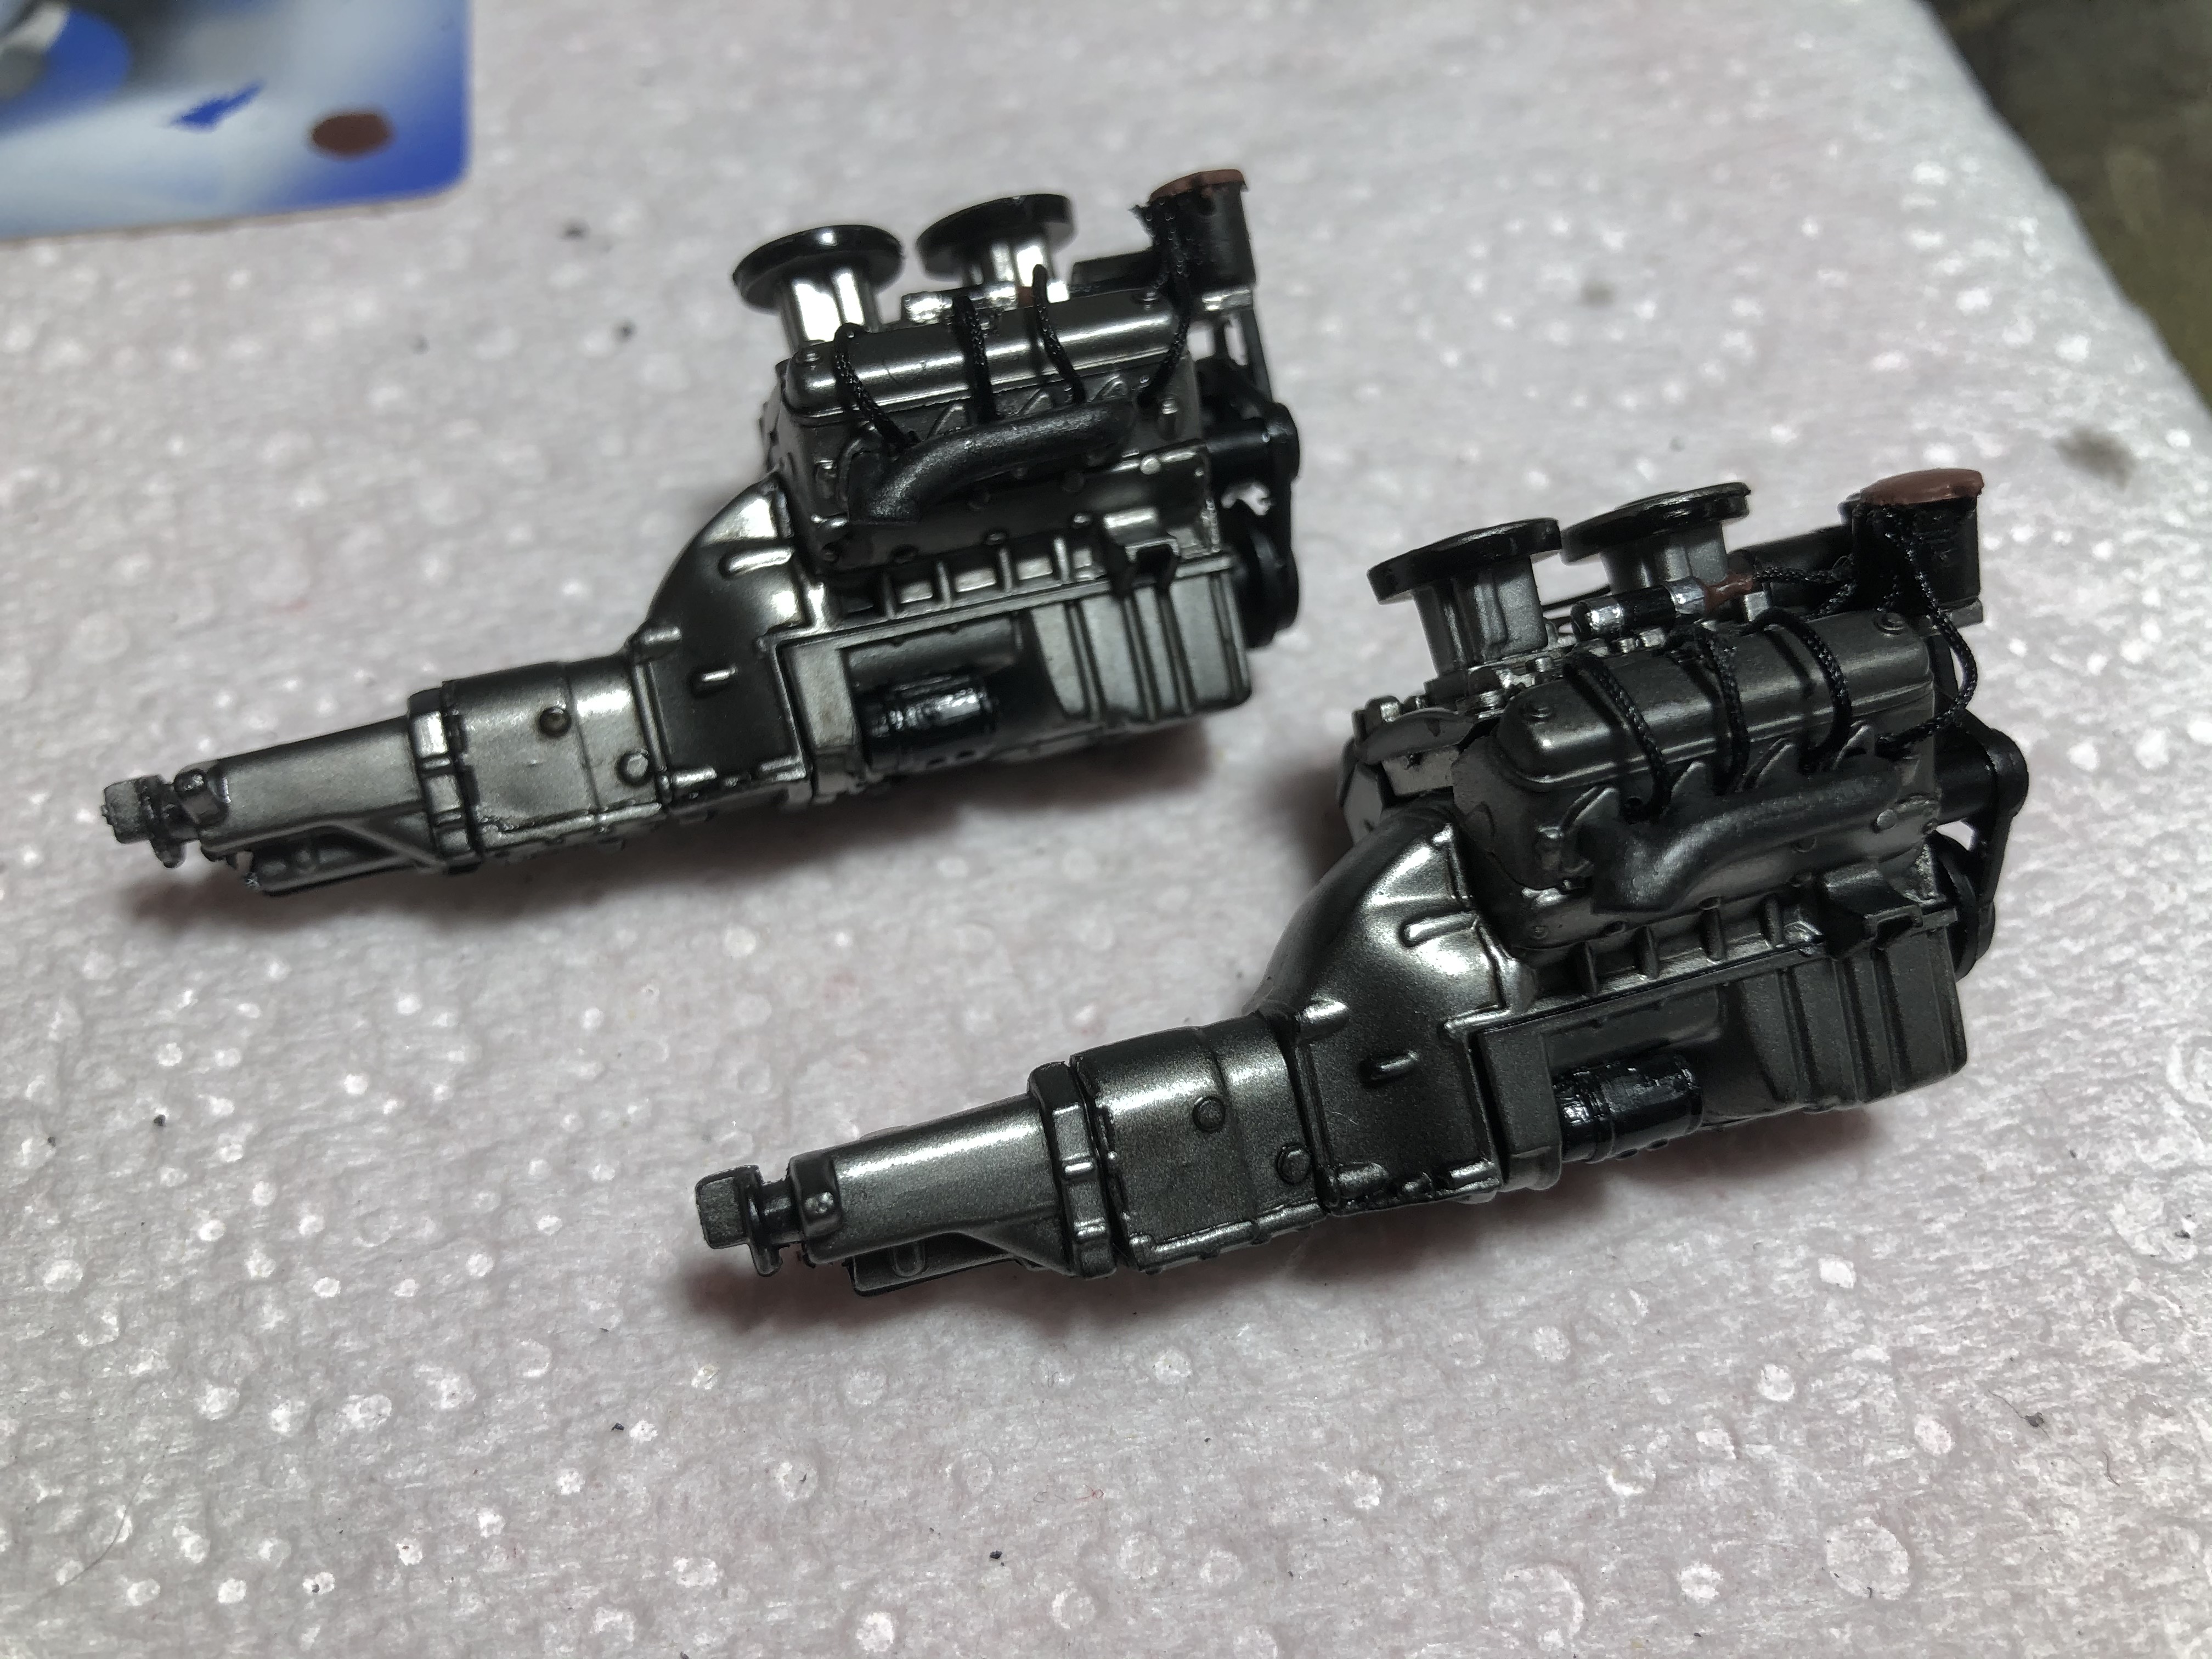
Step 12 is the tailshaft and rear section of the exhausts and the chrome tips.
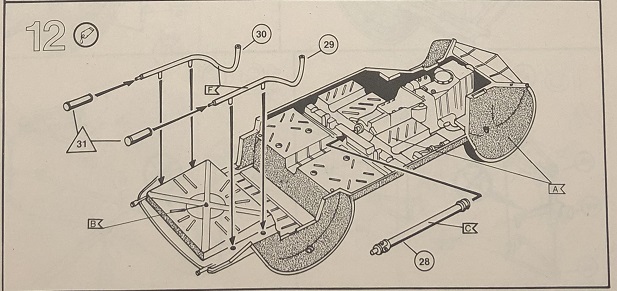
The locating tab on the back of the transmission doesn't fit into the forward end of the tailshaft so I just trimmed it off with sprue cutters and CA'd the tailshaft in place.
The locating pin on the exhaust pipe drops into a wide slot in the chrome tip, not a tight fit so I used some medium CA to attach and fill the slot at the same time. Once attached and set the assembly dropped into place in the locating holes on the floor pan perfectly!
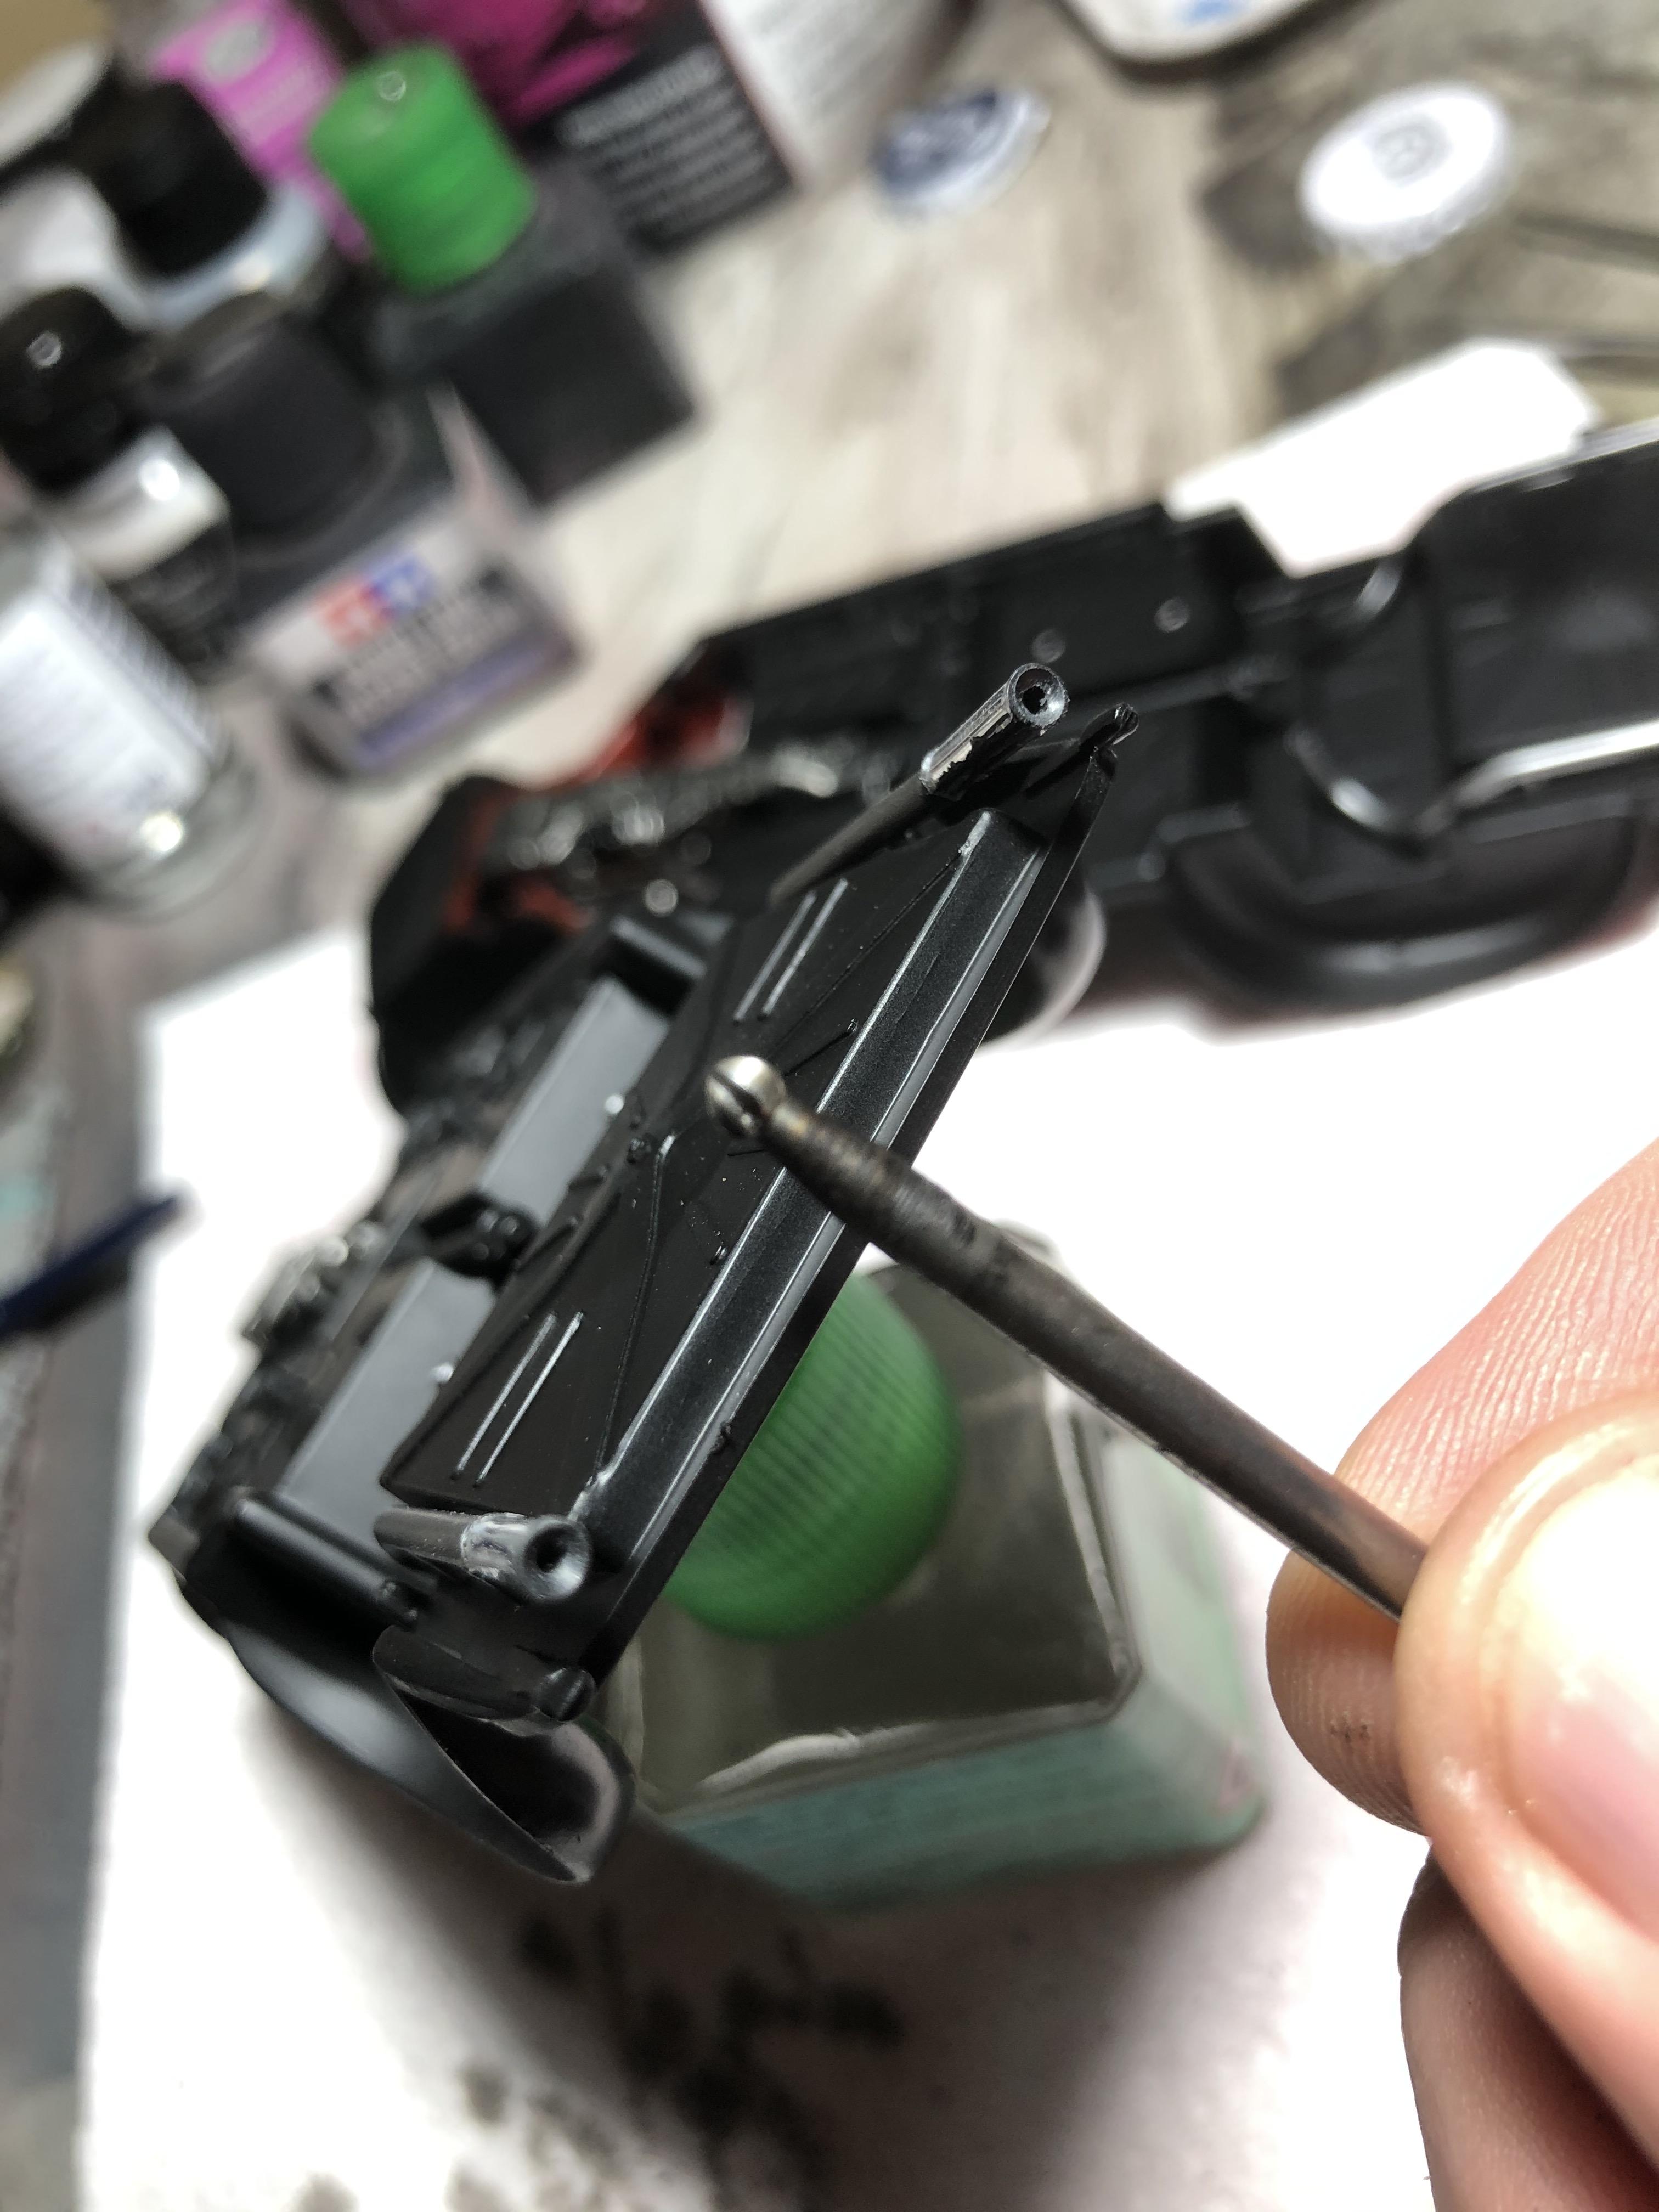
The chrome tips themselves are just solid parts with no holes, so I drilled them out using several sizes of PCB bits to keep the hole centered and not split the part. I even got out the round burr from my Dremel set and tapered the opening!
Step 13 is the mufflers and forward exhausts.
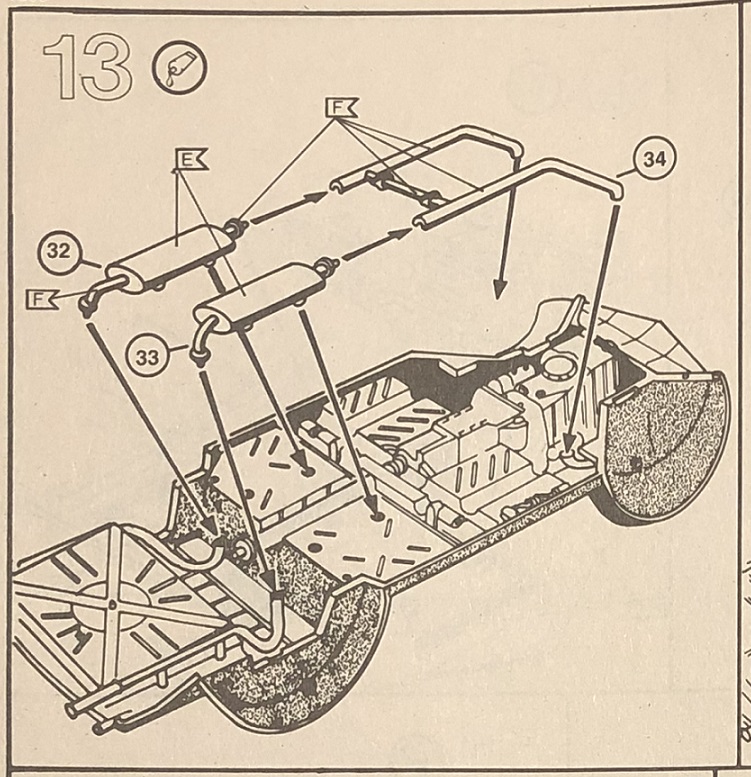
The locating holes for the RHS mufflers (Part #32) didn't line up perfectly with the pins, by about 1/3 of the diameter of the hole. Once again an easy fix to just open out the hole with the tip of the Xacto. The LHS muffler dropped in perfectly.
The locating pins on the rear end of the muffler were longer than the corresponding holes in the rear exhaust sections, so I trimmed off about half of their length (1mm or so), then once again things lined up beautifully.
The forward exhaust pair is a single part with a supporting cross member and it just fell into place perfectly.
Praise the gods of Polystyrene, the forward end of the exhausts even lined up perfectly with the headers!
Cheers, D
Step 12 is the tailshaft and rear section of the exhausts and the chrome tips.
The locating tab on the back of the transmission doesn't fit into the forward end of the tailshaft so I just trimmed it off with sprue cutters and CA'd the tailshaft in place.
The locating pin on the exhaust pipe drops into a wide slot in the chrome tip, not a tight fit so I used some medium CA to attach and fill the slot at the same time. Once attached and set the assembly dropped into place in the locating holes on the floor pan perfectly!
The chrome tips themselves are just solid parts with no holes, so I drilled them out using several sizes of PCB bits to keep the hole centered and not split the part. I even got out the round burr from my Dremel set and tapered the opening!
Step 13 is the mufflers and forward exhausts.
The locating holes for the RHS mufflers (Part #32) didn't line up perfectly with the pins, by about 1/3 of the diameter of the hole. Once again an easy fix to just open out the hole with the tip of the Xacto. The LHS muffler dropped in perfectly.
The locating pins on the rear end of the muffler were longer than the corresponding holes in the rear exhaust sections, so I trimmed off about half of their length (1mm or so), then once again things lined up beautifully.
The forward exhaust pair is a single part with a supporting cross member and it just fell into place perfectly.
Praise the gods of Polystyrene, the forward end of the exhausts even lined up perfectly with the headers!
Cheers, D
Dixon66
Joined: December 12, 2002
KitMaker: 1,500 posts
Auto Modeler: 645 posts
Posted: Wednesday, September 23, 2020 - 02:50 PM UTC
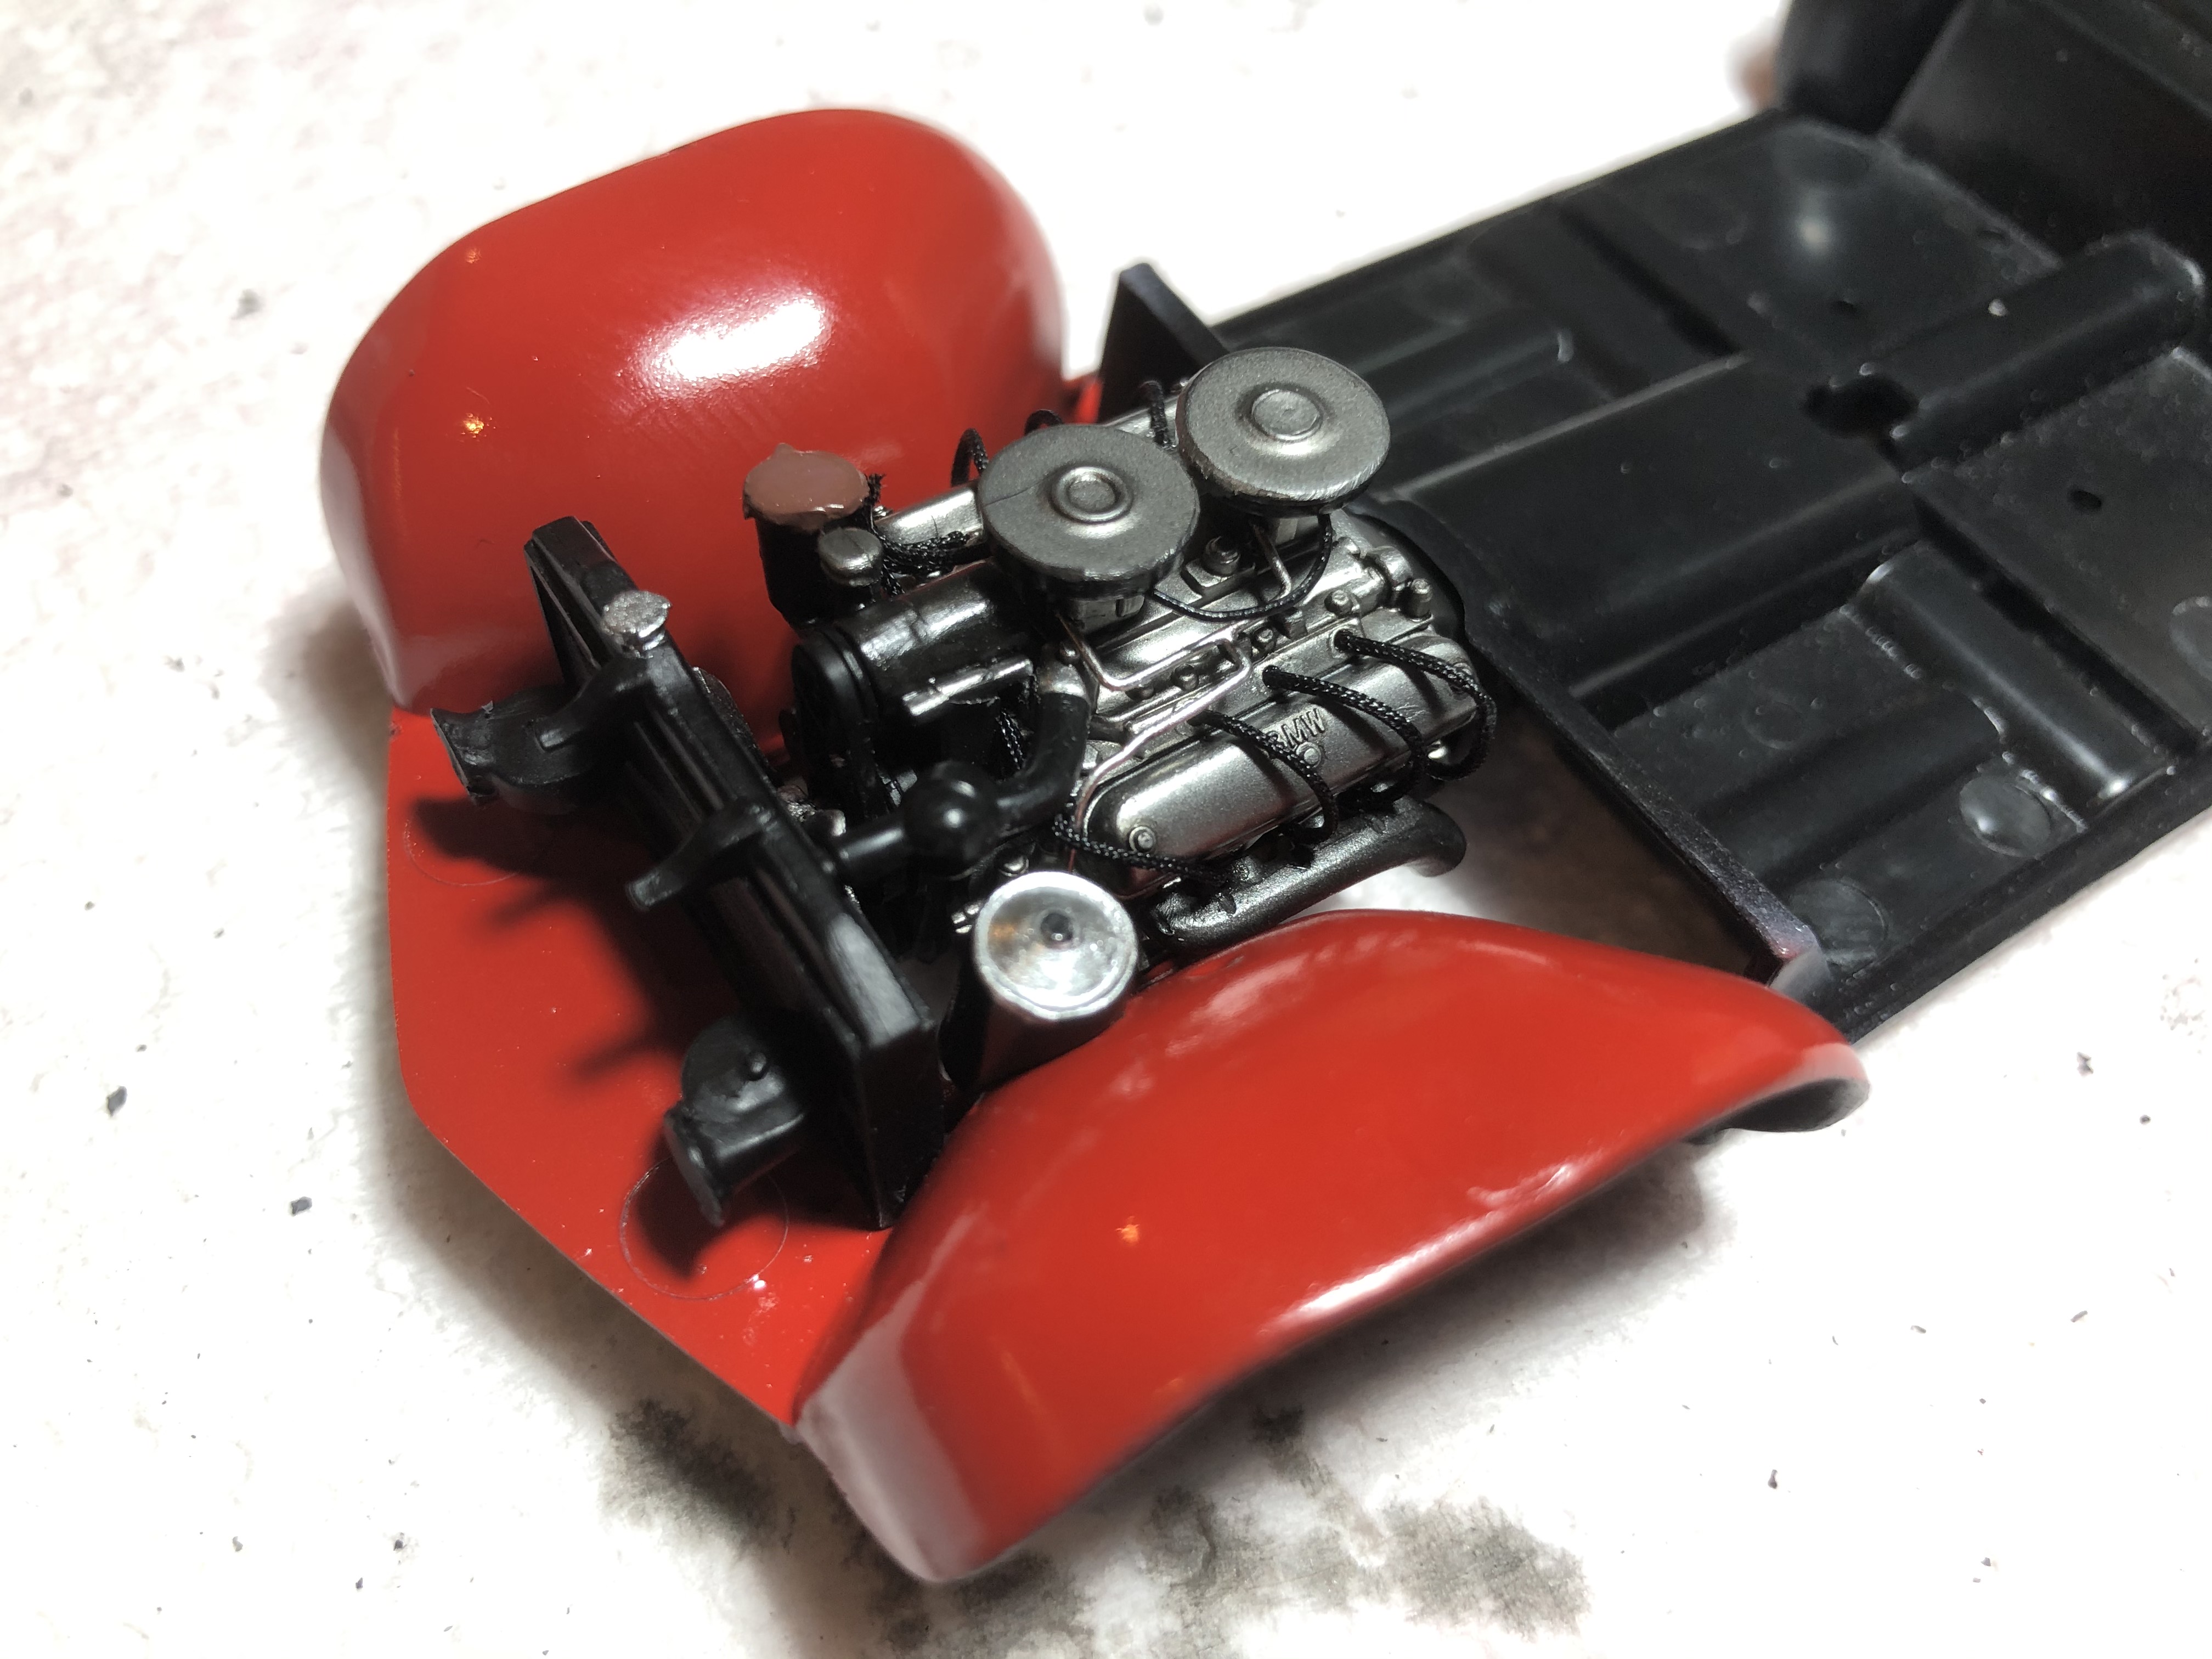
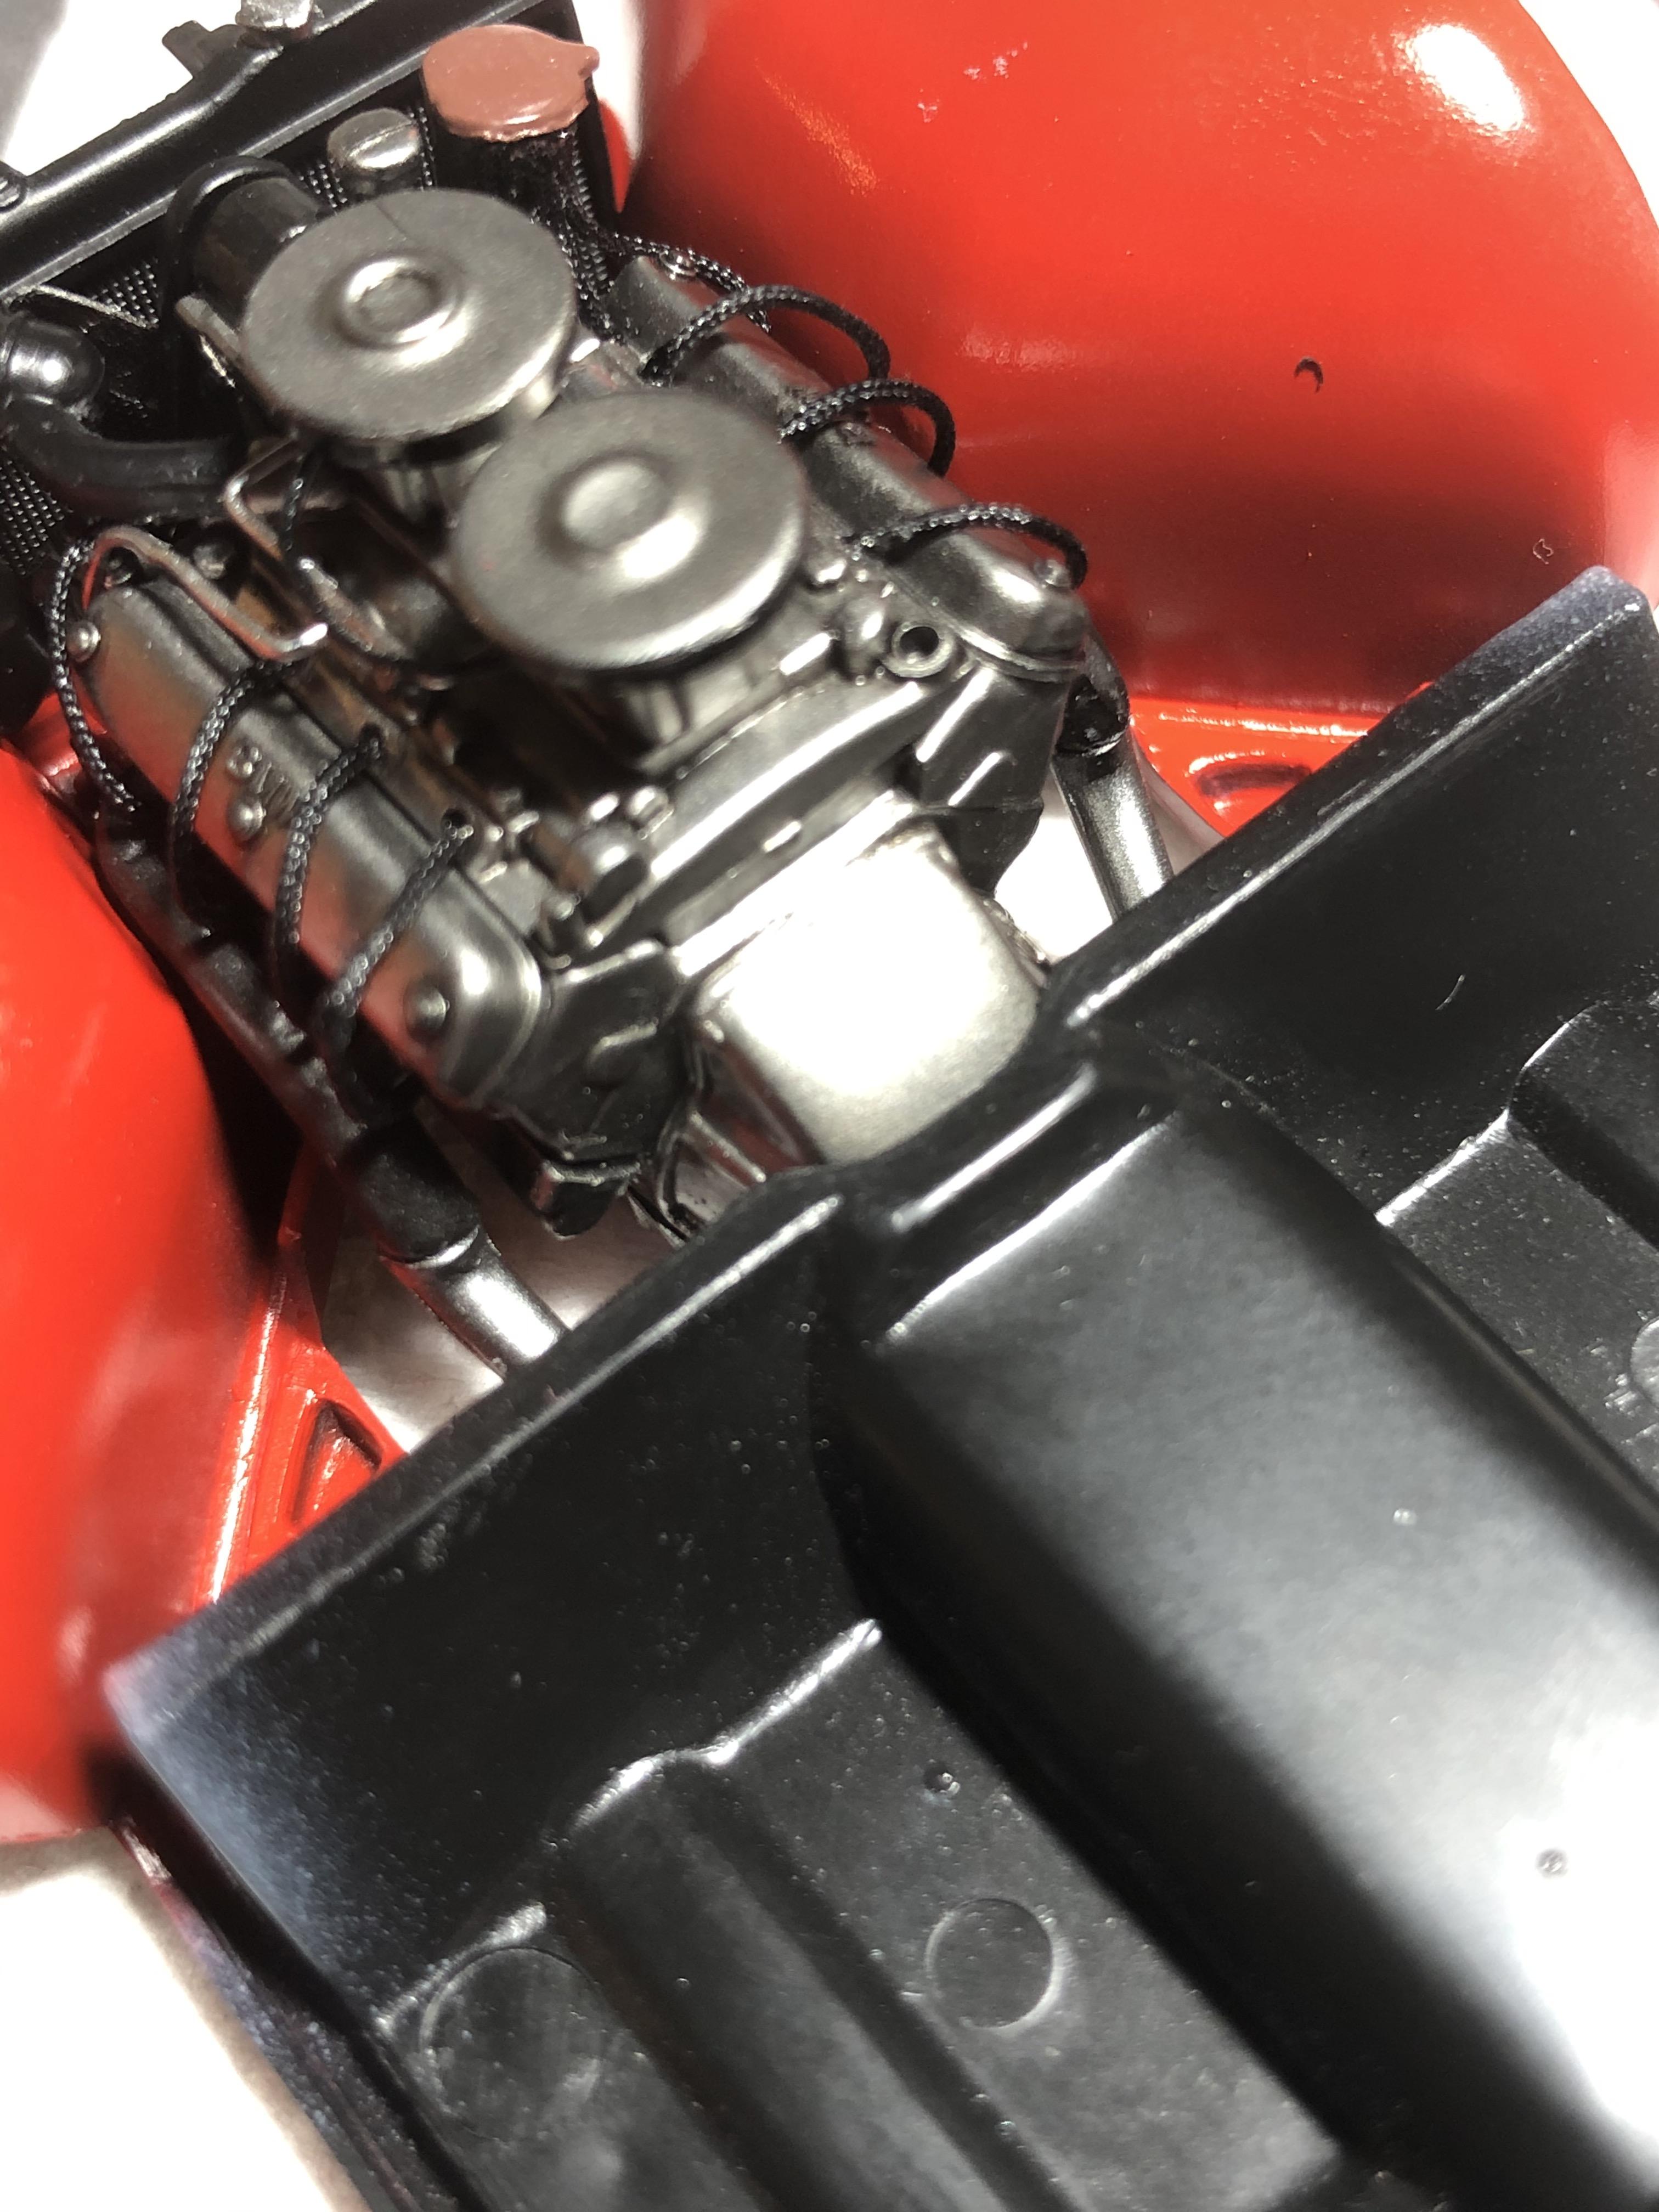
Talk about tight quarters, I wouldn't want to have to change those manifolds out!
Great work, but I feel like I'm seeing double. LOL
Great work, but I feel like I'm seeing double. LOL
Joel_W
Joined: December 04, 2010
KitMaker: 11,666 posts
Auto Modeler: 2,974 posts
Posted: Thursday, September 24, 2020 - 04:06 AM UTC
D,
Those twin exhaust systems look great. The panel line wash really adds so much to them. Nice job on drilling out the exhaust tips. Like you, I'm always amazed when the exhaust pipes actually align with the exhaust manifold without all kids of issues to be over come. These look dead on perfect for both cars.
As David said, those exhaust headers almost touch the inner wheel wells. Gotta be a design/molding issue that they let slide. Just the torque of the engine when you rev it would cause the header to hit the well. Back in the day, I do remember a few British sports cars that had similar issues, and we had to actually remove the motor mounts, lines etc, so that we could raise the block up enough to remove the headers. Usually it was a burnt gasket that needed replacing.
Joel
AussieReg
#007
Joined: June 09, 2009
KitMaker: 8,156 posts
Auto Modeler: 2,953 posts
Posted: Thursday, September 24, 2020 - 12:33 PM UTC
Quoted Text
Talk about tight quarters, I wouldn't want to have to change those manifolds out!
Great work, but I feel like I'm seeing double. LOL
Quoted Text
As David said, those exhaust headers almost touch the inner wheel wells. Gotta be a design/molding issue that they let slide.
I picked that up when I was dropping the engines in, but everything on the kit lines up neatly so it's not an assembly issue. It looks like the engine is slightly over-scale. The reference images show plenty of room between the exhaust manifolds and inner guards.
Cheers, D
Joel_W
Joined: December 04, 2010
KitMaker: 11,666 posts
Auto Modeler: 2,974 posts
Posted: Friday, September 25, 2020 - 01:59 AM UTC
D,
100% agreed that it's a kit screw up issue. That last picture clearly shows the normal amount of room for a header with the steering shaft to the left of it. I wouldn't let it bother you one way or the other. It was more of just an observation then anything else.
Joel
100% agreed that it's a kit screw up issue. That last picture clearly shows the normal amount of room for a header with the steering shaft to the left of it. I wouldn't let it bother you one way or the other. It was more of just an observation then anything else.
Joel
AussieReg
#007
Joined: June 09, 2009
KitMaker: 8,156 posts
Auto Modeler: 2,953 posts
Posted: Friday, September 25, 2020 - 02:36 AM UTC
Quoted Text
I wouldn't let it bother you one way or the other. It was more of just an observation then anything else. Joel
Joel, definitely not losing sleep over it mate!
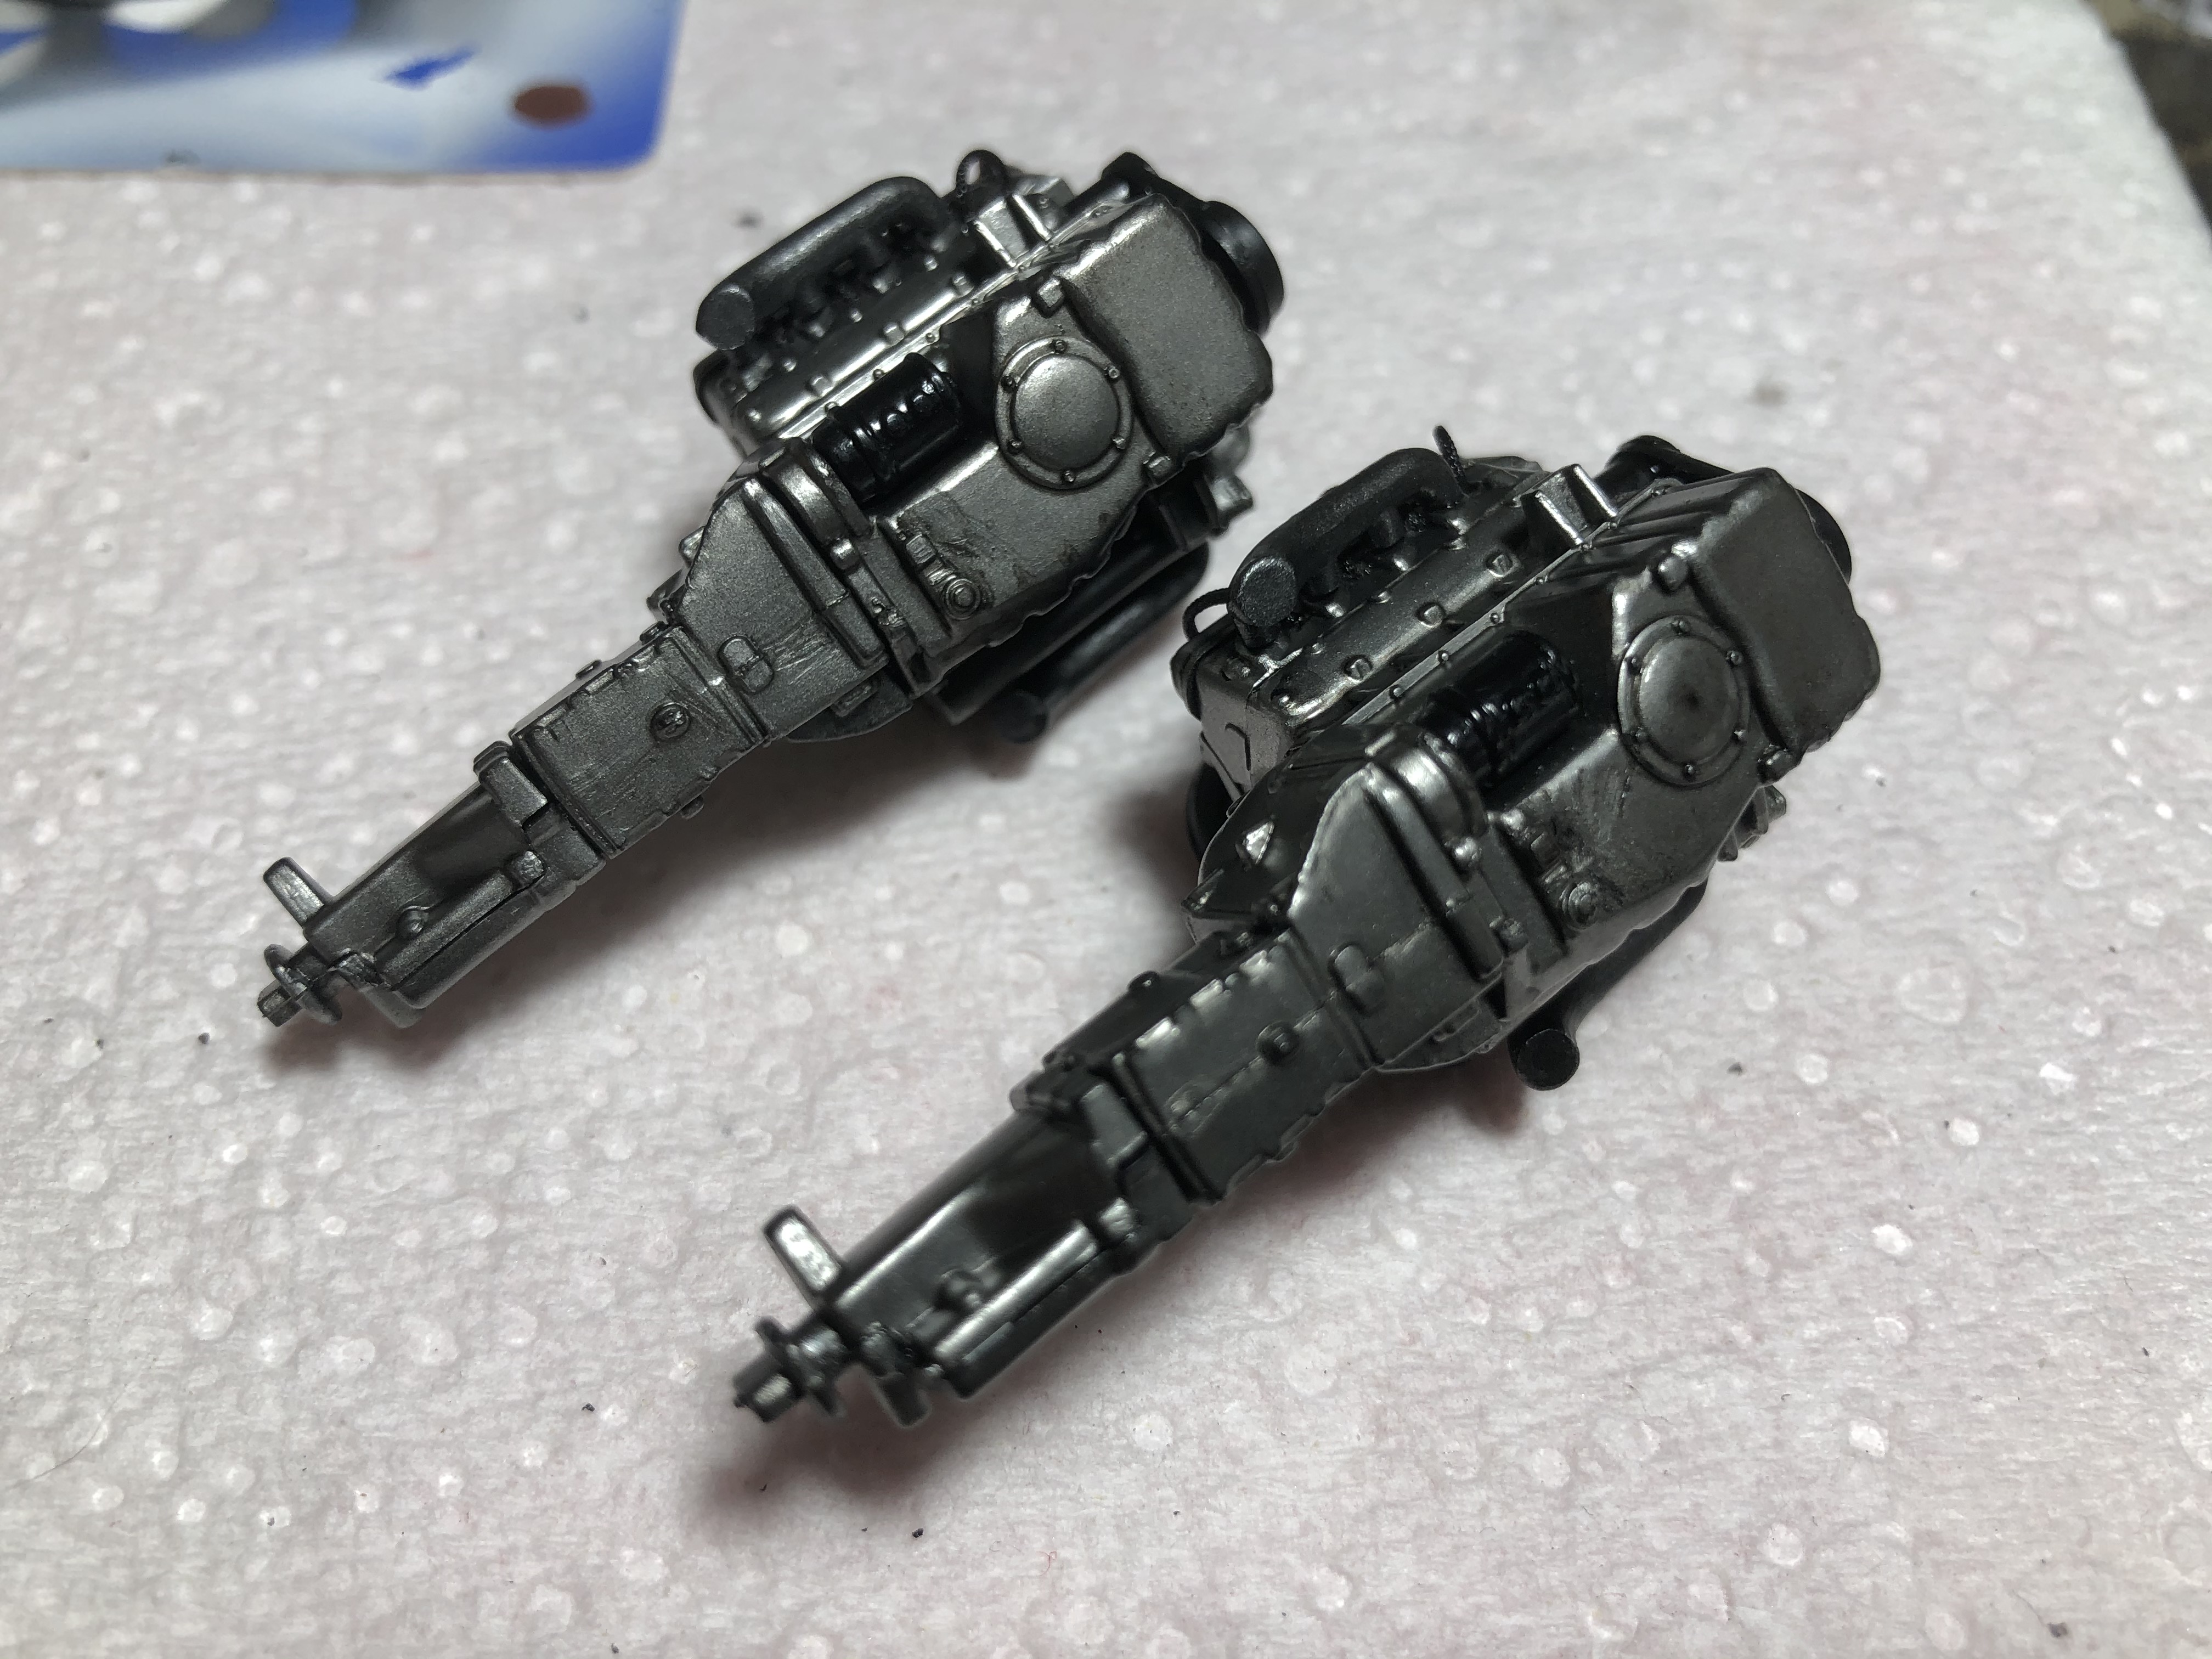
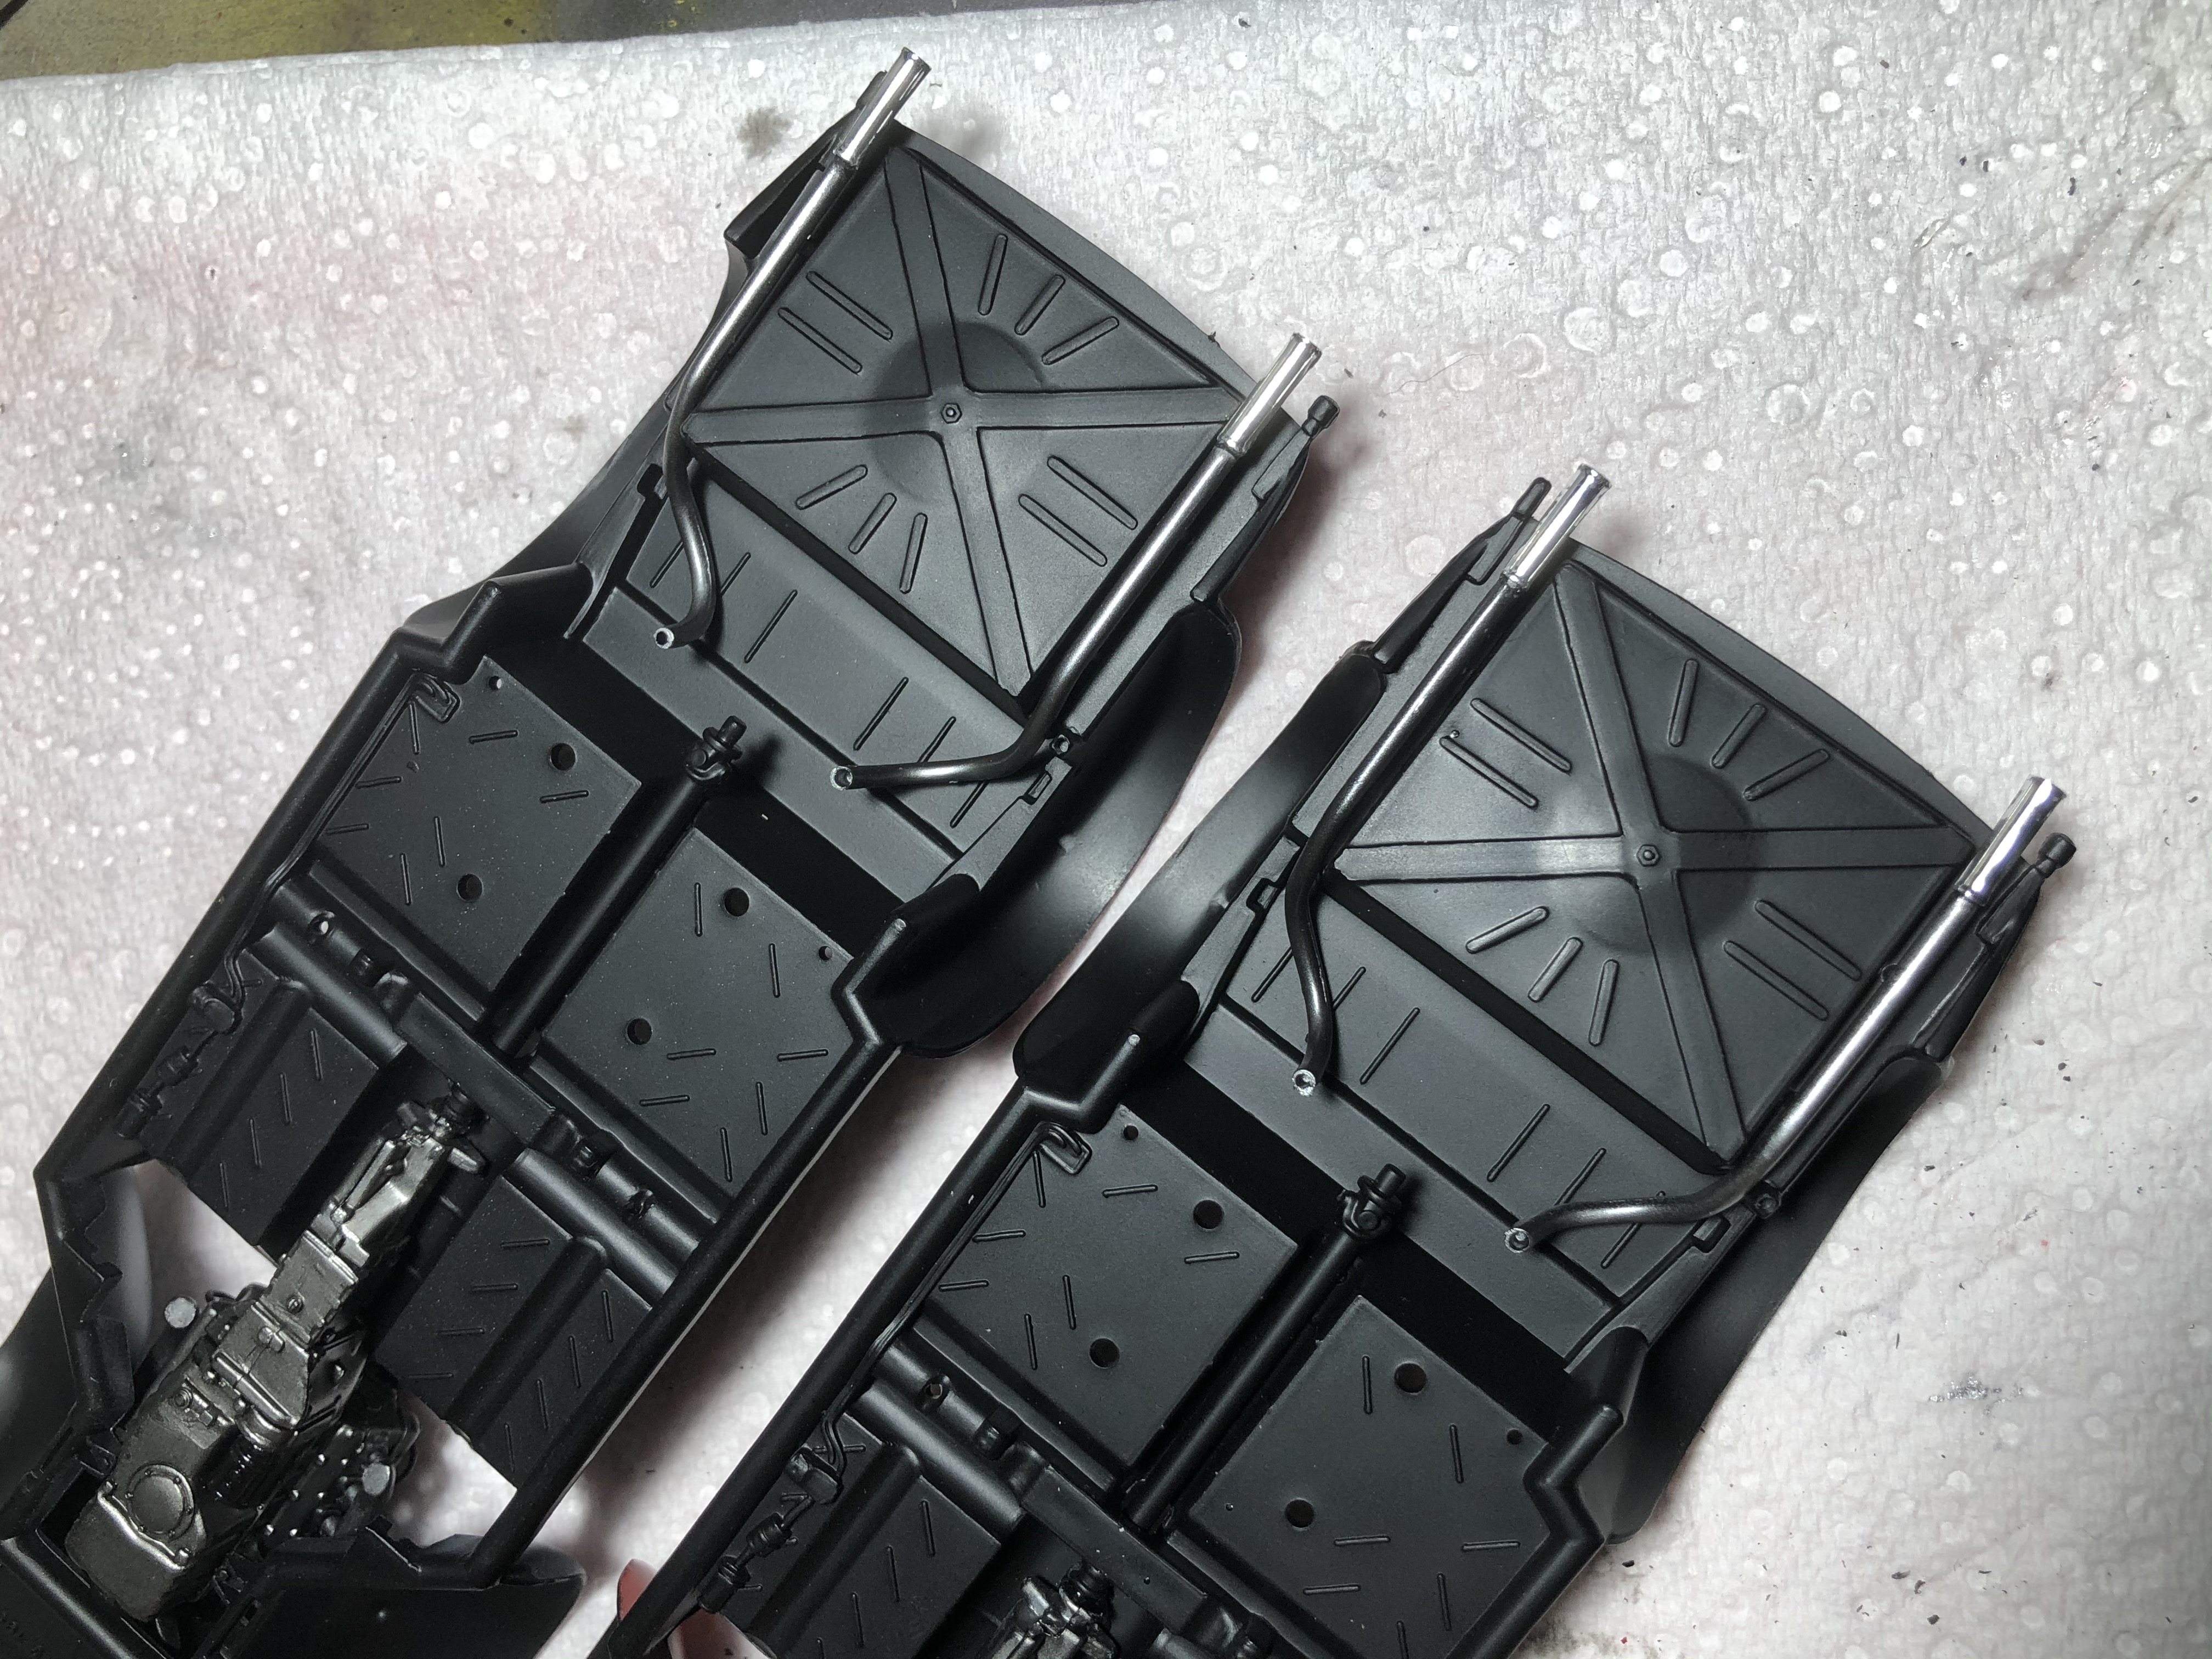
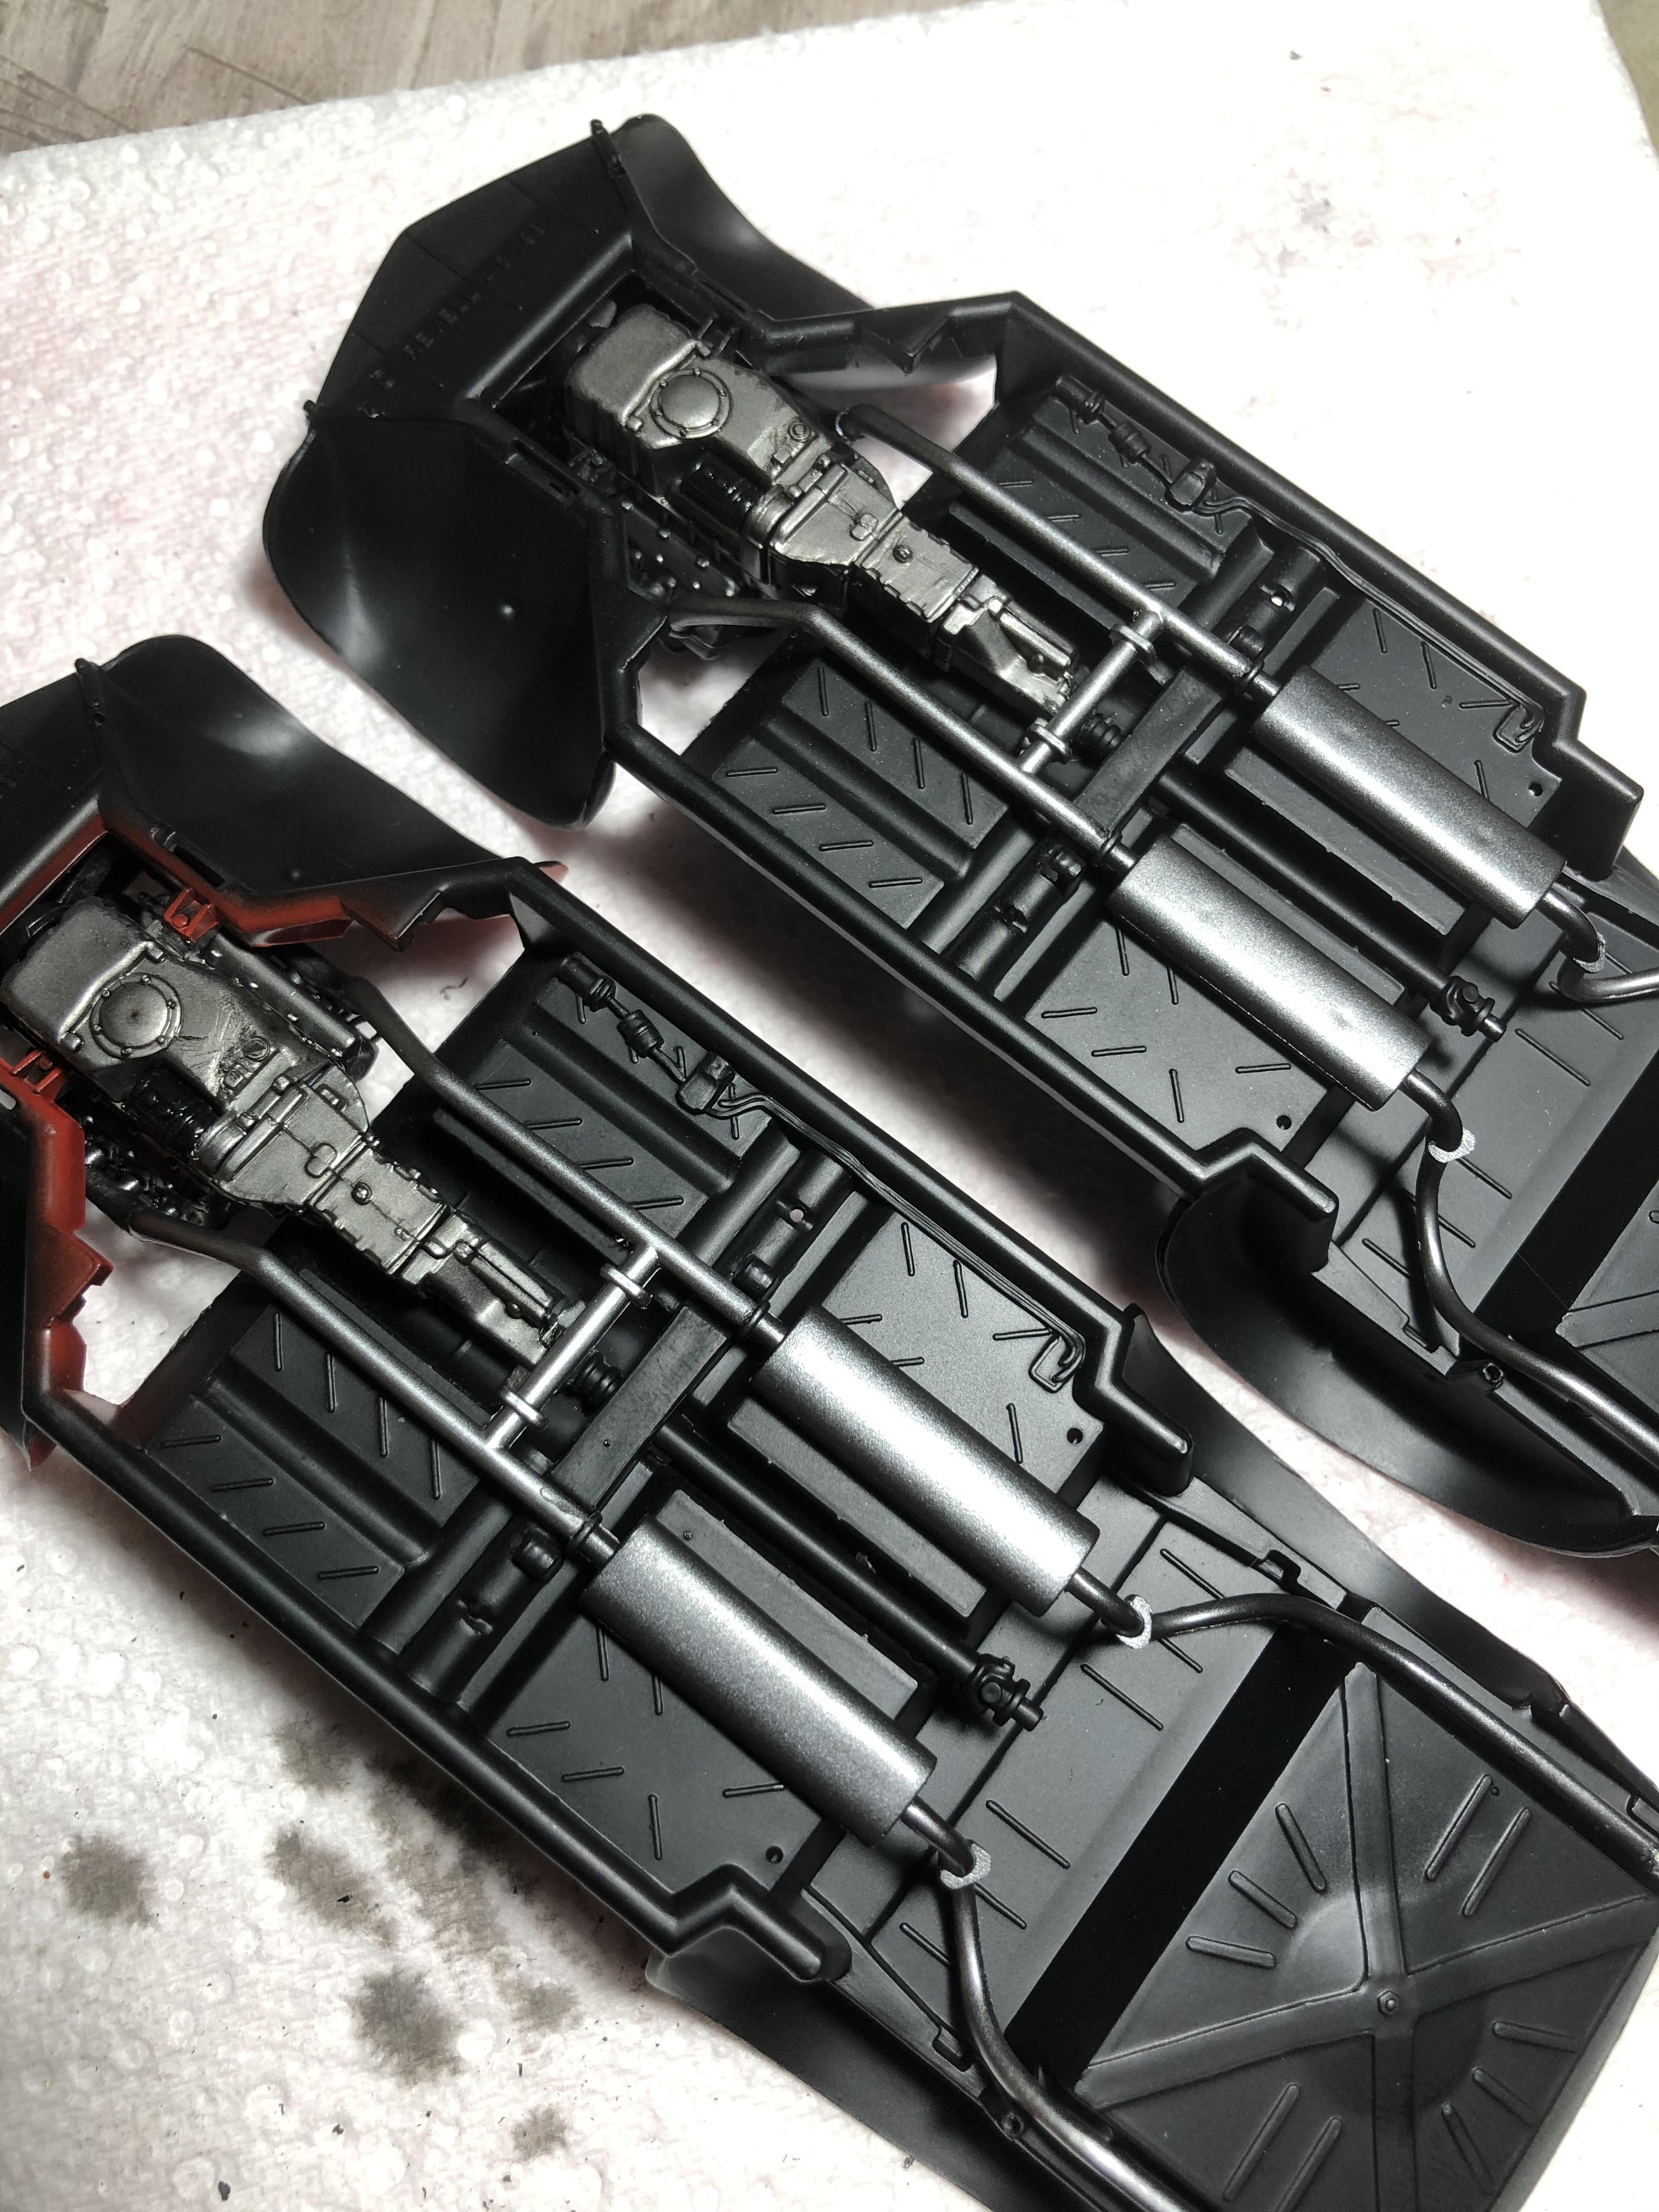
Some more progress tonight, steps 14 to 17 completed.
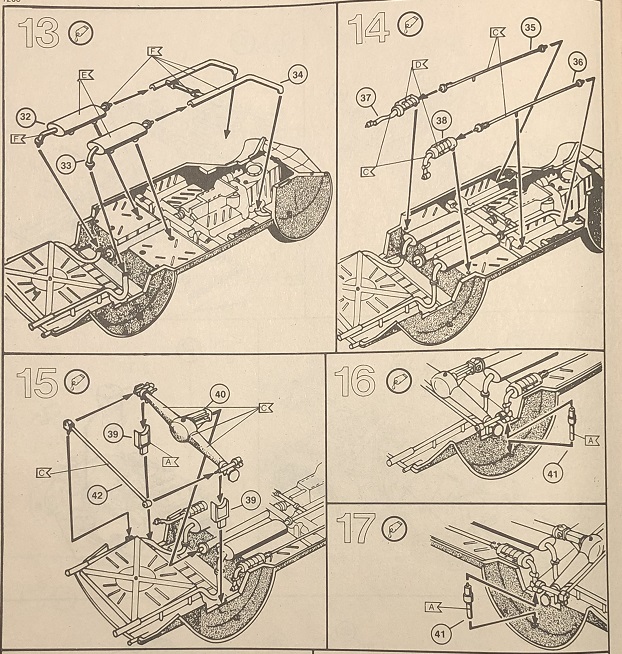
Some more artistic license taken here, a few of these parts are called out to be painted black, but the underside really needed some more bling so I went with Super Silver!
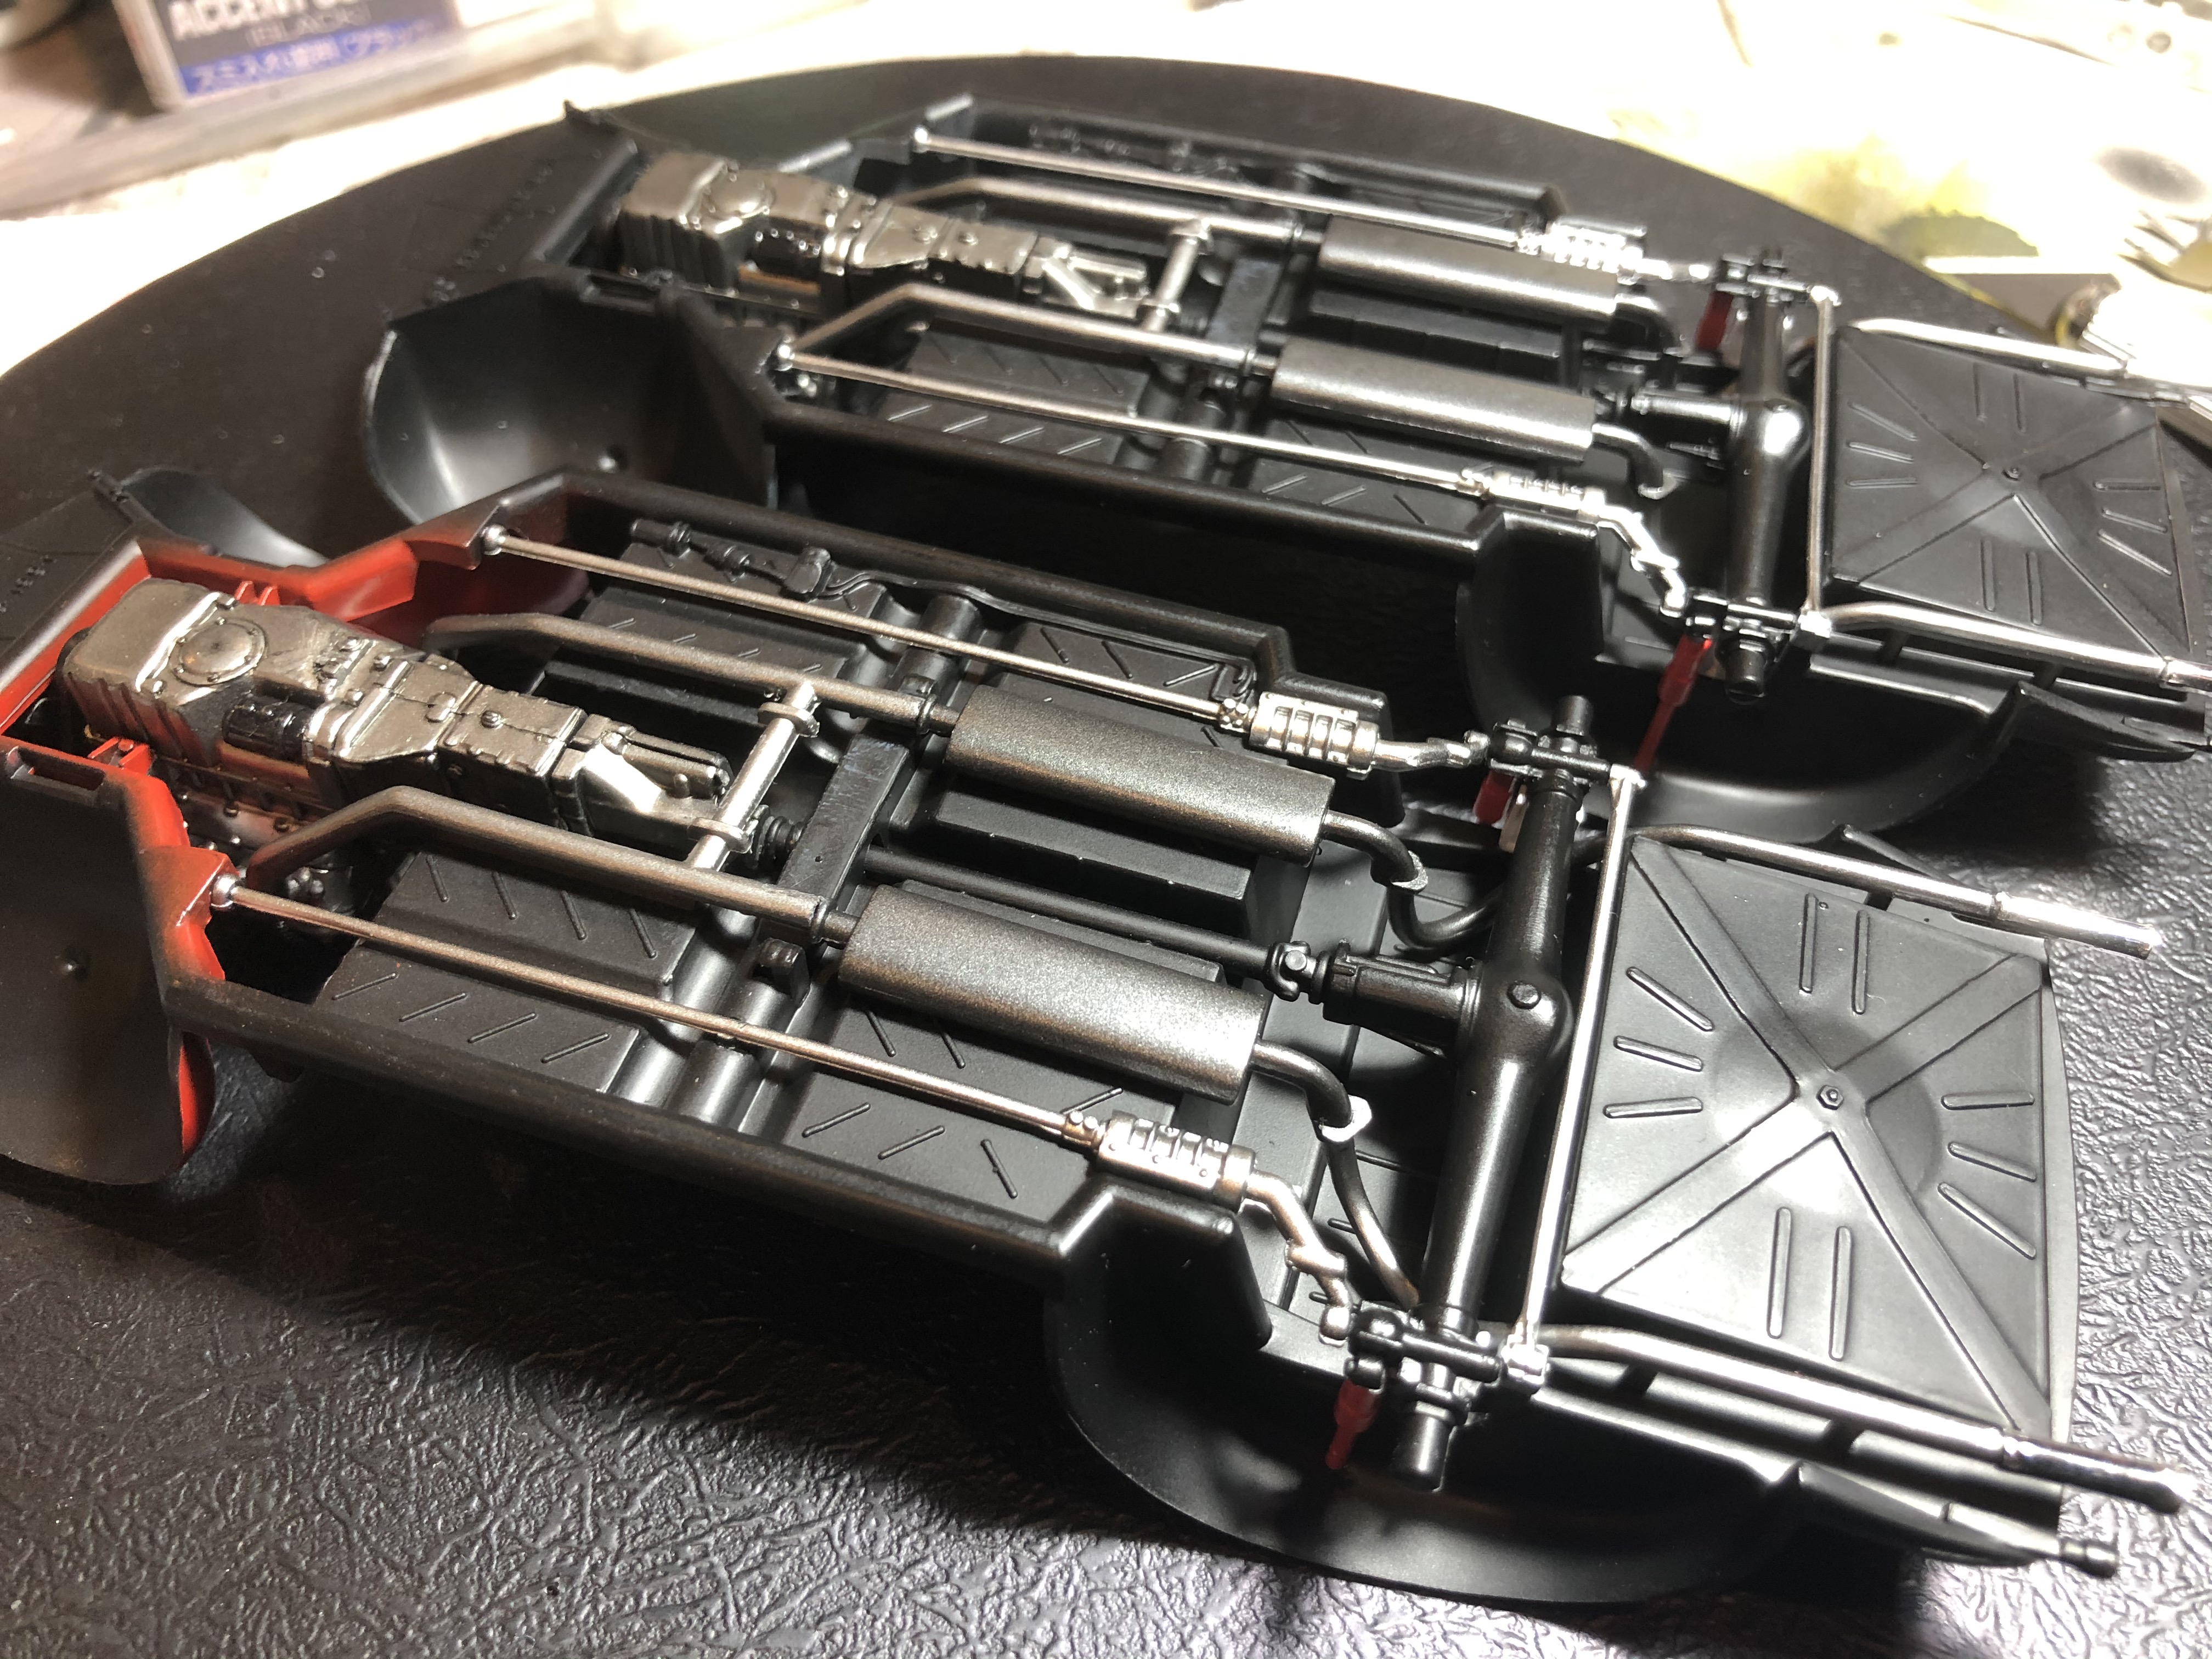
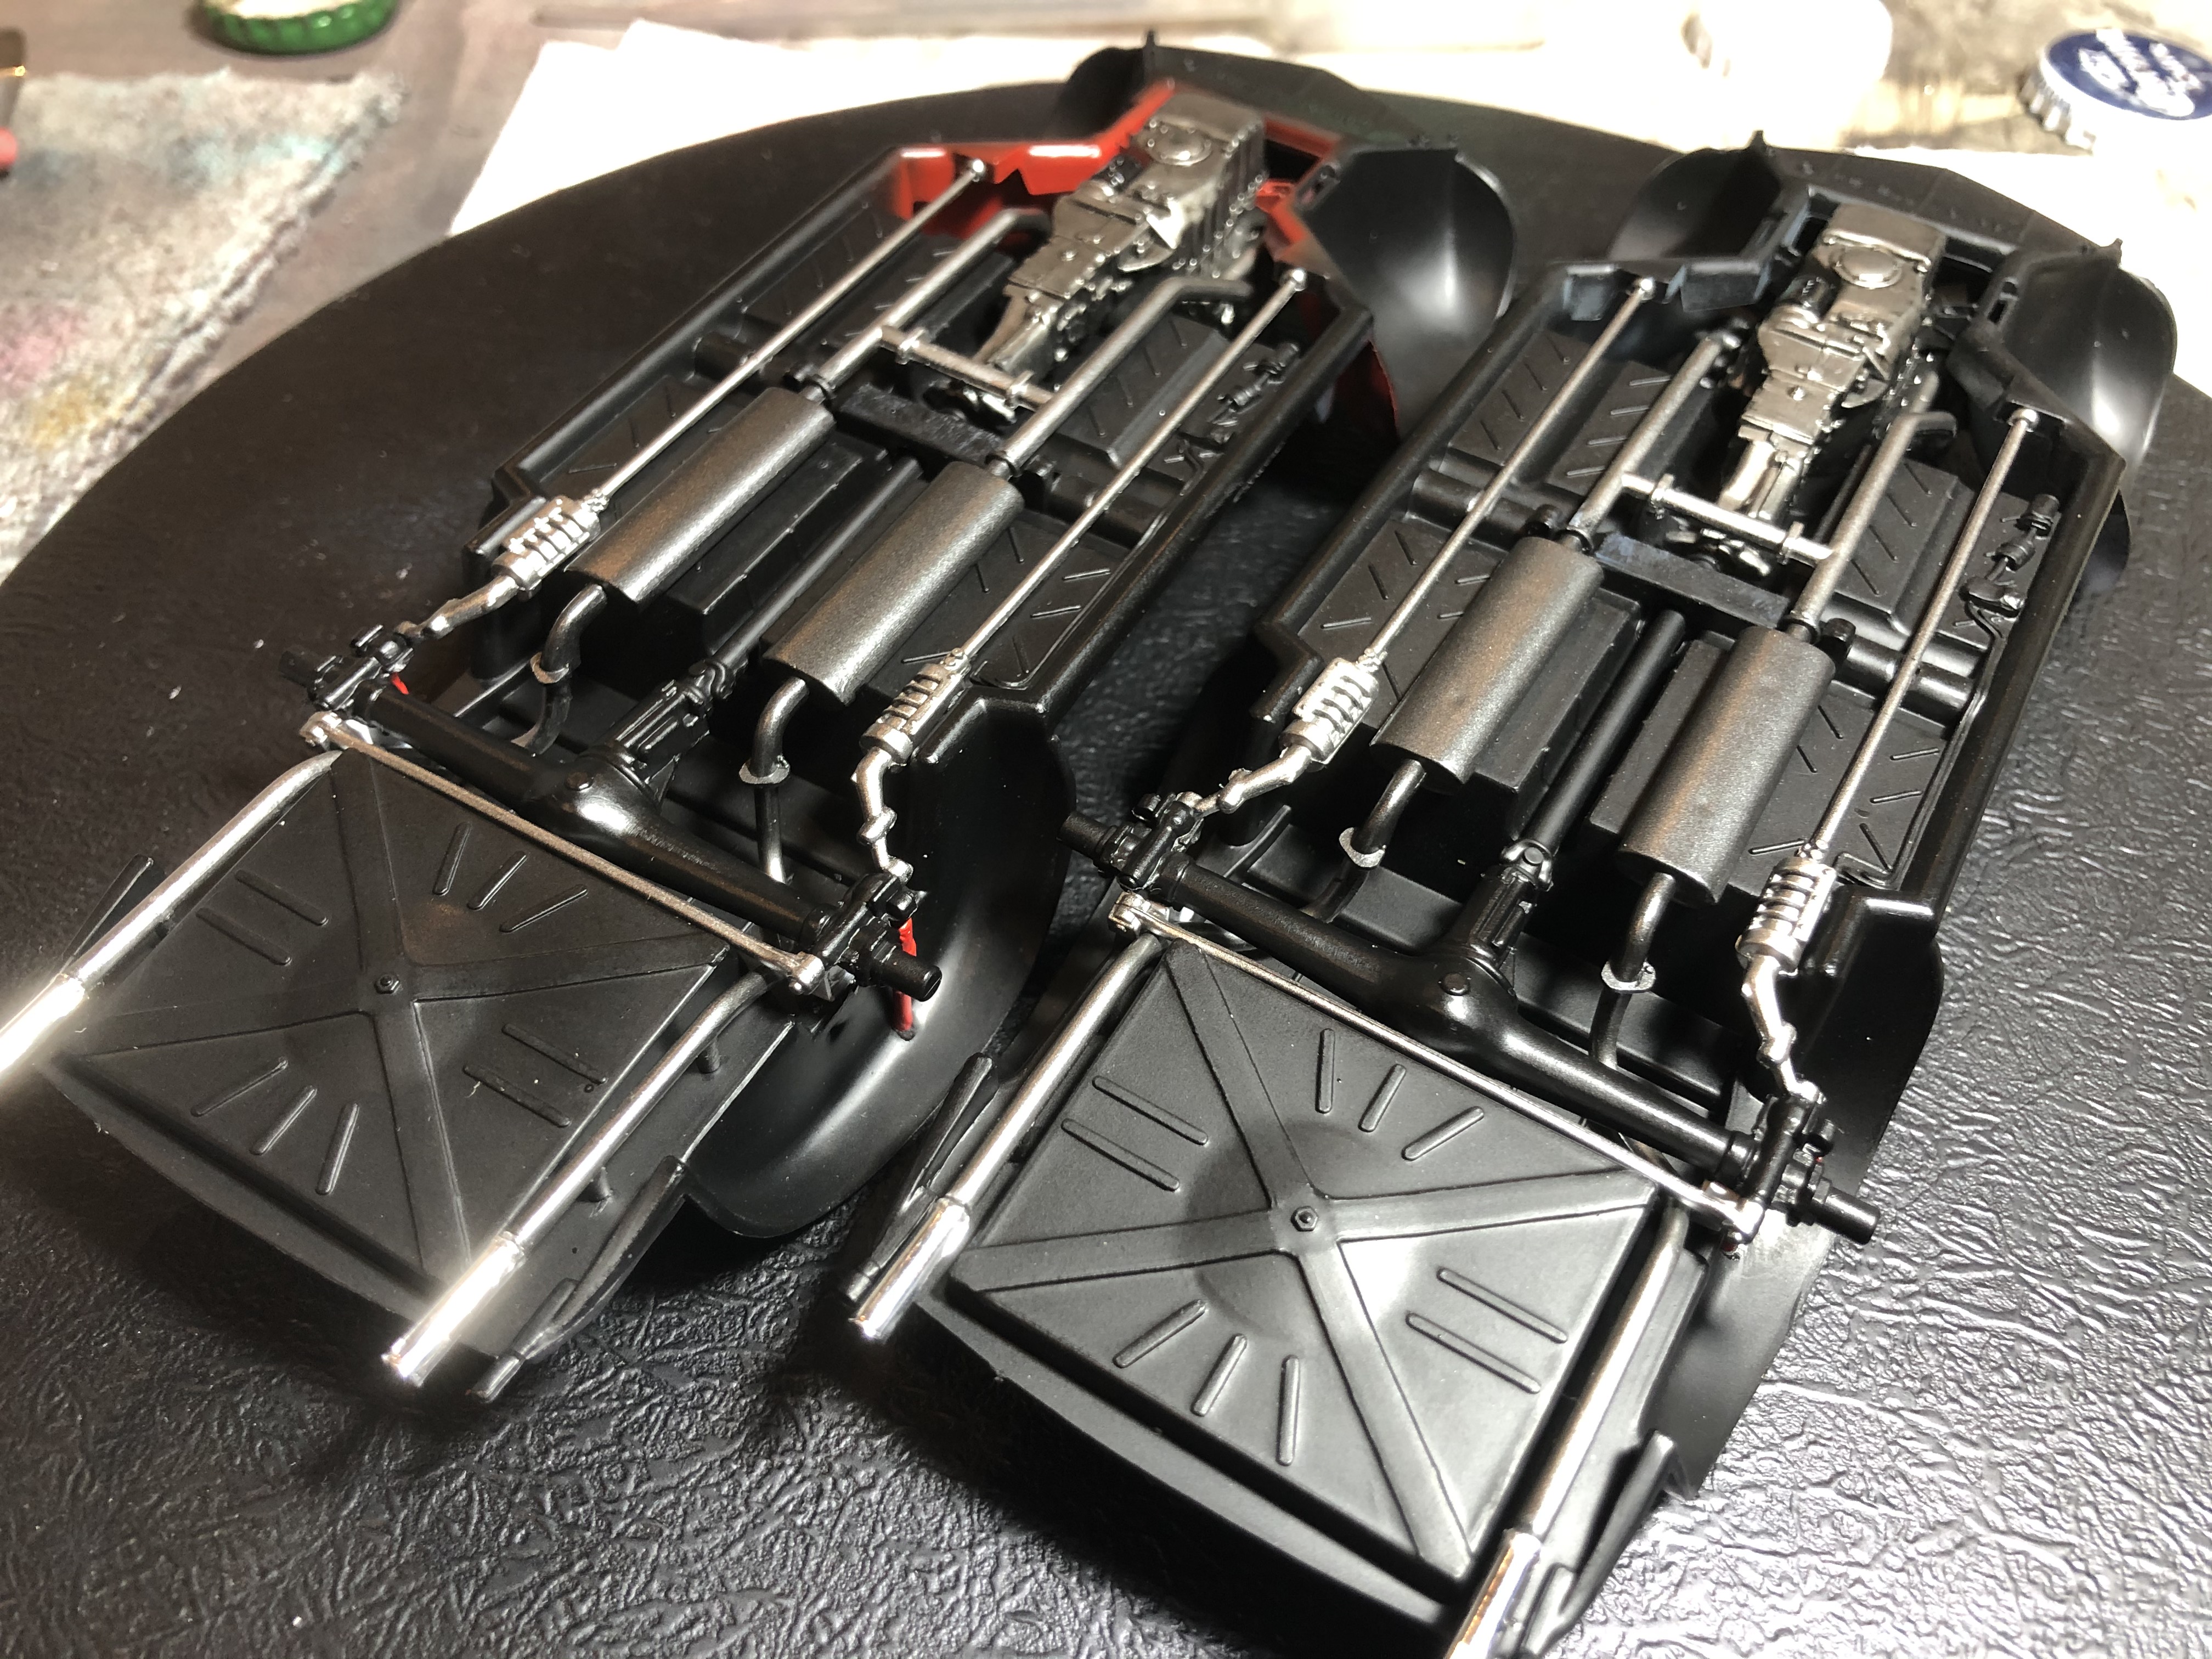
A couple of minor fit issues with locating pins not lining up, but nothing the Xacto blade couldn't deal with!
Cheers, D
Joel_W
Joined: December 04, 2010
KitMaker: 11,666 posts
Auto Modeler: 2,974 posts
Posted: Saturday, September 26, 2020 - 07:50 AM UTC
D,
Both chassis undersides are simply outstanding. Great decision for a little much needed artistic license. The end results speak for themselves.
Joel
Both chassis undersides are simply outstanding. Great decision for a little much needed artistic license. The end results speak for themselves.
Joel
Dixon66
Joined: December 12, 2002
KitMaker: 1,500 posts
Auto Modeler: 645 posts
Posted: Saturday, September 26, 2020 - 11:56 PM UTC
Like Joel said, great work on the underpans. Funny how one kit had sink marks in the mufflers and the other didn't. 
Hwa-Rang
Joined: June 29, 2004
KitMaker: 6,760 posts
Auto Modeler: 2,182 posts
Posted: Sunday, September 27, 2020 - 05:13 PM UTC
Great work D. Definitely a good choice, with some tonal variety.
 |

WEB HOSTING BY


Copyright ©2021 Auto Modeler and Kitmaker Network, a subsidiary of Silver Star Enterprises
All Rights Reserved. Please read our Conditions of Use and Privacy Policy.
All Rights Reserved. Please read our Conditions of Use and Privacy Policy.