_GOTOBOTTOM
Cars: Other Racing
For automotive racing topics not already covered.
Lotus Europa (Wing?) by Yodel
Szmann
_VISITCOMMUNITY
Netherlands Antilles
Joined: September 02, 2014
KitMaker: 1,977 posts
Auto Modeler: 1,371 posts
Posted: Wednesday, August 19, 2020 - 12:41 PM UTC
Hi, Guys!

As per my "reckless" style - yet another started build with unfinished others on the bench. I'll try and squeeze this anticipated short build with the P34 on tle last few yards of the GB. Let's see if I can.

This time I opened the Lotus from Yodel Models. As I said, I anticipate a short build because the model is curbside (it comes with electric motor which I discarded already) and it has very basic interior and no suspension to talk about.

The reason why I started it actually it is because I bought some professional body work products - I am replacing the passenger door on my Jimny in parallel with this build.


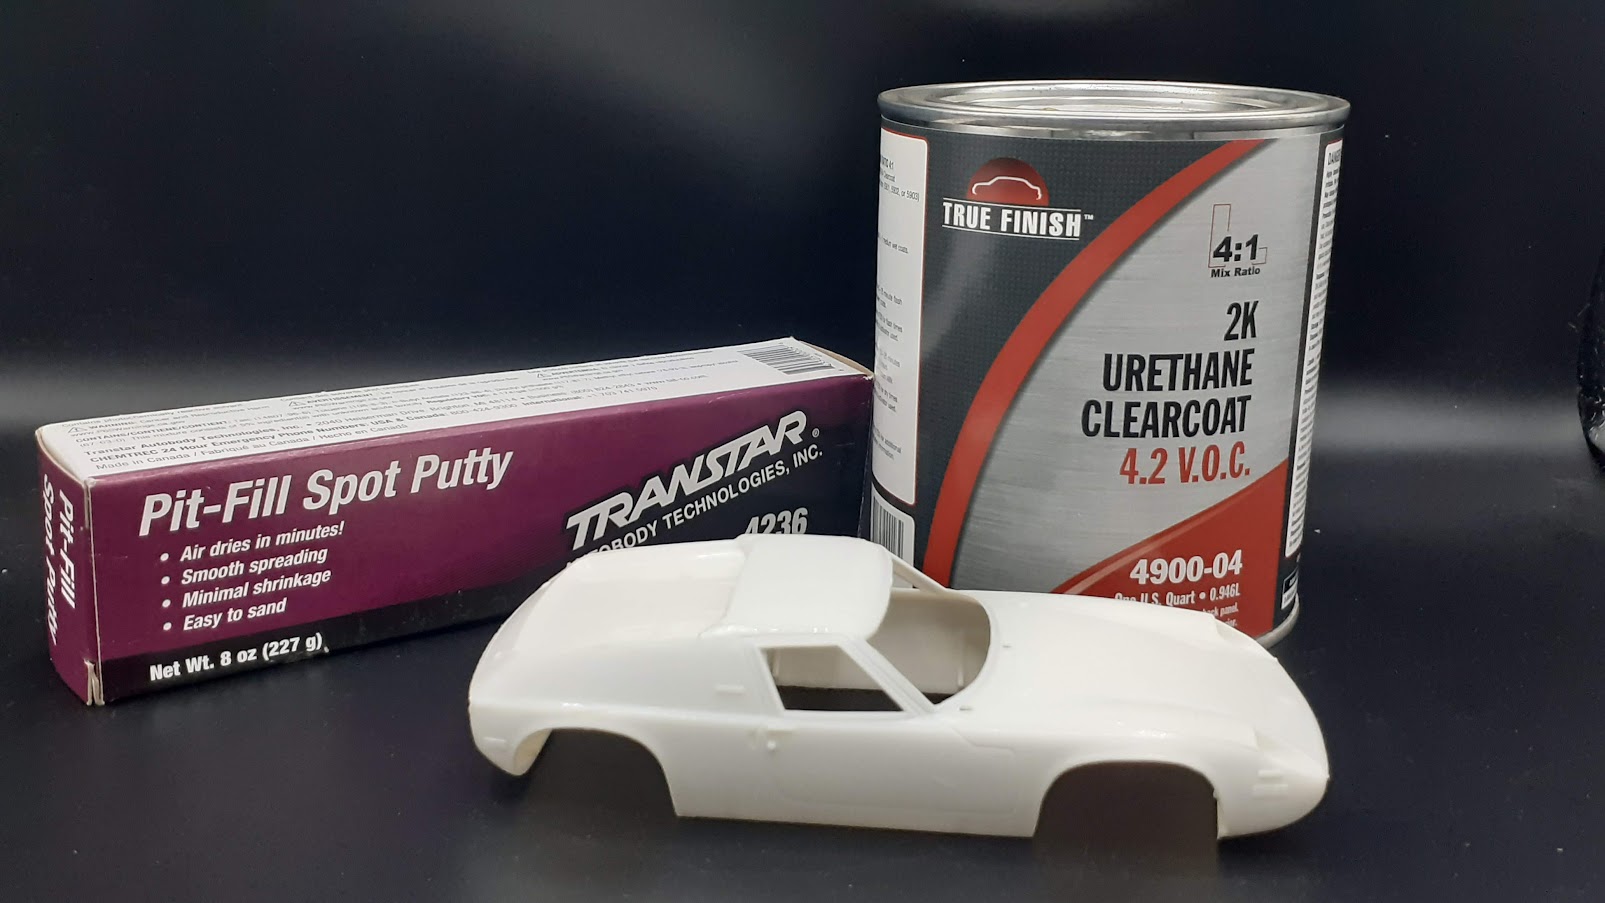
The price of these products is a fraction of the dedicated modeling products - reported to quantity and I tried them first (the putty so far) on the plastic trim of my Jimny's.

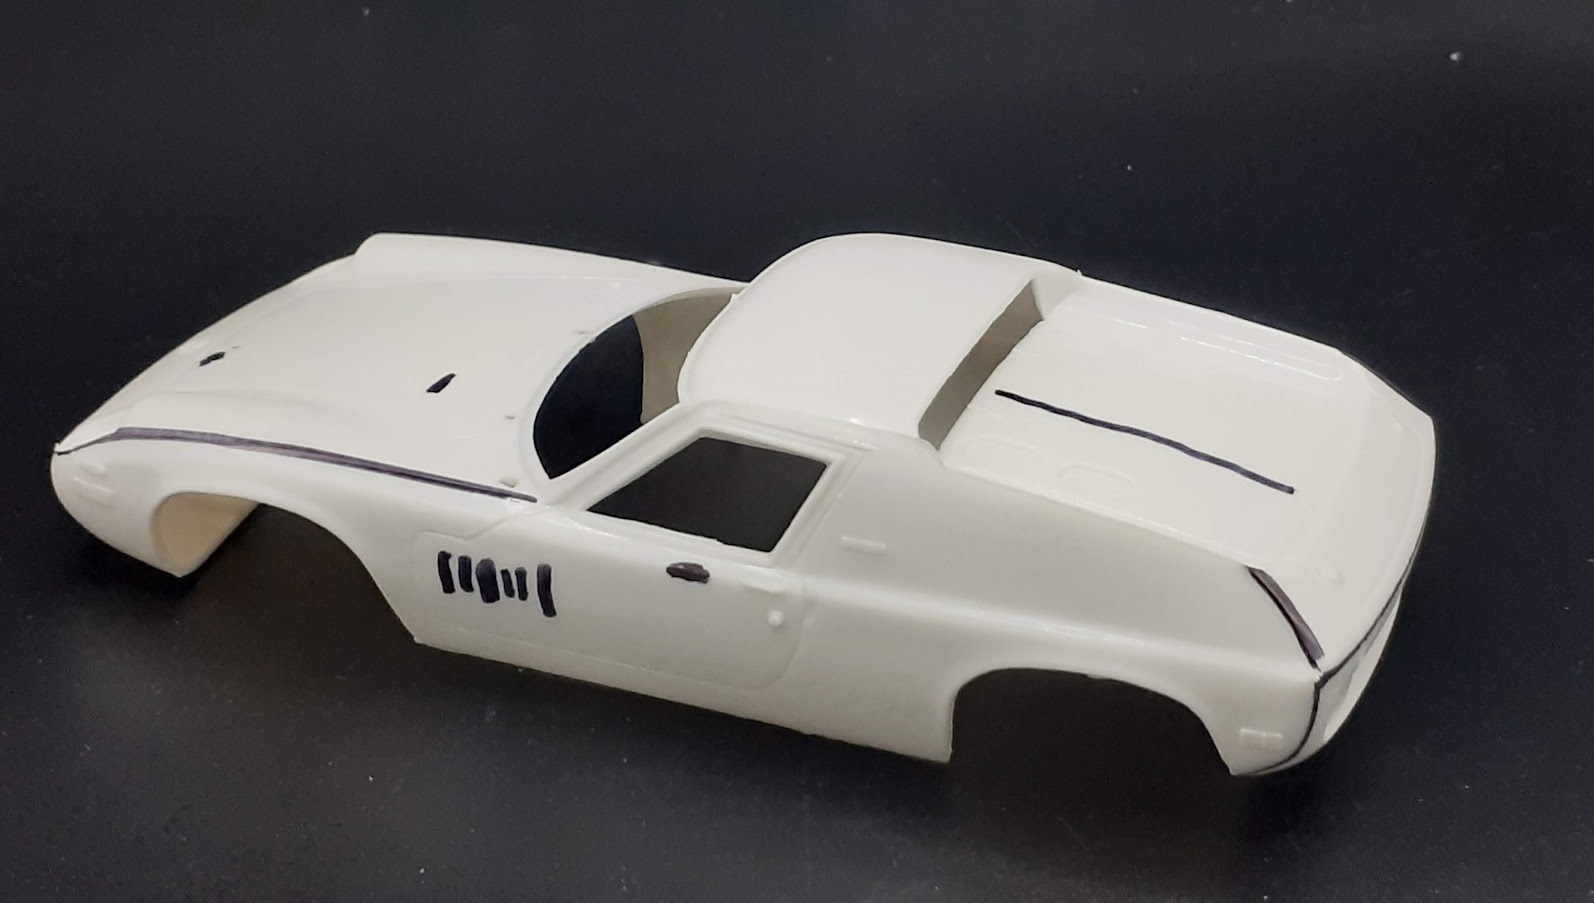
The imperfections of the body evidentiated with a marker - and there are a few; the mold technology is antiquated and the body suffered from tire burns (which I considered before some sort of urban legend).


I applied the putty with a Tamiya paint stirrer. It sticks very good to the plastic.


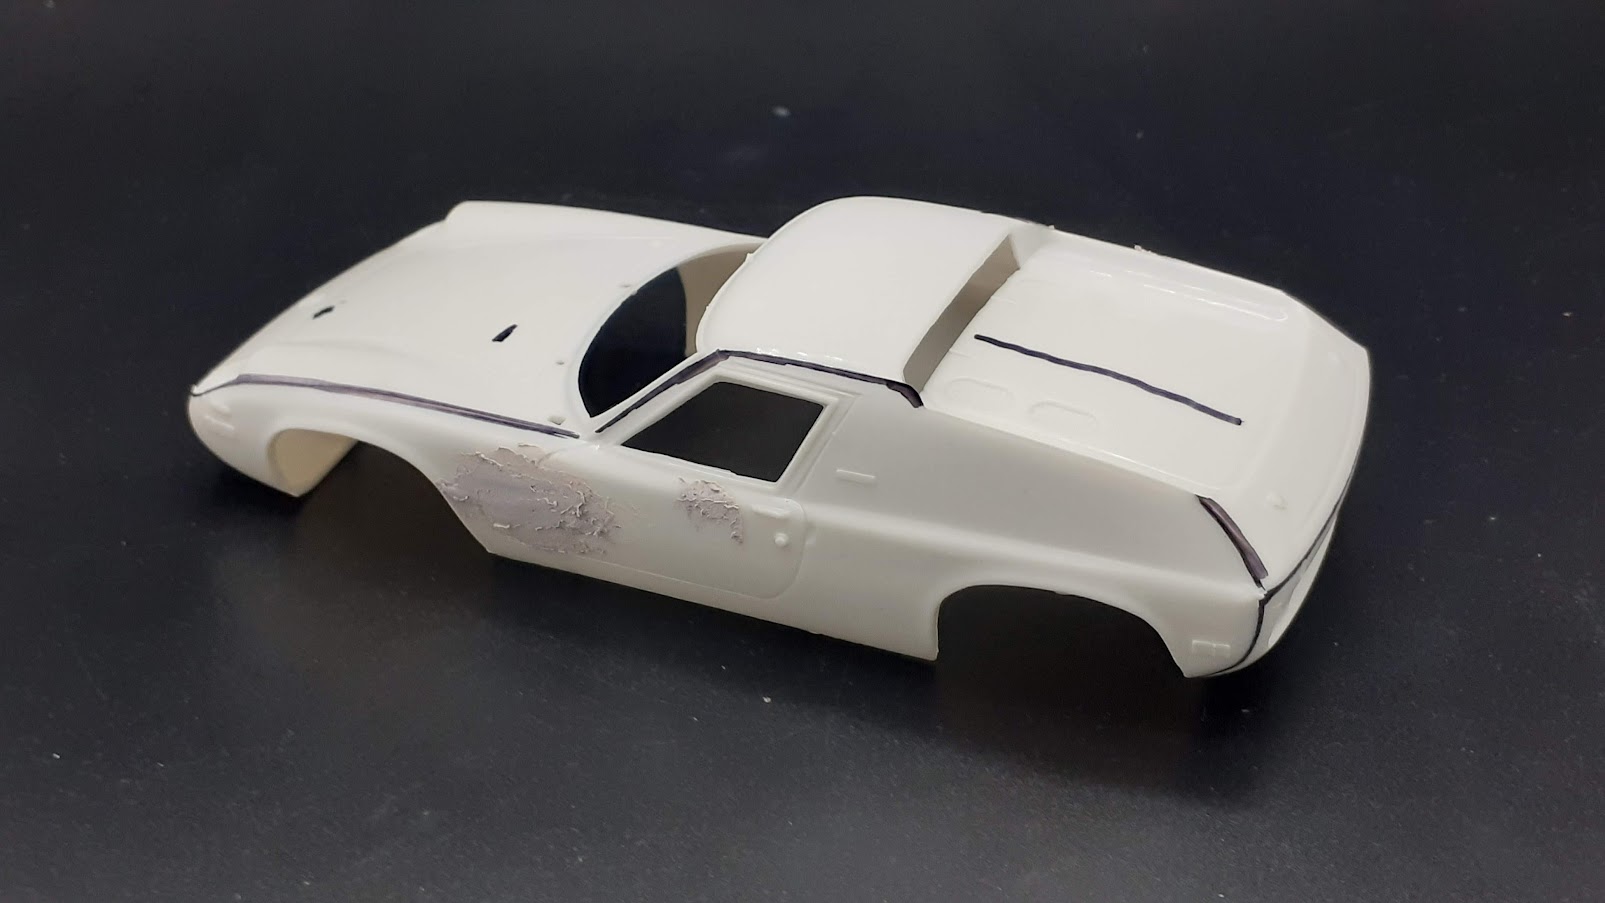
All the body sanded back to the true level, seam lines removed, panel lines re-scribed.


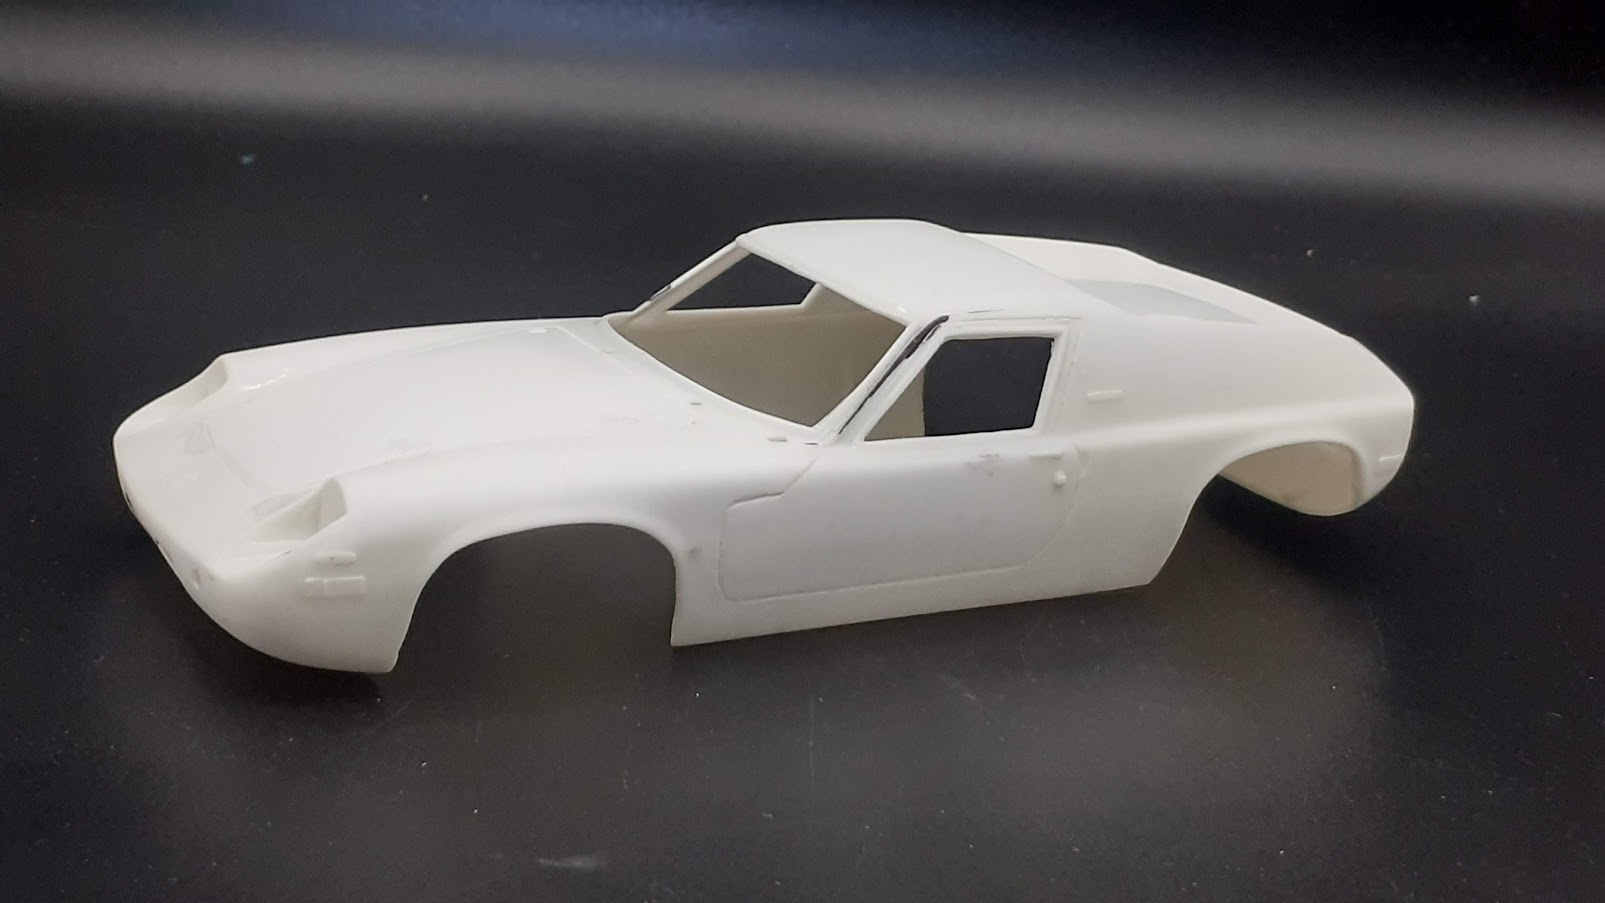
The entire body was sanded again all over with 1000 grit Tamiya sponge and tomorrow I should be ready for primer.

Cheers,
Gabriel
Hwa-Rang
_VISITCOMMUNITY
Kobenhavn, Denmark
Joined: June 29, 2004
KitMaker: 6,760 posts
Auto Modeler: 2,182 posts
Posted: Wednesday, August 19, 2020 - 10:12 PM UTC
Love the Lotus Europa, such a fun little car.

I always buy car polishing compounds and wax. You get a lot more, for almost the same price.

Joel_W
Staff MemberAssociate Editor
AUTOMODELER
_VISITCOMMUNITY
New York, United States
Joined: December 04, 2010
KitMaker: 11,666 posts
Auto Modeler: 2,974 posts
Posted: Thursday, August 20, 2020 - 01:53 AM UTC
Gabriel,
Looking forward to seeing the Lotus in it's primer coat. For what it's worth, for years I've been using Bondo #3 Glazing Putty for modeling. Cheap as dirt compared to Green Stuff and especially Tamiya's putties.

Joel
Szmann
_VISITCOMMUNITY
Netherlands Antilles
Joined: September 02, 2014
KitMaker: 1,977 posts
Auto Modeler: 1,371 posts
Posted: Thursday, August 20, 2020 - 10:25 AM UTC

Quoted Text

Love the Lotus Europa, such a fun little car.

I always buy car polishing compounds and wax. You get a lot more, for almost the same price.


I have used these too. Quite nice and cheap, yes. I still like Tamiya compounds for finishing, but also I use intermediate paste from Turtle Wax.


Quoted Text

Gabriel,
Looking forward to seeing the Lotus in it's primer coat. For what it's worth, for years I've been using Bondo #3 Glazing Putty for modeling. Cheap as dirt compared to Green Stuff and especially Tamiya's putties.
Joel


Your advice was taken into consideration, as you mentioned it prior. ANd it totally worth it, for what I can say so far (see infra).

UPDATE
I applied 2 coats of primer in a single session. First coat I used it as a filler primer, diluted just enough to pass through my 0.4 airbrush. After flashing time, I applied a second coat as per my usual settings. The surface of the primer isn't my best yet, but the body imperfections are pretty much gone.
After the primer will be dry, another fine sanding follows and a coat of black primer.


Cheers!
Gabriel
AussieReg
Staff MemberAssociate Editor
AUTOMODELER
#007
_VISITCOMMUNITY
Victoria, Australia
Joined: June 09, 2009
KitMaker: 8,156 posts
Auto Modeler: 2,953 posts
Posted: Thursday, August 20, 2020 - 10:53 AM UTC
An unusual subject and a bit of a challenge in this build Gabriel! Great progress so far, the body is looking good.

Cheers, D
Hwa-Rang
_VISITCOMMUNITY
Kobenhavn, Denmark
Joined: June 29, 2004
KitMaker: 6,760 posts
Auto Modeler: 2,182 posts
Posted: Thursday, August 20, 2020 - 06:25 PM UTC
Nice smooth body work.
Szmann
_VISITCOMMUNITY
Netherlands Antilles
Joined: September 02, 2014
KitMaker: 1,977 posts
Auto Modeler: 1,371 posts
Posted: Friday, August 21, 2020 - 07:33 AM UTC

Quoted Text

An unusual subject and a bit of a challenge in this build Gabriel! Great progress so far, the body is looking good.

Cheers, D


Thanks! Yes, the body needs more attention than on a "regular" build.

Thank you, Jesper!

UPDATE

The second round of "rough" sanding (600 - 1000 grit) and al the imperfections I could identify chased away:


After cleaning under running water and degreasing again the model, Mr. Surfacer 1500 black applied. This is in fact an intermediary picture, taken during the flashing time between the two "full" coats applied:


Of course I've got the habitual airbrush spitting and of course on the hood, for maximum visibility (my lack of attention) - se Mark's chipped paint as well.

So far so good I shall say.

I decided eventually that this car is going to be British Race Green - it's the only opportunity for me to liquidate my green pain stock and I shall not miss it

Gabriel
Cosimodo
#335
_VISITCOMMUNITY
Auckland, New Zealand
Joined: September 03, 2013
KitMaker: 1,808 posts
Auto Modeler: 701 posts
Posted: Friday, August 21, 2020 - 03:08 PM UTC
Interesting build Gabriel! I remember these, especially jn black with the gold pinstripe tocelebrate the Lotus F1 cars. I like the starf you've made. I haven't yet tried black as a primer so something to remember.

Cheers
Michael
Szmann
_VISITCOMMUNITY
Netherlands Antilles
Joined: September 02, 2014
KitMaker: 1,977 posts
Auto Modeler: 1,371 posts
Posted: Saturday, August 22, 2020 - 01:43 AM UTC

Quoted Text

Interesting build Gabriel! I remember these, especially jn black with the gold pinstripe tocelebrate the Lotus F1 cars. I like the starf you've made. I haven't yet tried black as a primer so something to remember.

Cheers
Michael


Thanks, Michael

Indeed, that black scheme would have been my choice, if the kit have offered the gold piping. The decals in this vintage kit are long gone, and I have to improvise. I will go for a vintage "GT strip" - I haven't decided yet if to be centered or offset - I find offset option more attractive.

UPDATE
The primer sanded. I think I have rushed it a bit; it was sandable, but a little too soft and I reach to the bare plastic in a few spots. I would normally patch these spots, but since the main coat is acrylic lacquer from TCP range (acetone solvent) and I am under time pressure, I skipped the step:


TCP "High Gloss [British] Racing Green" applied. I wrote some time ago to the company owner about their "high gloss" denomination. It is nothing like that. Their solvent it is very volatile and so the paint has no self-levelling capabilities. I actually like the smooth semi-gloss finish of these paints as they take very nicely the following clear yet, technically they are not "high gloss".

The surface is pretty much flawless. Please note the tone of the green over black primer. Probably now translates to a very dark forest green or to a RLM Schwartzgrun. That was my intention, since I cannot stand the artificial green. Also I had in mind the following step - the gold stripe(s) which will need a dark undercoat for "show-off"

Gabriel
Szmann
_VISITCOMMUNITY
Netherlands Antilles
Joined: September 02, 2014
KitMaker: 1,977 posts
Auto Modeler: 1,371 posts
Posted: Saturday, August 22, 2020 - 12:55 PM UTC
UPDATE
Just for conformity: A second coat of British Racing green applied after light sanding. Perhaps you're not going to notice any difference from the last picture before, except for the slightly changed angle. The weird granulation in the foreplan is the paint trying hard to be glossy and confusing the camera, not actual orange peel.


Gabriel
Szmann
_VISITCOMMUNITY
Netherlands Antilles
Joined: September 02, 2014
KitMaker: 1,977 posts
Auto Modeler: 1,371 posts
Posted: Sunday, August 23, 2020 - 06:35 AM UTC
UPDATE - Another ©Gabriel saga

Well - what should I expect from me! Murphy's Law for platic modelling at its best!

I have used a strip of Tamiya 10mm masking tape as template for my GT strip. That turned out to be a very frustrating operation; although I have used a one-piece strip of tape from head to tail, which I laid down as straight as I could, as soon as I cut it into segments, all alignment crumbled and I needed to reposition the segments tens of times (no exaggeration) in attempt to line them up properly (straight line illusion). In doing so, I damaged the paint, naturally!


... And where can be the damage easier to be done if not on the most visible spot?


And that happened because I didn't patched the primer when I reached down the bare plastic in previous sanding. I've been there, done that, no biggie - but I should know better by now:


To deal with the new and much deserved challenge, I sanded down the tear to taper the "step". I dry-sanded it, trying to contain it between the masking lines. I didn't wanted any liquid involved not to damage the already de-tacked masking tape:


I completed the masking with low tack painter's tape:


The affected spot was first primed with MS1500 black and then the entire strip sprayed with Alclad II 108 Pale Gold. The step it is still visible, because Alclad has no filling properties. In contrast, the following 2K has much more body and hopefully will fix the problem.


Only after removing the masks, I realized that I would better have done the black trim first, as now the Alclad is way too sensitive to mask over it and all that. Now I need to spray 2 sessions of 2K, first to protect the alclad, second one to integrate the black trim. That means extra time and effort, but also offers me two chances to repair the ding.


Quick poll:
What colour of the bumpers do you think will match better the graphic concept? (I can't decide - but I have decided that no wing will be installed)
a) black;
b) chrome;
c) pale gold;
d) body colour.

Thank you!
Gabriel
Szmann
_VISITCOMMUNITY
Netherlands Antilles
Joined: September 02, 2014
KitMaker: 1,977 posts
Auto Modeler: 1,371 posts
Posted: Sunday, August 23, 2020 - 09:07 AM UTC
UPDATE - True Finish resin - first assessment.

I never opened the resin can or the hardener bottle until just before spraying today. I felt since I bought them that they are very thin inside the containers and I didn't buy any reducer. My guess was correct: the two components are very thin and remain so after mixing for a 25 minutes span.

First I tested the mix on a spoon which I had with similar to TCP paint on it (acrylic nail polish):


After first two passes I realized I have the perfect viscosity and the resin lays down beautifully - thin enough to get a "perfect" wet coat without frills.
The second question it was how fast my mix will dry, After only 5 minutes, I noticed the oversprayed surfaces of the spoon are becoming really sticky. That was the sign that the mix works and I got to the car body:

Here is the result of 2 medium - wet coats, with a 10 minutes flashing time in between.

Additional observations:
1. This thing is the smelliest liquid ever created - it beats the mustard gas and the chlorine gas by a marine mile; I felt sorry I don't have a mask for my mask;
2. The resin and the hardener are totally incolore; there is not the slightest yellowish hue to be seen even when looking in depth of the containers.
3. The mix seems not to be hot at all; it didn't shoot thru the feeble Alclad (!) and no thermic reaction was noticed, not even into the mixing container;

Still to see:
1. Curing time (the instructions say 8-10 hrs, but I used medium drying hardener, and the times might vary);
2. Sandability;
3. Multiple coats application with sanding in between
4. Yellowing / non yellowing over time
5. Behaviour over decals

Disclaimer: I have no association with the brand - I have randomly picked it from the local Auto Supplies store

Gabriel
AussieReg
Staff MemberAssociate Editor
AUTOMODELER
#007
_VISITCOMMUNITY
Victoria, Australia
Joined: June 09, 2009
KitMaker: 8,156 posts
Auto Modeler: 2,953 posts
Posted: Sunday, August 23, 2020 - 04:42 PM UTC

Quoted Text

Quick poll:
What colour of the bumpers do you think will match better the graphic concept? (I can't decide - but I have decided that no wing will be installed)
a) black;
b) chrome;
c) pale gold;
d) body colour.


I think that the gold stripe is a great feature, excellent work! The bumpers aren't too large surface area, chrome will work well and highlight the body shape, they are not too big that they might distract from the gold stripe. More gold would look artificial to me, black would barley be visible and body colour too bland. Chrome gets my vote.

Cheers, D
AussieReg
Staff MemberAssociate Editor
AUTOMODELER
#007
_VISITCOMMUNITY
Victoria, Australia
Joined: June 09, 2009
KitMaker: 8,156 posts
Auto Modeler: 2,953 posts
Posted: Sunday, August 23, 2020 - 05:11 PM UTC
By the way, I was randomly browsing and found this -


about 1/3 down the page here https://tamiyablog.com/category/future-releases/page/3/

Talk about perfect timing!

Cheers, D
Szmann
_VISITCOMMUNITY
Netherlands Antilles
Joined: September 02, 2014
KitMaker: 1,977 posts
Auto Modeler: 1,371 posts
Posted: Monday, August 24, 2020 - 02:47 PM UTC
Thanks for the feedback, D.. Yes, as you see it, chrome makes perfect sense. Thank you!

Interesting news from Tamiya - however - the angle between the windshield and the roof looks quite different of my example. I guess Tamiya is more accurate than Yodel, even if Yodel looks more streamlined. I would love to have those JPS decals...

UPDATE

I sanded the body of "sugar grains" from the resin application. The resin was hard, yet softer than other brands I've tried. 24 hrs drying time might be the "sweet spot" for sanding.

I masked the trim under the doors and sprayed it with MS1500 black. I really needed some bonding:


Masks removed, the trim is barely visible over the dark green, but if feels good to know it's there:


Various decals scavenged from spares: Tamiya, Heller, Zvezda, Eduard - everybody got free sponsorship spots on my Lotus


Waiting for the decals to dry overnight so I can clean out the adhesive residues and to degrease the body before the second and (hopefully) last 2K application:


That following one is basically the most important step: resin over resin bonding and behaviour over decals.

Gabriel
Hwa-Rang
_VISITCOMMUNITY
Kobenhavn, Denmark
Joined: June 29, 2004
KitMaker: 6,760 posts
Auto Modeler: 2,182 posts
Posted: Monday, August 24, 2020 - 05:47 PM UTC
Looking good Gabriel. Fingers crossed, for a trouble free application, of 2K, over the decals.

The JP special do look amazing.
Cosimodo
#335
_VISITCOMMUNITY
Auckland, New Zealand
Joined: September 03, 2013
KitMaker: 1,808 posts
Auto Modeler: 701 posts
Posted: Monday, August 24, 2020 - 06:48 PM UTC
I probably wouldn't do it myself but the third photo of your last post, that looks like a well weathered race car. Could leave it there and have some dust on the glass. Just an idea but I am also keen to see how the 2K works.

cheers
Michael
md72
#439
_VISITCOMMUNITY
Washington, United States
Joined: November 05, 2005
KitMaker: 4,950 posts
Auto Modeler: 555 posts
Posted: Monday, August 24, 2020 - 06:51 PM UTC
Wow, that's brave. Showroom shine with reflected lights, to hard driven rally car.
Szmann
_VISITCOMMUNITY
Netherlands Antilles
Joined: September 02, 2014
KitMaker: 1,977 posts
Auto Modeler: 1,371 posts
Posted: Tuesday, August 25, 2020 - 08:22 AM UTC

Quoted Text

Looking good Gabriel. Fingers crossed, for a trouble free application, of 2K, over the decals.

The JP special do look amazing.


Thanks, Jesper! The application of 2K wen well - as I initially estimated, this resin isn't hot at all. And, yes, i think JPS livery it is probably the most elegant one in motorsports.


Quoted Text

I probably wouldn't do it myself but the third photo of your last post, that looks like a well weathered race car. Could leave it there and have some dust on the glass. Just an idea but I am also keen to see how the 2K works.

cheers
Michael


If to be displayed on base, yes, I would have followed that way. As a stand-alone model I prefer it glossy. In the first option, I would still have applied a clear semi-gloss acrylic on it to seal the decals.


Quoted Text

Wow, that's brave. Showroom shine with reflected lights, to hard driven rally car.


Mark, it was a necessary intermediary step. I would have liked it some less sanding - but it was the first encounter with the True Finish brand.

UPDATE
Well, after wiping off all glue and setting solutions runs with diluted IPA, I applied the second coat of 2K - this time as a single, wet coat. The clear laid superbly over the older one (intentionally I let an unsanded area under the car's "chin" for testing). The "glass" look settled in right away, with no fogging, milking of crazing. No visible effect on decals as well.


There are a few grits on the hood (normally ) that I need to get rid of but other than that it was a very good spraying session.

Other observations: all notes I made on the previous post remain valid (especially the smelly part) but today I spotted another advantage: being so thin, the resin doesn't trap air bubbles while mixing it - that is very important in time economy, because it doesn't need the rest period which narrows the working window for other mixes. (No, I'm not selling it, nor BLD )

Gabriel
Szmann
_VISITCOMMUNITY
Netherlands Antilles
Joined: September 02, 2014
KitMaker: 1,977 posts
Auto Modeler: 1,371 posts
Posted: Wednesday, August 26, 2020 - 01:18 PM UTC
UPDATE

I need to sand the resin one more time - to remove the few surface imperfections - but I let in purpose the body for one more night to check sandability after 48 hrs. Meanwhile, I went ahead with the other parts, with all of them at once

These are all parts in this kit and - mind you - not all to be used


All parts primed in one session with MS1500 gray:


Although very simple, the little detail present is rather nice in the interior:


The interior sprayed with the same green as the exterior, but over gray primer this time:


I have decided with Damian's help that the bumpers will be chromed, but I went for some gold accents as well. All parts to be metalized were first base coated with Krylon Gloss Black:


The chromed parts were also done, but the paint is too fresh now on them and I don't want to touch it by mistake. Normally I will clear the metalized parts with Aqua Gloss from Alclad but - you guessed it - this time I will try the resin.

Gabriel
AussieReg
Staff MemberAssociate Editor
AUTOMODELER
#007
_VISITCOMMUNITY
Victoria, Australia
Joined: June 09, 2009
KitMaker: 8,156 posts
Auto Modeler: 2,953 posts
Posted: Wednesday, August 26, 2020 - 03:20 PM UTC
Making good progress Gabriel, and some very clean paint work!

As you said, the interior is quite sparse, but very crisp details.

Cheers, D
Hwa-Rang
_VISITCOMMUNITY
Kobenhavn, Denmark
Joined: June 29, 2004
KitMaker: 6,760 posts
Auto Modeler: 2,182 posts
Posted: Wednesday, August 26, 2020 - 05:45 PM UTC
Looks great Gabriel. The stripes look very sharp.
Dixon66
_VISITCOMMUNITY
New Hampshire, United States
Joined: December 12, 2002
KitMaker: 1,500 posts
Auto Modeler: 645 posts
Posted: Thursday, August 27, 2020 - 12:13 AM UTC
Looking great Gabriel and glad to see you back online.
Szmann
_VISITCOMMUNITY
Netherlands Antilles
Joined: September 02, 2014
KitMaker: 1,977 posts
Auto Modeler: 1,371 posts
Posted: Thursday, August 27, 2020 - 12:24 AM UTC

Quoted Text

Making good progress Gabriel, and some very clean paint work!

As you said, the interior is quite sparse, but very crisp details.

Cheers, D


Thanks, D.!

Yes, the metallics went neat of, using the Joel method (we both have reached independently to the same workflow with metallics) but I was still up for an unpleasant surprise (see update).


Quoted Text

Looks great Gabriel. The stripes look very sharp.


Thank you, Jesper. They are in fact sliced decals from parade version of the GAZ AAA I built a while ago It worked!


Quoted Text

Looking great Gabriel and glad to see you back online.


Thanks, David, for warm reception. Yeah, I'm not having the most linear lifestyle here in Caribbean, but I'm definitely a modeller at heart!

UPDATE - Fancy metallics
I sprayed all metallic parts in one session, using the same settings, same type of paints, same black base - all conditions and materials identical. All parts went smooth and ginger, safe for the bumpers which developed some drizzling on the surface while drying. Cause still unknown. Not major setback, since they are the last parts to enter the assembly line


Back to sanding!

Last night I also polished the resin on the body with excellent results. More of that in the next update.

Gabriel
Szmann
_VISITCOMMUNITY
Netherlands Antilles
Joined: September 02, 2014
KitMaker: 1,977 posts
Auto Modeler: 1,371 posts
Posted: Thursday, August 27, 2020 - 08:35 AM UTC
UPDATE

I sanded down and re-sprayed the bumper with problems, then I coated all metallic parts with resin. This time my guess was correct, the resin shot slightly thorough chrome, but not thorough gold! (both Alclads!) hm...


In the picture above, the small black dots are base spots revealed after spraying resin. In the picture below, the resin left undisturbed the golden painted grille:


Undersides sprayed with Tamiya NATO Black, then cleared with Micro Satin. The lack of detail it's all too obvious:


Small detailing on the body: windows frames picked with black marker, grilles painted with acrylic flat black, the turn signals and reflectors based with silver...


The back grille was painted with gold to keep some of the colour into accents, and so were the stop lights bezels. Both need detailing: the grille needs wash, the "lights" need to be painted into the bezels:


The dash painted - awaiting detailing:


The seats inserts painted black (not too contrasty) and the gearshift lever added


Gabriel
 _GOTOTOP