

Looking really nice, Bob.
Jim


Go to automodeler.com for the current dynamic site!
Trucks
Scale truck modeling topics.
Scale truck modeling topics.
Hosted by Jim Starkweather
OTR build 2 - O.D.s Mack H-67

jimb

Joined: August 25, 2006
KitMaker: 2,539 posts
Auto Modeler: 1,405 posts

Posted: Monday, May 17, 2010 - 04:00 AM UTC


old-dragon
Joined: August 30, 2005
KitMaker: 3,289 posts
Auto Modeler: 1,620 posts

Posted: Tuesday, May 25, 2010 - 04:13 PM UTC
Just finished the suzie lines and masked then sprayed the alclad II chrome on...who says ya can't lay the chrome on anything but a black base?! Film at 11...hmm...it's 10:14 here now...ok, 11 tomorrow! 

AussieReg

#007

Joined: June 09, 2009
KitMaker: 8,156 posts
Auto Modeler: 2,953 posts

Posted: Wednesday, May 26, 2010 - 12:23 AM UTC
Looking good Bob, right down to the detail on the rims !!
Can't wait to see the Alclad now.
Cheers, D
Can't wait to see the Alclad now.
Cheers, D
old-dragon
Joined: August 30, 2005
KitMaker: 3,289 posts
Auto Modeler: 1,620 posts
Posted: Wednesday, May 26, 2010 - 11:46 AM UTC
Why put off till 11 what one can do now....here I'll show you that alclad II chrome can be applied over enamel paint as opposed to the recommended lacquer base black coat. Now, this is testors enamel paint for reference sake, blue on the grill and orange on the upper emblem and you'll note the chrome turned out just fine...I already knew this but I wanted to share the happening with all of you to show you what can be done with this stuff.
jimb
Joined: August 25, 2006
KitMaker: 2,539 posts
Auto Modeler: 1,405 posts
Posted: Thursday, May 27, 2010 - 04:59 AM UTC
Looks pretty good. Dark blue, black, close enough!
Jim
Jim
old-dragon
Joined: August 30, 2005
KitMaker: 3,289 posts
Auto Modeler: 1,620 posts
Posted: Thursday, May 27, 2010 - 11:42 AM UTC
Quoted Text
Looks pretty good. Dark blue, black, close enough!
Jim
Yeah, but it worked on the top section{badge} and that was orange. I've seen it work 1st hand on red, blue, black, green and now orange. I've even applied it over acrylic black or blue...
old-dragon
Joined: August 30, 2005
KitMaker: 3,289 posts
Auto Modeler: 1,620 posts
Posted: Monday, June 14, 2010 - 03:02 AM UTC
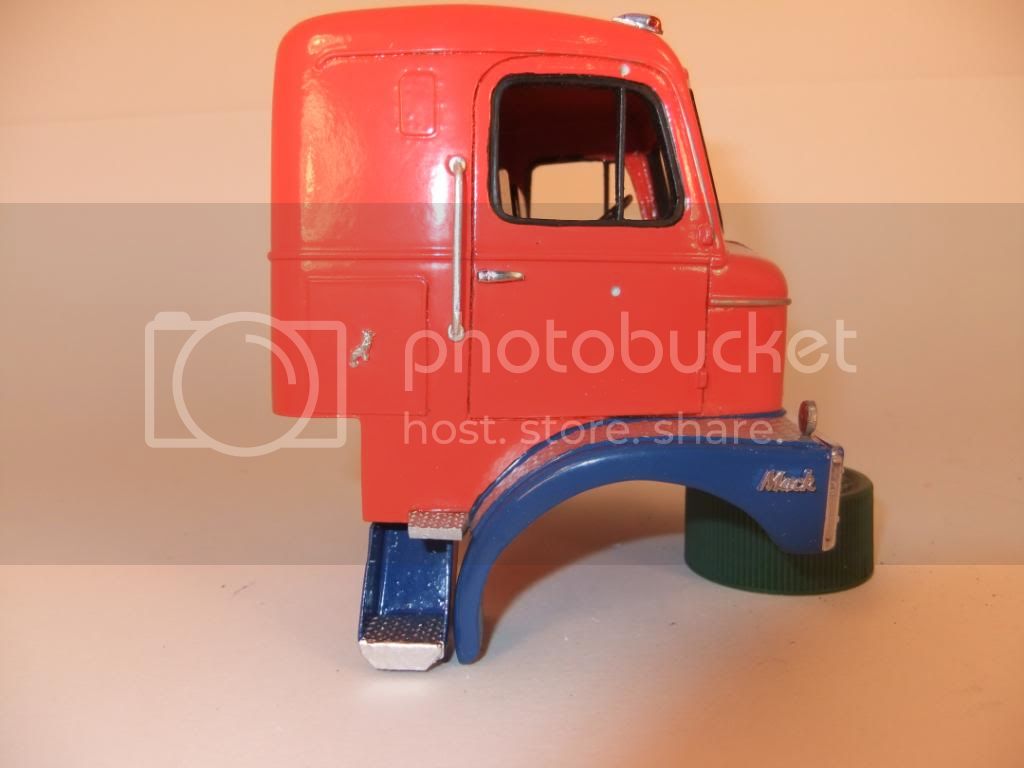
I haven't forgotten about this one but it is coming down to the slow nit picky stuff so that takes time-
At the moment I'm working on the white metal items, mirrors, hand rails, top marker lights and this - the bulldog. I took the dremel and attached the plastic bristle brush for laughs and I'm happy with the results.

Sorry the pic is 90 off...forgot to rotate it in photoshop.
The horns are on and the trim is done. Need to start drilling location holes for things next. I just buttoned up the side steps{forgot to toss those in the pic} and I'm getting nearer to the end. Started making templates too for the glass to cut out of clear sheet...that'll be a hoot!

That's tamiya chrome silver on the treads since I didn't want them too shiney.
Decals and clear coat{s} will seal the deal...
At the moment I'm working on the white metal items, mirrors, hand rails, top marker lights and this - the bulldog. I took the dremel and attached the plastic bristle brush for laughs and I'm happy with the results.
Sorry the pic is 90 off...forgot to rotate it in photoshop.
The horns are on and the trim is done. Need to start drilling location holes for things next. I just buttoned up the side steps{forgot to toss those in the pic} and I'm getting nearer to the end. Started making templates too for the glass to cut out of clear sheet...that'll be a hoot!
That's tamiya chrome silver on the treads since I didn't want them too shiney.
Decals and clear coat{s} will seal the deal...
jimb
Joined: August 25, 2006
KitMaker: 2,539 posts
Auto Modeler: 1,405 posts
Posted: Monday, June 14, 2010 - 03:06 AM UTC
It's getting there. I thing the bulldog looks nice. What did you use for your window gaskets? Is that Sharpie marker?
Jim
Jim
old-dragon
Joined: August 30, 2005
KitMaker: 3,289 posts
Auto Modeler: 1,620 posts
Posted: Monday, June 14, 2010 - 03:31 AM UTC
Quoted Text
It's getting there. I thing the bulldog looks nice. What did you use for your window gaskets? Is that Sharpie marker?
Jim
-I'm happy with the bulldog...I drilled out the front of the horns too then polished them with the plastic brush.
"Sharpie?" - No but the silver trim is...I have two silver sharpies - one is chisel tiped while the other is a thin fine point for dashes. That black is hand painted and I'm not as smooth as I used to be as you can tell! One thing you have to watch with the sharpies is that they will bleed/run with even moderate overcoats of clear lacquer so a brush coat of clear gloss acrylic seals them in and gives you no hassles!
Oh, and the one lil thing I don't care for on resin truck cabs is the built in headlights...it all seems to blend in together when there's a grill there too, so I'm taking my microscale clear glue{which I'll need for glueing in the windows} and covering the head lights to give them some depth and rounding...one coat is on now and I figure two more should do the trick!
old-dragon
Joined: August 30, 2005
KitMaker: 3,289 posts
Auto Modeler: 1,620 posts
Posted: Thursday, June 24, 2010 - 03:17 PM UTC
Nope...didn't forget about this puppy-
Here's the lots o' little details that have spent my time like the grab rails, top and front markers lights, big and lil side steps and the side emblems.
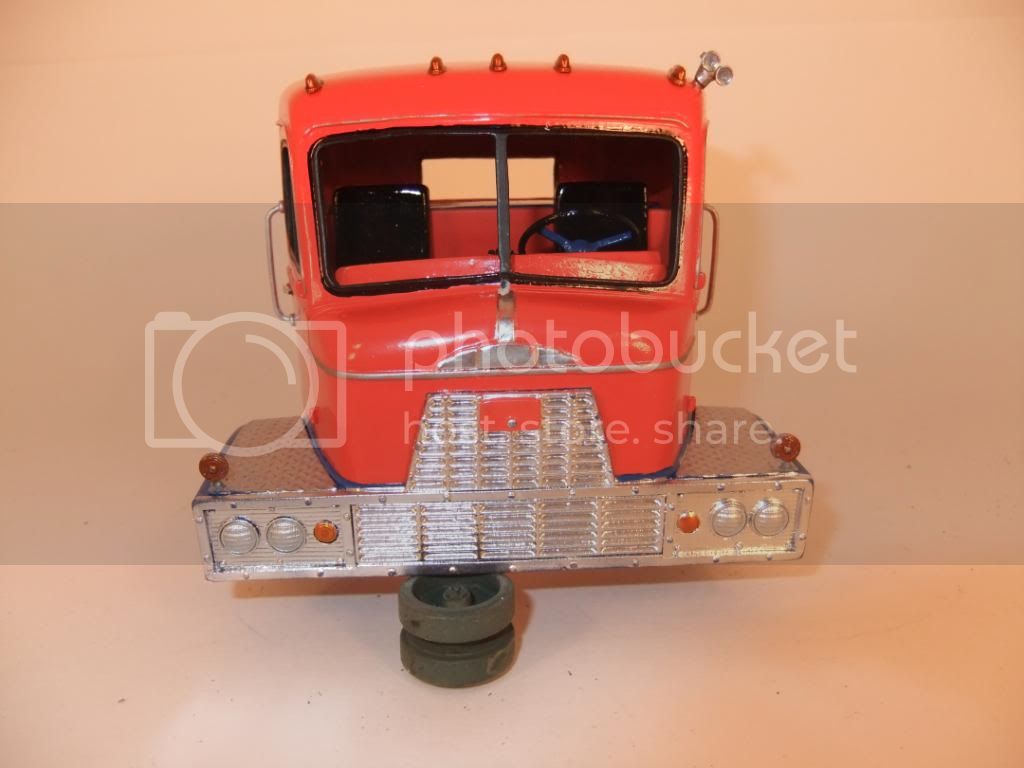
I do still need to install the glass{is cut out but not fully trimmed} and add some wiper arms and side mirrors.
More to do yet but this one is getting closer to done!
Here's the lots o' little details that have spent my time like the grab rails, top and front markers lights, big and lil side steps and the side emblems.
I do still need to install the glass{is cut out but not fully trimmed} and add some wiper arms and side mirrors.
More to do yet but this one is getting closer to done!
jimb
Joined: August 25, 2006
KitMaker: 2,539 posts
Auto Modeler: 1,405 posts
Posted: Thursday, June 24, 2010 - 04:22 PM UTC
I like the grab rails (heck, I like the whole build). How'd you make them?
Jim
Jim
old-dragon
Joined: August 30, 2005
KitMaker: 3,289 posts
Auto Modeler: 1,620 posts
Posted: Thursday, June 24, 2010 - 11:20 PM UTC
Quoted Text
I like the grab rails (heck, I like the whole build). How'd you make them?
Jim
Thank you - Those are the kit supplied white metal parts. You could take a punch set and pop out some small discs for the base, drill a rail hole in them and use wire to make the rail as well...

Modelbouwerke

Joined: August 25, 2006
KitMaker: 794 posts
Auto Modeler: 179 posts

Posted: Friday, June 25, 2010 - 01:25 AM UTC
Nice job so far.
Like the model, is a bit special
Erikssson
Like the model, is a bit special
Erikssson
old-dragon
Joined: August 30, 2005
KitMaker: 3,289 posts
Auto Modeler: 1,620 posts
Posted: Sunday, June 27, 2010 - 03:19 AM UTC
I've got the 1st grill wash of black installed...looks alittle rough but it will even out after 1-2 more times-
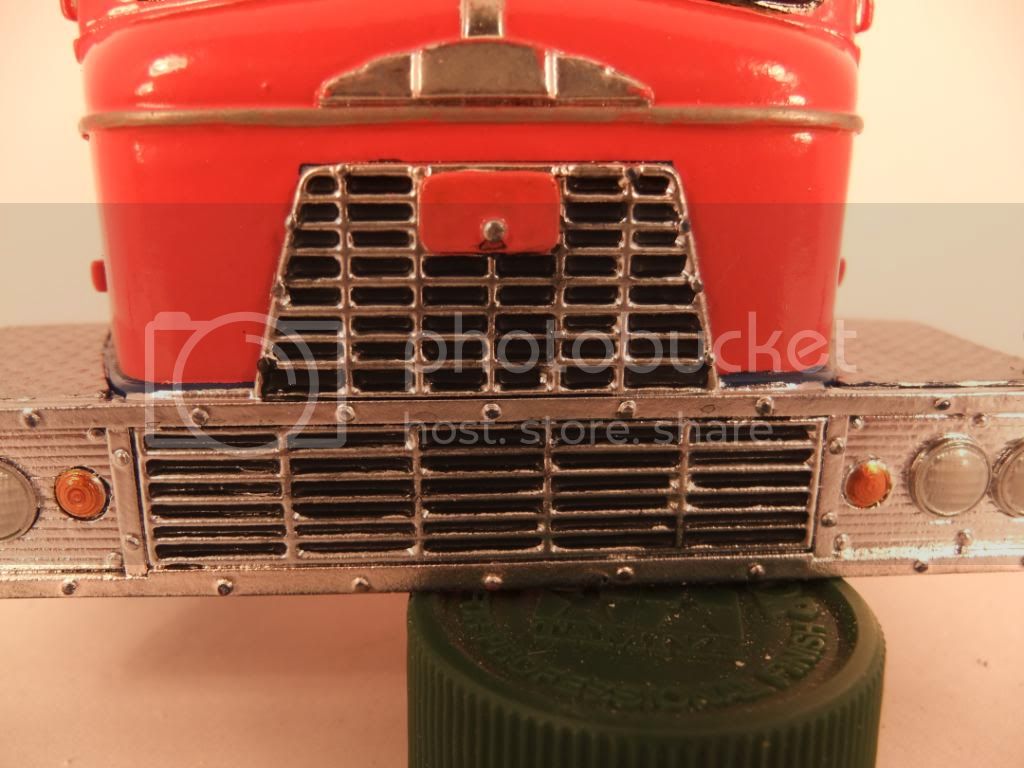
Also, if you look at the headlights you'll see the slightly white-ish look that 3 applications of microscale clear glue does for them...painting them white is too stark a difference{imho} and with this you get a white-ish tint, due to the layering, that's subtle while also giving them a rounding over since the glue builds up each time...something to consider on your next build of anything with an all chrome grill and headlight assembly.
Also, if you look at the headlights you'll see the slightly white-ish look that 3 applications of microscale clear glue does for them...painting them white is too stark a difference{imho} and with this you get a white-ish tint, due to the layering, that's subtle while also giving them a rounding over since the glue builds up each time...something to consider on your next build of anything with an all chrome grill and headlight assembly.
jimb
Joined: August 25, 2006
KitMaker: 2,539 posts
Auto Modeler: 1,405 posts
Posted: Sunday, June 27, 2010 - 06:27 AM UTC
The grill looks nice. I like how the wash looks.
Nice tip on the chrome lights. I'll have to remember that. (Yea, right!)
Jim
Nice tip on the chrome lights. I'll have to remember that. (Yea, right!)
Jim
old-dragon
Joined: August 30, 2005
KitMaker: 3,289 posts
Auto Modeler: 1,620 posts
Posted: Sunday, June 27, 2010 - 06:45 AM UTC
Quoted Text
The grill looks nice. I like how the wash looks.
Nice tip on the chrome lights. I'll have to remember that. (Yea, right!)
Jim
Thanks! and don't forget it works on model cars too....and I'll remind ya...
jimb
Joined: August 25, 2006
KitMaker: 2,539 posts
Auto Modeler: 1,405 posts
Posted: Sunday, June 27, 2010 - 08:30 AM UTC
Good thing I don't build cars. Although I might make an exception for the Revell of Germany 1964-1/2 Mustang in 1/24. Love that car!
Jim
Jim

casper

Joined: August 01, 2005
KitMaker: 395 posts
Auto Modeler: 107 posts
Posted: Sunday, June 27, 2010 - 12:51 PM UTC
[quoteThat black is hand painted and I'm not as smooth as I used to be as you can tell! [/quote]

 Hi ya Bob,
one trick I learn't many many years ago (when I didn't use 'liquid relaxer') is when doing things like window rubbers etc is to gently scribe a fine line and thin down the colour being applied - the scribed line acts as a dam/channel. Also use long bristles as it helps control the paint flow better (guess who trained as a signwriter).
Looking good
Roger.
Hi ya Bob,one trick I learn't many many years ago (when I didn't use 'liquid relaxer') is when doing things like window rubbers etc is to gently scribe a fine line and thin down the colour being applied - the scribed line acts as a dam/channel. Also use long bristles as it helps control the paint flow better (guess who trained as a signwriter
).Looking good
Roger.
old-dragon
Joined: August 30, 2005
KitMaker: 3,289 posts
Auto Modeler: 1,620 posts
Posted: Monday, June 28, 2010 - 06:49 AM UTC
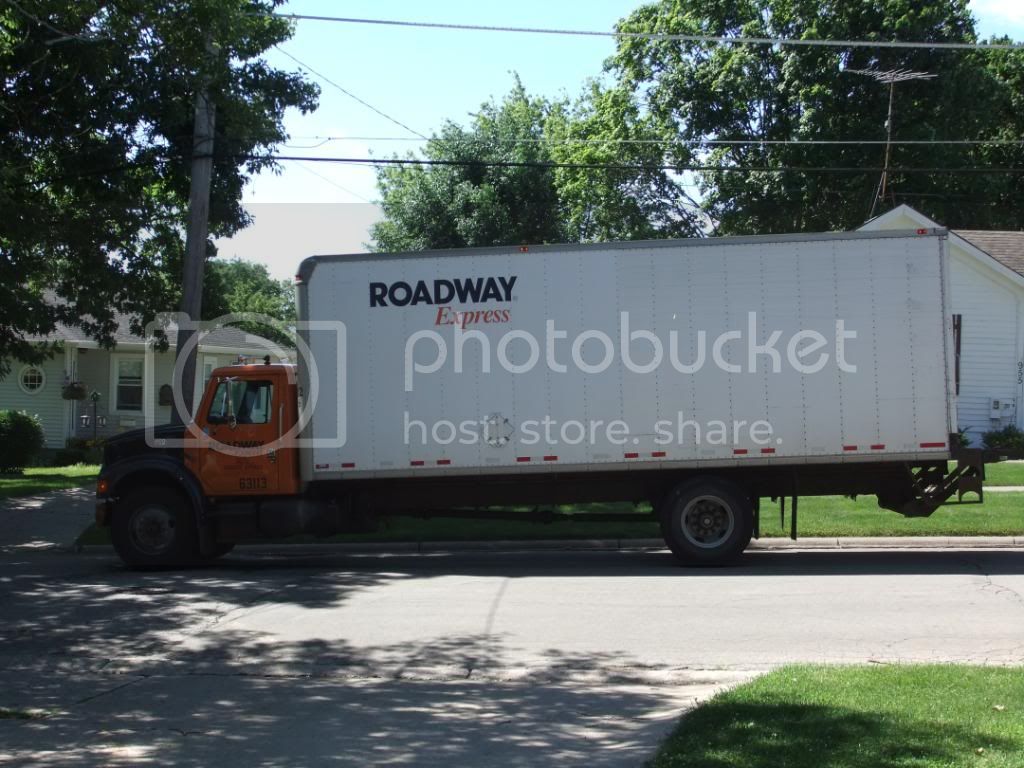
Bummer!...got the 2nd delivery today of my son's new bed and this time it came Roadway{last time it was Yellow} and I quickly found out my cab's blue is too light{but old RW blue was supposed to be lighter} and my orange was not yellow enough per today's colors. Was a nice straight truck though.
- Jim- "why not cars?"
- Casper- thanks for the idea...may have to try that..the scribed line thing too!
Oh, I had to touch up some of the chrome today since I handled it too much - the alclad chrome needs time to dry and then be sealed or it'll rub off. I'll seal it all after the decals go on.
Lube refiner was installed today{knew I forgot something!} and the decals will go on later today...then clear coats...then windows and I should be done.{with this one!}
old-dragon
Joined: August 30, 2005
KitMaker: 3,289 posts
Auto Modeler: 1,620 posts
Posted: Monday, June 28, 2010 - 08:36 AM UTC
The above mentioned delivery truck today...a future build!
jimb
Joined: August 25, 2006
KitMaker: 2,539 posts
Auto Modeler: 1,405 posts
Posted: Monday, June 28, 2010 - 09:27 AM UTC
Why not cars? Not sure. I guess I never got into them. I will admit they take up a lot less space than trucks & trailers! Maybe I'll do a car carrier & load it with Mustangs! I just need a car carrier & the appropriate mid-1960s Ford tractor. Maybe a C900 or a F8.
Jim
Jim
old-dragon
Joined: August 30, 2005
KitMaker: 3,289 posts
Auto Modeler: 1,620 posts
Posted: Monday, June 28, 2010 - 02:52 PM UTC
Quoted Text
Why not cars? Not sure. I guess I never got into them. I will admit they take up a lot less space than trucks & trailers! Maybe I'll do a car carrier & load it with Mustangs! I just need a car carrier & the appropriate mid-1960s Ford tractor. Maybe a C900 or a F8.
Jim
old-dragon
Joined: August 30, 2005
KitMaker: 3,289 posts
Auto Modeler: 1,620 posts
Posted: Sunday, July 04, 2010 - 06:34 AM UTC
We got decals! Getting closer now...
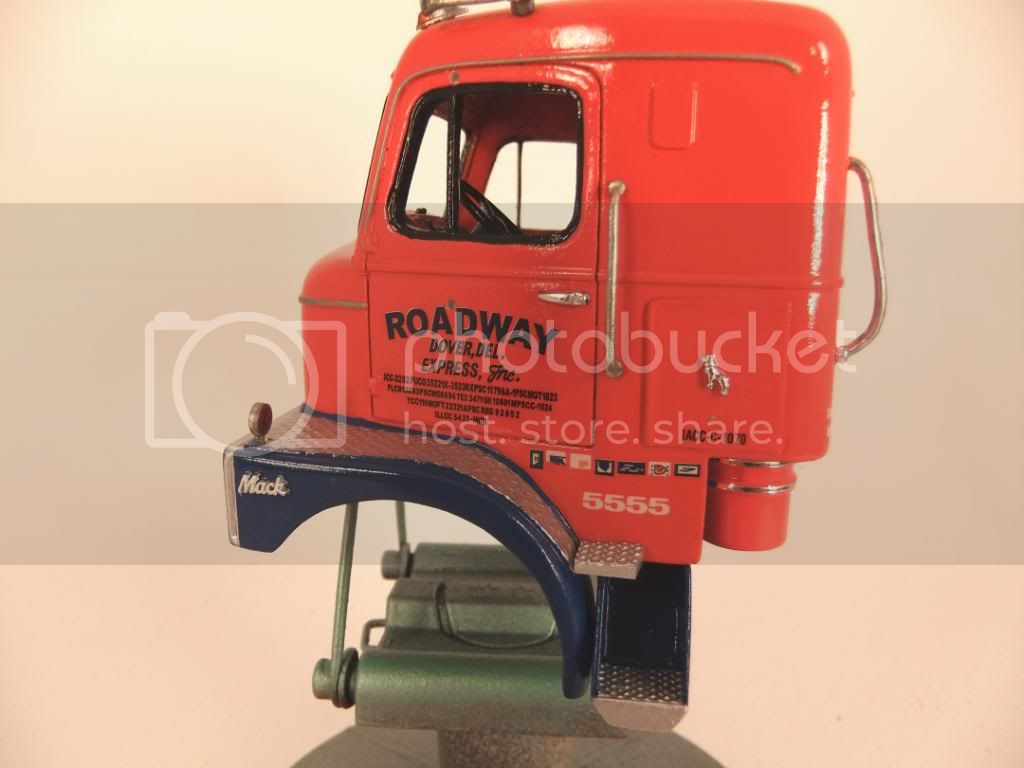
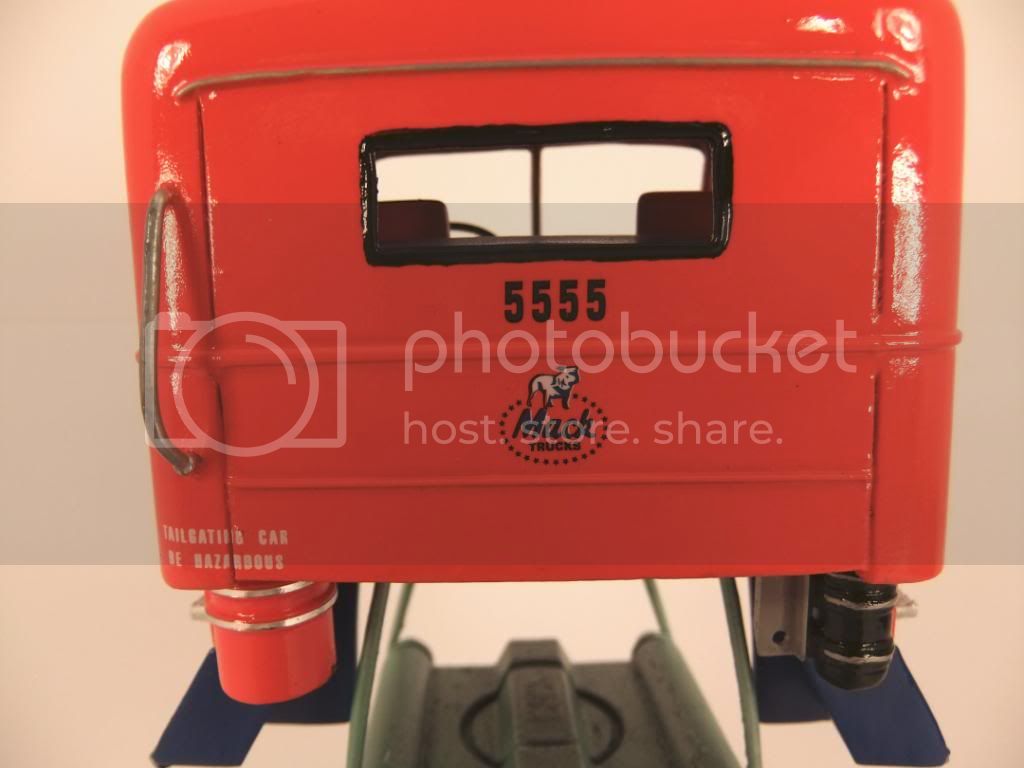
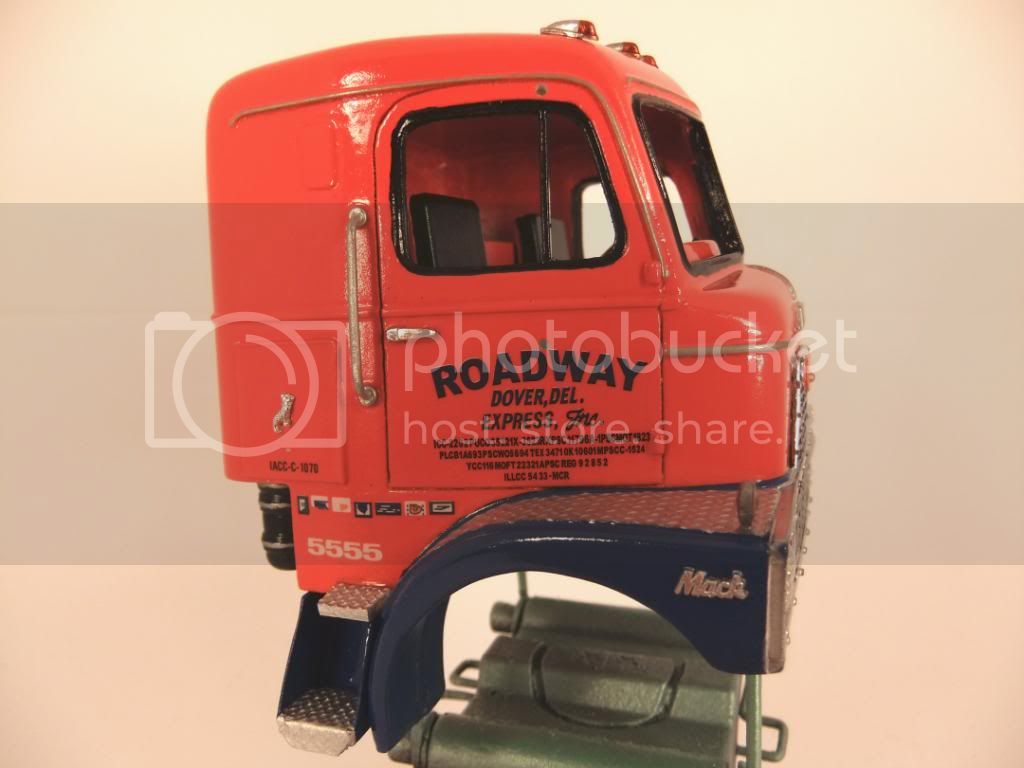
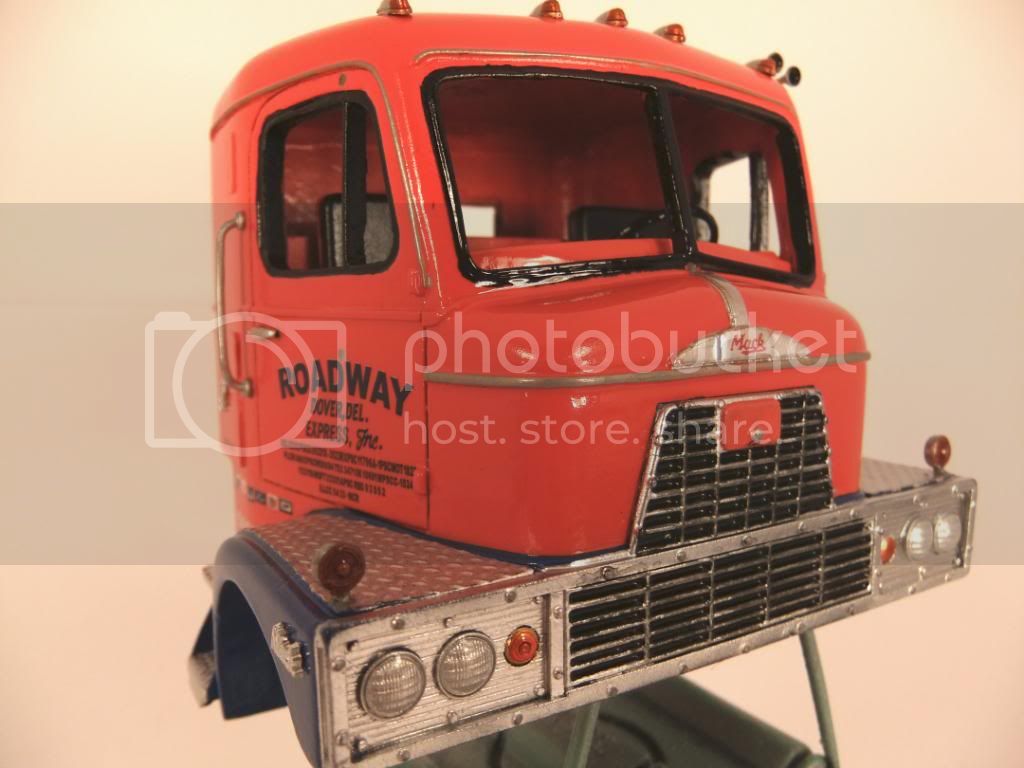

...I like the lil white lettered "tailgating can be hazardous" decal{lower left/back of cab}. She's got 4 coats of clear on her now and I'll wet sand and polish the cab in a day or so after it fully dries out.
...I like the lil white lettered "tailgating can be hazardous" decal{lower left/back of cab}. She's got 4 coats of clear on her now and I'll wet sand and polish the cab in a day or so after it fully dries out.
jimb
Joined: August 25, 2006
KitMaker: 2,539 posts
Auto Modeler: 1,405 posts
Posted: Sunday, July 04, 2010 - 09:40 AM UTC
That looks really nice, Bob. Great decal work.
What hapened to the top half of your fan?
Jim
What hapened to the top half of your fan?
Jim
old-dragon
Joined: August 30, 2005
KitMaker: 3,289 posts
Auto Modeler: 1,620 posts
Posted: Sunday, July 04, 2010 - 02:11 PM UTC
Quoted Text
That looks really nice, Bob. Great decal work.
What hapened to the top half of your fan?
Jim
...and the valve covers/intake/turbo....had to loose something to gain clearance for the untunneled interior tub. Good thing this isn't a tiltable cab!
 |

WEB HOSTING BY


Copyright ©2021 Auto Modeler and Kitmaker Network, a subsidiary of Silver Star Enterprises
All Rights Reserved. Please read our Conditions of Use and Privacy Policy.
All Rights Reserved. Please read our Conditions of Use and Privacy Policy.