

Hey, I'm all for it, but it's not my campaign so I can't say. I liked the origonal song/video by Genesis but the way Disturbed tweeked it, remade it pretty cool! This coming from a guy, no doubt like many here, who saw the 1st few VH-1/MTV videos........I want my.....I want my........I want my MVT!
Looking at my decals makes me think I should try something else quickly...the question is, "what"?


Go to automodeler.com for the current dynamic site!
The Garage
For general automotive modeling or non-modeling topics.
For general automotive modeling or non-modeling topics.
Hosted by Jim Starkweather
Official tv and movie build thread

old-dragon

Joined: August 30, 2005
KitMaker: 3,289 posts
Auto Modeler: 1,620 posts

Posted: Saturday, January 29, 2011 - 07:46 AM UTC

Tailor

Joined: May 26, 2008
KitMaker: 1,168 posts
Auto Modeler: 11 posts

Posted: Saturday, January 29, 2011 - 11:40 PM UTC
Gentlemen-
I am progressing swiftly with my build. (There are so few parts compared to ships, really)
The model is pre-shaded (I tried airbrush pre-shing this time, which is new to me) and painted 2 layers of red. Layer one is Tamiya red and the second is Taymiya red with a few drops of red brown. I had masked off the tapes on the wings (sorry for the lack of better words) before applying the second layer.
The model has received two coats of Future.
Next were the decals, which I finished last night, but did not take any photos, yet. I hope to be able to do some mor work tonight and maybe even finish the build by mid/end of ext week.
I have followed the search for the Bluesmobile, which I would relly like build one day myself. I really wonder there is no kit for it including Jake and Elwood to man the seats.
Cheers,
Guido
Tailor
Joined: May 26, 2008
KitMaker: 1,168 posts
Auto Modeler: 11 posts
Posted: Tuesday, February 01, 2011 - 12:02 AM UTC
The build is crawling along...
Indeed I thought it was quite fiddely to get the top wing to sit in position, but it worked out. I haven't however used a lot of colourful language like that in a long time.
Bits, bobs, and riggin g yet to be added and The Baron will be finsihed.
Cheers,
Guido
Indeed I thought it was quite fiddely to get the top wing to sit in position, but it worked out. I haven't however used a lot of colourful language like that in a long time.
Bits, bobs, and riggin g yet to be added and The Baron will be finsihed.
Cheers,
Guido
Tailor
Joined: May 26, 2008
KitMaker: 1,168 posts
Auto Modeler: 11 posts
Posted: Tuesday, February 01, 2011 - 11:17 AM UTC
Gentlemen-
This is it here is my 1/48 Albatross as can be seen in the German mortion picture Der Rote Baron. It's been a build with a learning curve (Lots o' curve, really!). These little planes are a wee bit complicated. The pre-shading bit was nice to do. UNfotunately I chose Tamiya as a colour coat of choice and it dried very grainy when I shot on with my airbrush (too little thinner, I think). As a result applying washings wasn't a choice. Anyway, it's been fun and my son like the red plane on the shelf a lot.


It's been an honour flying with you, gentlemen!
Cheers,
Guido
PS.: There is no campagain gallery to post the pictures to, yet.
This is it here is my 1/48 Albatross as can be seen in the German mortion picture Der Rote Baron. It's been a build with a learning curve (Lots o' curve, really!). These little planes are a wee bit complicated. The pre-shading bit was nice to do. UNfotunately I chose Tamiya as a colour coat of choice and it dried very grainy when I shot on with my airbrush (too little thinner, I think). As a result applying washings wasn't a choice. Anyway, it's been fun and my son like the red plane on the shelf a lot.
It's been an honour flying with you, gentlemen!
Cheers,
Guido
PS.: There is no campagain gallery to post the pictures to, yet.

spongya

Joined: February 01, 2005
KitMaker: 2,365 posts
Auto Modeler: 21 posts

Posted: Tuesday, February 01, 2011 - 12:19 PM UTC
Well, music videos are not very successful, but I have the solution. I made a figure of one of the Scot terriers from Coraline for my friend for Christmas in November -that should qualify, right?
old-dragon
Joined: August 30, 2005
KitMaker: 3,289 posts
Auto Modeler: 1,620 posts
Posted: Wednesday, February 02, 2011 - 04:16 AM UTC
Guido, that Alby turned out great! Nice rigging too! Last stringbag I built was my 1/72 HB W-29 floatplane - I think I need to build another from that time period! Oh, I've had issues recently with the Tamiya paint too when using the Ab....mine got all sorts of grainy looking so when I wet sand it down I'll retry with more thinner I guess. The problem is I'm painting a car that needs to be shiney. Usually their paint goes on easy.......
Tailor
Joined: May 26, 2008
KitMaker: 1,168 posts
Auto Modeler: 11 posts
Posted: Wednesday, February 02, 2011 - 08:07 PM UTC
Thanks, Bob!
I have the Alby sitting next to my Wyvern in the same scale, which is basically the culmination of the prop-driven fighter plane development. It is quite interesting to see the developement not only in technology, but in sheer size.
The flyboys of the first day really had to have some brass balls to climb into these stringbags.
This was certainly not my last WWI bi-plane.
Cheers,
Guido

windysean
Joined: September 11, 2009
KitMaker: 1,917 posts
Auto Modeler: 268 posts

Posted: Monday, February 21, 2011 - 01:43 AM UTC
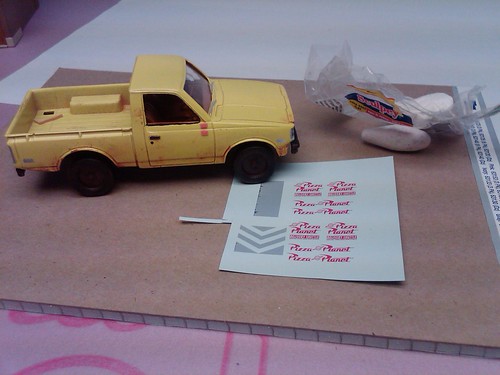
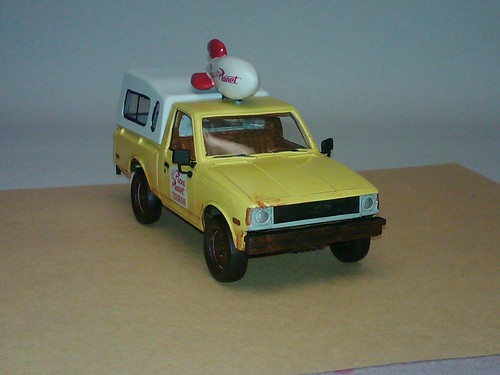
Decals are ready!! I got them finally, from my friend with the ALPS printer. Next to mask and paint the white magnetic sign on the door, and finish the rocket sign being formed from putty, so I can apply them.
Here's the nearly complete truck. (the orange rectangles will become mirror mounts soon.) I also still have the windows to do on the cap (not pictured here).
-Sean.
Here's the nearly complete truck. (the orange rectangles will become mirror mounts soon.) I also still have the windows to do on the cap (not pictured here).
-Sean.
windysean
Joined: September 11, 2009
KitMaker: 1,917 posts
Auto Modeler: 268 posts
Posted: Monday, February 28, 2011 - 10:10 AM UTC
Quoted Text
B - I've used "Sculpey" clay with great success...it comes in alot of colors, forms easily to what you want and then is baked to a hard item which can be easily painted if the colors available aren't to your liking. I'd suggest you form it and add the legs, then bake it the way you want it so you don't have to try and drill in it later after it's hardened...my 2 cents. I got mine from the local Hobby Lobby craft store - one pack cost under $2.{you might need two though}
Thanks, Bob, for the suggestion...
I used Sculpey, first doing my impression of a sculptor-- molding this stuff is tricky-- trying to get one detail without squishing the rest in your hand as you work
 . When I had a decent shape, I jammed holes in the bottom with a toothpick, for mounting rods later.
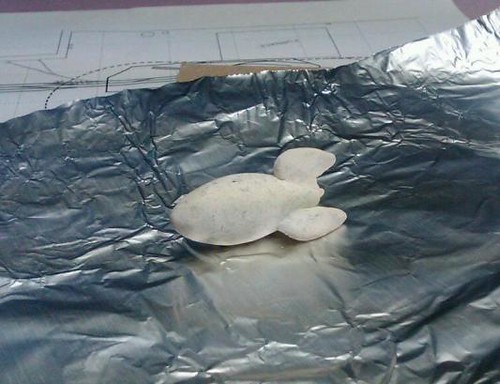
Once baked, it was easy to sand smooth.
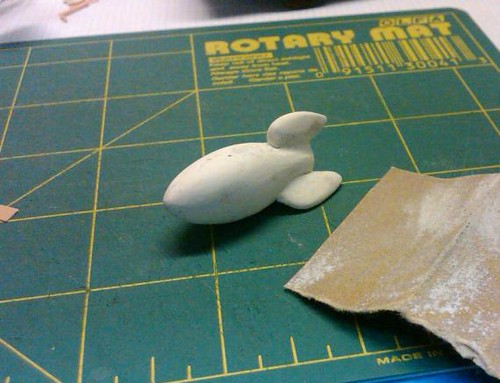
Then after it was baked hard and sanded smooth, I used a drillbit at a low speed (careful-- it's baked clay!)
 to clean up the holes.
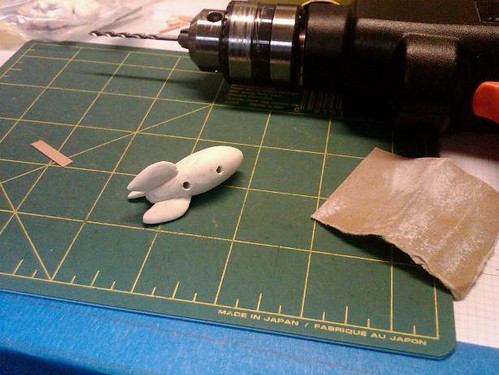
Now on to painting, mounting, a coat of Future, and decaling.
-thanks,
Sean.

windysean
Joined: September 11, 2009
KitMaker: 1,917 posts
Auto Modeler: 268 posts
Posted: Tuesday, March 01, 2011 - 11:07 AM UTC
More progress...
I painted and mounted the rocket-- success! That's the good news.
I put a piece of Scotch tape across the tailgate and penciled in the "YO" (took two tries to get that right, or at least close enough), then I cut the tape with an Xacto knife.
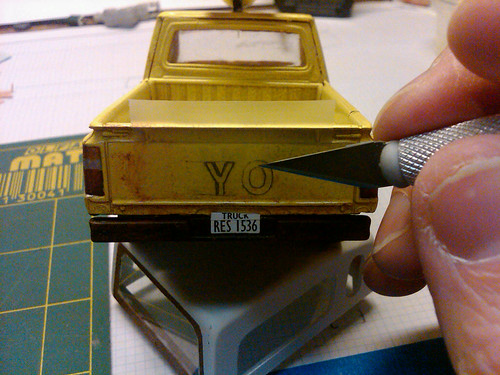
What I discovered when I cut out the letter shapes was that, while I always use some heavy primers, I hadn't cleaned off old decal glue (or something), and the paint came up with the tape. I went ahead and painted my letters in, removed the rest of the tape, and dabbed yellow (not the same yellow, but the truck is pretty grungy anyway) around the letter forms. That was the bad news.
I think it turned out alright in the end though.
I found the license number from an internet movie trivia site, and made it up on Microsoft Word, printed it on paper, and glued it on with tacky craft glue.
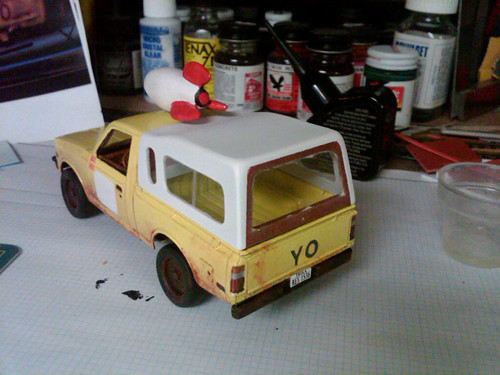
The rocket did take a while to cure. I was afraid to apply Future as a decal base until the rocket wasn't tacky, which took 3 or 4 days. I may have painted it too soon after baking. Now the Future is on, and I wait to apply decals.
thanks for looking!
-Sean.
I painted and mounted the rocket-- success! That's the good news.
I put a piece of Scotch tape across the tailgate and penciled in the "YO" (took two tries to get that right, or at least close enough), then I cut the tape with an Xacto knife.
What I discovered when I cut out the letter shapes was that, while I always use some heavy primers, I hadn't cleaned off old decal glue (or something), and the paint came up with the tape. I went ahead and painted my letters in, removed the rest of the tape, and dabbed yellow (not the same yellow, but the truck is pretty grungy anyway) around the letter forms. That was the bad news.
I think it turned out alright in the end though.
I found the license number from an internet movie trivia site, and made it up on Microsoft Word, printed it on paper, and glued it on with tacky craft glue.
The rocket did take a while to cure. I was afraid to apply Future as a decal base until the rocket wasn't tacky, which took 3 or 4 days. I may have painted it too soon after baking. Now the Future is on, and I wait to apply decals.
thanks for looking!
-Sean.
Tailor
Joined: May 26, 2008
KitMaker: 1,168 posts
Auto Modeler: 11 posts
Posted: Tuesday, March 01, 2011 - 05:48 PM UTC
Looking good!

HARV

#012
Joined: November 07, 2003
KitMaker: 3,098 posts
Auto Modeler: 182 posts

Posted: Wednesday, March 02, 2011 - 06:57 AM UTC
That is looking really cool Sean. Now if you could just find some scale Woody and Buzz figures you would be all set!!
Randy
Randy

windysean
Joined: September 11, 2009
KitMaker: 1,917 posts
Auto Modeler: 268 posts
Posted: Wednesday, March 02, 2011 - 07:52 AM UTC
Quoted Text
That is looking really cool Sean. Now if you could just find some scale Woody and Buzz figures you would be all set!!
Randy
I know, if I kept going on this, it would be fun to make a tiny Buzz, buckled in front next to the pizzas, and Woody sliding around in back with a toolbox, but I'm looking forward to my next build already-- looking through the posts, it's hard to believe I started way back in October.
Every build is like that-- I've got a Dodge army truck looking down on me as I type here that SOMEDAY might get a tarp, but probably never. Each of my builds has something more I could do, but the whim has passed.
thanks Harv and Guido for the nice words!
Should be wrapping this up tonight, then final photos in the gallery. (The decals on are AWESOME-- I tear up each time I look, it's so beautiful.)
-Sean.

windysean
Joined: September 11, 2009
KitMaker: 1,917 posts
Auto Modeler: 268 posts
Posted: Thursday, March 03, 2011 - 03:54 PM UTC
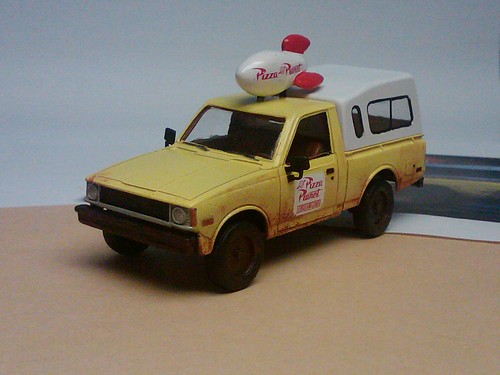
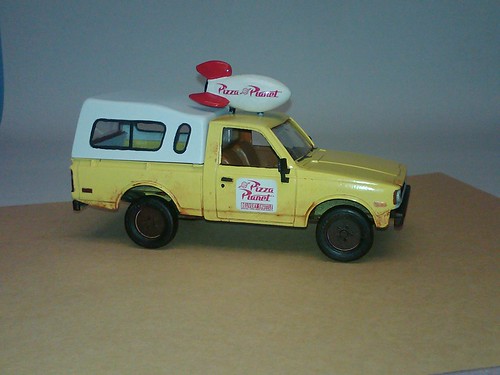
Here's the final product. I can't locate a campaign gallery for this one. Does it exist yet?
Thanks everyone.
-Sean


Thanks everyone.
-Sean
Tailor
Joined: May 26, 2008
KitMaker: 1,168 posts
Auto Modeler: 11 posts
Posted: Thursday, March 03, 2011 - 06:04 PM UTC
Excellent! Truely a unique model!
Cheers,
Guido
Cheers,
Guido

AussieReg
#007

Joined: June 09, 2009
KitMaker: 8,156 posts
Auto Modeler: 2,953 posts
Posted: Thursday, March 03, 2011 - 06:42 PM UTC
Awesome work Sean, one of my favourite movies ever and you have truly done it justice there !!
"You saved our lives, we are eternally grateful !"
Cheers, D
"You saved our lives, we are eternally grateful !"
Cheers, D


c5flies
Joined: October 21, 2007
KitMaker: 3,684 posts
Auto Modeler: 294 posts
Posted: Friday, March 04, 2011 - 01:17 PM UTC
Here's the Gallery link (if the link doesn't work it's in the AutoModeler Group Build section).
TV and Movie Gallery
TV and Movie Gallery

HARV
#012
Joined: November 07, 2003
KitMaker: 3,098 posts
Auto Modeler: 182 posts
Posted: Friday, March 04, 2011 - 01:46 PM UTC
Very cool Sean. It really turned out nice.
It makes me want to sit down and watch the movie again!!
Randy
It makes me want to sit down and watch the movie again!!
Randy
windysean
Joined: September 11, 2009
KitMaker: 1,917 posts
Auto Modeler: 268 posts
Posted: Friday, March 04, 2011 - 03:41 PM UTC
Quoted Text
Excellent! Truely a unique model!
Cheers,
Guido
Thanks much, D and Randy!
Guido, you too! In looking back through this thread, I realized I forgot to commend you on that great biplane. (I'm curious to see the Wyvern and Albatross side-by-side.)
Thanks, James, for opening the gallery for this build. Guido's done. I noticed tonight that I hadn't painted the support posts under the rocket yet, so I'll post newer final photos into the gallery soon.
Finally, Bob, hope to see that Ecto-1 finished up-- couldn't a dose of Future under the decal edges save it somehow?
-Sean.
old-dragon
Joined: August 30, 2005
KitMaker: 3,289 posts
Auto Modeler: 1,620 posts
Posted: Saturday, March 05, 2011 - 04:03 PM UTC
Quoted Text
Finally, Bob, hope to see that Ecto-1 finished up-- couldn't a dose of Future under the decal edges save it somehow?
-Sean.
Excellent work there sean, the truck turned out great!
Now, as for mine....the decals are wrinkled and every new set of solva set just seems to make them that much worse - so I stopped! Adding future to them would still leave them wrinkled so I've been trying to tweek some touch-up decals. Seems those decals I downloaded from the web are just a tad too big...excellently made, but just alittle too big.
I will try and see "that one" through, but another idea has been set in a bucket to remove any release agent and I hope to start the build on that one tomorrow if I'm lucky. I'll give yah a hint.........it's black, and it's a Bat-ty idea I've had for a while.

I'm down, but don't count me out just yet!
spongya
Joined: February 01, 2005
KitMaker: 2,365 posts
Auto Modeler: 21 posts
Posted: Wednesday, March 16, 2011 - 09:38 AM UTC
One of the terriers from Coraline.
(I'm planning to make a "bat-terrier" version as well.)


windysean
Joined: September 11, 2009
KitMaker: 1,917 posts
Auto Modeler: 268 posts
Posted: Wednesday, March 16, 2011 - 03:07 PM UTC
Cool stuff, Spongya.
Bob, I didn't see that March 5 post before now, but I put your clues into my Bat-computer, and I'm waiting for its printout.
Thanks,
Sean
Bob, I didn't see that March 5 post before now, but I put your clues into my Bat-computer, and I'm waiting for its printout.
Thanks,
Sean

GaryKato
Joined: December 06, 2004
KitMaker: 3,694 posts
Auto Modeler: 79 posts
Posted: Sunday, April 17, 2011 - 10:55 PM UTC
Anyone have any ribbon ideas?
Tailor
Joined: May 26, 2008
KitMaker: 1,168 posts
Auto Modeler: 11 posts
Posted: Monday, April 18, 2011 - 01:15 AM UTC
Simple but effective?

Cheers,
Guido
Cheers,
Guido
spongya
Joined: February 01, 2005
KitMaker: 2,365 posts
Auto Modeler: 21 posts
Posted: Monday, April 18, 2011 - 01:30 AM UTC
Great idea, but make the sides more wider (so that it's proportionate in the 35mm film format.)
Quoted Text
Simple but effective?
Cheers,
Guido
 |

WEB HOSTING BY


Copyright ©2021 Auto Modeler and Kitmaker Network, a subsidiary of Silver Star Enterprises
All Rights Reserved. Please read our Conditions of Use and Privacy Policy.
All Rights Reserved. Please read our Conditions of Use and Privacy Policy.