

Gabriel,
The prep work on the body really paid off, as the black primer coat looks smooth and no mold lines that I can see.
At least one of us has gotten enough done for an update, as I'm mired in the engine detailing and hours of work just looks more like maybe 15 min at best.
Joel


Go to automodeler.com for the current dynamic site!
The Garage
For general automotive modeling or non-modeling topics.
For general automotive modeling or non-modeling topics.
Hosted by Jim Starkweather
Porsche campaign anyone?

Joel_W

Joined: December 04, 2010
KitMaker: 11,666 posts
Auto Modeler: 2,974 posts

Posted: Tuesday, November 20, 2018 - 02:15 AM UTC


Szmann

Joined: September 02, 2014
KitMaker: 1,977 posts
Auto Modeler: 1,371 posts

Posted: Tuesday, November 20, 2018 - 07:25 AM UTC
Quoted Text
Gabriel,
The prep work on the body really paid off, as the black primer coat looks smooth and no mold lines that I can see.
At least one of us has gotten enough done for an update, as I'm mired in the engine detailing and hours of work just looks more like maybe 15 min at best.
Joel
Yes, as a joke I would say am 96% content with the result of the first step. My experience with aircraft builds and the "trick" with the black marker paid off and I have just small protruding dots above the front lights - easy to deal with.
Mr. Levelling Thinner, Mr. Surfacer 1500 and H&S are a happy threesome which I always join with full confidence in a decent result
 Still small polishing needed here and there but, as already said, it's just normal auto modeling routine. Meanwhile I stripped and cleaned the a/b properly and hopefully no more issues next time (the inner seal was sticking and the needle was't closing properly once the trigger released, building up paint blobs on the tip, causing splattering).
The engine is going to be a challenge for me as well. It is very well detailed from the kit but still the real vehicle has some plumbing in the visible part that needs to be scratch-built. I'm not stepping yet into internal details, since I have on the bench a 72nd scale Airfix that I want it gone asap

Cheers!
Gabriel

Joel_W
Joined: December 04, 2010
KitMaker: 11,666 posts
Auto Modeler: 2,974 posts
Posted: Tuesday, November 20, 2018 - 07:49 AM UTC
Quoted Text
Quoted Text
Gabriel,
The prep work on the body really paid off, as the black primer coat looks smooth and no mold lines that I can see.
At least one of us has gotten enough done for an update, as I'm mired in the engine detailing and hours of work just looks more like maybe 15 min at best.
Joel
Yes, as a joke I would say am 96% content with the result of the first step. My experience with aircraft builds and the "trick" with the black marker paid off and I have just small protruding dots above the front lights - easy to deal with.
Mr. Levelling Thinner, Mr. Surfacer 1500 and H&S are a happy threesome which I always join with full confidence in a decent result
The engine is going to be a challenge for me as well. It is very well detailed from the kit but still the real vehicle has some plumbing in the visible part that needs to be scratch-built. I'm not stepping yet into internal details, since I have on the bench a 72nd scale Airfix that I want it gone asap
Cheers!
Gabriel
Gabriel,
Mr. Hobby Leveling thinner 400 is my go to thinner these days. I'm trying to very slowly finish up the full 250 ml Tamiya Yellow cap thinner, and a 250 ml X-20A as well. I use the Yellow cap for interior and engine work, and the X-20A for thinning hand paints.
I've rather quickly have become quite comfortable with my two new Grex ABs. These are the 1st double action guns I've ever used. But honestly, I use them more like a single action gun with the trigger limiter.
I need to stop doing research on the engine compartment, as I keep on finding more and more things to add. At this rate I won't even get it finished for the Spring Replicon show.
Joel

Cosimodo

#335

Joined: September 03, 2013
KitMaker: 1,808 posts
Auto Modeler: 701 posts

Posted: Tuesday, November 20, 2018 - 06:23 PM UTC
Nice work Gabriel on the clean up. I had exactly the same lines on the 934 that also wrapped under the rear spoiler and around the bumpers so removal was messy.
cheers
Michael
cheers
Michael
Cosimodo
#335
Joined: September 03, 2013
KitMaker: 1,808 posts
Auto Modeler: 701 posts
Posted: Tuesday, November 20, 2018 - 06:30 PM UTC
So Xmas came earlier with the arrival of paint from Gravity of Spain (the correct order this time) and finally from Gravity USA with primer and green for the Porsche.
A body clean similar to Gabriel's and tried out the Gravity primer which went on very smoothly. Following the lessons learnt here, I have sanded it with 3000 wet sandpaper and should get some Vaillant Green on it tonight.


A couple of questions
After the colour coat and before the gloss coat I should apply the decals, or do a gloss coat first?
And along with that, there are two other colours to go on the body. The window trim and frames and the rear and front bumpers have rubber inserts which are all black, and the front splitter has a yellow/orange colour - do these before or after the gloss coat?
cheers
Michael
A body clean similar to Gabriel's and tried out the Gravity primer which went on very smoothly. Following the lessons learnt here, I have sanded it with 3000 wet sandpaper and should get some Vaillant Green on it tonight.
A couple of questions
After the colour coat and before the gloss coat I should apply the decals, or do a gloss coat first?
And along with that, there are two other colours to go on the body. The window trim and frames and the rear and front bumpers have rubber inserts which are all black, and the front splitter has a yellow/orange colour - do these before or after the gloss coat?
cheers
Michael
Joel_W
Joined: December 04, 2010
KitMaker: 11,666 posts
Auto Modeler: 2,974 posts
Posted: Wednesday, November 21, 2018 - 11:30 AM UTC
Michael,
The Gravity primer after sanding with 3,000 looks absolutely silky smooth.
As far as decaling is concerned, I've stopped gloss coating as base for the decals. What you need is a smooth surface that you can attain from Matt paints without any real issues. for this I wet sand the color coats with good old Tamiya 3,000 sponge. Just watch out for any raised edges as there is almost no paint on them.
I 1st learned of this somewhat radical method from Paul Budzik, a true master modeler. While I shied away from using this method on my last several aircraft builds, and my 1st car build, the Porsche 917K, I used it with great success on the Lotus 72E and the Ferrari 330 P4. every single decallaid down perfectly with no issues. But all the decals were AM decals by IndyCal with one exception. I try not to use kit decals unless they're by Cartograf.
I do Glosscoat for a final finish coat, and spend a great deal of time rubbing and polishing it out, and then finally waxing it.
Joel
Cosimodo
#335
Joined: September 03, 2013
KitMaker: 1,808 posts
Auto Modeler: 701 posts
Posted: Wednesday, November 21, 2018 - 11:35 AM UTC
Quoted Text
Michael,
The Gravity primer after sanding with 3,000 looks absolutely silky smooth.
As far as decaling is concerned, I've stopped gloss coating as base for the decals. What you need is a smooth surface that you can attain from Matt paints without any real issues. for this I wet sand the color coats with good old Tamiya 3,000 sponge. Just watch out for any raised edges as there is almost no paint on them.
I 1st learned of this somewhat radical method from Paul Budzik, a true master modeler. While I shied away from using this method on my last several aircraft builds, and my 1st car build, the Porsche 917K, I used it with great success on the Lotus 72E and the Ferrari 330 P4. every single decals laid down perfectly with no issues. But all the decals were AM decals as I try not to use kit decals unless they're by Cartograf.
Joel
Thanks Joel.
The primer is indeed very smooth. First time I have used a primer other Tamiya spray can which on planes and ships seems to very good but the Gravity out of the airbrush was a whole lot easier to do. For these earlier car builds it's all about learning what works so I will try that approach and see how it goes. I did the green last night in your method detailed in the Ferrari build. It was late so I will post some photos tonight and see how it worked out.
cheers
Michael
Szmann
Joined: September 02, 2014
KitMaker: 1,977 posts
Auto Modeler: 1,371 posts
Posted: Wednesday, November 21, 2018 - 01:44 PM UTC
Hi guys!
First off, sorry for late answer! I didn't get any mail notification - I understood that Staff Jim is doing some site upgrades and maybe this is the cause.
Michael, fortunately in my case the rear spoiler and the engine hood / rear vent are a separate sub-assembly
The decals question: both Budzik, cited here by Joel and Will Pattison claim there is no need for gloss coat before decals. Joel's experience confirms that same thing and on another forum I've seen recently somebody applied perfectly huge decals directly over Humbrol matte black (it was an Italeri trailer). As for myself, I am a stubborn mule and I want my decals sandwiched between two coats of clear. Whatever the case, I strongly recommend to apply a minimum of one coat of clear over decals so you can sand down the raised edges some thicker decals my bother you with.
Multiple color paint question: again, I will recommend to spray all colors before the gloss coat, unless you want some matte or semi-matte effect. Bear in mind that the adhesion over clear coat is very weak and those areas should be handled with much care. It happened to me that acrylic applied over gloss polyurethane clear peeled off as a low tack masking tape will do.
UPDATE
I sanded down the last molding imperfections and some painting errors, using ACE Hardware sanding sponge 220 grit and Tamiya sanding sponge 2000 grit:

After 24 hrs drying / curing time, I applied the second layer of primer in two stages: a blocker coat (Mr. Surfacer 50% + MLT 50%), followed by a finishing coat (Mr. Surfacer 40% + MLT 60%) with 15 min flashing time in between:

Michael, now I can say my car's body looks as neat and smooth like yours! - well done there
I haven't decided yet if the copper undercoat it's going to be Alclad II or Rust-oleum; each one has advantages and disadvantages - perhaps Rust-oleum will be the choice, but I still have a minimum of 48 hrs to take a decision, time required for primer to properly cure and some 3000 grit sanding it's also in the play...
More updates in the making!
Cheers!
Gabriel
First off, sorry for late answer! I didn't get any mail notification - I understood that Staff Jim is doing some site upgrades and maybe this is the cause.
Quoted Text
Nice work Gabriel on the clean up. I had exactly the same lines on the 934 that also wrapped under the rear spoiler and around the bumpers so removal was messy.
Michael, fortunately in my case the rear spoiler and the engine hood / rear vent are a separate sub-assembly
The decals question: both Budzik, cited here by Joel and Will Pattison claim there is no need for gloss coat before decals. Joel's experience confirms that same thing and on another forum I've seen recently somebody applied perfectly huge decals directly over Humbrol matte black (it was an Italeri trailer). As for myself, I am a stubborn mule and I want my decals sandwiched between two coats of clear. Whatever the case, I strongly recommend to apply a minimum of one coat of clear over decals so you can sand down the raised edges some thicker decals my bother you with.
Multiple color paint question: again, I will recommend to spray all colors before the gloss coat, unless you want some matte or semi-matte effect. Bear in mind that the adhesion over clear coat is very weak and those areas should be handled with much care. It happened to me that acrylic applied over gloss polyurethane clear peeled off as a low tack masking tape will do.
UPDATE
I sanded down the last molding imperfections and some painting errors, using ACE Hardware sanding sponge 220 grit and Tamiya sanding sponge 2000 grit:
After 24 hrs drying / curing time, I applied the second layer of primer in two stages: a blocker coat (Mr. Surfacer 50% + MLT 50%), followed by a finishing coat (Mr. Surfacer 40% + MLT 60%) with 15 min flashing time in between:
Michael, now I can say my car's body looks as neat and smooth like yours! - well done there
I haven't decided yet if the copper undercoat it's going to be Alclad II or Rust-oleum; each one has advantages and disadvantages - perhaps Rust-oleum will be the choice, but I still have a minimum of 48 hrs to take a decision, time required for primer to properly cure and some 3000 grit sanding it's also in the play...
More updates in the making!
Cheers!
Gabriel
Joel_W
Joined: December 04, 2010
KitMaker: 11,666 posts
Auto Modeler: 2,974 posts
Posted: Thursday, November 22, 2018 - 03:09 AM UTC
Gabriel,
Sounds like you've got a process for primer that really works. I've been in the lazy man's school or a tack coat, wait 5 mins and then a few heavier coats. Rubbed out with Tamiya 3.000 sponge wet works for me.
I'm still trying to find uses for the 1,000, 1,200, 1.500, & 2,000 grits I bought as 3,000 is my go to still.
BTW, your pictures didn't show up.
Joel
Szmann
Joined: September 02, 2014
KitMaker: 1,977 posts
Auto Modeler: 1,371 posts
Posted: Thursday, November 22, 2018 - 12:28 PM UTC
Joel, sometimes my Google Photos it's playing a game I don't understand  It did happen before that my pics were not visible, whatever I tried to do. Anyhow, I re-linked them (sometimes works) in the previous post.
After Tamiya sanding sponges became available to my online supplier I seldom use anything but 2000 and 3000 grit for finishing jobs. Also by the local DYI store I find 220 grit sponge (very "sharp" bite it has this one) but the last one I use only when I need to sand to bare plastic. Completely occasionally I use 600 grit regular sandpaper (wet or dry) when I smooth out bare plastic after rough sanding with a nail file (mostly aircraft joining lines). I must have "somewhere" 800, 1000, 1200 and 1500 grit sandpaper sheets, but they are sidelined.
Correction: I did received the notifications from Kitmaker Network after all, but my mobile phone message box was crammed with junk and won't display the new messages - fixed.
UPDATE
I often use the wheels as lab rats in my auto builds, and this build is no exception:
Alclad II Copper sprayed over gloss black enamel. This is going to be the definitive color - it just needs a coat of 2K and a light wash to pick up the Porsche badge:

Cheers!
Gabriel
It did happen before that my pics were not visible, whatever I tried to do. Anyhow, I re-linked them (sometimes works) in the previous post.After Tamiya sanding sponges became available to my online supplier I seldom use anything but 2000 and 3000 grit for finishing jobs. Also by the local DYI store I find 220 grit sponge (very "sharp" bite it has this one) but the last one I use only when I need to sand to bare plastic. Completely occasionally I use 600 grit regular sandpaper (wet or dry) when I smooth out bare plastic after rough sanding with a nail file (mostly aircraft joining lines). I must have "somewhere" 800, 1000, 1200 and 1500 grit sandpaper sheets, but they are sidelined.
Correction: I did received the notifications from Kitmaker Network after all, but my mobile phone message box was crammed with junk and won't display the new messages - fixed.
UPDATE
I often use the wheels as lab rats in my auto builds, and this build is no exception:
Alclad II Copper sprayed over gloss black enamel. This is going to be the definitive color - it just needs a coat of 2K and a light wash to pick up the Porsche badge:
Cheers!
Gabriel
Joel_W
Joined: December 04, 2010
KitMaker: 11,666 posts
Auto Modeler: 2,974 posts
Posted: Friday, November 23, 2018 - 02:13 AM UTC
Quoted Text
Quoted Text
Gabriel,
The prep work on the body really paid off, as the black primer coat looks smooth and no mold lines that I can see.
At least one of us has gotten enough done for an update, as I'm mired in the engine detailing and hours of work just looks more like maybe 15 min at best.
Joel
Yes, as a joke I would say am 96% content with the result of the first step. My experience with aircraft builds and the "trick" with the black marker paid off and I have just small protruding dots above the front lights - easy to deal with.
Mr. Levelling Thinner, Mr. Surfacer 1500 and H&S are a happy threesome which I always join with full confidence in a decent result
The engine is going to be a challenge for me as well. It is very well detailed from the kit but still the real vehicle has some plumbing in the visible part that needs to be scratch-built. I'm not stepping yet into internal details, since I have on the bench a 72nd scale Airfix that I want it gone asap
Cheers!
Gabriel
Gabriel,
Sure sounds like you've got it all under control. I'm also trying to work through the most basic of engine details on the flat 6 cyl Porsche engine for my 956 build. Hopefully I'll finally finish enough to take a few more pictures, and post my 1st update. Usually I start with the shell, but this time I wanted to work on the basic engine/transmission, and then the cockpit which is 100% wrong! I have to keep on reminding myself that this kit was 1st released in 1986, and it's still the equal of the vast majority of kits currently being released.
As for posting my updates, as I said I'm going to use Torsten's method of just replying to my original post so there is some continuity throughout the build. The other option is what I've done before, is just to do a regular build thread in the car forum.
Joel
Szmann
Joined: September 02, 2014
KitMaker: 1,977 posts
Auto Modeler: 1,371 posts
Posted: Friday, November 23, 2018 - 10:19 AM UTC
Quoted Text
Usually I start with the shell, but this time I wanted to work on the basic engine/transmission, and then the cockpit which is 100% wrong! I have to keep on reminding myself that this kit was 1st released in 1986, and it's still the equal of the vast majority of kits currently being released.
I always start with the shell as well, because the drying time alone between coats makes it the most "expensive" one. My Porsche is going to have at least 6 coats of primer / paint / gloss - that's a whopping 2 weeks! On the other hand, I fill this time with a parallel build or with the detailing of the interior or with video editing for my YT channel. All good here!
Coincidentally, my Tamiya backdates in 1987 and it's par if not above in quality and detail with any AMT / MPC / Revell / Fujimi / Aoshima / Italeri up to date. The only better kit I ever worked on was another Tamiya!
You might post as you please, naturally, but if you open a separate build thread, you still need to update at some intervals the GB thread, even with less detailed explanations, just to keep the GB rolling - you perhaps have noted it already, we are only three active participants so far

Cheers!
Gabriel
Szmann
Joined: September 02, 2014
KitMaker: 1,977 posts
Auto Modeler: 1,371 posts
Posted: Friday, November 23, 2018 - 01:53 PM UTC
Hi, guys!
UPDATE
As per my initial thought, I have sprayed the body with Rust-oleum copper over the sanded primer (Tamiya sanding sponge 3000 grit, wet):

Expectedly, I've got some gritty surfaces, especially on the roof and one runner board but to be honest the result surpassed my initial expectations
I decided eventually to apply a 2K coat over copper instead of a second layer of metallic. It could be that I will need to patch up the metallic paint if my sanding will go all the way down to the primer
Next I will try and do the home printed carbon fiber decals...
Cheers!
Gabriel
UPDATE
As per my initial thought, I have sprayed the body with Rust-oleum copper over the sanded primer (Tamiya sanding sponge 3000 grit, wet):
Expectedly, I've got some gritty surfaces, especially on the roof and one runner board but to be honest the result surpassed my initial expectations
I decided eventually to apply a 2K coat over copper instead of a second layer of metallic. It could be that I will need to patch up the metallic paint if my sanding will go all the way down to the primer
Next I will try and do the home printed carbon fiber decals...
Cheers!
Gabriel
Joel_W
Joined: December 04, 2010
KitMaker: 11,666 posts
Auto Modeler: 2,974 posts
Posted: Saturday, November 24, 2018 - 02:13 AM UTC
Gabriel
The Copper coat looks pretty good to me. Just smooth it out some, then the 2K will work it's wonders.
Hope to get a little modeling done today as I'm staying home and not running to the hospital.
Joel
The Copper coat looks pretty good to me. Just smooth it out some, then the 2K will work it's wonders.
Hope to get a little modeling done today as I'm staying home and not running to the hospital.
Joel
Szmann
Joined: September 02, 2014
KitMaker: 1,977 posts
Auto Modeler: 1,371 posts
Posted: Saturday, November 24, 2018 - 04:20 AM UTC
Quoted Text
Gabriel
The Copper coat looks pretty good to me. Just smooth it out some, then the 2K will work it's wonders.
Hope to get a little modeling done today as I'm staying home and not running to the hospital.
Joel
Your heart condition it saddens me deeply, Joel and one can only admire your dedication to the hobby in given conditions. You gained all my respect, my friend!
I'm betting on 2K's self-leveling properties and hardness because, although the copper went on as good as it can be, it also became obvious that I will never get a glass-like surface. This is basically the tipping point of this build... let see in which side will fall

I'm trying to push myself to prime, copper, paint and decal the spoiler over the week-end... remains to see if is feasible.
Waiting for your updates!
Cheers!
Gabriel
Joel_W
Joined: December 04, 2010
KitMaker: 11,666 posts
Auto Modeler: 2,974 posts
Posted: Saturday, November 24, 2018 - 08:23 AM UTC
Quoted Text
Quoted TextGabriel
The Copper coat looks pretty good to me. Just smooth it out some, then the 2K will work it's wonders.
Hope to get a little modeling done today as I'm staying home and not running to the hospital.
Joel
Your heart condition it saddens me deeply, Joel and one can only admire your dedication to the hobby in given conditions. You gained all my respect, my friend!
I'm betting on 2K's self-leveling properties and hardness because, although the copper went on as good as it can be, it also became obvious that I will never get a glass-like surface. This is basically the tipping point of this build... let see in which side will fall
I'm trying to push myself to prime, copper, paint and decal the spoiler over the week-end... remains to see if is feasible.
Waiting for your updates!
Cheers!
Gabriel
Gabriel,
Thanks my friend for the support. but this time it's not me, it's my 95 year old Mother-n-law. She was taken to the hospital thanksgiving morning with liquid in both lungs, as well as round her heart. We spent the day at the hospital then came home, and didn't eat until 7:30. My wife went back in yesterday with my brother-n-law whose Special, and has been there the last two days. I'm holding down the "fort" here.
I just wrote my update and I hit the wrong key, and POOF!! no update. I almost always write it out in New Text, but naturally this time I didn't. So now I have to start all over again.
Don't worry about the clearcoat. 2k will give you that mile deep shine as it has before.
Joel
Joel
Szmann
Joined: September 02, 2014
KitMaker: 1,977 posts
Auto Modeler: 1,371 posts
Posted: Saturday, November 24, 2018 - 08:23 AM UTC
Hi, guys!
UPDATE - Copper vs. Copper
I sprayed the engine cover and the spoiler with Alclad II copper, in the same manner I sprayed the main body. The difference in hue is notable - but it doesn't bother me: I doubt it's going to make any difference on the final product. As a personal preference, I vote with the Rust-oleum: much cheaper and much closer to bare copper than Alclad. The only advantage of Alclad is that is easier to use and goes a little smoother... :

A gloss clear coat will follow, and then the carbon fiber decals on the spoiler and the main color on the body and engine hood.
Cheers!
Gabriel
UPDATE - Copper vs. Copper
I sprayed the engine cover and the spoiler with Alclad II copper, in the same manner I sprayed the main body. The difference in hue is notable - but it doesn't bother me: I doubt it's going to make any difference on the final product. As a personal preference, I vote with the Rust-oleum: much cheaper and much closer to bare copper than Alclad. The only advantage of Alclad is that is easier to use and goes a little smoother... :
A gloss clear coat will follow, and then the carbon fiber decals on the spoiler and the main color on the body and engine hood.
Cheers!
Gabriel
Joel_W
Joined: December 04, 2010
KitMaker: 11,666 posts
Auto Modeler: 2,974 posts
Posted: Saturday, November 24, 2018 - 09:58 AM UTC
Finally, I've gotten enough done for my 1st update on the tamiya Porsche 956.
Usually I start with the shell, but as with the Ferrari 330 P4 I decided to 1st concentrate on the Engine/Transmission/suspension/chassis/cockpit, and leave the shell for the end of the build.
While the kit comes with a nicely detailed engine/transmission, I've found some issues that seem somewhat strange to me, but once I realized that this kit was molded in 1984, things were certainly done differently back then, and I had to every once in a while remind myself of that fact.
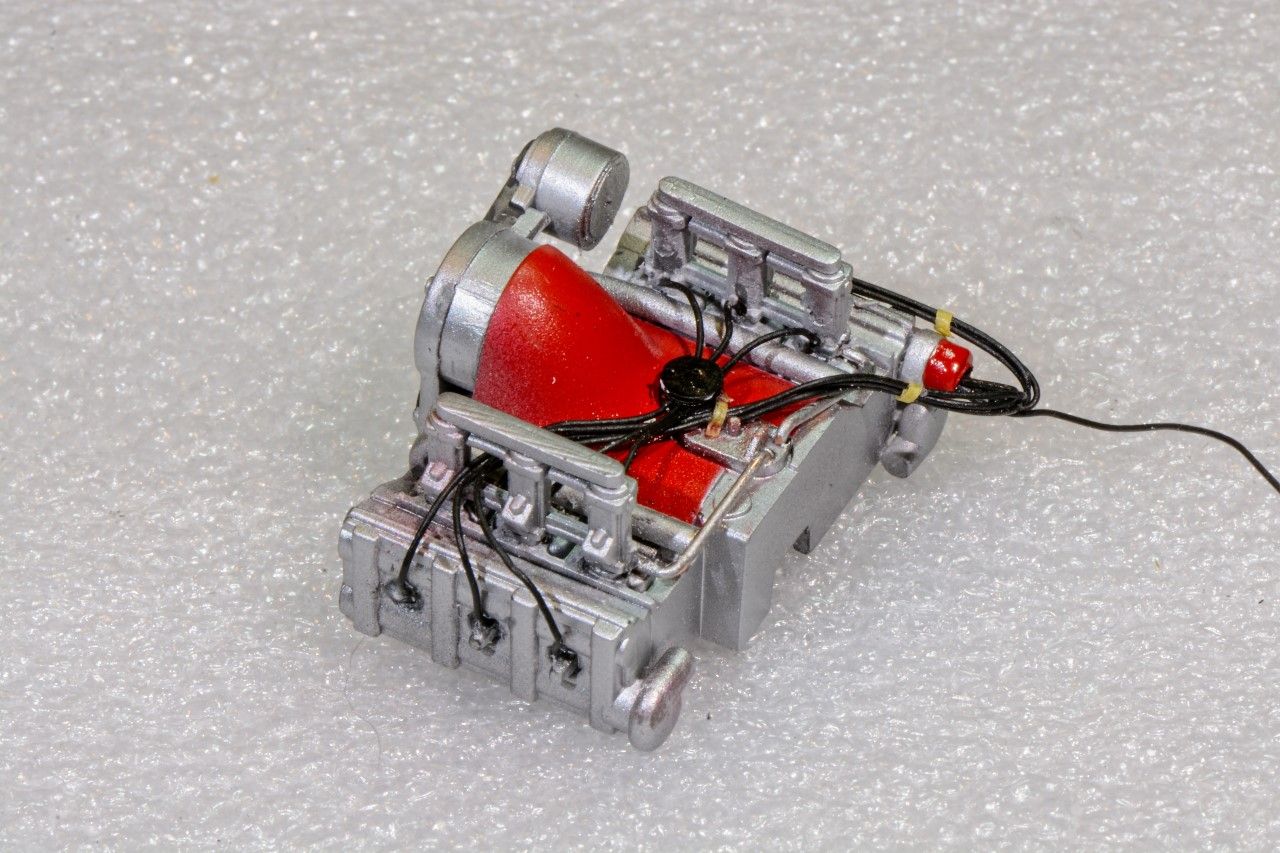
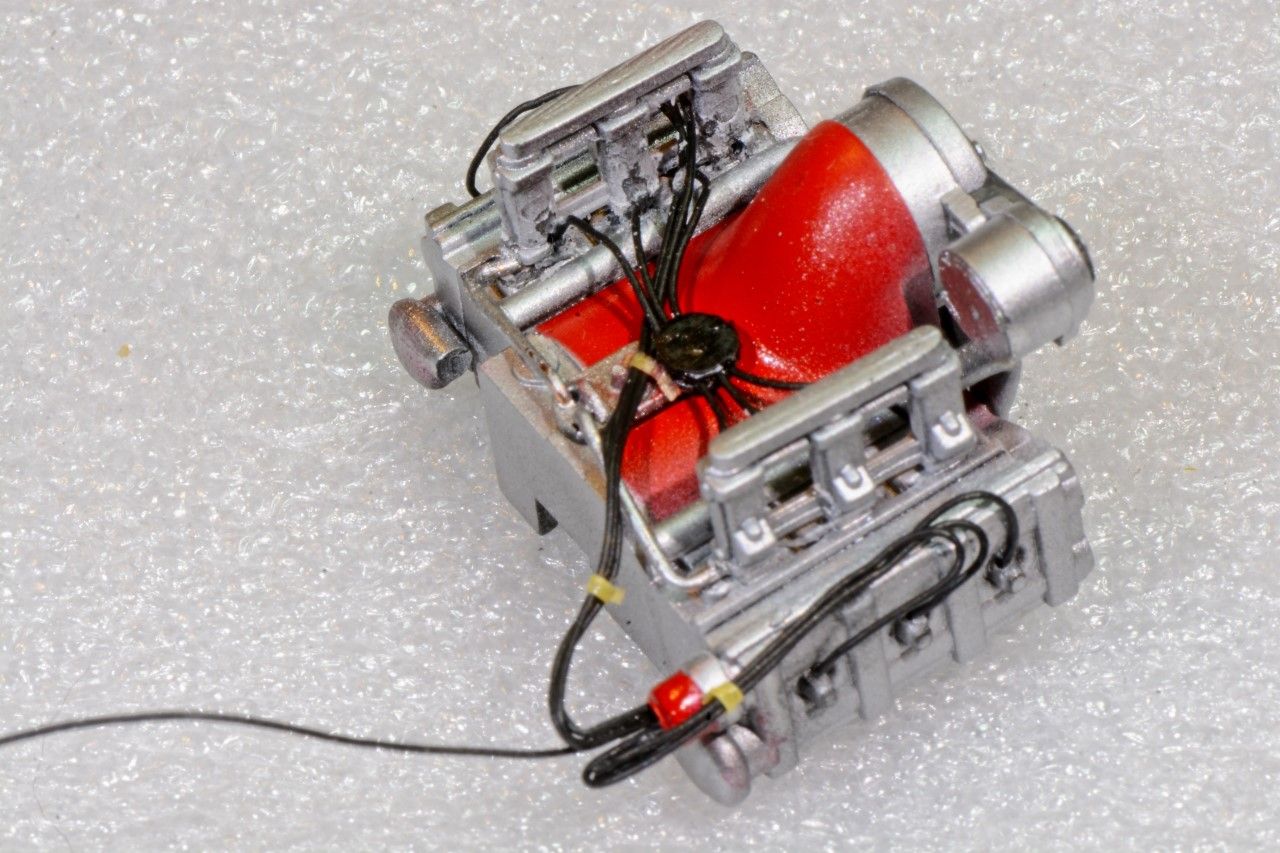
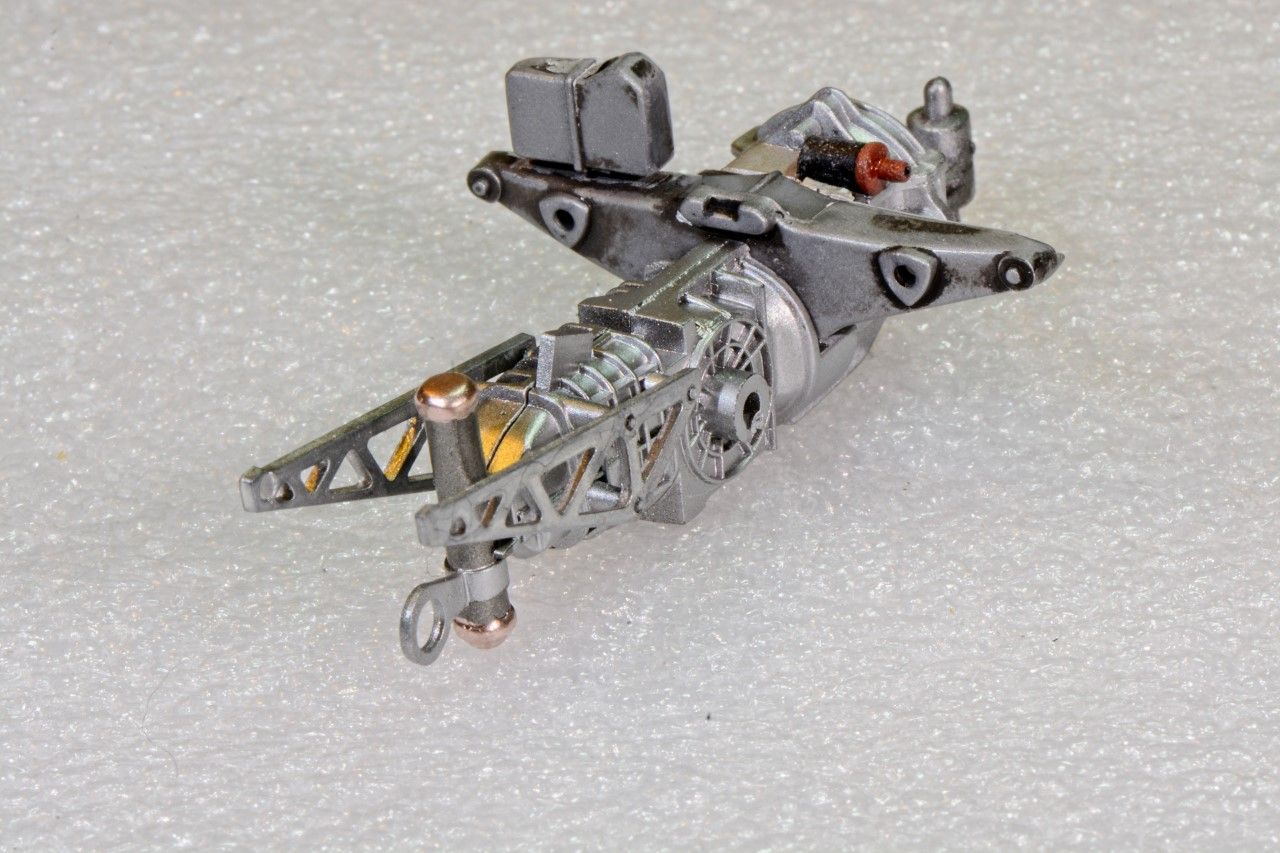
I started my build on Nov 9th with the Porsche twin turbo flat 6. It's the same engine that powered the 936 in the FIA class 6 enduracne races. The only change was with the addtion of a Bosch fuel injection metering system. I primed all the engine parts with Ammo Mig Black primer, then a few various shades of Alcad metalizers, with Flat Aluminum as the basic color. I followed this up with 1st masking off the top of the engine, and then air brusing it with Tamiya Gloss Red Acrylic paint.
I then drilled out the distributor cap and glued in 7 black wires, 6 for the sparks plugs. The 7th will be attached to the coil that is located on the front top of the gearbox. Next up I scratched out using round pieces of .020 sheet plastic the basic unit for the fuel injection lines, which in all my reference material are black, and ran them to the injectors. I added two alumiumin lines from the fuel enjection unit to the base of both injector banks. Finally I glued on two sheet plastic discs to close up the back of the Alternator. I couldn't find my Aluminum tape that I use for wire ties, so temp. I used some masking tape till I can get to my local hardware store. As you can see, they're already coming apart.
Now I built up the Transmission and painted it along with the main rear suspension arm Ammo Mig Black Primer, then various shades of Alcad. And yes, being lazy, I totally forgot to mask off the overflow catch tank.
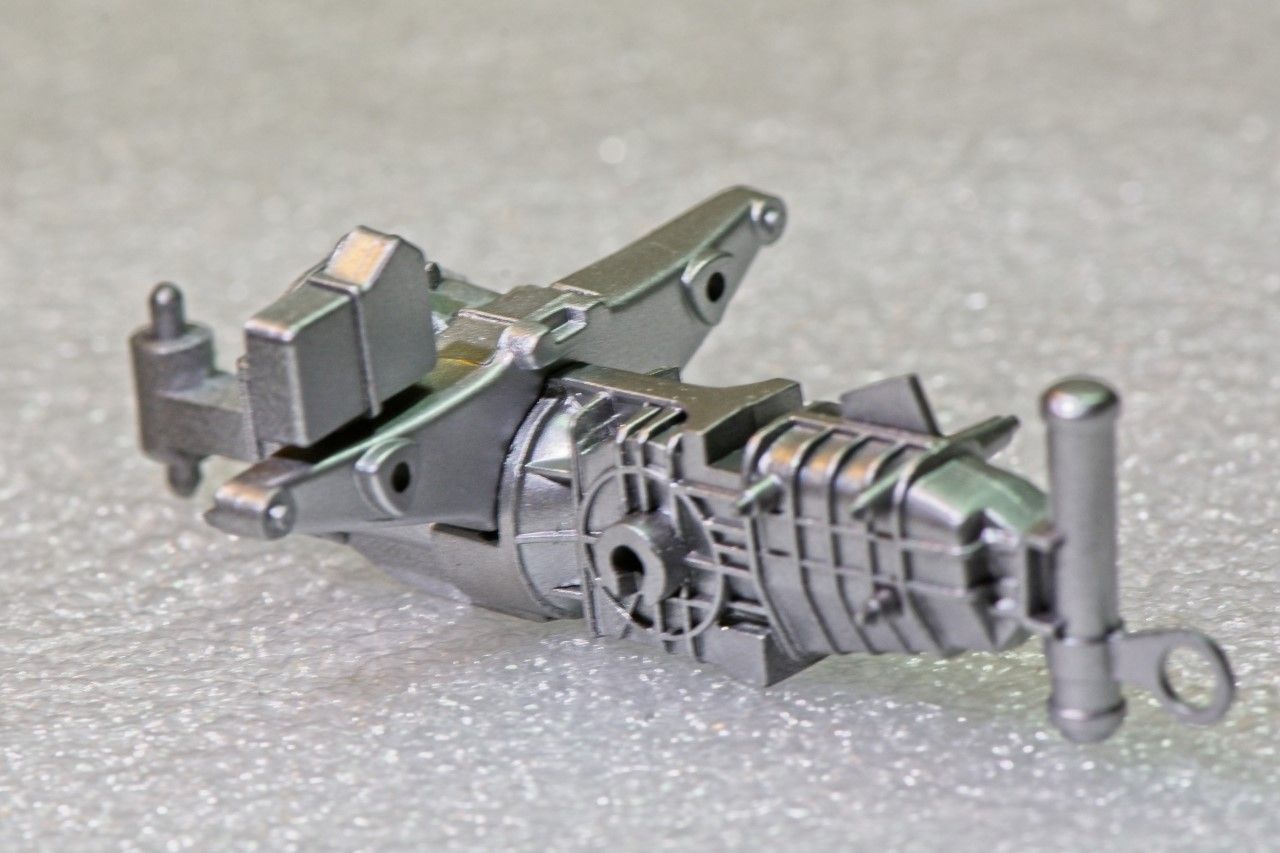
Everything looked pretty good till I turned it around. The back of that massive suspension arm was hollow!! 1st 1984 issue that I needed to deal with.
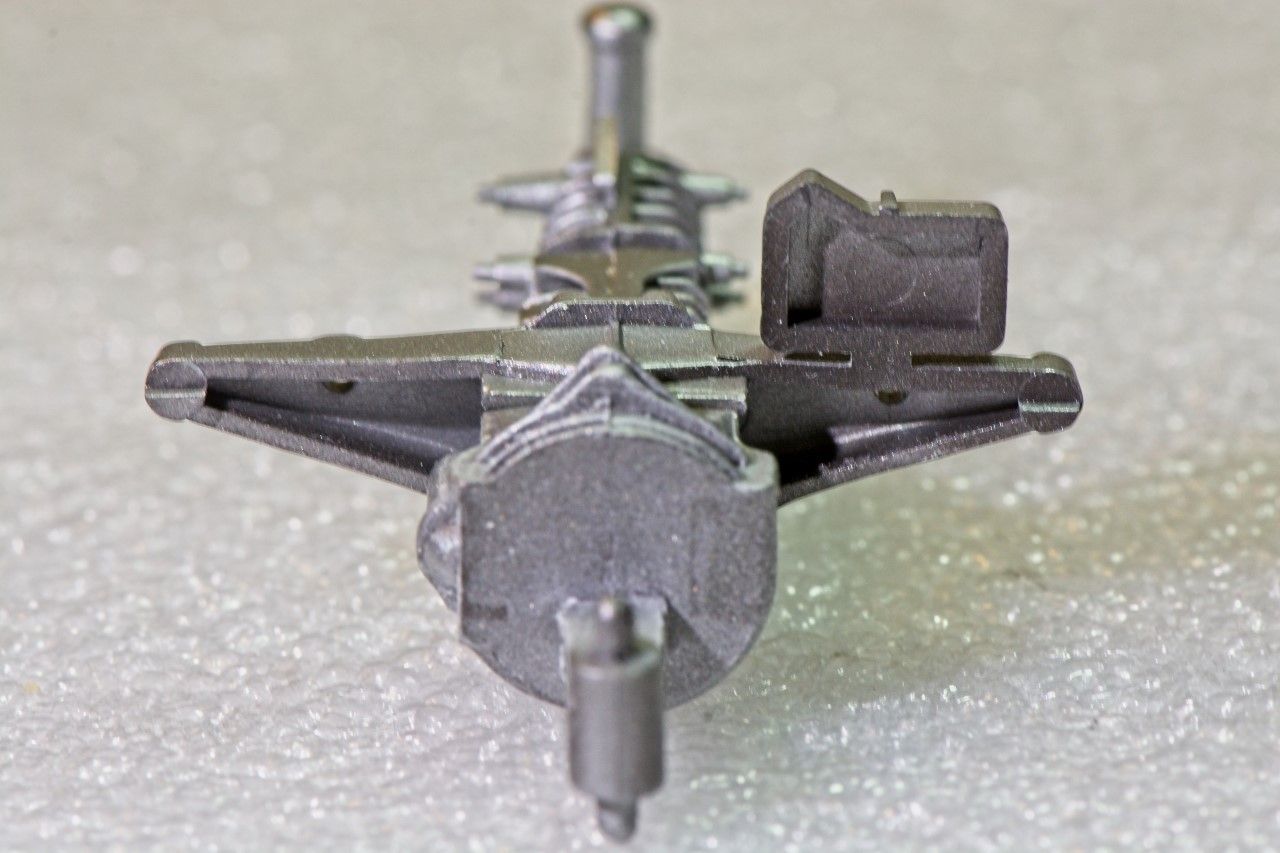
So I ended up stripping off all the Alcad and Primer, then using .020 sheet plastic, I covers all three sections.
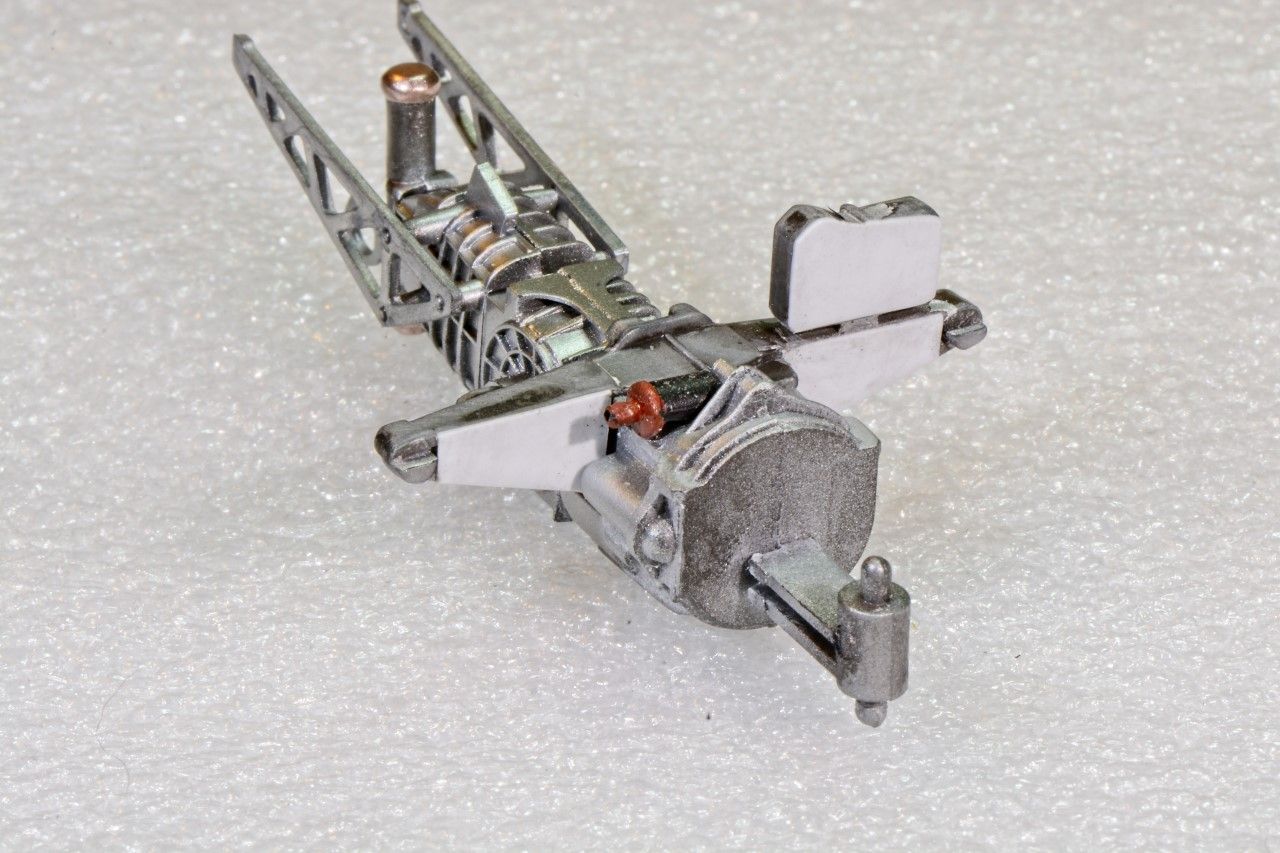
And yes, I still have to re-Alcad the suspension member, and paint the over flow tank.
I decided to test fit the enginer engine/transmission unit into the rear of the chassis just to make sure everything fit. And so far so good.
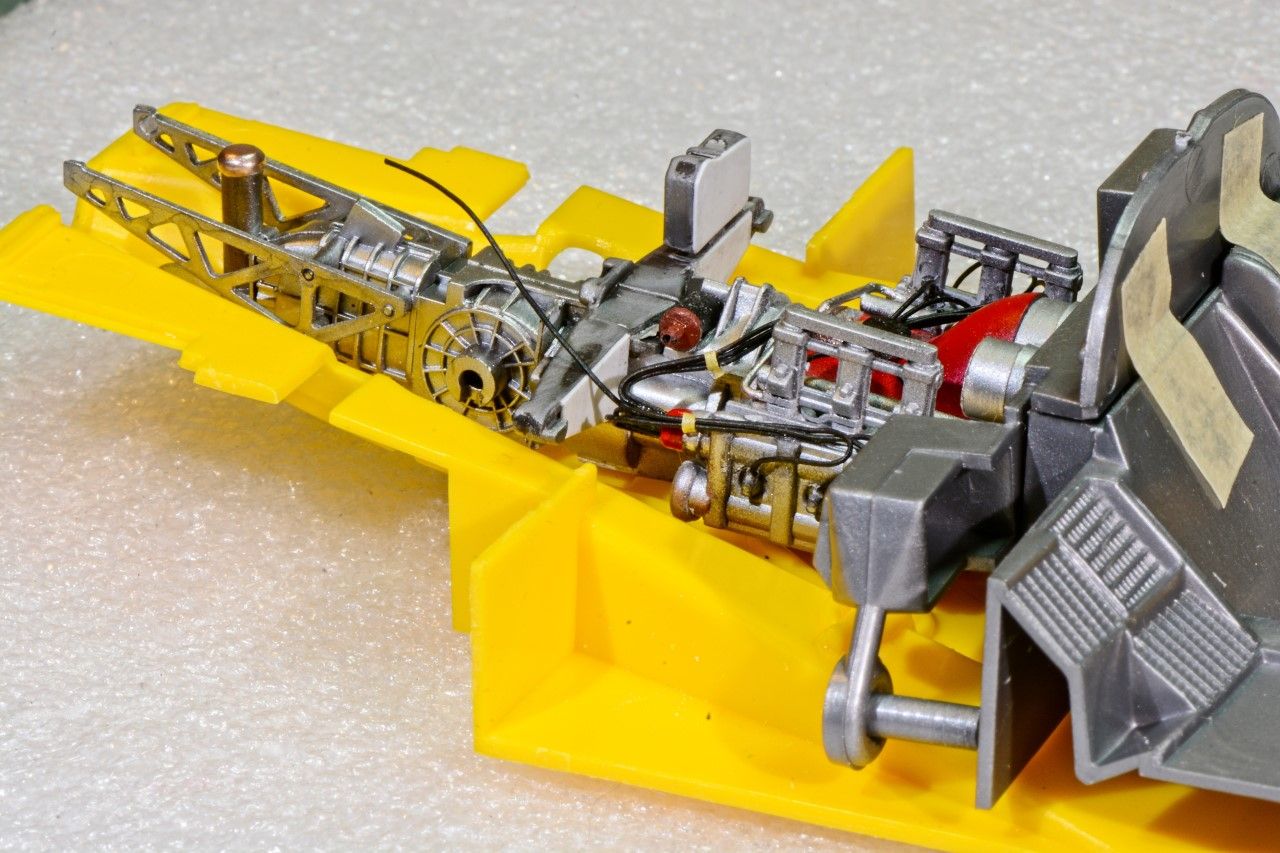
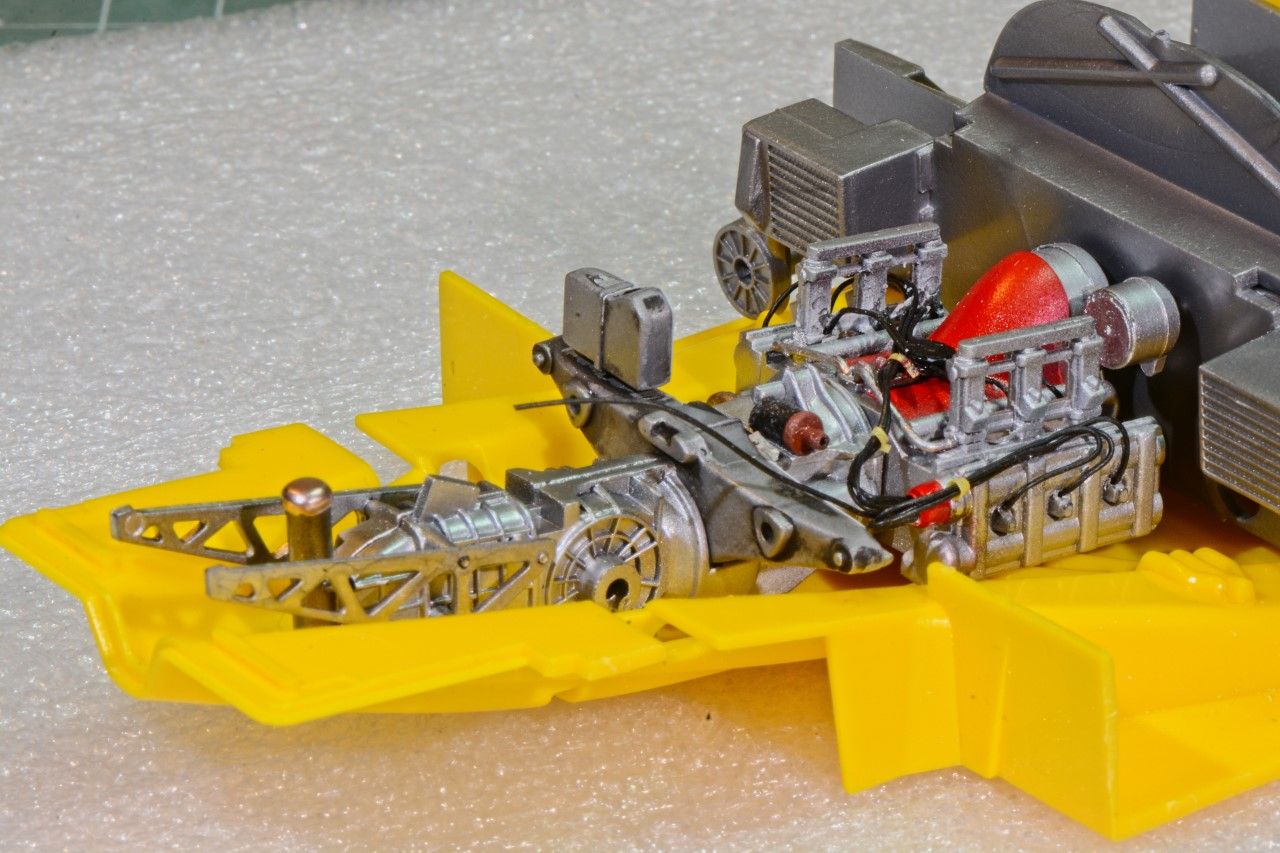
And this is as far as I've gotten to date.
Joel
Usually I start with the shell, but as with the Ferrari 330 P4 I decided to 1st concentrate on the Engine/Transmission/suspension/chassis/cockpit, and leave the shell for the end of the build.
While the kit comes with a nicely detailed engine/transmission, I've found some issues that seem somewhat strange to me, but once I realized that this kit was molded in 1984, things were certainly done differently back then, and I had to every once in a while remind myself of that fact.
I started my build on Nov 9th with the Porsche twin turbo flat 6. It's the same engine that powered the 936 in the FIA class 6 enduracne races. The only change was with the addtion of a Bosch fuel injection metering system. I primed all the engine parts with Ammo Mig Black primer, then a few various shades of Alcad metalizers, with Flat Aluminum as the basic color. I followed this up with 1st masking off the top of the engine, and then air brusing it with Tamiya Gloss Red Acrylic paint.
I then drilled out the distributor cap and glued in 7 black wires, 6 for the sparks plugs. The 7th will be attached to the coil that is located on the front top of the gearbox. Next up I scratched out using round pieces of .020 sheet plastic the basic unit for the fuel injection lines, which in all my reference material are black, and ran them to the injectors. I added two alumiumin lines from the fuel enjection unit to the base of both injector banks. Finally I glued on two sheet plastic discs to close up the back of the Alternator. I couldn't find my Aluminum tape that I use for wire ties, so temp. I used some masking tape till I can get to my local hardware store. As you can see, they're already coming apart.
Now I built up the Transmission and painted it along with the main rear suspension arm Ammo Mig Black Primer, then various shades of Alcad. And yes, being lazy, I totally forgot to mask off the overflow catch tank.
Everything looked pretty good till I turned it around. The back of that massive suspension arm was hollow!! 1st 1984 issue that I needed to deal with.
So I ended up stripping off all the Alcad and Primer, then using .020 sheet plastic, I covers all three sections.
And yes, I still have to re-Alcad the suspension member, and paint the over flow tank.
I decided to test fit the enginer engine/transmission unit into the rear of the chassis just to make sure everything fit. And so far so good.
And this is as far as I've gotten to date.
Joel
Cosimodo
#335
Joined: September 03, 2013
KitMaker: 1,808 posts
Auto Modeler: 701 posts
Posted: Saturday, November 24, 2018 - 01:38 PM UTC
Quoted Text
Hi, guys!
UPDATE - Copper vs. Copper
I sprayed the engine cover and the spoiler with Alclad II copper, in the same manner I sprayed the main body. The difference in hue is notable - but it doesn't bother me: I doubt it's going to make any difference on the final product. As a personal preference, I vote with the Rust-oleum: much cheaper and much closer to bare copper than Alclad. The only advantage of Alclad is that is easier to use and goes a little smoother... :
A gloss clear coat will follow, and then the carbon fiber decals on the spoiler and the main color on the body and engine hood.
Cheers!
Gabriel
Your copper looks fantastic Gabriel and I agree the Rust-oleum looks better than the Alclad. I have never seen a cooper car so this will be a first for me. The finish looks flawless.
cheers
Michael
Cosimodo
#335
Joined: September 03, 2013
KitMaker: 1,808 posts
Auto Modeler: 701 posts
Posted: Saturday, November 24, 2018 - 01:44 PM UTC
Quoted Text
Finally, I've gotten enough done for my 1st update on the tamiya Porsche 956.
Usually I start with the shell, but as with the Ferrari 330 P4 I decided to 1st concentrate on the Engine/Transmission/suspension/chassis/cockpit, and leave the shell for the end of the build.
While the kit comes with a nicely detailed engine/transmission, I've found some issues that seem somewhat strange to me, but once I realized that this kit was molded in 1984, things were certainly done differently back then, and I had to every once in a while remind myself of that fact.
I started my build on Nov 9th with the Porsche twin turbo flat 6. It's the same engine that powered the 936 in the FIA class 6 enduracne races. The only change was with the addtion of a Bosch fuel injection metering system. I primed all the engine parts with Ammo Mig Black primer, then a few various shades of Alcad metalizers, with Flat Aluminum as the basic color. I followed this up with 1st masking off the top of the engine, and then air brusing it with Tamiya Gloss Red Acrylic paint.
I then drilled out the distributor cap and glued in 7 black wires, 6 for the sparks plugs. The 7th will be attached to the coil that is located on the front top of the gearbox. Next up I scratched out using round pieces of .020 sheet plastic the basic unit for the fuel injection lines, which in all my reference material are black, and ran them to the injectors. I added two alumiumin lines from the fuel enjection unit to the base of both injector banks. Finally I glued on two sheet plastic discs to close up the back of the Alternator. I couldn't find my Aluminum tape that I use for wire ties, so temp. I used some masking tape till I can get to my local hardware store. As you can see, they're already coming apart.
Now I built up the Transmission and painted it along with the main rear suspension arm Ammo Mig Black Primer, then various shades of Alcad. And yes, being lazy, I totally forgot to mask off the overflow catch tank.
Everything looked pretty good till I turned it around. The back of that massive suspension arm was hollow!! 1st 1984 issue that I needed to deal with.
So I ended up stripping off all the Alcad and Primer, then using .020 sheet plastic, I covers all three sections.
And yes, I still have to re-Alcad the suspension member, and paint the over flow tank.
I decided to test fit the enginer engine/transmission unit into the rear of the chassis just to make sure everything fit. And so far so good.
And this is as far as I've gotten to date.
Joel
Very impressed with your engine building skills...again, Joel. Also impressed that Tamiya included an engine in the kit. I just have the one piece moulded base with some suspension arms. I guess that's the difference between a 70's kit and a 80's one

cheers
Michael
Cosimodo
#335
Joined: September 03, 2013
KitMaker: 1,808 posts
Auto Modeler: 701 posts
Posted: Saturday, November 24, 2018 - 01:55 PM UTC
Well the 934 Turbo has made some progress and I learned a lot about painting cars.
Being pretty happy with my primer coat I gave it a sand with the 3000 paper and applied the Vaillant Green in the suggested manner. It went on very well and looked pretty good from first impressions. But after a closer inspection, what I though was a smooth primed surface was not so in certain places especially around the bonnet and front guards. The bonnet has moulded on filler caps and a had been a bit wary of sanding them to closely to avoid damaging the detail. It was quite clear that areas around were much smoother. I took some photos but seem to have lost them somehow.
Anyway I re-sanded the Bonnet with 3000 paper and while it is improved still could have been better. Stored away for next time.
So with the green applied I have added the other colours.
Orange/yellow for the splitter and matt black for the window seals, frames and bumpers. The orange/yellow needs some smoothing then it will be on to the decals.


cheers
Michael
Being pretty happy with my primer coat I gave it a sand with the 3000 paper and applied the Vaillant Green in the suggested manner. It went on very well and looked pretty good from first impressions. But after a closer inspection, what I though was a smooth primed surface was not so in certain places especially around the bonnet and front guards. The bonnet has moulded on filler caps and a had been a bit wary of sanding them to closely to avoid damaging the detail. It was quite clear that areas around were much smoother. I took some photos but seem to have lost them somehow.
Anyway I re-sanded the Bonnet with 3000 paper and while it is improved still could have been better. Stored away for next time.
So with the green applied I have added the other colours.
Orange/yellow for the splitter and matt black for the window seals, frames and bumpers. The orange/yellow needs some smoothing then it will be on to the decals.
cheers
Michael
Szmann
Joined: September 02, 2014
KitMaker: 1,977 posts
Auto Modeler: 1,371 posts
Posted: Saturday, November 24, 2018 - 06:06 PM UTC
Joel, 95 years old is a venerable age! I wish her well!
Your aircraft building skills had found perfect application in auto modeling. I wish and I hope one day I will match your skills! I also need to learn some patience from you; perhaps I would never have turned back to seal the open transmission. Well, congratulations! the motor unit looks gorgeous and "alive" with all that wiring and good painting!
Michael, painting cars is a skill that requires much practice and patience. For a first try, I find you effort excellent. As a beginner (I still am a beginner, actually) I often did the mistake to believe that the following coat will cover the errors in the previous one! Alas, is quite the opposite! The orange peel and grits just grow and grow! I've learnt rather painfully that every single coat has to be treated as a final coat
The color inserts look good, especially the trim around the windows - another challenging point in auto modeling. You're doing mightily fine so far and the green color is definitely a winner!
UPDATE
Life will be boring without drama, right?
I changed my heart in the last moment and decided to use polyurethane clear instead of 2K, thinking its amber tone will complement excellently the copper. I tried first on the rims and it worked a threat! I moved to the engine cover and spoiler and here the things took a completely different turn. The clear coat started making bubbles and set unevenly. I recognized immediately the symptom: too little thinner. I tried to save it in the last moment, applying a heavily thinned coat, but It started running... Too bad for me: in the areas where the clear went good, the shine was just amazing! I threw the parts in my ultrasound cleaner for stripping, using enamel thinner as cleaning agent. The spoiler went clean right away but the engine cover didn't clean properly not even after the third 360 seconds cycle and the thinner began to etch the plastic surface:

I start restoring the parts and everything works fine (I guess)
The body had to suffer less of an ordeal in my hands: just some light sanding to eliminate the orange peel or grit deposits. Only now I can claim the body is silky smooth:

Once dry, the body will receive a patching paint job and a 2K clear coat, as per initial plan.
Cheers!
Gabriel
Your aircraft building skills had found perfect application in auto modeling. I wish and I hope one day I will match your skills! I also need to learn some patience from you; perhaps I would never have turned back to seal the open transmission. Well, congratulations! the motor unit looks gorgeous and "alive" with all that wiring and good painting!
Michael, painting cars is a skill that requires much practice and patience. For a first try, I find you effort excellent. As a beginner (I still am a beginner, actually) I often did the mistake to believe that the following coat will cover the errors in the previous one! Alas, is quite the opposite! The orange peel and grits just grow and grow! I've learnt rather painfully that every single coat has to be treated as a final coat
The color inserts look good, especially the trim around the windows - another challenging point in auto modeling. You're doing mightily fine so far and the green color is definitely a winner!
UPDATE
Life will be boring without drama, right?
I changed my heart in the last moment and decided to use polyurethane clear instead of 2K, thinking its amber tone will complement excellently the copper. I tried first on the rims and it worked a threat! I moved to the engine cover and spoiler and here the things took a completely different turn. The clear coat started making bubbles and set unevenly. I recognized immediately the symptom: too little thinner. I tried to save it in the last moment, applying a heavily thinned coat, but It started running... Too bad for me: in the areas where the clear went good, the shine was just amazing! I threw the parts in my ultrasound cleaner for stripping, using enamel thinner as cleaning agent. The spoiler went clean right away but the engine cover didn't clean properly not even after the third 360 seconds cycle and the thinner began to etch the plastic surface:
I start restoring the parts and everything works fine (I guess)
The body had to suffer less of an ordeal in my hands: just some light sanding to eliminate the orange peel or grit deposits. Only now I can claim the body is silky smooth:
Once dry, the body will receive a patching paint job and a 2K clear coat, as per initial plan.
Cheers!
Gabriel
Joel_W
Joined: December 04, 2010
KitMaker: 11,666 posts
Auto Modeler: 2,974 posts
Posted: Sunday, November 25, 2018 - 02:07 AM UTC
Quoted Text
Very impressed with your engine building skills...again, Joel. Also impressed that Tamiya included an engine in the kit. I just have the one piece moulded base with some suspension arms. I guess that's the difference between a 70's kit and a 80's one
cheers
Michael
Michael,
Thanks so much for those most kind words, They're much appreciated.
As for the detailed engine/transmission compartment that Tamiya included, it's the main reason I went with this kit. Unfortunately these days, almost all the closed wheel racing & Sports cars have at best just a bottom of the engine/transmission, and a over simplified suspension. This does keep the price down, and makes for a perfectly acceptable display model. But there are those modelers like myself that would prefer to model the whole car to at least some degree.
I've looked at both the Tamiya & Hasegawa Porsche 962 C, and they're basically just curbside models. The Hasegawa kit doesn't even make a half hearted attempt at a basic suspension.
The vast majority of new and current closed wheel kits are exactly the same.
Joel
Joel_W
Joined: December 04, 2010
KitMaker: 11,666 posts
Auto Modeler: 2,974 posts
Posted: Sunday, November 25, 2018 - 02:20 AM UTC
Quoted Text
Well the 934 Turbo has made some progress and I learned a lot about painting cars.
Being pretty happy with my primer coat I gave it a sand with the 3000 paper and applied the Vaillant Green in the suggested manner. It went on very well and looked pretty good from first impressions. But after a closer inspection, what I though was a smooth primed surface was not so in certain places especially around the bonnet and front guards. The bonnet has moulded on filler caps and a had been a bit wary of sanding them to closely to avoid damaging the detail. It was quite clear that areas around were much smoother. I took some photos but seem to have lost them somehow.
Anyway I re-sanded the Bonnet with 3000 paper and while it is improved still could have been better. Stored away for next time.
So with the green applied I have added the other colours.
Orange/yellow for the splitter and matt black for the window seals, frames and bumpers. The orange/yellow needs some smoothing then it will be on to the decals.
cheers
Michael
Michael,
I've gotta say that from what I can see on my monitor, the painted shell looks great.
I've had issues with every shell I've painted to date, so re-wet sanding with 3,000 has become just part of the procedure for me. But each shell seems to be better then the last one. Air turbulence in concave areas as well as in all sorts of angled bends are where I still have issues. I'm learning that the final few wet coats really works wonders in those areas, as well as air brushing at as close to 90 degrees as possible. Also never stop your pass for those critical areas, just more passes to evenly build up paint.
As for the paints, I've found that the lacquer based paints, from the big 3: Gravity, Zero, & MCW are super thin. Much thinner then when I was mixing my own colors at the beginning of my auto journey. How I painted Aircraft just doesn't work for auto shells.
Joel
Joel_W
Joined: December 04, 2010
KitMaker: 11,666 posts
Auto Modeler: 2,974 posts
Posted: Sunday, November 25, 2018 - 02:34 AM UTC
"Joel, 95 years old is a venerable age! I wish her well!
Your aircraft building skills had found perfect application in auto modeling. I wish and I hope one day I will match your skills! I also need to learn some patience from you; perhaps I would never have turned back to seal the open transmission. Well, congratulations! the motor unit looks gorgeous and "alive" with all that wiring and good painting!"
Gabriel,
Thanks so much for your thumbs up. I keep on telling you that your skills are more then equal to mine, and that includes air brushing. I'm not so sure after following your bike build, that you'd have left all those open backs either.
Joel
 |

WEB HOSTING BY


Copyright ©2021 Auto Modeler and Kitmaker Network, a subsidiary of Silver Star Enterprises
All Rights Reserved. Please read our Conditions of Use and Privacy Policy.
All Rights Reserved. Please read our Conditions of Use and Privacy Policy.