Trucks
Scale truck modeling topics.
How about another Keep On Truckin gig?
Dragon164
#226
_VISITCOMMUNITY
British Columbia, Canada
Joined: February 20, 2012
KitMaker: 1,909 posts
Auto Modeler: 118 posts
Posted: Monday, March 12, 2018 - 11:19 PM UTC
I am going to try something new with the chrome parts.

Cheers Rob.
noddy927
_VISITCOMMUNITY
Scotland, United Kingdom
Joined: February 15, 2013
KitMaker: 1,273 posts
Auto Modeler: 207 posts
Posted: Tuesday, March 13, 2018 - 05:49 PM UTC
Look forward to that Rob
Szmann
_VISITCOMMUNITY
Netherlands Antilles
Joined: September 02, 2014
KitMaker: 1,977 posts
Auto Modeler: 1,371 posts
Posted: Thursday, March 15, 2018 - 02:38 AM UTC
Nice work, guys! I'm still busy with my two advanced builds. Maybe this week-end...

Michael, nice "vintage" chassis arrangement. I may "borrow" the look for my build...

Cheers!
Gabriel
Cosimodo
#335
_VISITCOMMUNITY
Auckland, New Zealand
Joined: September 03, 2013
KitMaker: 1,808 posts
Auto Modeler: 701 posts
Posted: Tuesday, March 20, 2018 - 02:27 PM UTC
Hi Gabriel, help yourself to the vintage look. It something I am trying on the cab next.

I have painted the cab gloss white though my camera seems to say otherwise but take my word for it. Inside behind the masking it is painted royal blue, a stock Peterbilt colour which should match the blue and orange colour scheme.


Now this re-pop of a 70's classic has not been without its issues and one of them is the decals. They are fairly solid and the features of this model are very well defined:

that I just can't see me getting the decals to settle over these hinges and rivets. So I decided I would mask it up and paint my own stripes.
I copied the decals onto a Tamiya masking sheet using a photo copier and then cut out what I would need.

It will still take some effort to get the masking tape flat and keep the bleeding to a minimum but I'll give a go on the weekend.


cheers
Michael

Szmann
_VISITCOMMUNITY
Netherlands Antilles
Joined: September 02, 2014
KitMaker: 1,977 posts
Auto Modeler: 1,371 posts
Posted: Tuesday, March 20, 2018 - 05:49 PM UTC
Hi, Michael! Nice! It looks undeed we're goi g ro have parallel ways in this build. I'm laying now plans for my cab painting scheme, while the chrome is soaking in Clorox. I have the same problem with the light colors in the camera - so I do believe you.

KUTGW!

Gabriel
Szmann
_VISITCOMMUNITY
Netherlands Antilles
Joined: September 02, 2014
KitMaker: 1,977 posts
Auto Modeler: 1,371 posts
Posted: Thursday, March 22, 2018 - 12:57 AM UTC
Hi, guys!

I managed eventually to clear my desk and to write all due reviews - with some two weeks delay. The main reason why I didn't want a parallel build it was that I knew the MPC kit isn't going to be easy, and I was right. Let alone the instructions which are in many places a divination book, the kit has its faults (and I have mine - for sure).

I wanted to start with the engine, but the chromed parts weren't quite ready


and needed more soaking time in oven cleaner.

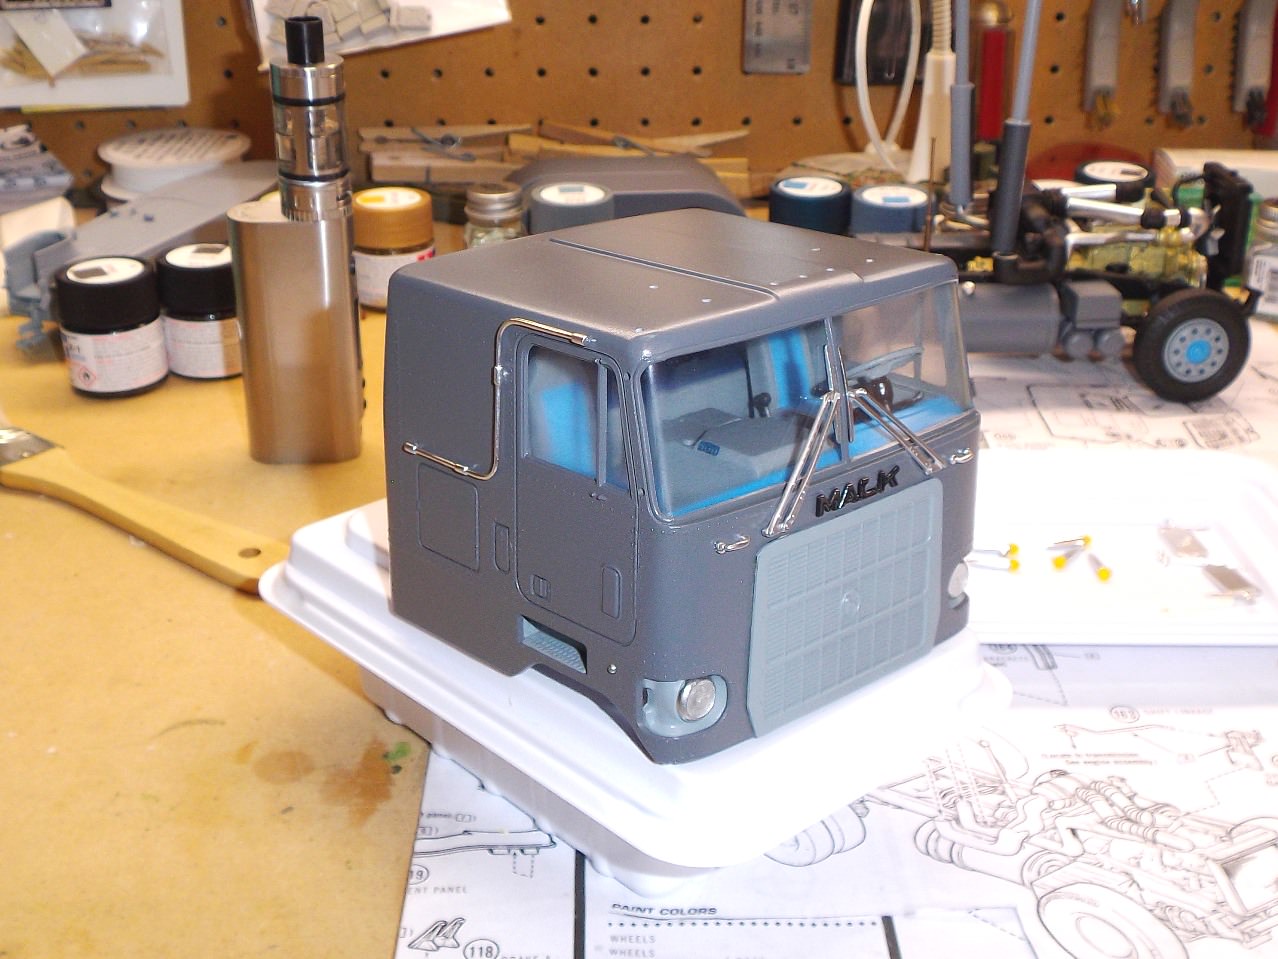
I started with the cab and hood preparation instead


There was a parting line around the cab like an aura; a sink mark on the right fender, seem lines at the front corners of the cab and so on... I scraped so much plastic from the cab alone that I could have mold the trailer out of it!

The detail on the firewall was useless and I erased as much I could without damaging the surroundings, making space for some scratch-building (I hope I know what I'm doing!)


This part was broken from the box and I glue it back but I'm not sure yet it's still usable or needs replacement:


Those huge pin marks inside the cab I have no idea how to deal with without making more harm than good. They won't be too visible, but they are annoying:


I had to re-scribe the door lines because the detail was too superficial and so I added a nice scratch to the build which I had to patch it - you may have noted already the green splash on the driver's door.

All those are minor hassles, of course, but time consuming and I started already late.

Question: This model comes with a Mack ENDT 673 engine which is supposedly "gold leaf" color. But I've seen a documentary in which the factory color is "Mack Red" - for newer models, not for DM600, and if I search online for images with the type, most of ENDT 673 appear gray! I know I can paint it turquoise if I want, but I prefer to remain in within the common sense rules. Any suggestions? (I hate gold leaf! )

Thank you!
Gabriel
noddy927
_VISITCOMMUNITY
Scotland, United Kingdom
Joined: February 15, 2013
KitMaker: 1,273 posts
Auto Modeler: 207 posts
Posted: Thursday, March 22, 2018 - 03:59 AM UTC
Redone the ladder on the back. Used a finer wire, I think it looks better. All work done on rig, I have made a small base I am just in the process of weathering. A clear green Will be applied to represent the decking fluid.
20180319_221247
20180319_204944
20180319_204746
20180319_204920
20180319_204713
20180319_204725

Pete
Cosimodo
#335
_VISITCOMMUNITY
Auckland, New Zealand
Joined: September 03, 2013
KitMaker: 1,808 posts
Auto Modeler: 701 posts
Posted: Thursday, March 22, 2018 - 04:00 AM UTC
Hi Gabriel,
Looks like you have some challenges there. On your chrome I followed Richard's oven cleaner methodology but I think they must sell much stronger stuff in the UK but it took me at three sprays for each sprue and left for several hours each time.
I had the same pin marks in the Peterbilt and just decided in the end to leave them. They won't be seen unless you turn the truck upside down.

Pete,
Your build looks amazing!. The finer wire on the ladder does look better and the overall effect of your scratch building is excellent.

cheers
Michael
jimb
_VISITCOMMUNITY
New York, United States
Joined: August 25, 2006
KitMaker: 2,539 posts
Auto Modeler: 1,405 posts
Posted: Thursday, March 22, 2018 - 07:40 AM UTC
Nice start on the Mack, Gabriel. Yes, the Mack ENDT 673 Maxidine engine & Mack Maxitorque transmission that come in the DM607SX kit would both be Gold Leaf (Tamiya Gold Leaf X12 is a good match). Also, because the engine & transmission are both Mack products, the bulldog on the hood would be gold as well.

Excellent work on the IVECO, Peter.

Jim
noddy927
_VISITCOMMUNITY
Scotland, United Kingdom
Joined: February 15, 2013
KitMaker: 1,273 posts
Auto Modeler: 207 posts
Posted: Thursday, March 22, 2018 - 04:58 PM UTC
Thanks for the comments

Pete
noddy927
_VISITCOMMUNITY
Scotland, United Kingdom
Joined: February 15, 2013
KitMaker: 1,273 posts
Auto Modeler: 207 posts
Posted: Thursday, March 22, 2018 - 05:02 PM UTC
Gabriel the oven cleaner can take a while to strip the chrome off, it's getting a good balance too long and it will distort the parts.
Michael good choice on the masking option, you can pull it off. It will look more realistic.

Pete
TacFireGuru
_VISITCOMMUNITY
Colorado, United States
Joined: December 25, 2004
KitMaker: 3,770 posts
Auto Modeler: 359 posts
Posted: Thursday, March 22, 2018 - 10:55 PM UTC
For what it's worth, I used to use the oven cleaner method which worked pretty well. Then I was introduced to Purple Power. Here in the States, I can get it at Wal-Mart. Not sure about overseas. Works great, and quick. This may be something for you all to check out.

Mike
TacFireGuru
_VISITCOMMUNITY
Colorado, United States
Joined: December 25, 2004
KitMaker: 3,770 posts
Auto Modeler: 359 posts
Posted: Thursday, March 22, 2018 - 11:00 PM UTC
I've started to add the bits and pieces to the cab. So far, so good. Not looking forward to trying to attach the cab to the frame though...looks to be a PITA.


In the background, you may be able to see the exhaust stacks...they're not attached yet, but I did paint the shields a Metallic Black to match the frame.

Mike
TacFireGuru
_VISITCOMMUNITY
Colorado, United States
Joined: December 25, 2004
KitMaker: 3,770 posts
Auto Modeler: 359 posts
Posted: Thursday, March 22, 2018 - 11:14 PM UTC
Peter, your de-icer really is looking good. Scratching ladders is NOT as easy as it looks...not at all!

Rob, nothing quite like a nice black frame.

Michael, I do like those colors. Almost Colorado Bronco's.

James, I've been the recipient of your knowledge and I really appreciate it as I'm sure the others do too. Thank you!

Mikw
Szmann
_VISITCOMMUNITY
Netherlands Antilles
Joined: September 02, 2014
KitMaker: 1,977 posts
Auto Modeler: 1,371 posts
Posted: Thursday, March 22, 2018 - 11:25 PM UTC
Hi, guys! Thank you for advice and support.

Michael the de-chroming worked fine after the second soaking. There are still patches here and there but I've noted they are on the uneven surfaces, and works as leveler . Some 1000 grit scuffing will do the job. As for the pins - yeah! - I think is wiser to let them alone...

Pete, nice work on the Iveco and yes! the back ladder looks spot-on.

Jim you're right about the engine. On DM600 even the clutch is Mack and all is factory standard gold leaf. The bulldog has to be gold, indeed! The ones I've seen gray are rebuilt engines, I figured out afterwards.

UPDATE

While my chrome-less now parts were drying I continued with the cab. What used to be before an armored vision port from a 1/35 armored car is now "Mack electric box" The "connectors" are stretched tube and the "wires" are stretched sprue. I'm not an electrician and maybe couple of wires are in short, but I didn't put the battery yet


That was the sink I was talking about, now level:


The broken window frame wasn't good after all and replaced it with a strip cut from the mud flaps because I'm going to make "custom" ones (I like trouble, as you can see). Also here you can see the scratch I put on the door wasn't an "amateur"'s feat


If all good, I'll start the engine tonight. My boss just smashed my week-end dreams and I have to work Saturday and Sunday. Well, it's good for the future of my stash at least

Cheers, guys!
More updates soon
jimb
_VISITCOMMUNITY
New York, United States
Joined: August 25, 2006
KitMaker: 2,539 posts
Auto Modeler: 1,405 posts
Posted: Thursday, March 22, 2018 - 11:33 PM UTC
Nice job on the firewall, Gabriel.

Jim
Szmann
_VISITCOMMUNITY
Netherlands Antilles
Joined: September 02, 2014
KitMaker: 1,977 posts
Auto Modeler: 1,371 posts
Posted: Saturday, March 24, 2018 - 10:11 PM UTC
Jim, thanks! We should "blame" Jesper for that - he shown me the trick a while ago. He uses fine wires but I figured out that stretched sprue is ready available on all gauges

UPDATE

I started working on the engine. It looks impressive, has to be said, but it must be treated as a short run aircraft model. I didn't find yet two parts in this kit that fit good without sanding, scraping or re-shaping I'm still optimistic; 200 more parts to go. Here you can see the seam line I have to putty and the ejector pins on the manifold that had become obvious after priming:


Here I commenced painting the sub-assemblies (fan belt thinned, details drilled... so on) which I'm going to attach after I seal the leaking oil pan


The result it's going to be impressive - that's for sure - but I'm not convinced it deserves all that work (?). I think I've done a mistake when I chose this MPC before Moebius' Prostar

But I wanted a classic and I got one

Cheers, guys!
More updates soon
Gabriel
Dragon164
#226
_VISITCOMMUNITY
British Columbia, Canada
Joined: February 20, 2012
KitMaker: 1,909 posts
Auto Modeler: 118 posts
Posted: Sunday, March 25, 2018 - 03:09 AM UTC
Nice work so far Guys!

Here is how I like to do my tires.


And this is how I am dealing with the chrome in the kit, I am just cleaning up the parts and touching up the seams.


Cheers Rob.
TacFireGuru
_VISITCOMMUNITY
Colorado, United States
Joined: December 25, 2004
KitMaker: 3,770 posts
Auto Modeler: 359 posts
Posted: Sunday, March 25, 2018 - 03:11 AM UTC
Backer rod. I'll be danged!

Mike
AussieReg
Staff MemberAssociate Editor
AUTOMODELER
#007
_VISITCOMMUNITY
Victoria, Australia
Joined: June 09, 2009
KitMaker: 8,156 posts
Auto Modeler: 2,953 posts
Posted: Sunday, March 25, 2018 - 03:32 PM UTC
About time I put up some progress here, you guys are trucking along beautifully!

I have repainted most of the exterior and sub assemblies in Tamiya Red Brown acrylic to give a rust base for chipping. I also started on the cabin interior which won't get much work put into it due to the plan for the windows to be quite dirty. I gave the fabric parts a quick burnt umber oil wash over Tamiya Deck Tan acrylic, and will do a bit more blending to tone it down. I will also give the dash a pin wash and some grunge, then close it up.


Cheers, D
Szmann
_VISITCOMMUNITY
Netherlands Antilles
Joined: September 02, 2014
KitMaker: 1,977 posts
Auto Modeler: 1,371 posts
Posted: Monday, March 26, 2018 - 04:32 AM UTC
Rob, nice trick with the tires. Comes right on time, as I was worried about my wheels fit; I just tried them last night and I was utterly disappointed. Thanks!

D, The wash effect looks nice indeed.

UPDATE
I went on with different sub-assemblies which need to be painted individually after the mandatory seam scrapping:


"Test shots" for my paints. From left to right: base coat, primer, white over primer, and gold leaf:


"Pre-production run" test - passed


A few pics with the engine, the most advanced sub-assembly up this moment:


Cheers!
Gabriel
jimb
_VISITCOMMUNITY
New York, United States
Joined: August 25, 2006
KitMaker: 2,539 posts
Auto Modeler: 1,405 posts
Posted: Monday, March 26, 2018 - 05:01 AM UTC
That engine looks great.

Jim
KoSprueOne
_VISITCOMMUNITY
Myanmar
Joined: March 05, 2004
KitMaker: 4,011 posts
Auto Modeler: 851 posts
Posted: Monday, March 26, 2018 - 05:59 AM UTC
Gabriel, Nice progress on that power plant.

Rob, Those Molotov pens are great for chrome. I'm using it on my truck chrome as well.

D, dude, that interior paint is looking fine.


noddy927
_VISITCOMMUNITY
Scotland, United Kingdom
Joined: February 15, 2013
KitMaker: 1,273 posts
Auto Modeler: 207 posts
Posted: Monday, March 26, 2018 - 04:32 PM UTC
Damian nice work on the cab

Gabe the engine looks superb buddy.


Pete
Szmann
_VISITCOMMUNITY
Netherlands Antilles
Joined: September 02, 2014
KitMaker: 1,977 posts
Auto Modeler: 1,371 posts
Posted: Thursday, March 29, 2018 - 11:28 PM UTC
James, KoSprueOne and Peter Thank you, guys! The engine is not finished yet. I added the turbo last night but I took no pictures because it's still in works.

I realized that not only the bad fitting is my problem, but also the color scheme I chose; every single part needs at least four coats (!) and, being enamels, they need time to dry. So I decided to break the build in small sub-assemblies, detail them completely and then add them to the "puzzle".

The only sub-assemblies finished so far are the wheels (before washes):


Then, finally, I was able to decide on the graphic layout. Initially I wanted my truck orange, then yellow and now is smoke gray! The reason for such an abrupt change is a small achievement: my YT channel has passed 100 subscribers and this build was the first on the row and I decided to mark the milestone accordingly. I tested my masks and color combos and this is going to look like:

My channels stylized logo on the doors and rear mudflaps; probably on the hood too (mirrored):


The milestone to be displayed on the front bumper and front mudflaps:


The abbreviated version of my channel's name on the rear fenders and possibly sideways on the left edge of the hood:


The main color is going to be smoke gray (civilian version of German grey), the secondary color is that sick orange and the trim color is white. I'm still working some details out, but generally speaking I know the direction I'm heading into.

Happy Modeling Easter!
Gabriel