How about another Keep On Truckin gig?
Netherlands Antilles
Joined: September 02, 2014
KitMaker: 1,977 posts
Auto Modeler: 1,371 posts
Posted: Thursday, March 01, 2018 - 10:08 PM UTC
Peter, you need a bigger cutting mat, mate!
Your build looks very attractive indeed. I hope I clear my bench until next week-end so I can start my DM-600.
KUTGW!
Gabriel

Gabriel
Many of my builds can be seen on YT in video format. Please check 'Panzergrau Models' Channel.

#226
British Columbia, Canada
Joined: February 20, 2012
KitMaker: 1,909 posts
Auto Modeler: 118 posts
Posted: Friday, March 02, 2018 - 11:05 PM UTC
Anything without guns is a target!
27 completed campaigns and counting :)
New York, United States
Joined: August 25, 2006
KitMaker: 2,539 posts
Auto Modeler: 1,405 posts
Posted: Saturday, March 03, 2018 - 01:00 AM UTC
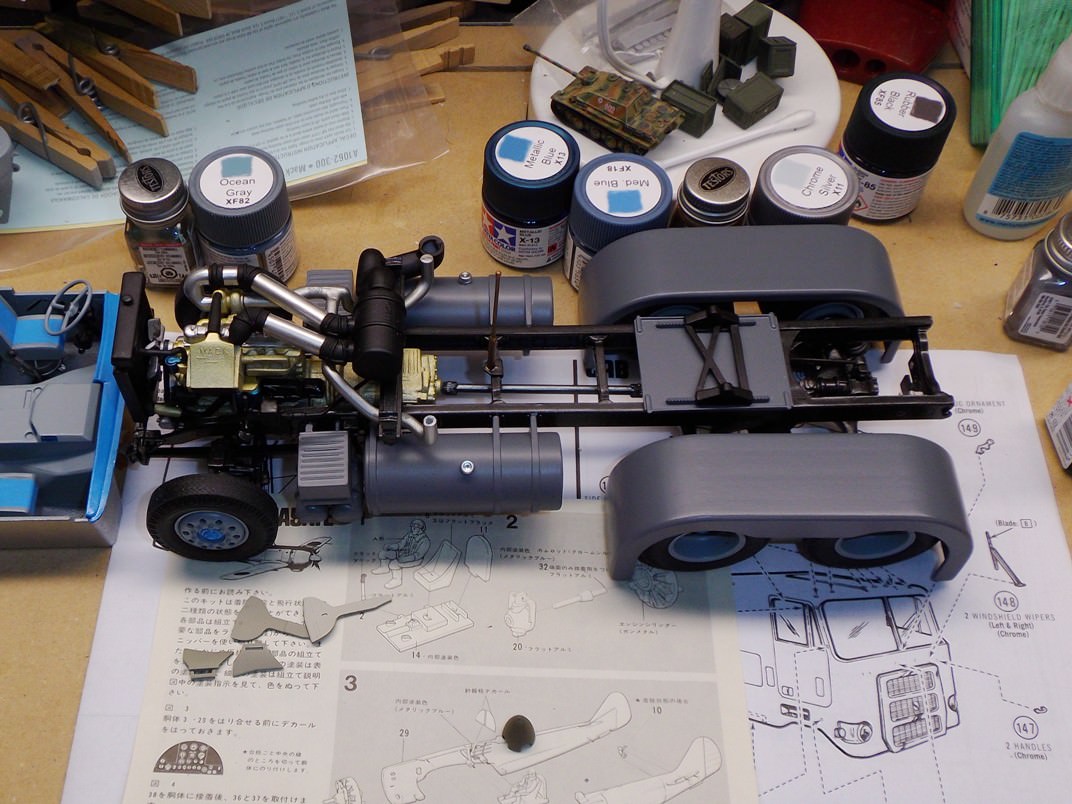
For what this kit is, it actually builds up fairly nicely. And it's held together like a snap kit, because it is a snap kit (even though the box doesn't indicate that).
The best part of the kit is the Caterpillar 3406A engine. Several truck modelers on other forums have purchased this kit or the snap Kenworth W900 Aerodyne just for the engine.
One of the major disappointments of this kit & the Kenworth are the tires. If you're disappointed with the kit in general, you'll be horrified by the tires.
Good luck with your build.
Jim
"Socialism is a philosophy of failure, the creed of ignorance, and the gospel of envy, its inherent virtue is the equal sharing of misery." ---- Winston Churchill
#226
British Columbia, Canada
Joined: February 20, 2012
KitMaker: 1,909 posts
Auto Modeler: 118 posts
Posted: Saturday, March 03, 2018 - 02:42 AM UTC
Thanks for the info James!
I am disappointed but it's not a deal breaker

I got it cheap and it will look good when finished

I just wish I had known the origins of the kit.
Cheers Rob.
Anything without guns is a target!
27 completed campaigns and counting :)
Scotland, United Kingdom
Joined: February 15, 2013
KitMaker: 1,273 posts
Auto Modeler: 207 posts
Posted: Saturday, March 03, 2018 - 02:53 AM UTC
Scotland, United Kingdom
Joined: February 15, 2013
KitMaker: 1,273 posts
Auto Modeler: 207 posts
Posted: Saturday, March 03, 2018 - 03:04 AM UTC
At work yesterday driving my Iveco beast and it started making a knocking noise. I pulled up behind an aircraft and it stopped completely, terminal noises then nothing. After the mechanic checked it out he said a conrod had punched a hole through the side of the engine. Gutted the rig I am building will be no more in real life. The company is going to replace it as an engine will be 16K and they can get a tractor unit for less.

At least I will have something to remember it.
Pete
Colorado, United States
Joined: December 25, 2004
KitMaker: 3,770 posts
Auto Modeler: 359 posts
Posted: Sunday, March 04, 2018 - 06:40 AM UTC
I've done a little here and a little there.
My rear fenders have arrived and....well....not a great fan of 3D printed fenders. I'm going to have to do even more sanding or filling or both to get them right. (not attached yet - looking for pics of they way they are supposed to be)
Mike
#226
British Columbia, Canada
Joined: February 20, 2012
KitMaker: 1,909 posts
Auto Modeler: 118 posts
Posted: Sunday, March 04, 2018 - 09:12 AM UTC
Anything without guns is a target!
27 completed campaigns and counting :)
#335
Auckland, New Zealand
Joined: September 03, 2013
KitMaker: 1,808 posts
Auto Modeler: 701 posts
Posted: Monday, March 05, 2018 - 01:53 PM UTC
Mike your build so far looks very sharp. The rear fenders do look like they are sitting on the ground.
And Rob, I hope your Peterbilt is in better shape then mine. The Revell kit seems to a bit more modern than my AMT.
This kit does not have me pining for the good old days. I can honestly say the only thing I have enjoyed so far is painting the rear mud guards. But now I have managed to get some paint on the chassis and engine I am feeling slightly more inclined to finishing. I have gone for a nice retro paint job of blue and orange.


cheers
Michael
Campaign:
Strip, Track and Trail - Porsche 917/20 - On the bench
Phantoms at 60 - F-4J Marines
Below 1000 tons - M50 minesweeper - Sailed for duty
Scotland, United Kingdom
Joined: February 15, 2013
KitMaker: 1,273 posts
Auto Modeler: 207 posts
Posted: Tuesday, March 06, 2018 - 01:43 AM UTC
Good work Mike & Rob both looking good. I know when the kit is not great to build it is frustrating,but I find once it is done and you have made a good job it is pleasing.
Pete
Scotland, United Kingdom
Joined: February 15, 2013
KitMaker: 1,273 posts
Auto Modeler: 207 posts
Posted: Tuesday, March 06, 2018 - 10:29 PM UTC
Started work on the basket


And the platform forthe lights at the back.

Cheers
Pete
Scotland, United Kingdom
Joined: February 15, 2013
KitMaker: 1,273 posts
Auto Modeler: 207 posts
Posted: Thursday, March 08, 2018 - 05:42 PM UTC
I have been burning the midnight oil to get some more work done on the deice rig.
The figure has had some work done on his arm

Work on the back and the lights


The back is in place

And reflective paint on the sides

Figure now has a hi-vis jacket

The basket is more or less done, with hose and buffers


Back plate in place

Figure has his orange gloves on

And work done on his harness. I need to paint it as it is only undercoated.


Hope to get some more done this afternoon.
Pete
#226
British Columbia, Canada
Joined: February 20, 2012
KitMaker: 1,909 posts
Auto Modeler: 118 posts
Posted: Friday, March 09, 2018 - 12:10 AM UTC
Very Nice! Pete

Your putting us all to shame!

Cheers Rob.
Anything without guns is a target!
27 completed campaigns and counting :)
#226
British Columbia, Canada
Joined: February 20, 2012
KitMaker: 1,909 posts
Auto Modeler: 118 posts
Posted: Saturday, March 10, 2018 - 01:32 AM UTC
Some more progress
With a sharp knife and some sanding I cleaned up the mud flap mounts and I fixed the rear mounts for the air bag suspension.
Cheers Rob.


Anything without guns is a target!
27 completed campaigns and counting :)
Myanmar
Joined: March 05, 2004
KitMaker: 4,011 posts
Auto Modeler: 851 posts
Posted: Saturday, March 10, 2018 - 02:39 AM UTC
Rob,
Michael, nice progress.
Mike, Those fenders, I dig it!
Pete, wow so far, just wow.

i watched a scale plastic figure crawl along the edge . . . of an exacto blade . . . that's my dream , it's my nightmare . . . . . . . crawling , slithering . . . . . along the edge . . . . . . of an exacto . . . . . blade . . . . and surviving
Myanmar
Joined: March 05, 2004
KitMaker: 4,011 posts
Auto Modeler: 851 posts
Posted: Saturday, March 10, 2018 - 02:42 AM UTC
I should get a lot done today. It's a curbside and it's raining today.
Dry fitting the cab and interior here:

i watched a scale plastic figure crawl along the edge . . . of an exacto blade . . . that's my dream , it's my nightmare . . . . . . . crawling , slithering . . . . . along the edge . . . . . . of an exacto . . . . . blade . . . . and surviving
#073
Pennsylvania, United States
Joined: October 05, 2002
KitMaker: 2,659 posts
Auto Modeler: 26 posts
Posted: Saturday, March 10, 2018 - 07:48 PM UTC
Hello everyone..
Getting ready to start building again after a winter break..
This looks like an interesting subject.. and I have a
1923 Model T Delivery Van than I think will fit right in if thats Ok..
Delbert

Just Your Everyday Average Model Builder
Scotland, United Kingdom
Joined: February 15, 2013
KitMaker: 1,273 posts
Auto Modeler: 207 posts
Posted: Sunday, March 11, 2018 - 12:54 AM UTC
#226
British Columbia, Canada
Joined: February 20, 2012
KitMaker: 1,909 posts
Auto Modeler: 118 posts
Posted: Sunday, March 11, 2018 - 04:41 AM UTC
Funny you should ask Peter
I just painted it, gloss black with the axles and such being semi gloss black. A few more bits put together and almost ready for paint.
Cheers Rob.

Anything without guns is a target!
27 completed campaigns and counting :)
Colorado, United States
Joined: December 25, 2004
KitMaker: 3,770 posts
Auto Modeler: 359 posts
Posted: Sunday, March 11, 2018 - 06:58 AM UTC
Quoted Text
1923 Model T Delivery Van
That'll be just fine Delbert.
Looking forward to seeing an old timer put together.
Mike
Colorado, United States
Joined: December 25, 2004
KitMaker: 3,770 posts
Auto Modeler: 359 posts
Posted: Sunday, March 11, 2018 - 07:06 AM UTC
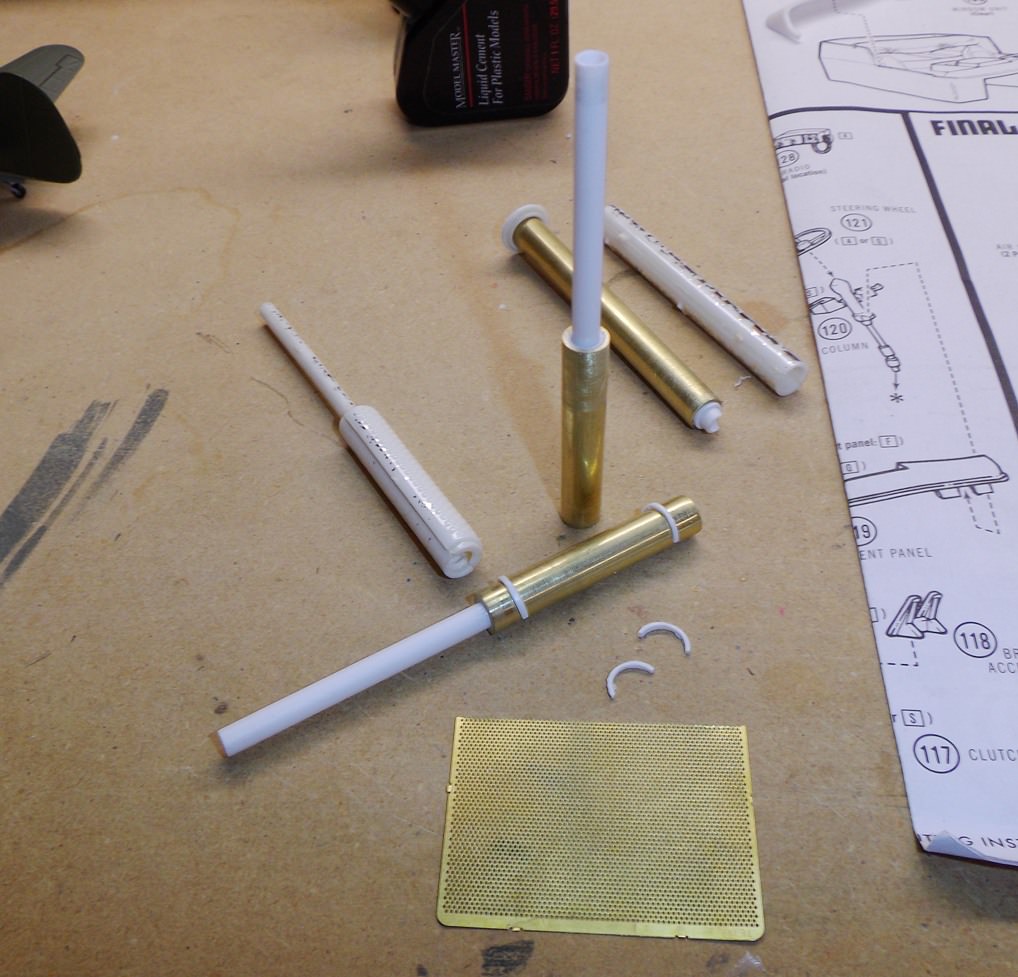
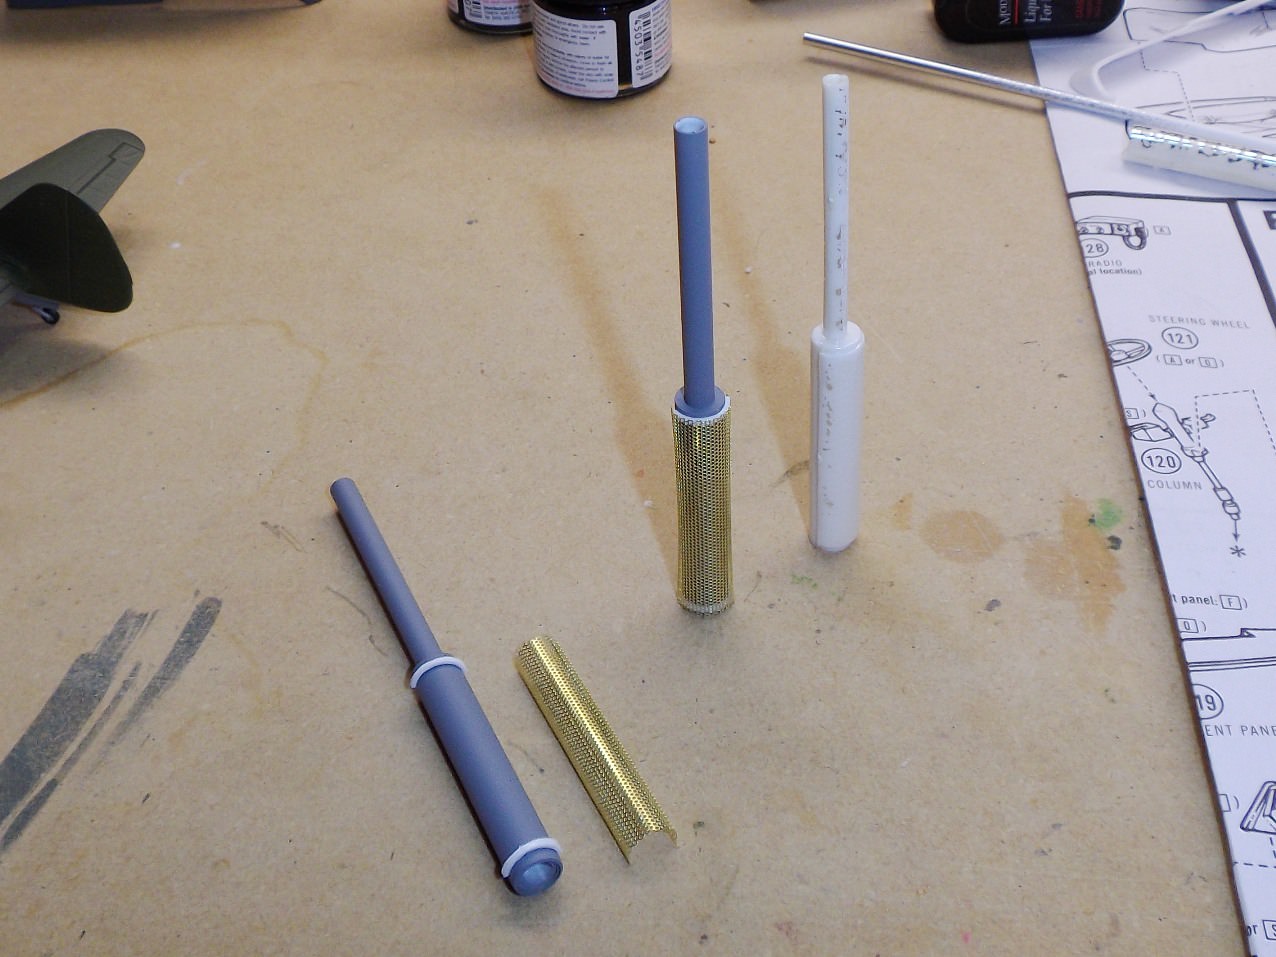
I've been working on the air intake and exhaust stacks today. They are very close to the same size as the kit's plastic parts.
Brass and polystyrene tubes inside each other. The small "half-round" sections will hold the perforated PE acting as the heat shields. I'm not 100% sure I'll put them on though...maybe, maybe not.
Oh, dipped the windshield in Future - had a couple spots that didn't coat right. Tried to clean off the Future and ultimately had to sand the clear plastic. So....waiting on a couple more super super fine sanding sponges and some polish to arrive.

What a let down.
Mike
#226
British Columbia, Canada
Joined: February 20, 2012
KitMaker: 1,909 posts
Auto Modeler: 118 posts
Posted: Sunday, March 11, 2018 - 09:39 AM UTC
Suspension painted
Mike I usually let the part sit in Windex for however long it takes if I mess something up with future.
Cheers Rob.


Anything without guns is a target!
27 completed campaigns and counting :)
Scotland, United Kingdom
Joined: February 15, 2013
KitMaker: 1,273 posts
Auto Modeler: 207 posts
Posted: Monday, March 12, 2018 - 12:35 AM UTC
Nice work Rob black works well. Will you keep the chromed parts as they are or strip them.?
Pete
Colorado, United States
Joined: December 25, 2004
KitMaker: 3,770 posts
Auto Modeler: 359 posts
Posted: Monday, March 12, 2018 - 06:40 AM UTC
Mike
Scotland, United Kingdom
Joined: February 15, 2013
KitMaker: 1,273 posts
Auto Modeler: 207 posts
Posted: Monday, March 12, 2018 - 02:27 PM UTC
That stacks up great Mike

Pete


 The first pick shows it just clipped together almost like a snap kit
  the next one shows the holes that will need to be fixed in the back


