

Hi Damian
I'm guessing you will give the grill a dark wash or black paint, to simulate the holes in the grill. If you do, there won't be much chrome left, so the difference might not be so noticable. How about the bumpers, will they be chrome? They have a large surface, so dryfitting the bumpers, to assess, how noticable the difference is, might be a good idea.


Go to automodeler.com for the current dynamic site!
The Garage
For general automotive modeling or non-modeling topics.
For general automotive modeling or non-modeling topics.
Hosted by Jim Starkweather
Garage Queens 2019 Group Build

Hwa-Rang

Joined: June 29, 2004
KitMaker: 6,760 posts
Auto Modeler: 2,182 posts

Posted: Sunday, January 13, 2019 - 07:21 PM UTC

md72

#439

Joined: November 05, 2005
KitMaker: 4,950 posts
Auto Modeler: 555 posts

Posted: Sunday, January 13, 2019 - 07:59 PM UTC
I say leave it as is, it's all going to weather at different rates anyway 


Szmann

Joined: September 02, 2014
KitMaker: 1,977 posts
Auto Modeler: 1,371 posts

Posted: Monday, January 14, 2019 - 12:03 AM UTC
Quoted Text
My opinion, there is quite a noticeable difference in the tone and gloss, but given that everything will be toned down with some weathering I'm not inclined to strip off the kit chrome and repaint.
D., I am afraid the painted chrome will "take" the wash / dirt much easier than the plated chrome and the difference can become even more obvious.
Lacquer paints should do good straight over chrome, you just need to clean the seams and proceed "as usual".
Gabriel


Pave-Hawk

Joined: May 05, 2006
KitMaker: 900 posts
Auto Modeler: 27 posts

Posted: Wednesday, January 16, 2019 - 11:34 AM UTC
Because gloss paint hates me I have gone backwards. The paint finish on the lancer turned to custard so the whole body got a metho bath to strip it right back to primer. Primer coat got a little damaged as well so a trip to a hobby store(35 minutes each way) to get some white primer was required.
No I am back to trying to get a decent white paint finish instead of getting ready to spray the red.

No I am back to trying to get a decent white paint finish instead of getting ready to spray the red.
Szmann
Joined: September 02, 2014
KitMaker: 1,977 posts
Auto Modeler: 1,371 posts
Posted: Wednesday, January 16, 2019 - 01:47 PM UTC
Quoted Text
Because gloss paint hates me I have gone backwards. The paint finish on the lancer turned to custard so the whole body got a metho bath to strip it right back to primer. Primer coat got a little damaged as well so a trip to a hobby store(35 minutes each way) to get some white primer was required.
No I am back to trying to get a decent white paint finish instead of getting ready to spray the red.
Ouch!
I understand 70 minutes is a terrible waste of bench time! However, you're on the lucky side as I am located two weeks (shipping time) of the closest hobby shop. I've learnt to make do with what I have and after some years I managed to come up with some functional formulas

Yes, we know white is the "right" color, but we also know she's a very mischievous color as well.
I keep my fingers crossed!
Cheers!
Gabriel

AussieReg

#007
Joined: June 09, 2009
KitMaker: 8,156 posts
Auto Modeler: 2,953 posts

Posted: Wednesday, January 16, 2019 - 03:53 PM UTC
Iain, I feel your pain mate. It's not only you. Gloss paint hates me as well. It wrinkles itself up at the sight of me. I've never been able to work out what I ever did to upset it 
Hopefully you two can make up and everything will be shiny again. I'm going to try buying my gloss paint some flowers before I go any further
Cheers, D
Hopefully you two can make up and everything will be shiny again. I'm going to try buying my gloss paint some flowers before I go any further
Cheers, D


ChurchSTSV
Joined: September 20, 2017
KitMaker: 350 posts
Auto Modeler: 64 posts

Posted: Thursday, January 17, 2019 - 04:51 AM UTC
Small update!!
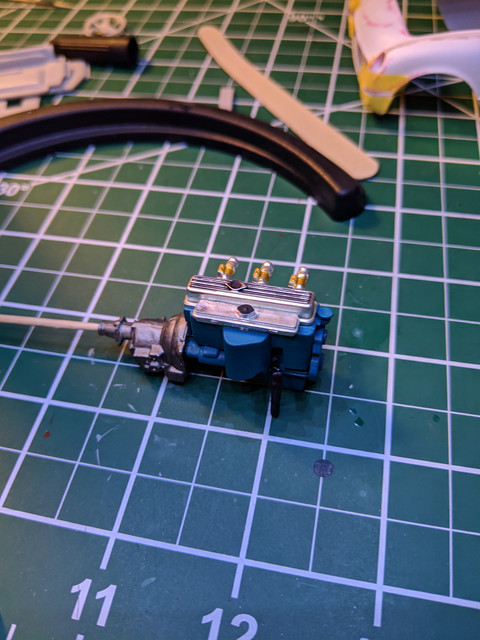
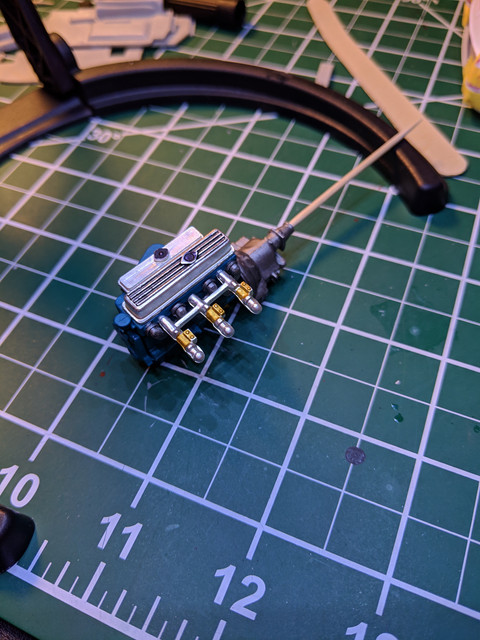
Tried out some Dullcote to see if I could bring down the chrome a little:
Just got some semi-gloss painting out of the way
I would like to add more detail to the engine, but for now, just a wash will do. Never done a wash on an engine before. then again, I haven't build a model car since I was 13. I also got the wild idea to thin out the belts on the accessory drive. Never tried that before but was please with the results.
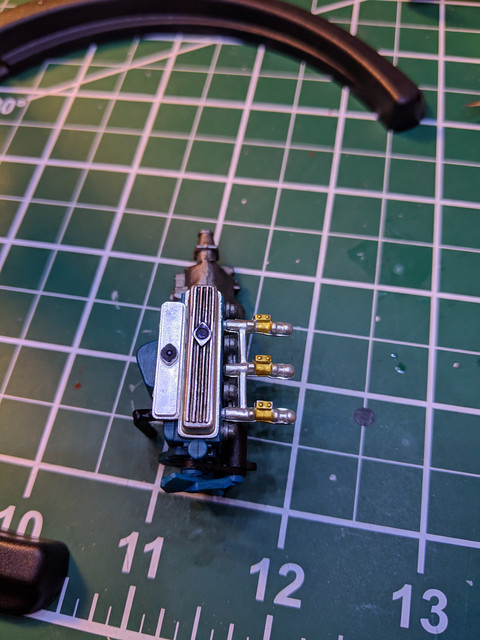
That's all for last night.
Tried out some Dullcote to see if I could bring down the chrome a little:
Just got some semi-gloss painting out of the way
I would like to add more detail to the engine, but for now, just a wash will do. Never done a wash on an engine before. then again, I haven't build a model car since I was 13. I also got the wild idea to thin out the belts on the accessory drive. Never tried that before but was please with the results.
That's all for last night.

Szmann
Joined: September 02, 2014
KitMaker: 1,977 posts
Auto Modeler: 1,371 posts
Posted: Thursday, January 17, 2019 - 10:56 PM UTC
Well done, Charlie! I like the general look and the wash worked just fine! Too bad for those seam lines which are quite visible. I know, they are very difficult to see on the white plastic and difficult to remove, but once paint applied, they just stand out too much. Good exercise nonetheless - metallic colors are not easy to master.
KUTGW!
Cheers!
Gabriel
KUTGW!
Cheers!
Gabriel
AussieReg
#007
Joined: June 09, 2009
KitMaker: 8,156 posts
Auto Modeler: 2,953 posts
Posted: Friday, January 18, 2019 - 03:21 AM UTC
Great to see this one back on the bench Charlie, also good to see you trying out some new techniques. They all add to the picture that you are trying to build!
Cheers, D
Cheers, D
ChurchSTSV
Joined: September 20, 2017
KitMaker: 350 posts
Auto Modeler: 64 posts
Posted: Friday, January 18, 2019 - 03:28 AM UTC
Quoted Text
Well done, Charlie! I like the general look and the wash worked just fine! Too bad for those seam lines which are quite visible. I know, they are very difficult to see on the white plastic and difficult to remove, but once paint applied, they just stand out too much. Good exercise nonetheless - metallic colors are not easy to master.
KUTGW!
Cheers!
Gabriel
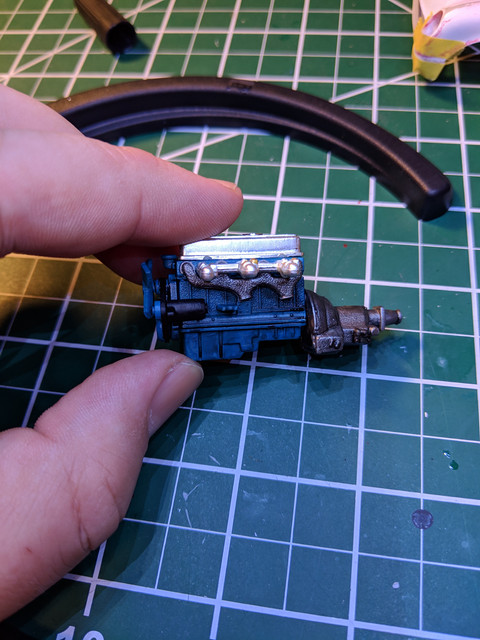
Ya know, totally didn't notice until you pointed it out!! Gah!! Good news is the seam on the coolant line will be covered be coolant hose when completed. Next engine will definitely have the seams on the oil pan/trans pan cleaned uop and filled.
I really appreciate the kind words. makes me feel like I know what I am doing. LOL
ChurchSTSV
Joined: September 20, 2017
KitMaker: 350 posts
Auto Modeler: 64 posts
Posted: Friday, January 18, 2019 - 03:29 AM UTC
Quoted Text
Great to see this one back on the bench Charlie, also good to see you trying out some new techniques. They all add to the picture that you are trying to build!
Cheers, D
Found some time while my wife takes night classes!!The way I figured, I already put the dullcote on so if the wash didn't take, I could just wipe it off.
Thank you too for the kind words. They really help me stay inspired and excited about the hobby.

windysean
Joined: September 11, 2009
KitMaker: 1,917 posts
Auto Modeler: 268 posts
Posted: Friday, January 18, 2019 - 04:38 AM UTC
Damian, the El Camino is looking great! I like everything about that interior bucket-- color scheme and weathering and detail painting. Good choice on the dull black paint too.
When you say "Some obvious little touch-ups to do where the chrome has crept under the masking, but nothing major", what exactly did you end up doing to get that corrected? Use a fine brush and super-steady hand? Or remask the chrome and then fine brush-- or finely tuned airbrush?
thanks in advance,
Sean
Szmann
Joined: September 02, 2014
KitMaker: 1,977 posts
Auto Modeler: 1,371 posts
Posted: Friday, January 18, 2019 - 09:56 AM UTC
Quoted Text
Ya know, totally didn't notice until you pointed it out!! Gah!!
Haha! All of us have the same issue, Charlie! Macro photography isn't our friend, right? Honestly, I won't bother myself that much either with all the seam lines if would be to have a closed bonnet.
KUTGW!
Gabriel
AussieReg
#007
Joined: June 09, 2009
KitMaker: 8,156 posts
Auto Modeler: 2,953 posts
Posted: Friday, January 18, 2019 - 04:08 PM UTC
Hi Sean, great to see you checking in on our adventures here. Are you planning to join the fun?
Thanks for the feedback, much appreciated. I am very happy with how it looks so far. As I said, I still plan to add a few touches of an earthy colour here and there as well.
A tiny little bush (20/0 I think it is), a tiny little drop of paint, and a steady hand. A JD on ice to calm the nerves is a prerequisite as well.
Cheers, D
Quoted Text
Damian, the El Camino is looking great! I like everything about that interior bucket-- color scheme and weathering and detail painting. Good choice on the dull black paint too.
Thanks for the feedback, much appreciated. I am very happy with how it looks so far. As I said, I still plan to add a few touches of an earthy colour here and there as well.
Quoted Text
When you say "Some obvious little touch-ups to do where the chrome has crept under the masking, but nothing major", what exactly did you end up doing to get that corrected? Use a fine brush and super-steady hand? Or remask the chrome and then fine brush-- or finely tuned airbrush?
thanks in advance,
Sean
A tiny little bush (20/0 I think it is), a tiny little drop of paint, and a steady hand. A JD on ice to calm the nerves is a prerequisite as well.
Cheers, D
AussieReg
#007
Joined: June 09, 2009
KitMaker: 8,156 posts
Auto Modeler: 2,953 posts
Posted: Sunday, January 20, 2019 - 11:54 AM UTC
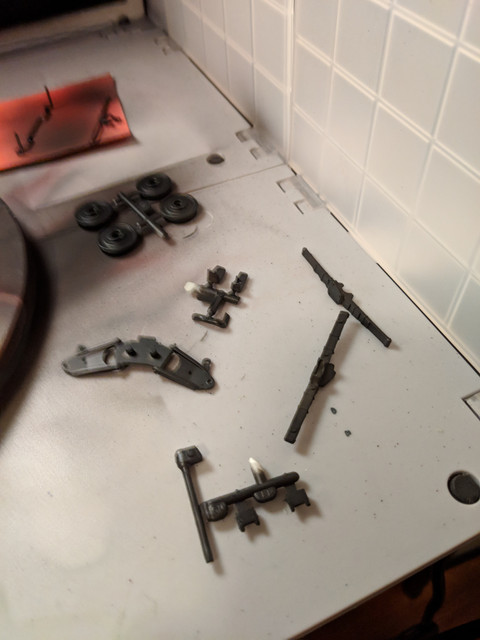
Engine and driveshaft mounted on the El Camino.

The only other "progress" on this build is a bit of playing around with various paints on scrap chrome to get a finish I'm happy with to avoid stripping and repainting the kit chrome parts. Alclad chrome over the kit chrome didn't really make much difference. Dullcote with a slight black tint looks like the clubhouse leader at this stage.
I hope everybody else is getting some bench time in, looking forward to progress reports!
Cheers, D
Szmann
Joined: September 02, 2014
KitMaker: 1,977 posts
Auto Modeler: 1,371 posts
Posted: Sunday, January 20, 2019 - 12:33 PM UTC
Good progress, D.!
I will love to contribute more than commenting, but I have two builds on my bench already and my European trip to prepare. In conjunction with overly busy schedule, I think it is safe to say I won't be able to start (continue) my BMW before my return from Europe.
Cheers!
Gabriel
Quoted Text
I hope everybody else is getting some bench time in, looking forward to progress reports!
Cheers, D
I will love to contribute more than commenting, but I have two builds on my bench already and my European trip to prepare. In conjunction with overly busy schedule, I think it is safe to say I won't be able to start (continue) my BMW before my return from Europe.
Cheers!
Gabriel
Pave-Hawk
Joined: May 05, 2006
KitMaker: 900 posts
Auto Modeler: 27 posts
Posted: Sunday, January 20, 2019 - 09:38 PM UTC
After stripping it got a new coat of primer, then I pulled out my old airbrush with a bigger nozzle.
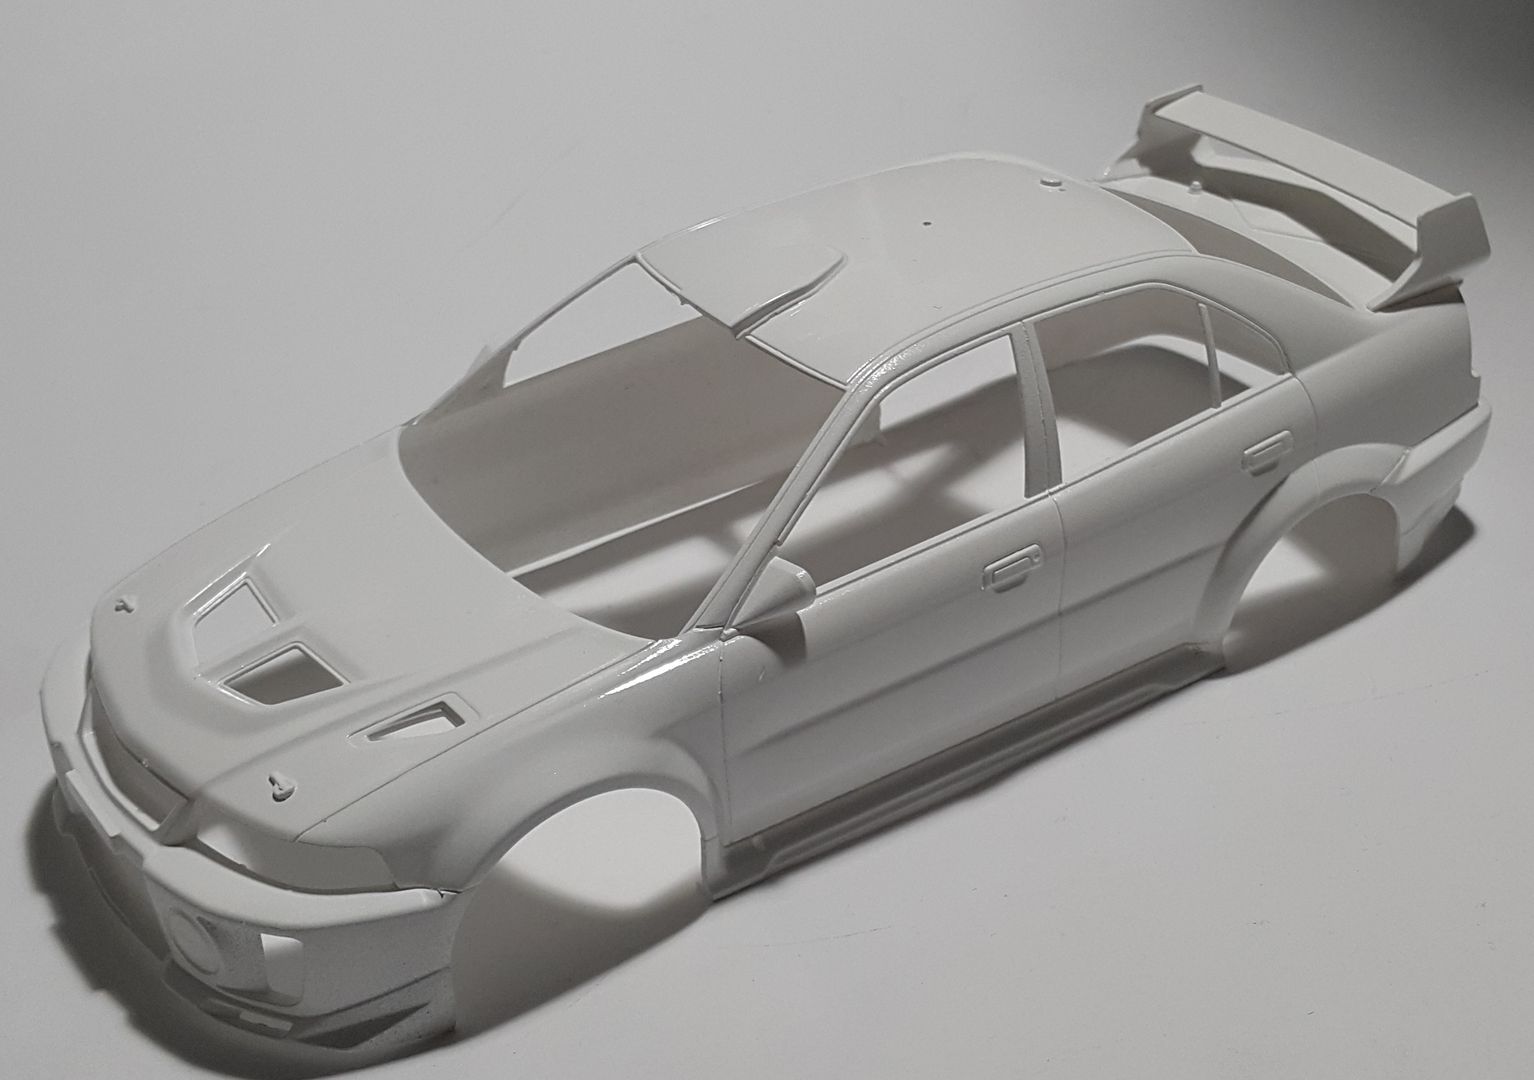
Starting to look half decent.
Starting to look half decent.
AussieReg
#007
Joined: June 09, 2009
KitMaker: 8,156 posts
Auto Modeler: 2,953 posts
Posted: Monday, January 21, 2019 - 12:07 PM UTC
Ok folks, I've had some help and worked out how to set up the Group Build Galleries for Automodeler now. It has changed a bit since I was admin on the P-47 SIG.
Garage Queens 2019 Group Build Gallery
I have now also added links to the Gallery and enlistment page to the opening post in this thread.
Cheers, D
Garage Queens 2019 Group Build Gallery
I have now also added links to the Gallery and enlistment page to the opening post in this thread.
Cheers, D
Szmann
Joined: September 02, 2014
KitMaker: 1,977 posts
Auto Modeler: 1,371 posts
Posted: Monday, January 21, 2019 - 03:26 PM UTC
Iain, "half decent" is pretty good actually!
KUTGW!
Gabriel
KUTGW!
Gabriel
AussieReg
#007
Joined: June 09, 2009
KitMaker: 8,156 posts
Auto Modeler: 2,953 posts
Posted: Saturday, February 02, 2019 - 11:29 AM UTC
Just bumping this one back up the list to see where everybody is at. We are 1 month in already and 11 to go!
I have fitted the glass to my El Camino (no photos yet) so I'm very close to putting the major sub assemblies together. Another local modeler has supplied me with a tandem trailer and a couple of sets of matching wheels, so this work ute will be really working! I need to design and scratchbuild a tow bar once it is fully assembled, then I think the 55 street rod might sit nicely right behind!

I hope everybody is getting some bench time and enjoying their builds!
Cheers, D
I have fitted the glass to my El Camino (no photos yet) so I'm very close to putting the major sub assemblies together. Another local modeler has supplied me with a tandem trailer and a couple of sets of matching wheels, so this work ute will be really working! I need to design and scratchbuild a tow bar once it is fully assembled, then I think the 55 street rod might sit nicely right behind!
I hope everybody is getting some bench time and enjoying their builds!
Cheers, D
AussieReg
#007
Joined: June 09, 2009
KitMaker: 8,156 posts
Auto Modeler: 2,953 posts
Posted: Monday, February 04, 2019 - 01:32 AM UTC
El Camino Chaos update, glass fitted, dry-fit assembly to check wheels, ready to detail paint engine bay now then put it together.


Cheers, D
Cheers, D
Szmann
Joined: September 02, 2014
KitMaker: 1,977 posts
Auto Modeler: 1,371 posts
Posted: Monday, February 04, 2019 - 04:05 AM UTC
Looking "deadly", D.! Great job!
Gabriel
Gabriel
ChurchSTSV
Joined: September 20, 2017
KitMaker: 350 posts
Auto Modeler: 64 posts
Posted: Friday, February 08, 2019 - 05:08 AM UTC
Finally got some work done on the Vette
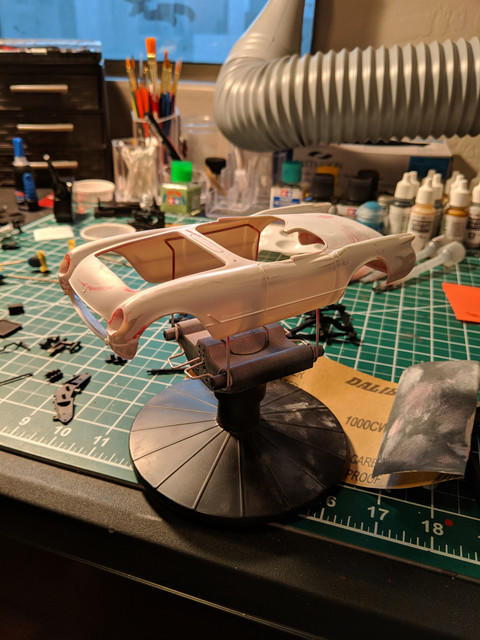
Did some filling, sanding, some more sanding and finished it off with a little sanding.
Gonna post some experiment pictures on painting the exhaust this weekend. I got inspired by the 300C thread.
Did some filling, sanding, some more sanding and finished it off with a little sanding.
Gonna post some experiment pictures on painting the exhaust this weekend. I got inspired by the 300C thread.
md72
#439
Joined: November 05, 2005
KitMaker: 4,950 posts
Auto Modeler: 555 posts
Posted: Friday, February 08, 2019 - 07:52 AM UTC
How did you get the seam off of the fenders without losing the curves?
ChurchSTSV
Joined: September 20, 2017
KitMaker: 350 posts
Auto Modeler: 64 posts
Posted: Friday, February 08, 2019 - 08:22 AM UTC
Quoted Text
How did you get the seam off of the fenders without losing the curves?
Nonstop sanding. I have sheets and metal files from Tamiya and other stores. A venerable cornucopia of sanding tools. Here are the steps I used:
Sanded
Primered
Painted
Hated it
Windex bath
Sanding
Attached fenders
Filler
Sanding filler
Sanding some more
Scribbed some lines on the door, gas tank, etc
More sanding
Up next!
Sanding and primer!!
 |

WEB HOSTING BY


Copyright ©2021 Auto Modeler and Kitmaker Network, a subsidiary of Silver Star Enterprises
All Rights Reserved. Please read our Conditions of Use and Privacy Policy.
All Rights Reserved. Please read our Conditions of Use and Privacy Policy.