

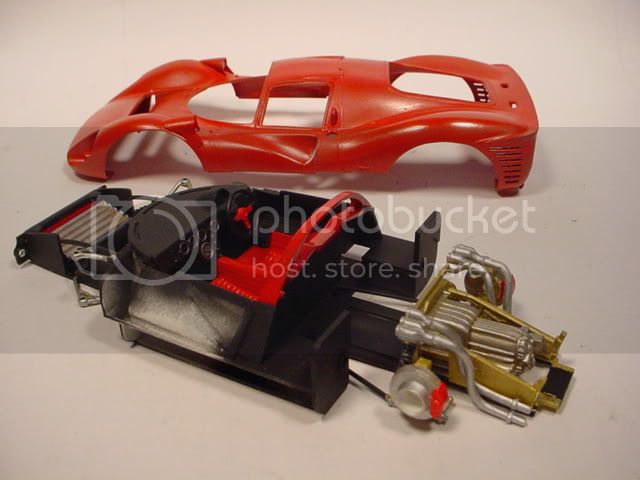
James: for auto bodies i now always use Tamiya TS sprays. In this case TS-8 Italian Red, which for a vintage subject like mine could actually be a bit over bright to be honest.
Even though the TS paints come in spray cans...consider them more as a convenient air tight storage container. I decant them into an airbrush jar for the first coat of paint, then use them straight from the can for the flowing coat/s, one coat per day so that the new paint doesn't just reactivate the earlier one, that way the gloss add up. For airbrushing use a large tip in the airbrush and have laquer thinner/cleaner to clean. I find that the TS paints airbrush better than anything else i've ever tried. They self level easily and set hard and tough for polishing. I know others get excellent results using water based paints or enamels, but i found the Tamiya TS laquers far eaiser.
A very important caution for anyone decanting the spray cans into an airbrush jar, use a drinking straw to spray through into the jar. And this is really important: NEVER store the paint in a sealed jar for later use! Why? Well when decanted it has air trapped in the paint. You know what happens when you shake a Coke can and open it? Well imagine you walls splattered in TS-8 Italian Red. You may think it's cool, but others you live with probably won't. Just decant only what you need for the session and leave the rest in the can for later!
Andrew


Go to automodeler.com for the current dynamic site!
The Garage
For general automotive modeling or non-modeling topics.
For general automotive modeling or non-modeling topics.
Hosted by Jim Starkweather
Feisty Ferrari's Campaign Proposal

CMOT70

Joined: August 23, 2007
KitMaker: 629 posts
Auto Modeler: 34 posts

Posted: Sunday, January 10, 2010 - 04:13 PM UTC

VonCuda

Joined: November 28, 2005
KitMaker: 2,216 posts
Auto Modeler: 522 posts

Posted: Monday, January 11, 2010 - 12:58 PM UTC
Here is what I'm building. An Ebay $19.00 special. Fujimi Ferrari Testarossa Koenig Special.

Dunno about the color yet. I may keep her wearing white.
Hermon
Dunno about the color yet. I may keep her wearing white.
Hermon

VonCuda
Joined: November 28, 2005
KitMaker: 2,216 posts
Auto Modeler: 522 posts
Posted: Monday, January 11, 2010 - 01:01 PM UTC
Andrew, thanks for the tip about the TS paints. I usually use Tamiya gloss from the bottle and airbrush it. I'll try your method on my Ferrari though. It just looks great.
Hermon
Hermon

old-dragon
Joined: August 30, 2005
KitMaker: 3,289 posts
Auto Modeler: 1,620 posts

Posted: Monday, January 11, 2010 - 03:49 PM UTC
Here's where mine sits so far...1st coat of paint on the body..not so smooth till I wet sand her. Chassis is nearly done. This kit is a curbside{no motor} but what gets me is the lack of rear suspension support - it actually bows alittle when the body is put on it. I'll need to install something to fix that.

c5flies
Joined: October 21, 2007
KitMaker: 3,684 posts
Auto Modeler: 294 posts
Posted: Monday, January 11, 2010 - 06:35 PM UTC
Thanks for the info on the paints and process Andrew, much appreciated. Especially from someone used to using flat Dunkelgelb 
Hermon, congrats on the win, great price IMO.
Bob and Lewis, excellent progress, can't wait to see the finished projects!
Hermon, congrats on the win, great price IMO.
Bob and Lewis, excellent progress, can't wait to see the finished projects!


Loobes

Joined: August 20, 2007
KitMaker: 409 posts
Auto Modeler: 87 posts

Posted: Monday, January 11, 2010 - 07:56 PM UTC
Very nice builds everyone,
James - Thanks for the gallery
Keep the builds coming!
James - Thanks for the gallery
Keep the builds coming!

CMOT70
Joined: August 23, 2007
KitMaker: 629 posts
Auto Modeler: 34 posts
Posted: Tuesday, January 12, 2010 - 04:35 PM UTC
Decals are on the body work, in fact the setting solution is still doing it's work when the pic was taken. Also stripped the chrome sprues of their shinyness today.
Now just have to wait a few weeks for the chassis/engine to be built.

Andrew
Now just have to wait a few weeks for the chassis/engine to be built.
Andrew
CMOT70
Joined: August 23, 2007
KitMaker: 629 posts
Auto Modeler: 34 posts
Posted: Wednesday, January 13, 2010 - 12:50 PM UTC
Wheels done.

Andrew
Andrew
Loobes
Joined: August 20, 2007
KitMaker: 409 posts
Auto Modeler: 87 posts
Posted: Thursday, January 14, 2010 - 06:33 AM UTC
Andrew yours looks very good at the moment, you build fast. Can you tell me how you did the red?

BaconPaws

Joined: April 02, 2007
KitMaker: 35 posts
Auto Modeler: 20 posts

Posted: Friday, January 15, 2010 - 04:42 AM UTC
Hi Guys, I'm joining in the campaign as look what I got for my birthday - a Fujimi Enzo Ferrari !

Now I'm not normally a car builder, so this should be interesting. Getting that gloss finish that some of you have managed looks quite daunting.
Now I'm not normally a car builder, so this should be interesting. Getting that gloss finish that some of you have managed looks quite daunting.

Loobes
Joined: August 20, 2007
KitMaker: 409 posts
Auto Modeler: 87 posts
Posted: Saturday, January 16, 2010 - 12:54 AM UTC
Good to have you on board Ian. How is the kit? It will be interesting to see your progress
BaconPaws
Joined: April 02, 2007
KitMaker: 35 posts
Auto Modeler: 20 posts
Posted: Saturday, January 16, 2010 - 11:09 PM UTC
Quoted Text
Good to have you on board Ian. How is the kit? It will be interesting to see your progress
This kit looks good, nicely moulded, and I like the fact they include the brake/indicator light lenses. The paint masks are also included which I think is a great idea, something other manufacturers could do as well. One disappointment is the engine is a single piece already mounted in the tub, so not much detail on it or chance for improvement.
Loobes
Joined: August 20, 2007
KitMaker: 409 posts
Auto Modeler: 87 posts
Posted: Sunday, January 17, 2010 - 02:49 AM UTC
Got the paint on, waiting for klear
old-dragon
Joined: August 30, 2005
KitMaker: 3,289 posts
Auto Modeler: 1,620 posts
Posted: Sunday, January 17, 2010 - 05:36 AM UTC
Quoted Text
Wheels done.
Andrew
Hey, what'd you use for the gold on those...looks really nice! Is that tamiya clear yellow over the factory chrome?
Loobes
Joined: August 20, 2007
KitMaker: 409 posts
Auto Modeler: 87 posts
Posted: Sunday, January 17, 2010 - 08:55 AM UTC
Here is where I am at

No Klear down yet, the maskol is very difficult to remove, any tips?
Cheers
Loobes
No Klear down yet, the maskol is very difficult to remove, any tips?
Cheers
Loobes
CMOT70
Joined: August 23, 2007
KitMaker: 629 posts
Auto Modeler: 34 posts
Posted: Monday, January 18, 2010 - 12:34 PM UTC
Quoted Text
Andrew yours looks very good at the moment, you build fast. Can you tell me how you did the red?
Hi Lewis, if you scroll up a bit further you can see a bit of info on how i do auto bodies. The problem may be availabity of Tamiya TS laquer paints in your area...i've heard they're not so common in the UK. Another good paint system for cars that is definately available in the UK are the "Zero" paints which consist of a fla base and clear top coat. Zero paints are from here http://www.hiroboy.com/catalog/ . I've never been able to achieve satisfactory results using enamel or acrylic hobby paints for car bodies, though other people seem to be able.
Andrew
CMOT70
Joined: August 23, 2007
KitMaker: 629 posts
Auto Modeler: 34 posts
Posted: Monday, January 18, 2010 - 12:38 PM UTC
Quoted Text
Quoted TextWheels done.
Andrew
Hey, what'd you use for the gold on those...looks really nice! Is that tamiya clear yellow over the factory chrome?
You're close...i used clear orange sprayed over the kits chrome instead of yellow. I used Tamiya acrylic, but any brand of clear paints should do the same job. The orange gave a look more like the original wheels' anodised finish which was quite a deep gold.
Andrew
VonCuda
Joined: November 28, 2005
KitMaker: 2,216 posts
Auto Modeler: 522 posts
Posted: Thursday, January 21, 2010 - 04:15 AM UTC
OK, here is my kit before I get started on it.


Time to get started,
Hermon
Time to get started,
Hermon
VonCuda
Joined: November 28, 2005
KitMaker: 2,216 posts
Auto Modeler: 522 posts
Posted: Thursday, January 21, 2010 - 08:12 AM UTC
A quick shot of the engine. The instructions called for only red and silver. I decided to use several different colors of model masters metal paints to break things up. Can't really tell in the pic's but it's there.


Hermon
Hermon
CMOT70
Joined: August 23, 2007
KitMaker: 629 posts
Auto Modeler: 34 posts
Posted: Thursday, January 21, 2010 - 12:57 PM UTC
I now have a box of bits all ready to go together. Should only be touch up painting to go from here on, assuming everything goes to plan.
Can anyone pick the parts that don't belong to this model?


Andrew
Can anyone pick the parts that don't belong to this model?
Andrew

AussieReg

#007
Joined: June 09, 2009
KitMaker: 8,156 posts
Auto Modeler: 2,953 posts
Posted: Thursday, January 21, 2010 - 02:05 PM UTC
Quoted Text
I now have a box of bits all ready to go together. Should only be touch up painting to go from here on, assuming everything goes to plan.
Can anyone pick the parts that don't belong to this model?
The 250-pound bombs look to be off a P-47 . . . . . Hold on, where are the wings ?? OMG I'm on the wrong site !!


Very nice work. I have the 1/12 Monogram 57 Chev, Corvette and Camaro all in the stash and just decided to have a browse here for some inspiration. Maybe the wingy-thingys will take a rest soon.
Cheers, D

VonCuda
Joined: November 28, 2005
KitMaker: 2,216 posts
Auto Modeler: 522 posts
Posted: Friday, January 22, 2010 - 02:45 PM UTC
Quoted Text
Can anyone pick the parts that don't belong to this model?
Andrew
I'm gonna guess it's the matchsticks in pic #3?
Anyhoo..............
Here are some updates on my kit.


It'll look better when I hit it with some dullcoat. I decided to go with yellow for the body so I'll have to make a trip out this weekend and get a can.
Hermon
VonCuda
Joined: November 28, 2005
KitMaker: 2,216 posts
Auto Modeler: 522 posts
Posted: Friday, January 22, 2010 - 05:06 PM UTC
Another pic. SLIGHTLY out of focus but you can see the yellow accent stripe with the rollbar.

Hermon
Hermon
CMOT70
Joined: August 23, 2007
KitMaker: 629 posts
Auto Modeler: 34 posts
Posted: Friday, January 22, 2010 - 07:26 PM UTC
A big push on this one today.
The engine before some tidy up on the ignition leads (which are a bit overscale) and fuel injection hoses.

The suspension and steering assembles much like the real thing and is mostly glueless and sort of functions...though i wouldn't want to play with it very often.


Most of the main assemblies are either screwed together or clip together and, in theory, can be taken apart for display. I say in theory because i wouldn't want to do it too often as it will cause wear of the components and then sloppy fit. The camera has trouble focusing when using the flash because of the reflections off the paint.

When i first looked at how the engine was mounted i just thought "no way is this going to work". The entire engine and rear suspension mounts using no glue and just the real mounting points of the actual true life vehicle. It all just seems too fragile. But it works! Though, once again, i wouldn't want to be dismantling it to remove the engine now that it's all fitted.

And it's basically finished in this pic. Just the mirrors to put on once the windshield glue has set and a gentle wax job. Hopefully tomorrow i'll get some completed pics done outside, using natural light- weather permitting.
Incidentally this is a 39 year old model kit. The 1/12 scale F1 cars from Tamiya were the state of the art in model kits for their time. They are not too shabby even by todays standards.

Andrew
The engine before some tidy up on the ignition leads (which are a bit overscale) and fuel injection hoses.
The suspension and steering assembles much like the real thing and is mostly glueless and sort of functions...though i wouldn't want to play with it very often.
Most of the main assemblies are either screwed together or clip together and, in theory, can be taken apart for display. I say in theory because i wouldn't want to do it too often as it will cause wear of the components and then sloppy fit. The camera has trouble focusing when using the flash because of the reflections off the paint.
When i first looked at how the engine was mounted i just thought "no way is this going to work". The entire engine and rear suspension mounts using no glue and just the real mounting points of the actual true life vehicle. It all just seems too fragile. But it works! Though, once again, i wouldn't want to be dismantling it to remove the engine now that it's all fitted.
And it's basically finished in this pic. Just the mirrors to put on once the windshield glue has set and a gentle wax job. Hopefully tomorrow i'll get some completed pics done outside, using natural light- weather permitting.
Incidentally this is a 39 year old model kit. The 1/12 scale F1 cars from Tamiya were the state of the art in model kits for their time. They are not too shabby even by todays standards.
Andrew
Loobes
Joined: August 20, 2007
KitMaker: 409 posts
Auto Modeler: 87 posts
Posted: Friday, January 22, 2010 - 08:16 PM UTC
Excellent build Andrew, finished yet?
Loving the yellow Hermon, what paint are you using - I find it difficult to find decent quality basic paints
Cheers
Loobes
Loving the yellow Hermon, what paint are you using - I find it difficult to find decent quality basic paints
Cheers
Loobes
 |

WEB HOSTING BY


Copyright ©2021 Auto Modeler and Kitmaker Network, a subsidiary of Silver Star Enterprises
All Rights Reserved. Please read our Conditions of Use and Privacy Policy.
All Rights Reserved. Please read our Conditions of Use and Privacy Policy.