Feisty Ferrari's Campaign Proposal
Illinois, United States
Joined: August 30, 2005
KitMaker: 3,289 posts
Auto Modeler: 1,620 posts
Posted: Friday, January 29, 2010 - 04:13 PM UTC
Quoted Text
Hiya Hermon, it's 32 degrees here today as well (Celcius my friend  )
)
Really nice job on the Yellow Peril, looks great.
Cheers, D
Wow, only 32 ...break out the winter jackets!!!!!!!!...was -9 celcius here!{fricken warm smart guys!}


-I say I have two kids- one son & one daughter...my wife says she has three- one son ,one daughter and one husband.
...and don't tell yourself you can't do it....it'll just take longer then
England - East Anglia, United Kingdom
Joined: April 19, 2008
KitMaker: 4 posts
Auto Modeler: 3 posts
Posted: Saturday, January 30, 2010 - 02:07 AM UTC
Hi all,
I have started my 328 gtb first build to be on here, Whats the best way to get pics on the forums
Regards
Rich

AussieReg
 Associate Editor
#007
Victoria, Australia
Joined: June 09, 2009
KitMaker: 8,156 posts
Auto Modeler: 2,953 posts
Posted: Saturday, January 30, 2010 - 05:10 PM UTC
Quoted Text
Hi all,
I have started my 328 gtb first build to be on here, Whats the best way to get pics on the forums
Regards
Rich
Hi Rich, welcome !!
The easiest way to upload pics into the forum threads is via Photobucket. Once you have you pics in Photobucket, you will find when you cursor over the pic you want a small "pop-up" list of links appears. Simply copy/paste the bottom link in that pop-up straight into your forum post.
Cheers, D

ON the bench
Revell 1/24 '53 Corvette (building as '54)
Revell 1/24 BMW 507 Coupe and Cabrio
Italeri 1/48 Me262 B-1a/U1 Nightfighter
Monogram 1/24 '57 Chevy Nomad
Dragon 1/350 USS Frank Knox DD-742
Illinois, United States
Joined: August 30, 2005
KitMaker: 3,289 posts
Auto Modeler: 1,620 posts
Posted: Sunday, January 31, 2010 - 03:46 AM UTC
Yeah, photobucket is free and there's quite alot of room for pics on said accounts...even more if you pay.
Set up an account and if you have any problems we'll walk ya through it.
-I say I have two kids- one son & one daughter...my wife says she has three- one son ,one daughter and one husband.
...and don't tell yourself you can't do it....it'll just take longer then
California, United States
Joined: October 21, 2007
KitMaker: 3,684 posts
Auto Modeler: 294 posts
Posted: Sunday, January 31, 2010 - 12:21 PM UTC
Hi Rich,
Like the others have said, Photobucket is probably the easiest route to take, just get the img code from PB and copy/paste it in your post.
Everybody else.....man, you guys not only build beautiful models, but quickly too! I've got the second coat of TS paint on just now. I'm spraying it right out of the can so we'll see how it ends up. Andrew is right, this stuff is nice and pretty much hard as glass within a day. I'll have some pics up next weekend....if I'm not too embarrassed to show them

Anyway, don't forget to add a couple of images of your finished Ferrari in the gallery....
Feisty Ferraris North Carolina, United States
Joined: November 28, 2005
KitMaker: 2,216 posts
Auto Modeler: 522 posts
Posted: Sunday, January 31, 2010 - 01:35 PM UTC
James, it's not about how beautiful you can make the model turn out......it's about how well you can hide the mistakes with good photography.
Wait, that didn't come out right.
BTW, I added my pic's to the gallery.
"Those who would give up Essential Liberty
to purchase a little Temporary Safety,
deserve neither Liberty nor Safety."
Benjamin Franklin
California, United States
Joined: October 21, 2007
KitMaker: 3,684 posts
Auto Modeler: 294 posts
Posted: Sunday, January 31, 2010 - 02:10 PM UTC
I'll remember that, I should go and sign up for some Photoshop classes.....although the finish will probably still look like a chia pet. Just found out something....when you sand the primer down and expose filler...re-prime it. Top coats of red don't cover Mr. Surfacer

Live and learn!
Ohio, United States
Joined: March 09, 2002
KitMaker: 818 posts
Auto Modeler: 78 posts
Posted: Monday, February 01, 2010 - 11:57 AM UTC
North Carolina, United States
Joined: November 28, 2005
KitMaker: 2,216 posts
Auto Modeler: 522 posts
Posted: Monday, February 01, 2010 - 01:11 PM UTC
DAMN!!!
I didn't even know Tamiya made a metallic black. Mike, that is one sexy paint job man. Not only do I really dig the color big time but in the pic's the paint job looks flawless.
Nice work man. Really nice.
Hermon

"Those who would give up Essential Liberty
to purchase a little Temporary Safety,
deserve neither Liberty nor Safety."
Benjamin Franklin
Illinois, United States
Joined: August 30, 2005
KitMaker: 3,289 posts
Auto Modeler: 1,620 posts
Posted: Monday, February 01, 2010 - 02:35 PM UTC
Quoted Text
I'll remember that, I should go and sign up for some Photoshop classes.....although the finish will probably still look like a chia pet. Just found out something....when you sand the primer down and expose filler...re-prime it. Top coats of red don't cover Mr. Surfacer Live and learn!
Oh yeah...been there regretted doing that - shooting alcladII chrome is no different since if the surface isn't all the same and smooth...you'll know it afterwards!
-I say I have two kids- one son & one daughter...my wife says she has three- one son ,one daughter and one husband.
...and don't tell yourself you can't do it....it'll just take longer then
Removed by original poster on 02/03/10 - 21:56:18 (GMT).
England - South East, United Kingdom
Joined: April 02, 2007
KitMaker: 35 posts
Auto Modeler: 20 posts
Posted: Saturday, February 06, 2010 - 04:12 AM UTC
What can you do to chrome wheels to make them look more like alloys. I know some of you strip them and respray, but I was wondering if a coat of matt varnish would do the trick, or should I leave well alone ?

North Carolina, United States
Joined: November 28, 2005
KitMaker: 2,216 posts
Auto Modeler: 522 posts
Posted: Saturday, February 06, 2010 - 09:50 AM UTC
Ian, the matt will tone down the shinyness of the wheels but it won't look exactly like alloy. If you don't want to go through the trouble of stripping and repainting them, try coating some extra chrome sprue with the matt and you'll see what your wheels will end up looking like instead of taking a chance on coating the wheels first.
Another thought is to spray some very thinned down Tamiya smoke on the wheels. It'll cut down on the shine but still leave the metal look.
Hermon
"Those who would give up Essential Liberty
to purchase a little Temporary Safety,
deserve neither Liberty nor Safety."
Benjamin Franklin
England - South East, United Kingdom
Joined: April 02, 2007
KitMaker: 35 posts
Auto Modeler: 20 posts
Posted: Saturday, February 06, 2010 - 11:37 PM UTC
Thanks Hermon, I'll try experimenting as you suggest.
Illinois, United States
Joined: August 30, 2005
KitMaker: 3,289 posts
Auto Modeler: 1,620 posts
Posted: Sunday, February 07, 2010 - 09:51 AM UTC
Ok, here's the interior for my 330 P4,
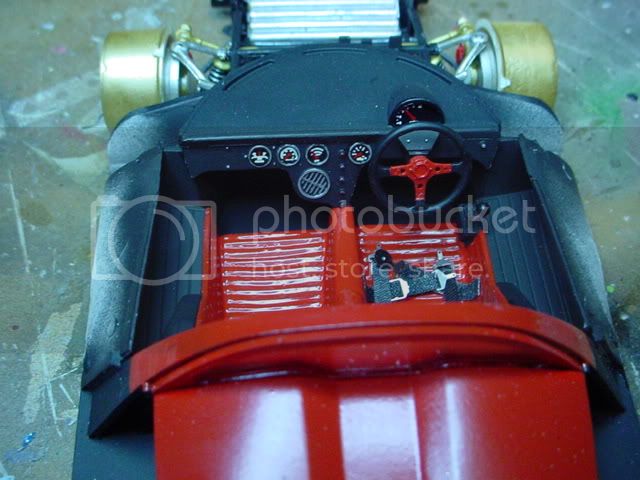
Now that this is done I can assemble the body to the chassis...
-I say I have two kids- one son & one daughter...my wife says she has three- one son ,one daughter and one husband.
...and don't tell yourself you can't do it....it'll just take longer then
England - South East, United Kingdom
Joined: April 02, 2007
KitMaker: 35 posts
Auto Modeler: 20 posts
Posted: Monday, February 08, 2010 - 06:32 AM UTC
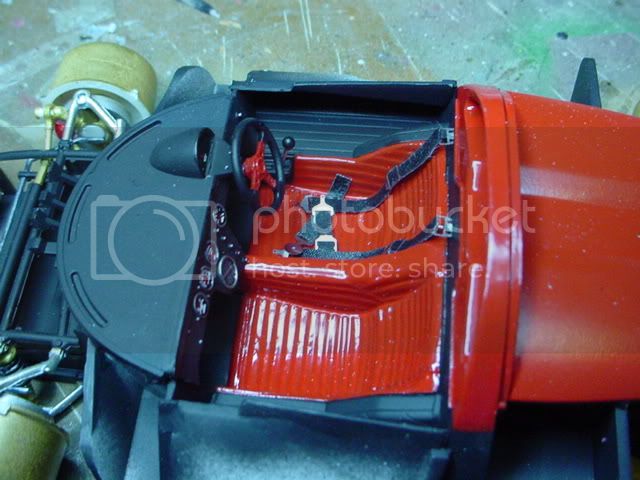
Looking good Bob - did those seat belts come with the kit ? That's one thing that is missing from my Enzo and I was wondering if I should add them.
England - South East, United Kingdom
Joined: April 02, 2007
KitMaker: 35 posts
Auto Modeler: 20 posts
Posted: Monday, February 08, 2010 - 10:51 AM UTC
Got some work done over the weekend - here's progress so far


Now ready for paint !
Illinois, United States
Joined: August 30, 2005
KitMaker: 3,289 posts
Auto Modeler: 1,620 posts
Posted: Monday, February 08, 2010 - 03:33 PM UTC
Quoted Text
Looking good Bob - did those seat belts come with the kit ? That's one thing that is missing from my Enzo and I was wondering if I should add them.
Thank you, and yes they did. Dang sanding dust gets over everything don't it!...it'd be unacceptable except its from ferrari build #2{BB512}.
-I say I have two kids- one son & one daughter...my wife says she has three- one son ,one daughter and one husband.
...and don't tell yourself you can't do it....it'll just take longer then
Illinois, United States
Joined: August 30, 2005
KitMaker: 3,289 posts
Auto Modeler: 1,620 posts
Posted: Monday, February 08, 2010 - 03:37 PM UTC
Nice start....alittle paint and washes in the engine compartment will bring in some depth and detail.
-I say I have two kids- one son & one daughter...my wife says she has three- one son ,one daughter and one husband.
...and don't tell yourself you can't do it....it'll just take longer then
North Carolina, United States
Joined: November 28, 2005
KitMaker: 2,216 posts
Auto Modeler: 522 posts
Posted: Tuesday, February 09, 2010 - 01:05 PM UTC
Bob, you've put the steering wheel on the wrong side.
Ian, looks like that dash has quite a bit of detail. What kit is that again?
Hermon
"Those who would give up Essential Liberty
to purchase a little Temporary Safety,
deserve neither Liberty nor Safety."
Benjamin Franklin
England - South East, United Kingdom
Joined: April 02, 2007
KitMaker: 35 posts
Auto Modeler: 20 posts
Posted: Friday, February 12, 2010 - 11:58 AM UTC
Quoted Text
Ian, looks like that dash has quite a bit of detail. What kit is that again?
Hermon
Hermon, its the Fujimi Enzo Ferrari, 1/24 scale. I was just looking at the dash on your Datsun 240Z - how did you highlight the details ?
California, United States
Joined: October 21, 2007
KitMaker: 3,684 posts
Auto Modeler: 294 posts
Posted: Saturday, February 13, 2010 - 09:31 PM UTC
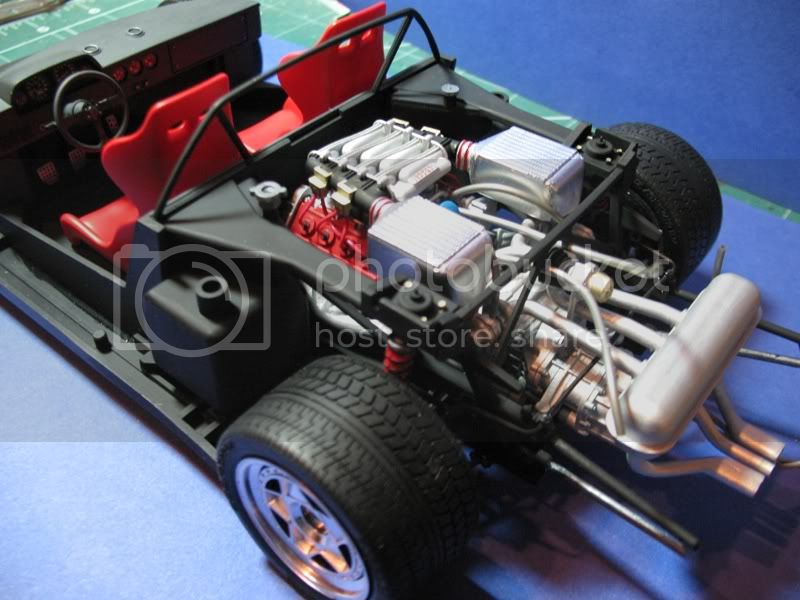
Just a quick update to show I'm still going on this

Body parts are all painted red, chassis is nearly finished. Thankfully there are not many decals, as they're not in very good condition. I see some flash that still needs to be removed. Maybe about 75% done, might even finish this thing!
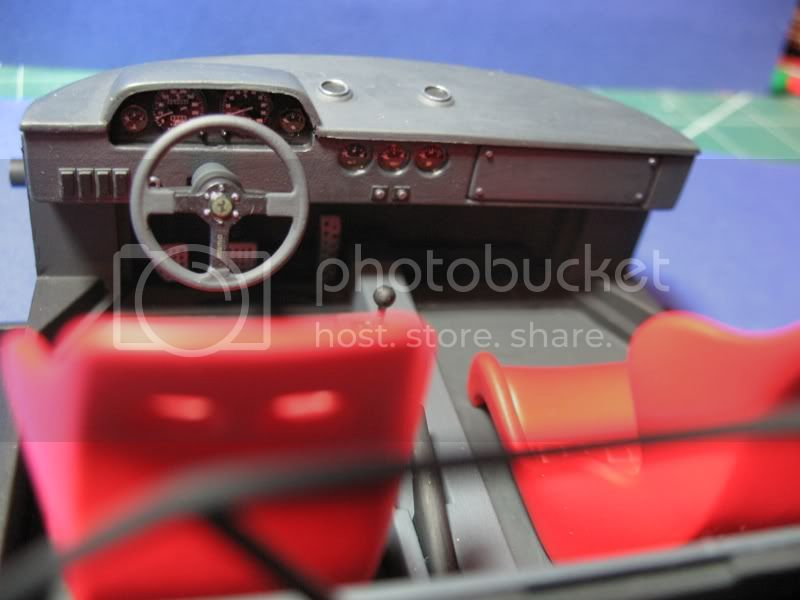
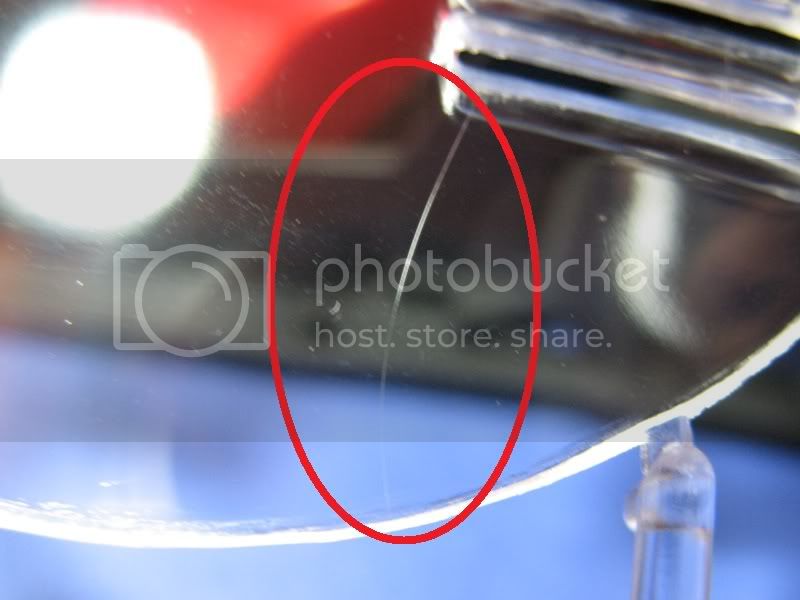
After taking the clear sprue out of it's bag, I noticed these flaws, granted it's an older kit and maybe molding technology couldn't do any better. Any suggestions on how (if possible) to fix these lines? They are on almost every clear part, I've tried coating with future with no luck.
North Carolina, United States
Joined: November 28, 2005
KitMaker: 2,216 posts
Auto Modeler: 522 posts
Posted: Sunday, February 14, 2010 - 07:07 AM UTC
James, for someone who is new to building model cars and has no experience, that looks awsome. You been sandbaggin' on us or what?

There is a thread somewhere on kitmaker dealing with the scratched clear plastic issues. Can't remember where or how long ago it was that I read it but it's there. Basically it involves lots of sanding and buffing and polishing. I've heard some guys use toothpaste as well. Give it a search.
Hermon
"Those who would give up Essential Liberty
to purchase a little Temporary Safety,
deserve neither Liberty nor Safety."
Benjamin Franklin
England - South East, United Kingdom
Joined: April 02, 2007
KitMaker: 35 posts
Auto Modeler: 20 posts
Posted: Sunday, February 14, 2010 - 10:49 AM UTC
James, you can fix this with a bit of effort. I was sceptical like you - I had an aircraft canopy with a bad seam line down the middle. I ground it down finally with 2000 grit wet/dry paper, polished it and coated in Klear and it looked perfectly clear by the end.
California, United States
Joined: October 21, 2007
KitMaker: 3,684 posts
Auto Modeler: 294 posts
Posted: Sunday, February 14, 2010 - 12:29 PM UTC
Hermon, thanks! I'm just learning from the pro's (you guys)
Ian, thanks for the tip, I'll try it on one of the pieces that won't be seen. This is more
in the glass than
on it, so if that doesn't work I'll do some searching on the sites.