Ontario, Canada
Joined: February 04, 2008
KitMaker: 2,507 posts
Auto Modeler: 409 posts
Posted: Thursday, August 11, 2016 - 05:42 AM UTC
Thanks Jim!
Here is my completed entry:-
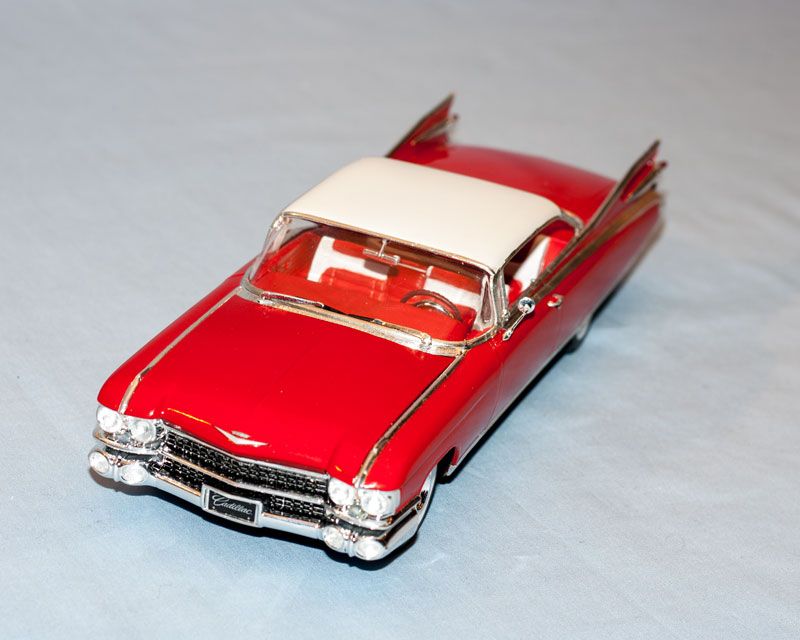
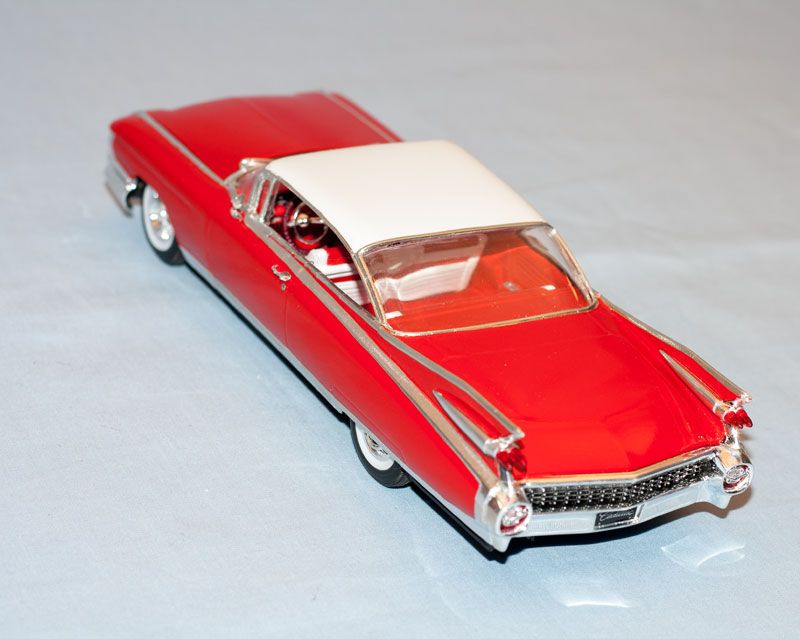

First time using BMF on an auto!
Thanks for the group build!

" The Die Hards"
43rd MIDDLESEX REGIMENT
MACHINE GUN CORPS
XXX CORP
The most effective way to do it, is to do it.
- Amelia Earhart
New York, United States
Joined: August 25, 2006
KitMaker: 2,539 posts
Auto Modeler: 1,405 posts
Posted: Thursday, August 11, 2016 - 07:20 AM UTC
That looks great, Richard. Definitely qualifies as Big Fins & Chrome!
Jim
"Socialism is a philosophy of failure, the creed of ignorance, and the gospel of envy, its inherent virtue is the equal sharing of misery." ---- Winston Churchill
Kobenhavn, Denmark
Joined: June 29, 2004
KitMaker: 6,760 posts
Auto Modeler: 2,182 posts
Posted: Thursday, August 11, 2016 - 10:35 AM UTC
On the workbench:
MPC: 1972 Pontiac GTO
Revell: 1965 Mustang
Verlinden 120mm guard of the marine.
Revell: 2010 Camaro
Monogram: 1931 Rolls Royce
Italeri: LVT2 Amtrac
Ontario, Canada
Joined: February 04, 2008
KitMaker: 2,507 posts
Auto Modeler: 409 posts
Posted: Saturday, August 13, 2016 - 02:18 AM UTC
Thank's for the comments!
I enjoyed this build and learned a few things on the way

" The Die Hards"
43rd MIDDLESEX REGIMENT
MACHINE GUN CORPS
XXX CORP
The most effective way to do it, is to do it.
- Amelia Earhart
Wisconsin, United States
Joined: March 08, 2016
KitMaker: 128 posts
Auto Modeler: 31 posts
Posted: Friday, August 19, 2016 - 10:34 PM UTC
Nice looking build Richard. It all came together beautifully. Great work on the miles of BMF!
AussieReg
 Associate Editor
#007
Victoria, Australia
Joined: June 09, 2009
KitMaker: 8,156 posts
Auto Modeler: 2,953 posts
Posted: Wednesday, August 24, 2016 - 06:00 PM UTC
Very nicely done Richard, congrats on getting finished! How did you go with the BMF? I have a couple of sheets in the stash but haven't tried it out yet.
Some minor assembly on the chassis and a third coat of clear tonight on the body for my build.


Cheers, D
ON the bench
Revell 1/24 '53 Corvette (building as '54)
Revell 1/24 BMW 507 Coupe and Cabrio
Italeri 1/48 Me262 B-1a/U1 Nightfighter
Monogram 1/24 '57 Chevy Nomad
Dragon 1/350 USS Frank Knox DD-742
New York, United States
Joined: August 25, 2006
KitMaker: 2,539 posts
Auto Modeler: 1,405 posts
Posted: Thursday, August 25, 2016 - 07:36 AM UTC
"Socialism is a philosophy of failure, the creed of ignorance, and the gospel of envy, its inherent virtue is the equal sharing of misery." ---- Winston Churchill
Wisconsin, United States
Joined: March 08, 2016
KitMaker: 128 posts
Auto Modeler: 31 posts
Posted: Thursday, August 25, 2016 - 08:12 AM UTC
^ I agree. Nice work.
Pretty cool that there's at least 3 people who haven't used BMF before this campaign. My biggest challenge with the ultra bright chrome bmf was it's tensile strength and it's resistance to stick to the surface. I used new blades but I think I applied too much pressure a few times and tore a couple pieces. I tore some taking it off of the sheet trying to keep a low angle instead of pulling straight up. I was doing that to avoid the curly ribbon the strips like to turn into.. I tried cleaning my surfaces with a couple different things but nothing worked all that well. Paint is well cured so Idk what the deal is. During my next application I'm going to try heating the sheet up with a light bulb to warm the adhesive.
Ontario, Canada
Joined: February 04, 2008
KitMaker: 2,507 posts
Auto Modeler: 409 posts
Posted: Sunday, August 28, 2016 - 04:01 AM UTC
Hi Andrew.
I use a glass photo frame to cut all masking tape and BMF still on its backing sheet, here is a link to a feature I did on Aeroscale:-
http://aeroscale.kitmaker.net/features/5161I sharpen a new #11 blade with a fine sanding stone to get and keep blade ultra sharp!
The BMF sheet has to be free of any wrinkles and dead smooth otherwise it will tear when you remove it from the backing sheet.
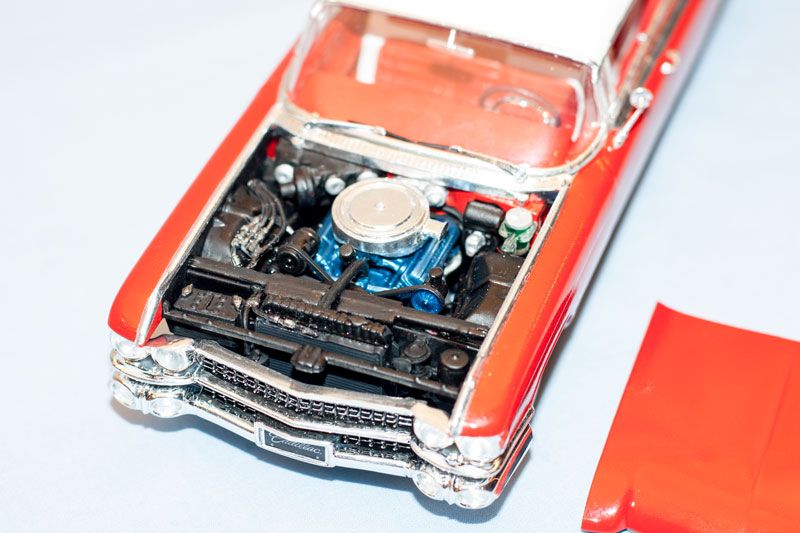
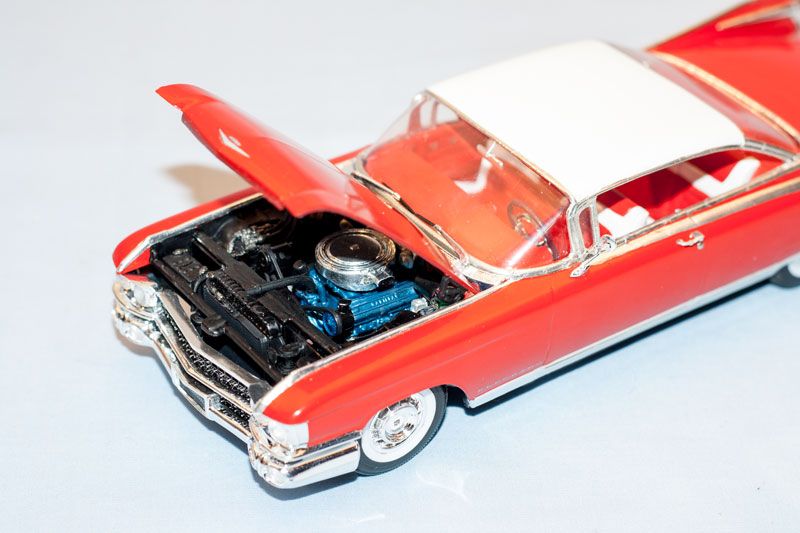
Damian reminded me with his posting that I forgot to post engine photos:-
" The Die Hards"
43rd MIDDLESEX REGIMENT
MACHINE GUN CORPS
XXX CORP
The most effective way to do it, is to do it.
- Amelia Earhart
Kobenhavn, Denmark
Joined: June 29, 2004
KitMaker: 6,760 posts
Auto Modeler: 2,182 posts
Posted: Sunday, August 28, 2016 - 11:05 AM UTC
Looking good Damian.
Excellent engine shot Richard. It's really packed in there, isn't it.
On the workbench:
MPC: 1972 Pontiac GTO
Revell: 1965 Mustang
Verlinden 120mm guard of the marine.
Revell: 2010 Camaro
Monogram: 1931 Rolls Royce
Italeri: LVT2 Amtrac
Ontario, Canada
Joined: February 04, 2008
KitMaker: 2,507 posts
Auto Modeler: 409 posts
Posted: Monday, August 29, 2016 - 02:21 AM UTC
Thank you Jesper!
" The Die Hards"
43rd MIDDLESEX REGIMENT
MACHINE GUN CORPS
XXX CORP
The most effective way to do it, is to do it.
- Amelia Earhart
Wisconsin, United States
Joined: March 08, 2016
KitMaker: 128 posts
Auto Modeler: 31 posts
Posted: Monday, August 29, 2016 - 08:59 AM UTC
Richard, the engine looks lovely all nestled in there. Thanks for the tips. I've been meaning to buy some form of sharpening utensil. I was thinking I might try mdf on a grinder since I have those things now. I was disappointed enough by the xacto blades I bought recently that I wrote them an email. They did offer to replace them but I didn't take them up on it. I did come across my strop today so I can at least realign my old blades.
I too use glass to cut tape. I haven't used this on anything yet but I cut thin strips of electrical tape and wrapped a sanded wire (to keep the tape from sliding) with it by rolling it in my fingers and thumbs and going down the length of it while overlapping the last "turn" to simulate wiring harnesses. It works well and could be bent to shape after the tape was on. Forgot all about it until now so thanks for the reminder!
Wisconsin, United States
Joined: September 11, 2009
KitMaker: 1,917 posts
Auto Modeler: 268 posts
Posted: Sunday, September 11, 2016 - 03:41 AM UTC
Wow, you have all set the bar high.
Nonetheless, I'm entering the fray. Here's our (my son and my) starting photo.
https://flic.kr/p/LXteuGUgh. I can't find the bb code on my phone, but I'll get there!
Cheers!
-Sean
Current: model railroad layout
Stalled a while ago:
. 1950's Chrome, WW II Twins
Last completed: Police Car
Wisconsin, United States
Joined: September 11, 2009
KitMaker: 1,917 posts
Auto Modeler: 268 posts
Posted: Monday, September 12, 2016 - 08:14 PM UTC
Here's the starting pic...
 Fins and Chrome 50's start
 by
windysean, on Flickr
Cheers!
-Sean.

Current: model railroad layout
Stalled a while ago:
. 1950's Chrome, WW II Twins
Last completed: Police Car
Kobenhavn, Denmark
Joined: June 29, 2004
KitMaker: 6,760 posts
Auto Modeler: 2,182 posts
Posted: Tuesday, September 13, 2016 - 10:56 AM UTC
On the workbench:
MPC: 1972 Pontiac GTO
Revell: 1965 Mustang
Verlinden 120mm guard of the marine.
Revell: 2010 Camaro
Monogram: 1931 Rolls Royce
Italeri: LVT2 Amtrac
Wisconsin, United States
Joined: September 11, 2009
KitMaker: 1,917 posts
Auto Modeler: 268 posts
Posted: Monday, September 19, 2016 - 07:42 PM UTC
Here's an update on where I'm at lately.
 Because of the order of assembly, I had to spray the front of the frame first, before further parts.
 by
windysean, on Flickr
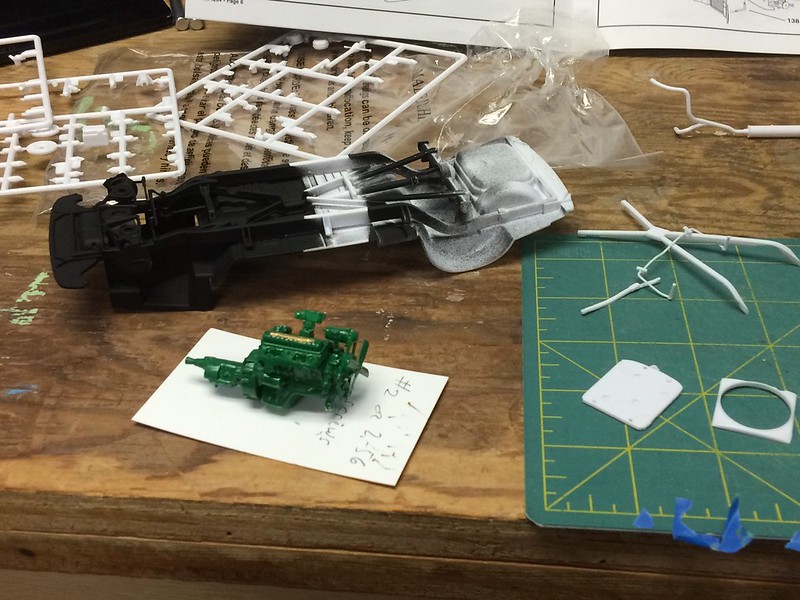
I didn't add wiring or detail to the engine, but painted up what the kit gave me. (My kids keep asking why I'm painting details that will be under the hood.)
We're getting near the point where we have to get the body paint. I let my son pick the metallic green, like the box art, from the paint scheme list, but I chose to give ours a black roof to emphasize 1950's tastes.
Cheers!
-Sean H.

Current: model railroad layout
Stalled a while ago:
. 1950's Chrome, WW II Twins
Last completed: Police Car
Wisconsin, United States
Joined: March 08, 2016
KitMaker: 128 posts
Auto Modeler: 31 posts
Posted: Monday, September 19, 2016 - 11:26 PM UTC
Nice work, Sean. The engine looks cool in that color. Most of my Automobile knowledge is from the 1960's and later. Was that an original engine color for the 50 Olds? Who's race car is included in that kit?
Your kids have a very legitimate question. Sometimes I wonder the very same thing but we gotta do what's right lol
Looking forward to seeing more of that beauty.
Kobenhavn, Denmark
Joined: June 29, 2004
KitMaker: 6,760 posts
Auto Modeler: 2,182 posts
Posted: Tuesday, September 20, 2016 - 11:17 AM UTC
Coming along fine there Sean.
On the workbench:
MPC: 1972 Pontiac GTO
Revell: 1965 Mustang
Verlinden 120mm guard of the marine.
Revell: 2010 Camaro
Monogram: 1931 Rolls Royce
Italeri: LVT2 Amtrac
Wisconsin, United States
Joined: September 11, 2009
KitMaker: 1,917 posts
Auto Modeler: 268 posts
Posted: Tuesday, September 20, 2016 - 08:00 PM UTC
Quoted Text
Nice work, Sean. The engine looks cool in that color. Most of my Automobile knowledge is from the 1960's and later. Was that an original engine color for the 50 Olds? Who's race car is included in that kit?
Your kids have a very legitimate question. Sometimes I wonder the very same thing but we gotta do what's right lol
Looking forward to seeing more of that beauty.
Yes, the engine in the 1950 Olds is green, and the kit includes the Oldsmobile Rocket and other decals for the engine too. I referred to photos found on the internet (in Hemmings Motor News, mostly).
 motor and frame
 by
windysean, on Flickr
There are two different racing decals-- a Mexican PanAmerica race entry and Buck Baker's stock car.
Cheers!
Sean
Current: model railroad layout
Stalled a while ago:
. 1950's Chrome, WW II Twins
Last completed: Police Car
AussieReg
Associate Editor #007
Victoria, Australia
Joined: June 09, 2009
KitMaker: 8,156 posts
Auto Modeler: 2,953 posts
Posted: Wednesday, September 21, 2016 - 03:54 AM UTC
Great progress folks, loving these classic builds!
A setback for me, I was trying out gloss acrylic black and clear to see if I could get the sheen level that I was happy with but it just didn't come up how I wanted. I started to give it a wet polish with some very fine sanding pads and almost instantly went straight though to the base plastic

I am away from home on a work trip at the moment, but when I get home I plan to strip the paint all off the body and hood and repaint with Tamiya Gloss Black from a rattle can.
The chassis and engine are all good, no issues there.
Keep up the great work folks.
Cheers, D
ON the bench
Revell 1/24 '53 Corvette (building as '54)
Revell 1/24 BMW 507 Coupe and Cabrio
Italeri 1/48 Me262 B-1a/U1 Nightfighter
Monogram 1/24 '57 Chevy Nomad
Dragon 1/350 USS Frank Knox DD-742
New York, United States
Joined: August 25, 2006
KitMaker: 2,539 posts
Auto Modeler: 1,405 posts
Posted: Friday, September 23, 2016 - 01:17 AM UTC
So I managed to get some more work done on the 1957 Ford Chief's Car.


Jim
"Socialism is a philosophy of failure, the creed of ignorance, and the gospel of envy, its inherent virtue is the equal sharing of misery." ---- Winston Churchill
New York, United States
Joined: August 25, 2006
KitMaker: 2,539 posts
Auto Modeler: 1,405 posts
Posted: Monday, October 17, 2016 - 03:39 AM UTC
Coming down to the wire, guys! Only 14 day left.
Jim
"Socialism is a philosophy of failure, the creed of ignorance, and the gospel of envy, its inherent virtue is the equal sharing of misery." ---- Winston Churchill
Kobenhavn, Denmark
Joined: June 29, 2004
KitMaker: 6,760 posts
Auto Modeler: 2,182 posts
Posted: Monday, October 17, 2016 - 03:01 PM UTC
Looks great James.
Have done a fair amount of work, but will not be finished within 14 days.
Will post images soon.
On the workbench:
MPC: 1972 Pontiac GTO
Revell: 1965 Mustang
Verlinden 120mm guard of the marine.
Revell: 2010 Camaro
Monogram: 1931 Rolls Royce
Italeri: LVT2 Amtrac
New York, United States
Joined: August 25, 2006
KitMaker: 2,539 posts
Auto Modeler: 1,405 posts
Posted: Monday, October 17, 2016 - 09:58 PM UTC
Thanks, Jesper.
I just have all the little fiddly details to do on the body, then I can call it done! I'm hoping to get some bench time this weekend, but I doubt it.
Jim
"Socialism is a philosophy of failure, the creed of ignorance, and the gospel of envy, its inherent virtue is the equal sharing of misery." ---- Winston Churchill
Wisconsin, United States
Joined: March 08, 2016
KitMaker: 128 posts
Auto Modeler: 31 posts
Posted: Tuesday, October 18, 2016 - 05:03 AM UTC
I'd better get going on this!


