Trucks
Scale truck modeling topics.
How about another Keep On Truckin gig?
Dragon164
#226
_VISITCOMMUNITY
British Columbia, Canada
Joined: February 20, 2012
KitMaker: 1,909 posts
Auto Modeler: 118 posts
Posted: Saturday, July 21, 2018 - 08:08 AM UTC
Looks good Gabriel!
Nice choice Delbert!
That looks interesting Mark.

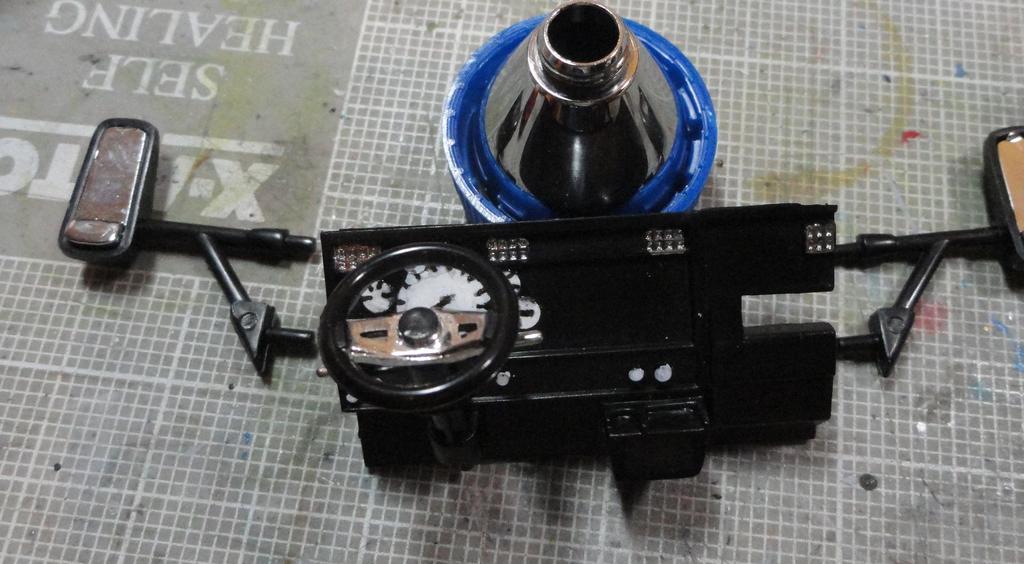
I think I have finished with fighting these decals now it's time to fight with the chrome!

Cheers Rob.


md72
#439
_VISITCOMMUNITY
Washington, United States
Joined: November 05, 2005
KitMaker: 4,950 posts
Auto Modeler: 555 posts
Posted: Saturday, July 21, 2018 - 08:57 AM UTC
I first thought 1:28 was to compete with the die-cast collectibles, but they look like 1:43, 1:62, 1:24 and 1:18 are the most common. I guess the 1:28 was a victory of the Finance department over Marketing. The extra 1-2% increase in cost for the larger tools must have been the deciding factor...
Szmann
_VISITCOMMUNITY
Netherlands Antilles
Joined: September 02, 2014
KitMaker: 1,977 posts
Auto Modeler: 1,371 posts
Posted: Sunday, July 22, 2018 - 01:42 AM UTC
It looks nice, Rob!

About "fighting the chrome": I just bought a ultra-sound cleaner for my airbrushes and empty jars... I wonder if I can use it for removing the chrome plating? Did somebody try it yet? On my Mack build I was successful in removing the chrome but not as successful in removing the lacquer MPC used as base coat for chrome. And dipping too long the parts in oven cleaner or Clorox leads to softening the plastic... one cannot overdo it!

Gabriel
Dragon164
#226
_VISITCOMMUNITY
British Columbia, Canada
Joined: February 20, 2012
KitMaker: 1,909 posts
Auto Modeler: 118 posts
Posted: Sunday, July 22, 2018 - 11:26 AM UTC
Thanks, I don't want to remove it I just wish I had a Molotow refill so I could airbrush it!

Cheers Rob.
Delbert
#073
_VISITCOMMUNITY
Pennsylvania, United States
Joined: October 05, 2002
KitMaker: 2,659 posts
Auto Modeler: 26 posts
Posted: Sunday, July 22, 2018 - 02:26 PM UTC
Hello To All.

Rob.. looking good.. nice job on the decals making those look good is half the battle.. :>

Gabriel.. I've had some success in removing chrome by lightly spraying with oven cleaner and putting them in a ziplock bag overnight.. remove, brush and rinse, repeat as necessary. I used this to remove the chrome from a lindberg kit and had no problem with parts getting soft.

Now on to my progress on the 1923 Delivery "T"

Today I airbrushed various small parts, the Chassis, and the body Interior Flat Black.

Now for the Twist. I used Vallejo Model Color Black Acrylic paint. This is only the 2nd time I have airbrushed these. They require a lot of thinning.. about 50/50 in order to airbrush them.

And here is the uninspiring photo of some stuff painted black.. and yes I know I have to touch up the inner frame rails. Just couldn't shoot the paint in there completely.


so there u can see some progress.. lol
later
Delbert
TacFireGuru
_VISITCOMMUNITY
Colorado, United States
Joined: December 25, 2004
KitMaker: 3,770 posts
Auto Modeler: 359 posts
Posted: Sunday, July 22, 2018 - 03:34 PM UTC

Quoted Text

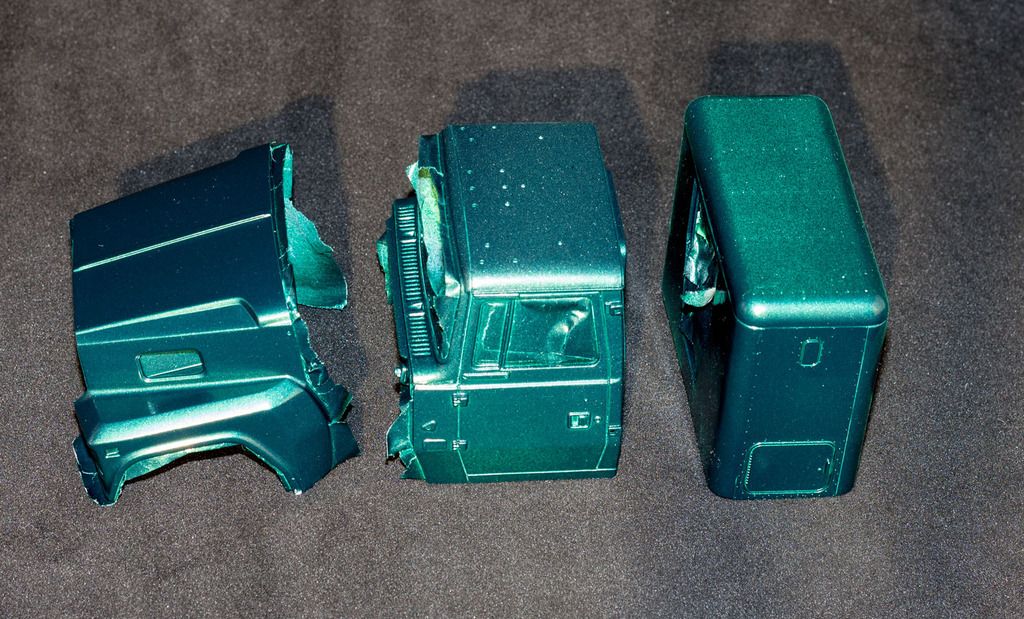
It's not the typical plastic assembly kit. So I hope it's allowed.


MD, looks good to me. Welcome aboard.

Rob, decals look good to me! I have the Molotow refill - just haven't had any chrome to try it on. Honestly, I think I'd clean the chrome off first, then shoot the Molotow.

Regarding Chrome Removal:

I used to use oven cleaner. Never had any plastic melt and I've let it soak for a few days. Different kits, different plastic?

I now use Purple Power. Much quicker and "cleaner." Less hassle too. It's readily available in the States, but not sure about overseas. Something to look into? Pour it into a container, set the parts in and (literally) watch it start to remove the chrome.

Regarding that clear coat that's under the chrome - Primer will cover and adhere to it just fine, in my rather limited experiences. Purple Power and Primer was used on my Mack and the paint over that came out nice...

Delbert, Model Color is great for brush work but it sure does need to be thinned for the AB. 80% of my Vallejo is now Model Air. It can be touched up with a brush straight from the bottle - light coats with a good brush works and you can hardly tell if it gets "feathered" to the AB'd paint.

Mike
md72
#439
_VISITCOMMUNITY
Washington, United States
Joined: November 05, 2005
KitMaker: 4,950 posts
Auto Modeler: 555 posts
Posted: Monday, July 23, 2018 - 07:33 AM UTC
Thanks Mike. But I might have to back off on that 25% complete. I had to remove a bunch of parts last night when I found out the previous owner had closed up the rear differentials without trapping the axles in place. Then I found the missing Cooling fan and had to disassemble half of the engine to install it. Luckily I think he use the Testors Wood and Metal glue and it didn't work well on some of the plastic to plastic joints.....
Szmann
_VISITCOMMUNITY
Netherlands Antilles
Joined: September 02, 2014
KitMaker: 1,977 posts
Auto Modeler: 1,371 posts
Posted: Wednesday, August 01, 2018 - 01:50 PM UTC
Slow like cold molasses probably summarizes my build on the Mack DM600. Always a step forward means a couple steps backwards

small UPDATE

Time has come to add the last bits to the chassis frame. The turbo exhaust pipe it's a naughty one.

First I sprayed the pipe gloss black with Krylon, then applied gloss polyurethane and finally Alclad polished aluminum


I was quite pleased with the result and moved to heat stains. That was mostly a style exercise because just a tiny bit will be visible (on the mirrored base that is).


Again, quite content I tried to install the pipe 
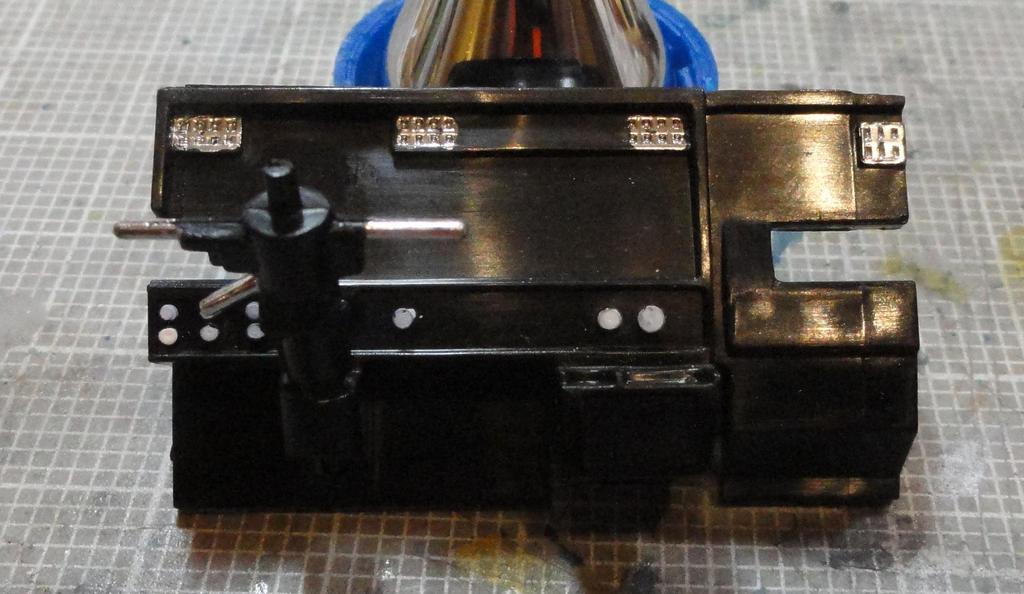
and the circus began. First I knocked down an engine sub-assembly - easy fix I thought. Then I realized I need to move the engine a little bit. I was congratulating myself that I had the engine only tacked in place, because I was expecting surprises And fiddling with the engine and with the turbo exhaust in the same time, I knocked down the exhaust stack Now I have to install all three in the same time and I desperately need to grow another pair of hands for that single purpose. The saddest part of the story begins only now: the intake pipe it's still to be installed and the radiator hose follows some time after. The instructions manual it's warning already that the radiator hose might need trimming
oh, well...
Cosimodo
#335
_VISITCOMMUNITY
Auckland, New Zealand
Joined: September 03, 2013
KitMaker: 1,808 posts
Auto Modeler: 701 posts
Posted: Wednesday, August 01, 2018 - 10:29 PM UTC
Keep at it Gabriel! The pipe is looking good... the rest is just the modelling gods reminding us it isn't always meant to be easy
Szmann
_VISITCOMMUNITY
Netherlands Antilles
Joined: September 02, 2014
KitMaker: 1,977 posts
Auto Modeler: 1,371 posts
Posted: Sunday, August 05, 2018 - 12:38 AM UTC
Thank you, Michael. I hope the modelling gods go picking in another build, because this one has seen too much already Or maybe that's the "chosen one"? LOL! My faith it's being really tested

UPDATE

I managed to install the turbo exhaust pipe without the second pair of hands. However, I was well sweating over it. Somehow I even preserved all surrounding details intact (WOW!)

There was no way to make the turbo exit and muffler inlet connect properly. There is a 2mm gap where the pipe ends before meeting the muffler. I could force it but in doing so I would have the engine completely lifted from the mounts and I am quite sure it's sitting as high as the space under cab allows (I dry fitted them). I guess I'm going to live with that - I don't feel like tearing everything apart again and stretching the pipe with heat... no way. And to see the gap you really need to crawl under the truck and you're not allowed to, OK?!

I also installed the rear fenders - I still need to scratch build the mud guards. On a second thought, it would have been better if I would made the designs mirrored, but now it's awfully late for such change of heart


And so she's looking thus far. I will install soon the fifth wheel - it's still in the painting booth because - you guessed - I'm running some paint experiment on it like I don't have enough trouble already!


Cheers!
Gabriel
Delbert
#073
_VISITCOMMUNITY
Pennsylvania, United States
Joined: October 05, 2002
KitMaker: 2,659 posts
Auto Modeler: 26 posts
Posted: Sunday, August 05, 2018 - 05:52 AM UTC
Hello again..

and that is some extreme detail there Gabriel.

Well I got the base coat of flat red on my delivery van.. will have to sand a couple of places and mist over a 2nd coat to get it up to par.. I used Vallejo Flat Red for this as I am experimenting with this paint for this build. The red seems to be a little smoother than the black was.. anyways here is the photo..


later
Delbert
md72
#439
_VISITCOMMUNITY
Washington, United States
Joined: November 05, 2005
KitMaker: 4,950 posts
Auto Modeler: 555 posts
Posted: Sunday, August 05, 2018 - 04:43 PM UTC
Well the the dashboard on this truck is beyond bland.

just a basic black molded part. I added Molotov Chrome to the AC vents and the stalks on the column. A little white paint on the knobs. Next up some paper cutouts for some instruments, and a speedometer.

It's not that the kit had decals or stickers that didn't survive till I got the kit, there's no indication that they evenr intened to add them to the kit.
Szmann
_VISITCOMMUNITY
Netherlands Antilles
Joined: September 02, 2014
KitMaker: 1,977 posts
Auto Modeler: 1,371 posts
Posted: Monday, August 06, 2018 - 01:18 AM UTC
Delbert, thank you! That red looks intriguing. I find it just fine like that. A too matte appearance will kill the "life" in it. I don't know how far you want to go with the weathering - if would be me I would add some discoloration with dry pastel pigments

Mark, it's easy to add some detail to that dash from sliced sprue for knobs and pieces of styrene for 3d effect. Not sure if the effort it's well worth though (?)

UPDATE
And here's the completed chassis of the beast... more delicious cab detailing follows


Cheers!
Gabriel
tinbanger
_VISITCOMMUNITY
Ontario, Canada
Joined: February 04, 2008
KitMaker: 2,507 posts
Auto Modeler: 409 posts
Posted: Monday, August 06, 2018 - 09:07 AM UTC
Great work guys!
Here is my update:-

Dragon164
#226
_VISITCOMMUNITY
British Columbia, Canada
Joined: February 20, 2012
KitMaker: 1,909 posts
Auto Modeler: 118 posts
Posted: Monday, August 06, 2018 - 12:49 PM UTC
Some nice work guys!

I got the chrome fixed!
So the grill is now done.

Cheers Rob.

TacFireGuru
_VISITCOMMUNITY
Colorado, United States
Joined: December 25, 2004
KitMaker: 3,770 posts
Auto Modeler: 359 posts
Posted: Monday, August 06, 2018 - 02:50 PM UTC
A lot of nice things are happening! Lookin' good y'all!

Mike
md72
#439
_VISITCOMMUNITY
Washington, United States
Joined: November 05, 2005
KitMaker: 4,950 posts
Auto Modeler: 555 posts
Posted: Monday, August 06, 2018 - 04:42 PM UTC
Added some paper gauges to dress it up a bit. I think you'll be able to see some of them once it's installed.

Cosimodo
#335
_VISITCOMMUNITY
Auckland, New Zealand
Joined: September 03, 2013
KitMaker: 1,808 posts
Auto Modeler: 701 posts
Posted: Monday, August 06, 2018 - 09:13 PM UTC
Rob,
Nice work on the grill. I wish I had done that on mine and put the black on.

cheers

Michael
Dragon164
#226
_VISITCOMMUNITY
British Columbia, Canada
Joined: February 20, 2012
KitMaker: 1,909 posts
Auto Modeler: 118 posts
Posted: Tuesday, August 07, 2018 - 05:19 AM UTC
Thanks!

A little Molotow through an airbrush and some ink stuff I picked up somewhere.

Cheers Rob.
Szmann
_VISITCOMMUNITY
Netherlands Antilles
Joined: September 02, 2014
KitMaker: 1,977 posts
Auto Modeler: 1,371 posts
Posted: Tuesday, August 07, 2018 - 04:15 PM UTC
Rob I really like how you you've got that grille. Well done!

Mark, you made it. Good enough for me (and Bobby McGee )

UPDATE

With the chassis now complete and with the trailer out of the way, I found the time to fiddle with the "juicy parts"

I started detailing the dash and applied some color to it - a mix of acrylics across three brands. The detail is very soft and my skills rusty - I didn't get the best of jobs, but there is still hope. I'm waiting for the paints to dry before applying a gloss wash and instrument "lenses" from Micro Crystal Clear:


I also added the A/C control panel inside the cab (man, I hate those pin marks).


On the outside of the cab, I added the unit's radiator and the wind trap:


Hopefully by tomorrow I will have the lower cab ready, steering wheel and all...

Cheers!
Gabriel
md72
#439
_VISITCOMMUNITY
Washington, United States
Joined: November 05, 2005
KitMaker: 4,950 posts
Auto Modeler: 555 posts
Posted: Tuesday, August 07, 2018 - 04:33 PM UTC
Nice work Gabriel. IF, I ever build another truck, I'll look to this thread for ideas.
I'm calling this one DONE!

It was a good break from aircraft, a completely different skill set. But I still had fit issues and glue joints that were difficult.

I'm glad I took a shot at the paper dashboard. I think I'll try some different ideas next time.

Well, it looks like a big rig. And now I have a new problem, I don't have an place to put it now that it's finished.

Thanks guyz, it was a fun build, with great campaigners. See ya next time.
Szmann
_VISITCOMMUNITY
Netherlands Antilles
Joined: September 02, 2014
KitMaker: 1,977 posts
Auto Modeler: 1,371 posts
Posted: Tuesday, August 07, 2018 - 04:57 PM UTC
Cheers, Mark!

Well, cast metal or not, it turned out nicely.
Haha! It's a big IF right there, isn't! Same here, buddy! I'm not sure I'm done with the trucks in 1/24th scale, but I'm darn sure I'm done with MPC trucks. With Revell sunk, with AMT issuing only reboxes from '60s and with Italeri comitted to their poor quality at high prices, there is not so much from where to chose. A relatively new Revell might worth a try sometime.

You certainly contributed solidly to this campaign and the pleasure to have good company reciprocate. See you around, bud!

BTW: what's next?

Gabriel
md72
#439
_VISITCOMMUNITY
Washington, United States
Joined: November 05, 2005
KitMaker: 4,950 posts
Auto Modeler: 555 posts
Posted: Tuesday, August 07, 2018 - 05:20 PM UTC
Lots of half finished and almost started kits. Trying to finish off the F-94 I didn't get done for Aluminum Cans, a UH-1C extra from Vietnam 50. Think I'm behind on an A-36 for MTO and there are a couple of other campaigns to work on...
Szmann
_VISITCOMMUNITY
Netherlands Antilles
Joined: September 02, 2014
KitMaker: 1,977 posts
Auto Modeler: 1,371 posts
Posted: Tuesday, August 07, 2018 - 05:34 PM UTC

Quoted Text

Lots of half finished and almost started kits. Trying to finish off the F-94 I didn't get done for Aluminum Cans, a UH-1C extra from Vietnam 50. Think I'm behind on an A-36 for MTO and there are a couple of other campaigns to work on...


I shall see you at MTO campaign, because there's my next stop as well. My Airfix Ju-87 B (an R actually) it's i the briefing room right now and it's going to take off right after I finish this haunting truck

Gabriel
Szmann
_VISITCOMMUNITY
Netherlands Antilles
Joined: September 02, 2014
KitMaker: 1,977 posts
Auto Modeler: 1,371 posts
Posted: Wednesday, August 08, 2018 - 04:14 AM UTC
Hi, guys!

UPDATE

The lower half of the cab finished. Again, lots of fitting issues but eventually the dry fit shows it will slide tight into place.


The softness of detail sort of defeated my painting attempts, but the consolation prize is that not much is to be seen once the cab will be closed

Cheers!
Gabriel