The Garage
For general automotive modeling or non-modeling topics.
Blue Oval - Ford Motor Co. GB Build Thread
AussieReg
Staff MemberAssociate Editor
AUTOMODELER
#007
_VISITCOMMUNITY
Victoria, Australia
Joined: June 09, 2009
KitMaker: 8,156 posts
Auto Modeler: 2,953 posts
Posted: Tuesday, December 03, 2019 - 12:27 AM UTC
Mark, I'm feeling your pain mate. These Flatheads are really just an approximation, a lot of work needs to go into them to get them looking half decent.

The '36 landed on its wheels tonight, another significant step forward! I just need to add the headlights and the front and rear bumper assemblies, tidy up a few little touch-up spots, and it will be done!


Cheers, D
Joel_W
Staff MemberAssociate Editor
AUTOMODELER
_VISITCOMMUNITY
New York, United States
Joined: December 04, 2010
KitMaker: 11,666 posts
Auto Modeler: 2,974 posts
Posted: Tuesday, December 03, 2019 - 02:18 AM UTC
Mark,
I often find myself reflecting back to the good old days of being a kid in the very late 1950's through all the 1960's, and building one car kit after another, especially the few race cars that were available. Funny, but I just remember one nearly perfect build after another where everything fitted like a glove, and every part snapped of their sprue tree without any issues. Maybe it was my super low standards ( don't think that I actually had any), that I rarely if ever painted anything. Decals went right on raw plastic without a trace of Flash or Silvering. But 50+ years later the memories of kits like the MPC McLaren M8-B came out like IPMS National winners.

The reality of it is that what you're experiencing now is what those kits really are. The amount of work and effort needed to bring them up to acceptable levels can be mind boggling. Just the research you're doing has been not only time consuming, but has turned up numerous issues, discrepancies, & alternatives that would drive most of us over the line. Yet you're slowly creating a display model that will be heads and shoulders above what the AMT designers and mold makers ever envisioned.

Joel
Joel_W
Staff MemberAssociate Editor
AUTOMODELER
_VISITCOMMUNITY
New York, United States
Joined: December 04, 2010
KitMaker: 11,666 posts
Auto Modeler: 2,974 posts
Posted: Tuesday, December 03, 2019 - 02:21 AM UTC
D,
Lookin' real good. Can't wait till she rolls over the finish line.

Joel
md72
#439
_VISITCOMMUNITY
Washington, United States
Joined: November 05, 2005
KitMaker: 4,950 posts
Auto Modeler: 555 posts
Posted: Tuesday, December 03, 2019 - 07:21 PM UTC
Well Joel, I don't think I dreamed about contest winners. But I remember building a lot of cars without adding any paint. And in those days, they used screws with funky plastic threads to hold the chassis and body together. I remember building a bunch of Aurora planes, mostly Pipers and Beachcrafts, and I can't recall being concerned about the lack of details in the cockpits, or see through jets, or engine components not lining up. I think it was 2-3 years of building before my parents let me mess with any paint. Ah, those were the days.
Cosimodo
#335
_VISITCOMMUNITY
Auckland, New Zealand
Joined: September 03, 2013
KitMaker: 1,808 posts
Auto Modeler: 701 posts
Posted: Tuesday, December 03, 2019 - 07:35 PM UTC
Looking good Damian! Reflecting on the comments in the posts above, you have certainly shown what can becdone with old kits. Can wait to hear it rumble down the road.

Cheers
Michael
Joel_W
Staff MemberAssociate Editor
AUTOMODELER
_VISITCOMMUNITY
New York, United States
Joined: December 04, 2010
KitMaker: 11,666 posts
Auto Modeler: 2,974 posts
Posted: Wednesday, December 04, 2019 - 02:42 AM UTC
Mark,
I completely forgot about those two screws. But boy did you get a solid fit. Also, every single American car that I built had two solid axles for the wheels. Without paint, which like you I wasn't allowed to use in my room out of fear of ruining the carpet and my desk. I could finish a build start to finish in one Saturday afternoon.

Joel
PasiAhopelto
_VISITCOMMUNITY
Uusimaa, Finland
Joined: October 01, 2016
KitMaker: 514 posts
Auto Modeler: 44 posts
Posted: Wednesday, December 04, 2019 - 02:50 AM UTC
White paint done:


It's one layer of white primer and three or so layers of flat white. Both are from Tamiya spray cans.

I'll wait few days before masking and painting the red areas.
Joel_W
Staff MemberAssociate Editor
AUTOMODELER
_VISITCOMMUNITY
New York, United States
Joined: December 04, 2010
KitMaker: 11,666 posts
Auto Modeler: 2,974 posts
Posted: Wednesday, December 04, 2019 - 05:27 AM UTC
Pasi,
The color coat looks super smooth and quite glossy. My only concern that on my monitor he paint looks gray, as does the surface the body shell is on. Are both White? If so it could be a White Balance issue.

Joel
AussieReg
Staff MemberAssociate Editor
AUTOMODELER
#007
_VISITCOMMUNITY
Victoria, Australia
Joined: June 09, 2009
KitMaker: 8,156 posts
Auto Modeler: 2,953 posts
Posted: Thursday, December 05, 2019 - 10:51 AM UTC
Time for a "State of Play" post, I really like to see a snapshot of where things are at. If anybody spots an error in here, please let me know.

Aussiereg (Damian) - '36 Ford 5-Window Coupe - Final assembly stage
jimb (James) - '48 Deluxe Convertible - Body Prep, chassis and drive train assembly
Szmann (Gabriel) - '66 F-100 Flareside - Paint Stage
PasiAhopelto (Pasi) - '57 "Fireball Roberts" NASCAR - Body Painted
md72 (Mark) - '51 Custom Coupe - Body Prep Work
Littorio (Luciano) - '65 Falcon Ranchero or '60 Starliner - enlisted
Dixon66 (David) - 1st Generation Bronco - enlisted
Joel_W (Joel) - '85 Mustang Roush Body - Shell decalled and clear coated, frame and tub detailed
tinbanger (Richard) - '65 Mustang 2+2 Fastback - Primer
Cosimodo (Michael) - Escort RS1600 MkI 1973 RAC - Body Prep Work and drive train assembly, interior detailing
Ray_from_SA (Ray) - WRC Escort, Focus or Fiesta (or all 3 ??) - enlisted
Hwa-Rang (Jesper) - '65 Mustang 2+2 Fastback - Body Prep Work
betheyn (Andy) - enlisted
accessdenied (Roger) -
Propster (Stephen) -
Hudson29 (Paul) -
Delbert (Delbert) - enlisted
bluebell914 (Patrick) - 66 GT40 enlisted
heavyjagdpanzer (Bill) - Mustang "Blue Max" Funny Car - enlisted
Mechworker (Adam) -
IronHide (Arnel) -
Spruslayer (Mike) - '65 F-100 Service Truck - COMPLETED
forest1000 (David) - "Thunderbat" NASCAR - Painted, decals on, assembly pending
TacFireGuru (Mike) - Louisville Delivery Truck - Finishing touches
roman (Roman) - enlisted
JClapp (Jonathan) - '15 Model T - Parts Prep
Merlin (Rowan) - '40 Standard Coupe - Chassis/Engine Painted
Nick (Stickframe) - IMSA Mustang - COMPLETED
IronOwl (Sascha) - enlisted

Stats update:

9 weeks in, approaching 14,300 views and 360 posts
24 enlisted (new player IronOwl - Sascha)
13 builds in progress (2 in final stages)
2 builds completed

Cheers, D
AussieReg
Staff MemberAssociate Editor
AUTOMODELER
#007
_VISITCOMMUNITY
Victoria, Australia
Joined: June 09, 2009
KitMaker: 8,156 posts
Auto Modeler: 2,953 posts
Posted: Thursday, December 05, 2019 - 11:01 AM UTC
Pasi, great to see some colour going down on your '57! Looking forward to the next stage soon!

Cheers, D
Joel_W
Staff MemberAssociate Editor
AUTOMODELER
_VISITCOMMUNITY
New York, United States
Joined: December 04, 2010
KitMaker: 11,666 posts
Auto Modeler: 2,974 posts
Posted: Friday, December 06, 2019 - 08:24 AM UTC
D,
thanks for the update on the stats. The GB is still pretty active. I'm hoping that some of the guys that haven't started will start after the holidays.

Joel
Joel_W
Staff MemberAssociate Editor
AUTOMODELER
_VISITCOMMUNITY
New York, United States
Joined: December 04, 2010
KitMaker: 11,666 posts
Auto Modeler: 2,974 posts
Posted: Sunday, December 08, 2019 - 06:28 AM UTC
Finally, after two weeks without an update, I've got enough accomplished during this Holiday season to post another update. As I said in my last update, that polishing out the body shells was number 1 on my hit list, well, it just never happened. Just spent more time working on finishing up the engine compartment.

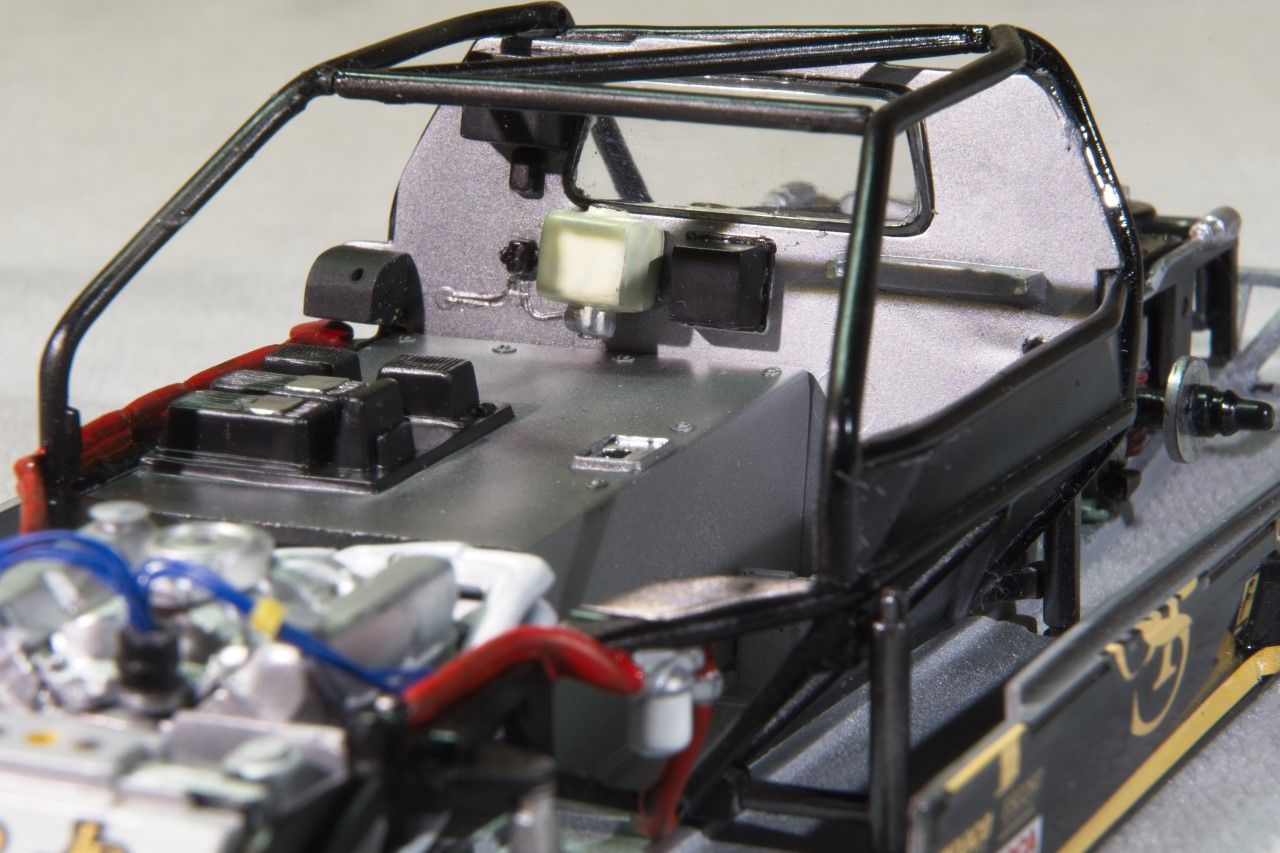
1st order of business was to glue the glass bukhead window in place, but 1st I had to paint the rubber glasket, which I did by hand painting Tamiya XF-69 Nato Black, then gluing it in place with Tamiya Extra Thin. Then glue the driver's compartment rear bulkhead to the chassis tubing. Turned out to be another gluing adventure. Only this time it was all my fault. The tubing is super glossy, and not even Tamiya Extra Thin would eat through all the layers of Tamiya X-1 Gloss Black. Then I tried CA glue, and it was basically another failure as it held, but would snap right off while working on the interior. So out came the 5 min Epoxy, a little scraping of the tubing, and the job was done.


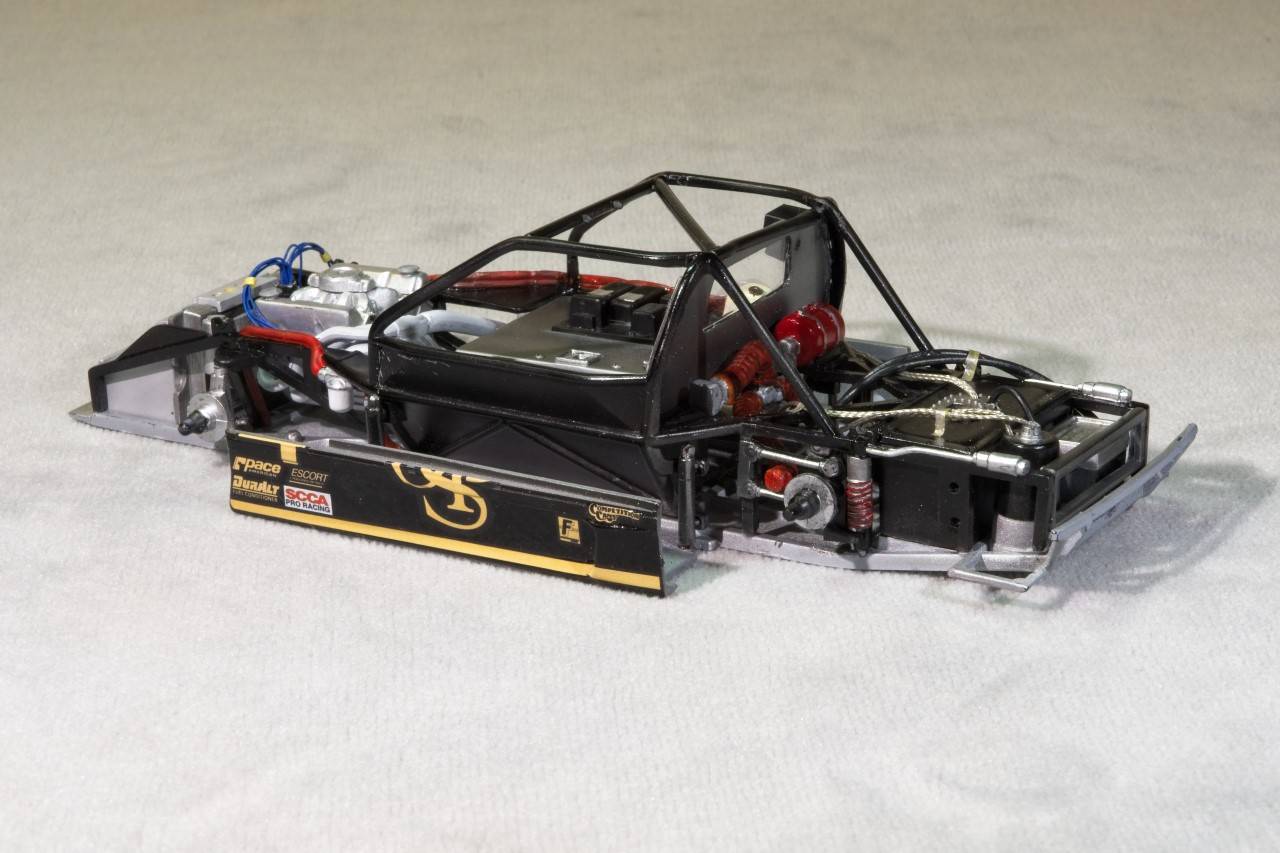
Now my undivided attention was focused on the engine/transmission sub assembly. The Roush Ford 358 ci V8 engine developed 650 hp running a single 4 barrel carb, and a Oil Dry Sump system. The kit parts fit basically well enough so that assembly was straight forward. However, the valve covers are the wrong ones, but I didn't have any spares so I used them with one modification. The breathers are just represented by a small raised circle?:


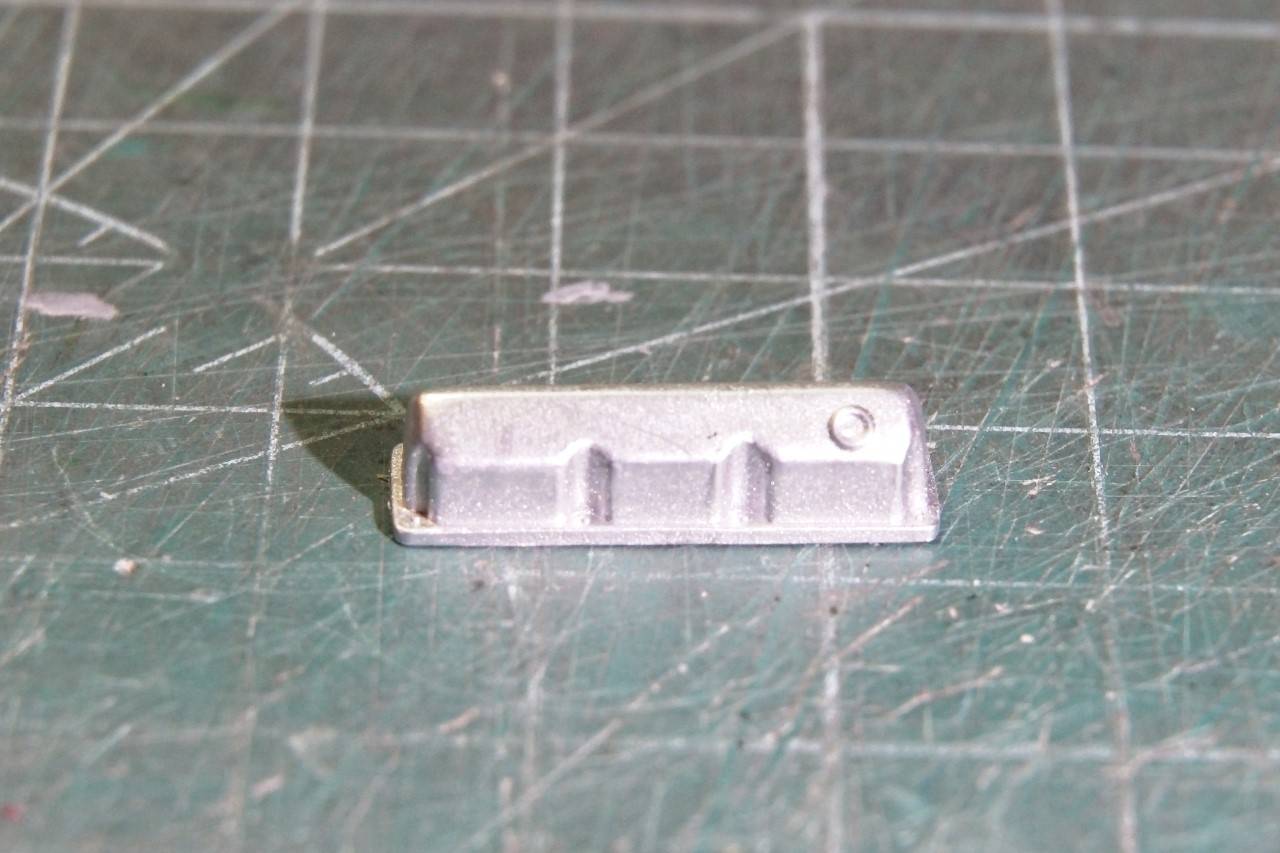
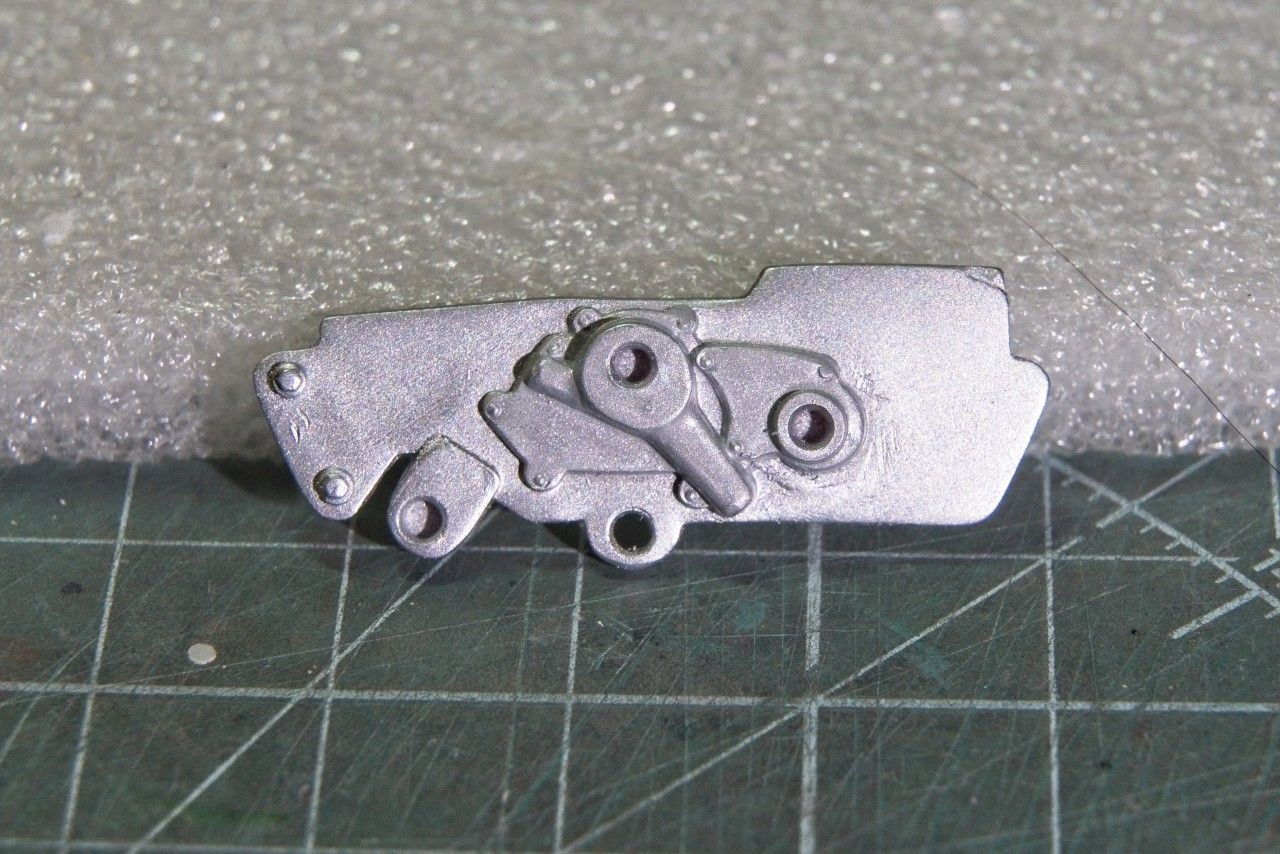
The Alloy Aluminum front plate was used as the main attachment points for the engine to the chassis, had some vaguely molded on parts that represented the ignigion coil and an over flow bottle. I just cut, filed, and sanded them off. I air brushed the plate Mr. Color Metalizer Steel, and then painted the water pump flat Aluminum. Unfortunately, I've never been able to really photograph the various shades of Aluminum Metalizer so that it looks like it does in person. This is the best I could do.


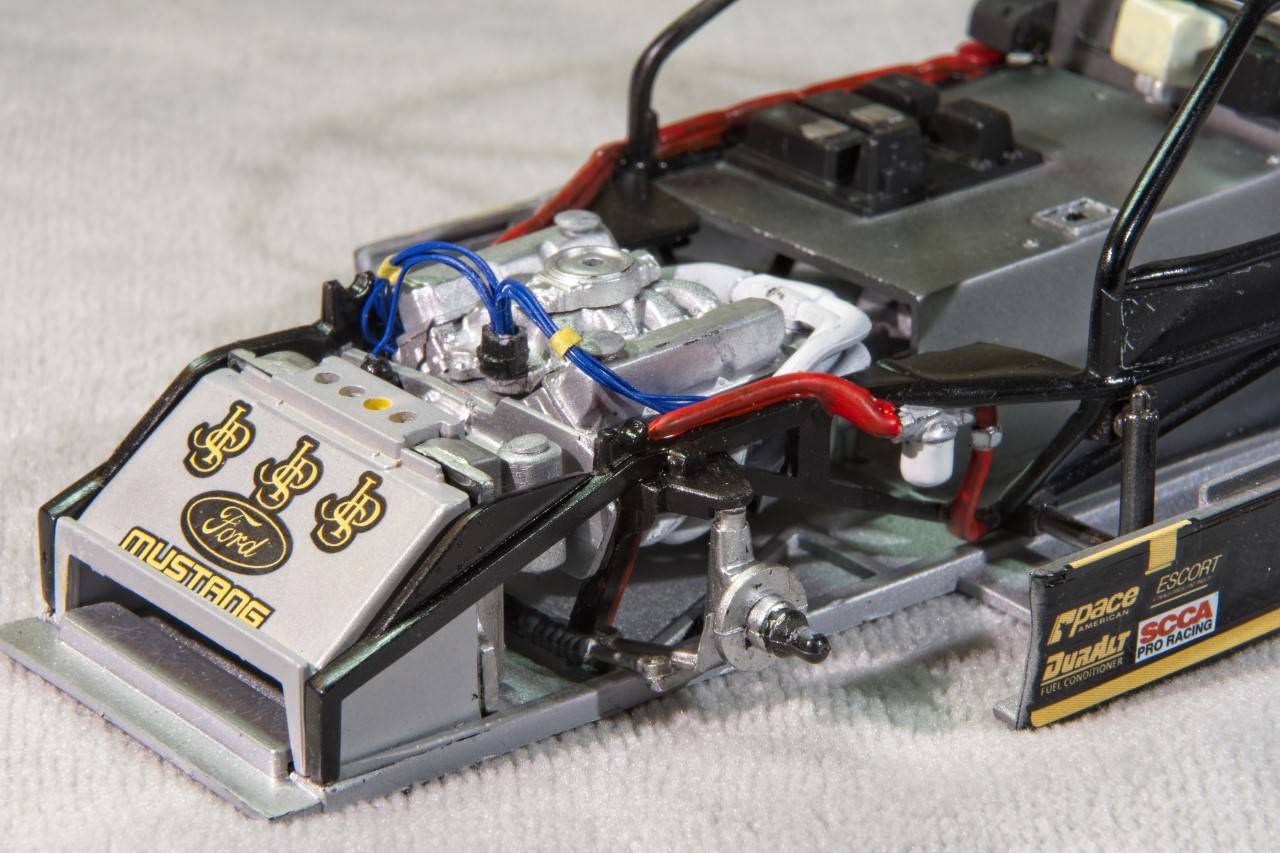
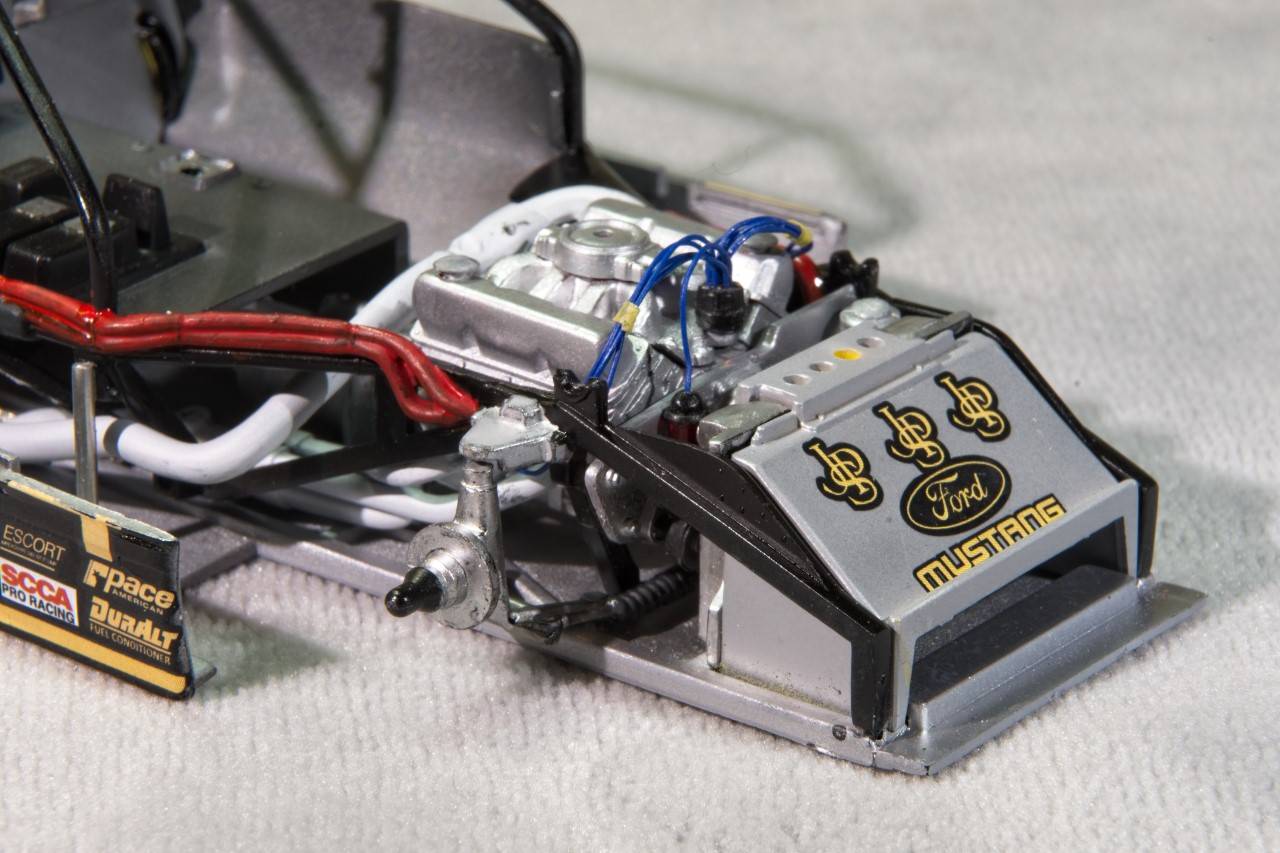
I made a ignition coil out of Evergreen tubing, and a little putty that was sanded to shape to represent the cone top. I used a generic bottle to represent the overflow bottle from my spares box. Unfortunately, I just forgot to photograph the assembly before installing the engine. I drilled out the distributor, and glued 9 Blue ignition wires for the plugs plus the one for the coil. Then glued the wires in place. The ignition wires are strapped and attached to the front of the valve covers on the real engine. I've wrapped them, but haven't as yet glued the wrap to the valve covers. I also used bits & pcs to make the breathers for the valve covers. If you look at the front of the engine, you can see the Aluminum mounting plate and on one side the over flow bottle, and on the other side the top of the coil with the ignition wire. You can also see that both Valve covers have a breathers made from more bits & pcs.

As for getting the engine/trans installed as it's a super tight fit was a major squeeze job, but ventually it does fit.


I didn't bother doing anthing with the carb other then gluing it on the top of the intake manifold as it will be completely covered by the air filter to be attached later. It's really more of a spacer then anything else.

As for the engine exhaust manifolds, they're each a 2 pc assembly that did require some putty and sanding. Then they were painted using the "Neat" method of no thinner so that it had a really rough texture to it. Installation was shall I say a little sloppy at best, but I did manage to get both installed and aligned, as well as the exhaust pipes which don't rearch the body panels. No big deal in my build as you can't see them once the main body is on. There is still a cross over pipe that I need to install to complete the engine exhaust system.

Originally I was going to add more lines to the engine compartment, but it's pretty tight with the engine installed, so this is going to be it unless I figure how to add a line here and there.

Here' a few pictures of the overall chassis assembly to date:


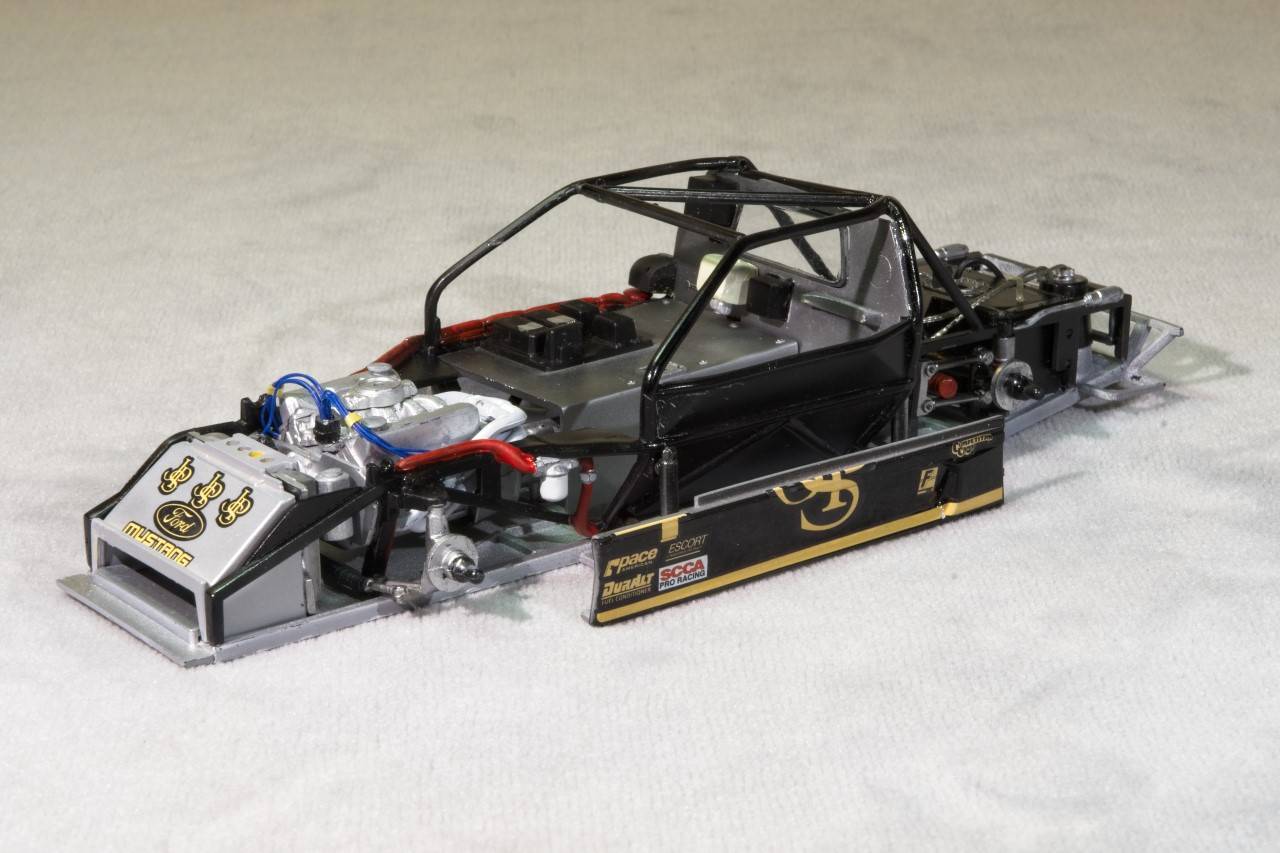
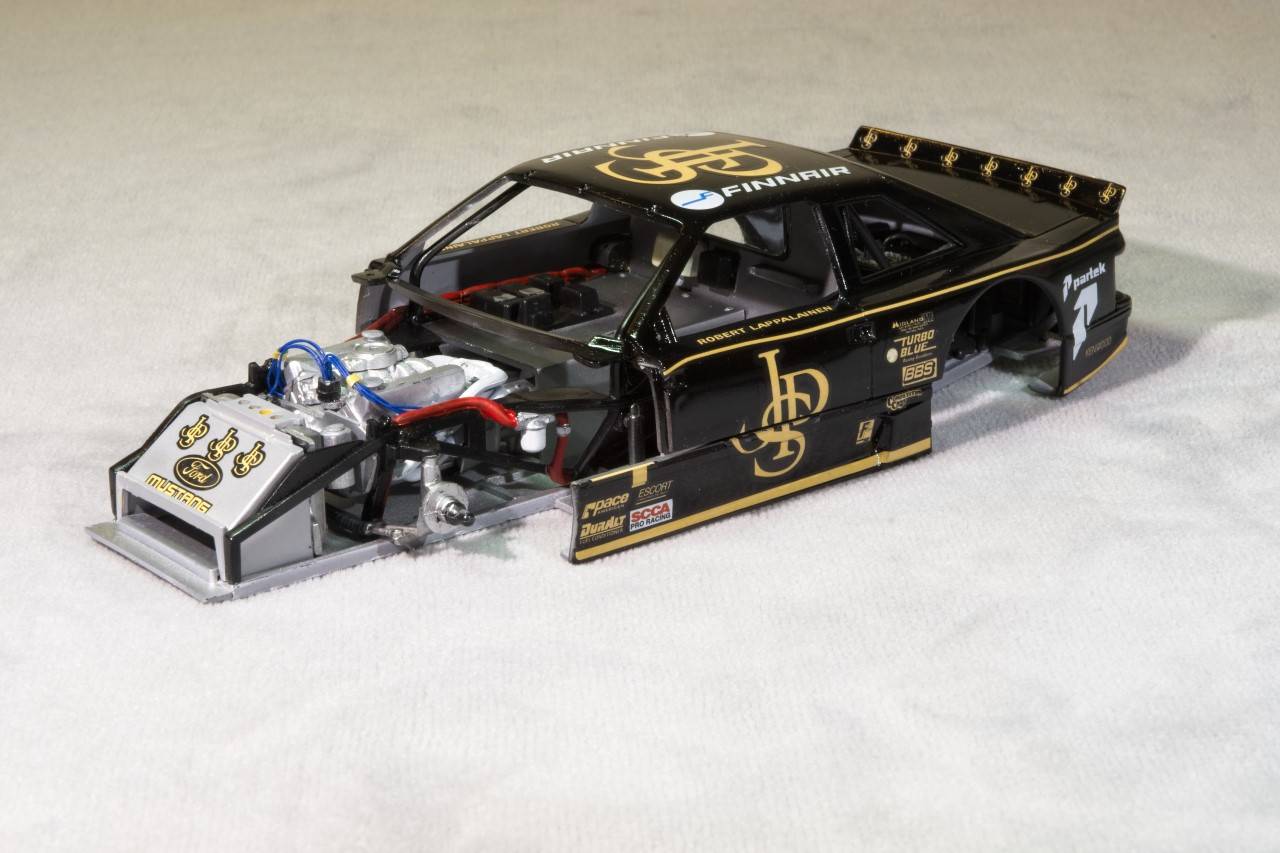
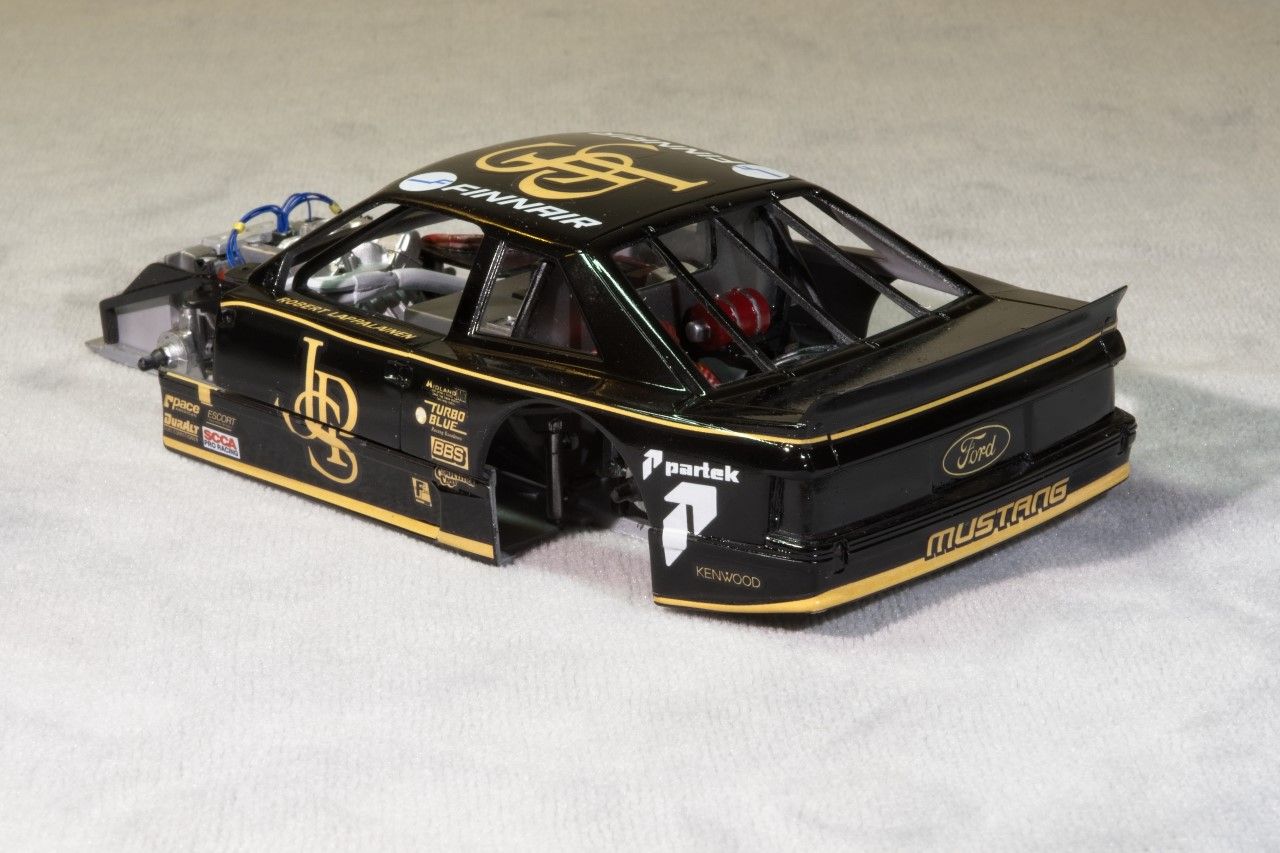
And 2 pics with the rear shell just dry fitted. Of course it's out of alignment as I must have done that while placing the chassis for pictures.


Thanks for taking the time to check out my build to date, it's always much appreciated.

Joel


AussieReg
Staff MemberAssociate Editor
AUTOMODELER
#007
_VISITCOMMUNITY
Victoria, Australia
Joined: June 09, 2009
KitMaker: 8,156 posts
Auto Modeler: 2,953 posts
Posted: Sunday, December 08, 2019 - 01:36 PM UTC
Another great update Joel, some superb detailing going on to really busy up the engine bay. Really neat work, this build is getting better and better with every update.

Cheers, D
Hwa-Rang
_VISITCOMMUNITY
Kobenhavn, Denmark
Joined: June 29, 2004
KitMaker: 6,760 posts
Auto Modeler: 2,182 posts
Posted: Sunday, December 08, 2019 - 06:04 PM UTC
Great work Joel. All the extra detailing is definitely worth the effort.
Stickframe
#362
_VISITCOMMUNITY
California, United States
Joined: December 01, 2013
KitMaker: 1,661 posts
Auto Modeler: 431 posts
Posted: Sunday, December 08, 2019 - 06:50 PM UTC
Damian and Joel - you guys are making great progress

D, you continue to impress with the finish you (always!) achieve on your builds, they’re each a pleasure to see!

Joel, you’ve certainly been busy detailing that mustang! The engine and details look great - they really “pop” - nice! I’m still looking forward to seeing it with the drivers area installed -

Cheers guys
Nick
AussieReg
Staff MemberAssociate Editor
AUTOMODELER
#007
_VISITCOMMUNITY
Victoria, Australia
Joined: June 09, 2009
KitMaker: 8,156 posts
Auto Modeler: 2,953 posts
Posted: Monday, December 09, 2019 - 12:39 AM UTC
Edging closer to the finish line on the '36, tonight saw the mounting brackets and front/rear bumpers installed, as well as the headlights and door handles.


So here's where it sits now. I still need to find some clear red sprue and fabricate some tail lights, and then it's just a couple of tiny paint touch-ups where it has been knocked during handling.


Cheers, D
Joel_W
Staff MemberAssociate Editor
AUTOMODELER
_VISITCOMMUNITY
New York, United States
Joined: December 04, 2010
KitMaker: 11,666 posts
Auto Modeler: 2,974 posts
Posted: Monday, December 09, 2019 - 01:47 AM UTC
D, Jasper, & Nick,

Thanks guys for all those really big thumbs up, it's certainly appreciated.

Finally, the "Stang is starting to look more and more like the Winner Roush Trans Am car she was.

Next up this week is to focus on the Drivers compartment. Plenty to do, but not more detailing as the majority of wires, cables, and lines are under the transmission safety cover.

I've started on the seat and it almost fit, but not quite. By now I'm really use to this, so I was ready with filing sticks, and sand paper. Primed and painted as an added bonus.

Joel

Joel_W
Staff MemberAssociate Editor
AUTOMODELER
_VISITCOMMUNITY
New York, United States
Joined: December 04, 2010
KitMaker: 11,666 posts
Auto Modeler: 2,974 posts
Posted: Monday, December 09, 2019 - 01:51 AM UTC
D,
Absolutely a stunning build. I'm just super impressed how you got this build up to your high standards.

As for needing some clear red sprue, you could just use clear sprue and paint it with Tamiya Clear Red followed by some Pledge or whatever you Aussies call it. I've done that many times and it always has worked out for me.

Joel
TacFireGuru
_VISITCOMMUNITY
Colorado, United States
Joined: December 25, 2004
KitMaker: 3,770 posts
Auto Modeler: 359 posts
Posted: Monday, December 09, 2019 - 06:19 AM UTC
I don't know why these mirrors seemed to cause me so much "mental" pain... Really the last thing to do and I've delayed and delayed. Finally decided/figured out how I'd do them. Mind you, the instructions were nearly useless and the fit of the frame made NO sense.

Ultimately cut off the support arm (that just didn't seem to fit right any way I tried).

Set in place with white glue to get the tree parts aligned.


ALmost there!

Mike
Joel_W
Staff MemberAssociate Editor
AUTOMODELER
_VISITCOMMUNITY
New York, United States
Joined: December 04, 2010
KitMaker: 11,666 posts
Auto Modeler: 2,974 posts
Posted: Monday, December 09, 2019 - 08:50 AM UTC
Mike,
The sideview mirror frame really does look correct to me.

As for the instructions being next to useless, they most likely were done by the old Revell guys who drew the Instructions to the Trans Am and IMSA GTO cars. I've run into issue after issue where the drawings make no sense as well.

Joel
TacFireGuru
_VISITCOMMUNITY
Colorado, United States
Joined: December 25, 2004
KitMaker: 3,770 posts
Auto Modeler: 359 posts
Posted: Monday, December 09, 2019 - 09:15 AM UTC
Joel,

Thank you.

There was a piece that when diagonal from the top of the mirror frame to the bottom of the frame by the door. I tried a cack-ton of different ways to get it to align - with no luck. So I removed them. I "could" make new ones, but I rather like how they are without.

Mike
Joel_W
Staff MemberAssociate Editor
AUTOMODELER
_VISITCOMMUNITY
New York, United States
Joined: December 04, 2010
KitMaker: 11,666 posts
Auto Modeler: 2,974 posts
Posted: Monday, December 09, 2019 - 10:24 AM UTC
Mike,
The frame looks perfect as is. No one except would have known that you modified the frame. Like I said, just a super truck build.

Joel
AussieReg
Staff MemberAssociate Editor
AUTOMODELER
#007
_VISITCOMMUNITY
Victoria, Australia
Joined: June 09, 2009
KitMaker: 8,156 posts
Auto Modeler: 2,953 posts
Posted: Monday, December 09, 2019 - 11:51 AM UTC

Quoted Text

There was a piece that when diagonal from the top of the mirror frame to the bottom of the frame by the door. I tried a cack-ton of different ways to get it to align - with no luck. So I removed them. I "could" make new ones, but I rather like how they are without.

Mike


You can use my phrase if you want Mike - IFSM (In Field Styling Modifications). It's looking really good at this point, very close to the finishing touches. Great work.

Cheers, D
AussieReg
Staff MemberAssociate Editor
AUTOMODELER
#007
_VISITCOMMUNITY
Victoria, Australia
Joined: June 09, 2009
KitMaker: 8,156 posts
Auto Modeler: 2,953 posts
Posted: Wednesday, December 11, 2019 - 10:44 PM UTC
Another finishing touch in progress. The clear red sprue from my '59 Caddy kit donated a section of straight sprue, which I cleaned up with a 2000 grit sanding stick then put a bit of a taper on each end using a pencil sharpener.


A short length was cut off each end with a razor saw, then polished up a bit further.


The 2 lenses were then glued in place using Humbrol Clear parts Cement. Still some tidying up to do to fill the join, but I think they look good. I might put a thin line of chrome paint around the base of each lens once I get the join cleaned up.


Cheers, D
Hwa-Rang
_VISITCOMMUNITY
Kobenhavn, Denmark
Joined: June 29, 2004
KitMaker: 6,760 posts
Auto Modeler: 2,182 posts
Posted: Wednesday, December 11, 2019 - 11:52 PM UTC
Mike: That frame sure looks good to me.

Damian: Rear light look good D. A small strip, of BMF, at the base, would set it of nicely.