Blue Oval - Ford Motor Co. GB Build Thread
Colorado, United States
Joined: December 25, 2004
KitMaker: 3,770 posts
Auto Modeler: 359 posts
Posted: Sunday, November 24, 2019 - 03:01 PM UTC
AussieReg
 Associate Editor
#007
Victoria, Australia
Joined: June 09, 2009
KitMaker: 8,156 posts
Auto Modeler: 2,953 posts
Posted: Sunday, November 24, 2019 - 03:14 PM UTC
Nice! Cover it up with mud, no driver keeps his rig that tidy underneath!
Cheers, D
ON the bench
Revell 1/24 '53 Corvette (building as '54)
Revell 1/24 BMW 507 Coupe and Cabrio
Italeri 1/48 Me262 B-1a/U1 Nightfighter
Monogram 1/24 '57 Chevy Nomad
Dragon 1/350 USS Frank Knox DD-742
#362
California, United States
Joined: December 01, 2013
KitMaker: 1,661 posts
Auto Modeler: 431 posts
Posted: Sunday, November 24, 2019 - 04:21 PM UTC
Hi guys - lots of nice work going on!
D - that trio of coupes are looking great - again, your finish work is really something else...nice!!
Mike, your van looks like it just rolled out of the Ford factory! Looking good -
Joel - yes, that mustang - nice! I made a note on your thread already - looking forward to seeing more!
Go team blue oval!
Cheers
Nick
Joel_W
Associate Editor New York, United States
Joined: December 04, 2010
KitMaker: 11,666 posts
Auto Modeler: 2,974 posts
Posted: Monday, November 25, 2019 - 02:22 AM UTC
Nick,
I saw your post in my build thread and replied. Thanks so much for taking the time to post there as well.
Mike,
the underside of really looks like it just came off the line. Unless you're going to enter your build in a contest, no one will ever see it once it's on a display base.
Joel
On my Workbench:
Monogram 1/24 scale 427 Shelby Cobra
Just Completed:
Beemax 1/24 scale BMW M3 E30 1992 Evolution II
Colorado, United States
Joined: December 25, 2004
KitMaker: 3,770 posts
Auto Modeler: 359 posts
Posted: Monday, November 25, 2019 - 11:11 AM UTC
Quoted Text
the underside of really looks like it just came off the line. Unless you're going to enter your build in a contest, no one will ever see it once it's on a display base.
No way this one would go into a contest - frame and drive train were started when I bought it and, well...somewhat cockeyed. It'll sit on my shelf and look purty (clean it'll be).

Mike

#439
Washington, United States
Joined: November 05, 2005
KitMaker: 4,950 posts
Auto Modeler: 555 posts
Posted: Monday, November 25, 2019 - 05:43 PM UTC

Read the
F@@#$%^g instructions
I got the rear panel glued on, let it cure then went after it with the chisel, sanding sticks, sanding rods, got the Apoxy Sculpt on order, had it smooth enough to wait for the epoxy. Then I tried to align the chassis and figure out where the bumper would set. Nothing fit right, so I went to the last resort and checked in instructions. The panel goes on the Custom, not the Coupe. Clever application of Tamiya Extra Thin and a bit of pressure got the lower panel off with almost no damage.

The whole stackup is going need some work, but this is gonna look a lot better.
Hanger Queens in Waiting:
Monogram 1/72 F8F-1
Corsair the Sky Pirate - 1/72 Ace A-7D
Century Series - Airfix 1/72 F-105G
Anti Shipping - Academy 1/72 PBJ-1D
Academy 1/72 F-84E
AussieReg
Associate Editor #007
Victoria, Australia
Joined: June 09, 2009
KitMaker: 8,156 posts
Auto Modeler: 2,953 posts
Posted: Monday, November 25, 2019 - 06:07 PM UTC
Mark, I'm sure we have all done that once, if not several times, in our careers.
A paint manufacturer here in Australia had it in BIG BOLD LETTERS across the lid of their paint cans - "When all else fails, please read the instructions!"
Onwards and Upwards mate.
Cheers, D
ON the bench
Revell 1/24 '53 Corvette (building as '54)
Revell 1/24 BMW 507 Coupe and Cabrio
Italeri 1/48 Me262 B-1a/U1 Nightfighter
Monogram 1/24 '57 Chevy Nomad
Dragon 1/350 USS Frank Knox DD-742
#335
Auckland, New Zealand
Joined: September 03, 2013
KitMaker: 1,808 posts
Auto Modeler: 701 posts
Posted: Monday, November 25, 2019 - 08:26 PM UTC
Well reading this site you learn something new everyday...kits come with instructions!

Mark,
Good recovery. I did also learn Tamiya extra thin can also be used for removing parts.
Mark,
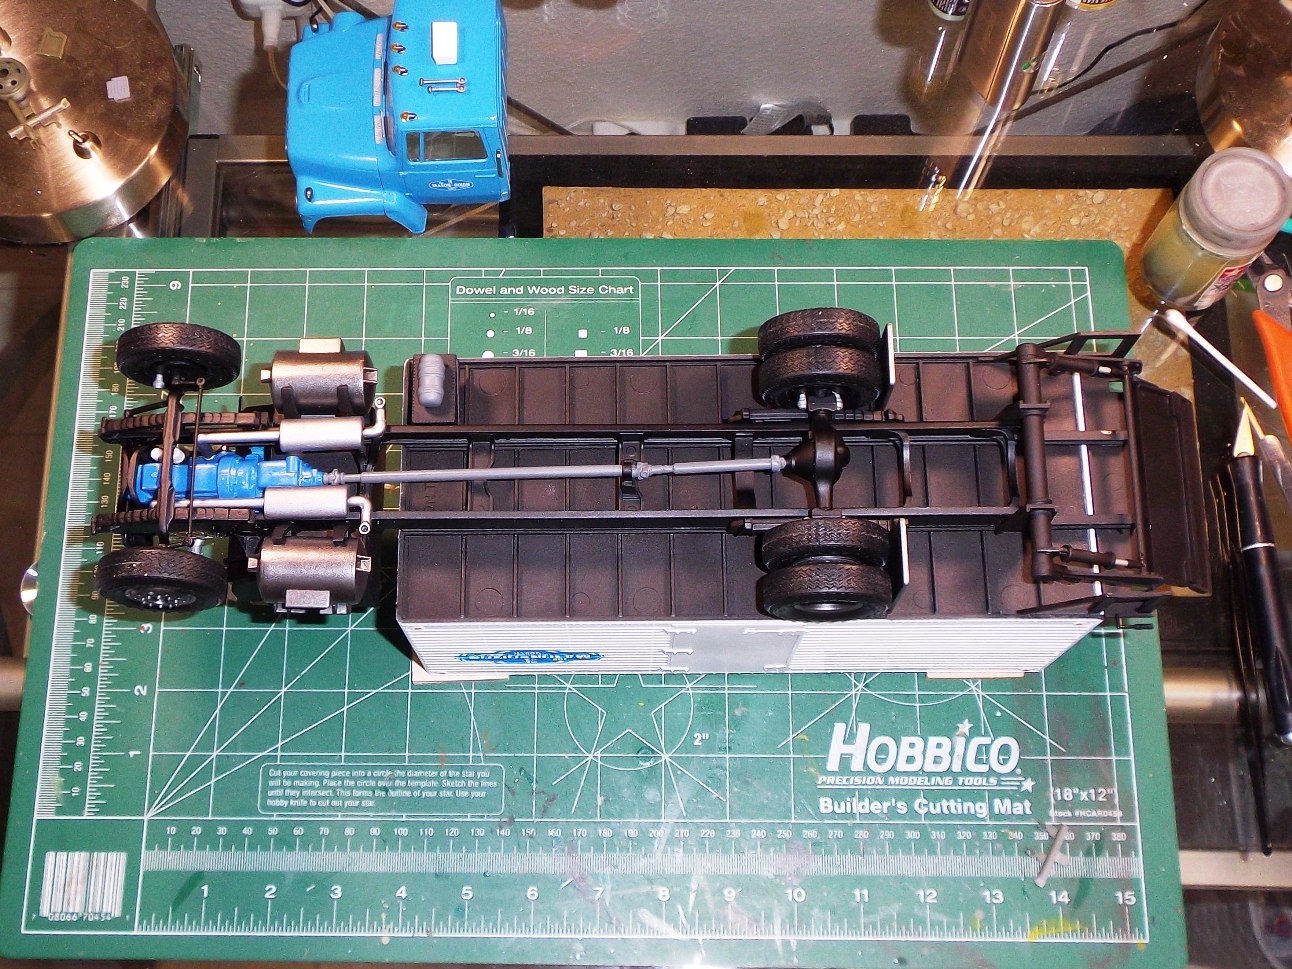
The truck looks great. Impressive work getting that decal settled over the corrugations.
cheers
Michael.
Campaign:
Strip, Track and Trail - Porsche 917/20 - On the bench
Phantoms at 60 - F-4J Marines
Below 1000 tons - M50 minesweeper - Sailed for duty
#335
Auckland, New Zealand
Joined: September 03, 2013
KitMaker: 1,808 posts
Auto Modeler: 701 posts
Posted: Monday, November 25, 2019 - 08:38 PM UTC
Working on the interior. To avoid double vision I will just post one car this time. Not many parts but it does the job. Ford Escorts were an everyman car, with fairly basic finishes and interior options. The rally cars were no exception. They were often bought second hand by the teams and stripped and converted for rallying.
As with the rear axle they did need chassis stiffening and a plate was added across the back. The plate is from the etch, the big lugs I added from the leftover McLaren bits.


Ford badge ensures I pass the Blue Oval test though actually there are plenty on the outside of the car.
This will be the last update for several weeks. My wife is taking me away from the modelling desk to visit the home of the automobilia...Italia. I had hoped for Modena but got Turin, so more Fiat than Ferrari.
I will keep following the campaign and other builds on my phone.
cheers
Michael
Campaign:
Strip, Track and Trail - Porsche 917/20 - On the bench
Phantoms at 60 - F-4J Marines
Below 1000 tons - M50 minesweeper - Sailed for duty
AussieReg
Associate Editor #007
Victoria, Australia
Joined: June 09, 2009
KitMaker: 8,156 posts
Auto Modeler: 2,953 posts
Posted: Monday, November 25, 2019 - 09:19 PM UTC
Super neat work Michael, that interior came up beautifully!
Enjoy the travels and stay safe, bring back some inspiration for an Italian themed Group Build!
Cheers, D
ON the bench
Revell 1/24 '53 Corvette (building as '54)
Revell 1/24 BMW 507 Coupe and Cabrio
Italeri 1/48 Me262 B-1a/U1 Nightfighter
Monogram 1/24 '57 Chevy Nomad
Dragon 1/350 USS Frank Knox DD-742
Joel_W
Associate Editor New York, United States
Joined: December 04, 2010
KitMaker: 11,666 posts
Auto Modeler: 2,974 posts
Posted: Tuesday, November 26, 2019 - 02:50 AM UTC
Mark,
Great save. I'm 100% positive you'll get the sculpting putty to blend in perfect.
I've learned the hard way about not reading the instructions many times. and as the kits get more complicated I got myself into some really tough corners that were nearly impossible to get out of. Once or twice I actually had to buy a 2nd kit, and we're talking expensive imported race car kits
I still don't study and refer to them enough, and I'm still paying the penalties for it. Go figure

Joel
On my Workbench:
Monogram 1/24 scale 427 Shelby Cobra
Just Completed:
Beemax 1/24 scale BMW M3 E30 1992 Evolution II
Joel_W
Associate Editor New York, United States
Joined: December 04, 2010
KitMaker: 11,666 posts
Auto Modeler: 2,974 posts
Posted: Tuesday, November 26, 2019 - 02:56 AM UTC
Michael,
Super impressive work on the interior. The rear stiffening panel looks great, and the dash is very well done. No way in the world you wouldn't qualify as building a duo of Fords with the Blue Ford Oval logo on the wheel for all to see.
Have a great trip.
Joel
On my Workbench:
Monogram 1/24 scale 427 Shelby Cobra
Just Completed:
Beemax 1/24 scale BMW M3 E30 1992 Evolution II
Uusimaa, Finland
Joined: October 01, 2016
KitMaker: 514 posts
Auto Modeler: 44 posts
Posted: Wednesday, November 27, 2019 - 05:11 AM UTC
Time to start my kit:

I've checked that chassis fits inside of the bodywork, and that major clear parts should also fit, so it's primer next.
Joel_W
Associate Editor New York, United States
Joined: December 04, 2010
KitMaker: 11,666 posts
Auto Modeler: 2,974 posts
Posted: Wednesday, November 27, 2019 - 06:45 AM UTC
Pasi,
Looking forward to the shell in it's primer coat. I'll be following right along till you earn your ribbon.
Joel
On my Workbench:
Monogram 1/24 scale 427 Shelby Cobra
Just Completed:
Beemax 1/24 scale BMW M3 E30 1992 Evolution II
#439
Washington, United States
Joined: November 05, 2005
KitMaker: 4,950 posts
Auto Modeler: 555 posts
Posted: Wednesday, November 27, 2019 - 11:31 AM UTC
OK, ignoring the body work for a while, I'm switching to the engine. AMT suggests "Blue Gray" for the engine block. Might that mean anything special? Could I just use "Ford Engine Blue" or even "Chrysler Engine Blue" and be good enough?
Hanger Queens in Waiting:
Monogram 1/72 F8F-1
Corsair the Sky Pirate - 1/72 Ace A-7D
Century Series - Airfix 1/72 F-105G
Anti Shipping - Academy 1/72 PBJ-1D
Academy 1/72 F-84E
Joel_W
Associate Editor New York, United States
Joined: December 04, 2010
KitMaker: 11,666 posts
Auto Modeler: 2,974 posts
Posted: Friday, November 29, 2019 - 12:24 PM UTC
Mark,
Just Google it. I'm betting that you'll get every color used by Ford during the production run.
Joel
On my Workbench:
Monogram 1/24 scale 427 Shelby Cobra
Just Completed:
Beemax 1/24 scale BMW M3 E30 1992 Evolution II
#439
Washington, United States
Joined: November 05, 2005
KitMaker: 4,950 posts
Auto Modeler: 555 posts
Posted: Friday, November 29, 2019 - 01:18 PM UTC
Well, I have seen some variations on this blue:
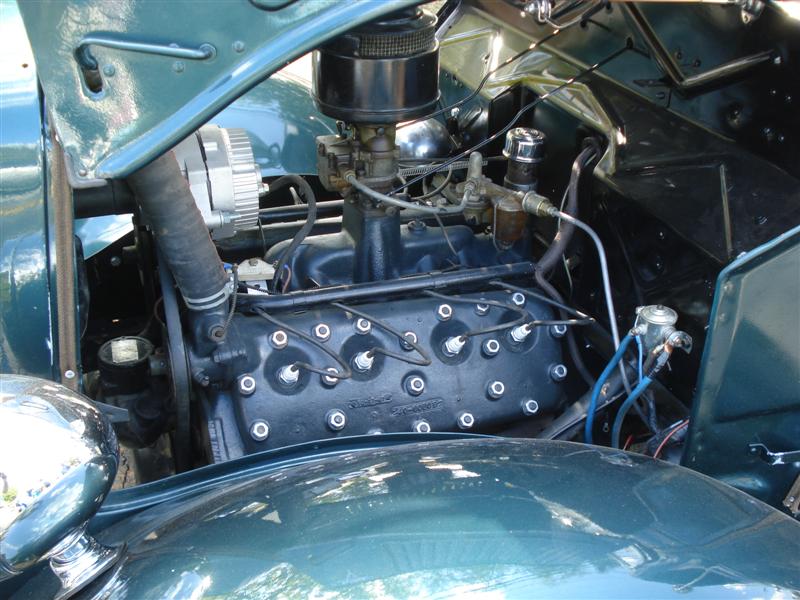


The bottom two are a different year than mine, since the water port is at the middle of the head instead of the front.
While I have seen some in Ford Engine Red, I think that they are more modern rebuilds.
Failing to find a Ford Engine Blue over the weekend, I think I'm going with Glossy Dark Sea Blue.
I'm also doing a bit of rebuilding on the front face of the engine. For what ever reasons, AMT molded the front corner of the right side of the engine block about 0.040 lower and 0.040 behind the left side.
Everything I've seen online shows that the front face is flat so that the dual water pumps can be the same.
Hanger Queens in Waiting:
Monogram 1/72 F8F-1
Corsair the Sky Pirate - 1/72 Ace A-7D
Century Series - Airfix 1/72 F-105G
Anti Shipping - Academy 1/72 PBJ-1D
Academy 1/72 F-84E
Joel_W
Associate Editor New York, United States
Joined: December 04, 2010
KitMaker: 11,666 posts
Auto Modeler: 2,974 posts
Posted: Saturday, November 30, 2019 - 02:52 AM UTC
Mark,
Glossy Dark Sea Blue has a visible Greenish tint to it. So it's not really the color that you want. All the major players in model paints have a darkish Blue whether Gloss or Matt. Don't laugh, but just about every big box store that carries models for kids has that familar Testors rack of paints, and they carry a gloss Blue darn close to Ford Engine Blue.
Joel
On my Workbench:
Monogram 1/24 scale 427 Shelby Cobra
Just Completed:
Beemax 1/24 scale BMW M3 E30 1992 Evolution II
Georgia, United States
Joined: February 17, 2013
KitMaker: 173 posts
Auto Modeler: 46 posts
Posted: Sunday, December 01, 2019 - 07:30 AM UTC
Here is my entry. I got this old kit from eBay. I am going to use Slixx decals and paint the car a darker blue as on the magazine cover.

On the bench, Blue Max, Mustang Funny car.
Airfix Hotspur glinder.
Joel_W
Associate Editor New York, United States
Joined: December 04, 2010
KitMaker: 11,666 posts
Auto Modeler: 2,974 posts
Posted: Sunday, December 01, 2019 - 08:33 AM UTC
Bill,
Looking forward to your build for sure.
The two cars aren't the same. The magazine cover blub under the car said that it's Harry Schmidt's new car, so I guess that they went with a different paint scheme.
Joel
On my Workbench:
Monogram 1/24 scale 427 Shelby Cobra
Just Completed:
Beemax 1/24 scale BMW M3 E30 1992 Evolution II
#439
Washington, United States
Joined: November 05, 2005
KitMaker: 4,950 posts
Auto Modeler: 555 posts
Posted: Sunday, December 01, 2019 - 08:58 PM UTC
I got the rear panel figured out, now the cylinder head is square to the front end. Then I figured out that there is effectively no exhaust manifold, no exhaust linkage from side to side, and the exhaust line just ends somewhere in the engine compartment.
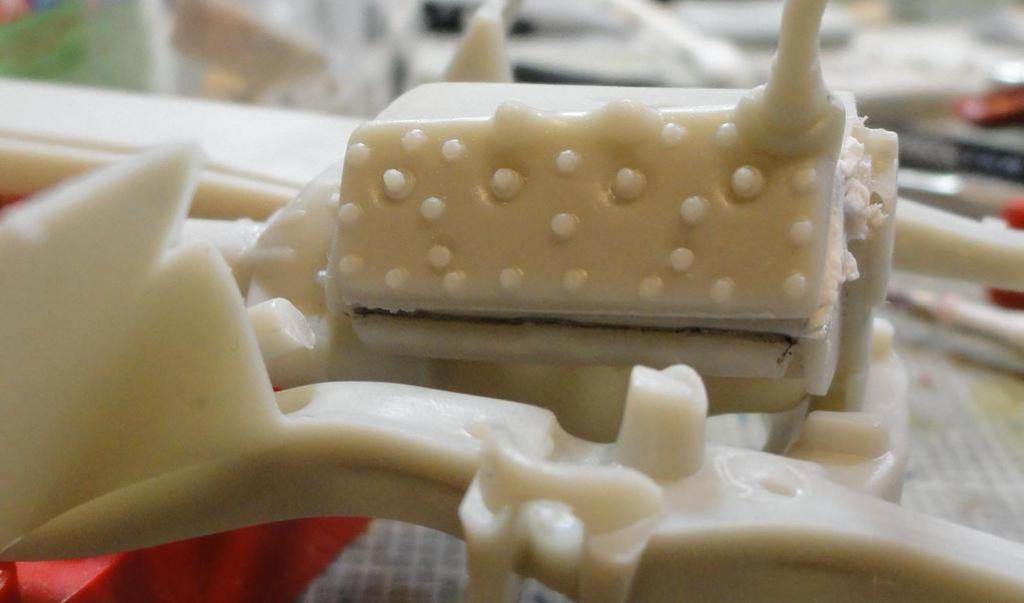
That thin black line is the top of the molded in exhaust manifold, it just a tube with three bumps at the nearly correct points, but no crossover or a connection to the exhaust pipe.
Hanger Queens in Waiting:
Monogram 1/72 F8F-1
Corsair the Sky Pirate - 1/72 Ace A-7D
Century Series - Airfix 1/72 F-105G
Anti Shipping - Academy 1/72 PBJ-1D
Academy 1/72 F-84E
Joel_W
Associate Editor New York, United States
Joined: December 04, 2010
KitMaker: 11,666 posts
Auto Modeler: 2,974 posts
Posted: Monday, December 02, 2019 - 02:39 AM UTC
Mark,
That's really an excellent correction to the heads. To someone like me, it does make a huge difference.
And like you, I'm somewhat disappointed that such an important and prominent part of the engine: the Exhausts manifolds, are just vaguely molded into the block. It certainly will be a real challenge to effectively paint them to fools the viewers eye.
Here's a picture for the guys to see what you're up against. These older kits are sure proving to be a real challenge to bring up to today's standards.
I'm looking forward to your next up, and how you dealt with this issue.
Joel
On my Workbench:
Monogram 1/24 scale 427 Shelby Cobra
Just Completed:
Beemax 1/24 scale BMW M3 E30 1992 Evolution II
#439
Washington, United States
Joined: November 05, 2005
KitMaker: 4,950 posts
Auto Modeler: 555 posts
Posted: Monday, December 02, 2019 - 05:32 AM UTC
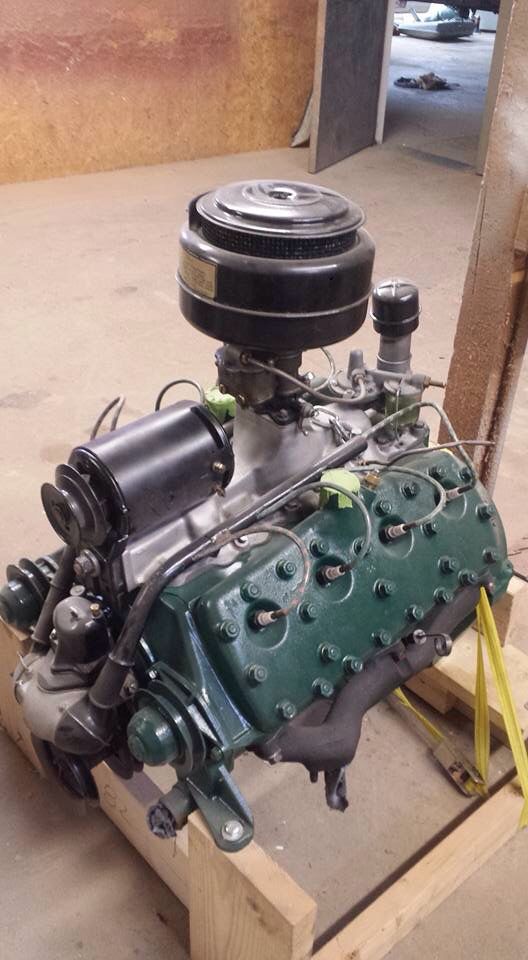
Daaaym, I've looked at too many flatheads. First off I noticed that this one is green, probably out of a truck instead of a car. Two, the water port is at the middle and the head is held down with studs in the block and added nuts, so it's an earlier flavor (30's-40's). And get a load of that distributor and ignition wire set up. Flatheads, for what ever engineering reasons had separate water jackets around each bank of cylinders. So there were 2 water pumps. The pulley nearest to the camera is for the left cylinder bank. Note how it's nearly flush to the engine block. A single belt connects the Cam shaft, Left and Right water pumps and the Alternator (or were they generators back then?). AMT has the pumps on 6" standoffs, I've got to figure out how to make that look less foolish.
Hanger Queens in Waiting:
Monogram 1/72 F8F-1
Corsair the Sky Pirate - 1/72 Ace A-7D
Century Series - Airfix 1/72 F-105G
Anti Shipping - Academy 1/72 PBJ-1D
Academy 1/72 F-84E
Joel_W
Associate Editor New York, United States
Joined: December 04, 2010
KitMaker: 11,666 posts
Auto Modeler: 2,974 posts
Posted: Monday, December 02, 2019 - 10:01 AM UTC
Mark,
I've been spending more time looking at Flat heads then I ever thought possible. The only reason I posted that picture is the exhaust manifold.
Granted, back when these kits were molded, they took a million liberties as the kits were targeted to kids like me, not adult modelers.
Joel
On my Workbench:
Monogram 1/24 scale 427 Shelby Cobra
Just Completed:
Beemax 1/24 scale BMW M3 E30 1992 Evolution II
#439
Washington, United States
Joined: November 05, 2005
KitMaker: 4,950 posts
Auto Modeler: 555 posts
Posted: Monday, December 02, 2019 - 06:13 PM UTC
It's something like that. According to Scalemates, this kit dates from 1962, the companion kit I bought also has it's origins in 1962. Although the instructions date to 2015 when all of the trademarks were renewed, the parts show a great similarity to the '62 kit. The new instructions are clearly not up to current specs, the alternate engine, possibly a Chrysler, has no assembly steps. The flathead has slightly better exhaust headers, including a cross over pipe. But absolutely no standard exhaust and muffler. There are some side pipes, but absolutely no connection from the headers to the pipes.
I remember 8 year old me putting kits like this together in 1962, but I don't remember them being this bad.

Hanger Queens in Waiting:
Monogram 1/72 F8F-1
Corsair the Sky Pirate - 1/72 Ace A-7D
Century Series - Airfix 1/72 F-105G
Anti Shipping - Academy 1/72 PBJ-1D
Academy 1/72 F-84E