The Garage
For general automotive modeling or non-modeling topics.
Blue Oval - Ford Motor Co. GB Build Thread
Joel_W
Staff MemberAssociate Editor
AUTOMODELER
_VISITCOMMUNITY
New York, United States
Joined: December 04, 2010
KitMaker: 11,666 posts
Auto Modeler: 2,974 posts
Posted: Thursday, December 12, 2019 - 01:39 AM UTC
D,
Nice job on making those Red lenses, as they sure do look the part. You sure you're a full blooded Aussie? Sure seems to me that you have a lot of what we call American Ingenuity

Joel
AussieReg
Staff MemberAssociate Editor
AUTOMODELER
#007
_VISITCOMMUNITY
Victoria, Australia
Joined: June 09, 2009
KitMaker: 8,156 posts
Auto Modeler: 2,953 posts
Posted: Thursday, December 12, 2019 - 12:51 PM UTC

Quoted Text

D,
Nice job on making those Red lenses, as they sure do look the part. You sure you're a full blooded Aussie? Sure seems to me that you have a lot of what we call American Ingenuity

Joel


Joel, not so much ingenuity, more borrowing (stealing) ideas and techniques from the many forums that I stalk!

Cheers, D
AussieReg
Staff MemberAssociate Editor
AUTOMODELER
#007
_VISITCOMMUNITY
Victoria, Australia
Joined: June 09, 2009
KitMaker: 8,156 posts
Auto Modeler: 2,953 posts
Posted: Thursday, December 12, 2019 - 12:54 PM UTC

Quoted Text

Mike: That frame sure looks good to me.

Damian: Rear light look good D. A small strip, of BMF, at the base, would set it of nicely.


Jesper, excellent plan. A strip of BMF will be easier to control than a line of chrome paint. Many thanks, another technique goes into the vault!

Cheers, D
Merlin
Staff MemberSenior Editor
AEROSCALE
#017
_VISITCOMMUNITY
United Kingdom
Joined: June 11, 2003
KitMaker: 17,582 posts
Auto Modeler: 388 posts
Posted: Friday, December 13, 2019 - 03:08 AM UTC
Hi there

I haven't had many chances to get online lately, so it's no surprise to see some dramatic progress on the builds since I last looked in! Fantastic work, everyone!

I do have the end in sight on a commissioned build that's taken up what modelling time I've had, so I hope to get back to my little Ford soon. I think, realistically, with all the craziness at work because of Christmas, a New Year re-start will be most likely.

All the best

Rowan

Rowan,
Missed seeing you here for sure. Looking forward to following your Ford build to its crossing of your finish line.

Joel
PasiAhopelto
_VISITCOMMUNITY
Uusimaa, Finland
Joined: October 01, 2016
KitMaker: 514 posts
Auto Modeler: 44 posts
Posted: Friday, December 13, 2019 - 09:55 PM UTC
And one step ahead:


There's little overspray on door due to inadequate masking (rattle can paint gets everywhere), but it's easy to fix. Some small fixes are also needed to roof. Trunk is almost ready for paint, but I'll cover the white areas with plastic bag and masking tape before that.
AussieReg
Staff MemberAssociate Editor
AUTOMODELER
#007
_VISITCOMMUNITY
Victoria, Australia
Joined: June 09, 2009
KitMaker: 8,156 posts
Auto Modeler: 2,953 posts
Posted: Friday, December 13, 2019 - 11:24 PM UTC
Very nice finish Pasi, the red and white combination is a classic!

Looking forward to the next update.

Cheers, D
AussieReg
Staff MemberAssociate Editor
AUTOMODELER
#007
_VISITCOMMUNITY
Victoria, Australia
Joined: June 09, 2009
KitMaker: 8,156 posts
Auto Modeler: 2,953 posts
Posted: Friday, December 13, 2019 - 11:34 PM UTC
I'm very happy to say that I put the final touches on the '36 Rod tonight, it is done!

I filled the gap around the tail lights with Humbrol Clear Parts cement over the last couple of nights by wicking it in using a toothpick, and tonight I applied a 1mm strip of Ultra Bright Chrome BMF around the join. Many thanks to Jesper for the idea, I was originally planning to paint a chrome strip but this was a much better and easier solution.


I will give it a good dust down and get some better photos over the next couple of days.

This one can go on the shelf now and I will get back to the other 2 '36 builds for the trio, then start work on the bases.

This is build #7 completed for 2019, a very productive year for me. Three of these were garage queens from years past and I am really pleased to get them completed and on display. Four were start-to-finish this year.

Cheers, D
Cosimodo
#335
_VISITCOMMUNITY
Auckland, New Zealand
Joined: September 03, 2013
KitMaker: 1,808 posts
Auto Modeler: 701 posts
Posted: Saturday, December 14, 2019 - 12:16 AM UTC
Congratulations from deepest Bavaria on a great finish to a challenging build. I think I would have given up a while ago. I know this is one of three you are building but the colour scheme and attention to detail has lifted this old kit to a new level. Well done Damian.

Cheers
Michael
Dixon66
_VISITCOMMUNITY
New Hampshire, United States
Joined: December 12, 2002
KitMaker: 1,500 posts
Auto Modeler: 645 posts
Posted: Saturday, December 14, 2019 - 01:35 AM UTC
Looking great everyone!

Will be starting the Bronco today, even if it is just soaking the sprues and parts in degreaser.
Joel_W
Staff MemberAssociate Editor
AUTOMODELER
_VISITCOMMUNITY
New York, United States
Joined: December 04, 2010
KitMaker: 11,666 posts
Auto Modeler: 2,974 posts
Posted: Saturday, December 14, 2019 - 04:43 AM UTC
Pasi,
The Red top really came out looking fantastic. If you didn't say that it was via a Rattle can, I would have sworn that you used a air brush. It's that good.

Joel
Joel_W
Staff MemberAssociate Editor
AUTOMODELER
_VISITCOMMUNITY
New York, United States
Joined: December 04, 2010
KitMaker: 11,666 posts
Auto Modeler: 2,974 posts
Posted: Saturday, December 14, 2019 - 04:45 AM UTC
D,
Wow

You just nailed it. And yes those chrome strips really kicks up those tail lights.

Joel
PasiAhopelto
_VISITCOMMUNITY
Uusimaa, Finland
Joined: October 01, 2016
KitMaker: 514 posts
Auto Modeler: 44 posts
Posted: Sunday, December 15, 2019 - 07:51 AM UTC
Thanks Damian and Joel.
Merlin
Staff MemberSenior Editor
AEROSCALE
#017
_VISITCOMMUNITY
United Kingdom
Joined: June 11, 2003
KitMaker: 17,582 posts
Auto Modeler: 388 posts
Posted: Wednesday, December 18, 2019 - 09:23 AM UTC
Hi Damian

Awesome job on your build! Your amazing save on the terrible body fit is something I'll long remember.

I may have to do a restart and change of subject for my entry...

In the course of juggling multiple projects and moving things from A to B, I seem to have managed to mislay the decals for my 1940 Coupe.

I'll keep searching, but if they don't turn up before the New Year, I'll switch over to building the 1957 Del Rio Ranch Wagon:


If I do swap builds, I'll make double sure not to mislay anything for this one!

All the best

Rowan
Joel_W
Staff MemberAssociate Editor
AUTOMODELER
_VISITCOMMUNITY
New York, United States
Joined: December 04, 2010
KitMaker: 11,666 posts
Auto Modeler: 2,974 posts
Posted: Wednesday, December 18, 2019 - 10:53 AM UTC
Rowan,
Never pictured you as a Station Wagon type of guy.

Joel
Dixon66
_VISITCOMMUNITY
New Hampshire, United States
Joined: December 12, 2002
KitMaker: 1,500 posts
Auto Modeler: 645 posts
Posted: Wednesday, December 18, 2019 - 03:20 PM UTC
Finished my Viper SciFi build a few days ago and start on the Bronco.

This is the newest date auto model I've ever attempted and wow, Revell really nailed the body mold. In contrast to what Damian has been fighting with on the Coupes, I have minimal cleanup to do, there are only two small areas that I can see with the naked eye on the body shell that have any kind of visible seams. I'll find out more once I prime the shell.

Rest of the kit looks pretty good and the light modifications have begun, converting from a "3 on the tree" to a floor shifter, converting the engine to EFI, suspension lift, etc.

Pics once there is something to worthwhile to see.

Stickframe
#362
_VISITCOMMUNITY
California, United States
Joined: December 01, 2013
KitMaker: 1,661 posts
Auto Modeler: 431 posts
Posted: Wednesday, December 18, 2019 - 04:12 PM UTC
Hi David,

I’m really looking forward to seeing the Bronco! I’m sort of a 4x4 nut and it sounds like you’ve got some neat mods planned -

Cheers
Nick
Joel_W
Staff MemberAssociate Editor
AUTOMODELER
_VISITCOMMUNITY
New York, United States
Joined: December 04, 2010
KitMaker: 11,666 posts
Auto Modeler: 2,974 posts
Posted: Thursday, December 19, 2019 - 02:54 AM UTC
David,
Just like Nick, I'm really looking forward to following your build of the Ford Bronco. Sure sounds like it's going to be a great build for sure.

Joel
Merlin
Staff MemberSenior Editor
AEROSCALE
#017
_VISITCOMMUNITY
United Kingdom
Joined: June 11, 2003
KitMaker: 17,582 posts
Auto Modeler: 388 posts
Posted: Thursday, December 19, 2019 - 07:44 AM UTC

Quoted Text

Rowan,
Never pictured you as a Station Wagon type of guy.

Joel


Hi Joel

Don't forget, my pride and joy for years was an old restored Morris Traveller - so I guess that counts as making me a Station Wagon type of guy. Apart from its vintage looks, the old Moggie was just right for carrying a load of musical gear around.

All the best

Rowan
Dixon66
_VISITCOMMUNITY
New Hampshire, United States
Joined: December 12, 2002
KitMaker: 1,500 posts
Auto Modeler: 645 posts
Posted: Thursday, December 19, 2019 - 09:38 AM UTC

Quoted Text

David,
Just like Nick, I'm really looking forward to following your build of the Ford Bronco. Sure sounds like it's going to be a great build for sure.

Joel


I hope I can do it justice, I'm definitely more an off road guy that a street machine guy. Road course racing comes second to off road.

Nick, BTW, since you have so many desert racing type builds done, have you ever seen the documentary Dust To Glory? Covers the 2003 Baja 1000 in spectacular style, even my wife loved it.
Joel_W
Staff MemberAssociate Editor
AUTOMODELER
_VISITCOMMUNITY
New York, United States
Joined: December 04, 2010
KitMaker: 11,666 posts
Auto Modeler: 2,974 posts
Posted: Friday, December 20, 2019 - 09:47 AM UTC

Quoted Text


Quoted Text

Rowan,
Never pictured you as a Station Wagon type of guy.

Joel


Hi Joel

Don't forget, my pride and joy for years was an old restored Morris Traveller - so I guess that counts as making me a Station Wagon type of guy. Apart from its vintage looks, the old Moggie was just right for carrying a load of musical gear around.

All the best

Rowan


Rowan,
I do remember you telling me that a while ago. As for me, I love my Sports Coupe, but my wife wants a small-Med SUV, so that's going to be her combo birthday gift and Xmas gift for this year, next year, and few after that.

Joel
md72
#439
_VISITCOMMUNITY
Washington, United States
Joined: November 05, 2005
KitMaker: 4,950 posts
Auto Modeler: 555 posts
Posted: Monday, December 23, 2019 - 05:10 PM UTC
Inching forward. Got the body primed, needs a sand and another coat. Got the Blue on the engine parts, need to do some touch-ups there too.

Joel_W
Staff MemberAssociate Editor
AUTOMODELER
_VISITCOMMUNITY
New York, United States
Joined: December 04, 2010
KitMaker: 11,666 posts
Auto Modeler: 2,974 posts
Posted: Tuesday, December 24, 2019 - 02:34 AM UTC
Mark,
Really looking good with a coat of primer on.

Joel
Joel_W
Staff MemberAssociate Editor
AUTOMODELER
_VISITCOMMUNITY
New York, United States
Joined: December 04, 2010
KitMaker: 11,666 posts
Auto Modeler: 2,974 posts
Posted: Tuesday, December 24, 2019 - 02:37 AM UTC
Well, work on the Roush Mustang has been preceeding at a slower pace then usual, but honestly my days of modeling 5+ days/week since I've retired has come to an end for the time being. It just started to feel more like a job then a hobby, which I looked forward to, when I'm at my bench. I do have a few other interests, so I just decided to slow it down to about 3 days per week, and that seems to be about right for now. My Mojo levels have increased even though I've been fighting the good fight with this Revell kit. So far I'd say that I'm winning the war (just barely), but it sure hasn't been an easy fight for an old man my age.

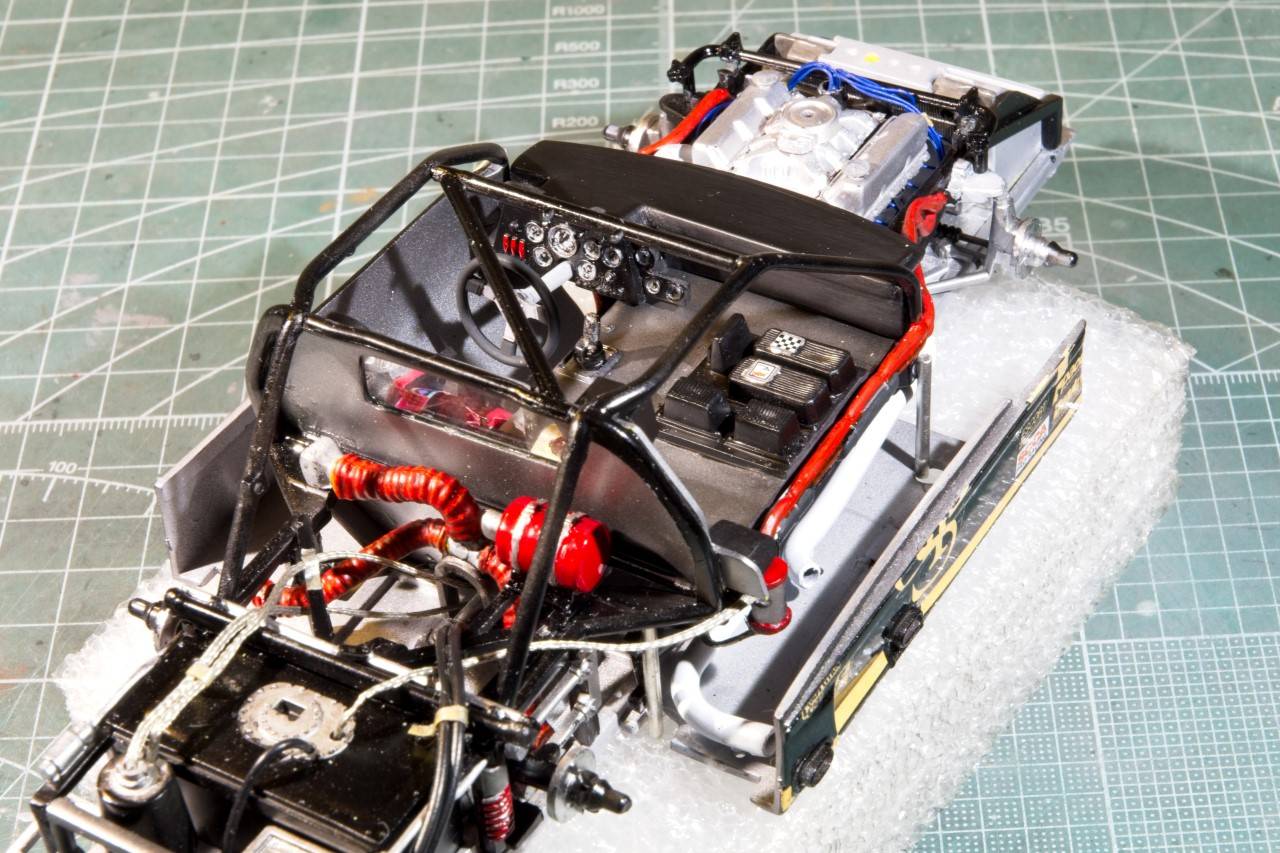
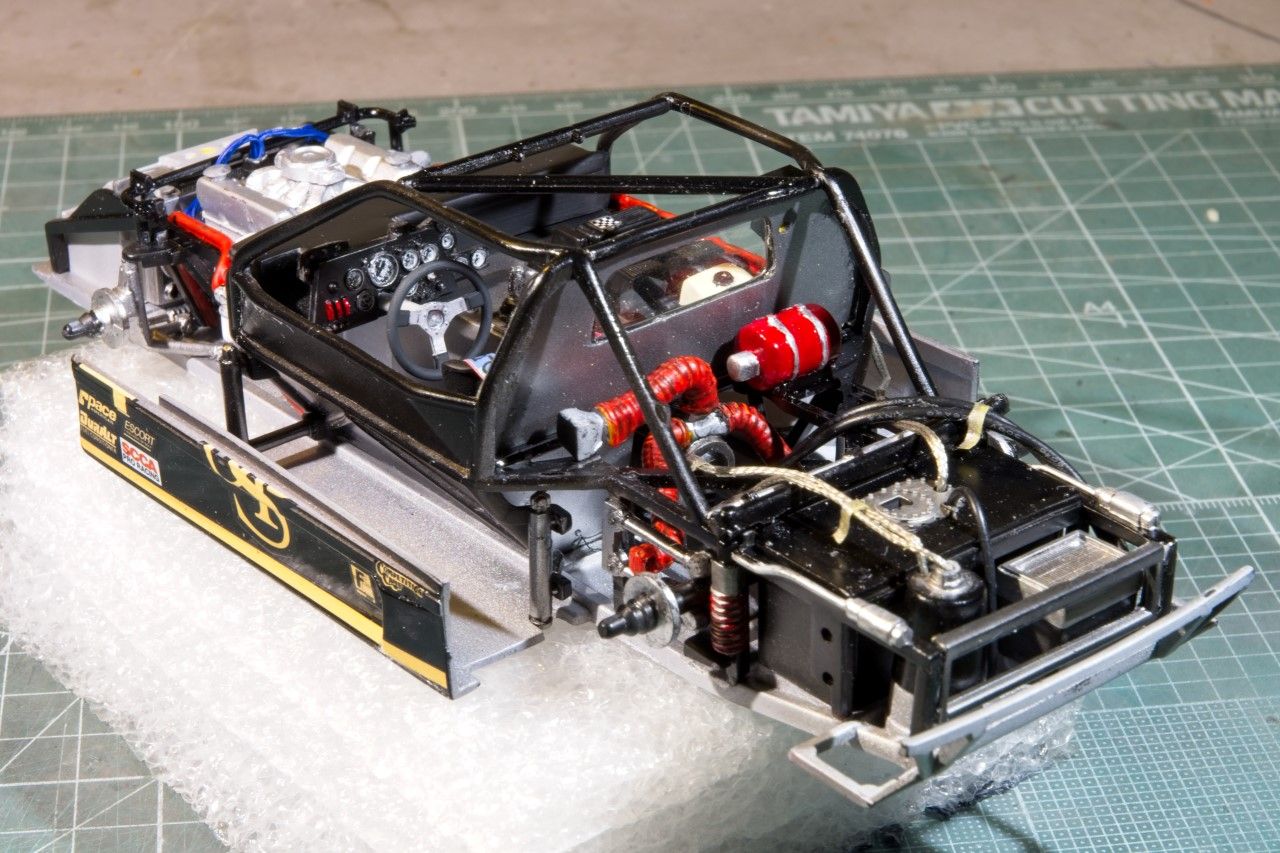
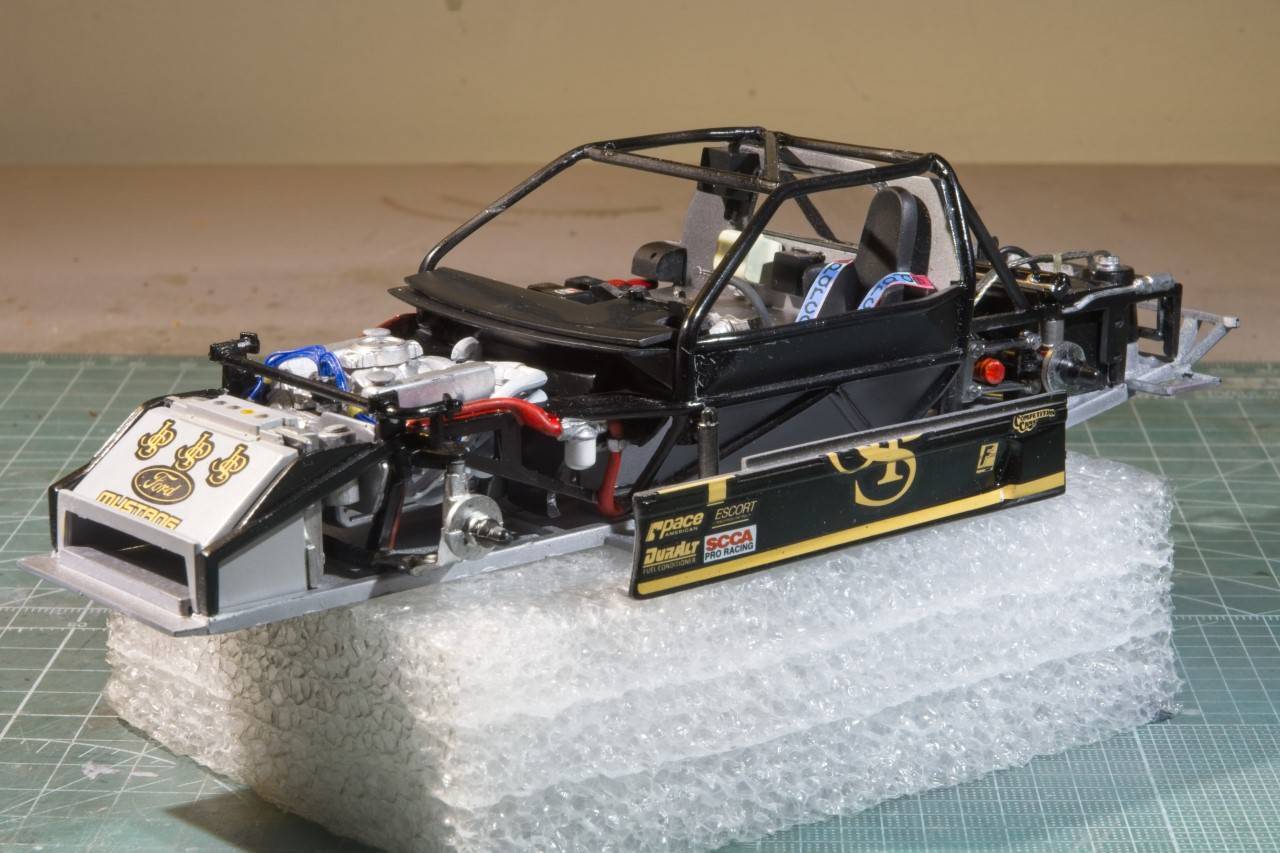
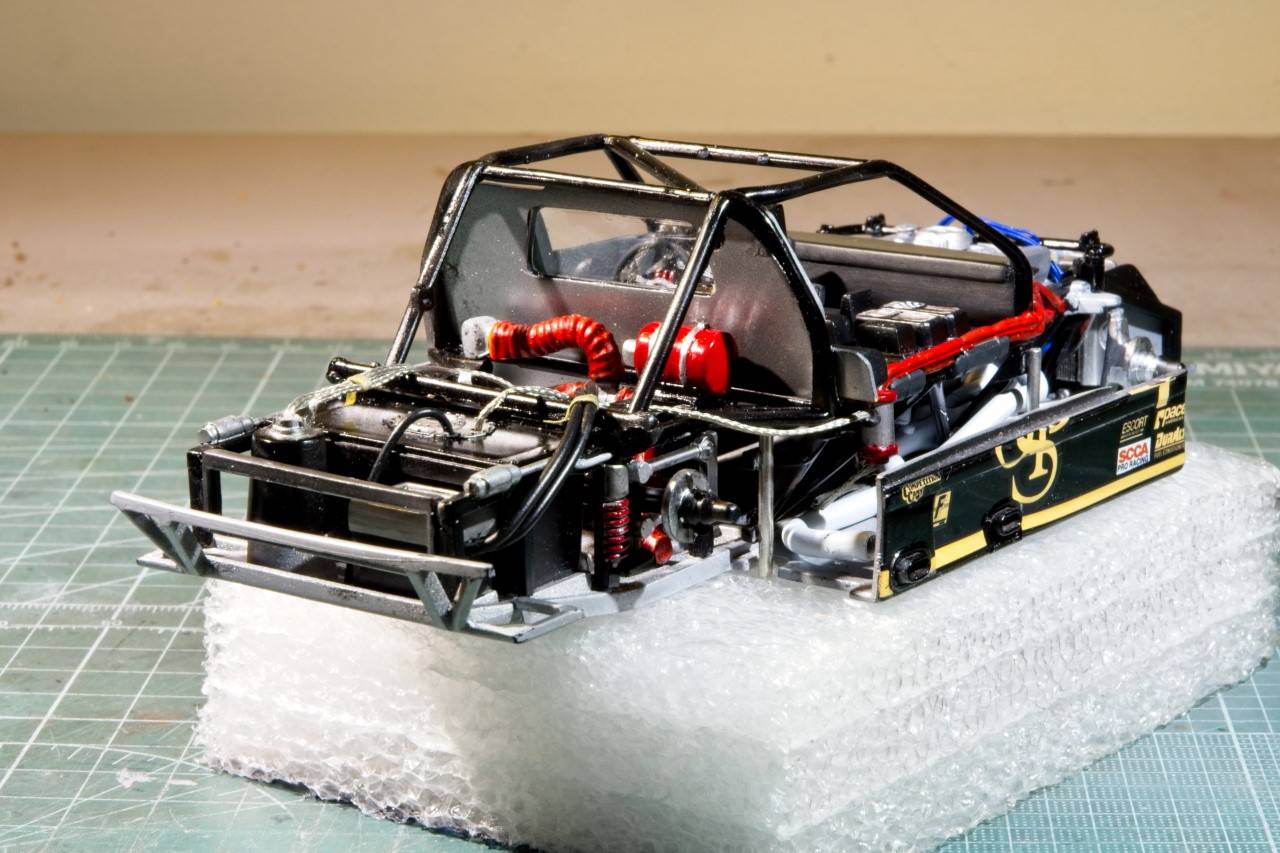
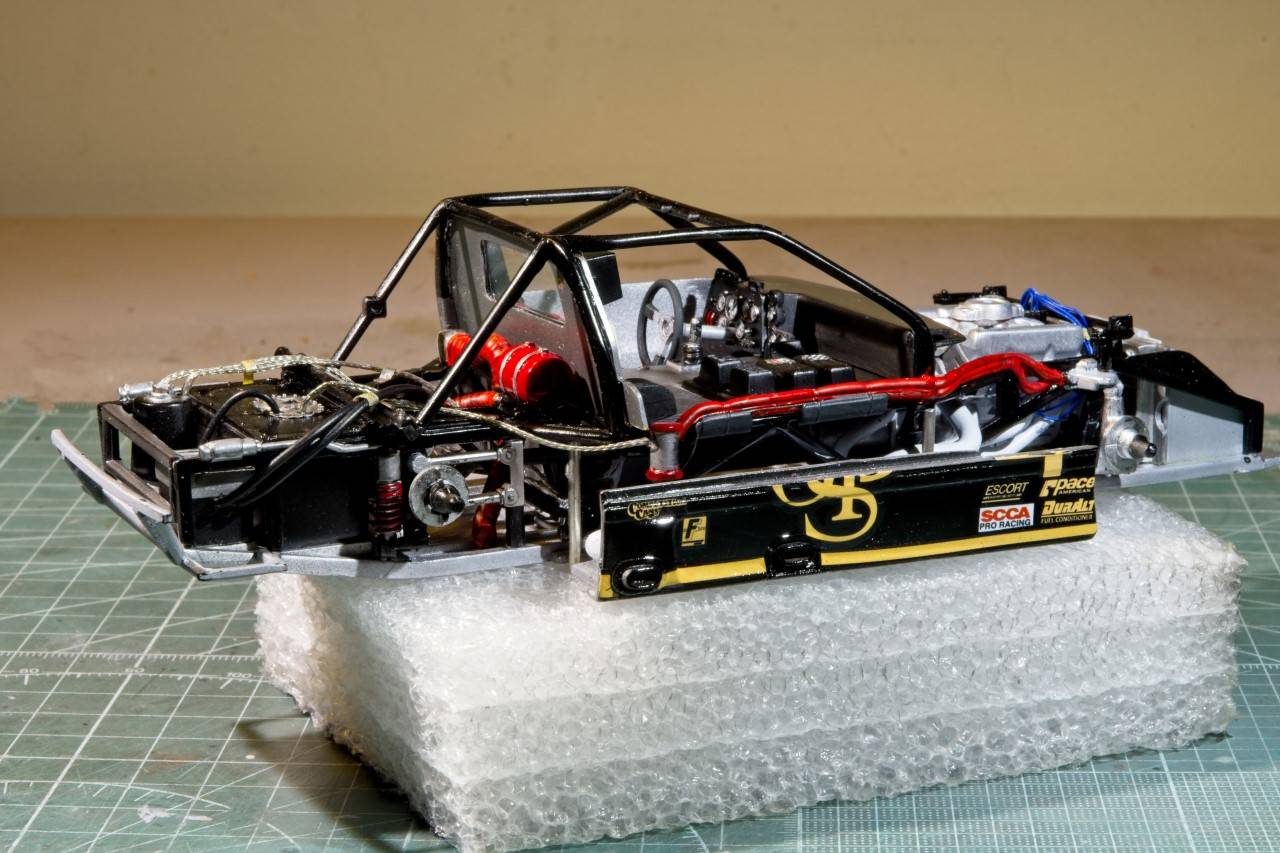
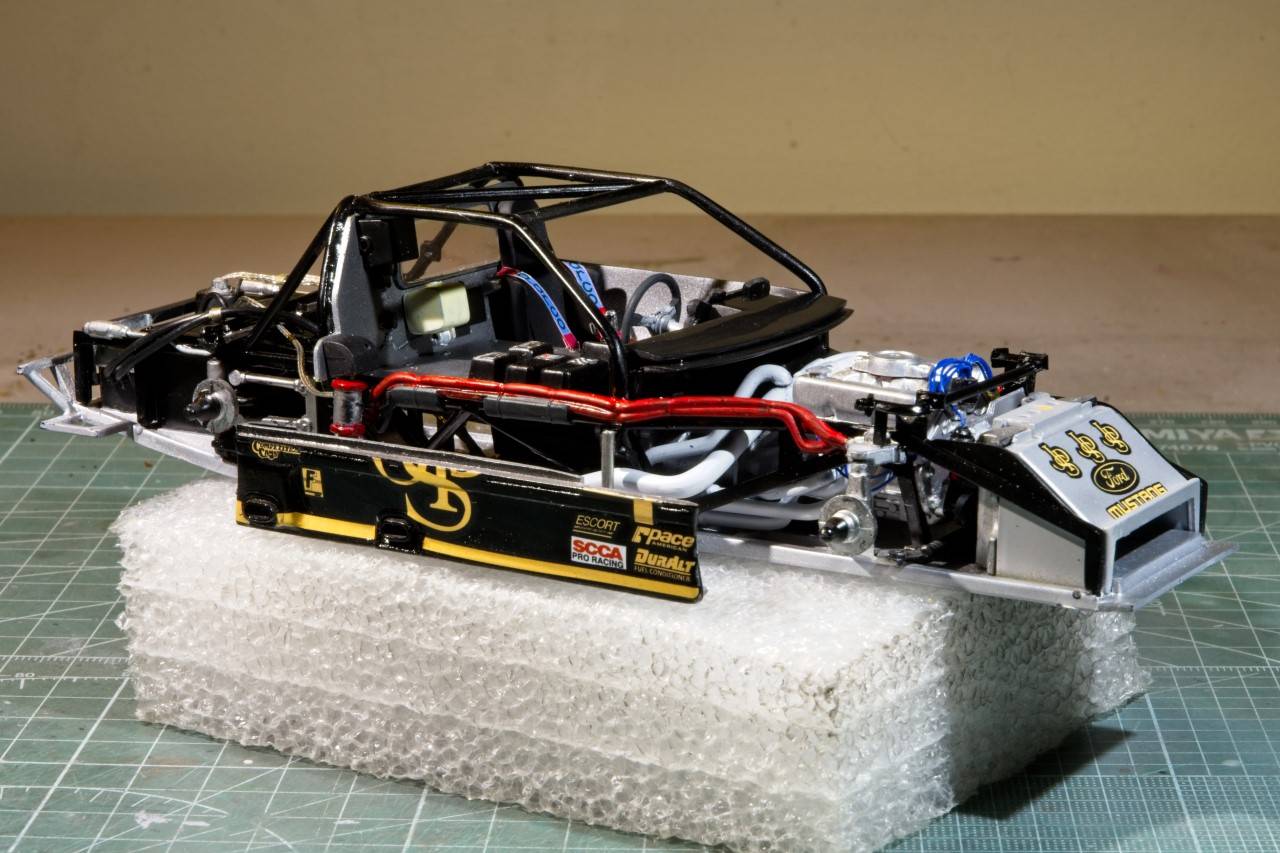
Since my last update I finished up the engine compartment with the addition of the exhaust cross over pipe. As I said in my last update I had come to the conclusion that unless I left the motor out, there's no more room for any additional lines. Just the air cleaner needs to be glued in place, but 1st I have to paint it. So my focus now turned to the drivers compartment.

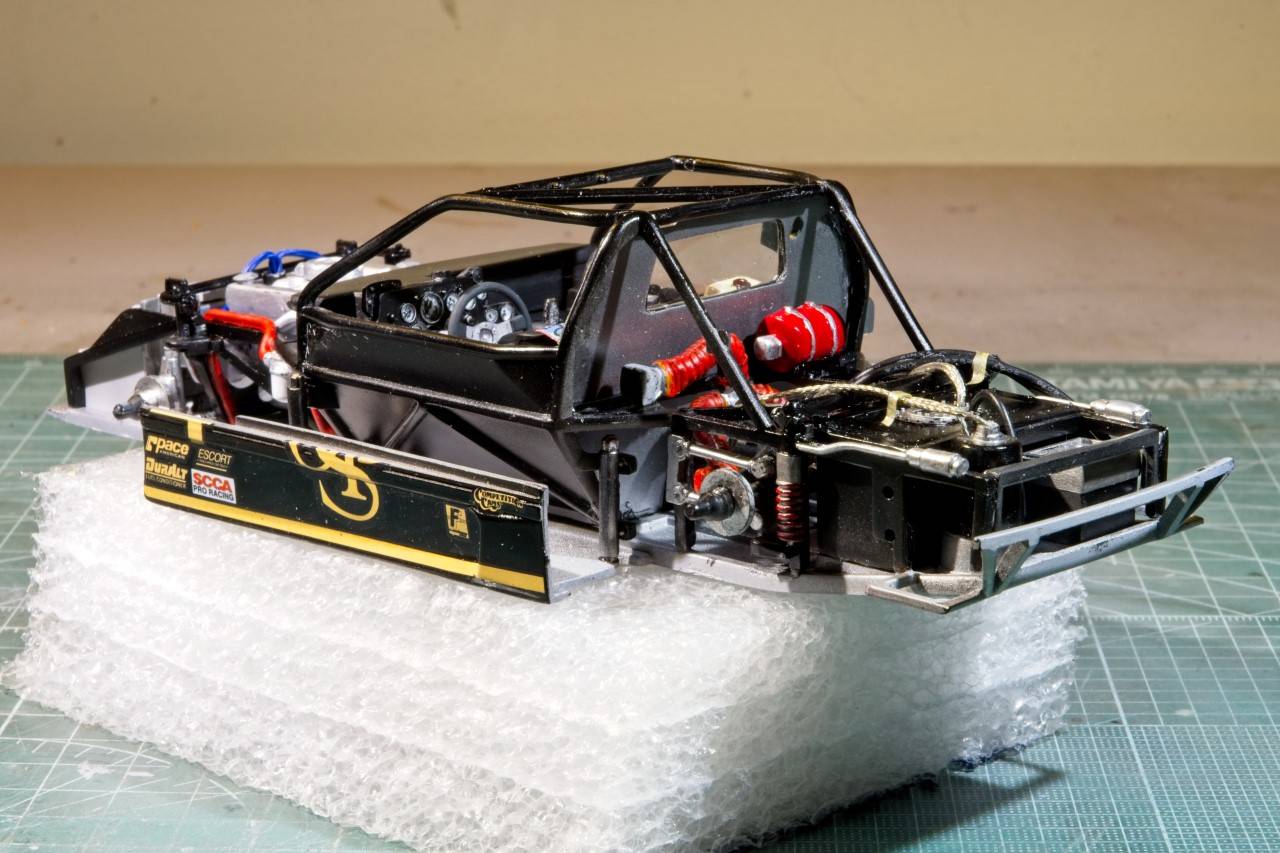
And here is where Revell has made another regroup, and counter attacked with all that this kit has. The front engine bulkhead just didn't fit as it's to wide. That's a combination of my NOT gluing the side frames exactly as they should be, but the fit was pretty sloppy so one has to guess. I just guessed slight wrong. So out came the files and various sandpapers. Finally it fits. Then I realized that the transmission cover needs to be installed 1st. So I dry fitted it, and then the battle really started in earnest. I just couldn't get the bulkhead to slide into position. Now this went on for two days, finally I figured that if I just dry fitted the cover, then tapped it so that the front was pulled up, the bulkhead would fit with a little persuasion. A few more dry fittings convinced me that it would work, so I glued the front builkhead in place with 5 min epoxy, but I didn't glue the transmission cover as I needed to be able to lift it again to get the dash in.


Next up was the dash, but not the instrument panel which is separate. Of course it didn't come close to fitting. So major surgery was needed to the sub structure that would go under the transmission cover, as well as narrowing it's width. Another day at the bench and it to was in place.


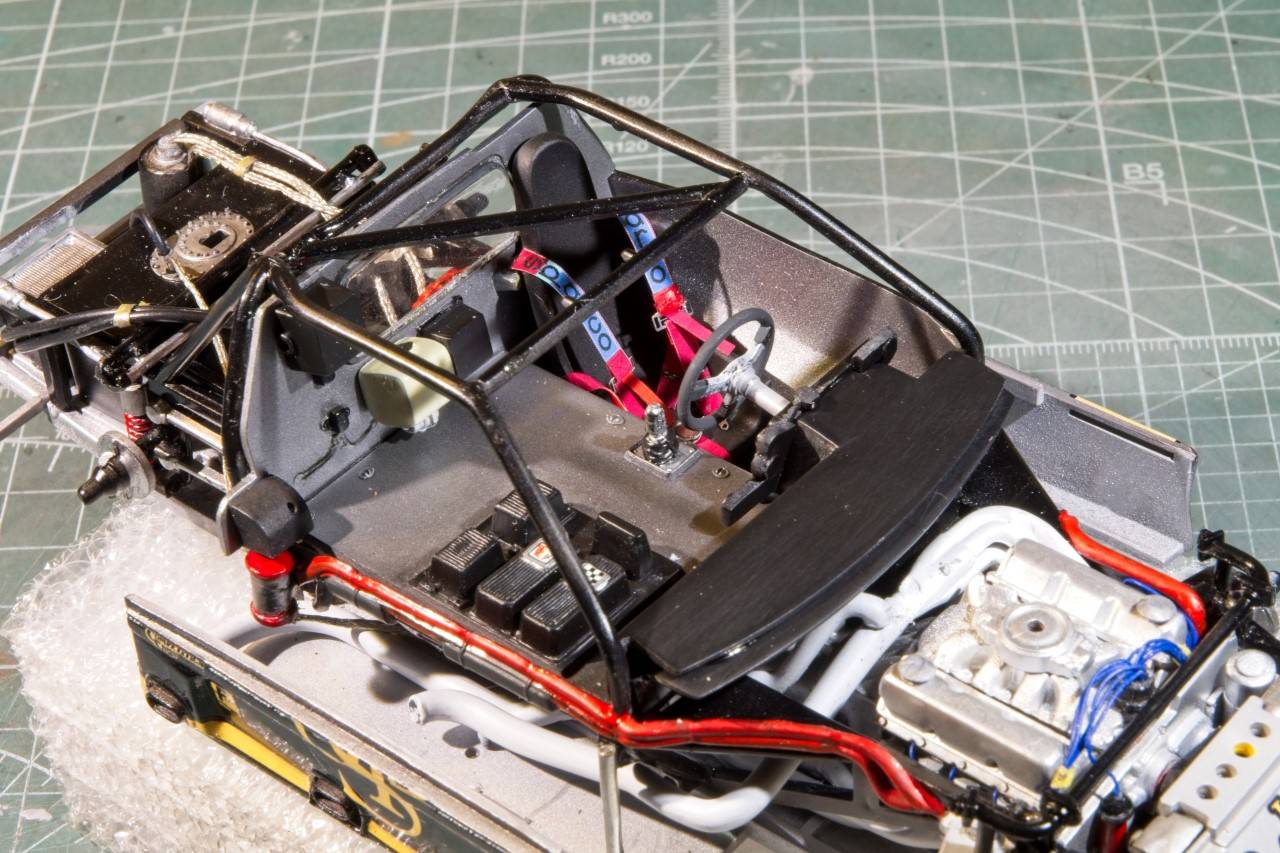
In between I hand painted all the instruments on the dash panel as there is no decal alternative in the kit, and I don't have any extras lying around close to the sizes I needed. The faces are supposed to be black with white numbers, but I opted to reverse them to add a little much needed color contrast. The bezels were painted with good old Testors Silver. The instrument panel slides right into place which was a very pleasant surprise. I left the steering wheel off for now.

The seat was painted a combination of Matt Black and Nato Black. Then epoxied into place. Now came the dreaded 6 way seatbelt/Harness time. One really needs a steady hand and good eyesight to build the HGW set. Unfortunately, neither of which I have. Somehow, I managed to get them built over the next few days. I adjusted the lengths of each belts as needed. I'm pretty happy with how they look. Not perfect, but gets the job done, especially as once the window netting is on, you really can't see much of the seat.


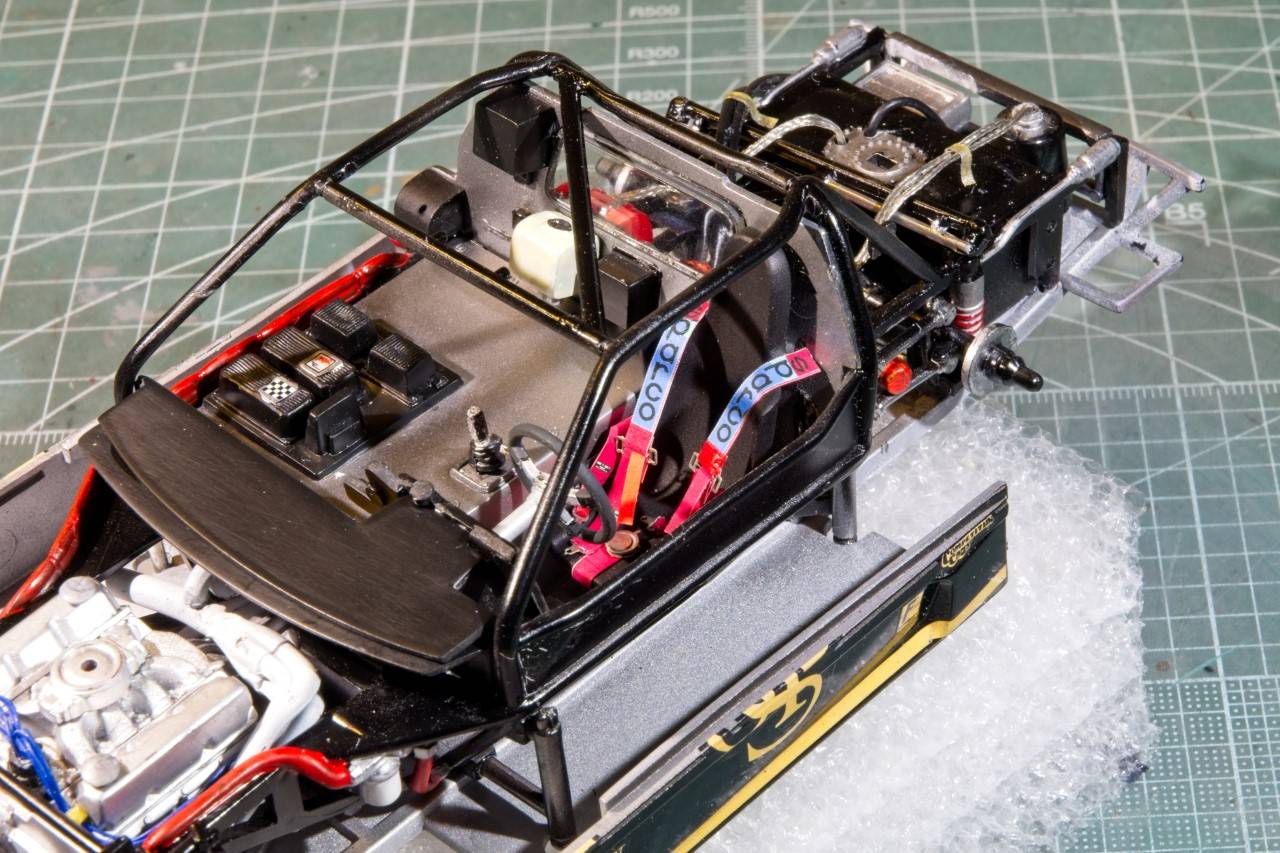
And finally the steering wheel was glued into place. I did paint the wheel Nato Black to represent the foam type cover on the wheel.

Still plenty to do including the fuel filters and lines, as well as replacing the two temp line straps in the trunk area. Of course I have to figure out a better alternative to the massively oversized window netting. And I'm looking forward to the wheels/tires so that the chassis can finally stand on it's own.


Joel
md72
#439
_VISITCOMMUNITY
Washington, United States
Joined: November 05, 2005
KitMaker: 4,950 posts
Auto Modeler: 555 posts
Posted: Tuesday, December 24, 2019 - 05:49 AM UTC
Wow Joel, it's really looking great. I've loving all the detail you're going into about your struggles, I'm getting ideas to try when I run into similar problems.

I think I need to get a bit more primer on the body, one of the fills is showing. and there's a bit more on the engine to touch up.

With my grandsons in quarter midget racing, I'm familiar with 5 point harnesses, but what's a 6 point?

Dixon66
_VISITCOMMUNITY
New Hampshire, United States
Joined: December 12, 2002
KitMaker: 1,500 posts
Auto Modeler: 645 posts
Posted: Tuesday, December 24, 2019 - 06:04 AM UTC

Quoted Text

With my grandsons in quarter midget racing, I'm familiar with 5 point harnesses, but what's a 6 point?


A six point has two anti submarine straps instead of just one between the driver's legs.

Joel, if you hadn't told us of the struggles I never would have guessed it. Looking great and the details just plain look awesome.

Quick update on the Bronco. The rear fenders have been cut to open up the wheel wells (scariest part of the build was the first touch of the razor saw to the plastic), and most all of the plastic and resing parts have been cleaned up. My SD card died and I'm going to try to salvage the pics on it. New card coming.