

Mark,
The chassis in the background really looks the part of being well rusted, very nicely done.
As for your testing of the clear Flat, I'd say that you'd want to go with the Flat finish on the left. I'm thinking that since that side had all it's recessed panel lines and details filled with the test paint, and that you air brushed both sides the same, that 1:1 thinning isn't enough. I'd try 2 parts paint/clear flat base :3 parts thinning agent.
Joel


Go to automodeler.com for the current dynamic site!
The Garage
For general automotive modeling or non-modeling topics.
For general automotive modeling or non-modeling topics.
Hosted by Jim Starkweather
Blue Oval - Ford Motor Co. GB Build Thread

Joel_W

Joined: December 04, 2010
KitMaker: 11,666 posts
Auto Modeler: 2,974 posts

Posted: Wednesday, January 08, 2020 - 01:49 AM UTC


md72

#439
Joined: November 05, 2005
KitMaker: 4,950 posts
Auto Modeler: 555 posts

Posted: Wednesday, January 08, 2020 - 08:31 AM UTC
Thanks Joel, but I don't think I said what I saw. The flat side is so dull, that there are no reflections off of the plastic edges at the panel lines. If I get an inspection light close to the wing, all of the lines are there, they weren't filled with paint. The finish is just so evenly flat the lines don't stand out. Guess that explains the case for Panel Line Washes. 
All that said, I prefer the satin finish of the right side. But since I don't really have a lot of experience with spraying Mr. Color and the flat base is kind of thick, I am going to use more thinner maybe a 2:3 like you are suggesting.
I also used a bit more pressure than normal, maybe on the high side of 25PSI vs something closer to 20.

Joel_W
Joined: December 04, 2010
KitMaker: 11,666 posts
Auto Modeler: 2,974 posts
Posted: Thursday, January 09, 2020 - 12:29 PM UTC
Been about two weeks since my last update. Of course those two weeks included Christmas and New Years, but I still managed to stick to my 3 day work week. Well, more of less.
Decided to switch gears, leaving the last of the drivers, engine, and rear compartments for a well needed break. So I turned my attention to the four wheels and tires. Now how hard could they possibly be? I should have known that the Revell Roush JPS Mustang still had some real fight left, as it seems that it's going to fight me all the way to the bitter end.
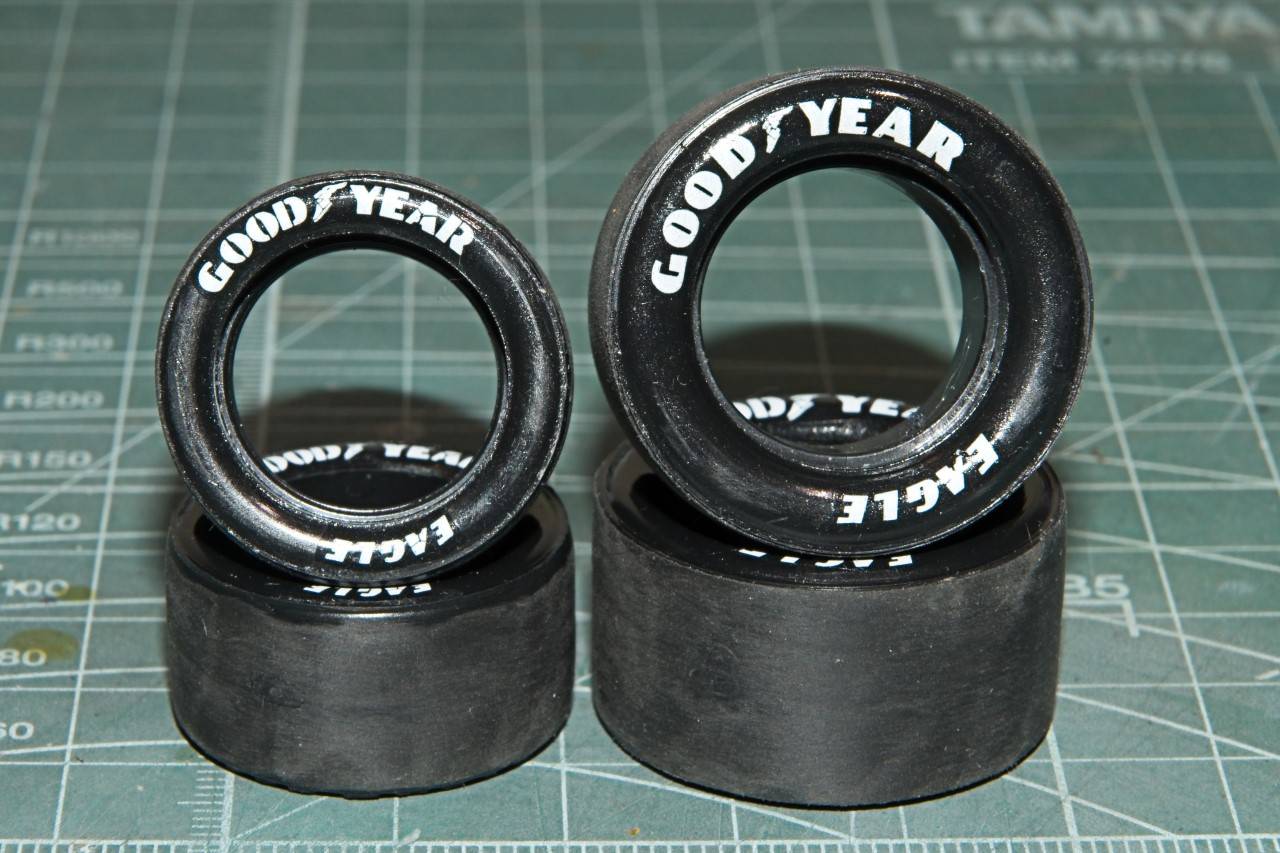
The tires are on a separate tree made out of some really hard as nails rubber. I can certainly live with that, but it's the molding that struck the 1st offensive blow of this battle. Seems that the molds leak a little, and they don't correctly align. That left me with both the usual center seam, and a slight step from one side of the seam to the other. Add to that the tires each have a sprue arm dead on center into the seam. Again, I can live with that resulting nub, but the attachment point actually is slightly below the surface.
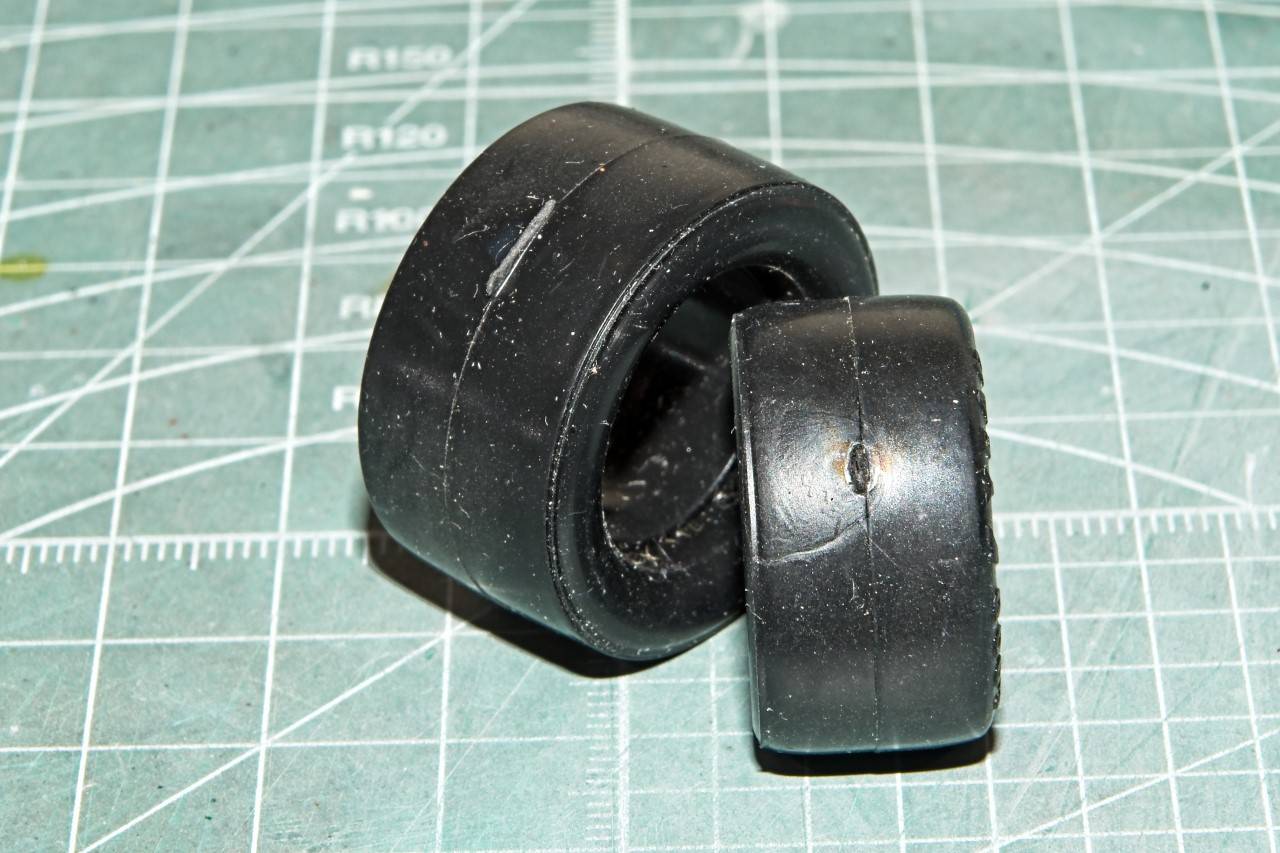
There's no using any type of filler for sure. So out came every grit of emerycloth I have plus some wood working files. I finally got rid of most of the seam which is prototypical, and gone are those nubs and depressions.
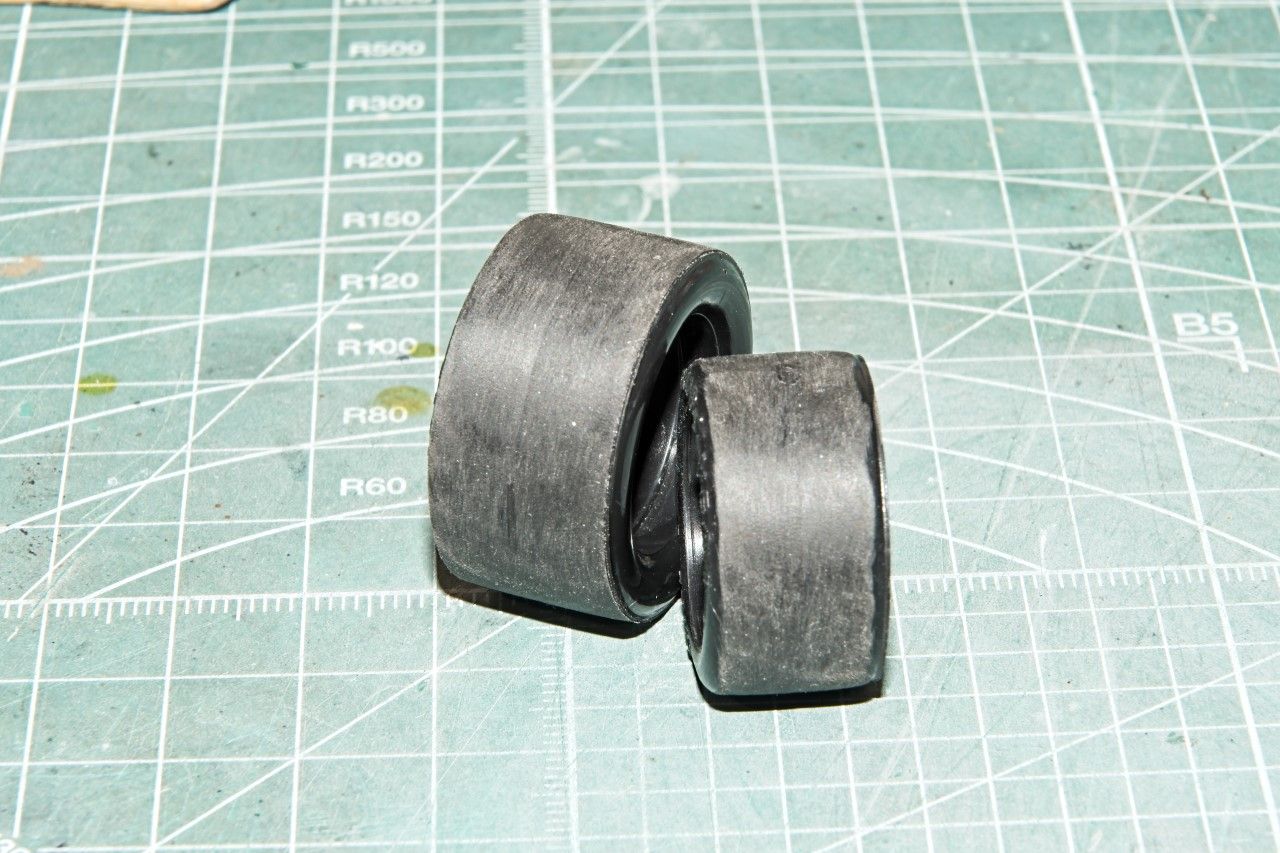
The tires still need to be cleaned up some, but you can get the general idea.
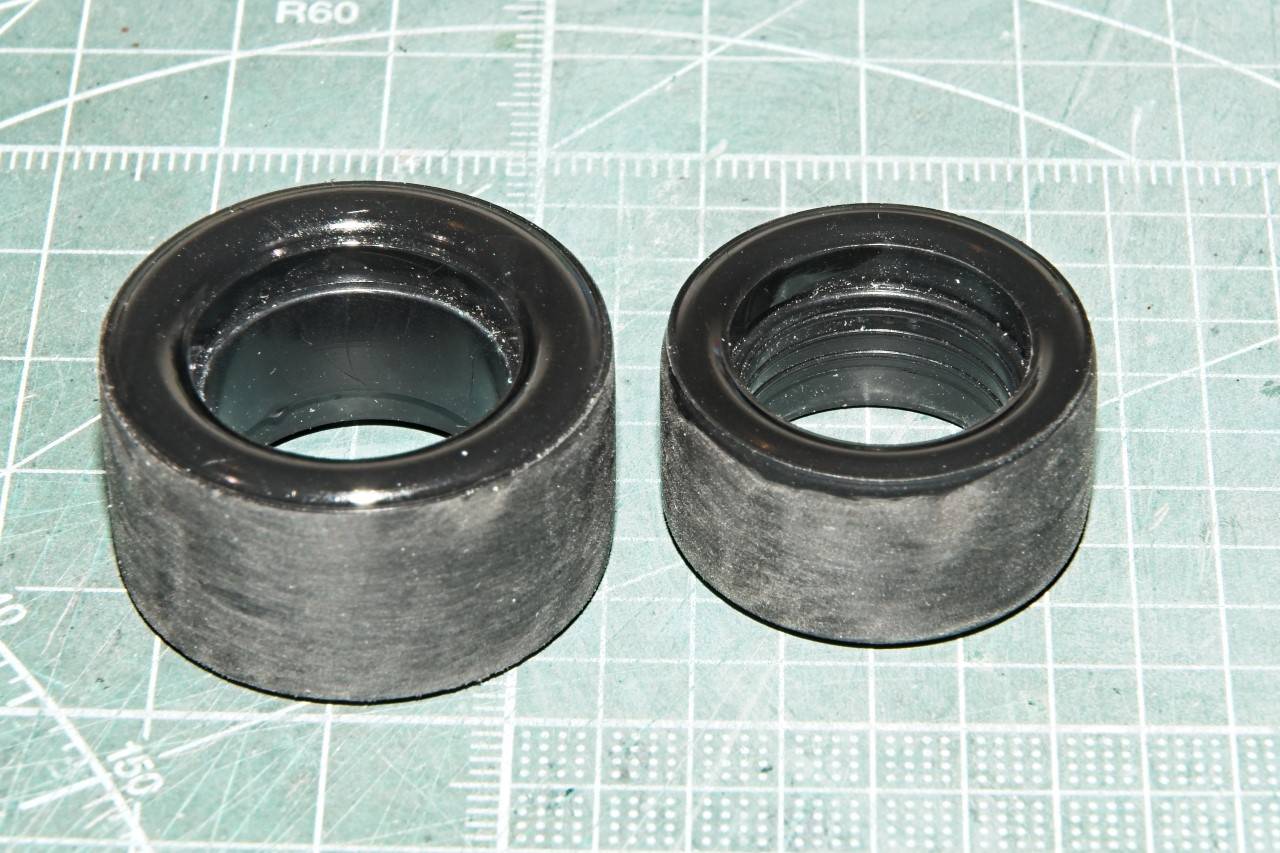
I had to decide if I wanted to use metal stencils or decals for the Goodyear logos. I opted for decals as properly applied, they do look rather good. I bought 1/25 scale Goodyear tire logos from Indy Cals pre 1981 as well as post 1981, but never gave it much thought as to why the 1981 break. But more on that in a few. 1st I had to gloss the side walls. This is the only application that I still use Pledge for by brush no less. I applied a even wet coat on the back sidewall, as the front side had the name in raised letters, and I've never gotten them to look good enough needing multiple coats of white over primer, Then cleaning up any screw ups with a toothpick. So I just reversed the tire sidewalls. I gave the Pledge two full days to dry and cure.
Then came the fun decal part. Indy Cal sheets are all one super big decal, so I have to cut each decal out from the blue backing paper which was EXTREMELY difficult for me to see under a bright tensor light, but very slowly I got it done. Then trim with a new #10 Exacto blade.
Now back to the imfamous 1981 issue. Once again I didn't really check my references as I should have, and started with one rear tire. With the way that the decals are laid out on the sheet you get all the Goodyears in pairs. So I applied two Goodyear logo decals on the 1st sidewall using my decaling method of Micro Set, Micro Sol, and Solvaset, giving each solution 1 min to work it's magic before touching them. Worked great. Then I noticed that the sheet had the year pre-1981 on it, but my build is post 1981. A guick Google check to confirm this, and sure enough Goodyear started to use the name EAGLE in 1981. So back into my decal box for Indy Cars to see what I had screwed up. And sure enough I had totally forgotten that I had multiple tire logo sheets from Indy Cals, and one was for 1/25 scale POST 1981 with GOODYEAR & EAGLE on it in pairs. So I just rewet the 2nd Goodyear logo and removed it. But if I thought that the Goodyear logos were hard to cut out and trim, they're a piece of cake compared to the two different sizes of EAGLE logos. But finally I got them cut out and ready to apply. Took a while but all four tires were decaled.
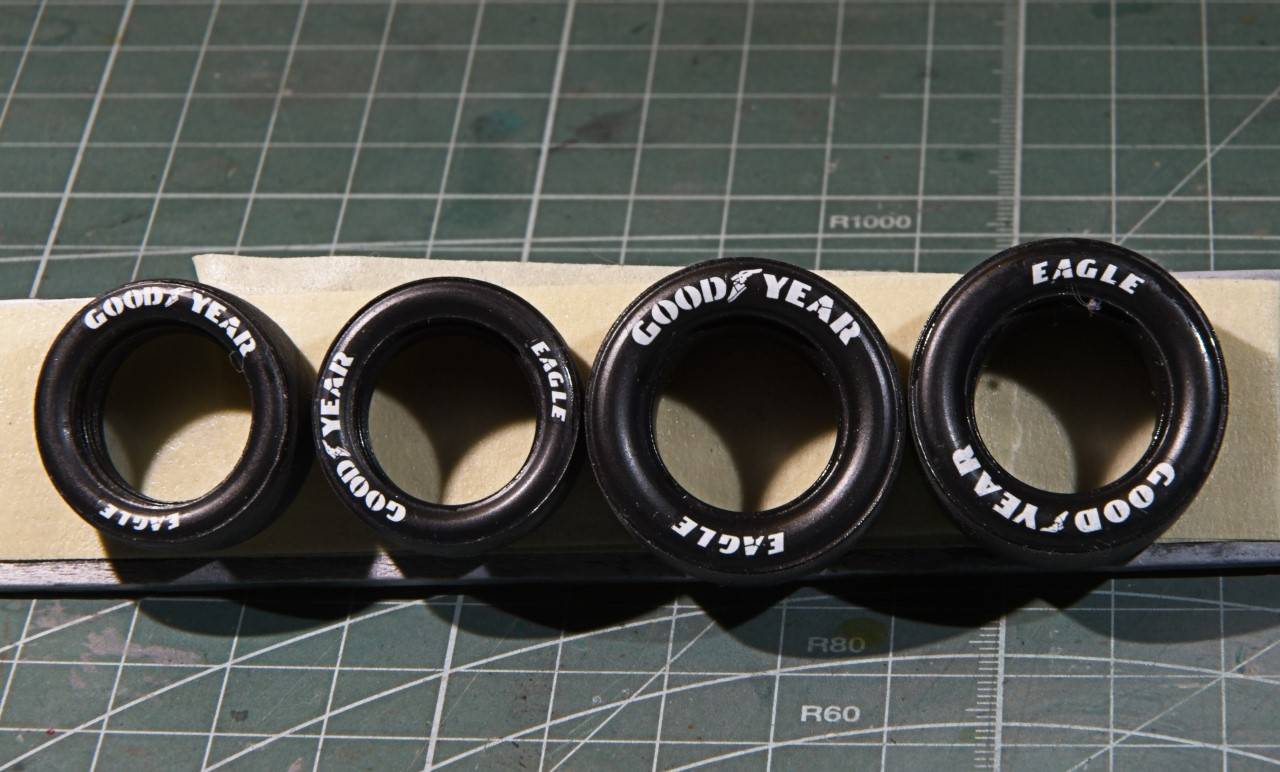
The following day I air brushed on a coat of Alcad2 Semi Matte as I wanted to tires to look more like used tires that were cleaned along with the car rather then new tires.
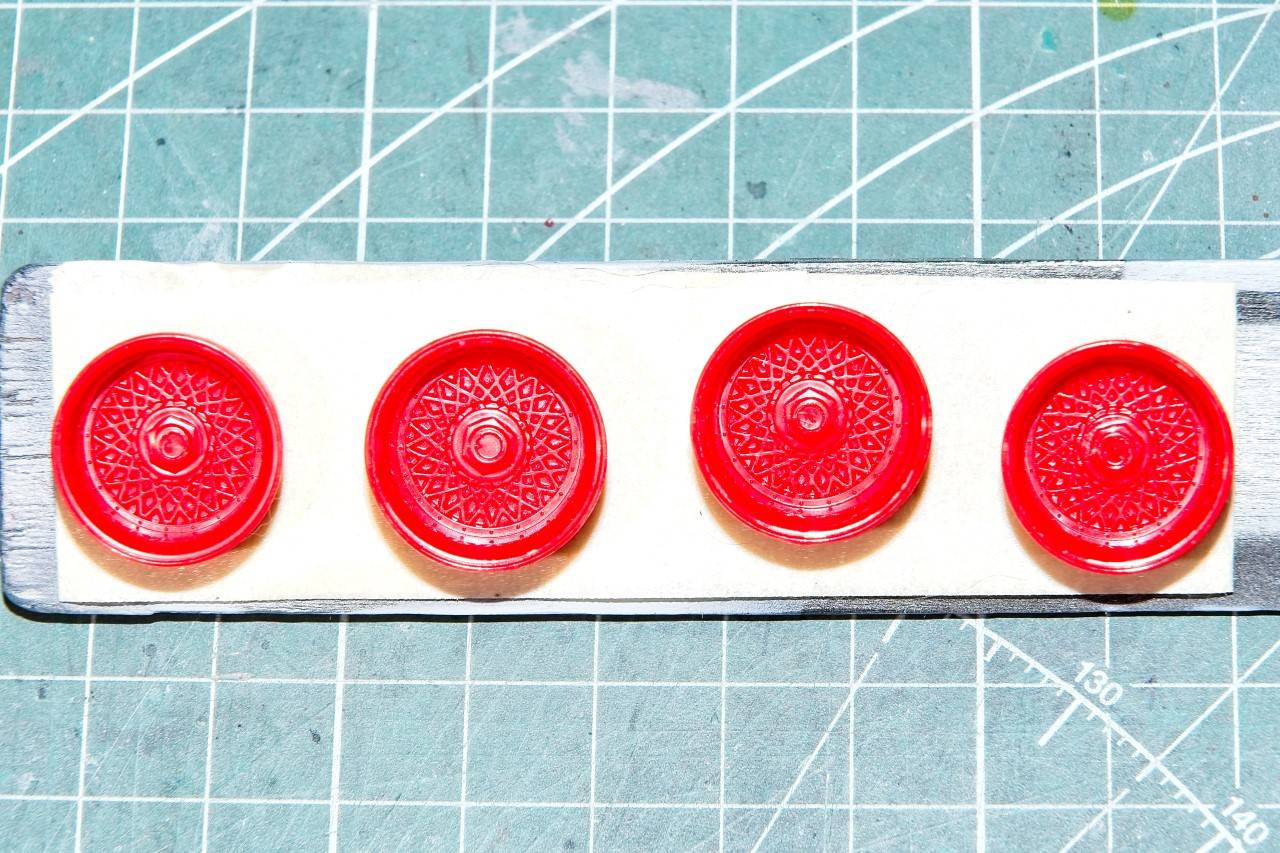
Tires done, so it's back to the wheels. They came in the kit with some overly done chrome, so I just stripped them in Denatured Alcohol. Just a lovely shade of bright Red. You'll notice that the BBS wheel inserts have next to no depth to fool ones eye of the open spaces.
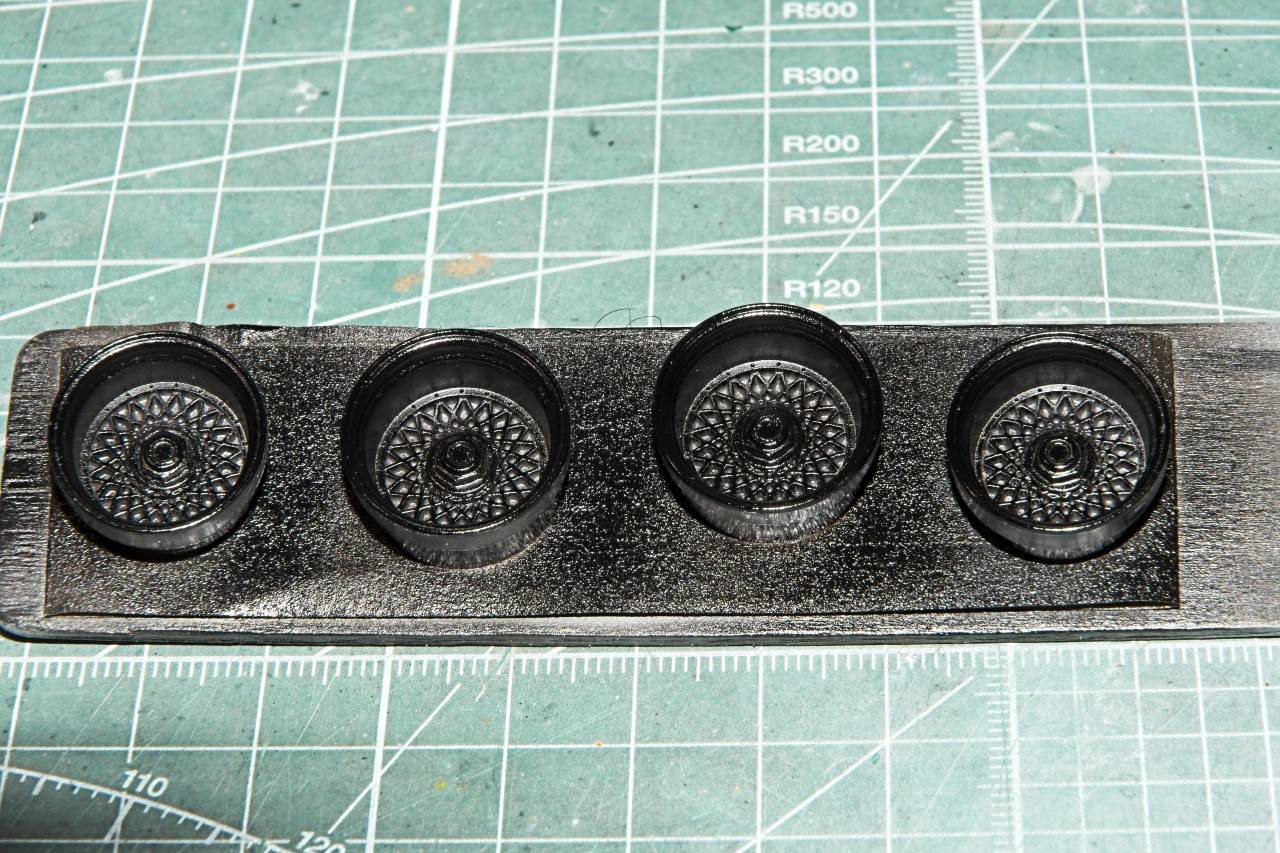
I primed them with Mr. Hobby Light Gray #1500 primer thinned 1:1 with their #400 leveling thinner. Waited a few hours, then I applied several lite coats of Tamiya X-1 Gloss Black. Gave that 2 full days to dry and cure.
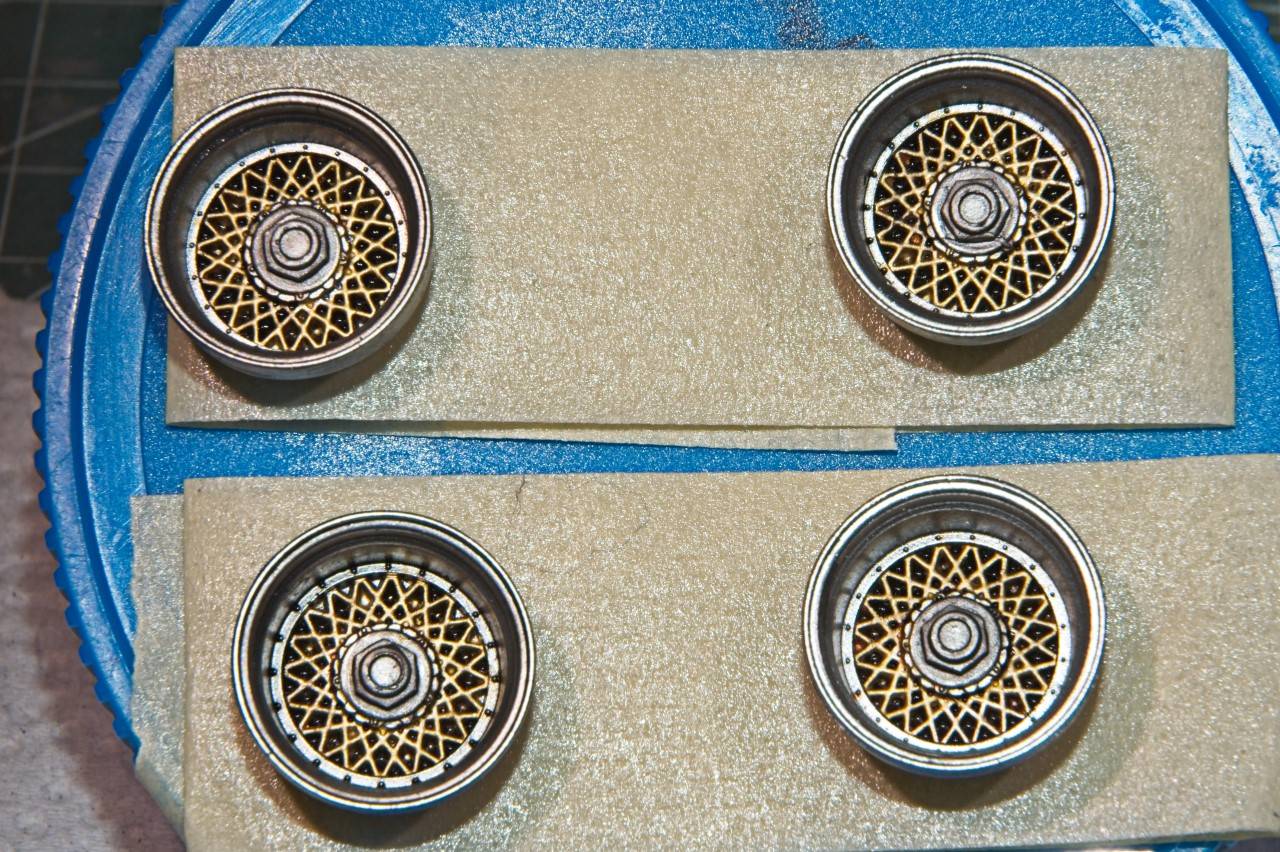
Then I decided to air brush on Alad2 Chrome as it has a kind of polished look to it, but not like polished Chrome. Next work session I hand painted the middle of the wheel with a custom mix of Mr. Color Gold & Bronze as neither color looked right. Gave that a day to really dry, then working with a very thin brush, I carefully dabbed on Tamiya Black panel line wash into the recesses, and then cleaned off any that I got on the wheel with a damp Q tip using Mineral Spirits.
Gave the wheels a few days to cure and then pushed them into place 1st on the rears and added the back half of the wheels which I also air brushed with Alcad2 Chrome. Nice tight fit. Then the front wheels, and wouldn't you just know it, the wheels wouldn't fit no matter how much force I used. So out came some #320 Emerycloth and a few jeweler files. Eventually I got them into place, but it was a struggle.

The finished wheels still need a final cleaning, but I'm really happy how they turned out. Lets hope that they actually will fit on to the press fit ends of the Axles after the the body shell is glued into place.
Thanks to all for checking out my build to date, it's always much appreciated.
Joel
Decided to switch gears, leaving the last of the drivers, engine, and rear compartments for a well needed break. So I turned my attention to the four wheels and tires. Now how hard could they possibly be? I should have known that the Revell Roush JPS Mustang still had some real fight left, as it seems that it's going to fight me all the way to the bitter end.
The tires are on a separate tree made out of some really hard as nails rubber. I can certainly live with that, but it's the molding that struck the 1st offensive blow of this battle. Seems that the molds leak a little, and they don't correctly align. That left me with both the usual center seam, and a slight step from one side of the seam to the other. Add to that the tires each have a sprue arm dead on center into the seam. Again, I can live with that resulting nub, but the attachment point actually is slightly below the surface.
There's no using any type of filler for sure. So out came every grit of emerycloth I have plus some wood working files. I finally got rid of most of the seam which is prototypical, and gone are those nubs and depressions.
The tires still need to be cleaned up some, but you can get the general idea.
I had to decide if I wanted to use metal stencils or decals for the Goodyear logos. I opted for decals as properly applied, they do look rather good. I bought 1/25 scale Goodyear tire logos from Indy Cals pre 1981 as well as post 1981, but never gave it much thought as to why the 1981 break. But more on that in a few. 1st I had to gloss the side walls. This is the only application that I still use Pledge for by brush no less. I applied a even wet coat on the back sidewall, as the front side had the name in raised letters, and I've never gotten them to look good enough needing multiple coats of white over primer, Then cleaning up any screw ups with a toothpick. So I just reversed the tire sidewalls. I gave the Pledge two full days to dry and cure.
Then came the fun decal part. Indy Cal sheets are all one super big decal, so I have to cut each decal out from the blue backing paper which was EXTREMELY difficult for me to see under a bright tensor light, but very slowly I got it done. Then trim with a new #10 Exacto blade.
Now back to the imfamous 1981 issue. Once again I didn't really check my references as I should have, and started with one rear tire. With the way that the decals are laid out on the sheet you get all the Goodyears in pairs. So I applied two Goodyear logo decals on the 1st sidewall using my decaling method of Micro Set, Micro Sol, and Solvaset, giving each solution 1 min to work it's magic before touching them. Worked great. Then I noticed that the sheet had the year pre-1981 on it, but my build is post 1981. A guick Google check to confirm this, and sure enough Goodyear started to use the name EAGLE in 1981. So back into my decal box for Indy Cars to see what I had screwed up. And sure enough I had totally forgotten that I had multiple tire logo sheets from Indy Cals, and one was for 1/25 scale POST 1981 with GOODYEAR & EAGLE on it in pairs. So I just rewet the 2nd Goodyear logo and removed it. But if I thought that the Goodyear logos were hard to cut out and trim, they're a piece of cake compared to the two different sizes of EAGLE logos. But finally I got them cut out and ready to apply. Took a while but all four tires were decaled.
The following day I air brushed on a coat of Alcad2 Semi Matte as I wanted to tires to look more like used tires that were cleaned along with the car rather then new tires.
Tires done, so it's back to the wheels. They came in the kit with some overly done chrome, so I just stripped them in Denatured Alcohol. Just a lovely shade of bright Red. You'll notice that the BBS wheel inserts have next to no depth to fool ones eye of the open spaces.
I primed them with Mr. Hobby Light Gray #1500 primer thinned 1:1 with their #400 leveling thinner. Waited a few hours, then I applied several lite coats of Tamiya X-1 Gloss Black. Gave that 2 full days to dry and cure.
Then I decided to air brush on Alad2 Chrome as it has a kind of polished look to it, but not like polished Chrome. Next work session I hand painted the middle of the wheel with a custom mix of Mr. Color Gold & Bronze as neither color looked right. Gave that a day to really dry, then working with a very thin brush, I carefully dabbed on Tamiya Black panel line wash into the recesses, and then cleaned off any that I got on the wheel with a damp Q tip using Mineral Spirits.
Gave the wheels a few days to cure and then pushed them into place 1st on the rears and added the back half of the wheels which I also air brushed with Alcad2 Chrome. Nice tight fit. Then the front wheels, and wouldn't you just know it, the wheels wouldn't fit no matter how much force I used. So out came some #320 Emerycloth and a few jeweler files. Eventually I got them into place, but it was a struggle.
The finished wheels still need a final cleaning, but I'm really happy how they turned out. Lets hope that they actually will fit on to the press fit ends of the Axles after the the body shell is glued into place.
Thanks to all for checking out my build to date, it's always much appreciated.
Joel

AussieReg

#007

Joined: June 09, 2009
KitMaker: 8,156 posts
Auto Modeler: 2,953 posts

Posted: Thursday, January 09, 2020 - 10:44 PM UTC
Those wheels look really nice Joel, you've done a great job of getting the spoked look using the Tamiya Wash, and the decals and paint work is super tidy!
I always find the rubber tyres to be a bit of a chore to remove the seams and "sprue gates" but if you get them right they can really lift the final look of the build.
Cheers, D
I always find the rubber tyres to be a bit of a chore to remove the seams and "sprue gates" but if you get them right they can really lift the final look of the build.
Cheers, D


Hwa-Rang

Joined: June 29, 2004
KitMaker: 6,760 posts
Auto Modeler: 2,182 posts

Posted: Thursday, January 09, 2020 - 11:00 PM UTC
Those wheels/tires looked awful, but post Joel treatment, they look pretty amazing.
Joel_W
Joined: December 04, 2010
KitMaker: 11,666 posts
Auto Modeler: 2,974 posts
Posted: Friday, January 10, 2020 - 03:39 AM UTC
Thanks D & Jasper,
I really appreciate your feedback and thumbs up for the effort on the wheels & tires. Sure looks like I won this Battle of the Revell war, but I'm sure that there's a few still left.
Joel
I really appreciate your feedback and thumbs up for the effort on the wheels & tires. Sure looks like I won this Battle of the Revell war, but I'm sure that there's a few still left.
Joel

forest1000

Joined: December 14, 2014
KitMaker: 80 posts
Auto Modeler: 44 posts

Posted: Sunday, January 12, 2020 - 02:19 PM UTC
See the attached artwork for the Ford badge for Mark's kit. The red is where a reflection would be off a red car. It can be changed for any colour.


Cosimodo
#335

Joined: September 03, 2013
KitMaker: 1,808 posts
Auto Modeler: 701 posts

Posted: Sunday, January 12, 2020 - 05:44 PM UTC
Well pride before a fall and all that. Having pretty happy with the paint job I started the decals. For this version of the two MK1s it has a white stripe all the way around the body and over the bonnet. I had originally thought about masking this up and painting it in place but decided to go with the kit decals even though I was slightly dubious that it would sit down over the contours, especially at the front and rear with so many different angles.So it proved to be, after much cursing I could get them to settled into all the curves, especially over the wheel arches. So I decided I would revert painting the white. Unfortunately I am sure I overdosed the decals on MicroSol and they had settled into the paint. So I settled for a strip back to the plastic. I used Tamiya Paint remover which I have used before without any troubles but now I don't know. A combination of decal solution maybe and paint remover saw the surface the plastic dissolve. I was using cotton buds but as the paint came off, and I got most of it off before I realised the plastic was degrading. I only have a picture of the mess I am left with.

Recoverable? I don't know but I am seriously thinking going Capt Oates on this build and moving onto the next.
Michael
Recoverable? I don't know but I am seriously thinking going Capt Oates on this build and moving onto the next.
Michael
AussieReg
#007
Joined: June 09, 2009
KitMaker: 8,156 posts
Auto Modeler: 2,953 posts
Posted: Sunday, January 12, 2020 - 08:40 PM UTC
Mike, such a shame mate. I'm really sorry to see you hit a snag on this one, it was moving along nicely. Maybe put the body aside for a couple of days, then hit it with some primer to see how it looks.
Cheers, D
Cheers, D
Joel_W
Joined: December 04, 2010
KitMaker: 11,666 posts
Auto Modeler: 2,974 posts
Posted: Monday, January 13, 2020 - 05:14 AM UTC
Michael,
I'm truly sorry that you ended up with a shell in that condition.
I've never used Tamiya Paint Remover which according to Tamiya "is a multi-purpose liquid capable of removing acrylic-, enamel- and lacquer-based paints, including paints for use on polycarbonate. It is kind to model parts surfaces, and does not cause clouding when used on polycarbonate, and can also be used to remove metal plating safely." Sounds like it's shouldn't be the cause of all that pitting I see especially on the hood. Are any of the areas that pitted filled with any kind of filler? My biggest issue with the Tamiya stuff is the $20 price tag for 250 ml.
Micro Set & Sol are Vinegar based setting solutions. They're pretty mild compared to some of the other decal setting solutions I've used. So I don't think that either caused the decals to eat into the plastic. The paint, yes, even lacquer if you used enough for long enough.
That's why I use Solvaset to really set the decals. For most in house Asian decals which are on the very thick side, I use Mr. Set and Mr. Sol from My Hobby. Much stronger then Solvaset, but will beat any decal into position without harming the paint.
If the hood is the worst of it, you can use a two part putty so you can smooth it out with water before it dries, and a thick primer sealer for pin holes applied with a brush over a few coats.
As for stripping paint, I head over to my local big box hardware chain store and buy Denatured Alcohol. Just soak for 30 min, then scrub off with a toothbrush. That's how I stripped the lacquer paint off of the Mustang and started over.
Joel

jimb
Joined: August 25, 2006
KitMaker: 2,539 posts
Auto Modeler: 1,405 posts

Posted: Monday, January 13, 2020 - 11:40 AM UTC
So just so everyone doesn't think I'm a total slacker on me 1948 Ford Deluxe Convertible build, I managed to get some paint onto the body over the weekend. I'm not totally happy with the shine (or lack there of), so I'm thinking another coat is in order.

For that rainy day in Southern California:

Wheels & tires are done, and the engine has a coat of green on it. Will it be done before the end of the Group Build? Heck if I know!
Jim
For that rainy day in Southern California:
Wheels & tires are done, and the engine has a coat of green on it. Will it be done before the end of the Group Build? Heck if I know!
Jim
jimb
Joined: August 25, 2006
KitMaker: 2,539 posts
Auto Modeler: 1,405 posts
Posted: Monday, January 13, 2020 - 11:43 AM UTC
Quoted Text
See the attached artwork for the Ford badge for Mark's kit. The red is where a reflection would be off a red car. It can be changed for any colour.
That's really nice. It would look good on the front of a Ford C800 as well.
Jim
md72
#439
Joined: November 05, 2005
KitMaker: 4,950 posts
Auto Modeler: 555 posts
Posted: Monday, January 13, 2020 - 07:10 PM UTC
Wow David, that is something else. Since my finish is going to be semigloss, there may may not be a reflection. what do I do with the A/W next?
I am making progress, slowly.
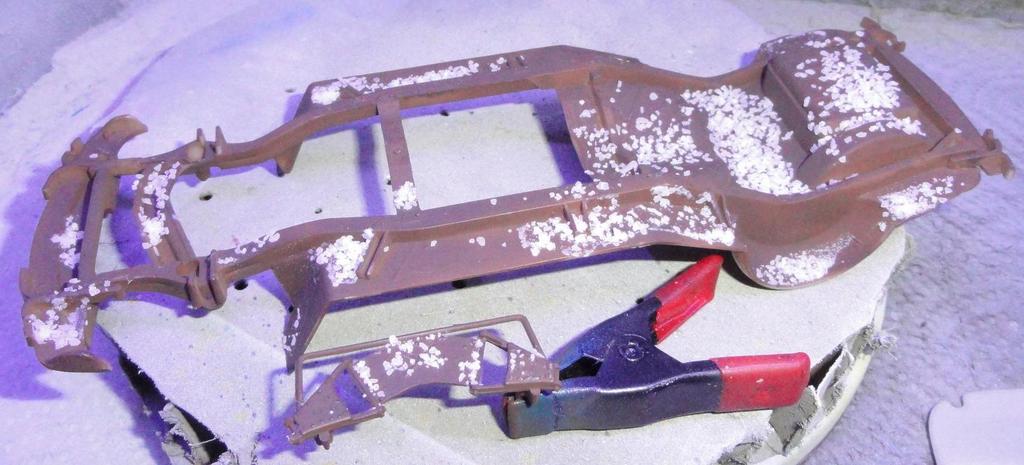
Salt on the rusted chassis.
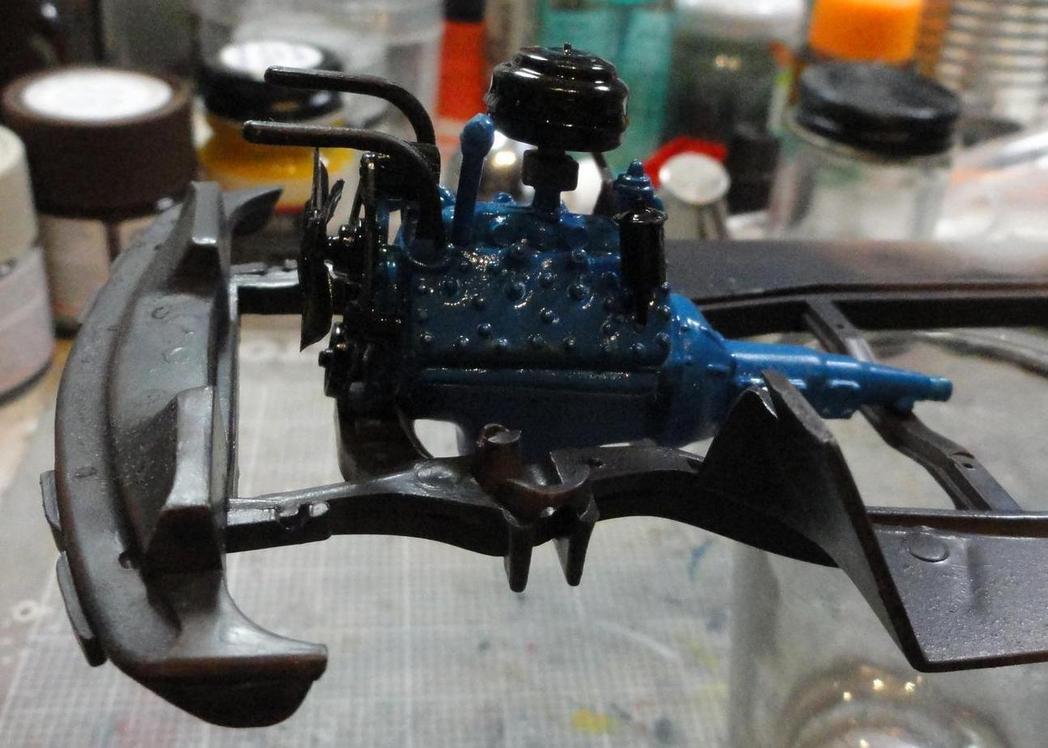
Chassis after the salt treatment with assembled engine.
Not sure I had enough salt and using a water-based paint might not have been the best plan.
I am making progress, slowly.
Salt on the rusted chassis.
Chassis after the salt treatment with assembled engine.
Not sure I had enough salt and using a water-based paint might not have been the best plan.
AussieReg
#007
Joined: June 09, 2009
KitMaker: 8,156 posts
Auto Modeler: 2,953 posts
Posted: Monday, January 13, 2020 - 10:57 PM UTC
Jim, "Greased Lightning" is coming along beautifully, super smooth paint job!
Mark, that flathead is very nicely done with the bits'n'bobs all in place. How does the salt chipping look? Can you post a photo of the chipped area?
Cheers, D
Mark, that flathead is very nicely done with the bits'n'bobs all in place. How does the salt chipping look? Can you post a photo of the chipped area?
Cheers, D
Joel_W
Joined: December 04, 2010
KitMaker: 11,666 posts
Auto Modeler: 2,974 posts
Posted: Tuesday, January 14, 2020 - 01:58 AM UTC
Jim,
From your pictures, the paint as D said, really looks smooth, and that's all you should want from the paint. The Real shine comes from Gloss clear coating, then rubbing it out, and finally waxing.
You've still got 2 1/2 months to go before the checkered flag flies on this GB. Plenty of time to finish your build.
Mark,
As D said, nice job on the Ford V8 Flat head as it's coming along quite nicely. I really can't see the chassis well enough to judge how the Salt treatment worked. How do you feel about the results?
Joel
forest1000
Joined: December 14, 2014
KitMaker: 80 posts
Auto Modeler: 44 posts
Posted: Tuesday, January 14, 2020 - 02:58 AM UTC
Quoted Text
Quoted TextSee the attached artwork for the Ford badge for Mark's kit. The red is where a reflection would be off a red car. It can be changed for any colour.
That's really nice. It would look good on the front of a Ford C800 as well.
Jim
Thanks, guys. The artwork can be used on any vehicle with obviously adjusting the dimensions a little.
Mark, the reflections are separate bits of drawing, so they can be made any colour, or made clear so the model colour comes through instead. Send me the dimensions of the shield on the kit, and I'll resize, give you some options and print on my laser printer and send it to you.
At the end of this project once you or others provide feedback (Jim: additional sizes etc) I'll provide the sheet for anyone to print their own.
md72
#439
Joined: November 05, 2005
KitMaker: 4,950 posts
Auto Modeler: 555 posts
Posted: Tuesday, January 14, 2020 - 04:39 PM UTC
Joel,
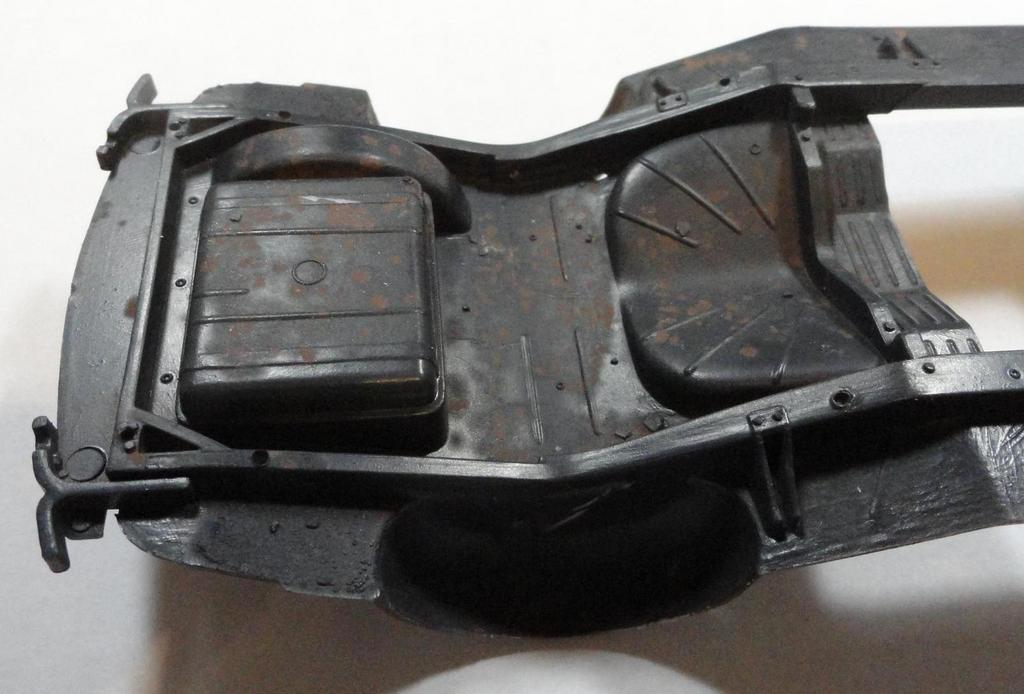
I'm underimpressed with the results. I expected more contrast.
I had really high hopes for the wheels since they would be most visible. they're just kinda dull.
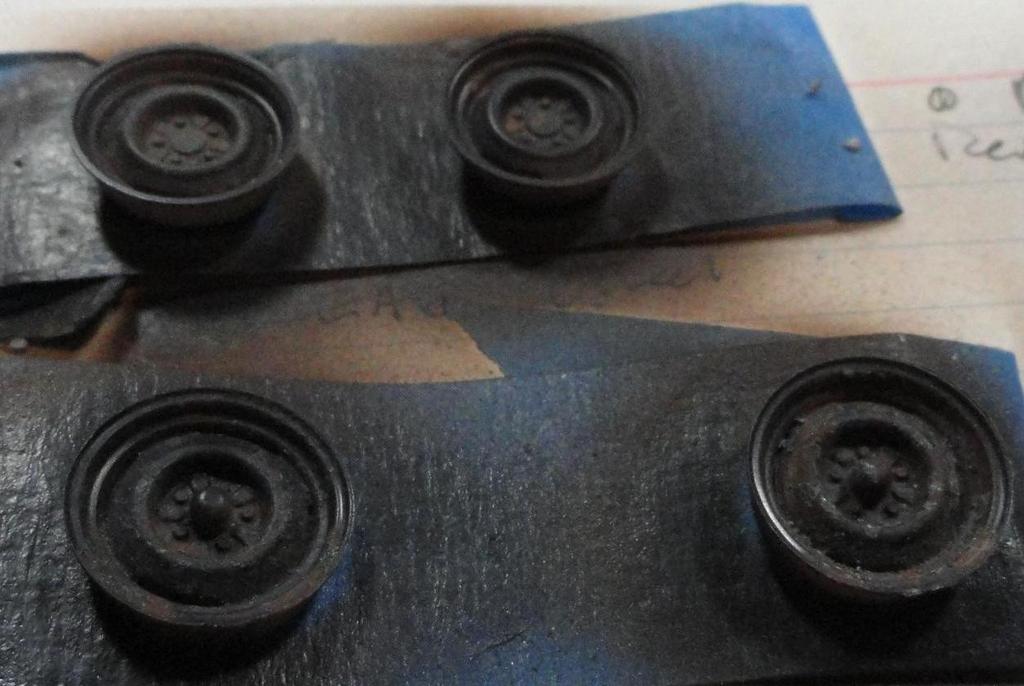
I'm thinking that I should have used a gloss or semi gloss black instead of weathered black. Should have also used more salt, so much blew away. Finally, a waterbased paint was a poor choice as it most likely dissolved the salt and left a paint/salt residue. Next time I try this on a chassis, I'll go with Tamiya NATO Black.
David, on the 1950 Ford Convertible from AMT, the logo is 3.70mm tall by 3.05mm wide.
I'm underimpressed with the results. I expected more contrast.
I had really high hopes for the wheels since they would be most visible. they're just kinda dull.
I'm thinking that I should have used a gloss or semi gloss black instead of weathered black. Should have also used more salt, so much blew away. Finally, a waterbased paint was a poor choice as it most likely dissolved the salt and left a paint/salt residue. Next time I try this on a chassis, I'll go with Tamiya NATO Black.
David, on the 1950 Ford Convertible from AMT, the logo is 3.70mm tall by 3.05mm wide.
Hwa-Rang
Joined: June 29, 2004
KitMaker: 6,760 posts
Auto Modeler: 2,182 posts
Posted: Tuesday, January 14, 2020 - 07:40 PM UTC
That's a shame Mark. Given the top job you did, with the rust colors, I too would have thought it would be more visible.
Joel_W
Joined: December 04, 2010
KitMaker: 11,666 posts
Auto Modeler: 2,974 posts
Posted: Wednesday, January 15, 2020 - 02:49 AM UTC
Mark,
I can now see why you're disappointed in the results as there's little contrast between the flat black and the rust colors. I'm guessing that a more bright Rust color and a duller Flat Black as in Nato Black would have made a huge difference. As far as acrylic base washing away the Salt, I'm not so sure if the same thing would have happened with any other paint base.
The best person I know to answer these questions would be Damian. He's Rust jobs are really excellent as the results speak for themselves.
Are you still going to move forward with the build, or strip the chassis and wheels and try again?
Joel
AussieReg
#007
Joined: June 09, 2009
KitMaker: 8,156 posts
Auto Modeler: 2,953 posts
Posted: Wednesday, January 15, 2020 - 10:16 AM UTC
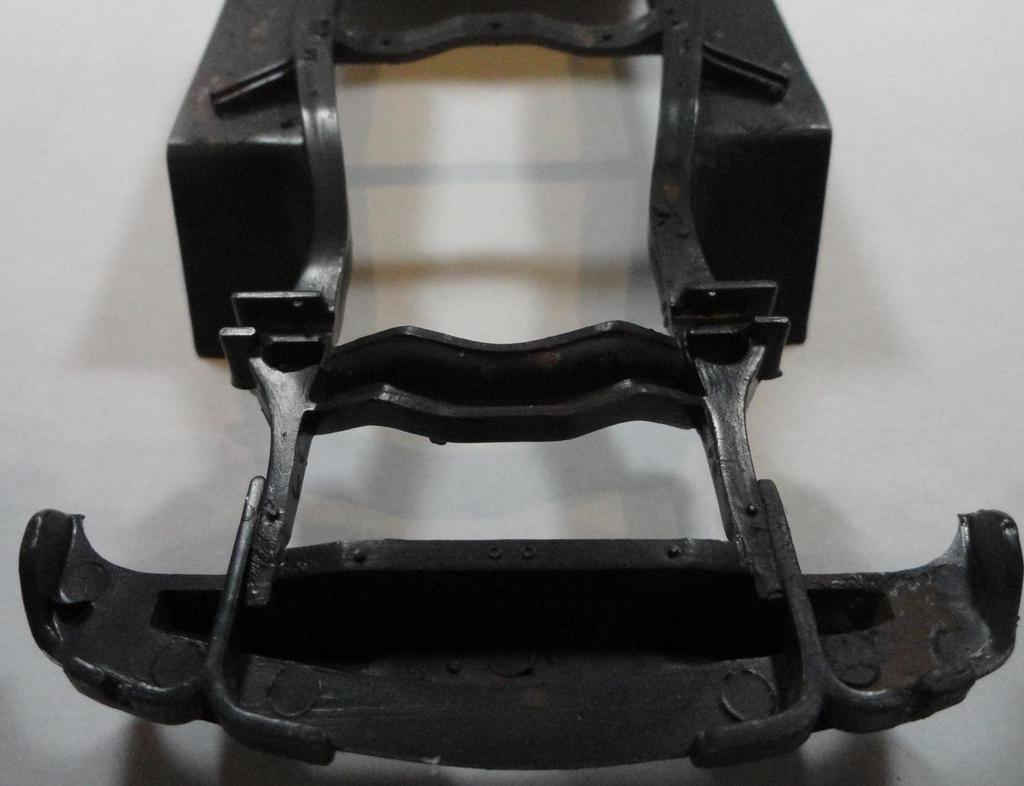
Mark, I'm going against the trend here and saying that looks pretty good! Old rust is very dark and against a black chassis can be hard to see. As Joel said, a brighter base rust tone can lift it, otherwise you could go back over it now and add some small spots of brighter tones from oils or enamels like below.

Getting a realistic rust look is a multi-layer process, basically the same as happens in real life.
For example, take this piece

The process here as follows:
Base Primer - Ammo Red Brown
Random Tamiya Acrylics - Red, Yellow, Orange
Dullcote
Hairspray
Grey Primer - Grey, Tan and Blue Tamiya Acrylics
Chipping to expose Base Primer
Dullcote
Hairspray
Black Top Coat - Black and Nato Black Tamiya Acrylics
Chipping to expose Grey Primer
Dullcote
Further work yet to be done - rust and dust streaking with oils and then pigments.
Cheers, D
Getting a realistic rust look is a multi-layer process, basically the same as happens in real life.
For example, take this piece
The process here as follows:
Base Primer - Ammo Red Brown
Random Tamiya Acrylics - Red, Yellow, Orange
Dullcote
Hairspray
Grey Primer - Grey, Tan and Blue Tamiya Acrylics
Chipping to expose Base Primer
Dullcote
Hairspray
Black Top Coat - Black and Nato Black Tamiya Acrylics
Chipping to expose Grey Primer
Dullcote
Further work yet to be done - rust and dust streaking with oils and then pigments.
Cheers, D
Cosimodo
#335
Joined: September 03, 2013
KitMaker: 1,808 posts
Auto Modeler: 701 posts
Posted: Wednesday, January 15, 2020 - 11:58 AM UTC
Hi Mark,
I think the rust looks pretty realistic. The underneath of cars is naturally dirty and almost never cleaned and rust there will always be dark. I think if you are working on the more visible parts you could take Damian's excellent approach and use a variety of rusty colours to show the different stages of rust.
cheers
Michael
md72
#439
Joined: November 05, 2005
KitMaker: 4,950 posts
Auto Modeler: 555 posts
Posted: Wednesday, January 15, 2020 - 06:04 PM UTC
Thanks Guys. I think what I'm going to do is leave the Chassis as is. I mean we sold the car 59 years ago, back when I was limber enough to get under an look. Since I didn't look and there aren't any pictures, who's to tell me I got it wrong?
For the wheels, I'll go with D's rust building formula. I need to learn how anyway. For the body rust, I'm thinking I'll use more a lot more salt hopefully that will give me more rust spots to work with. And follow with building up the rust spots.
For the wheels, I'll go with D's rust building formula. I need to learn how anyway. For the body rust, I'm thinking I'll use more a lot more salt hopefully that will give me more rust spots to work with. And follow with building up the rust spots.
Cosimodo
#335
Joined: September 03, 2013
KitMaker: 1,808 posts
Auto Modeler: 701 posts
Posted: Wednesday, January 15, 2020 - 06:38 PM UTC
Right, sulk over I moved on to painting the other body shell, the RHD drive version of my double Escort build.

and since I had the airbrush loaded with primer, I took Dr. Damian's advice and gave the other shell a new coat of primer to see what I was going to have to deal with for recovery.
I am sure all you car people can tell the difference between LHD and RHD Ford Escorts

Answers via the blog.
Anyway, some close up shots of the one in recovery mode


That is primer on plastic after cleaning of the rest of the paint with alcohol. I'm in for long sanding sessions. The trick will be not lose the crease details on the door and hood.
cheers
Michael
and since I had the airbrush loaded with primer, I took Dr. Damian's advice and gave the other shell a new coat of primer to see what I was going to have to deal with for recovery.
I am sure all you car people can tell the difference between LHD and RHD Ford Escorts
Answers via the blog.
Anyway, some close up shots of the one in recovery mode
That is primer on plastic after cleaning of the rest of the paint with alcohol. I'm in for long sanding sessions. The trick will be not lose the crease details on the door and hood.
cheers
Michael
md72
#439
Joined: November 05, 2005
KitMaker: 4,950 posts
Auto Modeler: 555 posts
Posted: Wednesday, January 15, 2020 - 06:46 PM UTC
I know, I know, the RHD is the one with the bonnet! 
Joel_W
Joined: December 04, 2010
KitMaker: 11,666 posts
Auto Modeler: 2,974 posts
Posted: Thursday, January 16, 2020 - 03:46 AM UTC
Michael,
Actually, it looks a lot better then I thought at 1st. Go with the Denatured Alcohol, and a toothbrush. You'll get off 90+% of the primers and paint. Then another bath, and the good old toothbrush again. Don't forget the every recess with the toothbrush. Now wet sand and polish with 600 grit. You're ready for primer after another bath to get rid of the sanding grit.
Joel
 |

WEB HOSTING BY


Copyright ©2021 Auto Modeler and Kitmaker Network, a subsidiary of Silver Star Enterprises
All Rights Reserved. Please read our Conditions of Use and Privacy Policy.
All Rights Reserved. Please read our Conditions of Use and Privacy Policy.