The Garage
For general automotive modeling or non-modeling topics.
Blue Oval - Ford Motor Co. GB Build Thread
AussieReg
Staff MemberAssociate Editor
AUTOMODELER
#007
_VISITCOMMUNITY
Victoria, Australia
Joined: June 09, 2009
KitMaker: 8,156 posts
Auto Modeler: 2,953 posts
Posted: Saturday, November 02, 2019 - 10:51 PM UTC

Quoted Text

It's really lookin' sexy Damian.

Mike


Thanks Mike. It scrubs up ok for a Ford!


Quoted Text

Hi D, you’re continuing to prove you’re one of the site’s top paint and body men - looking good!


Nick, very kind of you mate. I'm learning and trying to improve with every build, and each one throws up its own unique set of challenges. The bottom line is that I love doing this!

Cheers, D
Joel_W
Staff MemberAssociate Editor
AUTOMODELER
_VISITCOMMUNITY
New York, United States
Joined: December 04, 2010
KitMaker: 11,666 posts
Auto Modeler: 2,974 posts
Posted: Sunday, November 03, 2019 - 01:50 AM UTC
D,
The grill and engine Bonnet really look fantastic with the Wine color applied.

You really lucked out with those free wheels. I'd still go with the Wine color for the hubs.

Joel
Joel_W
Staff MemberAssociate Editor
AUTOMODELER
_VISITCOMMUNITY
New York, United States
Joined: December 04, 2010
KitMaker: 11,666 posts
Auto Modeler: 2,974 posts
Posted: Sunday, November 03, 2019 - 03:58 AM UTC
Well, another week has passed, and it's time once again for my weekly update.

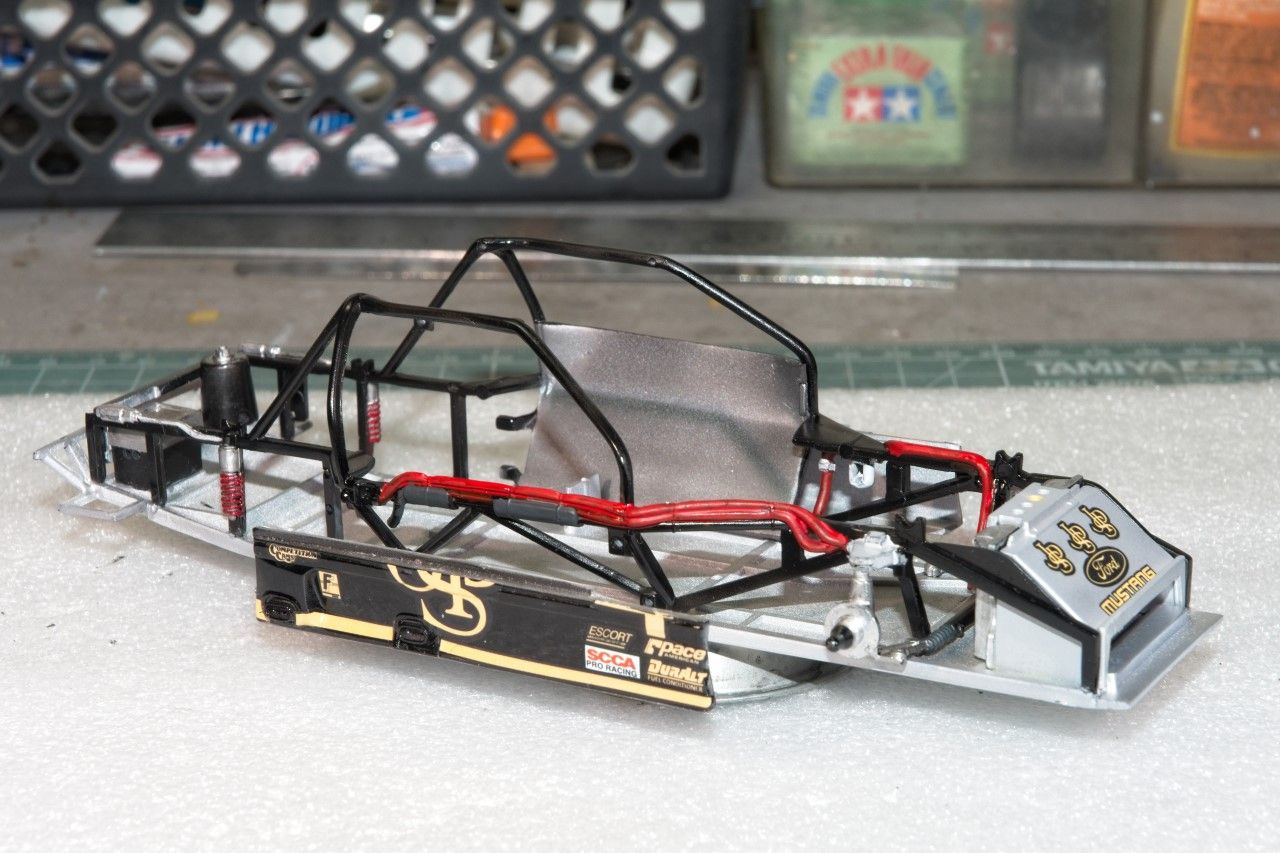
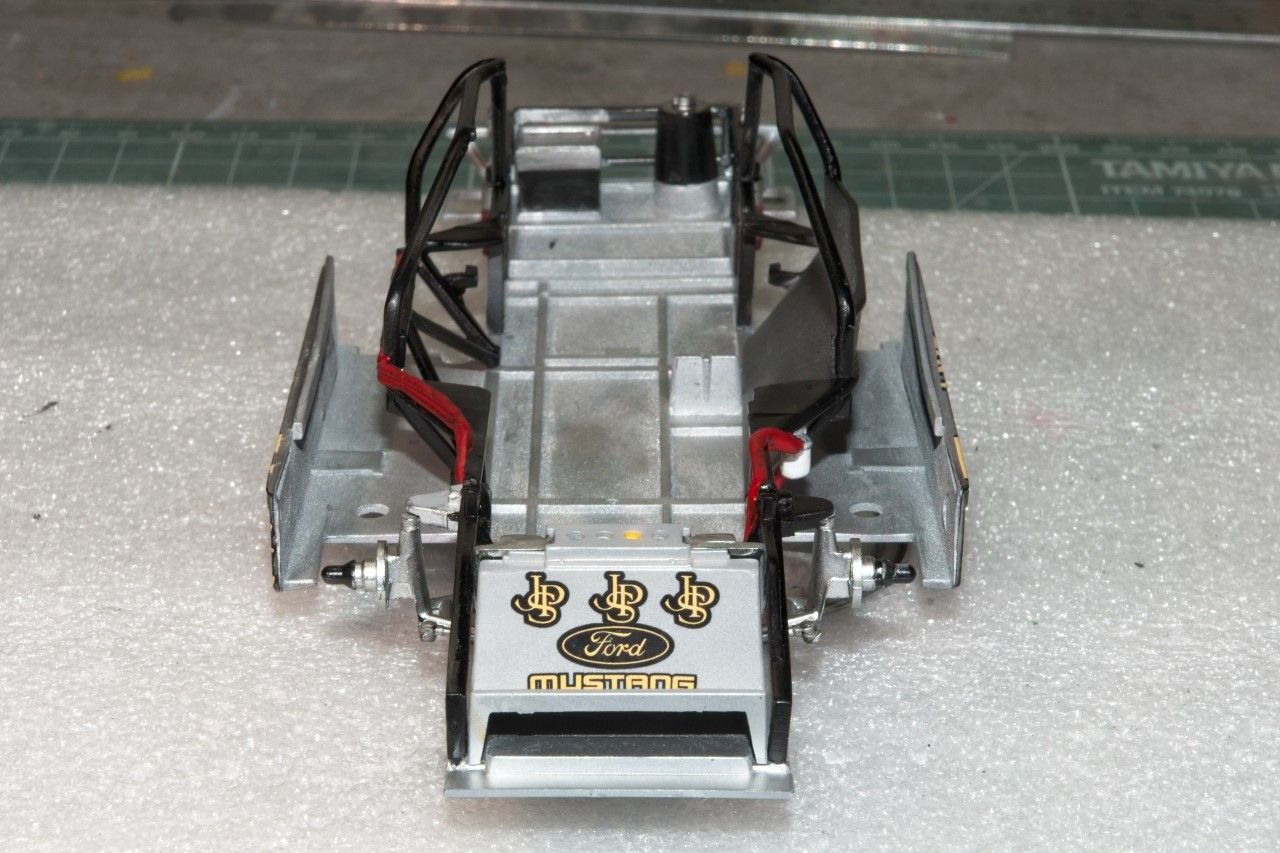
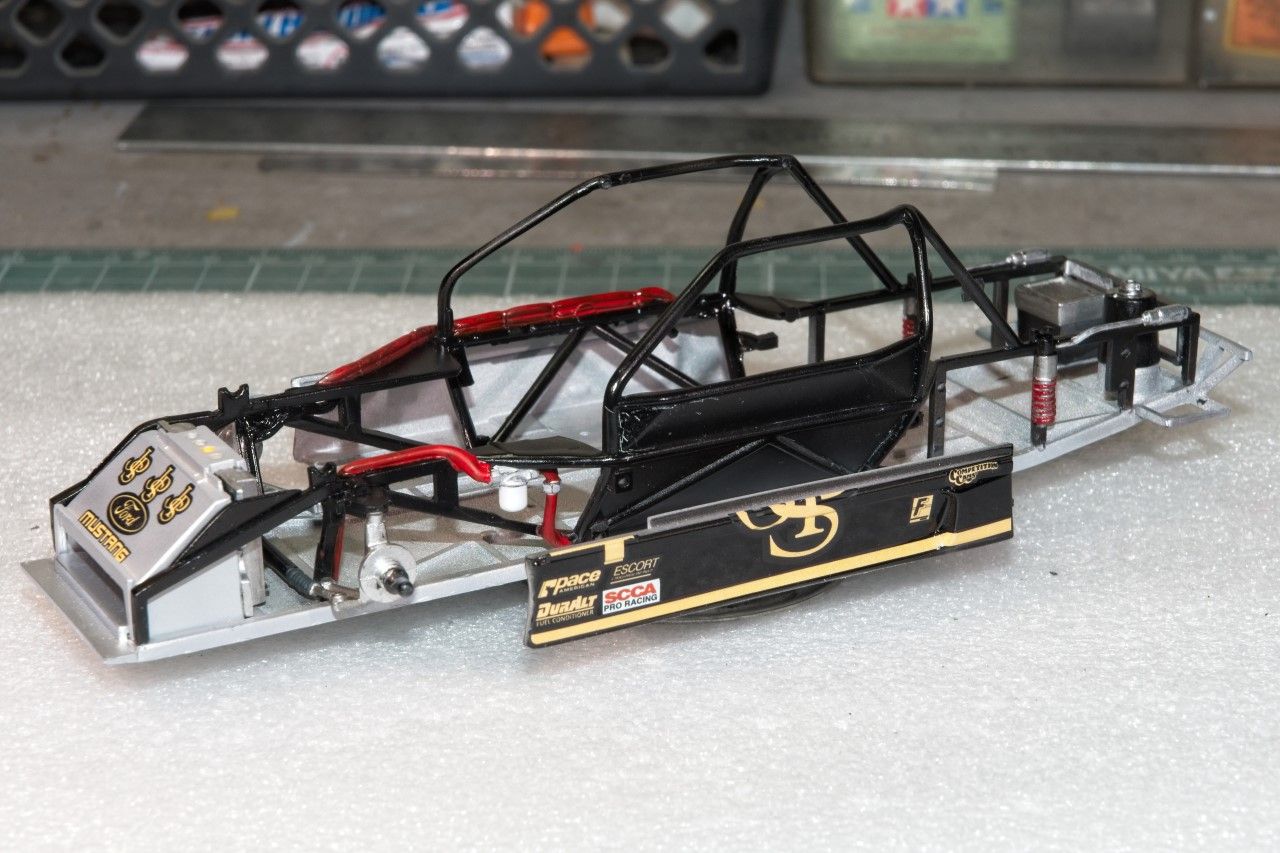
My focus started out with building up the chassis, cockpit, trunk, and engine sections. All the various basic parts for these areas were primed with Mr. Hobby Gray #1500 primer, Then all the parts were painted with Tamiya X-1 Gloss Black. Those parts that needed various shades of Aluminum, Steel, & Polished Steel were air brushed with the proper Alcad 2 color. Some small parts I opted to hand paint with either Testors Bright Silver, or various shades of Mr. Color Metalizers.

The side frames each have various lines that are wrapped in a protective rubberized casing to protect ones hands from being burnt. The color really varies all over the place due to dirt, grime, grease, oil, and what not. Since I found it basically impossible to mask them, I hand painted them with multiple coats of Ammo Mig Matt Red. Still the high spots didn't cover as well, giving the effect of wear & tear. The instructions call out for the oil filter to be painted Red which makes no sense as that's the color that STP used on their products, and Fords usually used AC Purolator filters that were White. A few pictures of Roush Yates Crate V8 motors show White oil filters, so I went with White.

The radiator and housing were glued into position, then the front steering assembly with the rubber boots being painted with Tamiya XF-69 Nato Black for some much needed contrast. Then the dry sump oil tank and battery housing were glued into the rear of the chassis. All the various lines and wires I'm planning on, will be added much later into the build.

I opted to hand detail paint the rear shocks rather then cut them off the frame supports as you won't really see much of them once the rear shell is installed.

Next up I glued both side frame rails to the chassis, which brings up a major gluing issue. Seems that for some strange reason Tamiya Extra Thin just won't melt and join any parts molded in Black. Now these parts don't really feel like, sand, or polish like regular plastic molded parts do. I opted for the smaller parts to use either CA or Gel CA glue. For larger parts like the frame rails where I needed a lot of working time for alignment and proper fit, I reverted to Testors Liquid glue. Worked great. Just like their tube glue from the good old days.


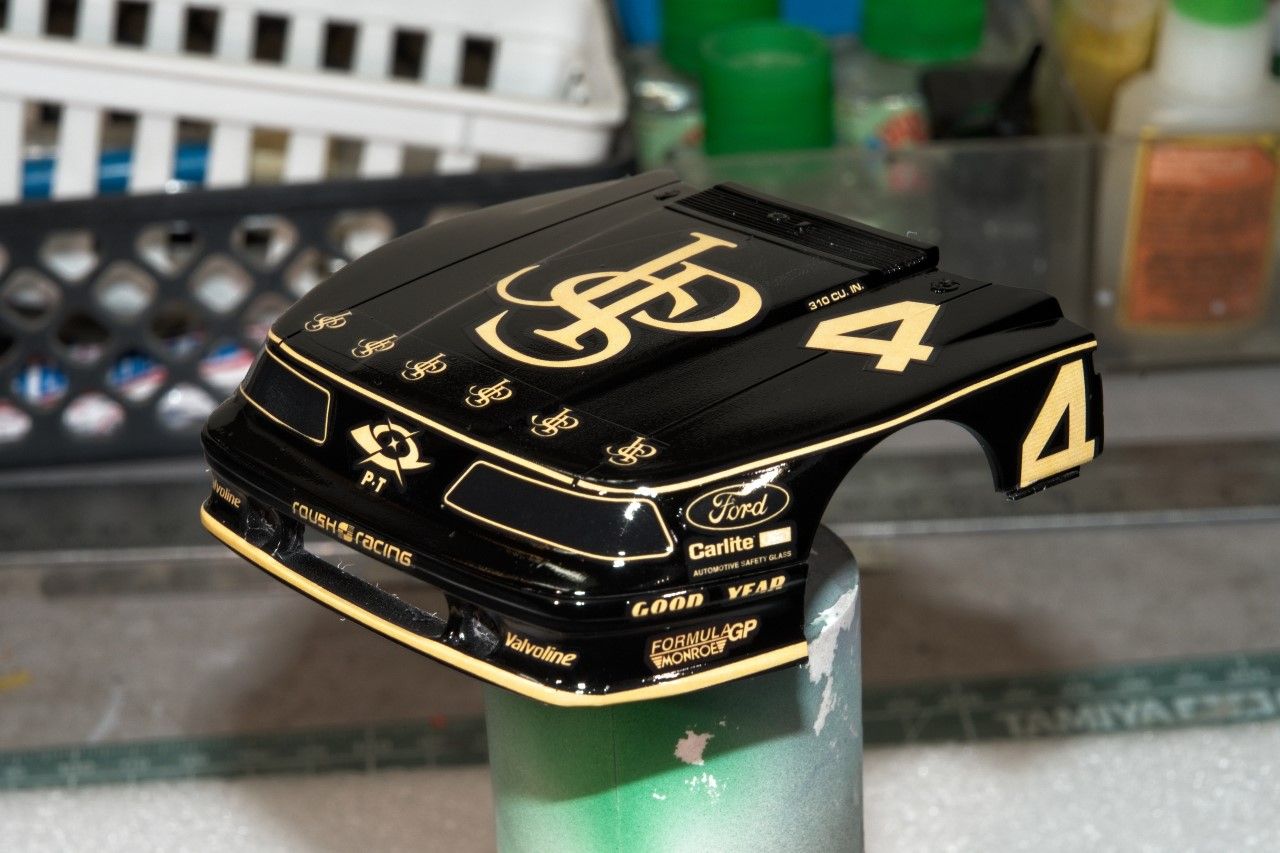
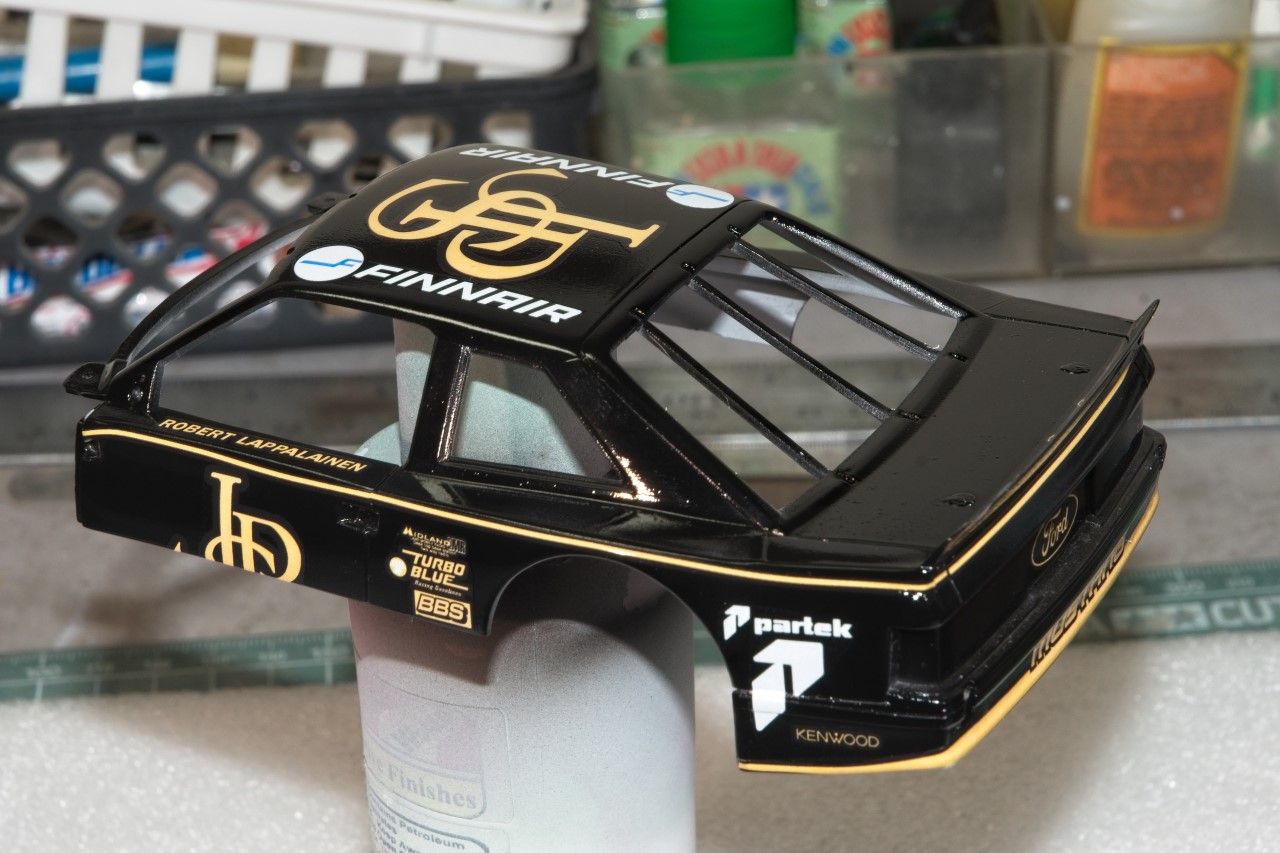
And finally yesterday, I got around to Clear gloss coating the body shells and sides of the chassis pan. I still use Mr. Color C46 Gloss thinned with Mr. Color Leveling Thinner. Only now I changed from a 1:1 ratio to a 2:3 ratio. Two tack coats 5 min apart. Then two wet coats 15 min apart. The 2nd wet coat was applied with a slower pass closely watching how it was laying down, and making slight corrections as needed. Here's 3 pcs of the glossed shells. Nothing has been done to them at all, as I'll give them a full 6 days to dry & cure.


Thanks to all for stopping by, and checking out my build to date. It's always much appreciated.

Joel
Dixon66
_VISITCOMMUNITY
New Hampshire, United States
Joined: December 12, 2002
KitMaker: 1,500 posts
Auto Modeler: 645 posts
Posted: Sunday, November 03, 2019 - 08:32 AM UTC
Raptor is done and I will be starting the Bronco after I finish a Viper. No, not the Dodge, a Colonial one (original Battlestar Galactica).
Joel_W
Staff MemberAssociate Editor
AUTOMODELER
_VISITCOMMUNITY
New York, United States
Joined: December 04, 2010
KitMaker: 11,666 posts
Auto Modeler: 2,974 posts
Posted: Sunday, November 03, 2019 - 09:01 AM UTC
David,
Nicely done. One more build to go before you start your Blue Circle build of the Bronco. Looking forward to it.

Joel

jimb
_VISITCOMMUNITY
New York, United States
Joined: August 25, 2006
KitMaker: 2,539 posts
Auto Modeler: 1,405 posts
Posted: Sunday, November 03, 2019 - 11:53 AM UTC
There are some fantastic builds in this Group Build. Just great work, guys.

I managed to get the engine & part of the frame assembled today.


Hopefully I'll get the rest of the frame assembled this week & be able to throw some paint on everything.

Jim
AussieReg
Staff MemberAssociate Editor
AUTOMODELER
#007
_VISITCOMMUNITY
Victoria, Australia
Joined: June 09, 2009
KitMaker: 8,156 posts
Auto Modeler: 2,953 posts
Posted: Sunday, November 03, 2019 - 12:02 PM UTC
Great to see you getting some more work done Jim, looking good.

Update on the state of play:

Almost 5 weeks in, 7,300-plus views and 250-plus posts
23 enlisted
11 builds in progress
2 builds completed

Details as follows:

Aussiereg (Damian) - '36 Ford 5-Window Coupe - Paint and assembly stage
jimb (James) - '48 Deluxe Convertible - Body Prep, chassis and drive train assembly
Szmann (Gabriel) - '66 F-100 Flareside - Paint Stage
PasiAhopelto (Pasi) - '57 "Fireball Roberts" NASCAR - enlisted
md72 (Mark) - '51 Custom Coupe - Body Prep Work
Littorio (Luciano) - '65 Falcon Ranchero or '60 Starliner - enlisted
Dixon66 (David) - 1st Generation Bronco - enlisted
Joel_W (Joel) - '85 Mustang Roush Body - Shell clear coated, frame and tub detail painting
tinbanger (Richard) - '65 Mustang 2+2 Fastback - Primer
Cosimodo (Michael) - Escort RS1600 MkI 1973 RAC - Body Prep Work
Ray_from_SA (Ray) - WRC Escort, Focus or Fiesta (or all 3 ??) - enlisted
Hwa-Rang (Jesper) - '65 Mustang 2+2 Fastback - Body Prep Work
betheyn (Andy) - enlisted
accessdenied (Roger) -
Propster (Stephen) -
Hudson29 (Paul) -
Delbert (Delbert) - enlisted
bluebell914 (Patrick) - 66 GT40 enlisted
heavyjagdpanzer (Bill) - enlisted
Mechworker (Adam) -
IronHide (Arnel) - enlisted
Spruslayer (Mike) - '65 F-100 Service Truck - COMPLETED
forest1000 (David) - "Thunderbat" NASCAR - enlisted
TacFireGuru (Mike) - Louisville Delivery Truck - Painted, assembled, decals pending
roman (Roman) - enlisted
JClapp (Jonathan) - '15 Model T - Parts Prep
Merlin (Rowan) - '40 Standard Coupe - Chassis/Engine Painted
Nick (Stickframe) - IMSA Mustang - COMPLETED

Awesome stuff folks, keep up the great work!

Cheers, D
Cosimodo
#335
_VISITCOMMUNITY
Auckland, New Zealand
Joined: September 03, 2013
KitMaker: 1,808 posts
Auto Modeler: 701 posts
Posted: Sunday, November 03, 2019 - 09:17 PM UTC
Well I feel like I almost arrived too late to the party. Some amazing builds completed already. Great Mustang Nick! and the F-100 is very cool Mike. I have in progress builds to catch up on and make some comments but I thought I would post what is going to my build(s) for this. A couple of MK1 Escorts, One out of the box to make sure I get something complete and the other will require me to make my own decals which will be a new challenge.
Here we are, two body shells ready to go.


First up I will need to get some white paint on the undersides and interior.

cheers

Michael
Cosimodo
#335
_VISITCOMMUNITY
Auckland, New Zealand
Joined: September 03, 2013
KitMaker: 1,808 posts
Auto Modeler: 701 posts
Posted: Sunday, November 03, 2019 - 09:39 PM UTC
Damian, the red wine and silver combination on the Coupe look amazing. I hope you've sorted a solution for your wheel!

Mike, the truck is a pearler. The blue is perfect. I am looking forward to see how you finish it off with the decals.

Joel, you're a busy man running two blogs for your mustang but it's going to turn out to be another Willstein special I am sure.

And that's just what I have seen from the last page and a half. So much going on.
AussieReg
Staff MemberAssociate Editor
AUTOMODELER
#007
_VISITCOMMUNITY
Victoria, Australia
Joined: June 09, 2009
KitMaker: 8,156 posts
Auto Modeler: 2,953 posts
Posted: Monday, November 04, 2019 - 12:49 AM UTC
Very cool dual build Michael, the Escorts are an iconic classic and it will be great to see yours come to life here. I have added your details to the "State of Play" post above.

Cheers, D
Joel_W
Staff MemberAssociate Editor
AUTOMODELER
_VISITCOMMUNITY
New York, United States
Joined: December 04, 2010
KitMaker: 11,666 posts
Auto Modeler: 2,974 posts
Posted: Monday, November 04, 2019 - 02:40 AM UTC
Jim,
Nicely done on the chassis, engine, and drive train. I always prefer the chassis and suspension separately molded, as the visual effect is just so much more convincing.

Looking forward to your next update.

Joel
Joel_W
Staff MemberAssociate Editor
AUTOMODELER
_VISITCOMMUNITY
New York, United States
Joined: December 04, 2010
KitMaker: 11,666 posts
Auto Modeler: 2,974 posts
Posted: Monday, November 04, 2019 - 02:42 AM UTC
Michael,
Looking forward to seeing some color on those two Escort shells. And I'm really interested in how you go about making your own decals. I've often thought about it, but just never got up the nerve to try.

Joel
Joel_W
Staff MemberAssociate Editor
AUTOMODELER
_VISITCOMMUNITY
New York, United States
Joined: December 04, 2010
KitMaker: 11,666 posts
Auto Modeler: 2,974 posts
Posted: Monday, November 04, 2019 - 02:47 AM UTC

Quoted Text

Great to see you getting some more work done Jim, looking good.

Update on the state of play:

Almost 5 weeks in, 7,300-plus views and 250-plus posts
23 enlisted
10 builds in progress
2 builds completed
…...
Awesome stuff folks, keep up the great work!
Cheers, D


D,
Those stats are truly amazing. I'm really confident that we'll get a good percentage of the enlistees to finish and receive their ribbons.

Joel
Hwa-Rang
_VISITCOMMUNITY
Kobenhavn, Denmark
Joined: June 29, 2004
KitMaker: 6,760 posts
Auto Modeler: 2,182 posts
Posted: Monday, November 04, 2019 - 06:31 PM UTC
Cleaned up most, of the parts, and have made a few subassemblies.

My original idea, was to paint this Ford ruby red(Gravity colors), with a biscuit'ish interior and Pegasus 23" Phat daddy's wheels. The wheels how ever are just to big, for this model. I might be able to rebuild the rear wheel wells, but getting the wheels to fit, in the front would be more than I could pull off.
So new battle plan. Bought a set of Aoshima 19" wheels and I think I only need to rebuild the rear wheel wells, to fit these.
The plan is to find a pearl white, for the body and bumpers, paint the wheels and some details in a dark grey metallic color. For the interior I'm contemplating a black and dark brown color combo.
Here's a quick mockup

1966 Mustang" BORDER="0">

AussieReg
Staff MemberAssociate Editor
AUTOMODELER
#007
_VISITCOMMUNITY
Victoria, Australia
Joined: June 09, 2009
KitMaker: 8,156 posts
Auto Modeler: 2,953 posts
Posted: Monday, November 04, 2019 - 09:07 PM UTC
That's a nice looking set of wheels Jesper, and a tough stance!

Looking forward to progress shots as that colour combination takes shape. I've updated the "State of Play" post with your details.

Cheers, D
Joel_W
Staff MemberAssociate Editor
AUTOMODELER
_VISITCOMMUNITY
New York, United States
Joined: December 04, 2010
KitMaker: 11,666 posts
Auto Modeler: 2,974 posts
Posted: Tuesday, November 05, 2019 - 12:52 AM UTC
Jesper,
My 1970 302 Mustang was Red with a Black interior. All the guys with 'Stangs back then had a Black interior if for no other reason then anything lite would show any little grease and grime.

Those wheels really look "Nasty" for sure.

Looking forward to seeing the White paint on her.

Joel
tinbanger
_VISITCOMMUNITY
Ontario, Canada
Joined: February 04, 2008
KitMaker: 2,507 posts
Auto Modeler: 409 posts
Posted: Tuesday, November 05, 2019 - 12:17 PM UTC
Great builds going on here!

The paint for my 65 Mustang came today:-


It will be my first time using gravity paints which cost me more than I paid for the model!

Cosimodo
#335
_VISITCOMMUNITY
Auckland, New Zealand
Joined: September 03, 2013
KitMaker: 1,808 posts
Auto Modeler: 701 posts
Posted: Tuesday, November 05, 2019 - 06:44 PM UTC
Very cool Mustang there Jesper. I like the more modern wheels with it and the low profile tyres.

cheers
Michael
Cosimodo
#335
_VISITCOMMUNITY
Auckland, New Zealand
Joined: September 03, 2013
KitMaker: 1,808 posts
Auto Modeler: 701 posts
Posted: Tuesday, November 05, 2019 - 06:46 PM UTC

Quoted Text

Great builds going on here!

The paint for my 65 Mustang came today:-


It will be my first time using gravity paints which cost me more than I paid for the model!


Richard, those Gravity paints are excellent, so smooth. The clear coat is more challenging I found to get right. I have used a few times now and I still not certain I have nailed it.

cheers
Michael
Joel_W
Staff MemberAssociate Editor
AUTOMODELER
_VISITCOMMUNITY
New York, United States
Joined: December 04, 2010
KitMaker: 11,666 posts
Auto Modeler: 2,974 posts
Posted: Wednesday, November 06, 2019 - 02:46 AM UTC
Richard,
Great choice of paint and color. You're going to love the Gravity paints. Not sure if you've used them before, but I found over several models that AB'ing with Gravity paints is a little different then with Tamiya or Mr. Color paints. I actually upped my flow rate to 20-24 psi, and two tack coats, then 2 or 3 wet color coats, which the last coat even slower then the others. 15 min drying time between wet coats makes a huge difference.

As for the Urethane Gloss, I've never used it, but plenty of guys love it. Just follow the mixing directions exactly. A few of them add 10% more thinner to the final Wet coat. Same 20-24 psi but a longer drying time between wet coats. One thing that the few online modelers I follow really drive home the point of a very good respirator, a directly vented spray booth, and gloves. This stuff is super toxic.

Can't wait to see how the 'Stang looks once painted.

Joel
PasiAhopelto
_VISITCOMMUNITY
Uusimaa, Finland
Joined: October 01, 2016
KitMaker: 514 posts
Auto Modeler: 44 posts
Posted: Wednesday, November 06, 2019 - 02:48 AM UTC
Initially I was bit sceptical, and expected that either nothing would happen or the plastic would melt, but I'm surprised how well 24 hours of oven cleaner bath removed chrome:


Joel_W
Staff MemberAssociate Editor
AUTOMODELER
_VISITCOMMUNITY
New York, United States
Joined: December 04, 2010
KitMaker: 11,666 posts
Auto Modeler: 2,974 posts
Posted: Wednesday, November 06, 2019 - 03:13 AM UTC
Nicely done. Usually 15 min has most of the chrome plating off. Wearing Playtex rubber gloves I use a toothbrush to work the rest of the plating off on just the larger areas. That's just me as I worry about the primer really sticking to those patches.

Joel
tinbanger
_VISITCOMMUNITY
Ontario, Canada
Joined: February 04, 2008
KitMaker: 2,507 posts
Auto Modeler: 409 posts
Posted: Wednesday, November 06, 2019 - 10:59 AM UTC
Joel thank you for the info as this will be my first use of this paint.
Joel_W
Staff MemberAssociate Editor
AUTOMODELER
_VISITCOMMUNITY
New York, United States
Joined: December 04, 2010
KitMaker: 11,666 posts
Auto Modeler: 2,974 posts
Posted: Wednesday, November 06, 2019 - 11:19 AM UTC

Quoted Text

Joel thank you for the info as this will be my first use of this paint.


Richard,
Glad I could help.

You can checkout Pau at International scale Modeler. Find any build and watch his technique. I learned a lot from him.

I'm sure that you'll nail it.

Joel
TacFireGuru
_VISITCOMMUNITY
Colorado, United States
Joined: December 25, 2004
KitMaker: 3,770 posts
Auto Modeler: 359 posts
Posted: Thursday, November 07, 2019 - 03:44 AM UTC
Regarding stripping chrome:

I used to use oven cleaner and then a fellow builder suggested I try Purple Power (I get mine at WalMart). I think the reason I like it better than OC is that it's less caustic on the body and generally cheaper. It works just as good, if not a bit better than OC.

I still have OC on the shelf, but I use that to strip the paint from parts.

Anyhow, just a bit of opinion.

Mike